How to Add Inventory in QuickBooks: A Step-by-Step Guide

Whether you're a small business owner setting up your first accounting system, an accountant managing client records, an e-commerce seller syncing online orders, a retail/wholesale operator, or a warehouse manager keeping stock under control, this guide is for you. You’re here because you need to:
Set up and automate inventory tracking in QuickBooks.
Avoid manual errors, overstocking, and stockouts.
Ensure accurate sales, purchases, and COGS for reliable reporting.
At various stages—from initial setup to troubleshooting syncing issues—your main goals are efficiency, accuracy, and streamlined financial management. Let's dive into how to add inventory in QuickBooks and tackle these common pain points.
Contents
How to add inventory in QuickBooks Online: Step-By-Step Guide
How to enter inventory in QuickBooks Desktop: Step-By-Step Guide
Frequently Asked Questions (FAQ) About Inventory in QuickBooks
How to add inventory in QuickBooks Online: Step-By-Step Guide
Step 1: Turn on Inventory Tracking
Begin by signing in to your QuickBooks Online account using your credentials. You’ll be redirected to the QuickBooks Online dashboard.
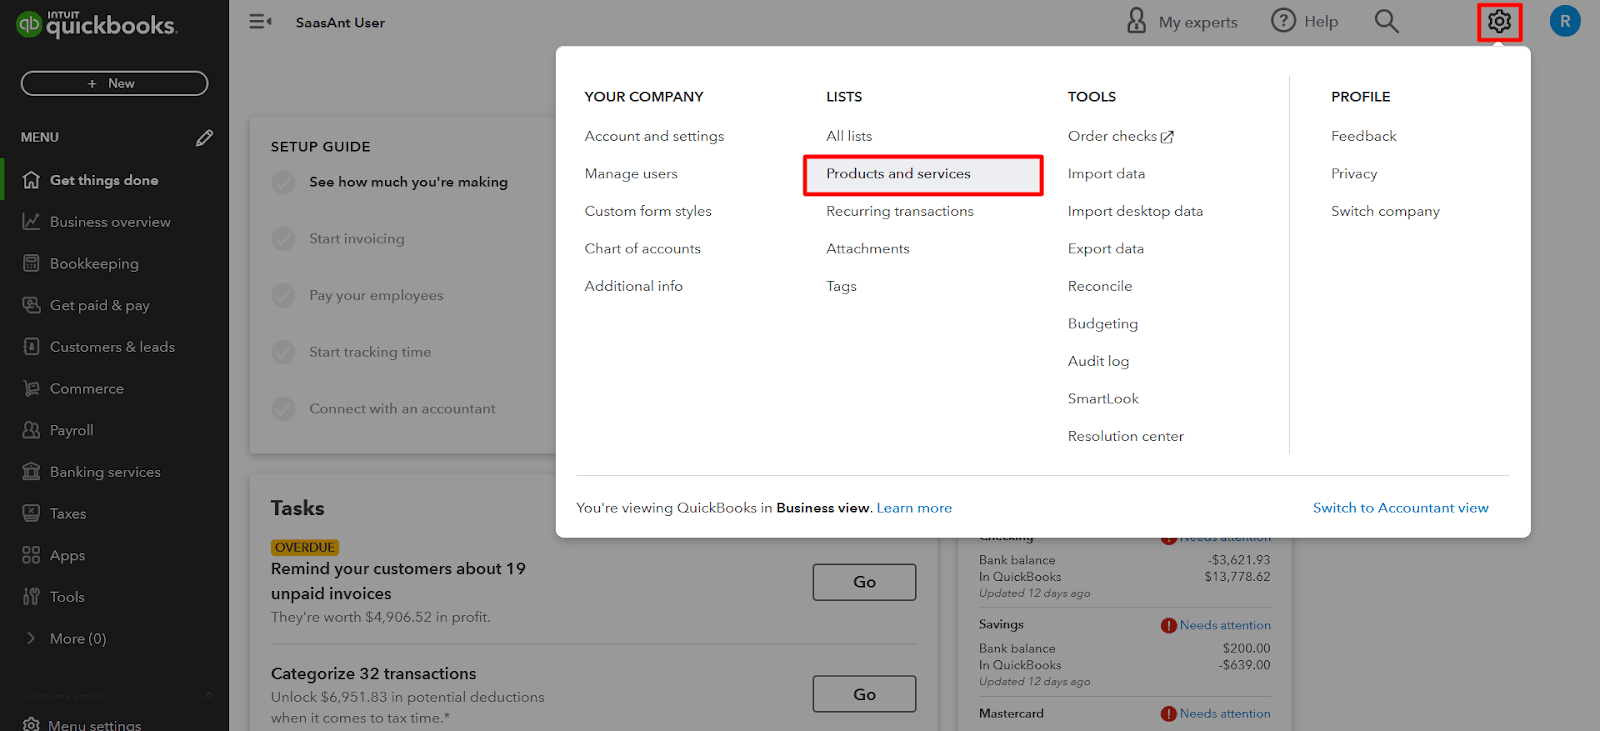
Navigate to the “Settings” menu by clicking the “Gear” icon
Select “Account and settings.”
Choose the “Sales” tab.
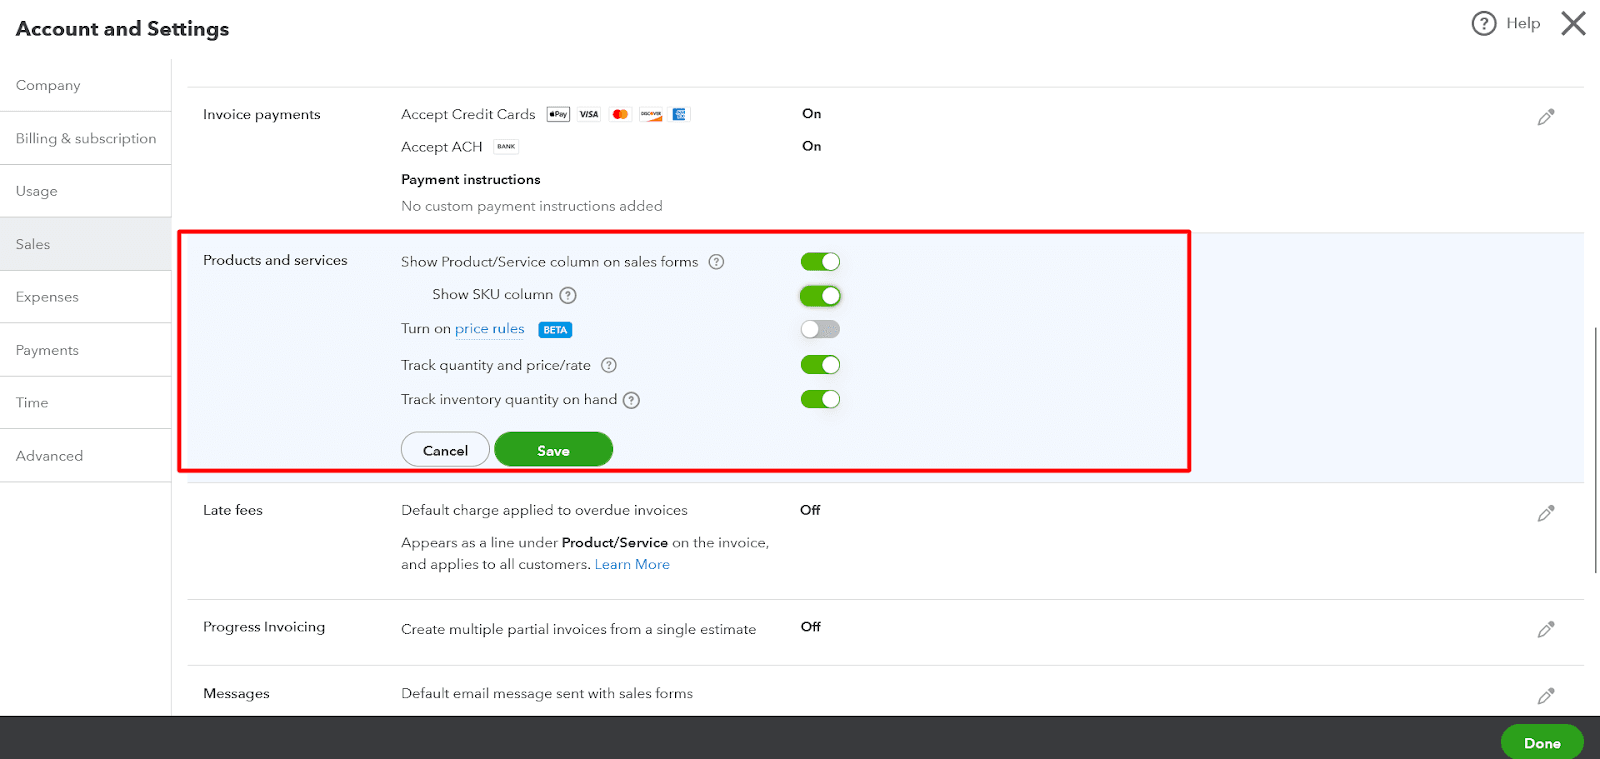
Click “Edit” in the “Products and Services” section
Enable the “Show Product/Service column on sales forms.”
Optionally, enable “Price rules for flexible pricing,” turn on “Track quantity and price/rate,” and “Track inventory quantity on hand.”
Select “Save” and then “Done.”
Step 2: Access the Products and Services Menu
Navigate to the Settings menu by clicking the “Gear” icon. Under the “Lists” menu, click the “Products and Services” option. This action will take you to the Products and Services page, where you can manage your inventory items.
Step 3: Create a New Inventory Item
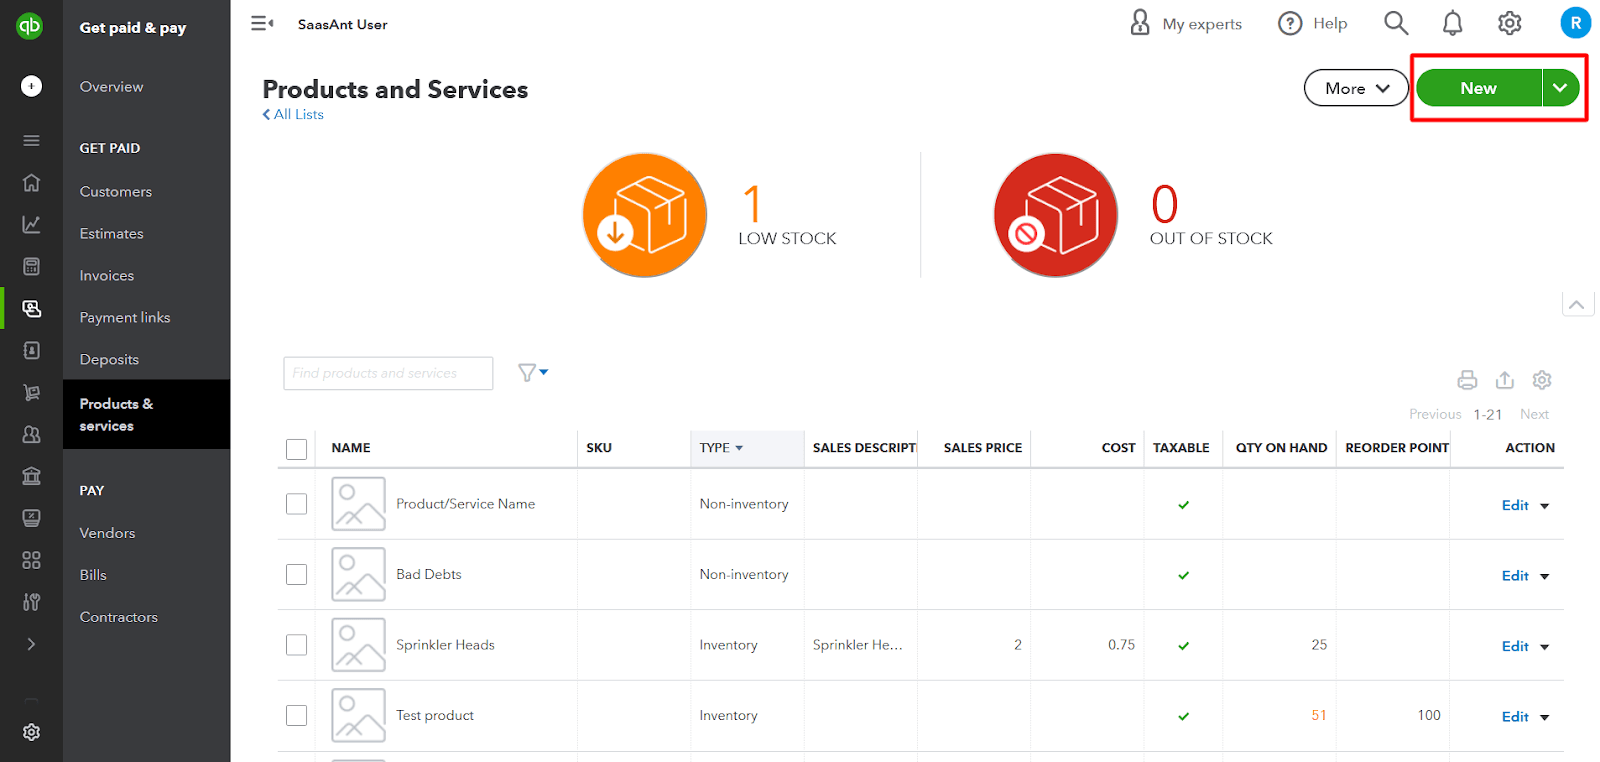
Click the "New" button in the upper right corner of the Products and Services page.
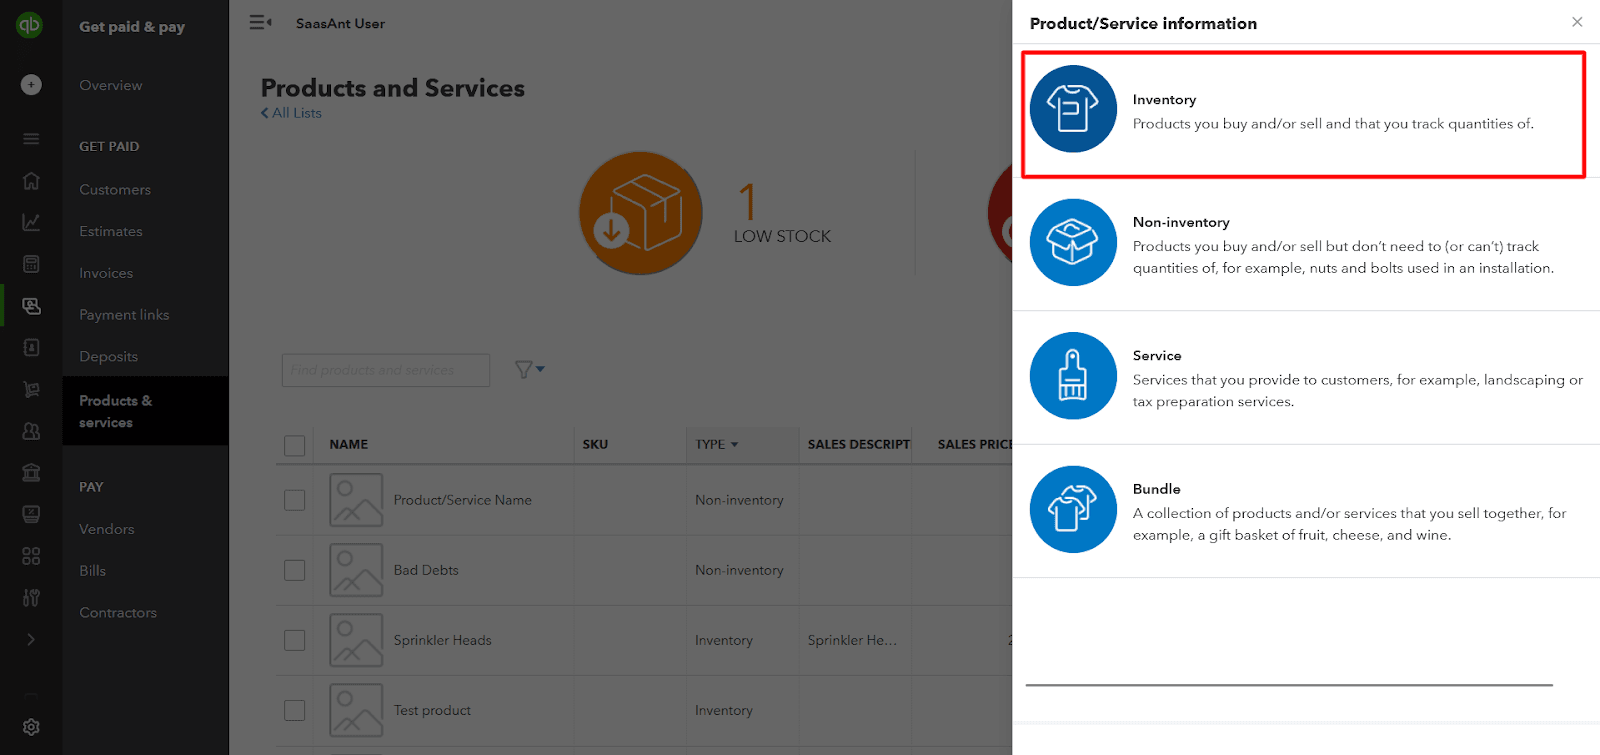
A drop-down menu will appear. Select "Inventory" from the list of options. This process will prompt QuickBooks Online to guide you through adding an inventory item.
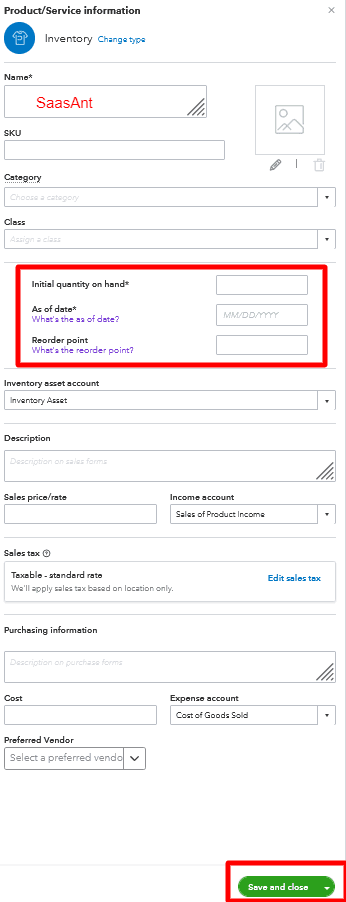
Step 4: Enter the Item Details
In the “New Item” window, you must enter specific details for your inventory item. Here’s what you need to fill in:
Item Name: Enter a unique name or identifier for your inventory item.
SKU: If applicable, input a stock-keeping unit or any other identifier you use for this item.
Category: You can group and organize inventory items to simplify inventory control and analysis.
Sales Price/Rate: Specify the selling price of the item.
Income Account: Select the appropriate income account to track the sales revenue generated by this item.
Expense Account: Choose the expense account corresponding to the cost of goods sold for this item.
Initial Quantity on Hand: Enter the current quantity of the item you have in stock.
As of date: Specify the date from which you want QuickBooks Online to start tracking this item.
Reorder Point: The minimum inventory quantity triggers a reminder to reorder items, ensuring you maintain sufficient stock levels and avoid stockouts.
Purchasing Information: Purchasing information encompasses supplier/vendor details, item cost, expense account, and preferred vendor.
Step 5: Save and Close
Review the entered details to ensure accuracy. Once verified, click the “Save and Close” button to add the inventory item to QuickBooks Online.
How to enter inventory in QuickBooks Desktop: Step-By-Step Guide
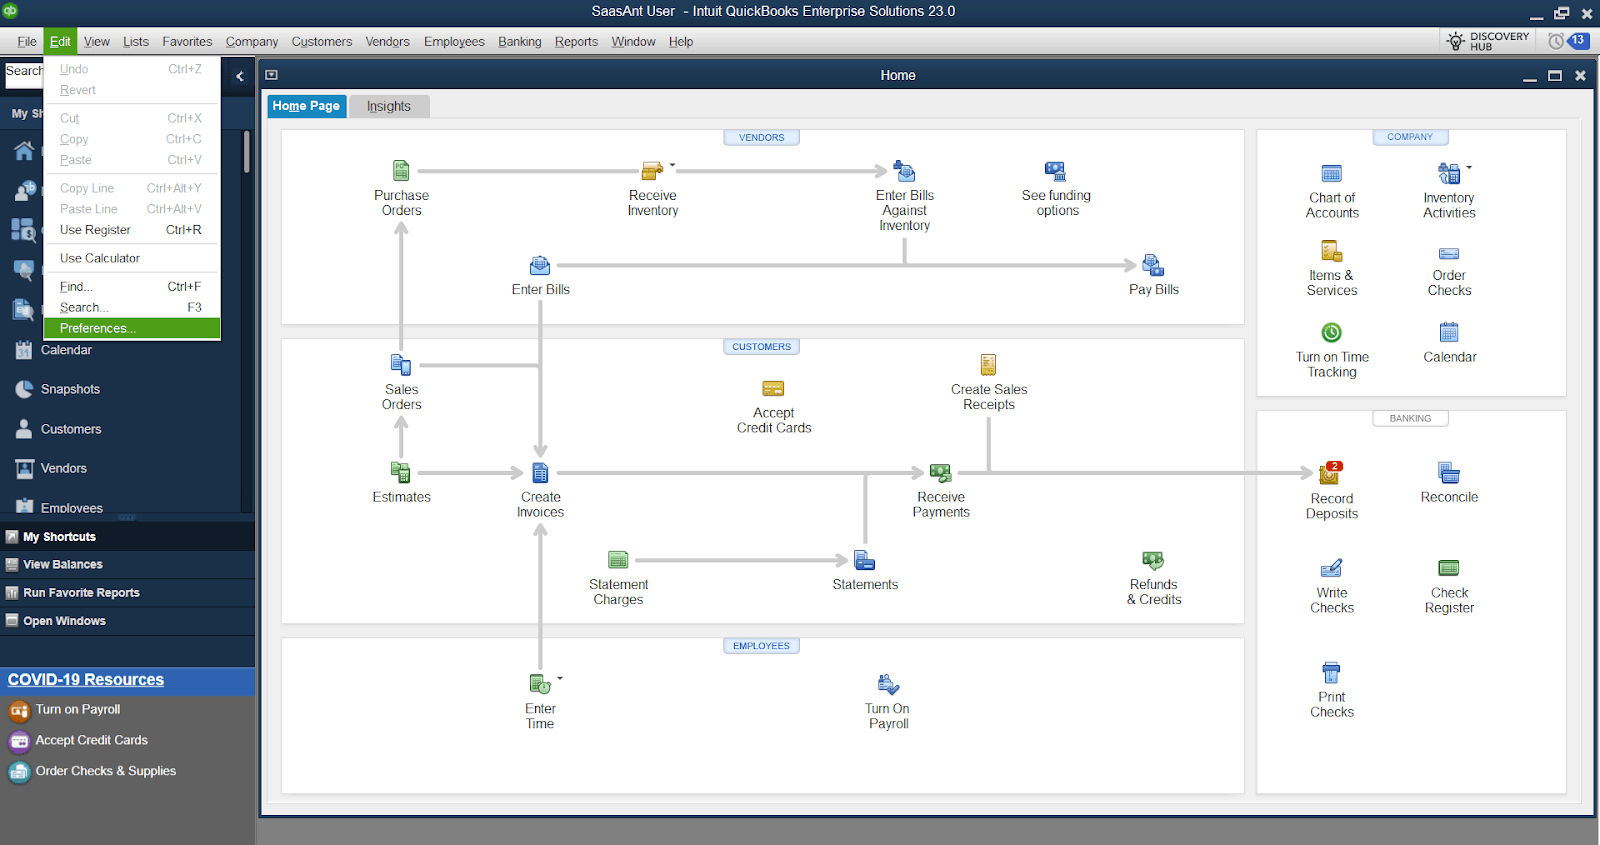
Step 1: Turn on Inventory Tracking
Begin by launching QuickBooks Desktop and opening your company file. Once you log in, QuickBooks Desktop will direct you to its home screen.
Select "Edit" from the top menu and choose "Preferences."
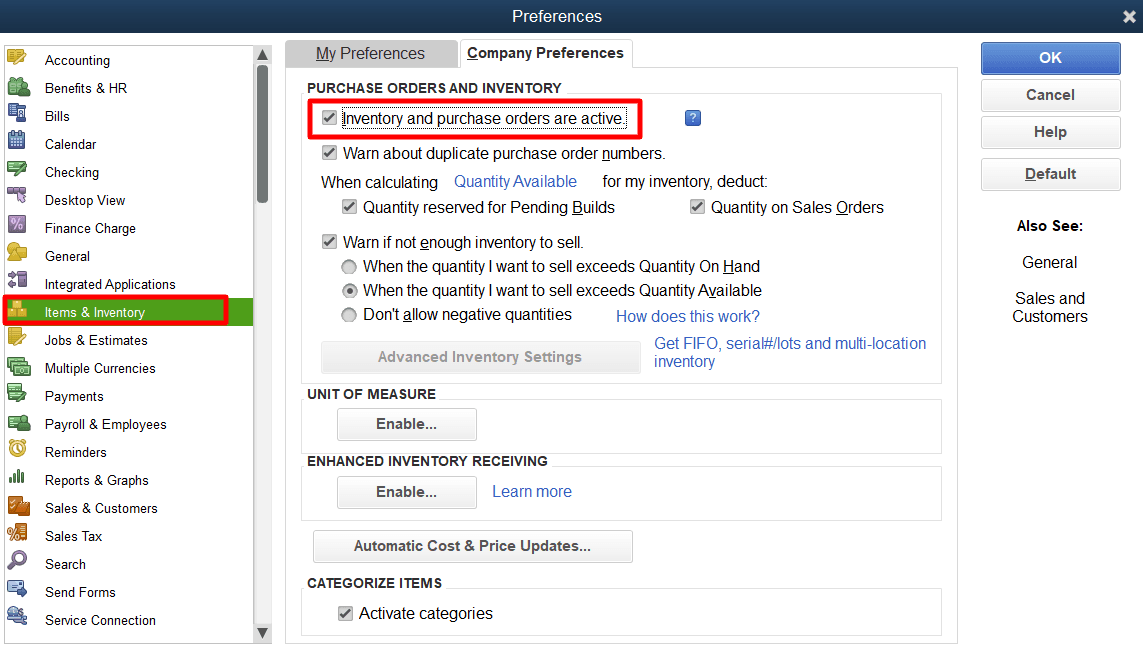
In the “Preferences” window, click "Items & Inventory" in the left-side menu.
Check the box "Inventory and purchase orders are active."
Optionally, configure additional preferences, like “Warn about duplicate purchase order numbers,” “Warn if there is not enough inventory to sell,” and “Don’t allow negative quantities” as needed.
Click "OK" to save the changes.
Step 2: Access the Item List
Navigate to the top menu and select “Lists.” From the dropdown menu, click “Item List.”

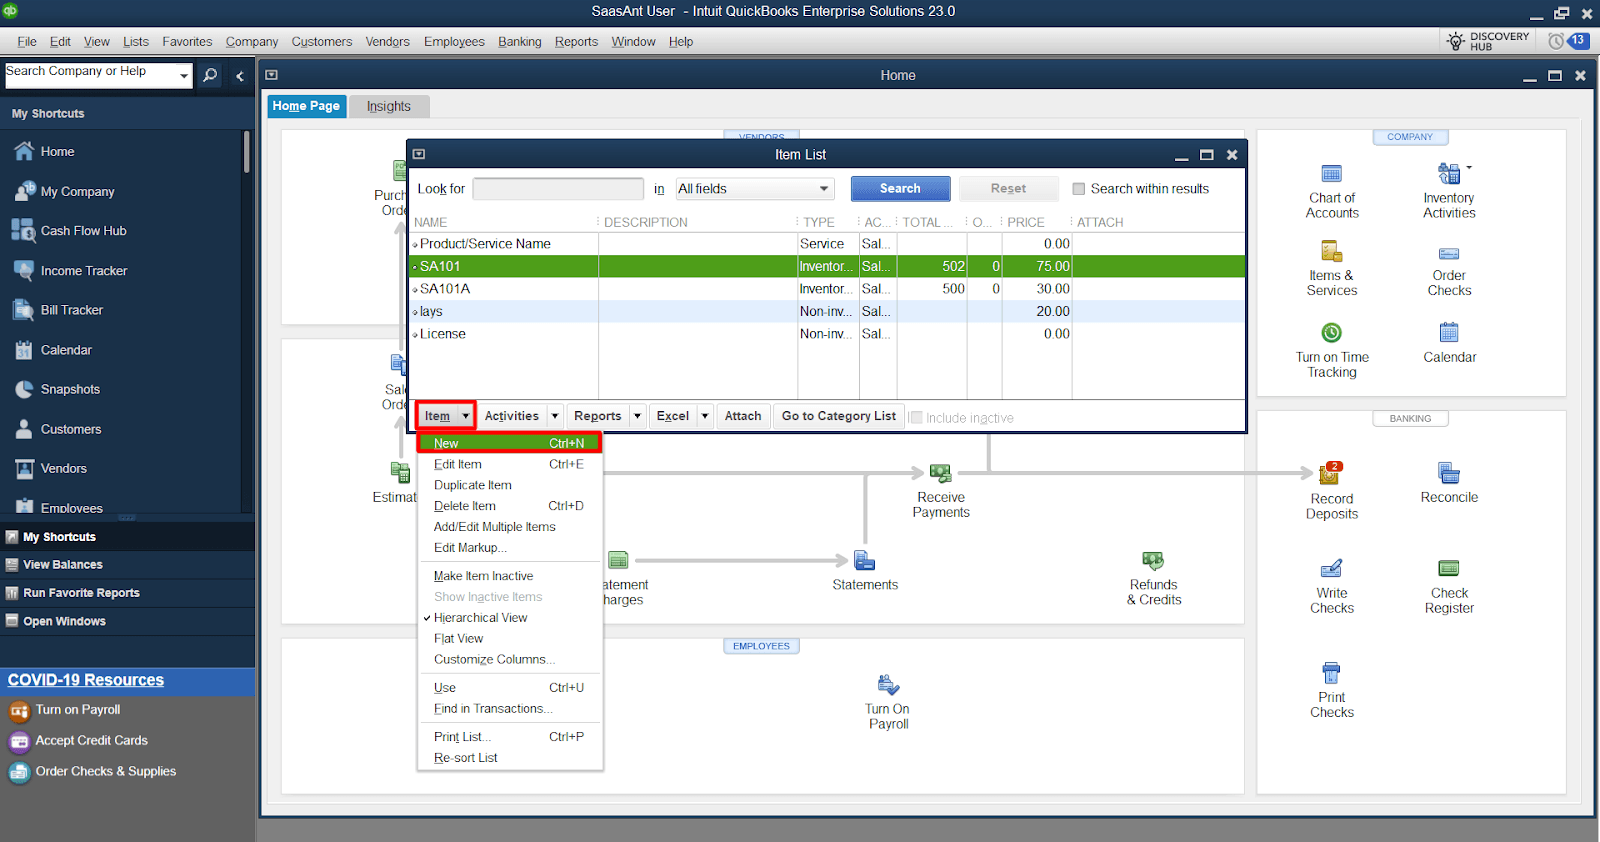
Step 3: Create a New Inventory Item
In the “Item List” window, click on the “Item” menu and select “New.” This will open a new window where you can create a new item.
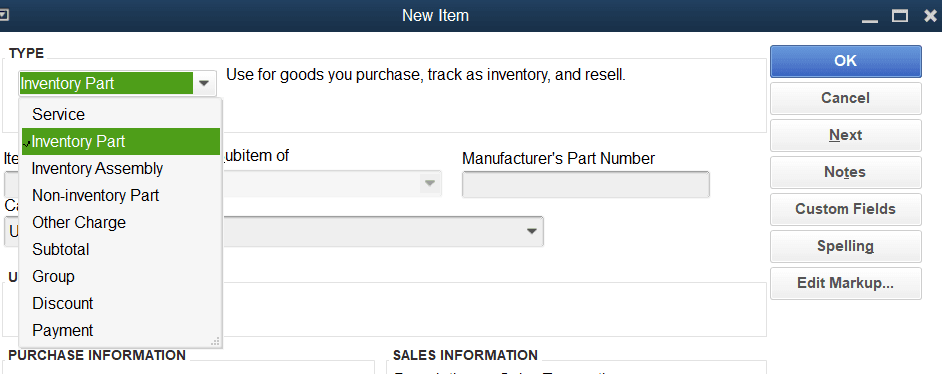
Step 4: Specify the Item Type
In this “New Item” window, you’ll need to specify the type of the item. Choose “Inventory Part” from the list of item types.
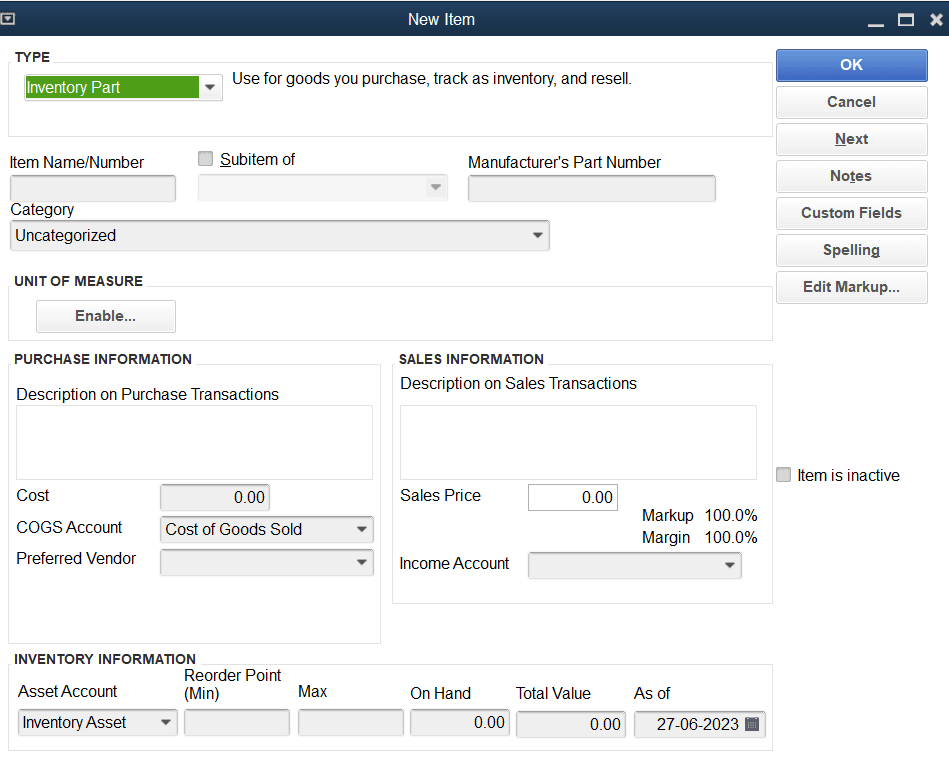
Step 5: Enter Item Details
Fill in the required information for your inventory item. Here’s what you need to provide:
Item Name/Number: Enter a unique name or number to identify the inventory item.
Description: Optionally, provide a brief description of the item.
Cost: Specify the price at which you purchase the item.
Income Account: Choose the appropriate income account to track the sales revenue for this item.
Expense Account: Select the expense account corresponding to this item's cost of goods sold (COGS).
Asset Account: Specify the asset account where you want to track the inventory value.
Quantity On Hand: Enter the initial quantity of your stock item.
Step 6: Additional Details
QuickBooks Desktop provides additional fields to capture more information about your inventory item. You can fill in the following details if applicable:
Manufacturer’s Part Number: Enter the manufacturer’s part number for the item.
Reorder Point: Specify the quantity you want to reorder the item.
Preferred Vendor: Indicate the name of the preferred vendor for purchasing this item.
Tax code: Assign a tax code if applicable.
Step 7: Save and Complete
Review the entered information to ensure accuracy. Once satisfied, click the “OK” button to add the inventory item to QuickBooks Desktop.
Here are more ways to help you in this process,
SaasAnt Transactions: Streamlining Inventory Management in QuickBooks
SaasAnt Transactions is a robust tool designed to automate and simplify the management of bulk transactions in QuickBooks Online and Desktop. It facilitates efficient inventory management through several key features:
Bulk Import of Inventory Data: Easily import large volumes of inventory items, including details like supplier invoices, sales invoices, and inventory counts, from Excel, CSV, or IIF files into QuickBooks. This reduces manual data entry and minimizes errors.
Automated Inventory Updates: Automatically update inventory levels by importing day-to-day transactions, ensuring that stock quantities in QuickBooks reflect real-time data. This helps prevent issues like overstocking or stockouts.
Comprehensive Data Management: Beyond inventory, SaasAnt Transactions allows for the bulk import, export, and deletion of various transaction types, streamlining overall accounting workflows and maintaining accurate financial records.
By leveraging these features, businesses can maintain accurate inventory records, ensure seamless integration with QuickBooks, and focus more on strategic operations rather than manual data management.
PayTraQer: Automating E-Commerce Accounting & Inventory Syncing
PayTraQer is an automation tool that integrates with QuickBooks and Xero to streamline e-commerce business finances. It synchronizes online payments, sales, inventory management, and more from platforms like Shopify, Amazon, eBay, WooCommerce, PayPal, Stripe, and Square.
Key Features:
Automated Bookkeeping: Automatically syncs sales, orders, deposits, inventory, and fees into QuickBooks and Xero, reducing manual data entry and errors.
Inventory Management: Tracks inventory levels by syncing product details and quantities from e-commerce platforms to accounting software, ensuring accurate stock records.
COGS Matching: Configures Cost of Goods Sold (COGS) matching to ensure accurate accounting for inventory-related expenses.
Tax Management: Records tax information from payment transactions accurately into QuickBooks Online, aiding in tax compliance.
Multi-Currency Support: Handles transactions in multiple currencies, ensuring accurate financial records for businesses operating globally.
By leveraging these features, PayTraQer helps businesses maintain accurate financial records, manage inventory effectively, and focus on growth by automating complex accounting tasks.
To try PayTraQer for free, get a trial.
Frequently Asked Questions (FAQ) About Inventory in QuickBooks
1. How to set up inventory in QuickBooks Online?
To set up inventory in QuickBooks Online, go to Settings > Account and Settings > Sales and enable Track inventory. Then, go to Products and Services > New > Inventory and enter item details like name, SKU, cost, and quantity. QuickBooks will now track stock levels automatically.
2. How to set up inventory in QuickBooks Desktop?
In QuickBooks Desktop, enable inventory tracking by going to Edit > Preferences > Items & Inventory and checking Inventory and purchase orders are active. Then, go to Lists > Item List > New, select Inventory Part, and enter the item details, including cost, quantity, and accounts for tracking purchases and sales.
3. How to track inventory in QuickBooks Desktop?
QuickBooks Desktop updates inventory automatically when you record purchases and sales. Use Purchase Orders and Bills to add stock, and Invoices or Sales Receipts to reduce inventory. To monitor stock levels, go to Reports > Inventory and run reports like Inventory Valuation Summary or Stock Status by Item.
4. How to track inventory in QuickBooks?
In both QuickBooks Online and Desktop, inventory is tracked automatically when purchases and sales are recorded. Use Purchase Orders to receive stock and Invoices/Sales Receipts to sell items. Regularly check inventory reports like Inventory Valuation Summary to monitor stock levels and avoid shortages.
5. What is the purpose of adding inventory in QuickBooks?
Adding inventory in QuickBooks helps businesses track stock levels, prevent overstocking or shortages, and calculate the cost of goods sold (COGS). It ensures accurate financial records, helps with tax calculations, and streamlines order management, making business operations more efficient.
Tags
Read also
How to Import Inventory Adjustment in QuickBooks Online
Recurring Transactions in QuickBooks Online - Detailed Guide
How to Edit Multiple Transactions in QuickBooks
Workflow Automation for Bookkeeping and Accounting Professionals