How to Categorize Cash Back Rewards in QuickBooks
Accurately tracking and categorizing business expenses is vital for maintaining reliable financial records. This article will guide you through categorizing cash-back rewards in QuickBooks, covering both QuickBooks Online and QuickBooks Desktop versions. By following these guidelines, you can ensure your cashback rewards are appropriately accounted for, enabling you to maintain accurate financial records.
A Step-By-Step Guide for Categorizing Cash Back Rewards in QuickBooks Online
Step 1: Create a Cash Back Rewards Account
Let's start by setting up a dedicated account in QuickBooks Online tailored for tracking your cash back rewards, ensuring accurate financial management for your business.
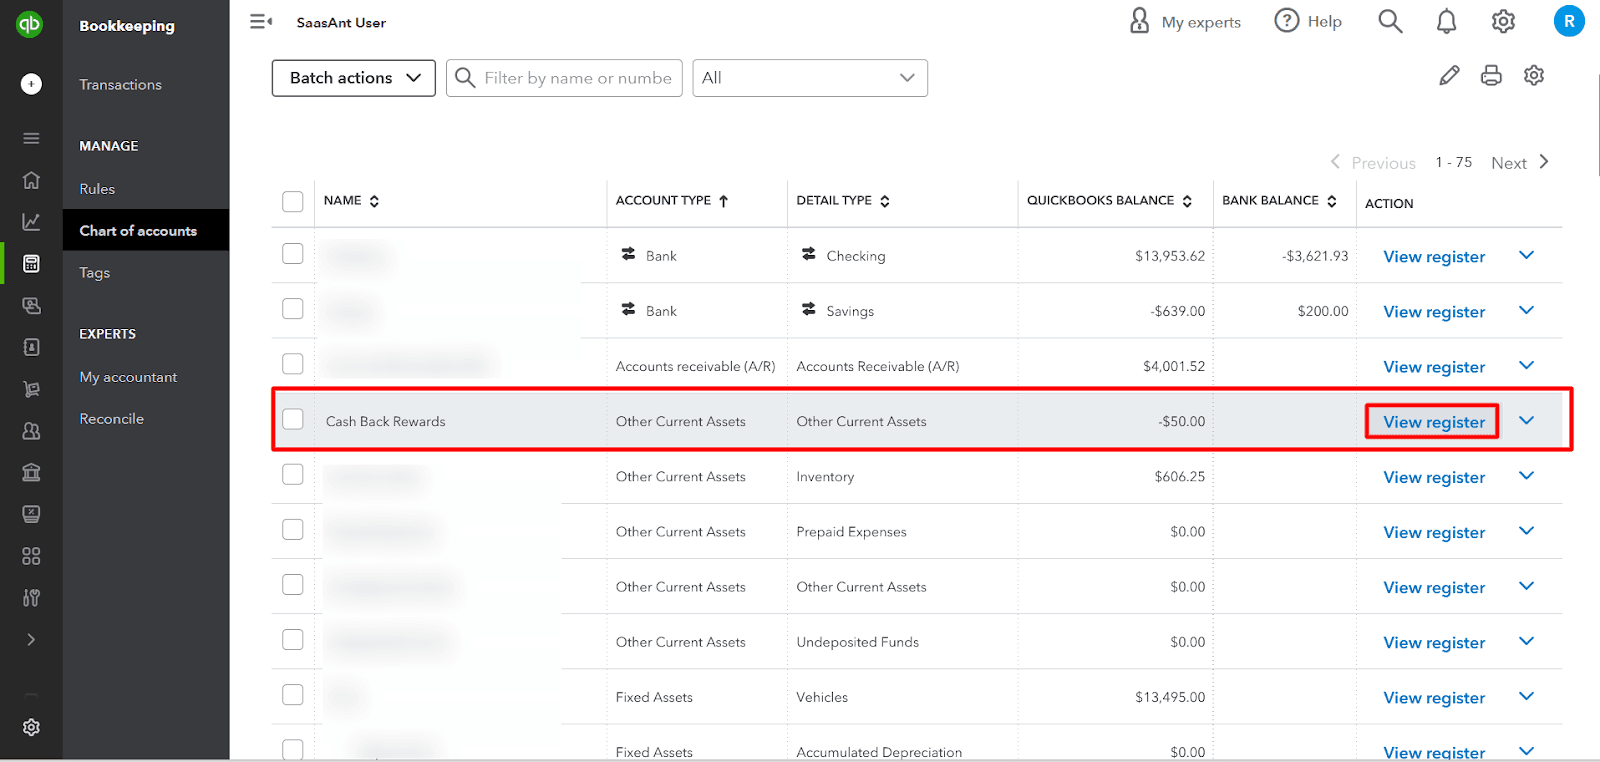
Navigate to the 'Chart of Accounts'
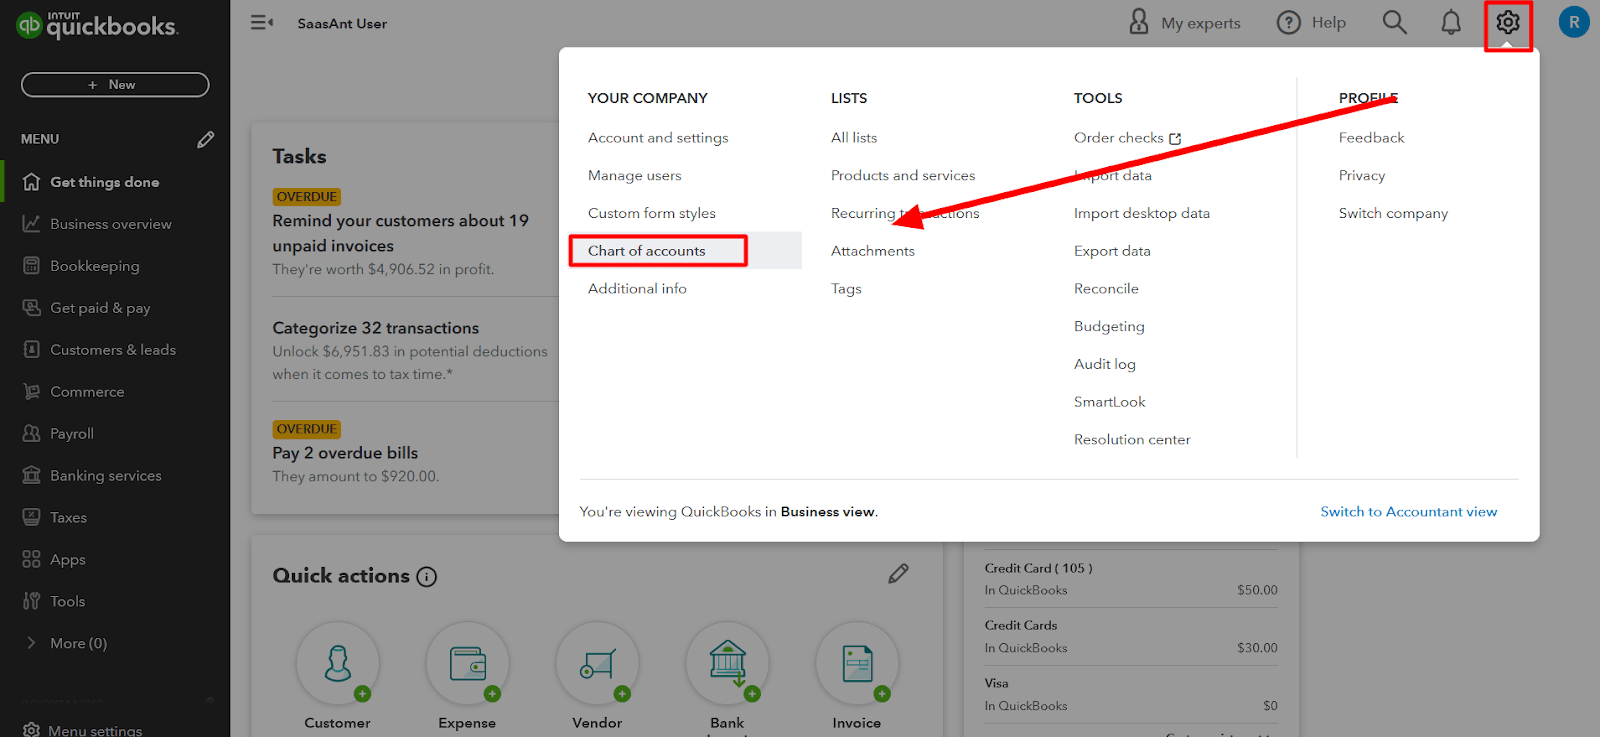
Click on 'New' to create a new account.

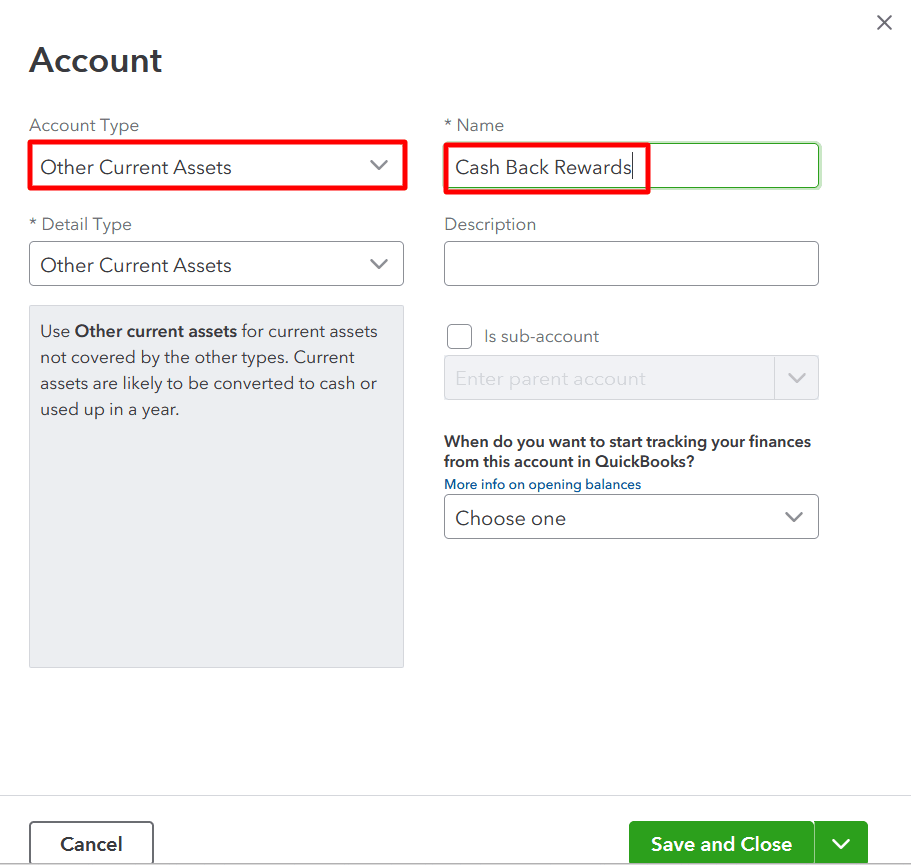
Select 'Other Current Asset' as the account type
Name the account 'Cash Back Rewards.'
Click 'Save and Close'
Step 2: Categorize Cash Back Transactions
Whenever you receive cash back rewards from your credit card company, record it as a deposit in QuickBooks Online.
Click on the '+ New' button on the top left corner of the screen and select 'Bank Deposit.'
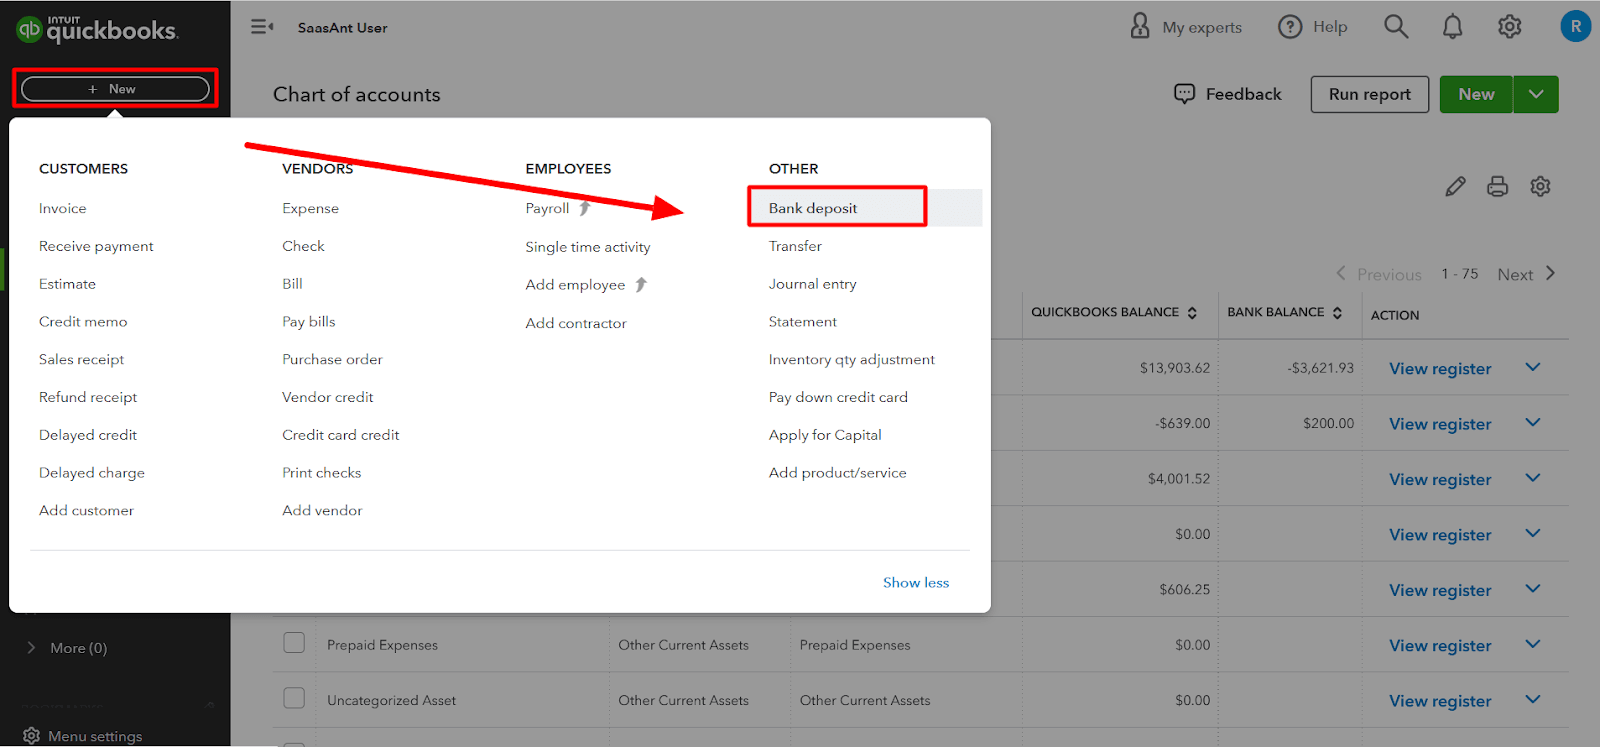
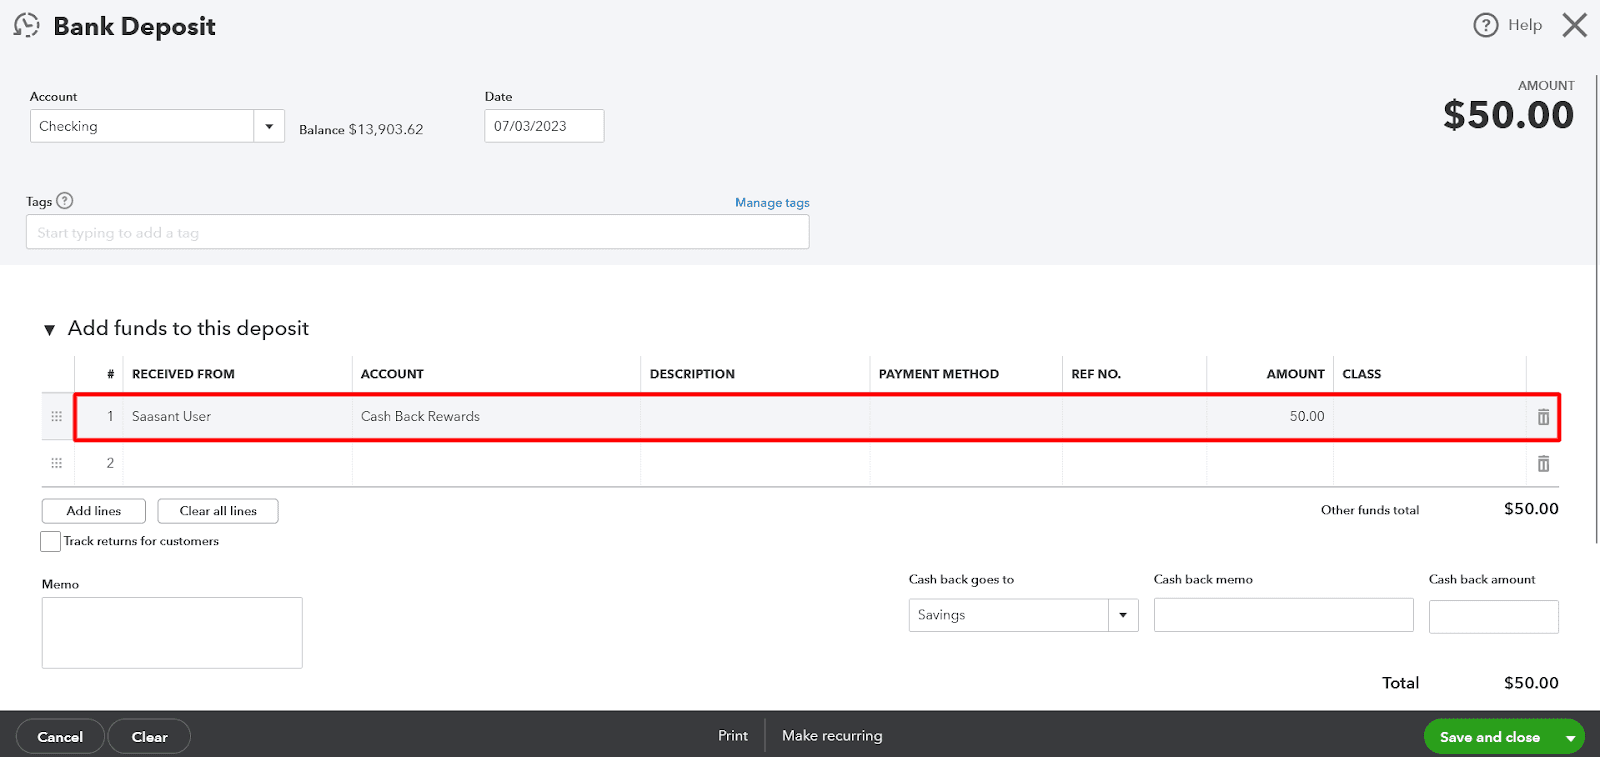
Choose the bank account where you received the cash-back rewards
In the 'Add funds to this deposit' section, select the 'Cash Back Rewards' account you created
Enter the amount of the cashback rewards in the 'Amount' field
Click on 'Save and close' to record the deposit
Step 3: Assign Appropriate Category
After recording the deposit, you must appropriately categorize the cash-back rewards.
Navigate to 'Chart of Accounts.'
Locate the deposit you created and click on it to open the transaction.
In the transaction window, click on the 'Category' column and select the appropriate category for the original expense for which you received the cashback. For example, select the 'Office Supplies Expense' category if you received cash back on office supplies.
Click 'Save and Close'
Step 4: Review Reports
Regularly review reports in QuickBooks Online to ensure that the cash-back rewards are appropriately categorized.
Navigate to the 'Reports' tab and select 'All Reports' or choose a specific report such as 'Profit & Loss' or 'Expense by Vendor.'
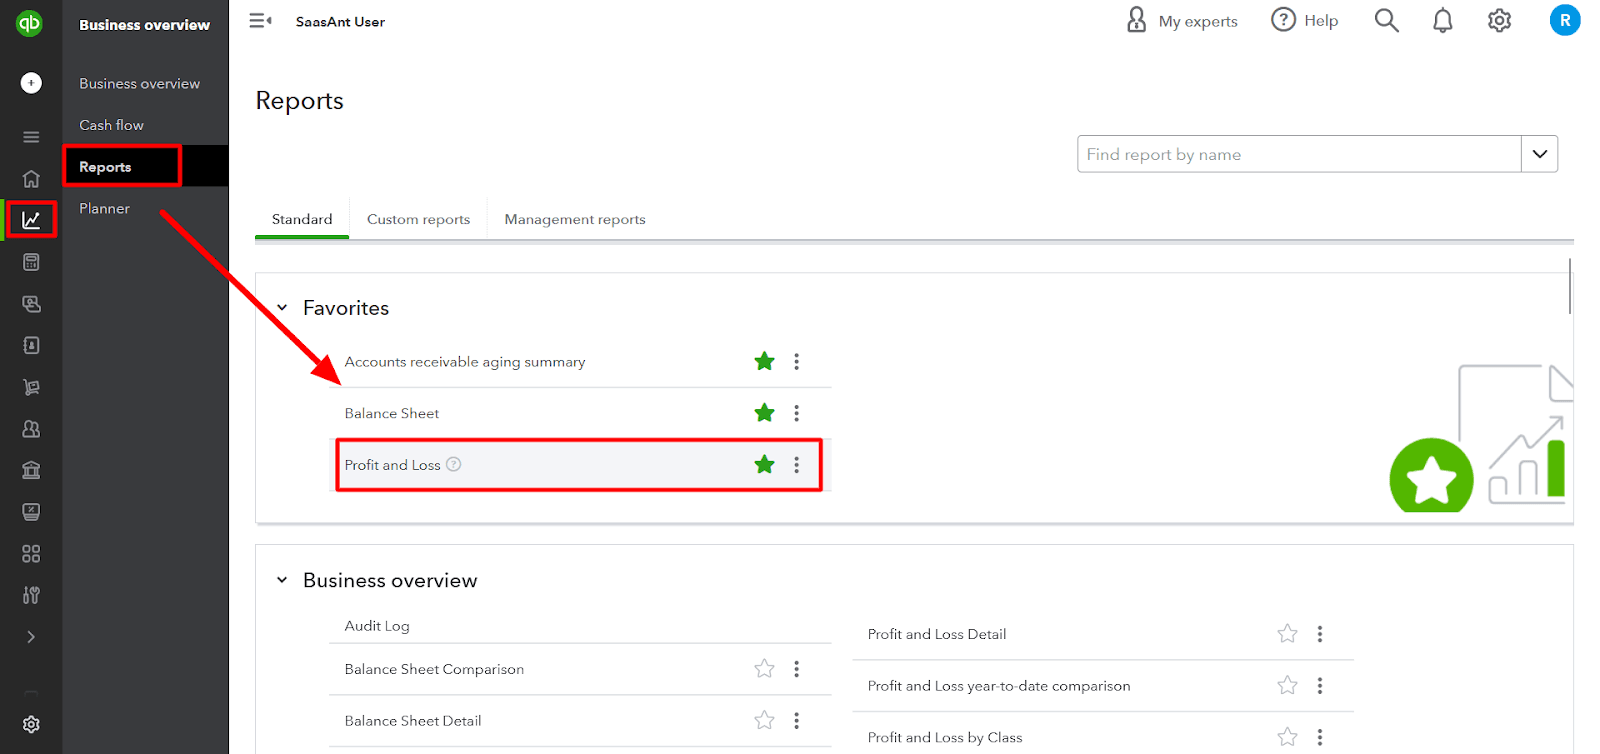
Customize the report settings to include the 'Cash Back Rewards' account and the respective expense categories.
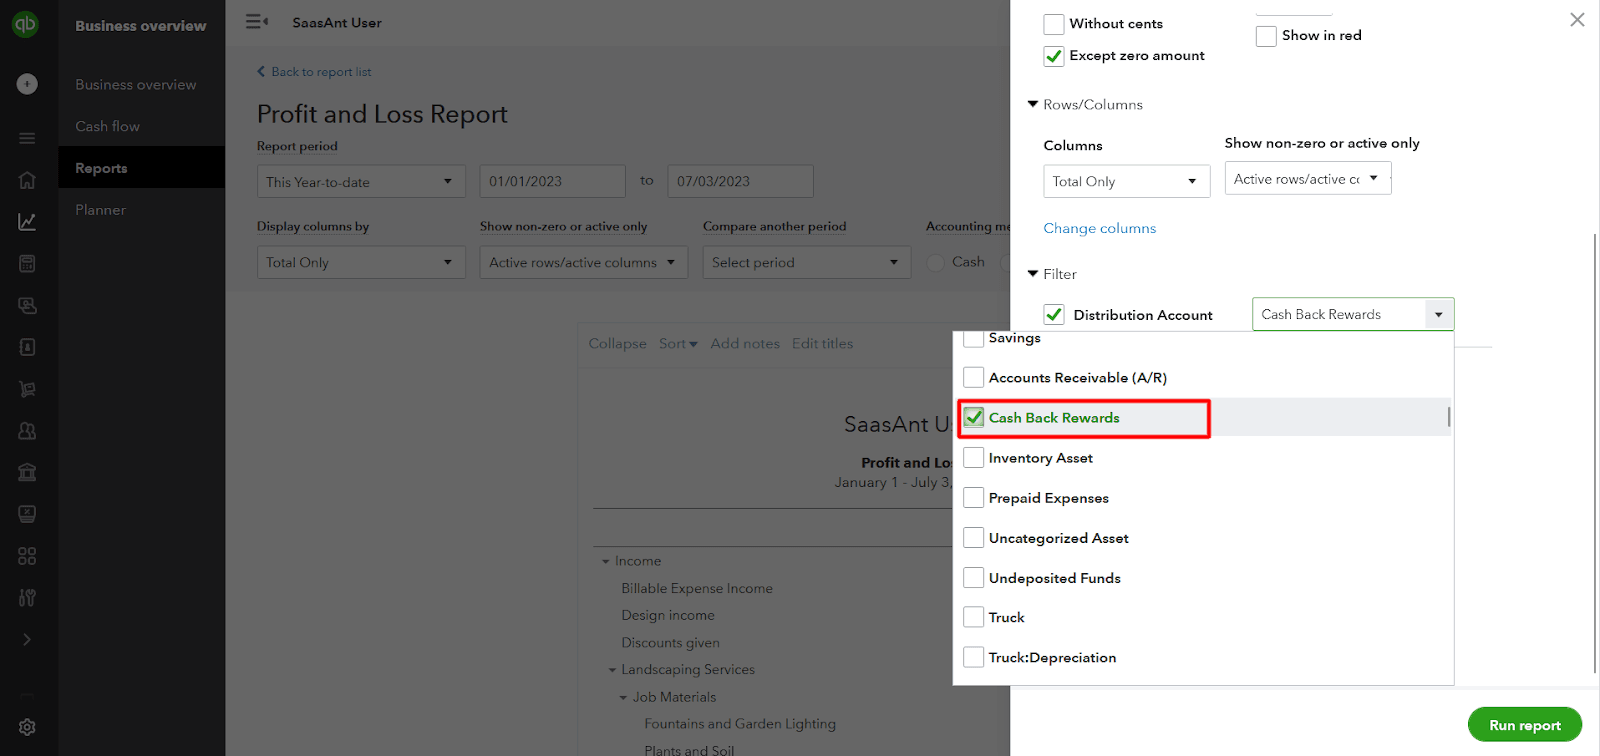
Analyze the reports to monitor how much you are saving through cash-back rewards in each category.
A Step-By-Step Guide for Categorizing the Cash Back Rewards in QuickBooks Desktop
Step 1: Set up a Cash Back Rewards Account
Like QuickBooks Online, you must create an account in QuickBooks Desktop to track cash-back rewards.
Launch QuickBooks Desktop and open your company file
Navigate to the 'Chart of Accounts' by clicking on 'Lists' in the top menu and selecting 'Chart of Accounts.'
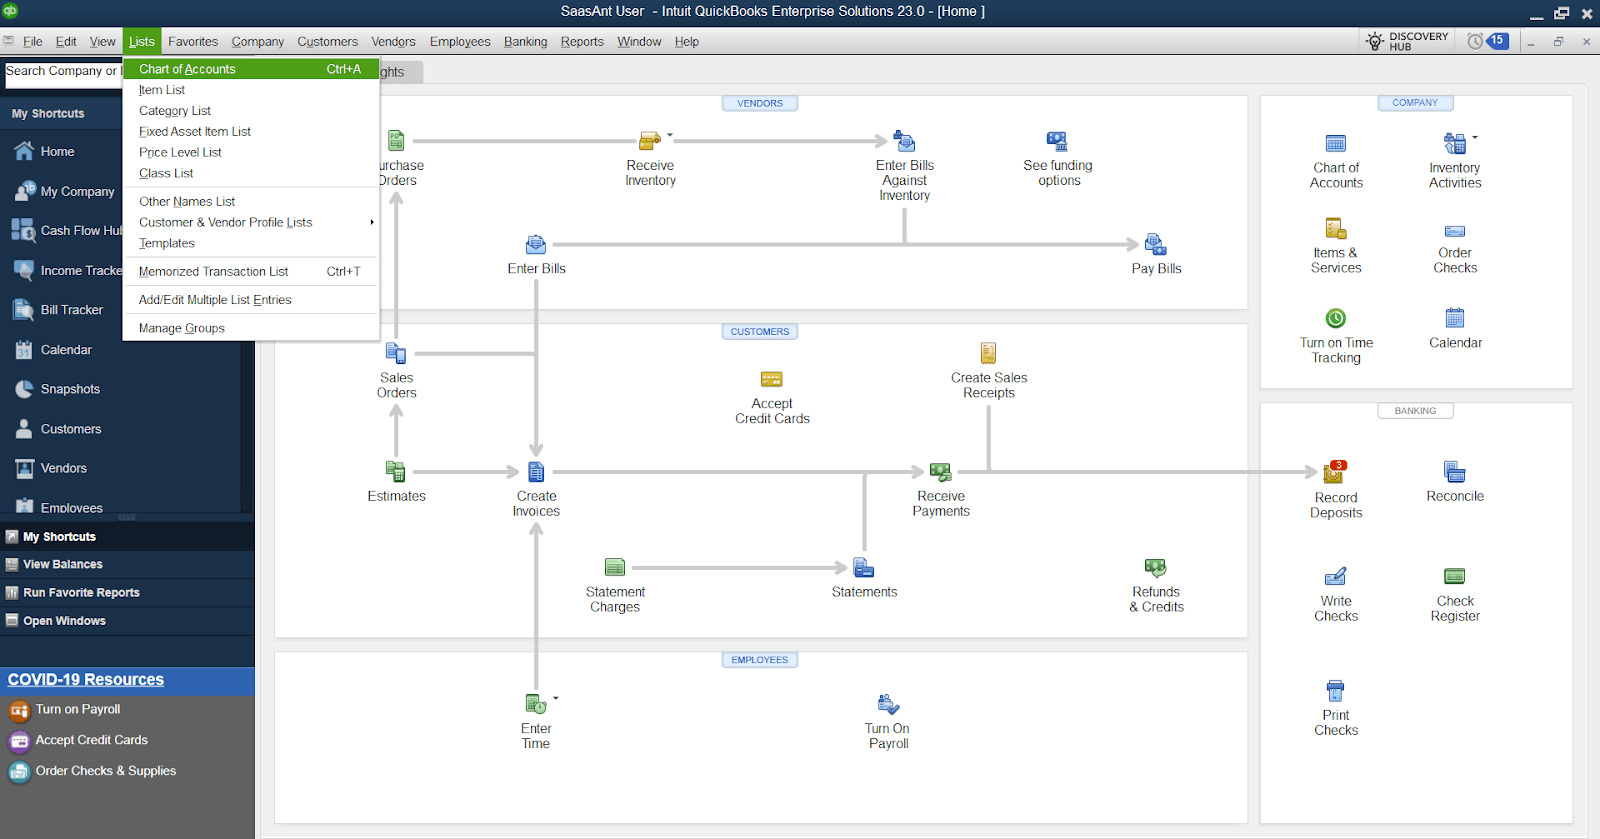
Click on the 'Account' button at the bottom of the window and select 'New Account.'
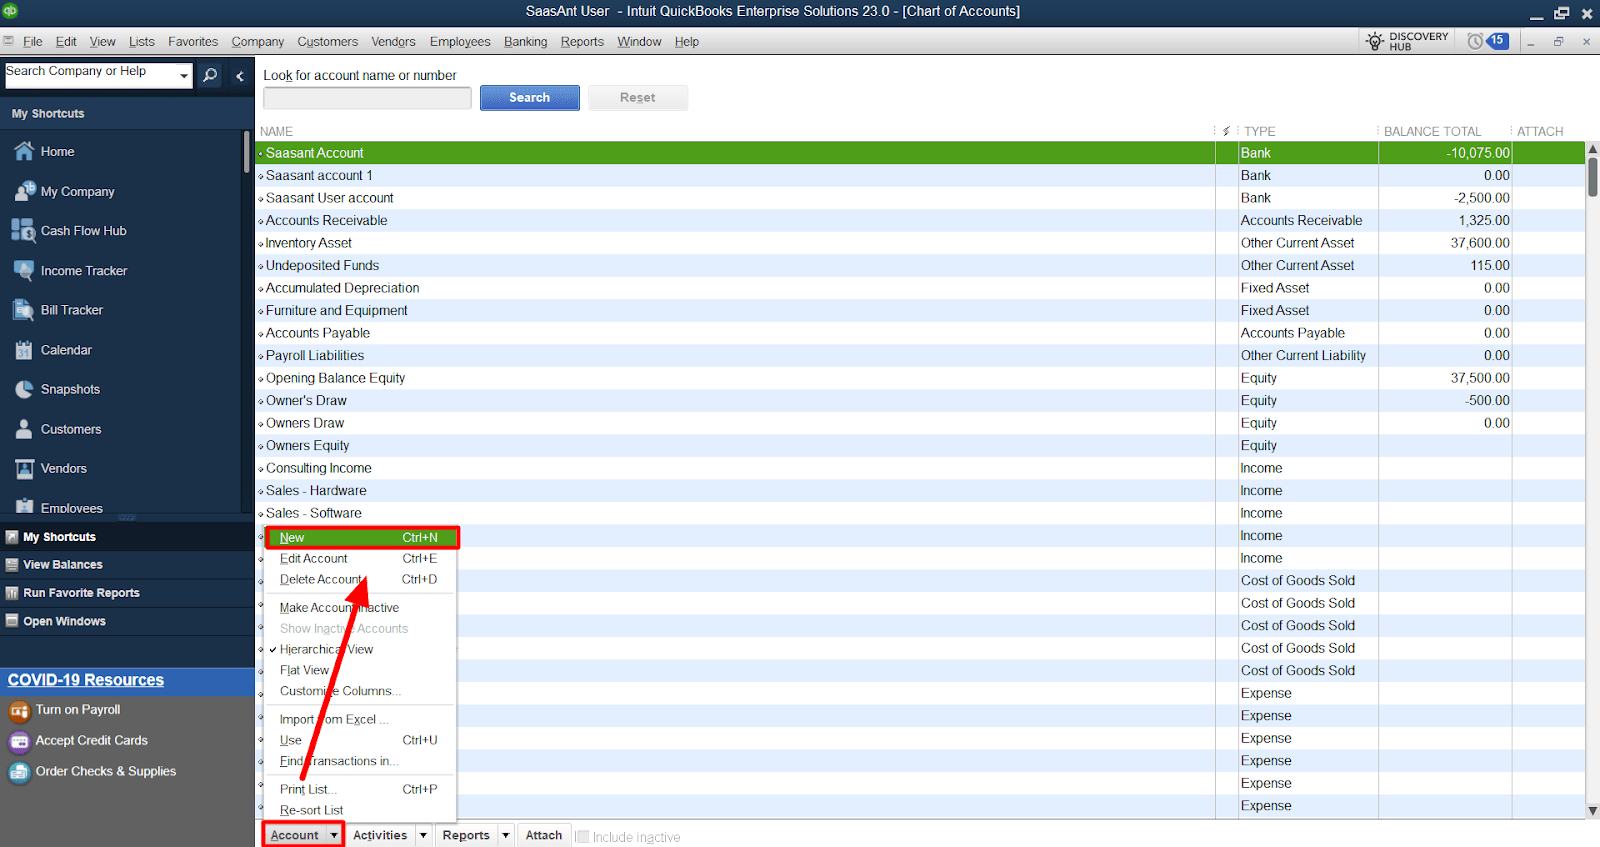
Choose 'Other Current Asset' as the account type and click 'Continue.'
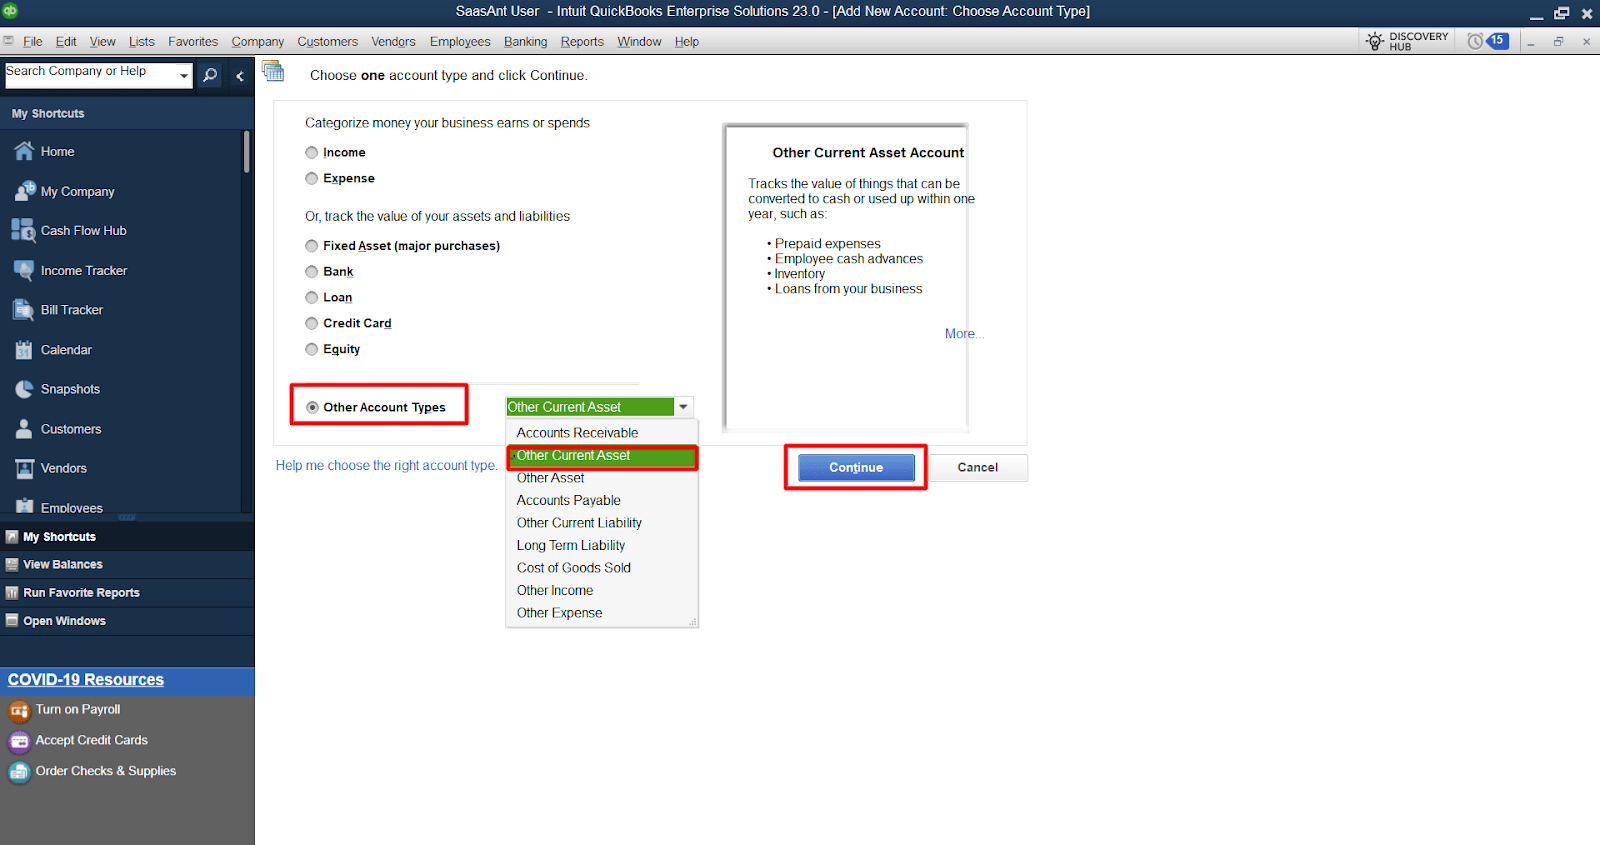
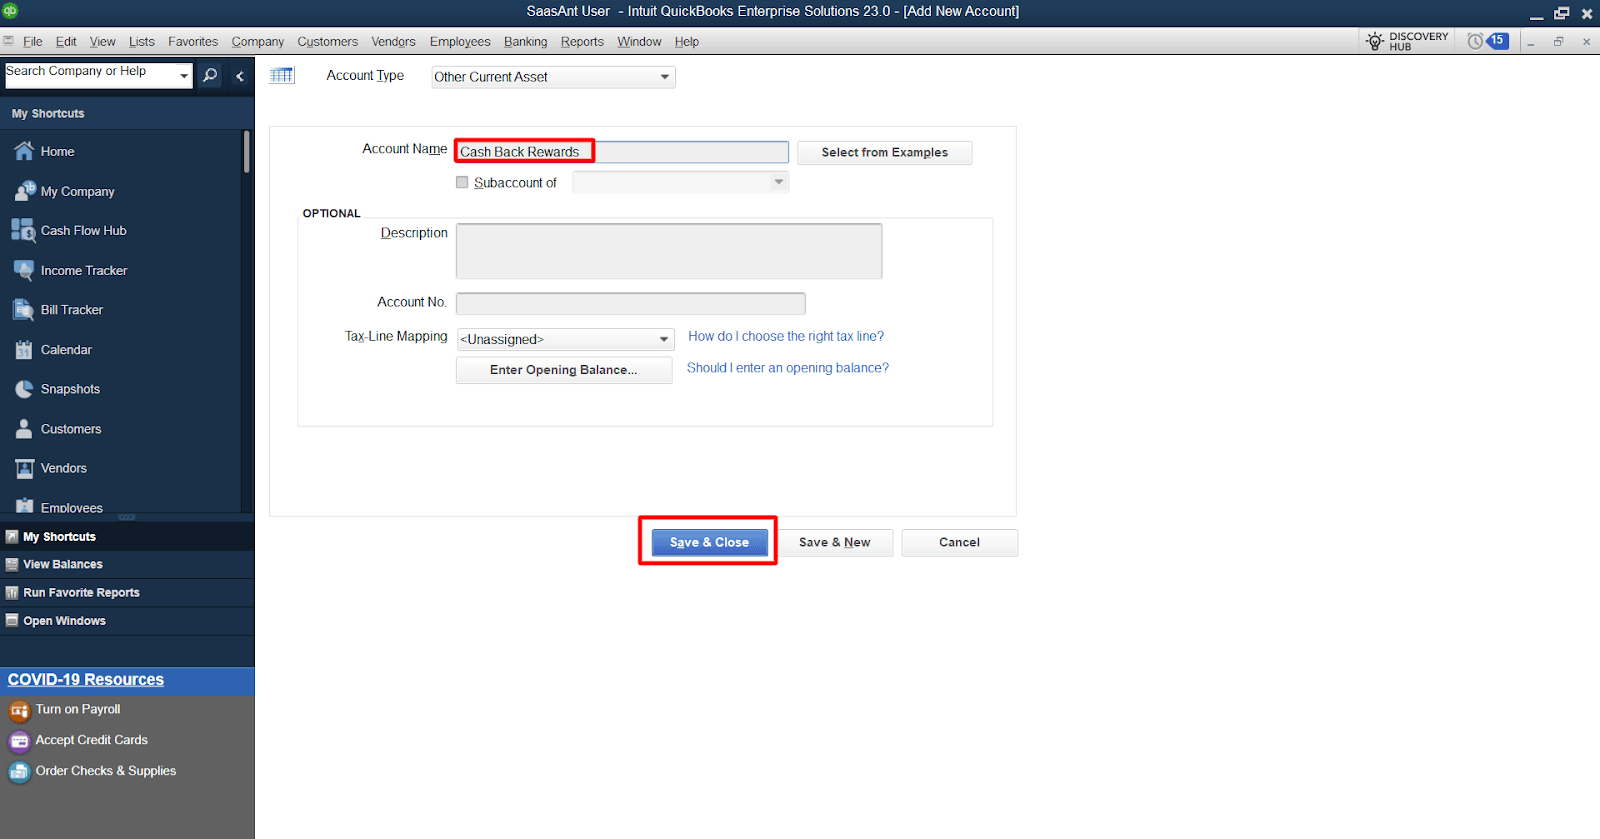
Name the account 'Cash Back Rewards.'
Click 'Save & Close'
Step 2: Record Cash Back Deposits
When you receive cash back rewards from your credit card company, record it as a deposit in QuickBooks Desktop.
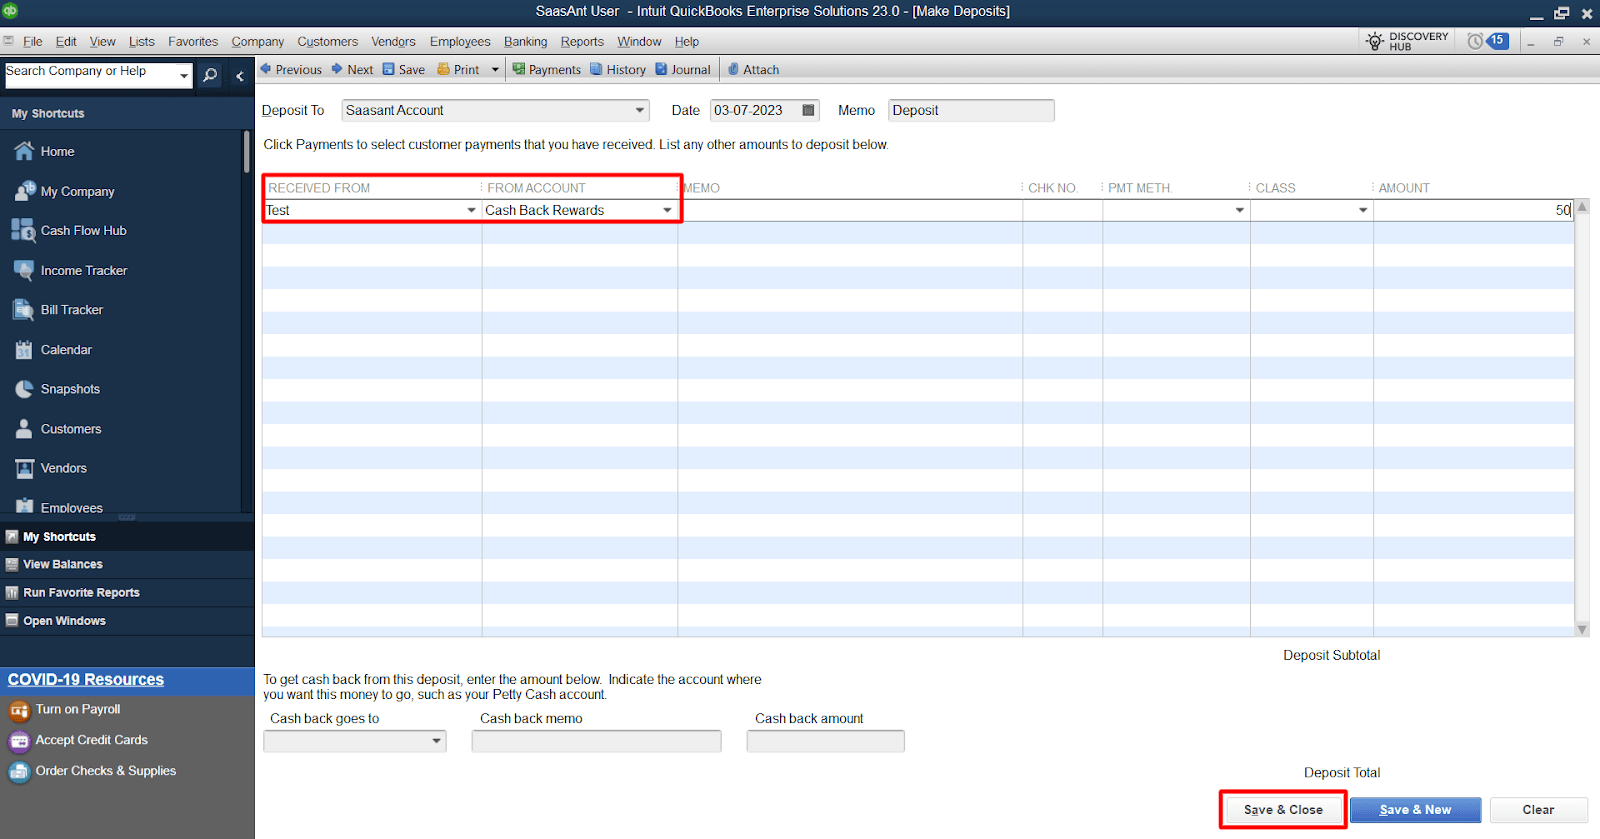
Navigate to the 'Banking' menu and select 'Make Deposits.'
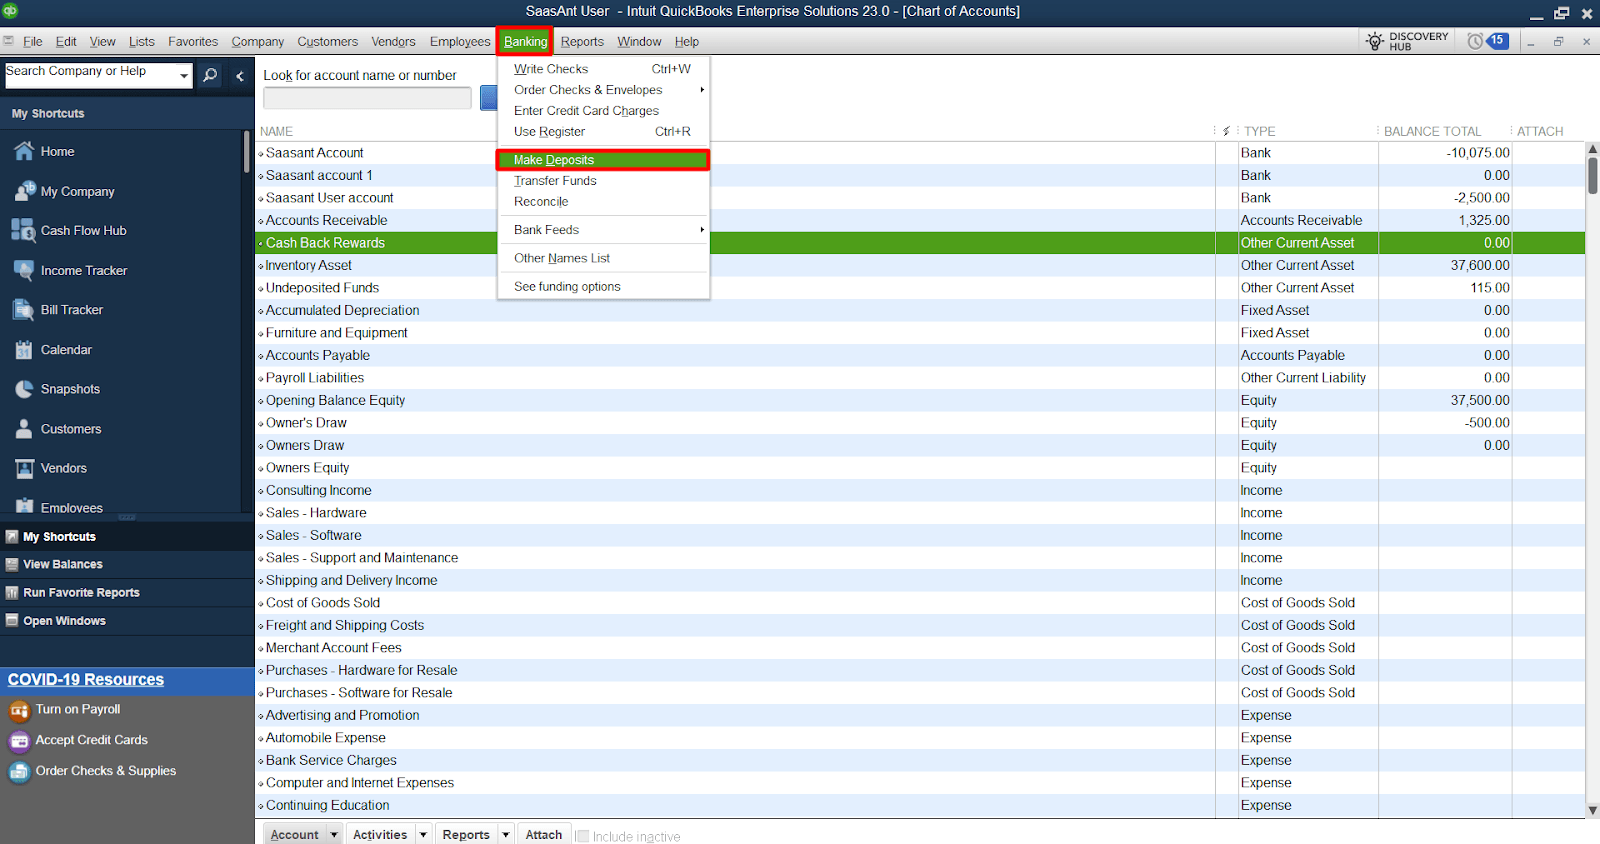
Choose the bank account where you received the cash-back rewards
In the 'Received From' column, enter the credit card company's name or select it from the list
In the 'From Account' column, select the 'Cash Back Rewards' account you created
Enter the amount of the cashback rewards in the 'Amount' field
Click on 'Save & Close' to record the deposit
Step 3: Assign Appropriate Expense Account
After recording the deposit, you must assign the cash-back rewards to the appropriate expense account.
Navigate to the 'Banking' menu and select 'Use Register.'
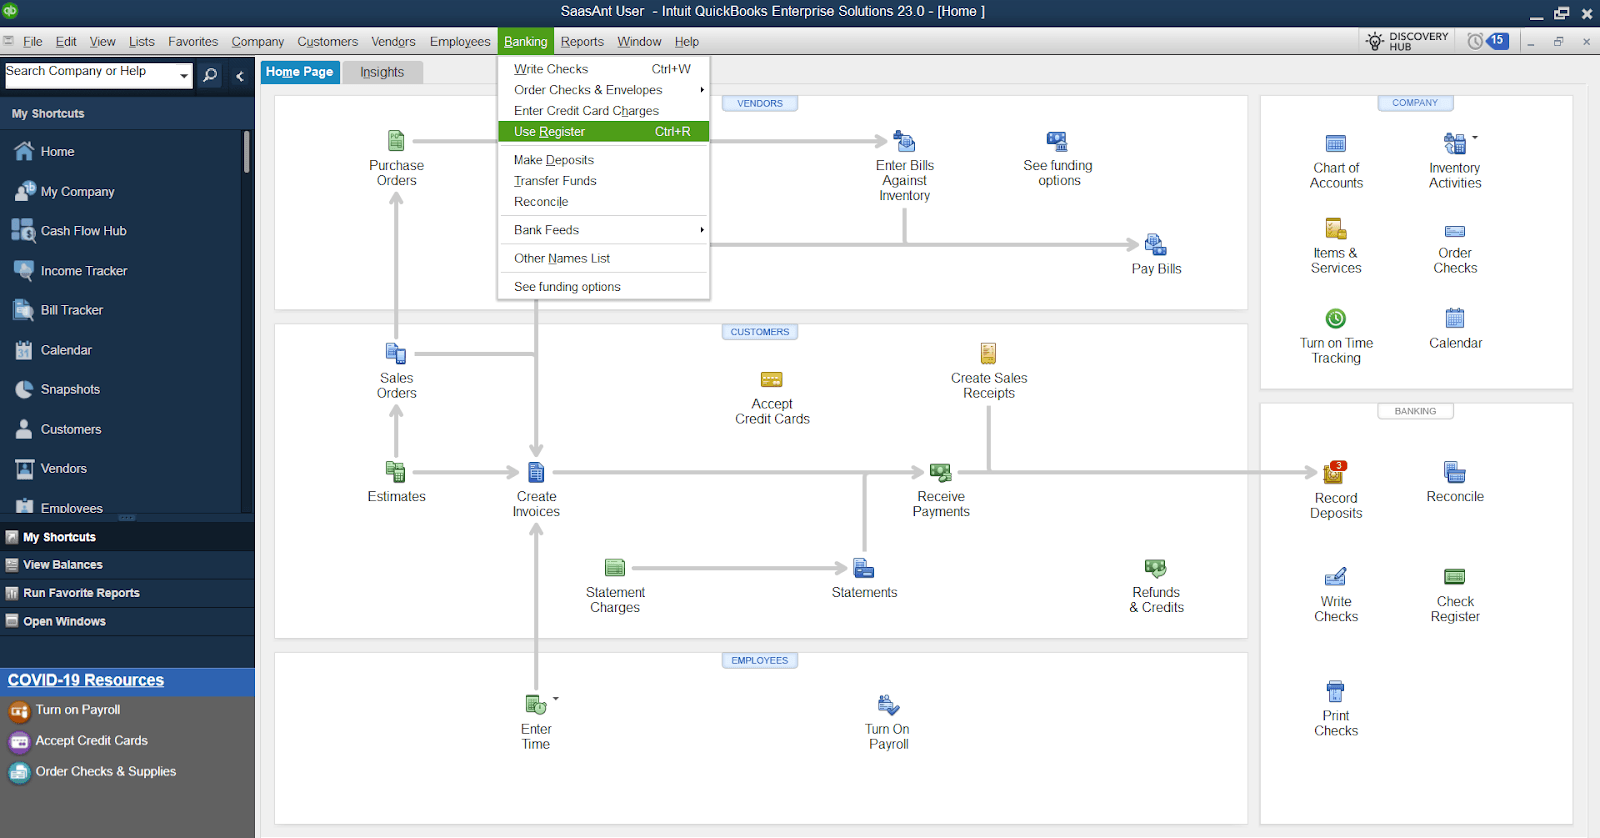
Locate the deposit you created in the register and double-click on it to open the transaction.

Click on the 'Account' field in the transaction window under the 'Account' column.
Select the appropriate expense account corresponding to the original expense associated with the cash-back rewards. For example, if the cashback is related to travel expenses, choose the 'Travel Expense' account.
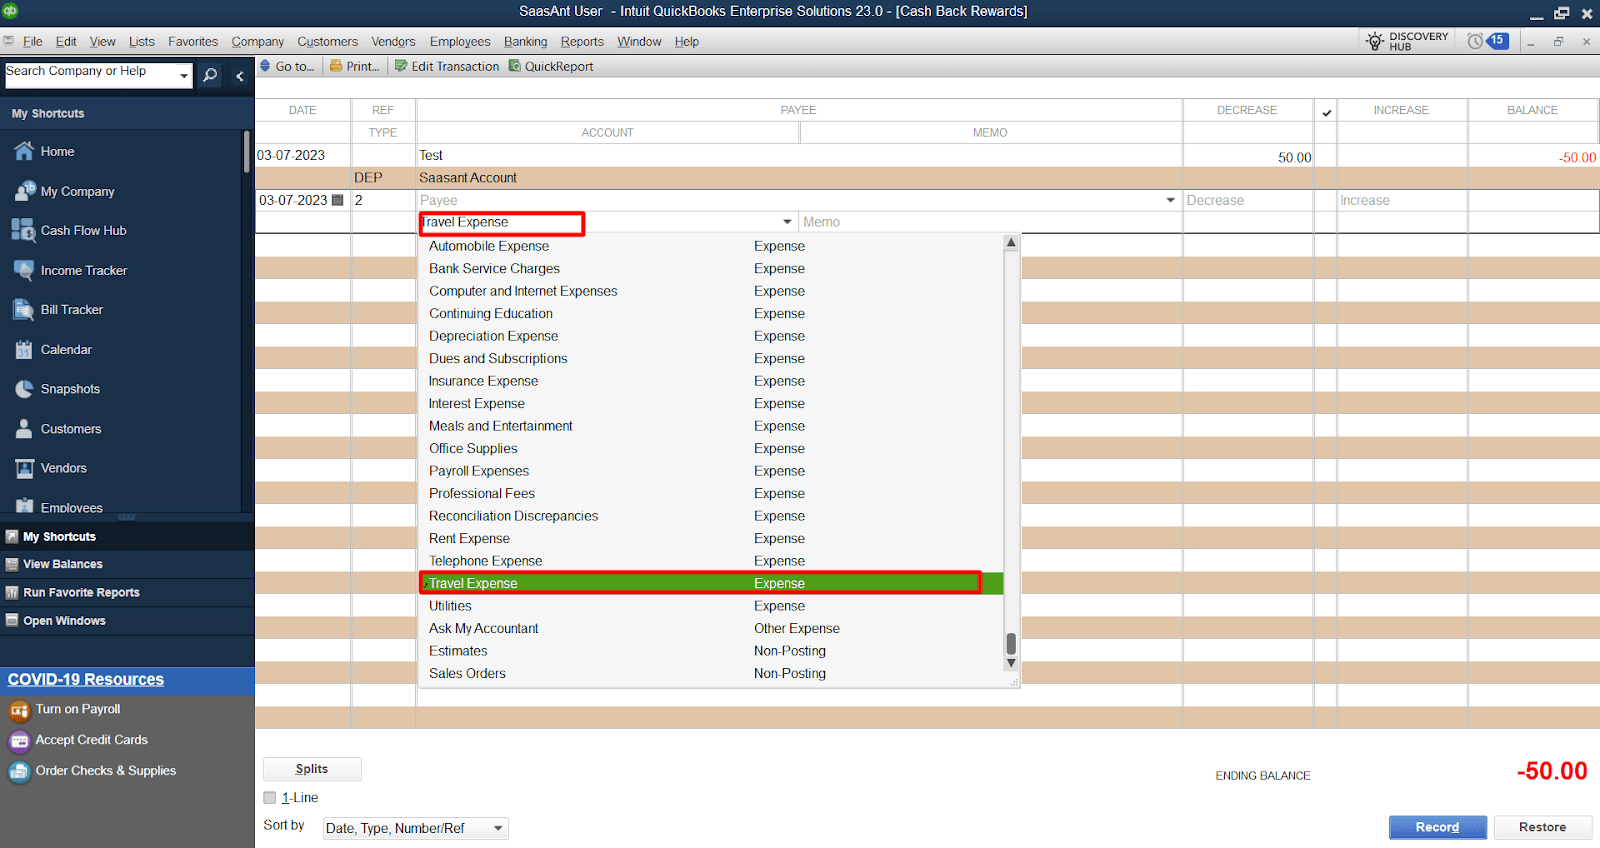
If necessary, enter a memo to provide further details about the transaction
Click on 'Save & Close' to save the changes
Step 4: Review and Analyze
To review the categorization of cash-back rewards:
Navigate to the 'Reports' menu at the top of the screen
Select 'Custom Reports' and choose 'Transaction Detail.'
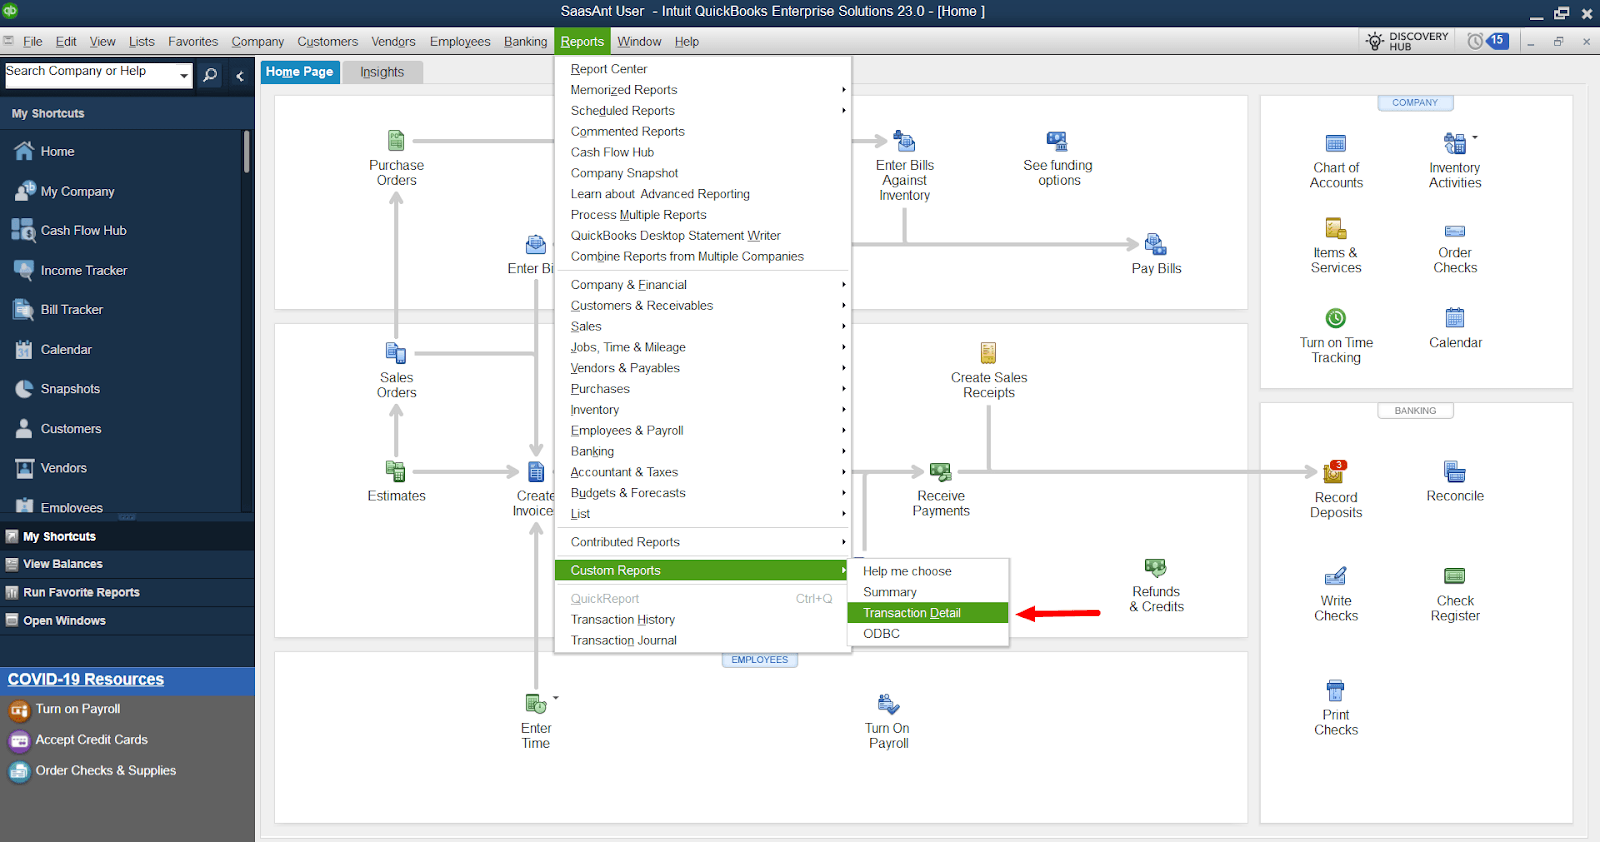
Customize the report settings to include the 'Cash Back Rewards' account and the respective expense accounts.
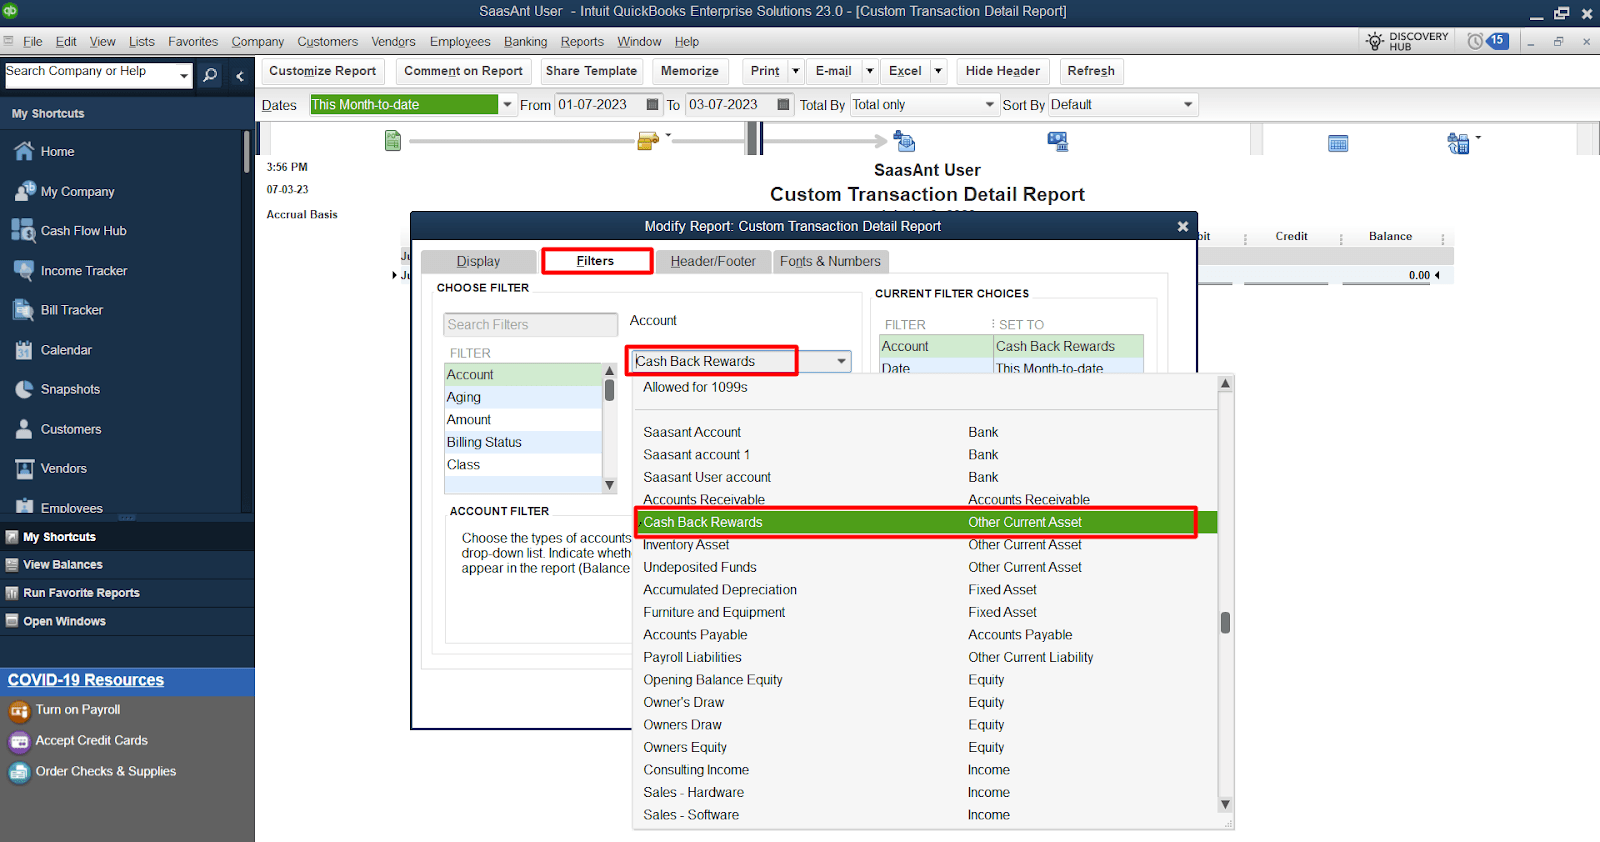
Run the report to view and analyze the cash-back rewards categorized under the appropriate expense accounts.
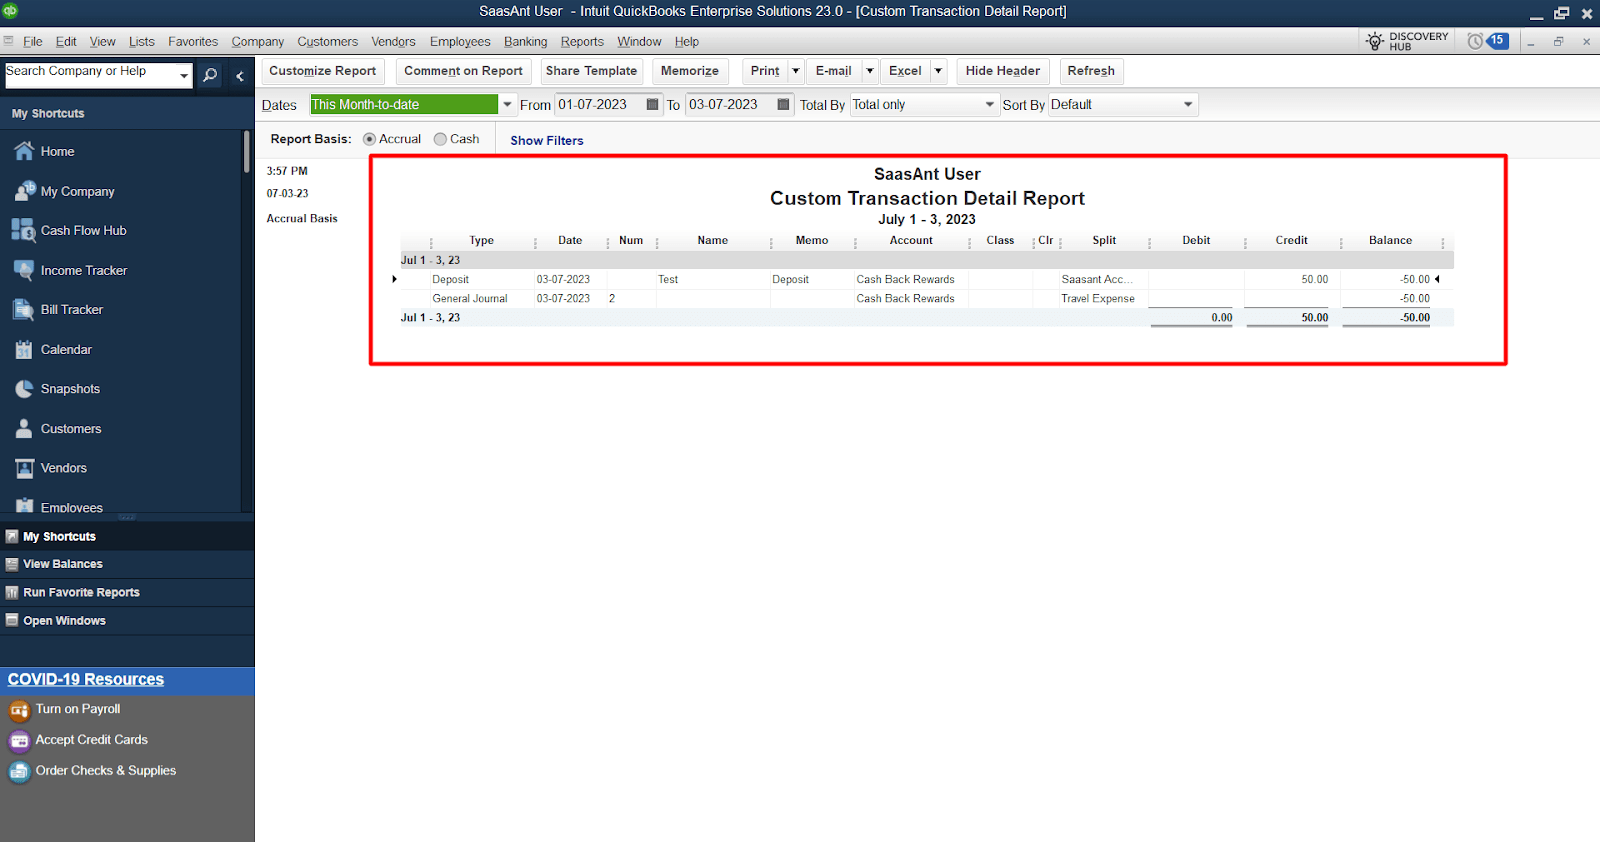
Use other reports such as 'Profit & Loss' and 'Expense by Vendor' to gain insights into your savings and expenses.
FAQs
Q1: Can I Track Cash Back Rewards Separately from Other Income in QuickBooks Online and Desktop?
You can create a dedicated account for tracking cash-back rewards in both QuickBooks Online and QuickBooks Desktop. This action allows you to categorize and monitor your cashback rewards separately from other income sources.
Q2: How Do I Create a Cashback Rewards Account in QuickBooks Online?
In QuickBooks Online:
Navigate to the 'Chart of Accounts'
Click on 'New'
Select 'Other Current Asset' as the account type, and name it 'Cash Back Rewards.'
Q3: How Do I Record Cash Back Deposits in QuickBooks Online and Assign Them to the Appropriate Categories?
To record cash back deposits in QuickBooks Online:
Click on the '+New' button, select 'Bank Deposit'
Choose the bank account, and select the 'Cash Back Rewards' account as the deposit to account
After recording the deposit, assign it to the appropriate category by selecting the corresponding expense account
Q4: Can I Categorize Cash Back Rewards in QuickBooks Desktop as Similar to QuickBooks Online?
Yes, in QuickBooks Desktop, you can create a cashback rewards account, record cashback deposits through the 'Make Deposits' feature, and assign them to the appropriate expense accounts, similar to the process in QuickBooks Online.
Q5: How Can I Review and Analyze Cash Back Rewards in QuickBooks Online and Desktop?
In both QuickBooks Online and QuickBooks Desktop, you can generate reports such as 'Profit & Loss' and 'Expense by Vendor' to review and analyze the cashback rewards. Customize the reports to include the cashback rewards account and relevant expense accounts to track your savings.
Q6: Is It Possible to Generate QuickBooks Online and Desktop Reports Showing the Total Cash Back Rewards Earned in Specific Expense Categories?
Yes, you can customize reports in QuickBooks Online and QuickBooks Desktop to include the cashback rewards account and expense accounts. This lets you view the total cashback rewards earned in specific expense categories, providing insights into your savings and expenses.
Q7: Can I Import Credit Card Transactions with Cash Back Rewards into QuickBooks Online and Desktop?
Both QuickBooks Online and QuickBooks Desktop provide options to import credit card transactions. When importing, make sure to categorize the cashback rewards appropriately.
Q8: Do I Need to Configure Any Specific Settings or Preferences in QuickBooks Online and Desktop for Tracking Cash Back Rewards?
No specific settings or preferences must be configured solely to track cash-back rewards. However, setting up the cashback rewards account and ensuring proper categorization of deposits and expenses to track and monitor your rewards accurately is essential.
Tags
Read also
How to Categorize Transactions in QuickBooks
How to Add Categories in QuickBooks Online
How to Download Bank Statements into QuickBooks Online
How to Upload Bank Statements to QuickBooks Online: A Comprehensive Guide