How to Convert an Estimate to Invoice in QuickBooks Online
As a business owner, accurately managing estimates and invoices is crucial for maintaining a healthy cash flow. QuickBooks, a popular accounting software, offers a seamless way to create estimates and convert them into invoices when the work is approved. This step-by-step guide will walk you through converting an estimate into an invoice using QuickBooks.
How to Convert an Estimate to an Invoice in QuickBooks Online: Step-By-Step Guide
Step 1: Sign In to QuickBooks Online
Visit the QuickBooks website and sign in to your account using your credentials.
Step 2: Navigate to the Get paid & pay Tab
Once logged in, locate and click the 'Get paid & pay' tab on the left-hand navigation menu.
Step 3: Select the Estimate Option
Once you select the 'Get paid & pay’ tab, you'll find various options; click 'Estimates' from the available options.
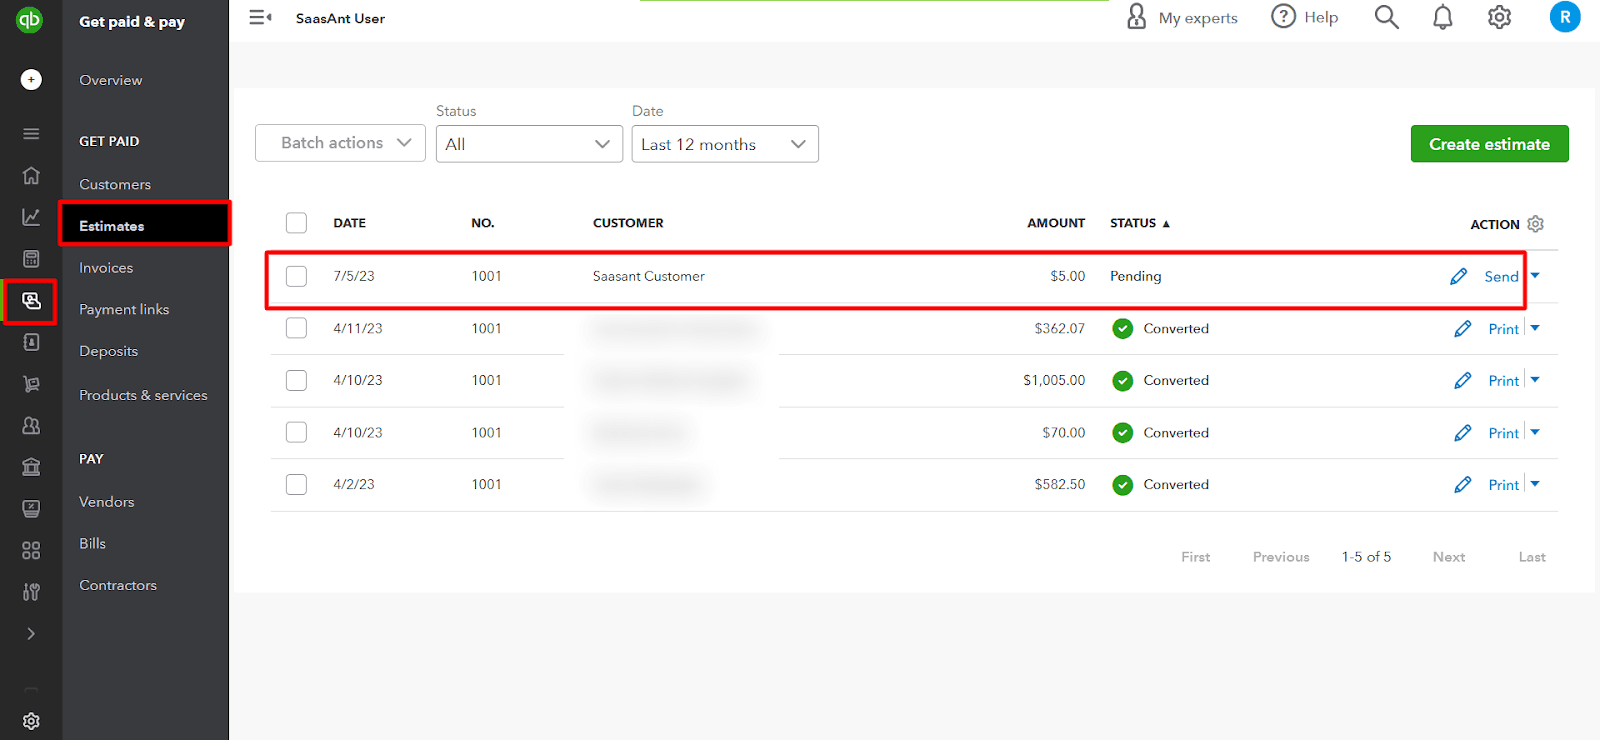
Step 4: Check the Status of an Estimate
When you send an estimate to your customer using QuickBooks, you can track its status, such as whether it has been viewed, accepted, or declined.
Step 5: Change the Status of an Estimate
If your customer accepts the estimate online, the status will automatically be marked as 'accepted.' If you receive a verbal confirmation, you can manually mark the estimate as 'accepted.'
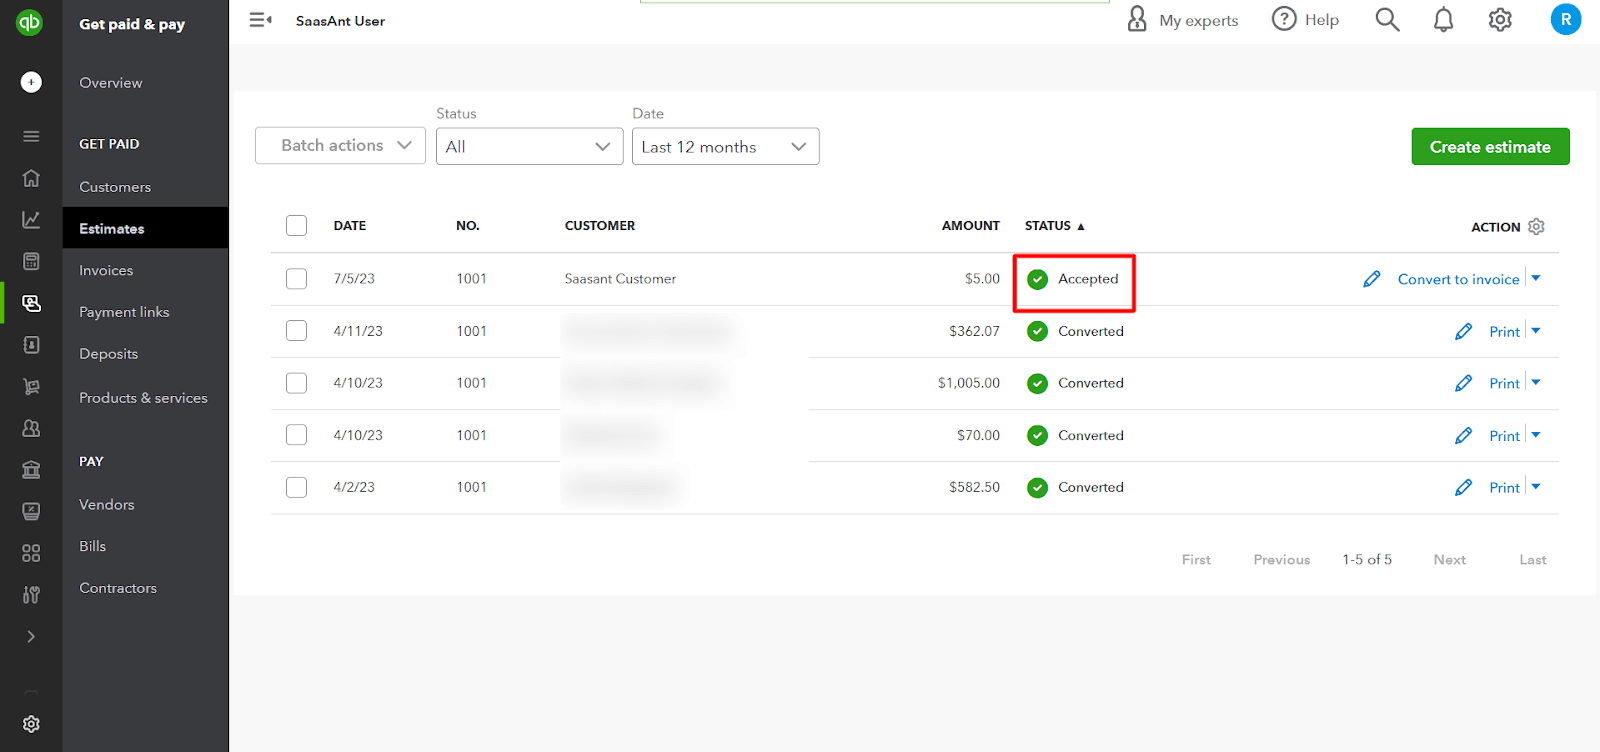
Step 6: Convert an Estimate into an Invoice
To convert an estimate into an invoice, locate the relevant estimate and click 'Convert to Invoice.'
Alternatively, you can select the estimate, click 'More Actions,' and choose 'Convert to Invoice.'
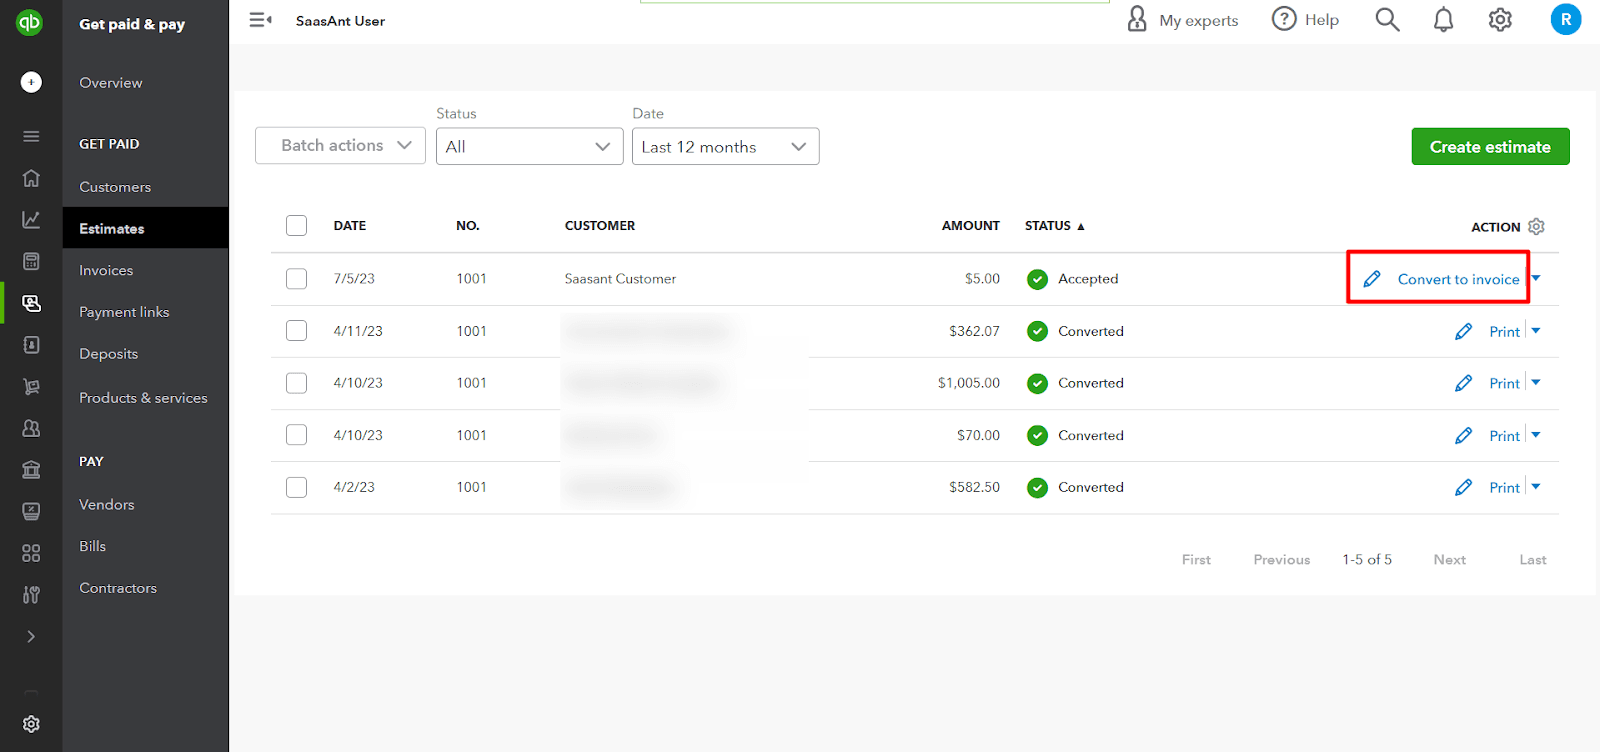
Step 7: Review and Edit the Invoice
QuickBooks will automatically prepare the invoice with details from the estimate, including the products or services used. Before converting the estimate into an invoice, verify all the products, quantities, rates, and discounts. Verify that the estimate reflects the agreed-upon terms with your customer. You can change the quantities and rates or add additional products/services to the invoice if required.
Step 8: Print Preview
Take a moment to preview the invoice in different formats, such as email view, PDF view, and online view. Once satisfied with the invoice, select 'Email' to send to your customer.
Step 9: Check the Status of the Invoice
When you send an invoice through QuickBooks, you can easily track its status by checking the invoice list, including whether the customer has viewed it.
Recommended reading:
How to Mark an Invoice as Paid in QuickBooks
How to Convert an Estimate to an Invoice in QuickBooks Desktop: Steps
Step 1: Access the Estimates Feature
Click on the 'Customers' menu and select 'Customer Center’ from the dropdown.
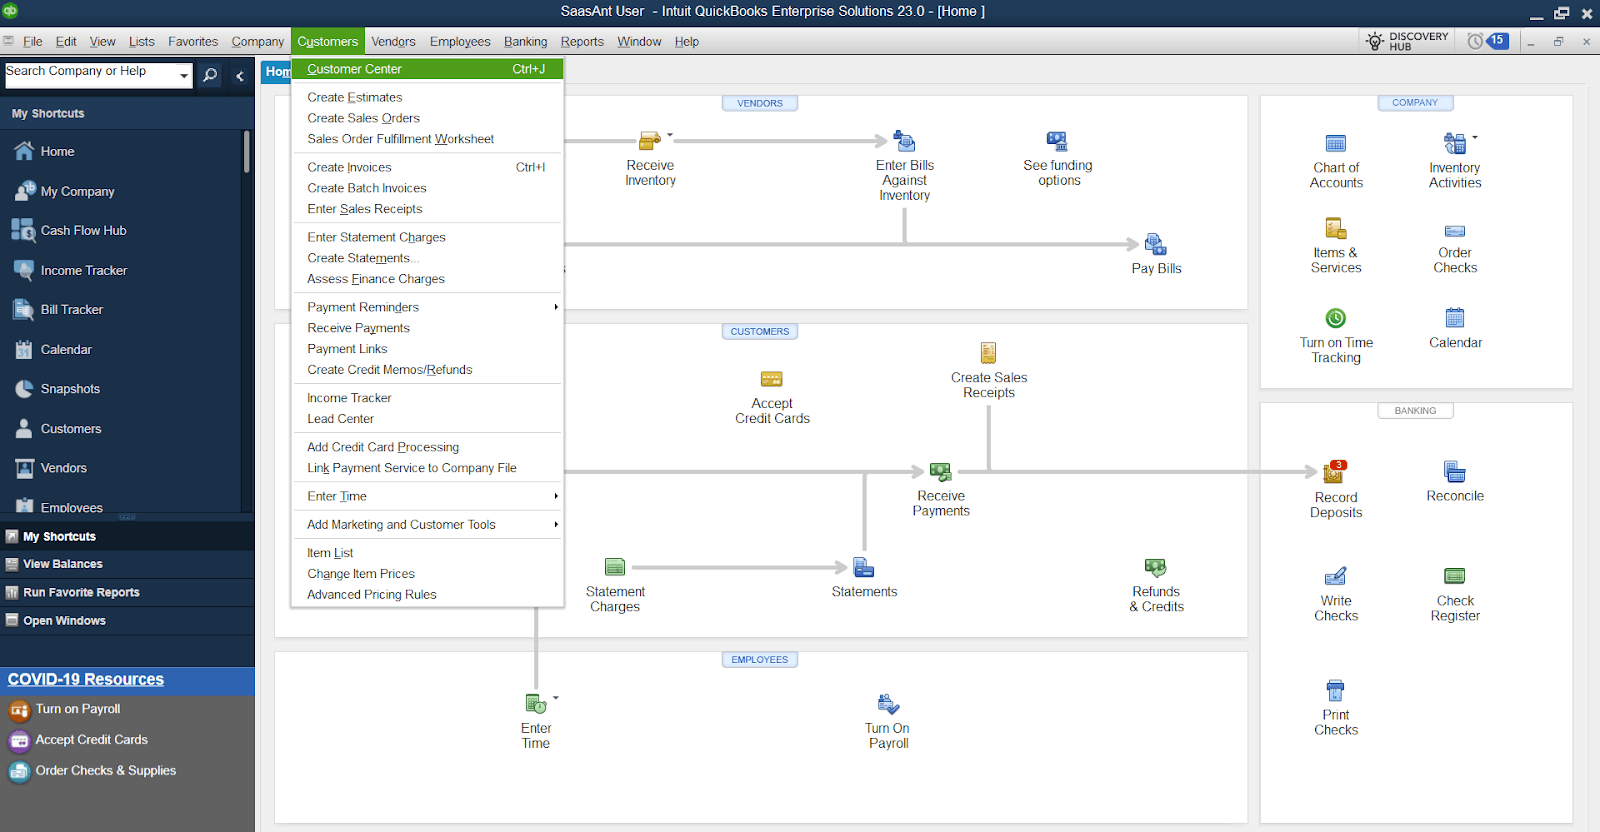
Step 2: Select the Transactions Tab
Select the ‘Transactions’ tab in the customer center window and click ‘Estimates’ from the dropdown.
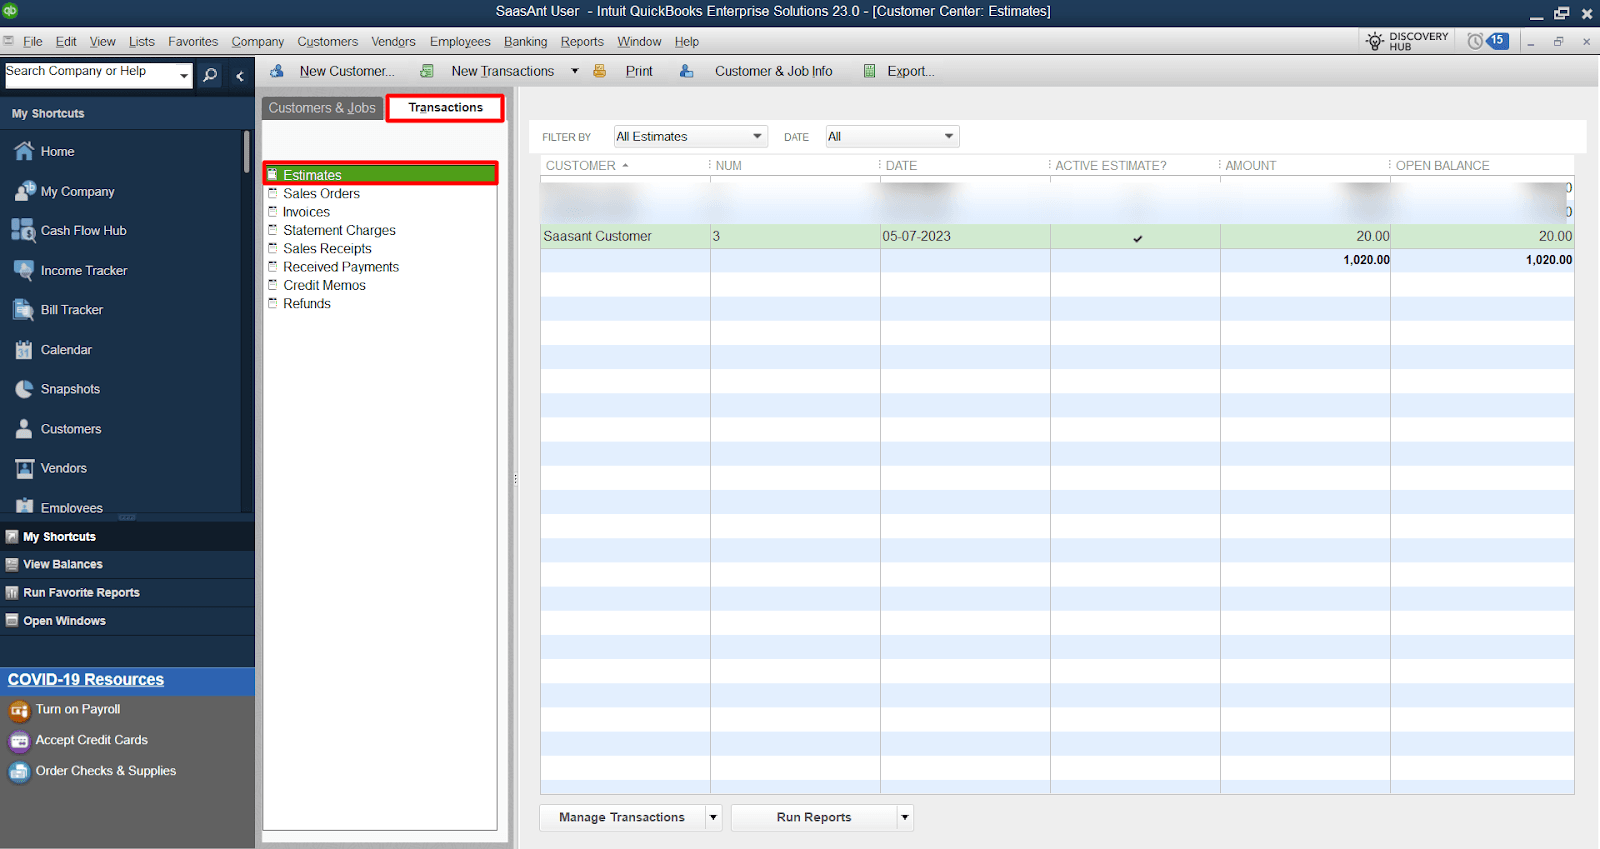
Step 3: Choose the Estimate
QuickBooks will automatically display the available estimates window, showing all available estimates for the selected job. Select the estimate you want to create an invoice.
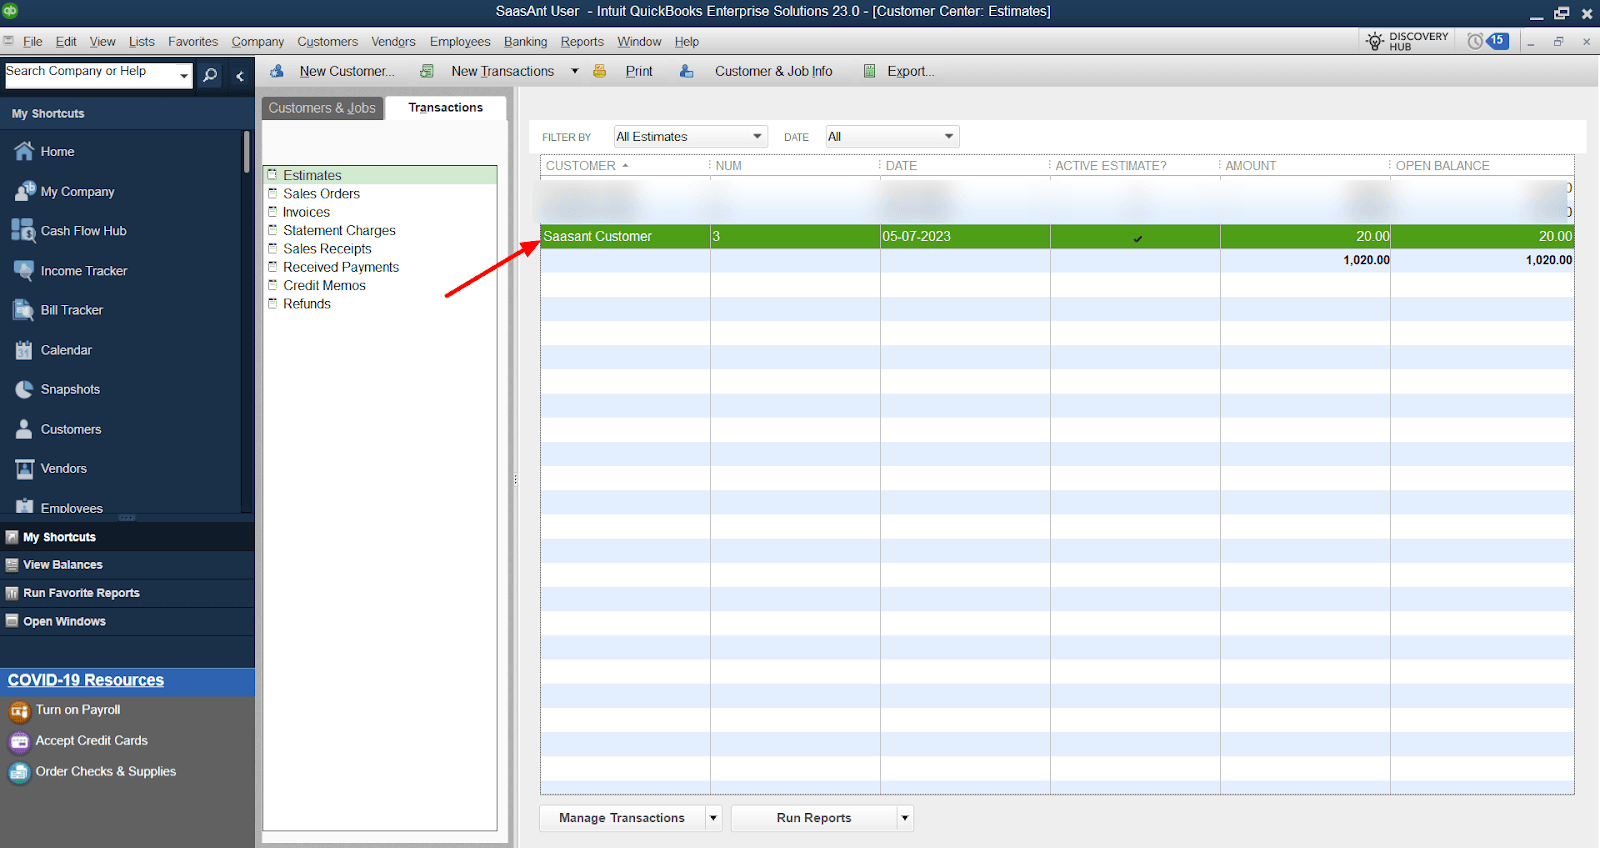
Step 4: Choose Invoicing Option
Once you open the selected estimate, you can see an option as ‘Create Invoice’ at the top of the ‘Estimate’ window.
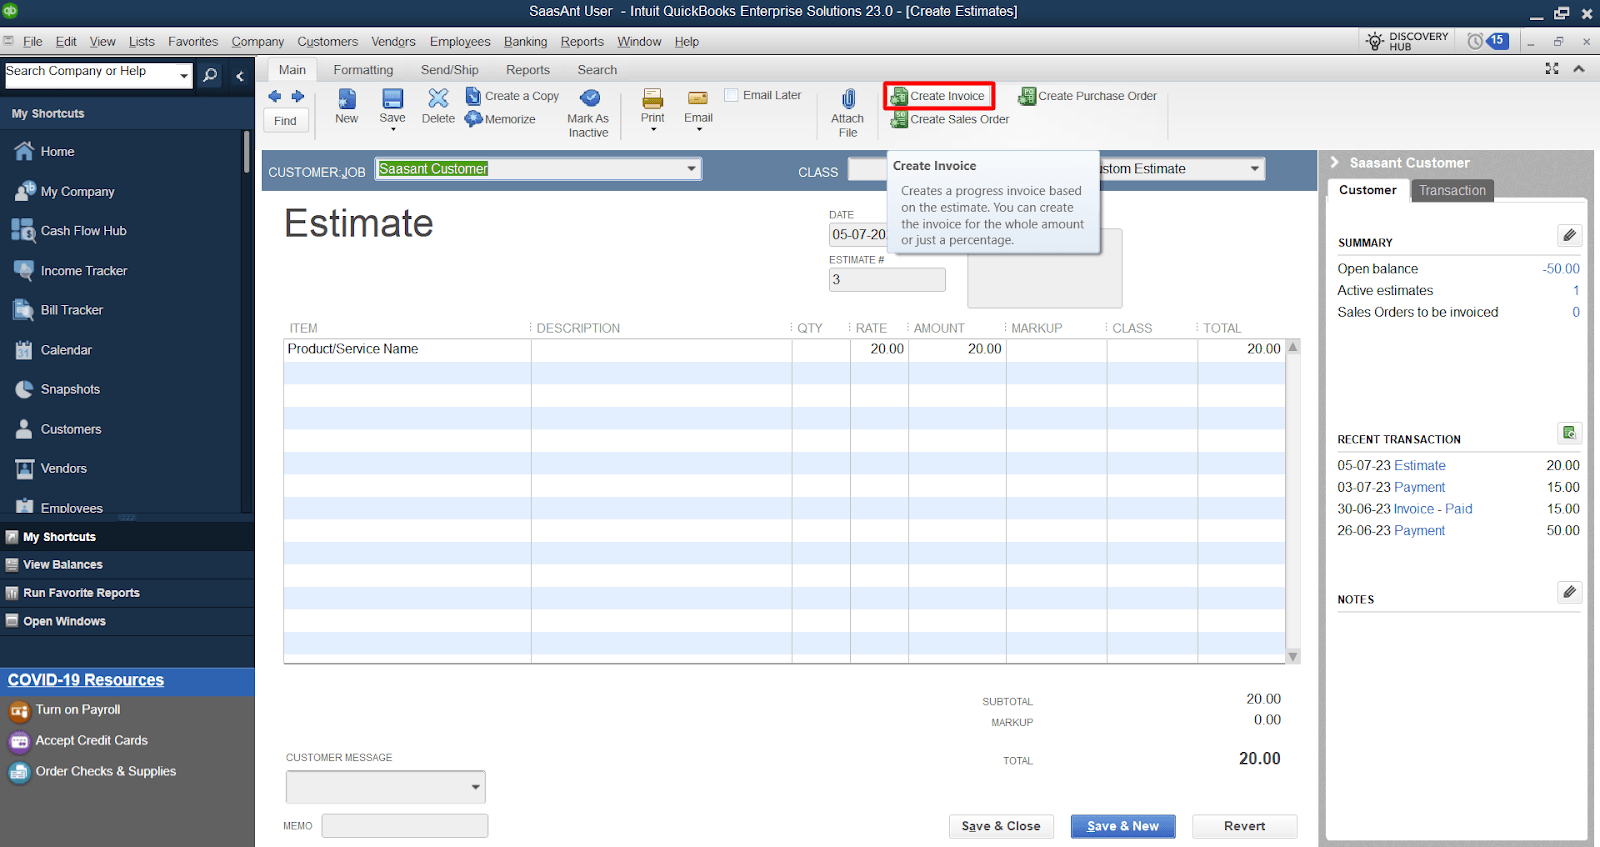
Step 5: Review and Customize the Invoice
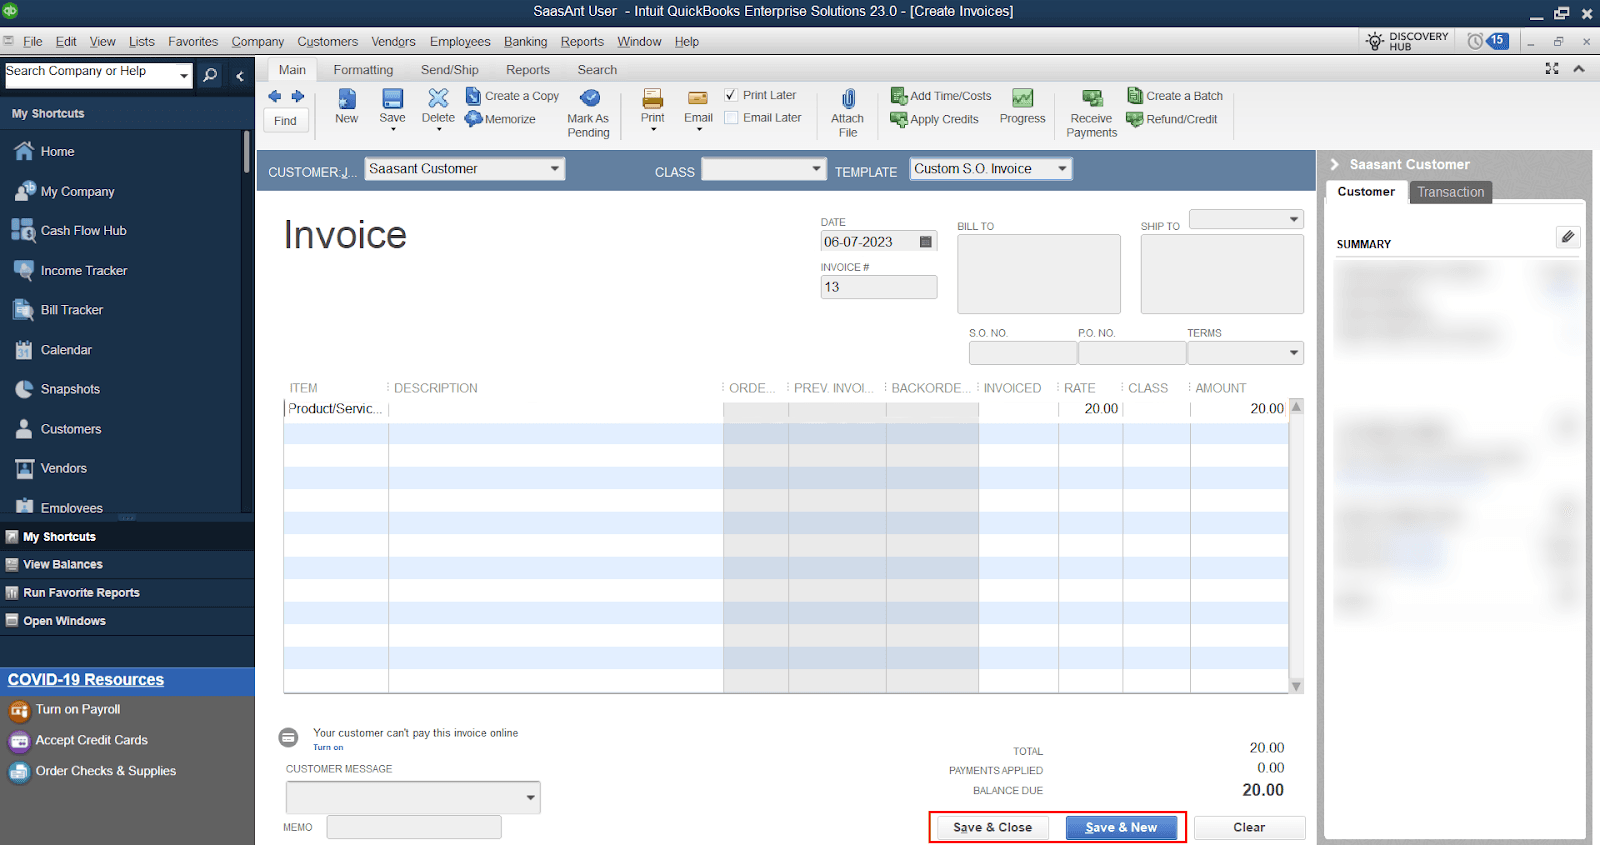
Your estimate will be converted into an invoice once you click the ‘Create Invoice’ option. Review the invoice and make necessary changes or adjustments for the products/services, amount, and date. Double-check the information for accuracy and completeness.
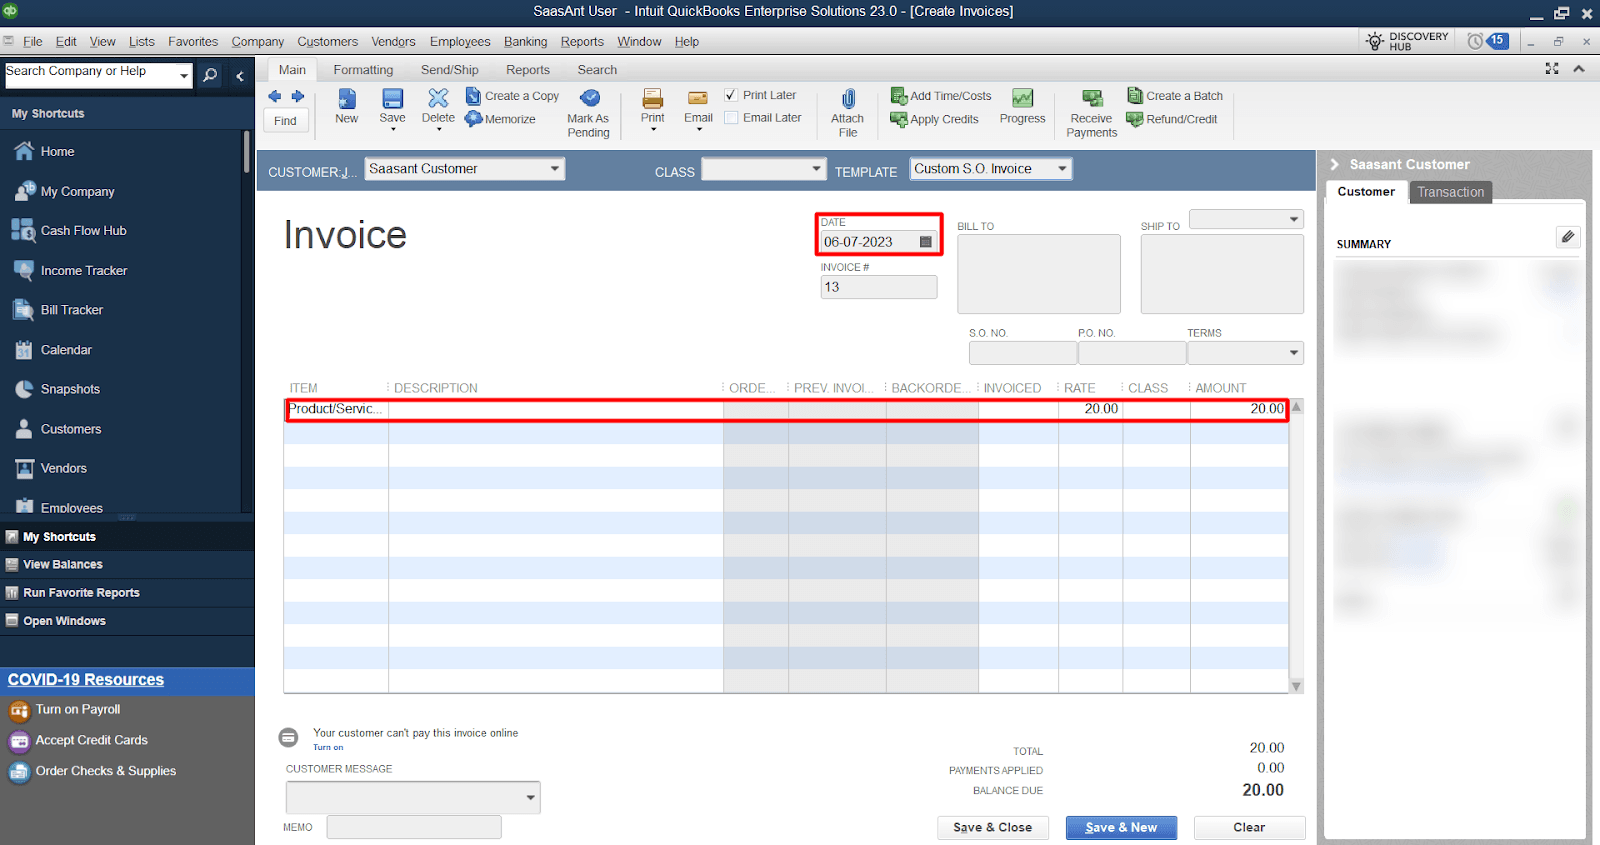
Step 6: Save and Finalize the Invoice
After reviewing and customizing the invoice, click the 'Save & Close' or 'Save & New' buttons to complete the process.
 CTA-Banner-1
FAQs
How Do I Convert an Estimate into an Invoice in QuickBooks Online?
Sign in to QuickBooks Online
Navigate to the ‘Sales’ tab
Select ‘Estimates’ option
You can track the estimates’ status, such as whether it has been viewed, accepted, or declined.
Locate the relevant estimate and click on 'Convert to Invoice.'
Alternatively, you can select the estimate, click 'More Actions,' and choose 'Convert to Invoice.'
Take a moment to preview the invoice in different formats, such as email view, PDF view, and online view. Once satisfied with the invoice, select 'Email' to send to your customer.
How Can I Convert an Estimate into an Invoice in QuickBooks Desktop?
Navigate to the ‘Customers’ menu and select ‘Customer Center.’
Choose the ‘Transactions’ tab and select ‘Estimates’ from the dropdown menu.
QuickBooks Desktop will automatically display the available estimates window. Select the estimate you want to convert.
Select the ‘Create Invoice’ option at the top of the estimate window
The selected estimate will now be converted into an invoice
Review and make any necessary adjustments to the invoice
Click 'Save & Close' or 'Save & New' to complete the conversion process
Can I Convert Only a Portion of the Estimate into an Invoice?
No, QuickBooks allows you to create an invoice for the total estimate, a percentage of the estimate, or selected items with different percentages. You can choose the option that fits your billing requirements.
How Do I Customize the Invoice after Converting It from an Estimate?
After the estimate is converted into an invoice, you can review and modify the invoice as needed. QuickBooks provides options to edit line items, quantities, and rates, add discounts, include additional charges, and personalize the invoice template to match your branding.
Are There Any Settings to Control the Display of Zero-Amount Line Items on the Invoice?
Yes, both QuickBooks Online and QuickBooks Desktop allow you to customize your preferences. Within the 'Jobs and Estimates' category, you can configure settings to hide zero-amount line items from printing on the invoice.
Can I Convert Estimates into Invoices Using Progress Billing in QuickBooks?
Yes, QuickBooks supports progress invoicing, also known as progress billing or partial billing. This feature enables you to create invoices for jobs completed in phases. You can transfer specific items or percentages from the estimate to the invoice based on the progress made on the project.
Will QuickBooks Track Estimated Costs and Revenue against Actual Costs and Revenue?
Yes, when you create invoices from estimates, QuickBooks provides reports that compare estimated costs and revenue with actual costs and revenue. This action helps you analyze project profitability and make informed business decisions.
Can I Convert Estimates into Invoices for Multiple Customers Simultaneously?
No, converting estimates into invoices is performed on a customer-by-customer basis. You need to repeat the steps for each customer and their respective estimates.
Can I convert an estimate into an invoice in QuickBooks Online?
Yes, in QuickBooks Online, you can convert an estimate into an invoice. After a customer accepts your estimate, you can convert it directly into an invoice, linking the two documents and ensuring accurate records. This process saves time by eliminating the need to re-enter information.
How do I convert a quote to an invoice in QuickBooks Online?
In QuickBooks Online, "quote" and "estimate" are often used interchangeably. The process to convert a quote into an invoice is the same as converting an estimate. Follow the steps outlined above to seamlessly transform a quote into an invoice.
Can an estimate be used as an invoice?
An estimate provides a proposed cost for goods or services and is not a request for payment. An invoice, however, is a formal request for payment after the goods or services have been delivered. While you can convert an estimate into an invoice in QuickBooks Online, they serve different purposes and should be used accordingly.
What should I do if I cannot add an estimate to an invoice?
If you're unable to add an estimate to an invoice:
Check the Estimate Status: Ensure the estimate is marked as Accepted or Pending. Estimates with a Rejected status cannot be converted.
Feature Availability: Confirm that your version of QuickBooks Online supports the estimate-to-invoice conversion feature.
User Permissions: Verify that your user role has the necessary permissions to perform this action.
If issues persist, consult QuickBooks Online's help resources or contact their support team.
What feature allows me to add an estimate to an existing invoice?
QuickBooks Online allows you to add items from an open estimate to an existing invoice for the same customer. To do this:
Open the existing invoice.
Click the small arrow above the Balance Due section on the right side of the screen.
A list of open estimates for the customer will appear.
Select the estimate items you want to add to the invoice.
This feature streamlines the billing process by allowing you to combine multiple estimates into a single invoice.
How to Convert an Estimate into an Invoice in QuickBooks Online?
To convert an estimate into an invoice in QuickBooks Online:
Navigate to Sales:
Go to the Sales menu and select All Sales.
Locate the Estimate:
Find and open the desired estimate.
Convert to Invoice:
Click Convert to invoice.
Save the Invoice:
Review the details and click Save.
This process links the estimate to the invoice, ensuring accurate records.