How to Convert from Quicken to QuickBooks
If you've been using Quicken for your personal finances or small business but now require more advanced accounting features, it might be time to switch to QuickBooks. QuickBooks is a robust accounting software solution designed for businesses of all sizes. Making the transition from Quicken to QuickBooks doesn't have to be a daunting task. This step-by-step guide will walk you through converting from Quicken to QuickBooks, ensuring a smooth transition for your financial data.
Step-By-Step Guide for Converting from Quicken to QuickBooks Online
Step 1: Evaluate Your Data and Requirements
Before diving into the conversion process, evaluating your data and accounting needs is essential. Consider the size of your business, the complexity of your financial transactions, and the specific features you require from QuickBooks. This evaluation will help you determine which version of QuickBooks (such as QuickBooks Online or QuickBooks Desktop) fits your needs best.
Step 2: Create a Backup of Your Quicken Data
To ensure that your data remains safe throughout the conversion process, it's crucial to create a backup of your Quicken data:
Open ‘Quicken’
Navigate to the ‘File’ menu
Select ‘Backup and Restore’
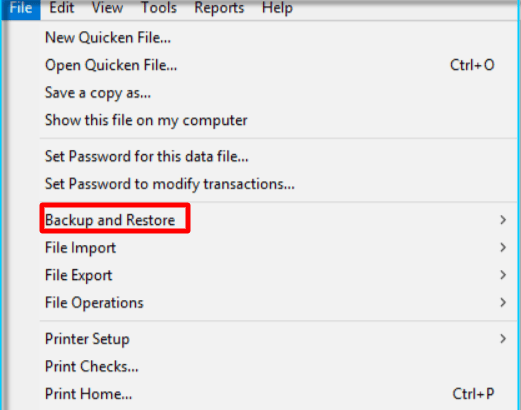
Choose ‘Backup Quicken File’
Save the backup file securely on your computer or an external storage device.
Step 3: Choose the Right QuickBooks Version
Select the appropriate version of QuickBooks for your business based on your evaluation. QuickBooks Online is a cloud-based solution that offers convenience and accessibility. At the same time, QuickBooks Desktop provides more robust features and is typically used by larger businesses or those with complex accounting needs.
Step 4: Set up a QuickBooks Account
If you've chosen QuickBooks Online, visit the official QuickBooks website and sign up for an account. Follow the instructions to create your QuickBooks account, including providing your business details and selecting a subscription plan.
If you've opted for QuickBooks Desktop, you must purchase and install the software on your computer. Follow the installation prompts, enter your license key when prompted, and complete the setup process.
Step 5: Export Data from Quicken
To transfer your data from Quicken to QuickBooks, you need to export your Quicken data in a compatible format:
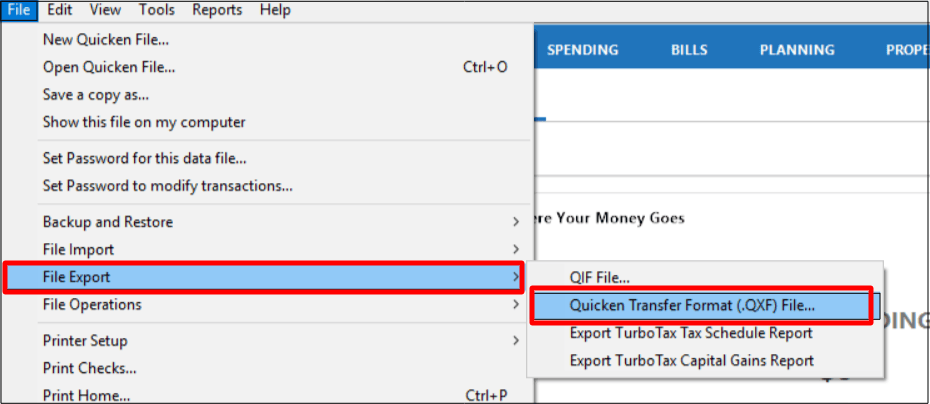
Open Quicken and navigate to the ‘File’ menu
Select ‘Export’
Choose the option to export to a ‘QFX file format,’ which is compatible with QuickBooks Online.
Save the exported file to your computer.
Step 6: Import Data into QuickBooks
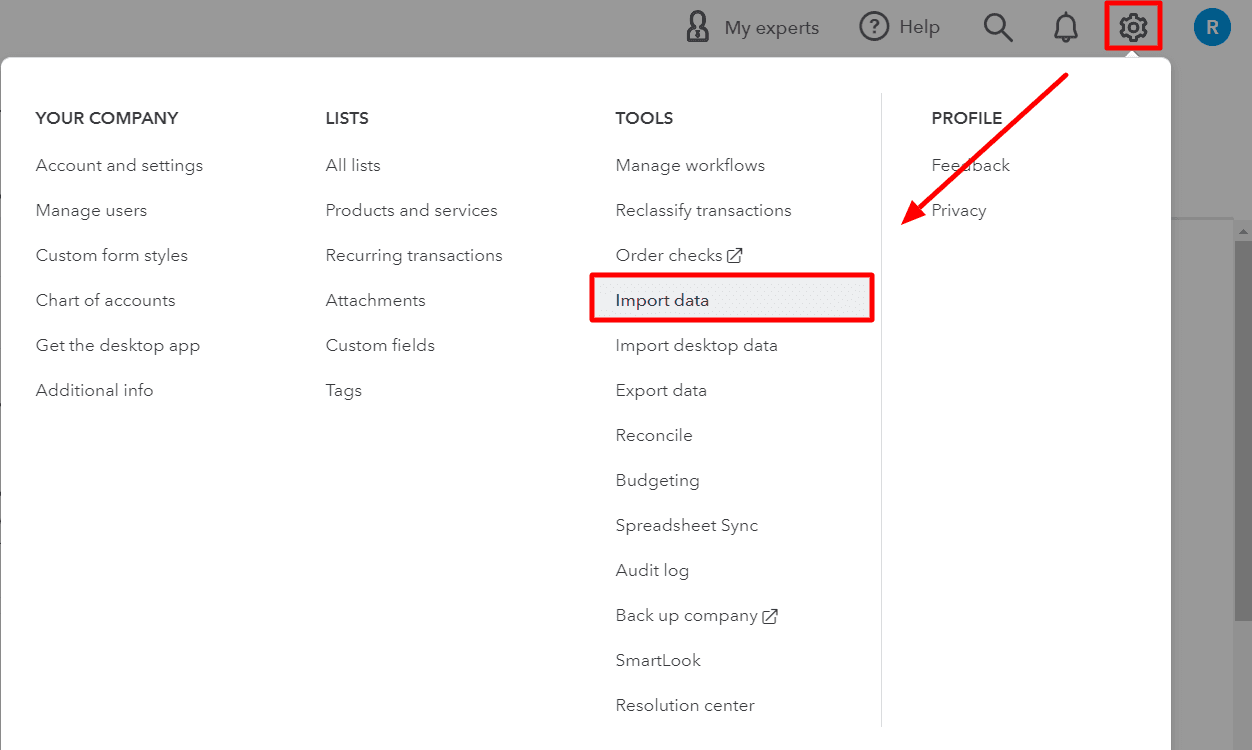
Log in to your QuickBooks Online account. Click the 'Gear' icon in the top right corner of the homepage and select "Imports" under the "Tools" section.
Choose the type of list that you want to import from Quicken.
Click the 'Browse' button and locate the .csv file you exported from Quicken. Then, select 'Open.'
Note: If you prefer, you can download a sample file as a template.
Click ‘Next.’ The "Map data" page will appear, displaying a green checkmark on fields that QuickBooks recognizes. Any fields without a checkmark will show as ‘No Match.’
Use the dropdown menus to map the fields, ensuring the correct data mapping. Click ‘Next’ to proceed.
Review all the entries you will import to confirm their accuracy. Finally, click 'Import' to initiate the import process.
Step 7: Review and Adjust Data in QuickBooks Online
Once your data is imported into QuickBooks Online, reviewing and adjusting any discrepancies or errors is crucial. Check account balances, transaction details, and other financial information to ensure everything has been transferred correctly. You may need to reconcile accounts or adjust based on differences between Quicken and QuickBooks Online.
Step 8: Customize QuickBooks Online
To optimize your experience with QuickBooks Online, customize the settings according to your business requirements. Set up your chart of accounts, add customers, vendors, and employees, and configure other preferences. QuickBooks Online offers various customization options, so explore the settings to tailor the software to your needs.
Step-By-Step Guide for Converting from Quicken to QuickBooks Desktop
Step 1: Create a Backup of Your Quicken Data
To ensure the safety of your data throughout the conversion process, create a backup of your Quicken data:
Open Quicken
Navigate to the ‘File’ menu
Select ‘Backup and Restore’

Choose the option to back up your Quicken data and save it in a secure location.
Step 2: Purchase and Install QuickBooks Desktop
If you haven't already, purchase the appropriate version of QuickBooks Desktop for your business needs.
Step 3: Determine When to Use Quicken Converter:
Quicken Converter is required if you're moving from a Quicken version that is not a parallel version of your QuickBooks Desktop (e.g., Quicken 2018 to QuickBooks Pro, Premier, or Enterprise 2021).
Note: Quicken Converter and the Conversion Utility in QuickBooks cannot transfer Quicken for Mac data files. If you have Quicken for Mac, move your data file to Quicken for Windows or create a new QuickBooks company file.
Step 4: Use the Quicken Converter
Before proceeding, ensure that no other version of the Quicken Converter is installed. If you have an older version, uninstall it from your computer. Download the appropriate version of the converter tool based on your QuickBooks Desktop year version.
Step 1: Install the Quicken Converter by following the on-screen instructions.
Step 2: Open the Quicken Converter and click ‘Next.’
Step 3: Accept the license agreement and click ‘Next.’
Step 4: Proceed with the installation by clicking 'Next' and 'Install.'
Step 5: Launch the Quicken Converter by selecting ‘Launch Quicken Converter’ and
click Finish
Step 6: Choose the option ''I am transferring data from Quicken for Windows" and click.
'Get Started.'
Step 7: Select ‘Open a data file located on this computer’ and click ‘Select File.’
Step 8: Browse and select your ‘Quicken file (.QDF)’ and click ‘OK.’
Step 9: Click ‘Convert it’ and then ‘OK.’
Step 10: Save your new Quicken Data File (.QDF) by selecting 'Save' and 'Exit.'
Note: The Quicken Converter generates two files, a .QFX and a .QDF. Use the.QDF file for moving your Quicken data into QuickBooks Desktop. Look for the upgraded.QDF file in the same folder as your original Quicken file. It will be in a folder named QXXFiles, where XX represents the version to which the file was upgraded.
Step 5: Use the Conversion Utility
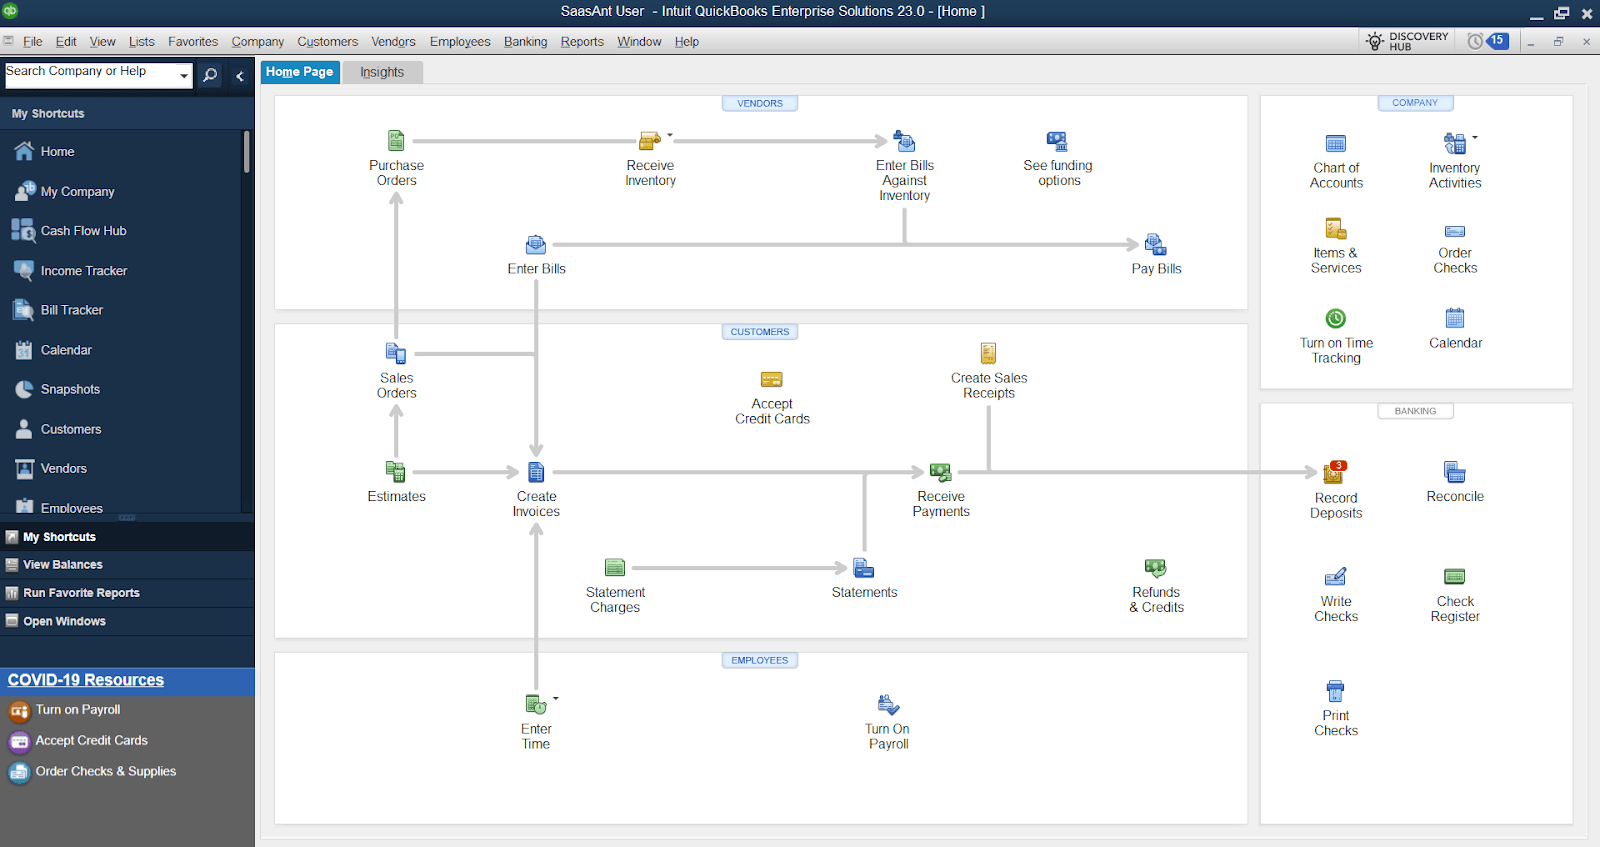
Launch QuickBooks Desktop and navigate to ‘File.’
Select ‘Utilities’ and then ‘Convert.’
Choose ‘From Quicken’ in the Conversion Utility
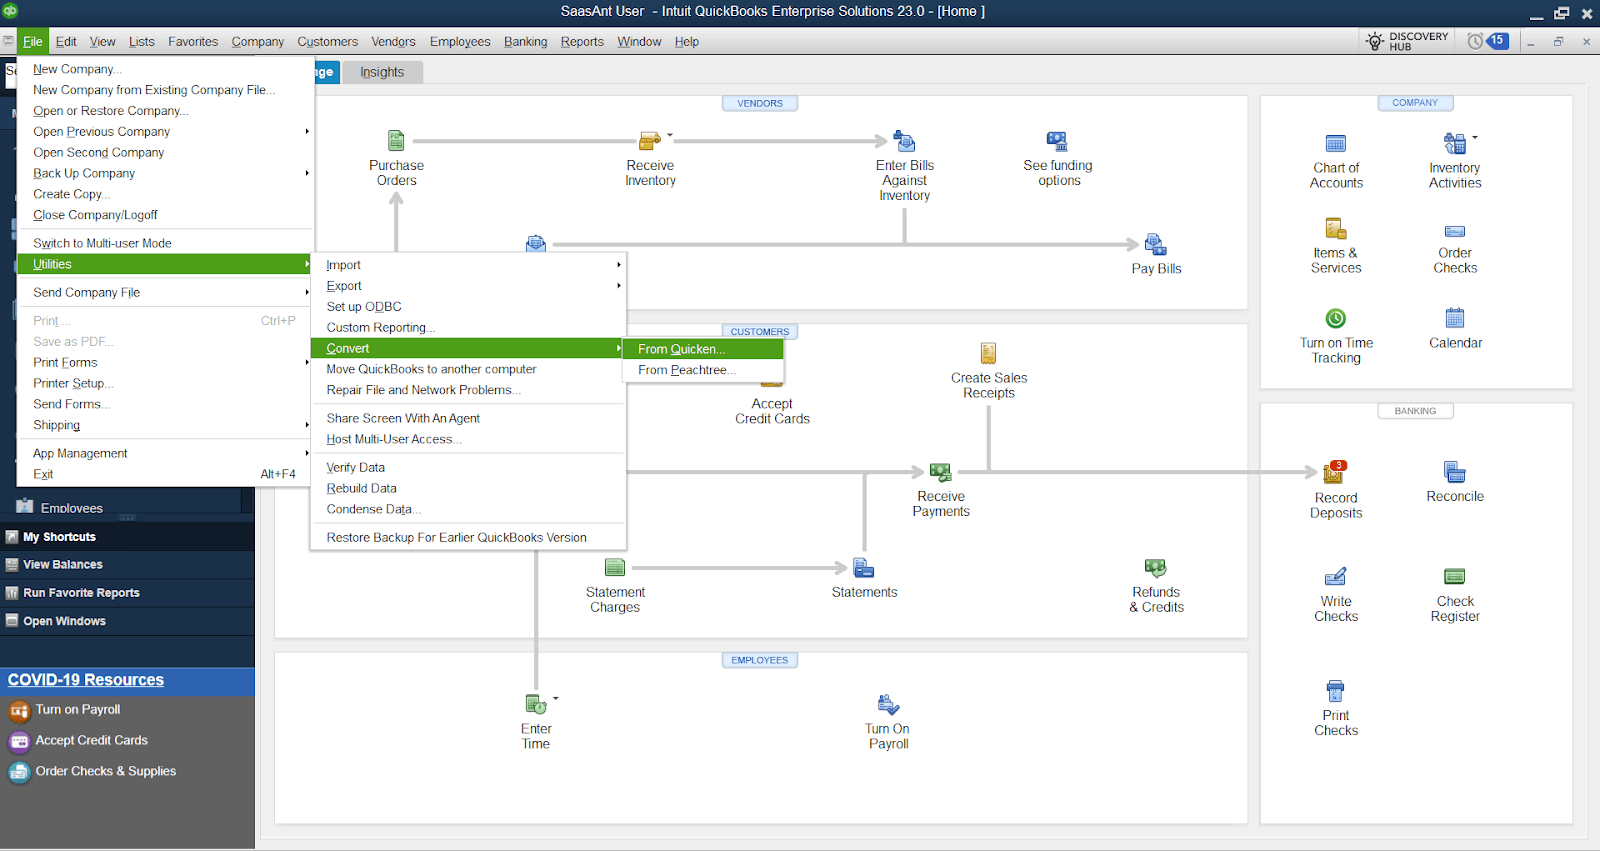
Browse and select the Quicken file (.QDF) that you want to move
Follow the prompts provided by the Conversion Utility to complete the conversion process
For more detailed instructions about the Conversion Utility, press ‘F1’ within QuickBooks Desktop to access the ‘Help’ window and type ‘Convert from Quicken.’

FAQs
Q1: What Is the Difference between Quicken and QuickBooks?
Quicken is a personal finance management tool primarily used for managing personal finances, while QuickBooks is a comprehensive accounting software designed for small businesses.
Q2: Why Would I Want to Convert from Quicken to QuickBooks?
If you are a business owner or your financial needs, have outgrown the capabilities of Quicken, converting to QuickBooks can provide you with more advanced accounting features, improved reporting, and better scalability for your business.
Q3: What Data Can I Transfer from Quicken to QuickBooks Online?
The data you can transfer from Quicken to QuickBooks Online includes your chart of accounts, customer information, vendor information, transactions, and balances. However, not all data may be compatible, and some manual adjustments may be required.
Q4: How Do I Convert My Quicken Data to QuickBooks Desktop?
To convert your Quicken data to QuickBooks Desktop, follow these steps:
Install and use the Quicken Converter or Conversion Utility, depending on the versions involved
Open the Quicken Converter and select 'transfer data from Quicken for Windows.'
Select your Quicken file (.QDF) and convert it to a compatible version of Quicken (.QDF)
Once converted, use the Conversion Utility in QuickBooks Desktop to import the converted data
Q5: Can I Convert Quicken for Mac Data to QuickBooks Online?
The Quicken Converter and QuickBooks Conversion Utility cannot convert Quicken for Mac data. You must find alternative methods, such as exporting your data from Quicken for Mac and manually importing it into QuickBooks Online.
Q6: Can I Convert My Quicken Data to QuickBooks Desktop for Free?
Yes, Intuit provides a free conversion tool called "Quicken Converter," which can help you migrate your Quicken data to QuickBooks Desktop. You can download this tool from the Intuit website.
Q7: Will All My Data from Quicken Transfer to QuickBooks?
While most of your financial data should transfer successfully, some variations in the data may result in differences between Quicken and QuickBooks. To ensure accuracy, reviewing and reconciling your data thoroughly after the conversion is recommended.
Q8: Can I Simultaneously Convert My Quicken Data to QuickBooks Online and QuickBooks Desktop?
No, the conversion process must be performed separately for QuickBooks Online and QuickBooks Desktop. You must choose the QuickBooks platform that suits your needs best and convert your Quicken data accordingly.
Tags
Read also
How to Edit Multiple Transactions in QuickBooks
How to Delete Multiple Transactions in QuickBooks Online
Accounting Automation with SaasAnt Transactions: Streamline Your Financial Processes