How to Fix Error Code 6175 in QuickBooks

Error Code 6175 in QuickBooks typically occurs when turning on the multi-user mode. This error can be challenging to tackle, but with a systematic approach, you can resolve it. This guide provides a step-by-step process to help you fix this error.
Contents
Step 1: Review Your Hosting Settings:
Step 2: Use QuickBooks File Doctor:
Step 3: Review Your Hosting and User Settings:
Frequently Asked Questions
Step 1: Review Your Hosting Settings:
A. Check Your Settings on Your Workstations:
Your PC might have been misconfigured as the server for QuickBooks. QuickBooks uses a database server to manage access to company files. If a workstation (a computer that's not the main server) is incorrectly set up as the server, it can cause issues due to insufficient resources or permissions. This can happen due to incorrect installation or network settings. To fix this, ensure only the main computer is set up as the server and that workstations are configured to access files from this server, not host them.
Follow these steps to check and modify your settings:
Launch QuickBooks on the PC that displays error messages such as H101, H303, H505, or 6175.
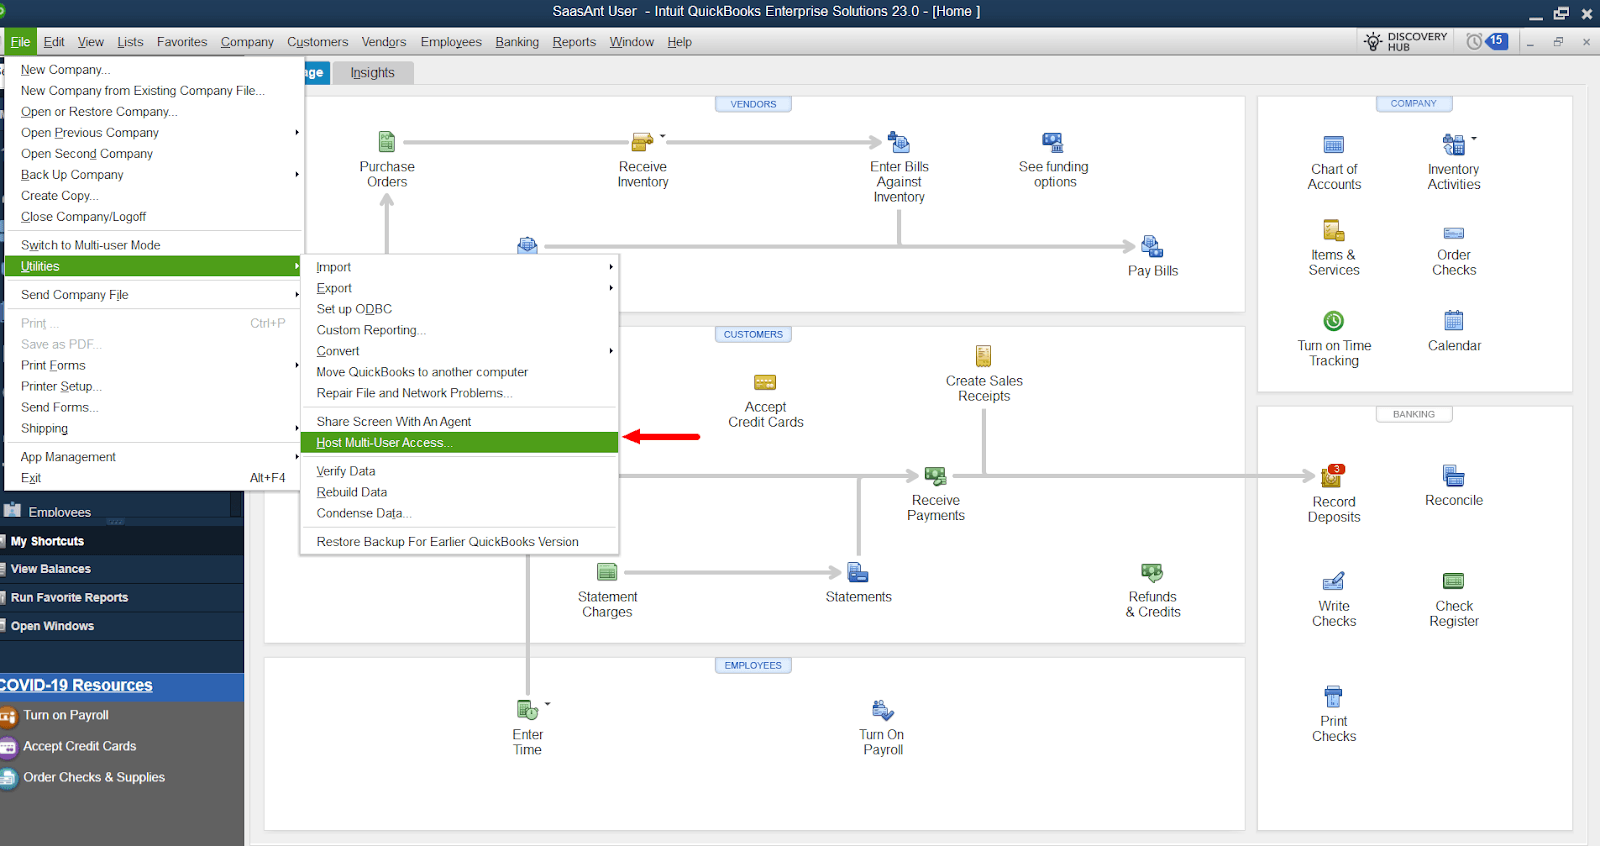
Open the File menu and hover over Utilities.
If you see the 'Host Multi-User Access' option, don’t select it. Move on to the next PC. This one isn’t causing the problem.

If 'Stop Hosting Multi-User Access' is an option, select it.
Repeat these steps on all workstations that are connected to the server.
B. Check Your Server Settings:
This issue depends on whether you have the full version of QuickBooks Desktop installed on your server or just the Database Server Manager.
If you have the full version of QuickBooks Desktop installed:
Open QuickBooks on your server computer.
Open the File menu and click Utilities.
If 'Host Multi-User Access' is an option, select it. Repeat this process and select 'Stop Hosting Multi-User Access.' This resets multi-user mode.

Repeat the process one more time and select 'Host Multi-User Access' to resolve this issue.
You must scan your company file folder if you only have the Database Server Manager installed on your server.
Step 2: Use QuickBooks File Doctor:
If the error persists after reviewing your hosting settings, you can use the QuickBooks File Doctor tool. Here's how to do it:
A. Download and install QuickBooks Tool Hub:
Close QuickBooks.
Download the most recent version of the QuickBooks Tool Hub.
Open the downloaded file (QuickBooksToolHub.exe).
Follow the on-screen steps to install and agree to the terms and conditions.
Double-click the icon on your Windows desktop to open the tool hub when the installation finishes.

B. Run Quick Fix my File:
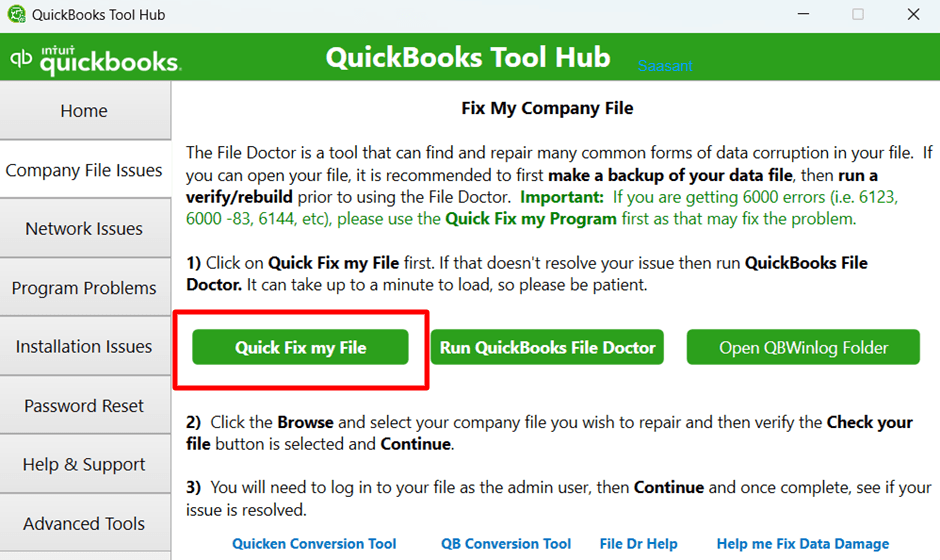
From the QuickBooks Tool Hub, select Company File Issues.
Select Quick Fix My File.
Select OK when it completes and launch your QuickBooks.

C. Run QuickBooks File Doctor:
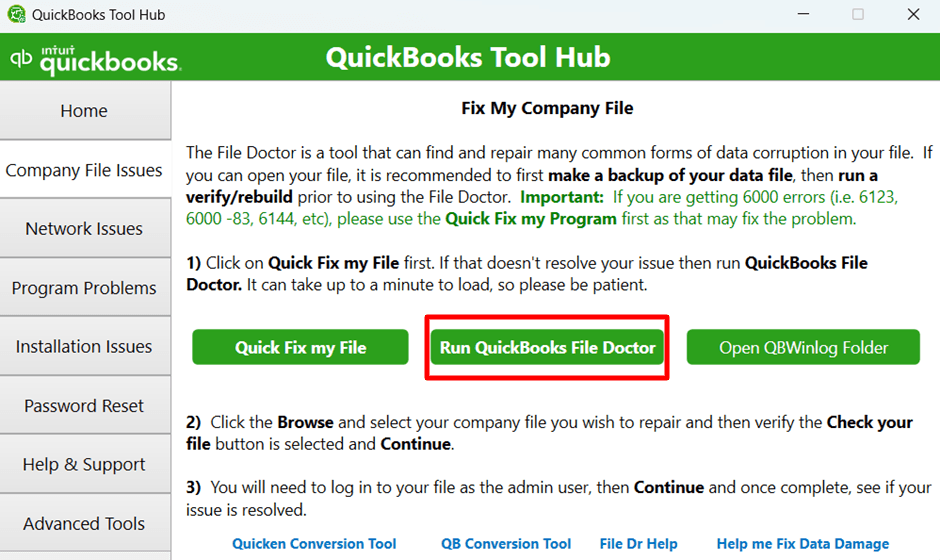
From the tool hub, select Company File Issues.
Select ‘Run QuickBooks File Doctor.’ It can take up to one minute for the file doctor to open.

Select your company file from the drop-down menu in QuickBooks File Doctor. If you don’t see your file, select Browse and Search to find your file.
Select Check your file (middle option only) and then Continue.
Enter your QuickBooks admin password and then select Next. The scan may take up to 10 –15 minutes.
Step 3: Review Your Hosting and User Settings:
This involves checking your Windows User settings and your Firewall settings.
Review Windows User Settings
The goal is to ensure that the QuickBooks-specific user, `QBDataServiceUser,’ has administrative privileges. Here's how you can do this:
Press the Windows key + R to open the 'Run' dialog box.
Type 'Control Panel' in the text field, click OK, or press Enter.
Click 'Change account type' in the Control Panel window under 'User Accounts.'
You should see a list of users on your computer. Find `QBDataServiceUser` (The version number may vary based on your QuickBooks version, e.g., `QBDataServiceUser28` for 2018).
Click on `QBDataServiceUser` to open its account.
Make sure to use the Administrator user account. If not, change it to have Administrator rights.
Review Firewall Settings
The goal is to ensure that crucial QuickBooks components have full access to your firewall. Here's how you can do this:
Type 'Firewall' in the Windows Search Bar and select 'Windows Defender Firewall.'
Click 'Allow an app or feature through Windows Defender Firewall' on the left pane.
Click 'Change settings' to enable changes. You may need administrative rights to do this.
Scroll through the list and ensure `QBW32.exe`, `QBUpdate.exe,` `QBDBMgr.exe,` and `QBDBMgrN.exe` are present and checked.
If any of these are missing, you need to add them. Click 'Allow another app,' browse for each file (usually found in the Intuit folder in Program Files), and add them.
After adding, ensure to check the boxes for both the 'Private' and 'Public' network types for these files.
Following these steps should help you resolve Error 6175 in QuickBooks. If the error persists, contact QuickBooks support for further assistance. It's crucial to remember that troubleshooting technical issues can be complex, so if you need clarification on any steps, seek professional help.
Frequently Asked Questions
What is Error Code 6175 in QuickBooks?
Error Code 6175 in QuickBooks, occurs when QuickBooks Desktop cannot start the QuickBooksDB service needed for the multi-user mode, often because the service is busy or blocked by a firewall or system security settings.
What are some common causes of Error Code 6175 in QuickBooks?
Common causes can include problems with the QuickBooks Database Server Manager, the server hosting the company file being busy, or firewall software blocking communication.
How can I resolve Error Code 6175 in QuickBooks?
There are several solutions to this issue. These can include checking if the server hosting the company file is working properly, ensuring the QuickBooks Database Server Manager is running correctly, and checking your firewall settings. Always remember to back up your data before making any changes.
How can I prevent Error Code 6175 from occurring in the future?
Regular system maintenance, ensuring that the Database Server Manager is properly configured, and regularly updating your firewall settings can help prevent this error. Always ensure you are running the latest version of QuickBooks.
What should I do if I can't resolve Error Code 6175?
If you've tried the troubleshooting steps and the error persists, it is recommended to get in touch with QuickBooks Support or a tech-savvy professional who can analyze your specific situation.
Can Error Code 6175 cause data loss in QuickBooks?
While Error Code 6175 is typically related to connection issues and doesn't directly cause data loss, any error in QuickBooks can potentially harm your data. It's always crucial to regularly back up your QuickBooks company file to protect your data.