How to Install and Use the QuickBooks Database Server Manager
In a multi-user environment, the key to success lies in utilizing tools that deftly manage shared resources. QuickBooks, a well-known accounting software suite, fulfills this need by providing the QuickBooks Database Server Manager (QBDSM). The QuickBooks Database Server Manager (QBDSM) is an essential tool that empowers users to set up the QuickBooks Server for multi-user access, boosting effectiveness and productivity within a group or business entity. Nonetheless, some users might find installing and utilizing the QBDSM complex. This article aims to simplify this process, actively presenting a comprehensive, step-by-step tutorial where you’ll learn how to install and set up QuickBooks Database Server Manager.
Contents
What Is a QuickBooks Database Server Manager?
Step-By-Step Guide for Installing QuickBooks Database Server Manager Using QuickBooks Tool Hub
Step-By-Step Guide for Using the QuickBooks Database Server Manager
FAQs
What Is a QuickBooks Database Server Manager?
The QuickBooks Database Server Manager (QBDSM) is a feature included with QuickBooks Desktop, created to assist users in managing multi-user network setups. This utility enables the configuration of QuickBooks Server for multi-user access by generating network data (.ND) files for every company file stored on the host workstation or server. These ‘.ND’ files store essential information about a company file's resources to access over a network. With QBDSM, multiple users can work on the same company file concurrently, enhancing team productivity.
The QuickBooks Database Server Manager (QBDSM) comes with multiple critical features designed to optimize the performance of QuickBooks in a multi-user setting:
Collaborative Working Environment
Also known as multi-user access, one of QBDSM's primary functionalities is facilitating multiple users' concurrent work on the same QuickBooks company file, promoting team productivity and collaboration.
Efficient File Identification
The QuickBooks Database Server Manager (QBDSM) includes a feature known as the 'Company File Scan.' This tool can scan hard drives to identify and catalog QuickBooks company files, which is pivotal in configuring these files for multi-user access.
Creation of Network Data Files
The 'Network Data (.ND) Files Creation' feature in QBDSM allows multi-user access. During scanning, QBDSM generates ‘.ND’ files for every company file on the host workstation, making multi-user access possible.
Robust Server Monitoring
The 'Database Server Management' feature of QBDSM actively oversees the database server housing the company files. It provides crucial information such as the status of the QuickBooks Database Server service, the server's IP address, and more.
Automatic System Update
The 'Update Feature' ensures that QBDSM stays current and compatible. When a workstation installs a newer version of QuickBooks Desktop, QBDSM self-updates to function optimally with the updated version.
Smart Drive Monitoring
The 'Monitored Drives Feature' within QBDSM actively tracks the hard drives that store QuickBooks company files. This feature ensures QBDSM automatically handles user permissions and generates ‘.ND’ files when introducing a new company file.
Step-By-Step Guide for Installing QuickBooks Database Server Manager Using QuickBooks Tool Hub
Step 1: Download QuickBooks Tool Hub
Start by visiting Intuit’s official website and downloading the QuickBooks Tools Hub.
Step 2: Access Downloads
Open the 'Downloads' folder by pressing the Ctrl + J keys simultaneously.
Step 3: Run the Installer
Locate the QuickBooksToolsHub.exe file in your downloads and click on it.

Step 4: Allow Changes
A permission prompt will appear, seeking your approval to let the application modify your device. To move forward, please choose 'Yes.'
Step 5: Begin Installation
Click 'Next' to start the installation process. When the license agreement appears, accept it by clicking 'Yes.'
Step 6: Continue with Installation
Proceed with the installation by selecting 'Next' and 'Install.' Be patient, as the installation may take a few minutes.
Step 7: Complete Installation
Once the installation is complete, finish the process by selecting the 'Finish' button.
Step 8: Open QuickBooks Tool Hub
Locate and open the QuickBooks Tool Hub icon on your desktop.

Step 9: Select QuickBooks Database Server Manager
Within the ‘QuickBooks Tool Hub,’ navigate to the 'Network Issues' tab. Here, you'll find the ‘QuickBooks Database Server Manager’ option. Click on it.
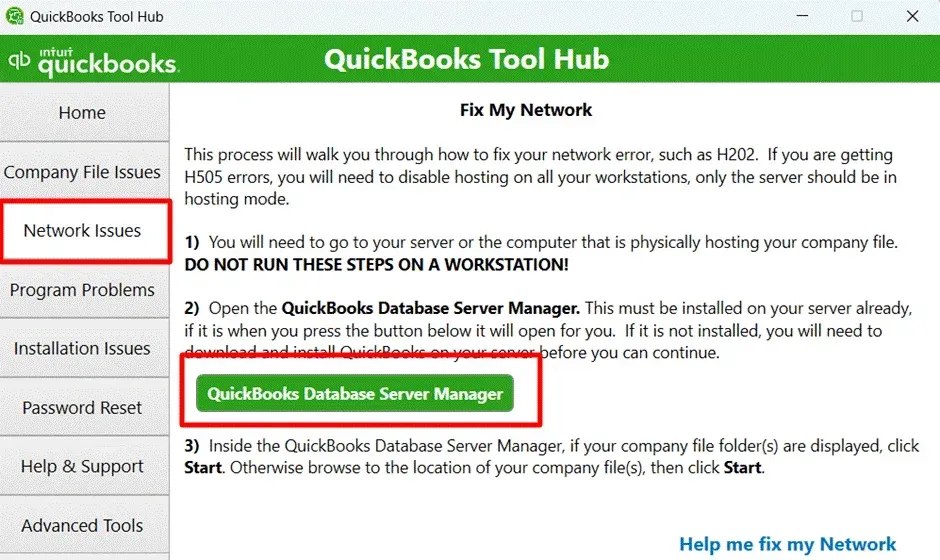
Step 10: Complete the Process and Set Permissions
Once the process is complete, ensure that all users have permission to access the company folders. By default, QuickBooks Database Server Manager creates a unique user for each installation, simplifying user management.
Step-By-Step Guide for Using the QuickBooks Database Server Manager
Step 1: Open QuickBooks Database Server Manager
Navigate to the ‘Windows Start’ menu, type 'Database' into the search bar, and click on ‘QuickBooks Database Server Manager.’

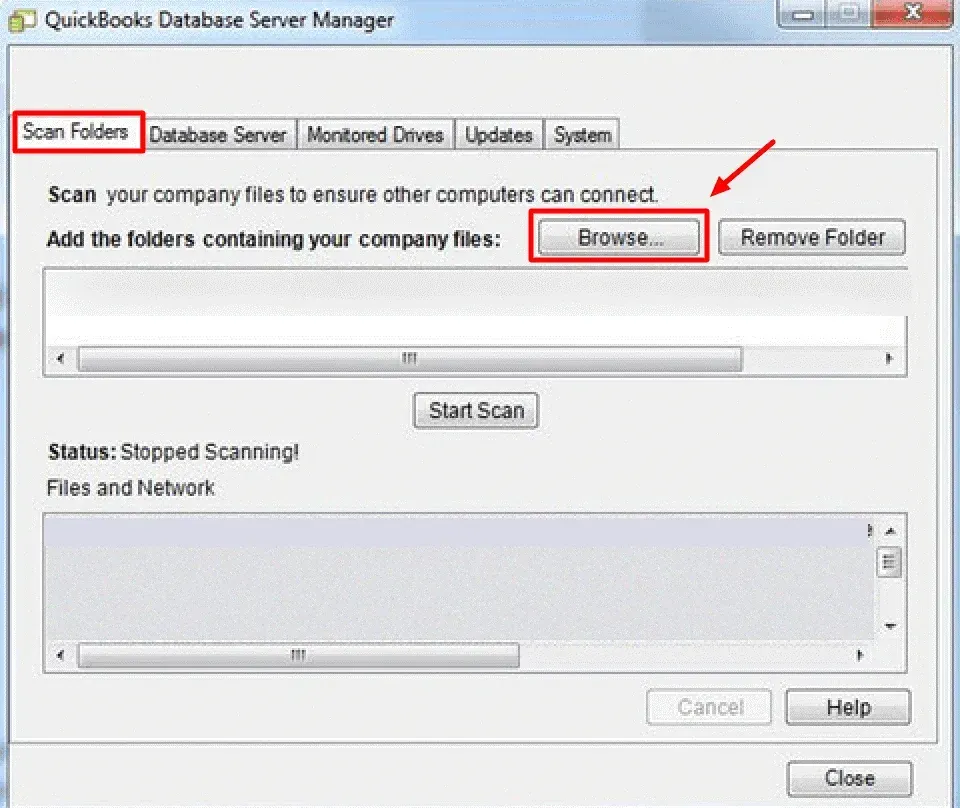
Step 2: Add Your Company Files
In the QBDSM window, navigate to the 'Scan Folders' tab and click 'Browse' to add the folder. Find and select the folder containing your company files. Click 'OK' to add the folder to the QBDSM.
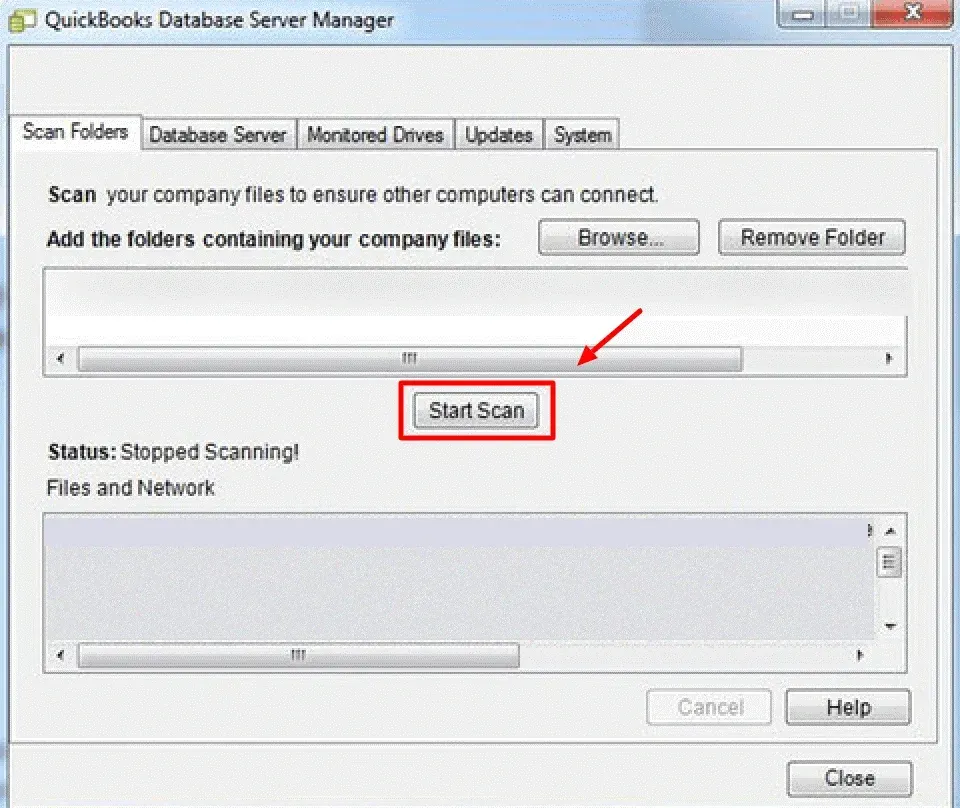
Step 3: Scan the Folders
After adding the folder, click the 'Scan' button. The QBDSM will scan the folder, create network data files, and set up necessary permissions for multi-user access.
Step 4: Confirm the Company Files
After the scan concludes, visit the 'Scan Results' tab to confirm the successful detection of your company files. These files are now ready for multi-user access.
Step 5: Monitor Your Drives
Leverage the 'Monitored Drives' feature to oversee your company files. By identifying the drives that store your company files, the QBDSM will supervise these locations and automatically manage permissions whenever a new company file is introduced.
Note: The QBDSM must always run on the server computer to ensure multi-user access. The tool operates in the background, so it doesn't interfere with other tasks.
FAQs
What is QuickBooks Database Server Manager?
QuickBooks Database Server Manager is a utility used with QuickBooks Desktop, allowing multiple users to access the same company file simultaneously.
Why Do I Need QuickBooks Database Server Manager?
Use the QuickBooks Database Server Manager if you plan to use QuickBooks in a multi-user environment. It enables multiple users to access the same QuickBooks company file concurrently.
How Can I Scan Folders with QuickBooks Database Server Manager?
After launching the QuickBooks Database Server Manager, switch to the 'Scan Folders' tab. Here, you can add folders that contain your company files. After adding these folders, press the 'Scan' button to let the tool identify and prepare the company files for multi-user access.
How Does QuickBooks Database Server Manager Create .ND Files?
Using the QBDSM to scan the folders containing your company files creates a Network Data (.ND) file for each company file it identifies. These .ND files store the information needed to access the company files over a network.
Can QuickBooks Database Server Manager Update Itself?
Yes, the QBDSM automatically updates itself to ensure compatibility whenever a new version of QuickBooks Desktop is installed on a workstation.
How Does the Monitored Drives Feature Work in QuickBooks Database Server Manager?
The 'Monitored Drives Feature' lets QBDSM monitor the hard drives storing QuickBooks company files. This functionality ensures that QBDSM can efficiently handle permissions and generate .ND files whenever a new company file is introduced to these drives.
How do I install Database Server Manager in QuickBooks?
It is a straightforward process if you’re wondering how to set up Database Server Manager in QuickBooks. First, ensure that you have the latest version of QuickBooks Desktop installed on the server computer where your company file is located. Then, insert the QuickBooks installation CD or download the QuickBooks installation file from the Intuit website. Run the installation wizard and follow the steps to install QuickBooks on the server computer. You will be prompted to choose the installation type when installing QuickBooks Database Server. Select the option for "Custom" or "Network" installation, which includes the Database Server Manager. Once the installation is complete, open QuickBooks and follow the on-screen instructions to set up the Database Server Manager. After configuration, the Database Server Manager will run in the background, allowing multiple users to access the company file simultaneously.
What is the significance of the QuickBooks Database Server Manager, and how does it relate to the version of QuickBooks Desktop?
The QuickBooks Database Server Manager facilitates multi-user access to QuickBooks company files over a network. It creates Network Data (.ND) files for each company file, enabling multiple users to work concurrently. The version of QuickBooks Desktop installed on the server computer where the company file is hosted must be compatible with the QuickBooks Database Server Manager to ensure smooth functionality. Upgrading or downgrading the QuickBooks Desktop version may require corresponding updates or adjustments to the QuickBooks Database Server Manager to maintain compatibility and optimal performance.
How can I configure QuickBooks to enable multi-user access using the QuickBooks Database Server Manager?
To configure QuickBooks for multi-user access, you must utilize the QuickBooks Database Server Manager. First, ensure that QuickBooks is installed on the host computer where your company files are stored. Then, install the QuickBooks Database Server Manager on the same host computer. Once installed, open the QuickBooks Database Server Manager and scan the folders containing your company files. This process creates Network Data (.ND) files for each company file, allowing multiple users to access them simultaneously over the network. Finally, set up user permissions and ensure the QuickBooks Database Server Manager runs in the background to facilitate seamless multi-user access to your company files.
What are the system requirements for QuickBooks Database Server Manager?
QuickBooks Database Server Manager requires specific system configurations to function optimally. The minimum requirements typically include a compatible Windows operating system version, sufficient disk space, and adequate RAM. Additionally, the server hosting QuickBooks Database Server Manager should have a stable internet connection and meet other network requirements for multi-user access. It's crucial to review the official documentation provided by QuickBooks to ensure your system meets these requirements before installing the Database Server Manager.
How can I enable multiple users to access QuickBooks Desktop on a server?
To enable QuickBooks Desktop on a server, ensure you have the necessary permissions and licenses. Then, install QuickBooks Desktop on the server computer following the installation instructions provided. Choose the appropriate installation type to configure QuickBooks for multi-user access during setup. Once installed, users can access QuickBooks Desktop remotely or directly from their workstations.
Can I configure QuickBooks Desktop on this computer to act as a server?
Yes, you can configure QuickBooks Desktop on this computer to function as a server. Install QuickBooks Desktop on the designated computer, ensuring it meets the system requirements for hosting the company file. During installation, select the appropriate installation type to configure QuickBooks for multi-user access. Once configured, users can access QuickBooks Desktop on this computer from other workstations within the network.
How do I set up QuickBooks Desktop on your server for multi-user access?
Setting up QuickBooks Desktop on your server for multi-user access involves installing QuickBooks Desktop on the server computer. Ensure the server meets the system requirements and has sufficient resources to host the company file. During installation, choose the appropriate installation type to configure QuickBooks for multi-user access. Once installed, users can access QuickBooks Desktop on your server remotely or directly from their workstations.
What steps are involved in configuring the QuickBooks server for multi-user access?
Configuring the QuickBooks server for multi-user access requires installing QuickBooks Desktop on the server computer. Ensure the server meets the system requirements and has adequate resources to host the company file. During installation, select the option to configure QuickBooks for multi-user access. Once installed, follow the on-screen instructions to set up QuickBooks Server Manager and configure user permissions for seamless multi-user functionality.