How to Map 1099 Accounts in QuickBooks Online
A 1099 account refers to an account that tracks payments made to independent contractors or vendors. The IRS requires businesses to issue this form to any individual or unincorporated business that paid $600 or more in a given tax year for services rendered. It is part of the business's tax obligations and helps the IRS track income.
This article will guide you on how to create and map 1099 accounts in QuickBooks Online.
Contents
What is a 1099 Account?
Eligibility for Vendors
Steps for Creating A New 1099 Account
Mapping 1099 Accounts with QuickBooks Online
Review and Print 1099 Forms
Why is it Important to Map 1099 Accounts to QuickBooks Online?
Conclusion
Frequently Asked Questions
What is a 1099 Account?
A 1099 account is a type of account in QuickBooks Online that tracks payments made to independent contractors. These payments are typically subject to 1099 reporting, meaning you must report the payments to the IRS and the contractor.
Eligibility for Vendors
Not all vendors are eligible for 1099 reporting. To be eligible, a vendor must meet the following criteria:
The vendor should be an independent contractor.
The vendor must be paid $600 or more during the year.
The vendor cannot be your employee.
Steps for Creating A New 1099 Account
Creating a new 1099 account in QuickBooks Online involves setting up a new expense account that you'll use to track payments to a 1099 vendor. Here are the steps:
Sign in to QuickBooks Online: Open your web browser and navigate to the QuickBooks Online login page. Enter your username and password to sign in.
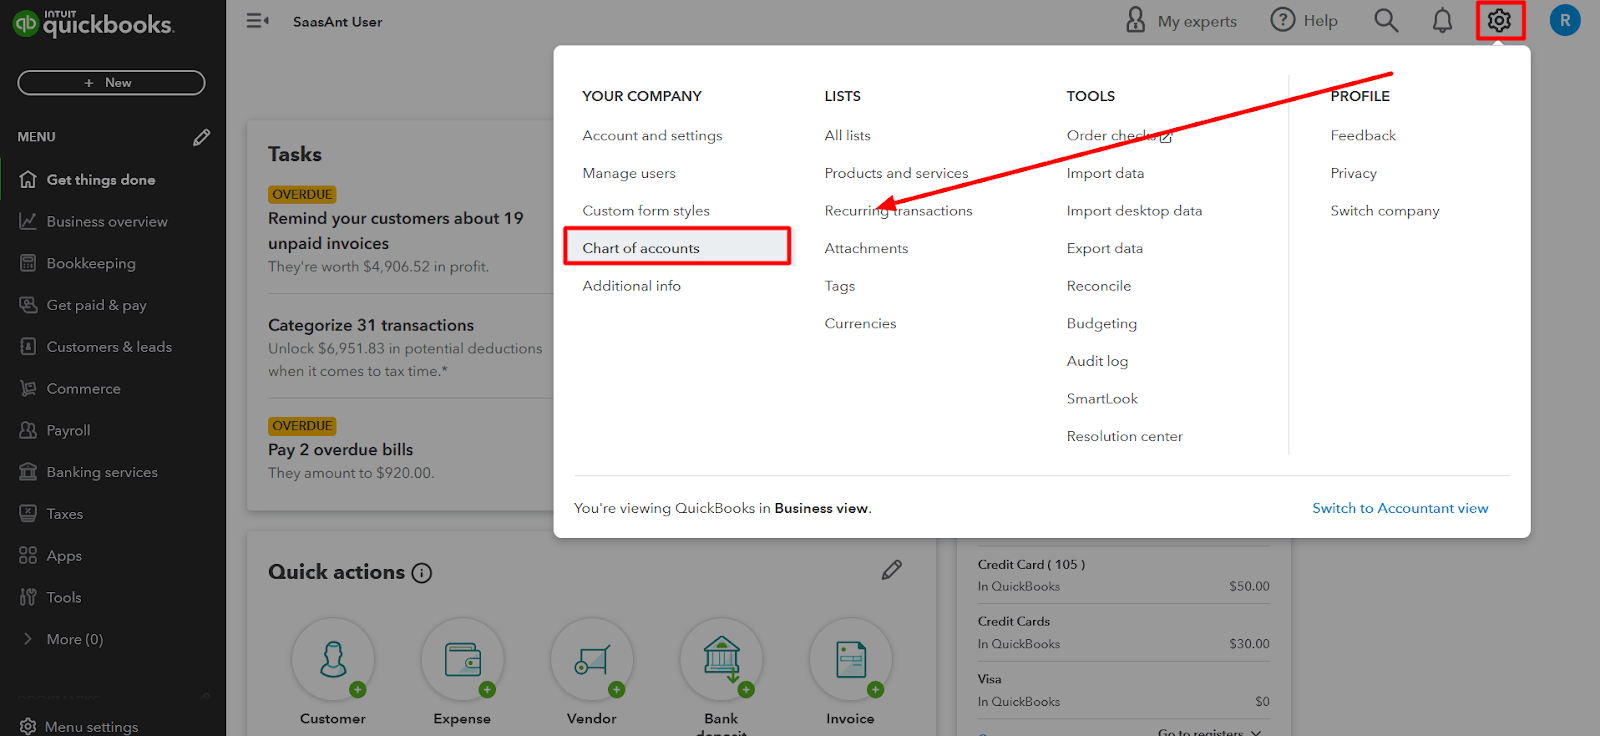
Access the Chart of Accounts: Once logged in, click ‘Settings’ (gear icon) and select ‘Chart of Accounts.’
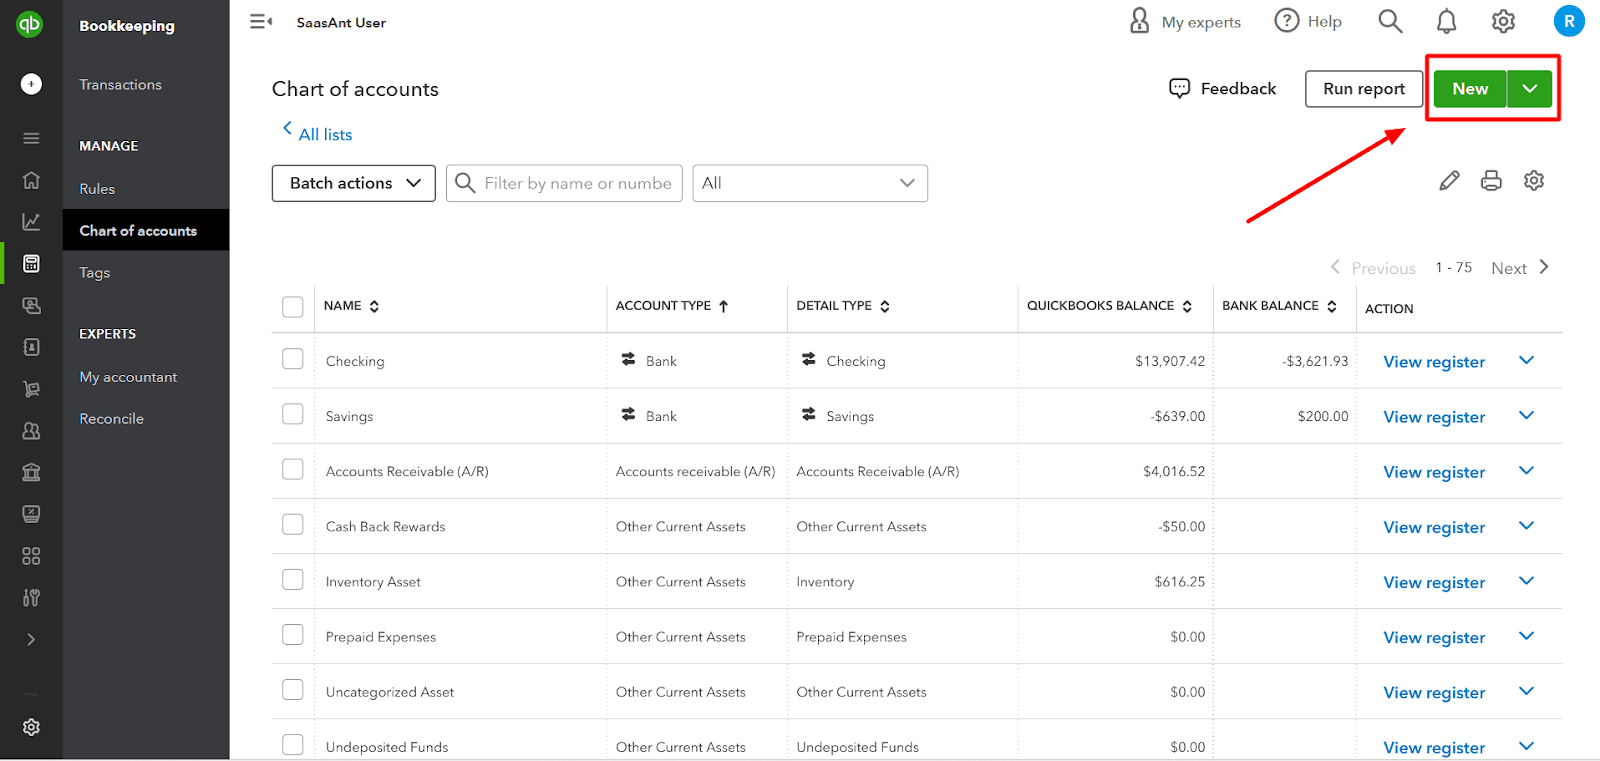
Create a New Account: In the Chart of Accounts screen, click the ‘New’ button to create a new account.
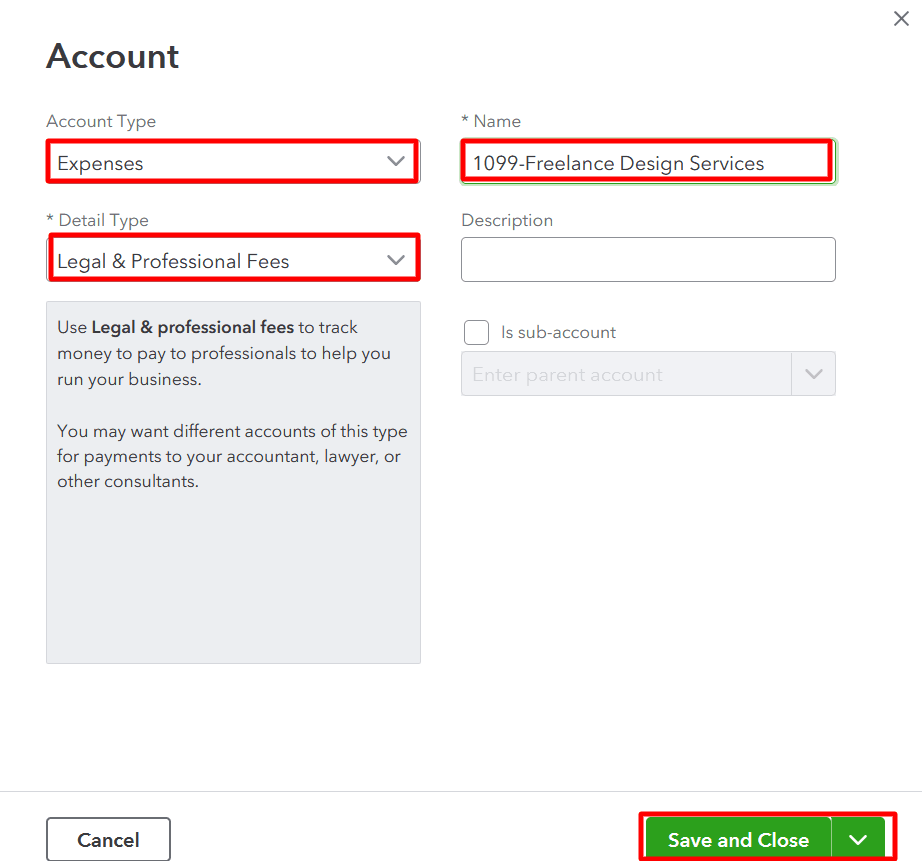
Select the Account Type: In the ‘Account Type’ dropdown menu, select ‘Expenses.’ This action is because payments to 1099 vendors are typically considered business expenses.
Select the Detail Type: In the ‘Detail Type’ dropdown menu, select the option that best describes the type of payments you'll be tracking with this account. For example, if you're setting up an account to track payments to a freelance graphic designer, you might select ‘Professional Services.’
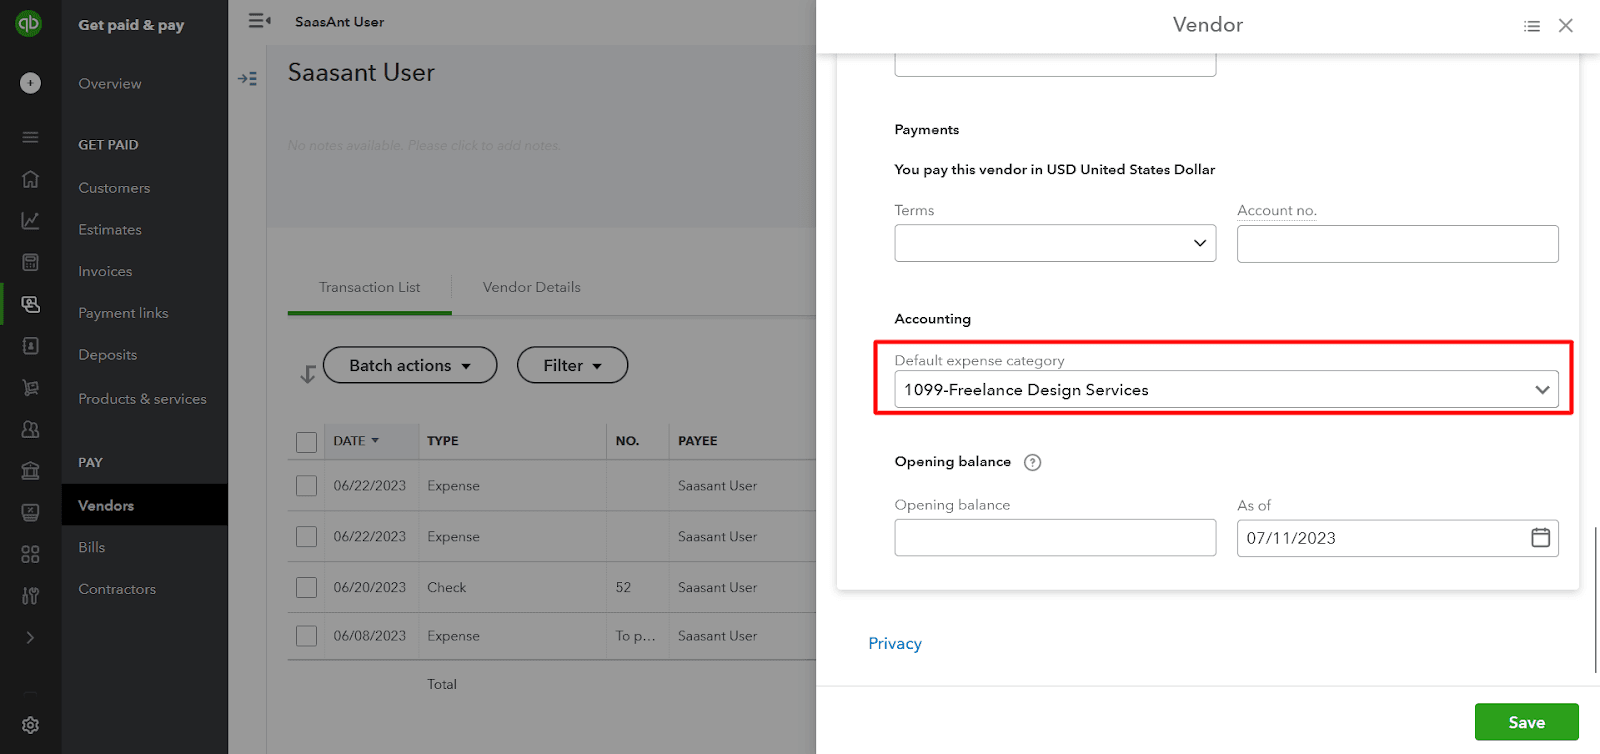
Name the Account: In the ‘Name’ field, enter a name for the account. It's a good idea to choose a name that indicates the purpose of the account, such as ‘1099-Freelance Design Services.’
Save and Close: Once you've completed all the necessary information, click the ‘Save and Close’ button to create the account.
Mapping 1099 Accounts with QuickBooks Online
To map a 1099 account to a vendor in QuickBooks Online, follow these steps:
Navigate to the Vendors tab from the main menu.
Identify the Vendor from the list and click on the Vendor name.
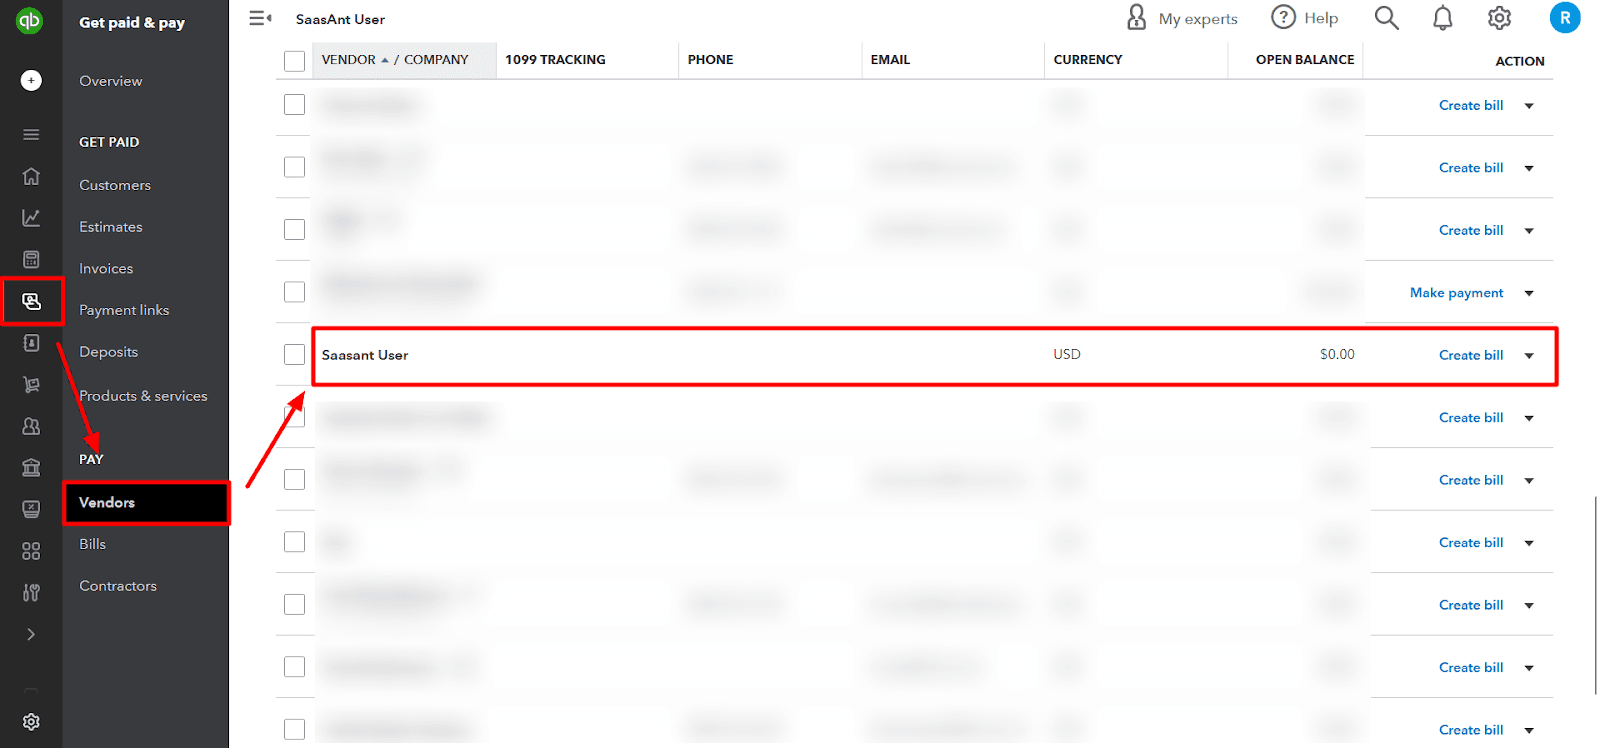
Click the Edit button to map to the 1099 account.
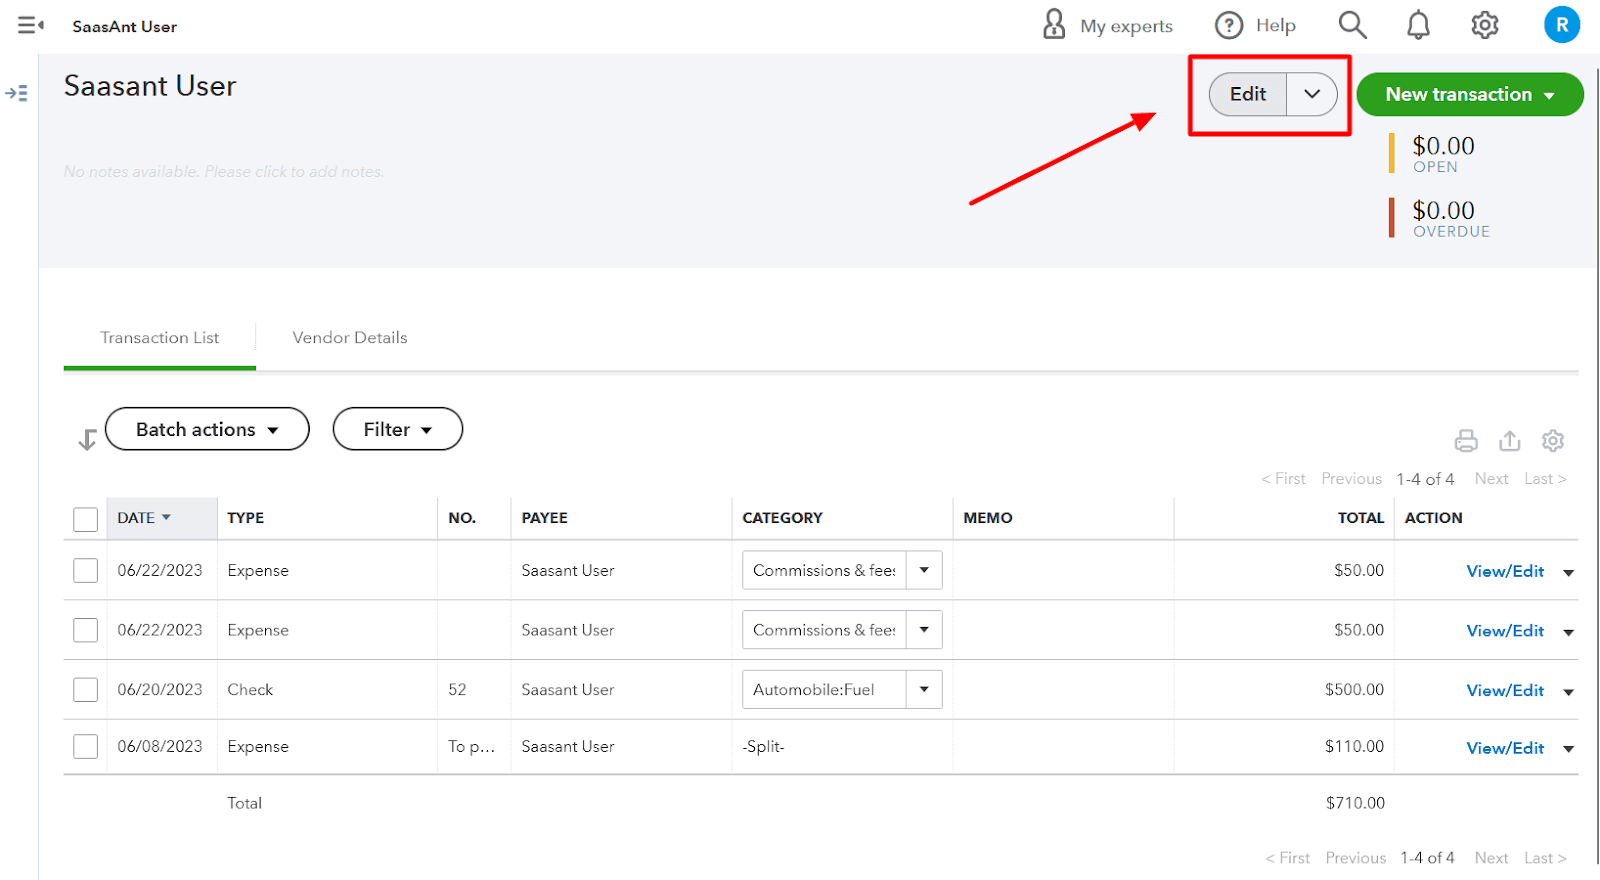
In the Account field, select the 1099 account that you created.
Check the ‘Track payments for 1099’ box to track every payment you make to contractors, and then create ready-to-send 1099 forms at tax time.
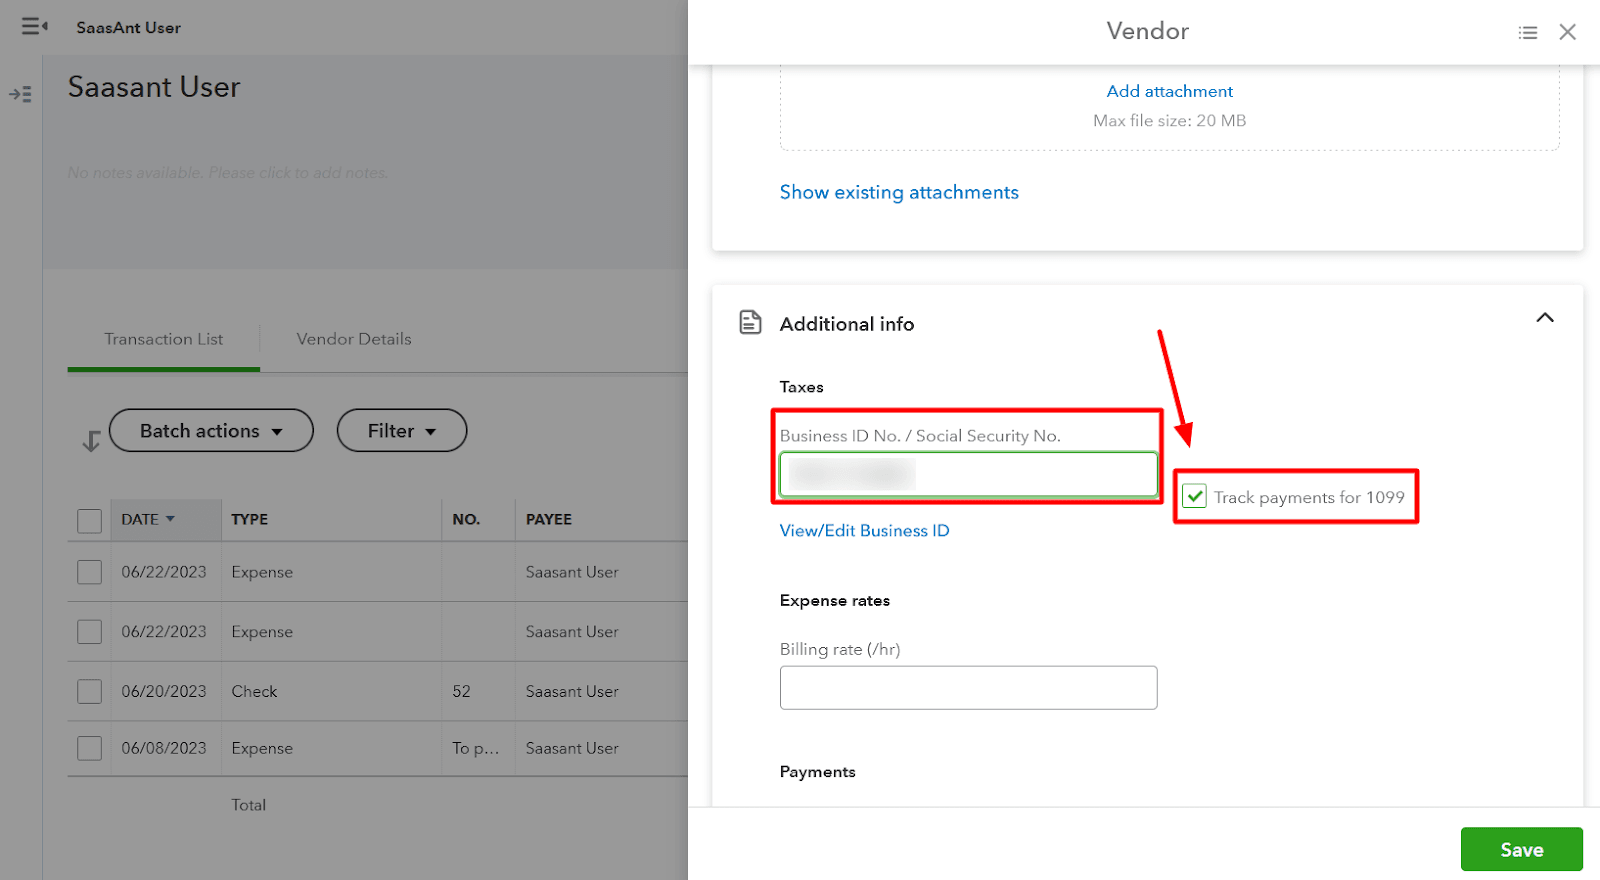
Click Save.
Once you have mapped the 1099 account to a vendor, you can test the mapping by creating a new invoice for the vendor. The 1099 account should be automatically selected in the Account field.
Review and Print 1099 Forms
Click “Get Paid & pay”
Choose “Vendors”
Click “Prepare 1099” button
Now, print the 1099 form
Why is it Important to Map 1099 Accounts to QuickBooks Online?
Mapping 1099 accounts in QuickBooks Online is crucial for several reasons:
Accurate Tax Reporting: The IRS requires businesses to issue Form 1099-NEC to any individual or unincorporated business they paid $600 or more in a given tax year for services rendered. By mapping 1099 accounts in QuickBooks, you can accurately track these payments and ensure you comply with IRS requirements.
Efficient Record Keeping: Mapping 1099 accounts allows you to keep track of all payments made to independent contractors in one place. This process makes reviewing and managing these payments easier, saving time and effort.
Simplified Tax Preparation: When it's time to prepare your taxes, having your 1099 accounts correctly mapped in QuickBooks can simplify the process. You can quickly generate 1099 forms directly from QuickBooks, reducing the chances of errors and making tax time less stressful.
Audit Protection: In case of an audit, having a well-organized record of your payments to contractors can be invaluable. Mapping 1099 accounts in QuickBooks helps ensure you have the documentation to substantiate your tax deductions.
Conclusion
Mapping 1099 accounts in QuickBooks Online is a straightforward process that simplifies your end-of-year tax preparations. You can ensure accurate and efficient 1099 form distribution by identifying and tracking eligible vendors.
Frequently Asked Questions
Why should we map 1099 accounts in QuickBooks Online?
Mapping 1099 accounts in QuickBooks Online is crucial for accurately tracking vendor payments, ensuring correct tax reporting, and maintaining IRS compliance. This process simplifies financial management and tax preparation, helping to avoid potential penalties.
Does QuickBooks automatically file 1099?
QuickBooks Contractor Payments and QuickBooks Online Payroll Core, Premium, and Elite include the e-filing feature. This feature lets you electronically file your 1099 forms with the IRS and distribute copies to your contractors. Please note that an additional fee may apply for this service in QuickBooks Online Payroll plans.
What is a 1099 summary report?
The Tax 1099 summary report prints a condensed list of 1099 statement information for vendors. The report also specifies whether the amount for each 1099 statement meets the 1099 reporting requirements, including the minimum requirements for amounts that must be reported to the IRS.