How to Print W-2 in QuickBooks
Printing W-2 forms is essential for businesses to comply with tax regulations and to provide employees with the necessary documentation. QuickBooks, a popular accounting software, offers features that make printing W-2 forms straightforward. This article will walk you through how to print W-2 forms in both QuickBooks Online and QuickBooks Desktop versions.
Discerning W-2 and W-9 Forms
Before diving into the step-by-step guide, let’s clarify the difference between W-2 and W-9 forms:
W-2 Form: The W2 form is an important tax document for employers. It contains a breakdown of the employee's yearly earnings, including wages, tips, and compensation. When individuals file their tax returns, they rely on the W2 form to report their income.
W-9 Form: The W-9 form serves a different purpose than the W2 form, specifically designed for independent contractors and freelancers. It is formally called the Request for Taxpayer Identification Number and Certification form. Its primary function is gathering the contractor's taxpayer identification number, which can be their Social Security Number (SSN) or Employer Identification Number (EIN). This information is essential for reporting the payments made to the contractor on Form 1099 MISC.
Printing W-2 in QuickBooks Online
QuickBooks Online provides a user-friendly interface for printing W-2 forms. Follow the step-by-step instructions below:
Step 1: Log in to QuickBooks Online
Visit the QuickBooks Online website and sign in using your credentials.
Step 2: Access W-2 Printing in QuickBooks Online Payroll
Click 'Taxes' from the left side panel, then select 'Payroll Tax.'
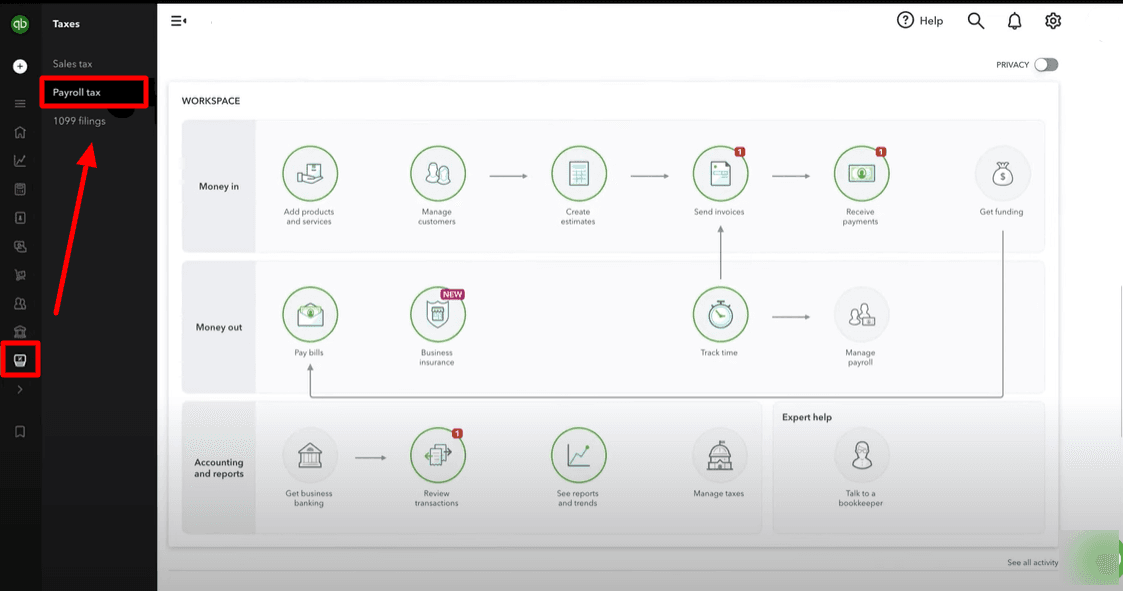
Under the ‘Filings’ section, click on ‘Resources.’
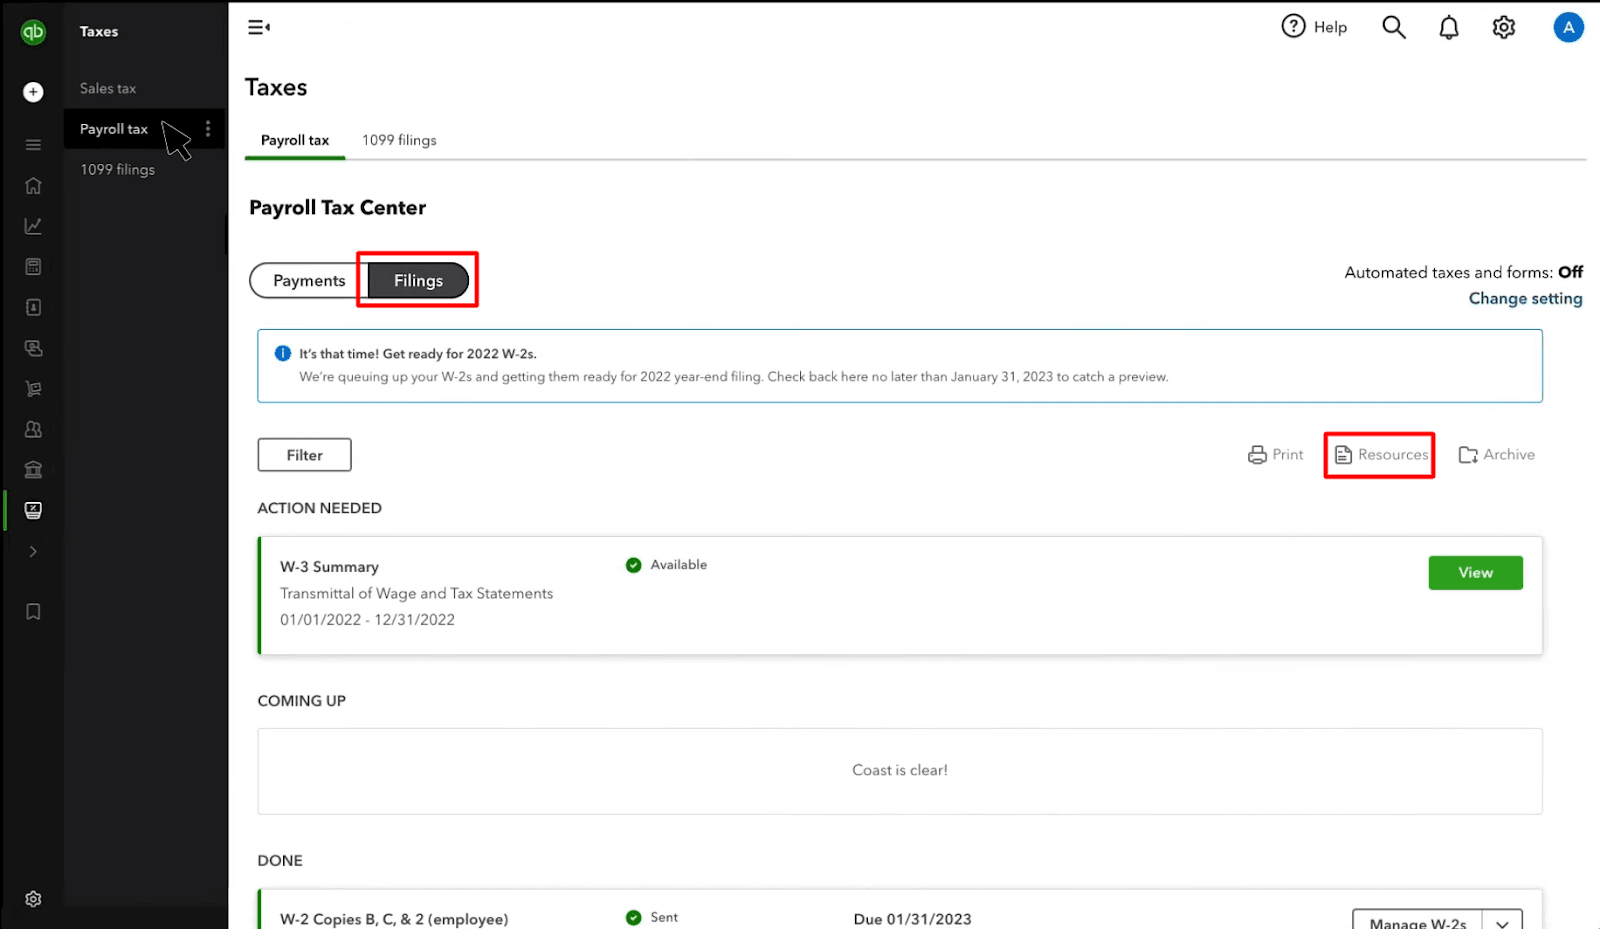
Under ‘Filings & Forms’ select ‘W-2s’
Under the ‘W-2s’ section below the ‘Employee W-2s’, click ‘W-2, Copies B, C & 2 (employee).’
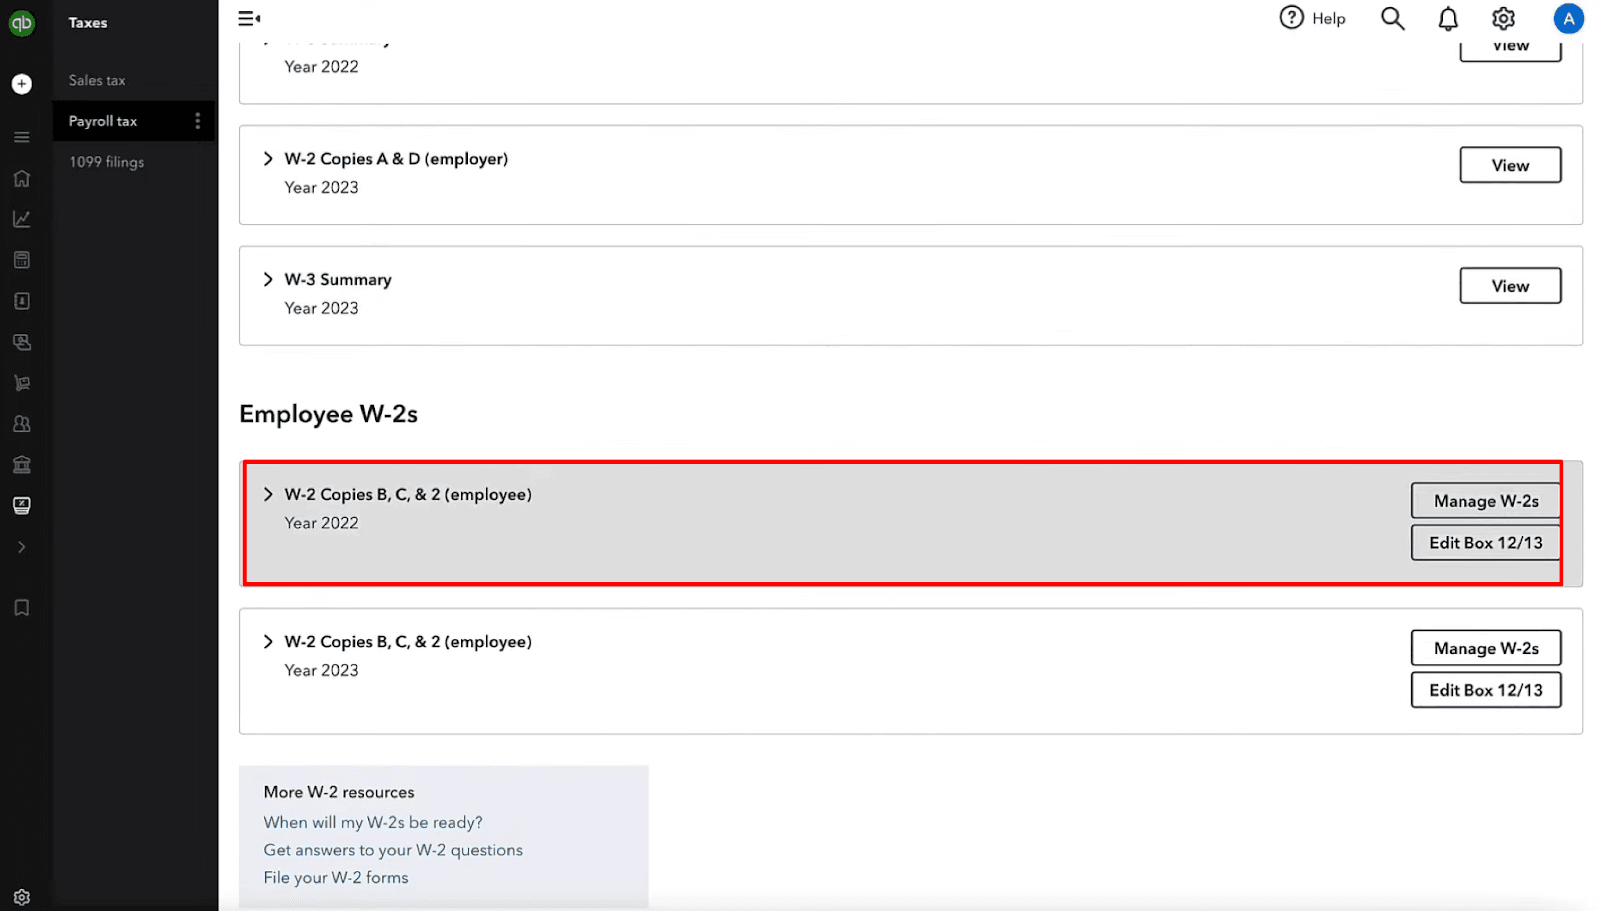
You can also ‘manage’ and edit the W-2 form by clicking the ‘Manage W-2’ and Edit Box 12/13’ button on the right.
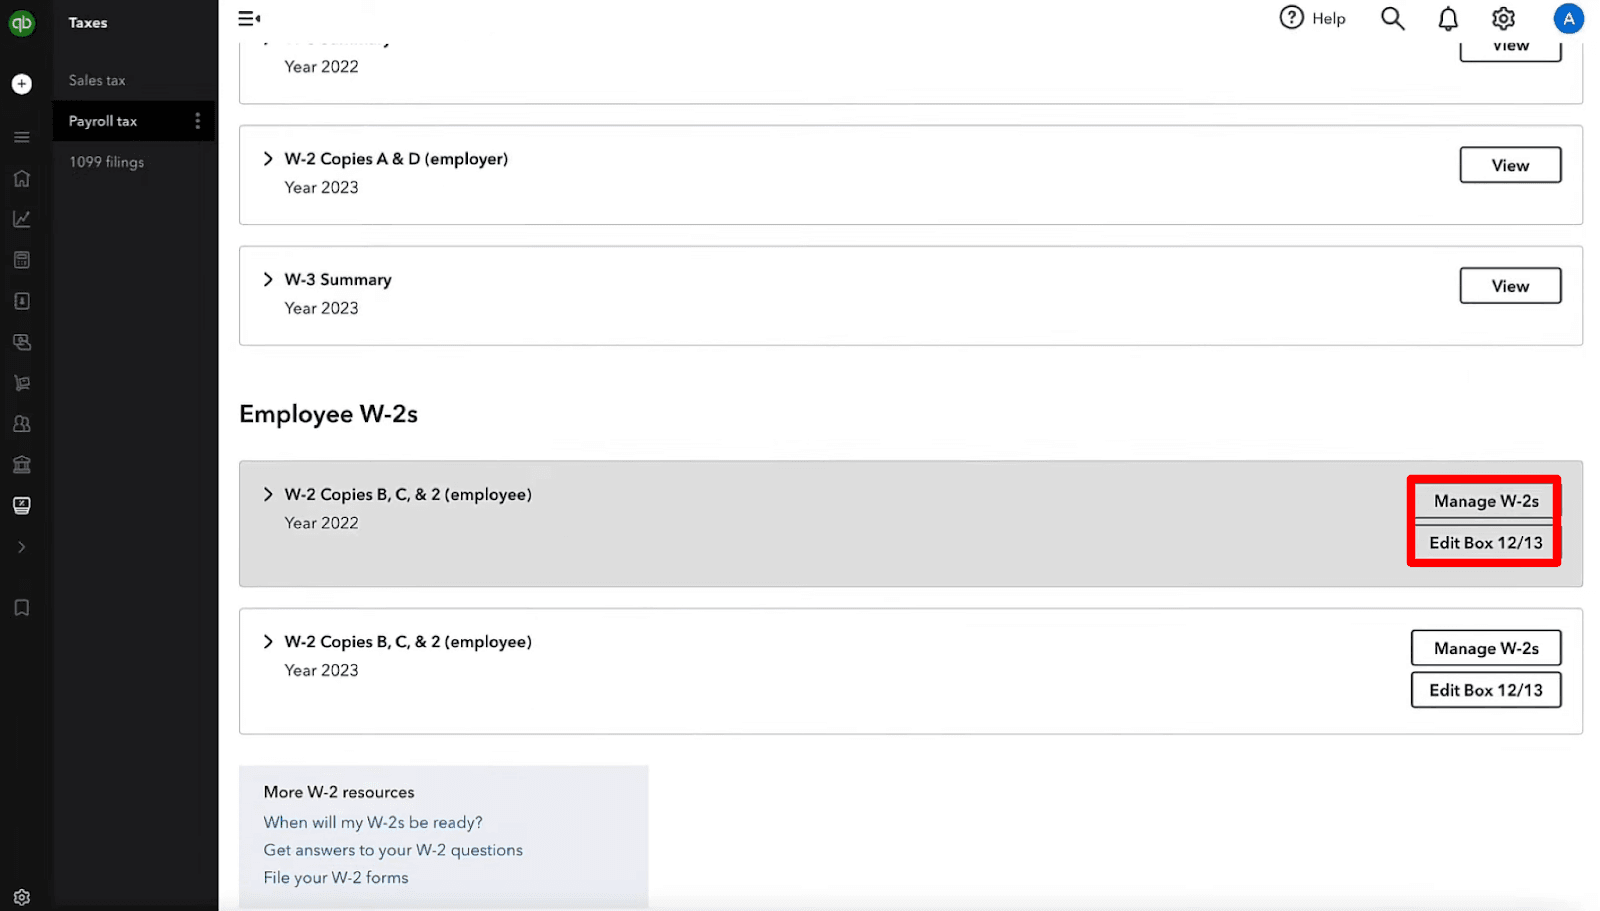
Step 3: Select the Employee and View the Form
Once you click the ‘Manage W-2’ button, you’ll find various options, such as:
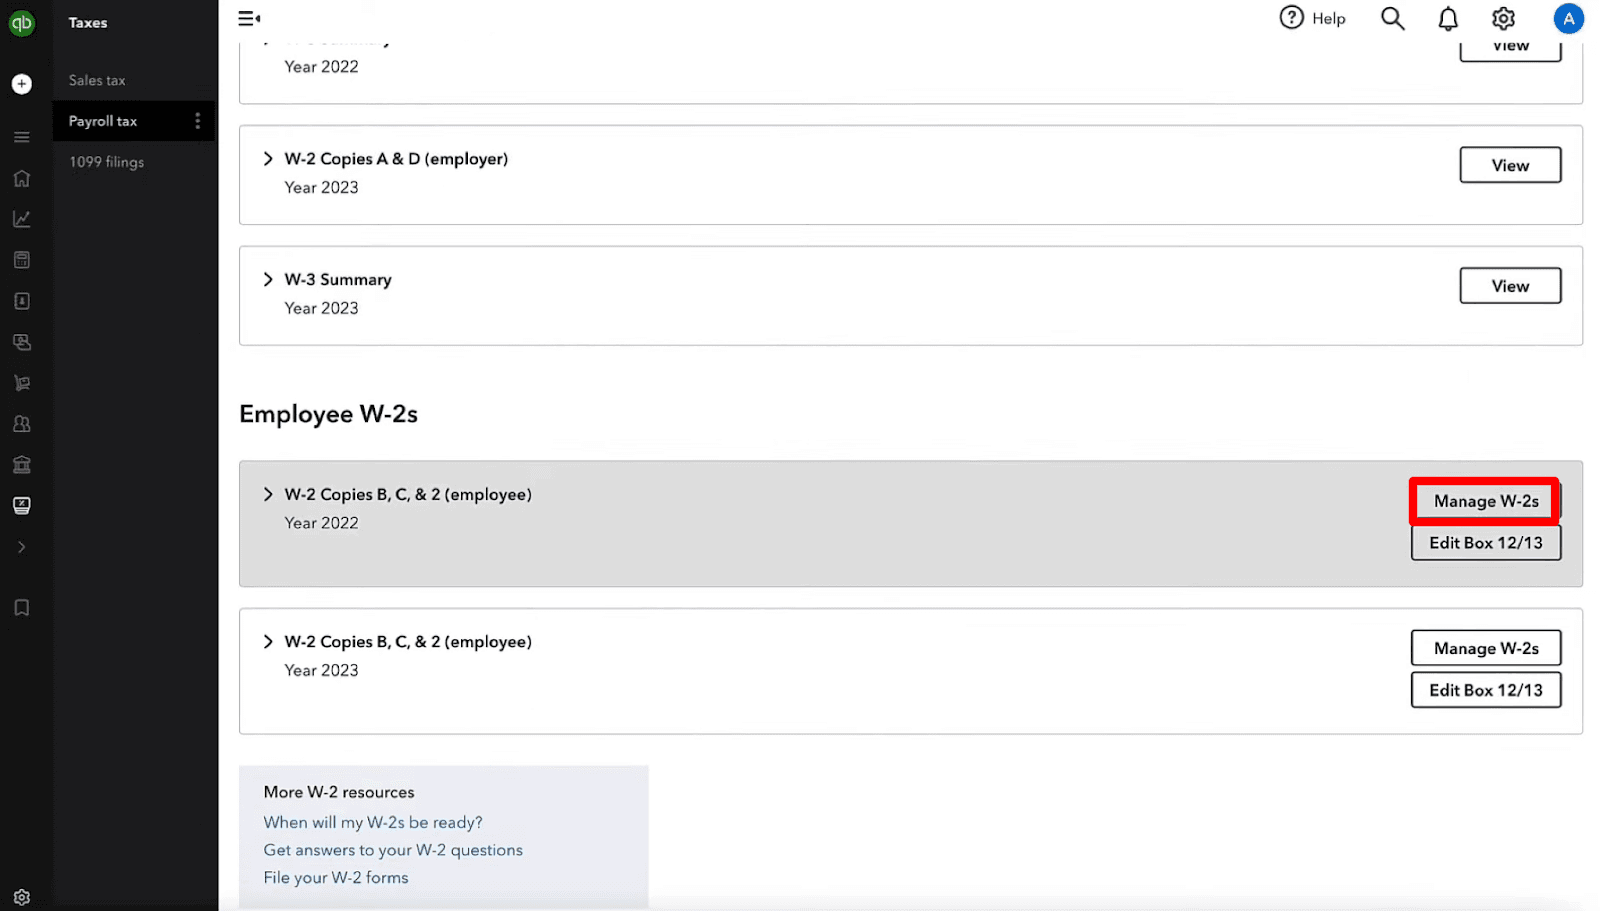
“The list of employees who need a printed copy of their W-2 and those who don’t.”
If you haven’t invited some of your employees to ‘QuickBooks Workforce,’ you can invite them by clicking ‘Invite your team to Workforce’ at the top.
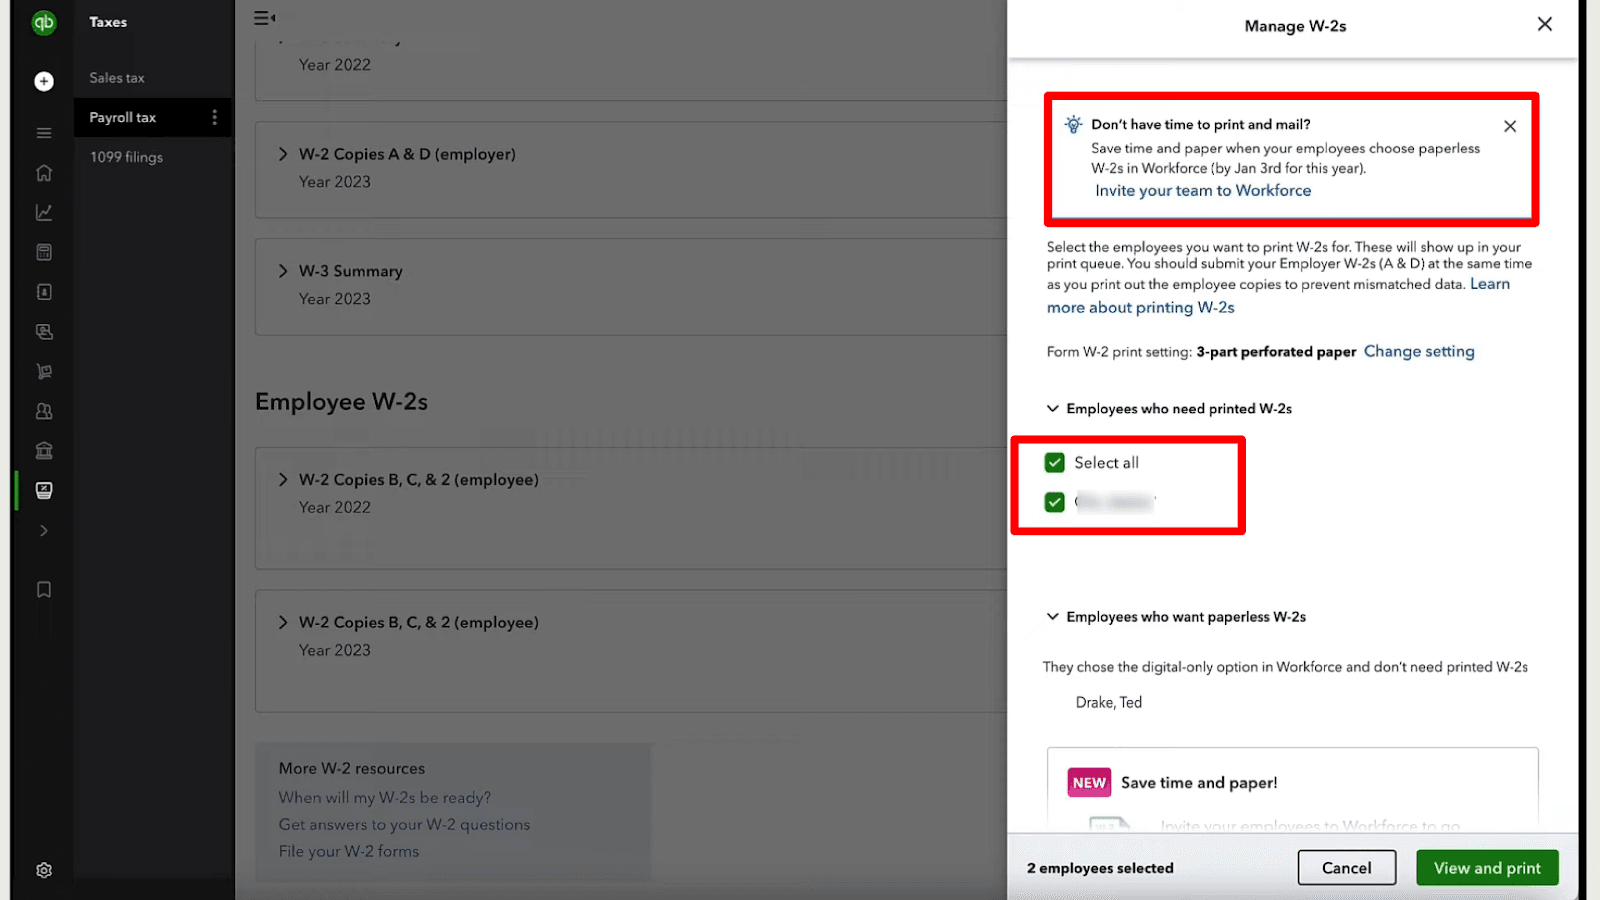
You can also change your W-2 print setting by clicking on the ‘Change Setting’ option. This will redirect to your ‘Payroll Setting’ page.
In the ‘Payroll Setting’ window, under the ‘Form W-2 Printing’ section, click on the ‘Pencil’ icon to edit the type of paper you need to use (either plain paper, 4-part perforated paper, or 3-part perforated paper). You can also purchase a W-2 kit by clicking the ‘Order W-2 kit from QuickBooks’ option.
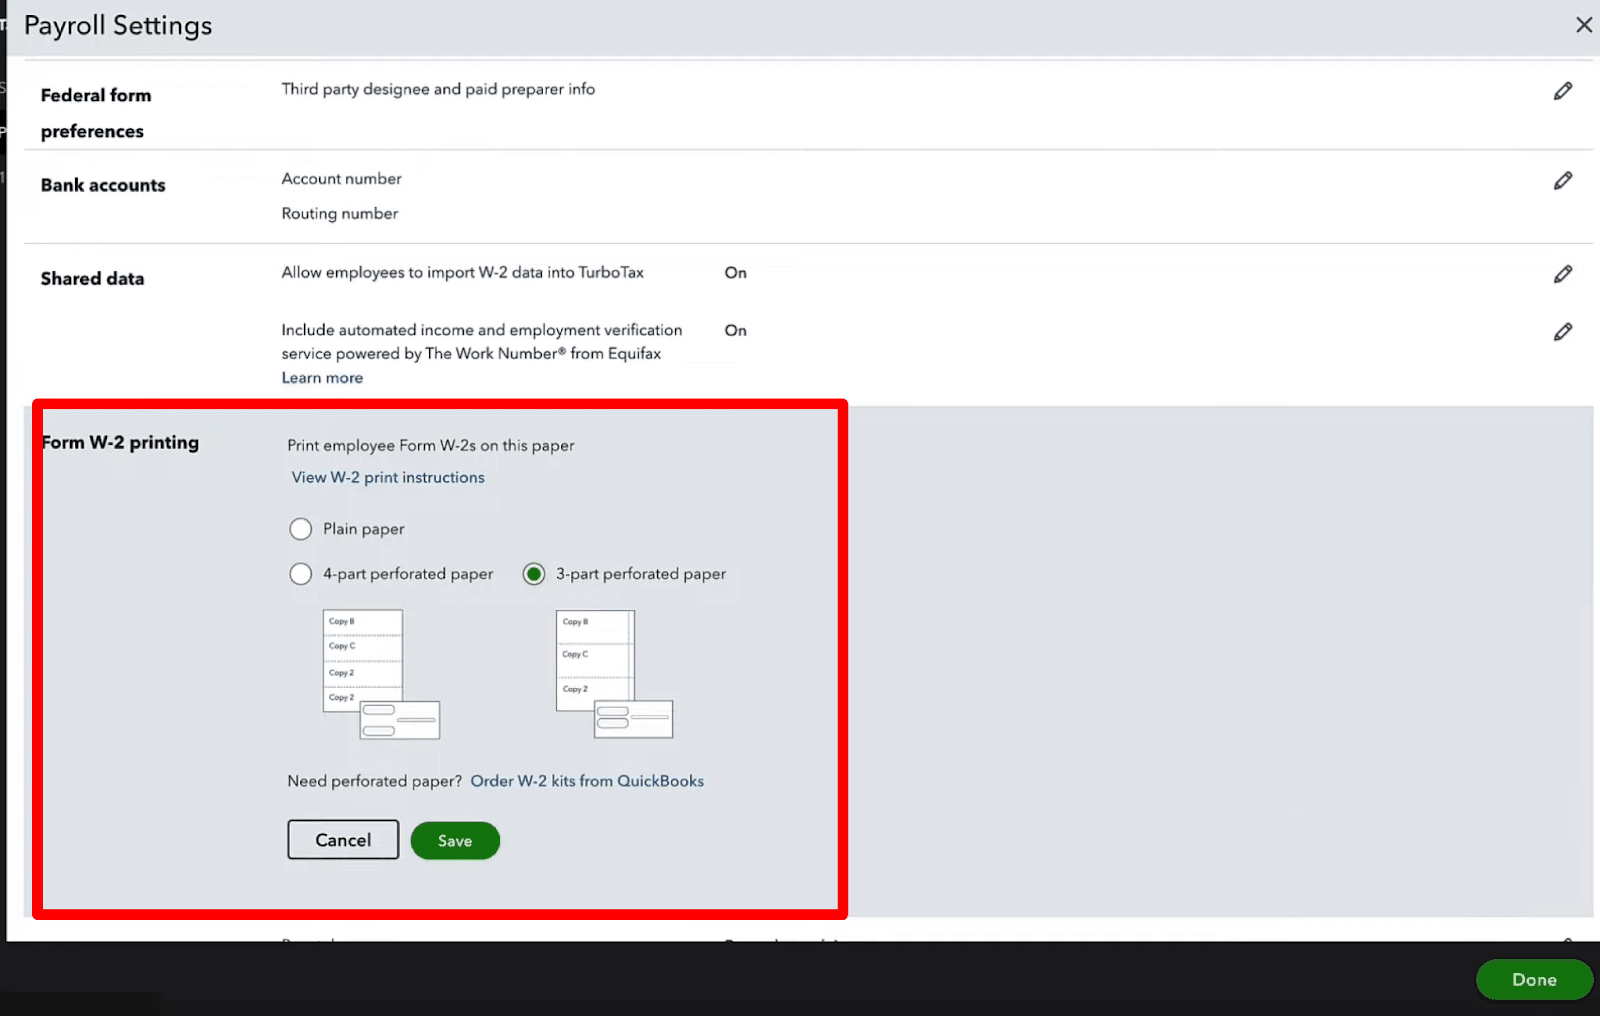
Once you’ve selected the paper, click ‘Save’ and ‘Done.’
Step 4: Print the W-2 Forms
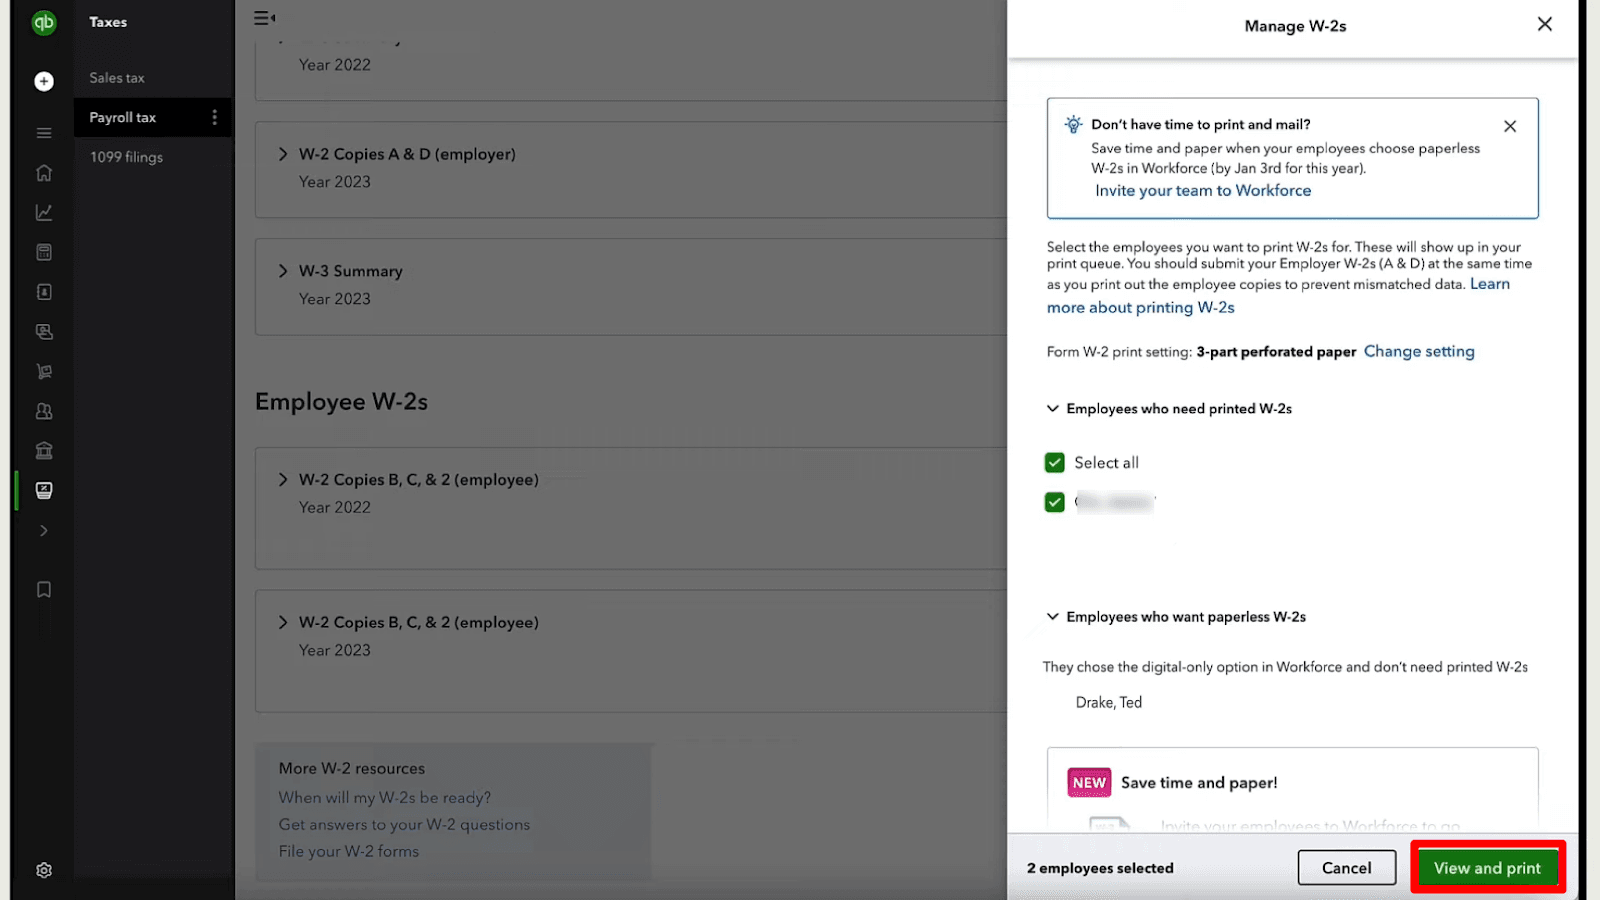
Once the W-2 form is ready to print, click the ‘View and Print’ option at the bottom right of the screen. Your W-2s will open as a PDF; press ‘Ctrl + P’ or click the ‘Print’ icon on the toolbar to initiate printing.
Printing W-2 in QuickBooks Desktop
The process for printing your W-2 forms will vary depending on whether you opted to have Intuit handle the printing and mailing to your employees or if you are printing and distributing them yourself. It is important to note that you can print W-2s from current and previous years as long as you utilize Assisted Payroll.
Intuit Print Method:
Step 1: Access QuickBooks Desktop and navigate to the 'Payroll Center.'
Step 2: Click on the ‘File Forms’ tab.
Step 3: Select ‘View/Print Forms & W-2s.’
Step 4: Enter your payroll PIN when prompted, and click ‘OK.’
Step 5: Click on the "W-2s" tab.
Step 6: Choose the appropriate tax year and select all employees or individual employees.
Step 7: Click on ‘Open/Save Selected.’
Step 8: Select the reason for printing the W-2s, such as reissuing a lost or undelivered form.
Step 9: Click ‘File on Adobe Reader’ and then select ‘Print.’
Self-Print Method:
Step 1: Purchase W-2 Paper
It is recommended to order W-2 paper through Intuit to ensure accurate printing and avoid any filing issues.
Visit the QuickBooks Checks & Supplies website
Choose "Tax Products"
Select "Blank W-2 kits" and follow the on-screen instructions to complete your order.
Step 2: Print W-2s (Current or Previous Years)
Access QuickBooks Desktop and navigate to the ‘Payroll Center.’
Click on the ‘File Forms’ tab
Choose ‘View/Print Forms & W-2s’
Enter your payroll PIN and click ‘OK.’
Select the ‘W-2s’ tab.
Choose the desired tax year and select either all employees or individual employees.
Click on the "Open/Save Selected" button.
Specify the reason for printing the W-2s, such as reissuing a lost or undelivered form.
Click ‘File on Adobe Reader’ and then select ‘Print.’
Note: When self-printing, distribute or mail the W-2 forms to your employees by January 31, postmarked on or before that date.
FAQs
Q1: How Do I Print W-2 Forms in QuickBooks Online?
To print W-2 forms in QuickBooks Online, follow these steps:
Click ' Taxes ' from the left side panel, then select 'Payroll Tax.'
Under the 'Forms' section, click on 'Annual Forms.'
Choose an employee's name from the drop-down list or select 'All Employees' to print W-2s for all employees.
Click on the link for W-2, Copies B, C & 2
In the Printable Employee Copies: Form W-2 page, you can view and print the W-2 forms.
Use the drop-down list to select the appropriate period for the W-2 forms.
Click 'View' to open the form in Adobe Reader.
Once the form is open, press Ctrl + P or click the 'Print' icon on the toolbar.
Q2: Can I Print W-2 Forms for Previous Years in QuickBooks Online?
Yes, you can print W-2 forms for previous years in QuickBooks Online if you used the payroll feature for those years.
Q3: Can I E-file W-2 Forms in QuickBooks Online Instead of Printing Them?
Yes, QuickBooks Online offers the option to e-file W-2 forms. Instead of printing the forms, you can electronically file the forms with the appropriate tax agencies.
Q4: How Do I Print W-2 Forms in QuickBooks Desktop?
To print W-2 forms in QuickBooks Desktop, follow these steps:
Navigate to the ‘Employees’ menu
Select ‘Payroll Tax Forms & W-2s’
Click on ‘Process Payroll Forms.’
Choose ‘Annual Form W-2/W-3 - Wage and Tax Statement/Transmittal’
Follow the on-screen instructions to review and complete the necessary information
When ready, click on ‘Create Form’ to open the form in PDF format
From the PDF viewer, select ‘Print’ to print the W-2 forms
Q5: How Can I Access Previous W-2 Forms in QuickBooks Online?
To access previous W-2 forms in QuickBooks Online,
Navigate to the ‘Payroll Tax Forms & W-2s section.’
Select the desired tax year
You can then view, print, or e-file the W-2 forms for that specific year
Q6: Is There a Deadline for Printing or Distributing W-2 Forms in QuickBooks?
Yes, the deadline to distribute W-2 forms to employees is generally January 31. IRS compliance mandates that your W-2 forms are printed and delivered to your employees by that date.
Q7: How Do I Print W-2 Forms for Terminated Employees in QuickBooks Desktop?
In QuickBooks Desktop, the process for printing W-2 forms for terminated employees is the same as for active employees. Select the appropriate employees when generating the W-2 forms, including active and terminated ones.
Q8: Can I Print W-2 Forms for Multiple Companies in QuickBooks Desktop?
If you have multiple company files in QuickBooks Desktop, you can print W-2 forms for each company by accessing the Payroll Tax Forms & W-2s section within the individual company file.