How to Record a Bounced Check in QuickBooks Online?
Before you learn to record a bounced check in QuickBooks, understand the meaning of a bounced check. According to Investopedia, a bounced check cannot be processed because the account holder has non-sufficient funds available for use. Banks return rubber checks, and banks charge the check writers NSF fees. Additional penalties for bouncing checks may include negative credit score marks, refusal of merchants to accept your checks, and potentially legal trouble.
When dealing with financial transactions, there's always a chance that a check might bounce. It's a common occurrence for the following reasons - insufficient funds, closed accounts, or a mistake in the check details. In such situations, recording the bounced check in your accounting software is crucial to ensure your financial records remain accurate.
Here's a detailed guide on how to record a bounced check in QuickBooks Online:
How to Record a Bounced Check In QuickBooks Online: Step-by-Step Guide
Step 1: Record the Bounced Check in QuickBooks Online
Login to your QuickBooks Online account.
Navigate to the ‘Sales tab’ and select ‘Customers.’
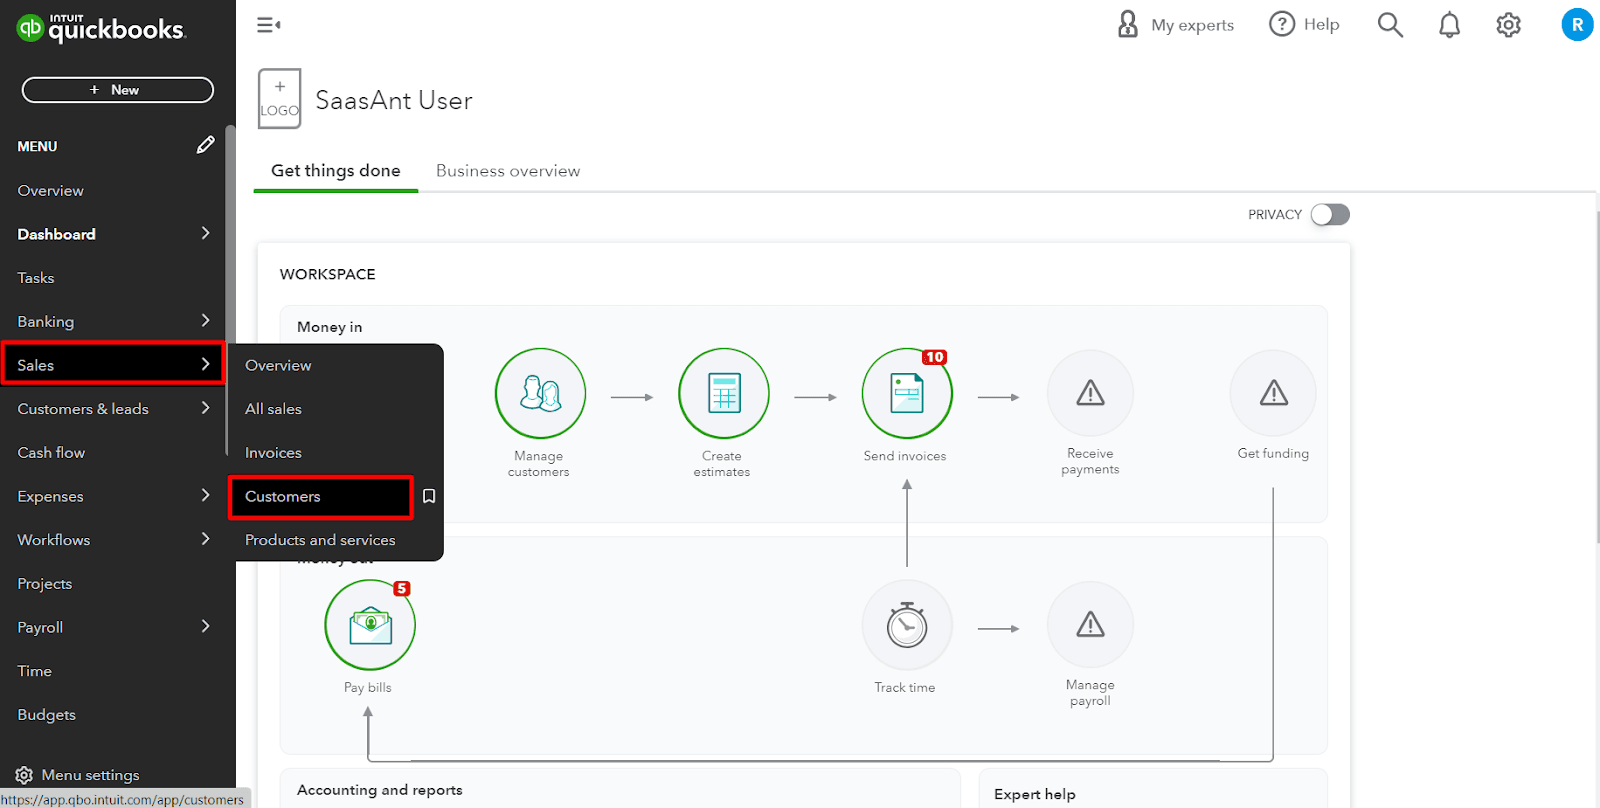
Locate and select the customer who has bounced the check.
Click on the ‘Receive Payment button,’ where you had initially recorded the payment.
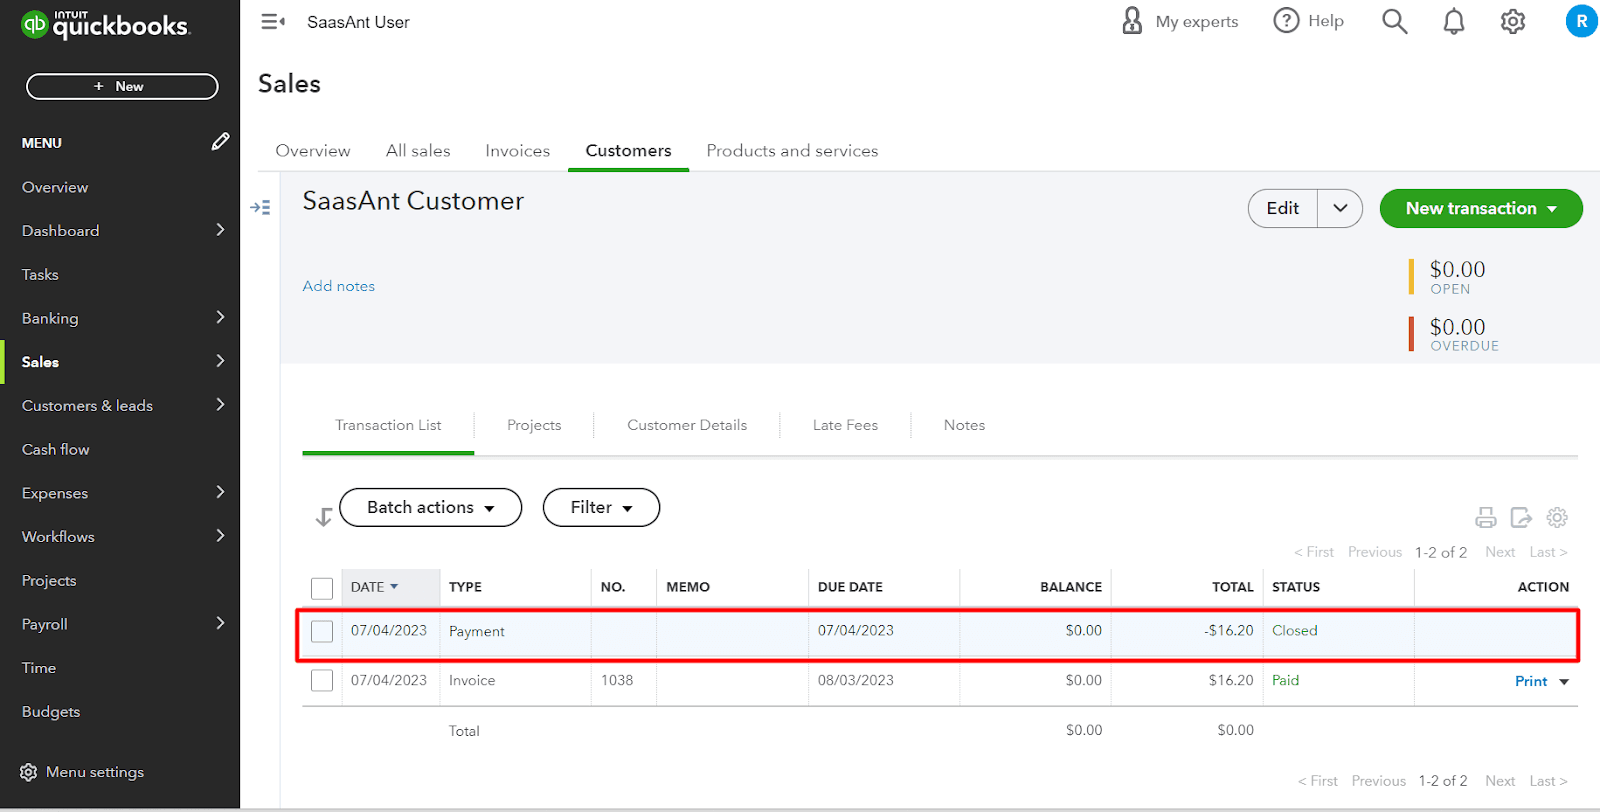
Click on ‘Edit’ and then ‘More at the bottom.’ Choose ‘Void.’ Do not delete the transaction, as this would erase the record.
Click ‘Save’ and ‘Close’ to save the changes.
Step 2: Record the Bank Fee
Typically, when a check bounces, banks charge a fee. To record this:
Click on the ‘+ New’ button.
Under the ‘Vendors’ column, select ‘Expense.’
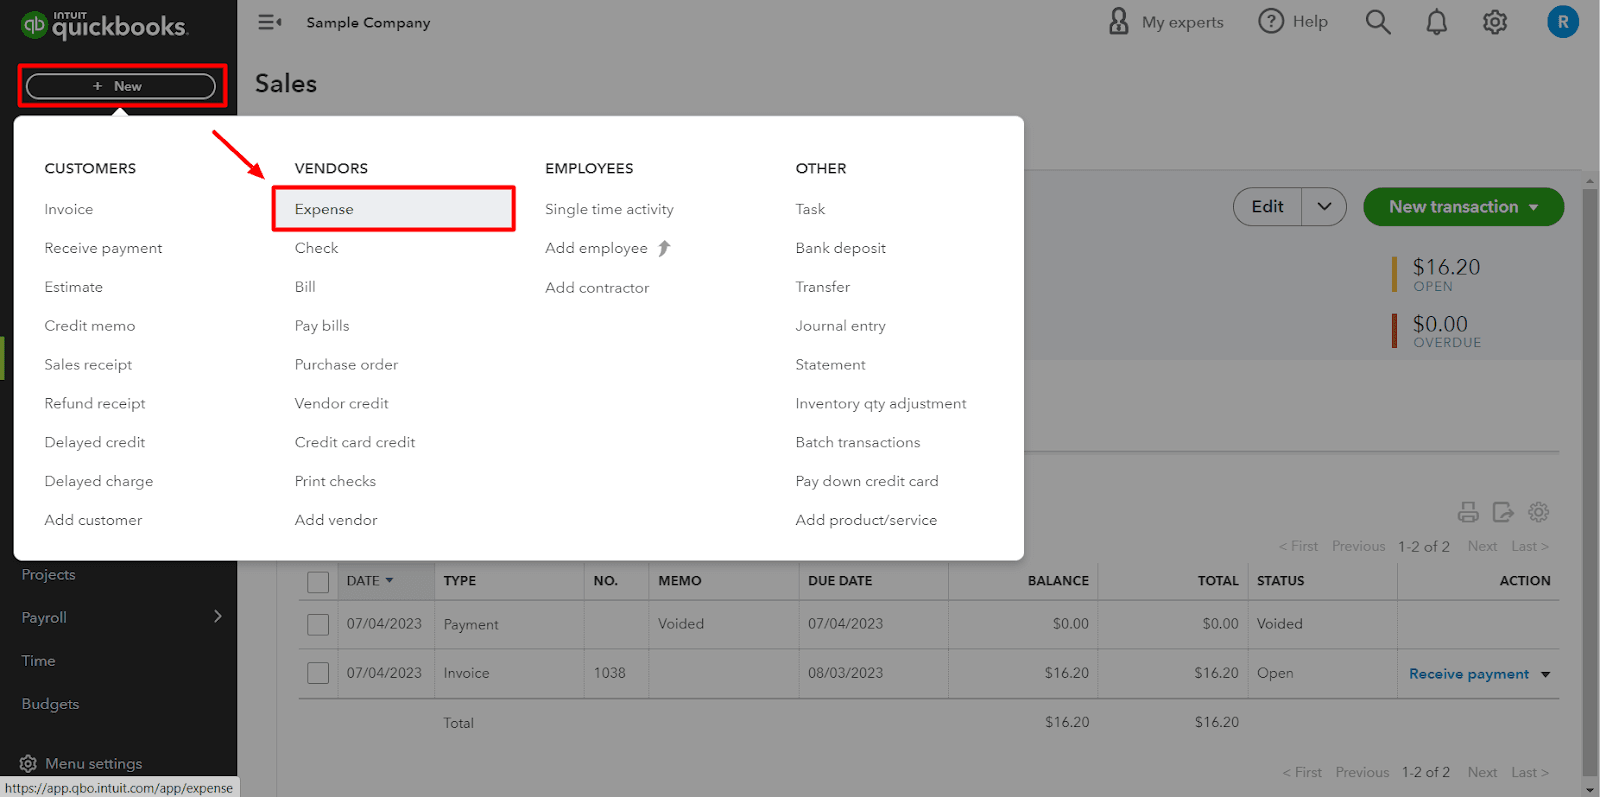
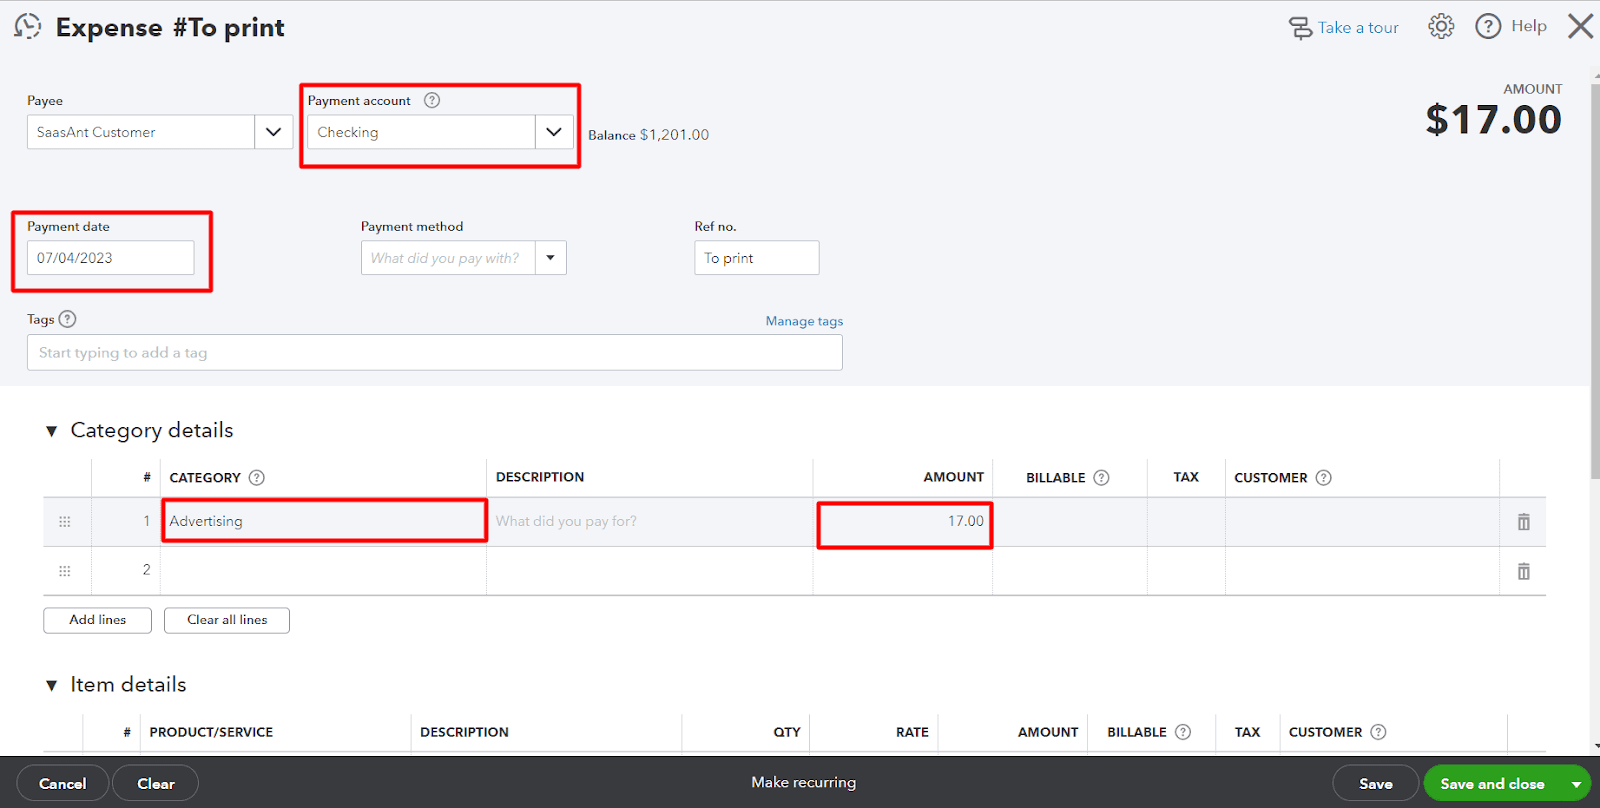
Choose the bank account affected by the bounced check.
In the ‘Payment date’ field, enter the date when the check bounced.
For the ‘Payee,’ you can set up your bank as a vendor.
In the ‘Category’ details, select the expense account where you want to track the bank fees.
Enter the amount of the bank fee in the ‘Amount’ field.
Click on ‘Save’ and ‘Close.’
Step 3: Invoice the Customer for the Bounced Check and Bank Fee
Now, it's time to invoice your customer for the bounced check and the related bank fee:
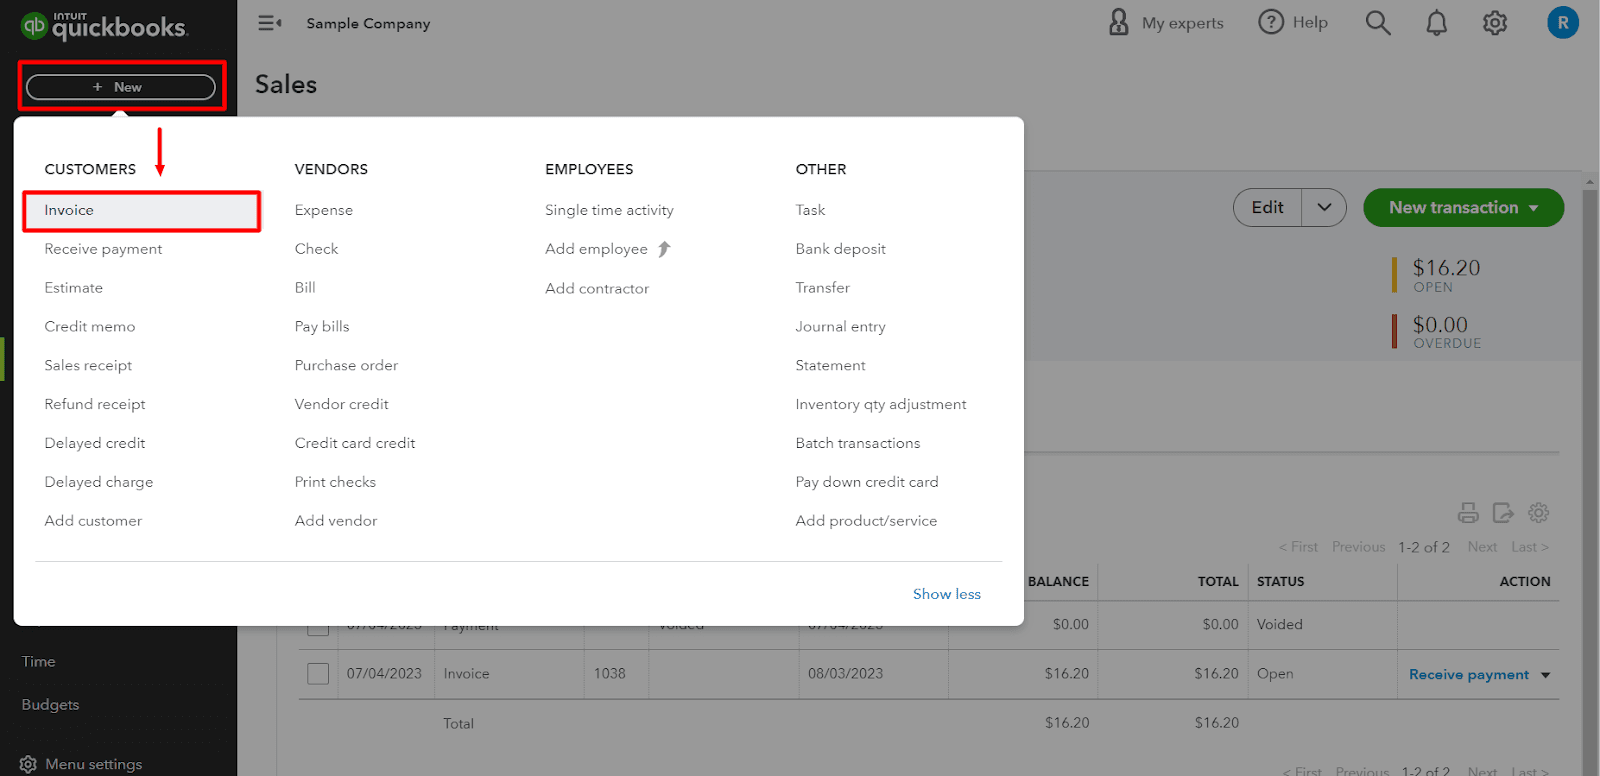
Click on the ‘+ New’ button.
Under the ‘Customers’ column, select ‘Invoice.’
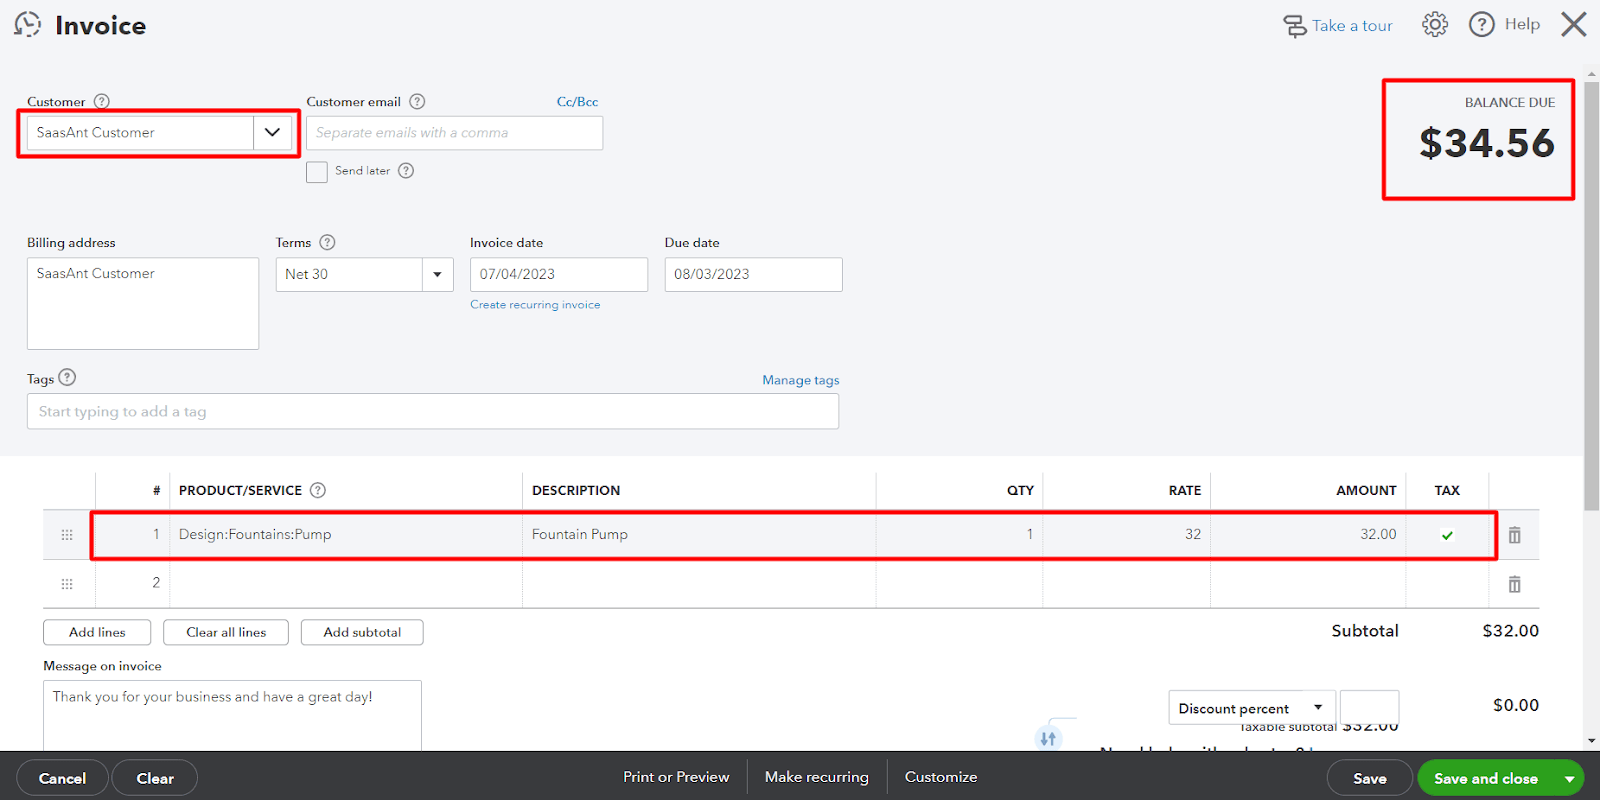
Choose the customer who bounced the check.
In the ‘Product/Service’ section, select the service item you set up for bounced checks.
Enter the bounced check amount and bank fee in the ‘Amount’ field.
Click on ‘Save’ and ‘Close.’
Follow these steps to keep your accounts accurate and up-to-date. Remember, it's essential to maintain clear communication with your customers during these circumstances to ensure smooth resolution of any financial discrepancies.
Simplify Check Management with Saasant Transactions
While we are on the topic of maintaining bounced checks, let’s also consider the easiest way to import checks into QuickBooks. SaasAnt Transactions allows you to import checks effortlessly using formats like XLS, XLSX, CSV, and IIF, ensuring your records remain precise. If you have PDF files, you can convert them to these supported formats, saving you time and effort. Additionally, with automated import options via Email, FTP/SFTP, and Zapier, you can schedule imports to keep your financial records current without the added hassle. Take control of your accounting and reduce the burden of managing checks with this efficient solution.
Frequently Asked Questions
How should I handle a check bounces in QuickBooks Online?
When a check bounces, in QuickBooks Online you should record the bounced check and the bank fee associated with the bounced check and then invoice the customer for the bounced check and the related bank fee.
Can I delete the initial transaction after a check bounces in QuickBooks Online?
Voiding the initial transaction instead of deleting it when a check bounces is recommended. Deleting the transaction would erase the record, while voiding it preserves the transaction history.
How do I record the bank fee for a bounced check in QuickBooks Online?
To record the bank fee, you create an expense under the bank account affected by the bounced check. You set up your bank as a vendor and select the expense account where you want to track the bank fees. Enter the amount of the bank fee, then save and close.
How do I invoice a customer for a bounced check in QuickBooks Online?
You create an invoice under the customer's name to invoice a customer for a bounced check. In the Product/Service section, select the service item you set up for bounced checks. Enter the bounced check amount and bank fee, then save and close.
What happens if I don't record a bounced check in QuickBooks Online?
If you don't record a bounced check, your financial records in QuickBooks Online will not accurately reflect your bank account balance or accounts receivable. This could lead to discrepancies in your financial reporting and potential issues with tax filings or audits.
How do I record a bounced check payment in QuickBooks Online?
To record a bounced check in QuickBooks Online, go to the ‘Sales’ tab and select ‘Customers.’ Find the customer with the bounced check, click ‘Receive Payment,’ then ‘Edit’ and ‘More’ at the bottom. Choose ‘Void’ to keep the record intact, then click ‘Save’ and ‘Close’ to finalize the changes.
How to create a journal entry for a bounced check in QuickBooks?
To create a journal entry for a bounced check in QuickBooks, you have to record a reversing journal entry. Go to the Company menu and select "Make General Journal Entries." Ensure the Date and Entry No are correct. Debit the checking account and credit the A/P account for the NSF check amount. Enter the vendor name, add any optional memos or classes, and then select "Save & Close.
How do I treat a bounced check in QuickBooks?
To treat a bounced check in QuickBooks, first void the original payment by locating the customer transaction under the ‘Sales’ tab. Click ‘Receive Payment,’ then ‘Edit’ and ‘Void.’ Next, record any bank fees as an expense. Finally, invoice the customer for the bounced check amount and any associated fees to keep records accurate.