How to Record and Categorize Refunds in QuickBooks Desktop

QuickBooks Desktop, a robust accounting software from Intuit, offers an array of functions to help businesses efficiently manage their financial activities. One such feature is the ability to record and categorize refunds. It may appear challenging for those who need to become more familiar with the process. Worry not - this article will guide you step-by-step to categorizing refunds in QuickBooks Desktop, helping you learn how to record refund transactions accurately and effectively.
Contents
Step 1: Launch QuickBooks Desktop
Step 2: Create a New Customer
Step 3: Create a Refund Receipt
Step 4: Apply the Refund to the Customer's Balance or Issue a Refund Check
Step 5: Review the Refund
Financial Accounts Management in Refund Recording and Categorization
Conclusion
Frequently Asked Questions
Step 1: Launch QuickBooks Desktop
The first step is straightforward: launch your QuickBooks Desktop software and log into your account.
Step 2: Create a New Customer
Before issuing a refund, you need to have a customer refund. If the customer isn't already in your database, you'll need to add them:
Navigate to the 'Customers' menu at the top, then select 'Customer Center.'
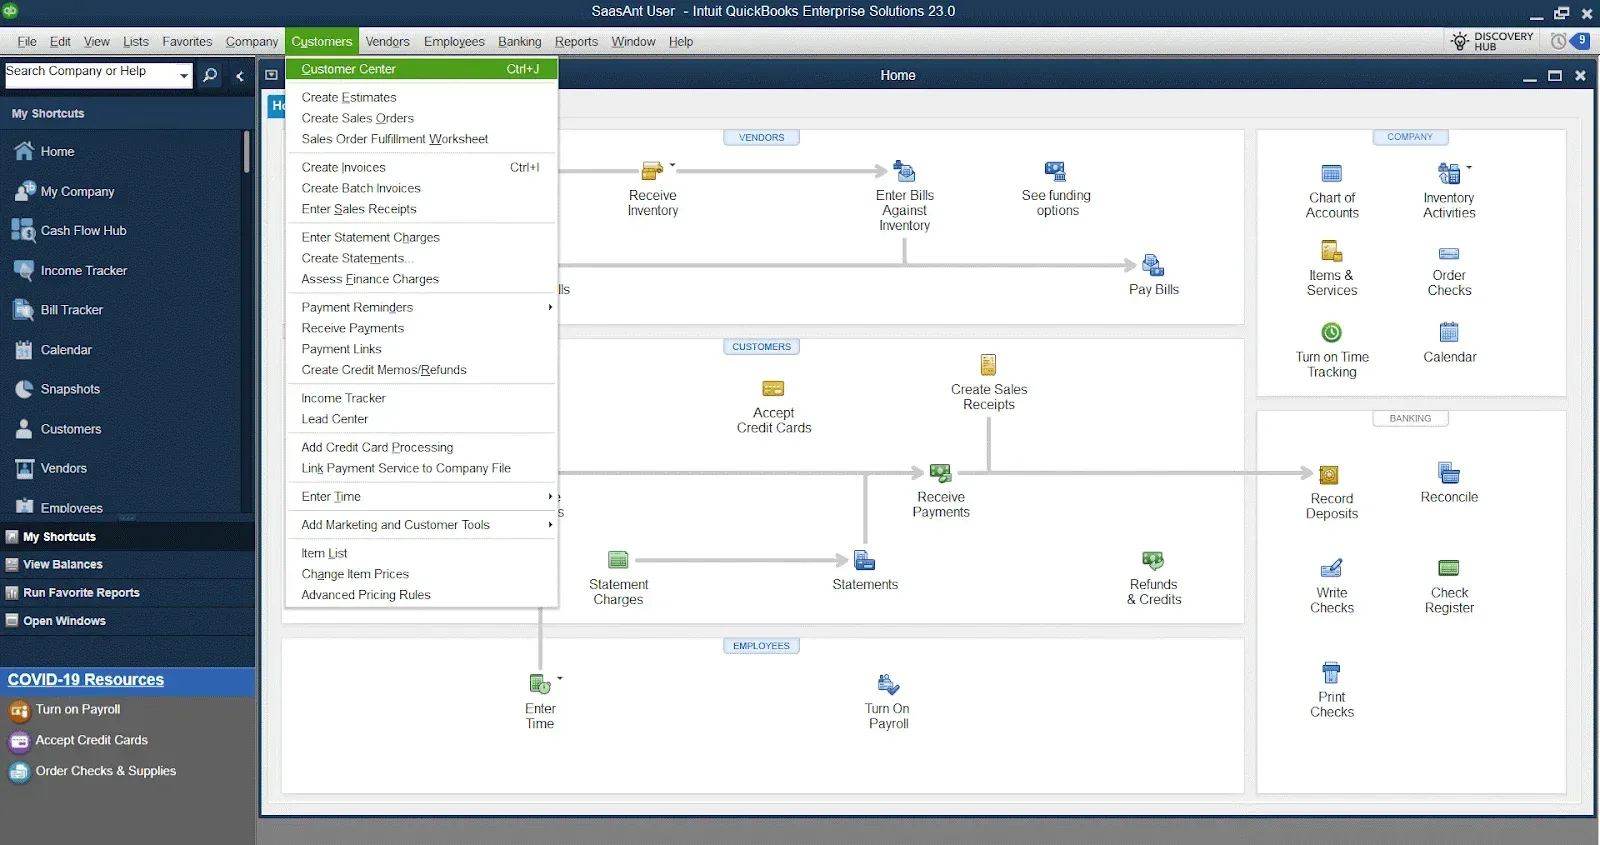
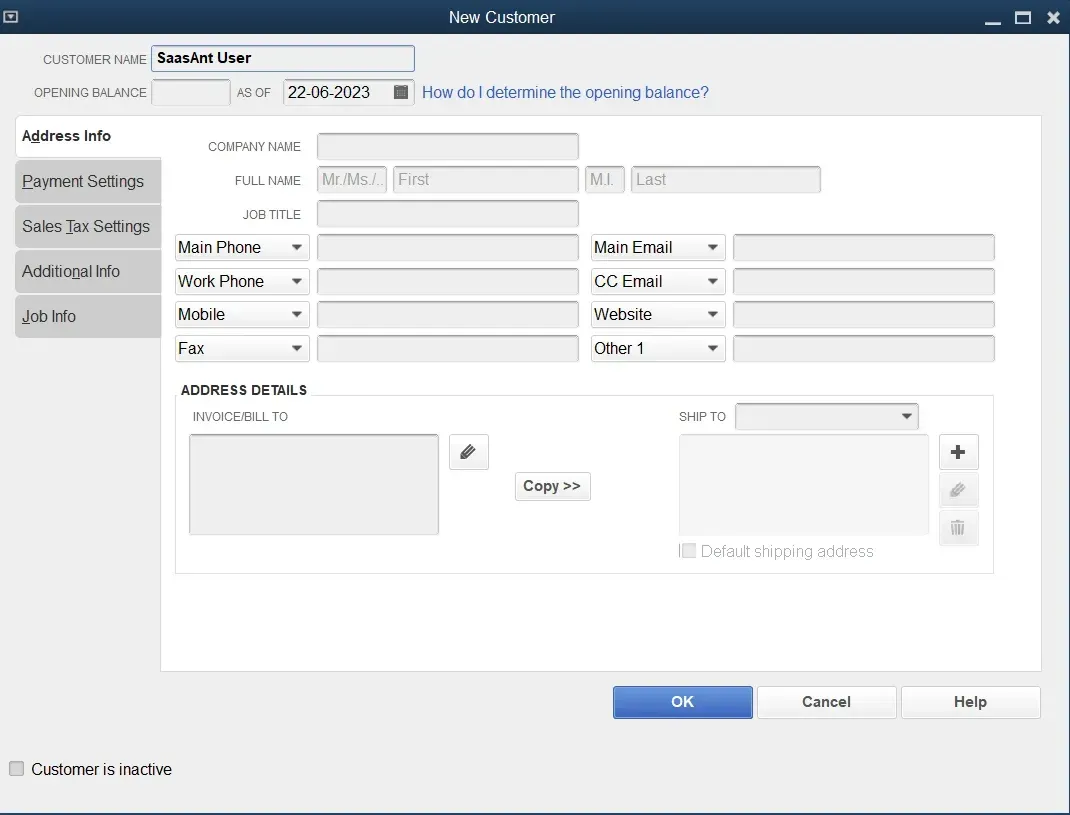
Click 'New Customer & Job' at the top, then select 'New Customer.'

Fill out the customer's details, such as name, address, and contact details.
Click 'OK.'
Step 3: Create a Refund Receipt
Next, you need to create a refund receipt. This step records the money you're returning to the customer:
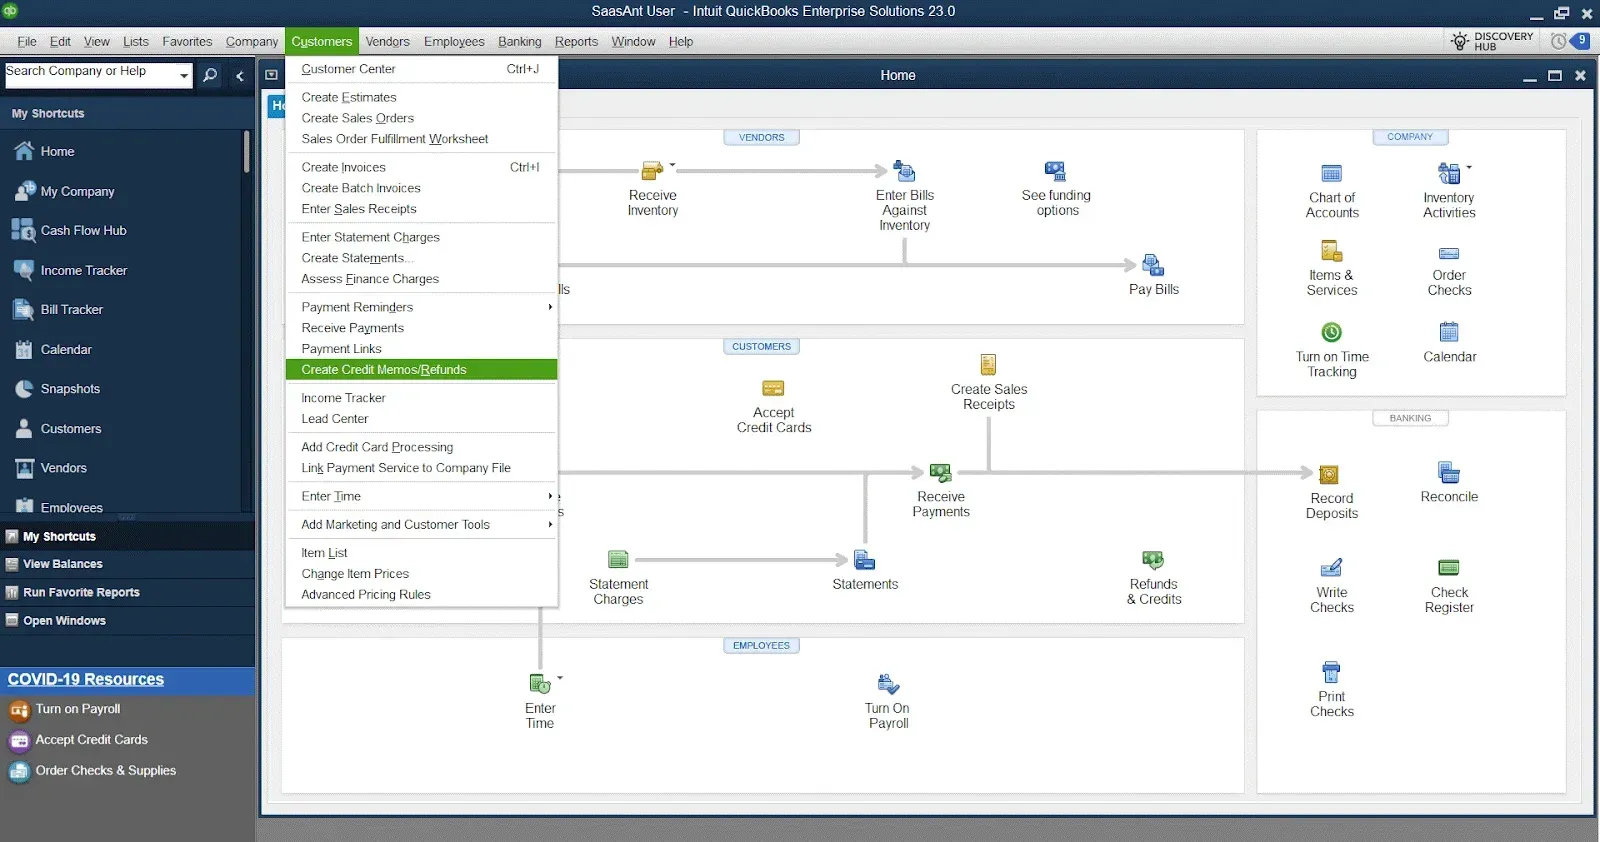
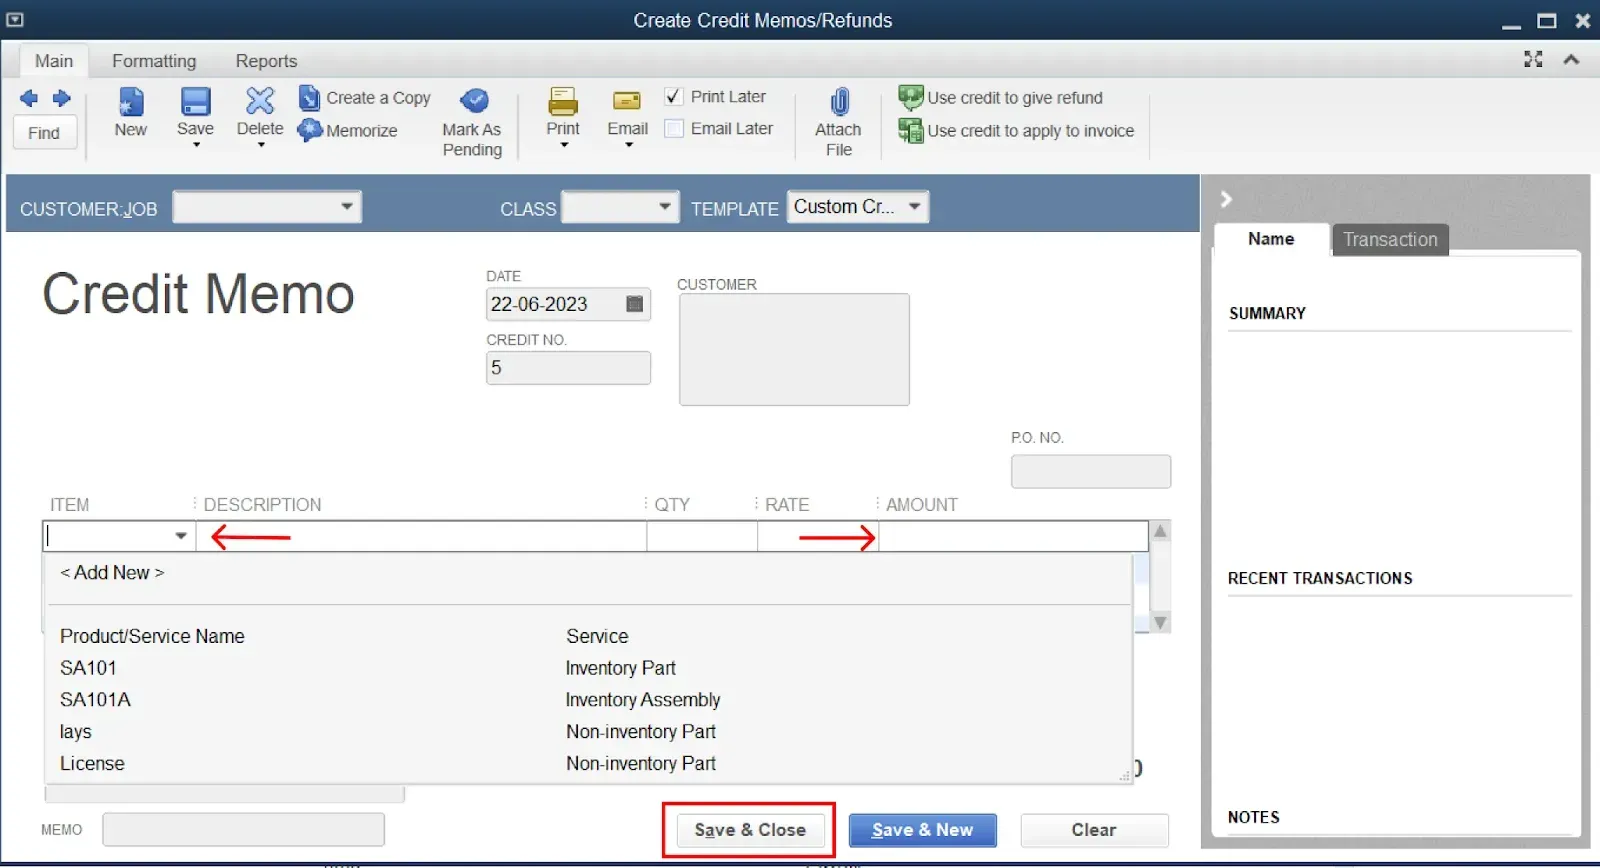
Navigate to the 'Customers' menu at the top, then select 'Create Credit Memos/Refunds.'
From the 'Customer Job' dropdown, select the customer you're refunding.
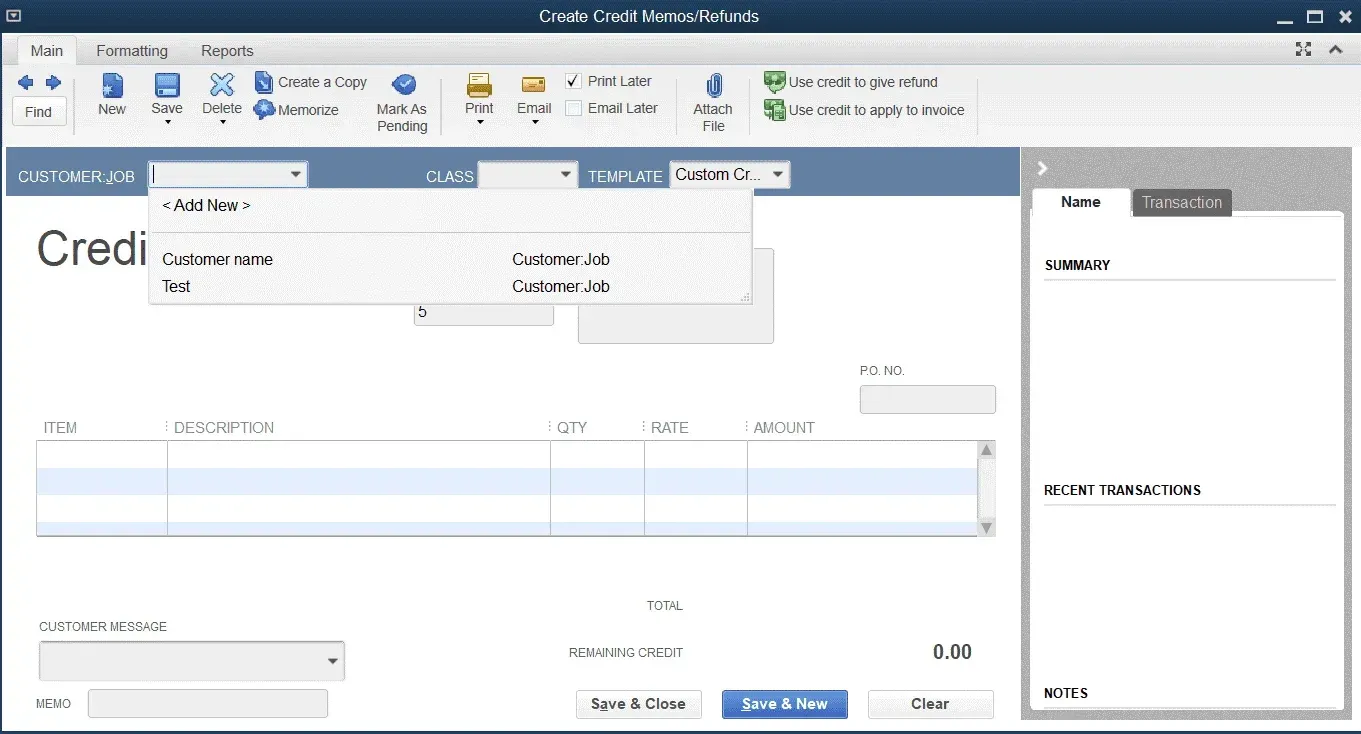
In the 'Item' section, select the items being refunded.
Enter the amount of the refund in the 'Amount' column.
Click 'Save & Close.'
Step 4: Apply the Refund to the Customer's Balance or Issue a Refund Check
Once the credit memo is created, you can either apply it to the customer's balance for future purchases or refund the amount right away:
After saving the credit memo, a window will appear asking how you want to handle the refund. Choose 'Apply to an invoice' to use the rebate for future purchases or 'Give a refund' to refund the amount now.
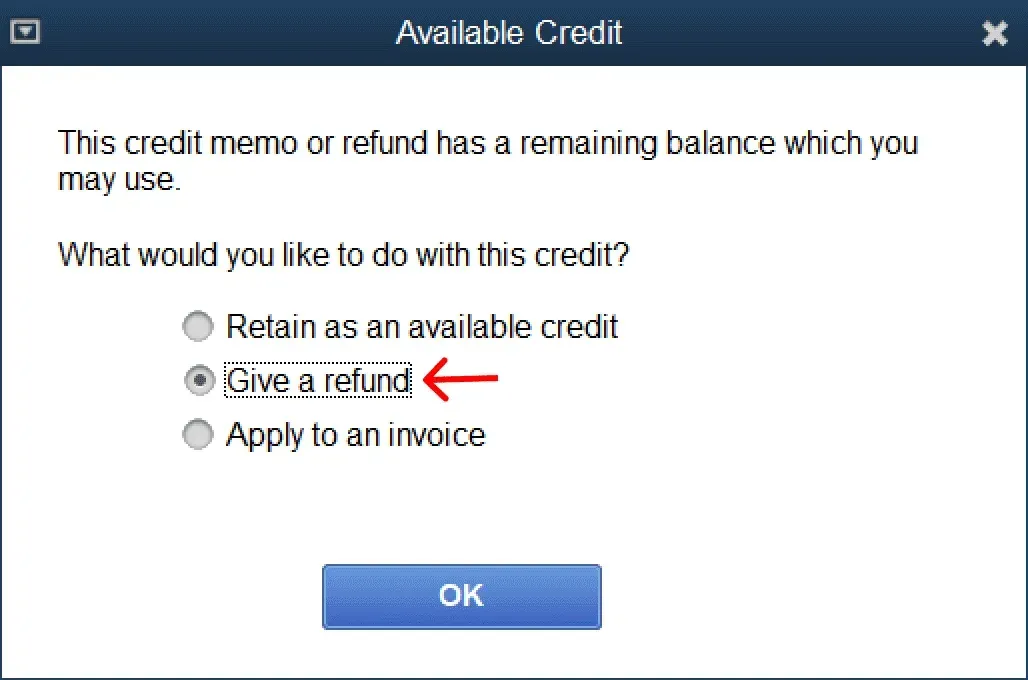
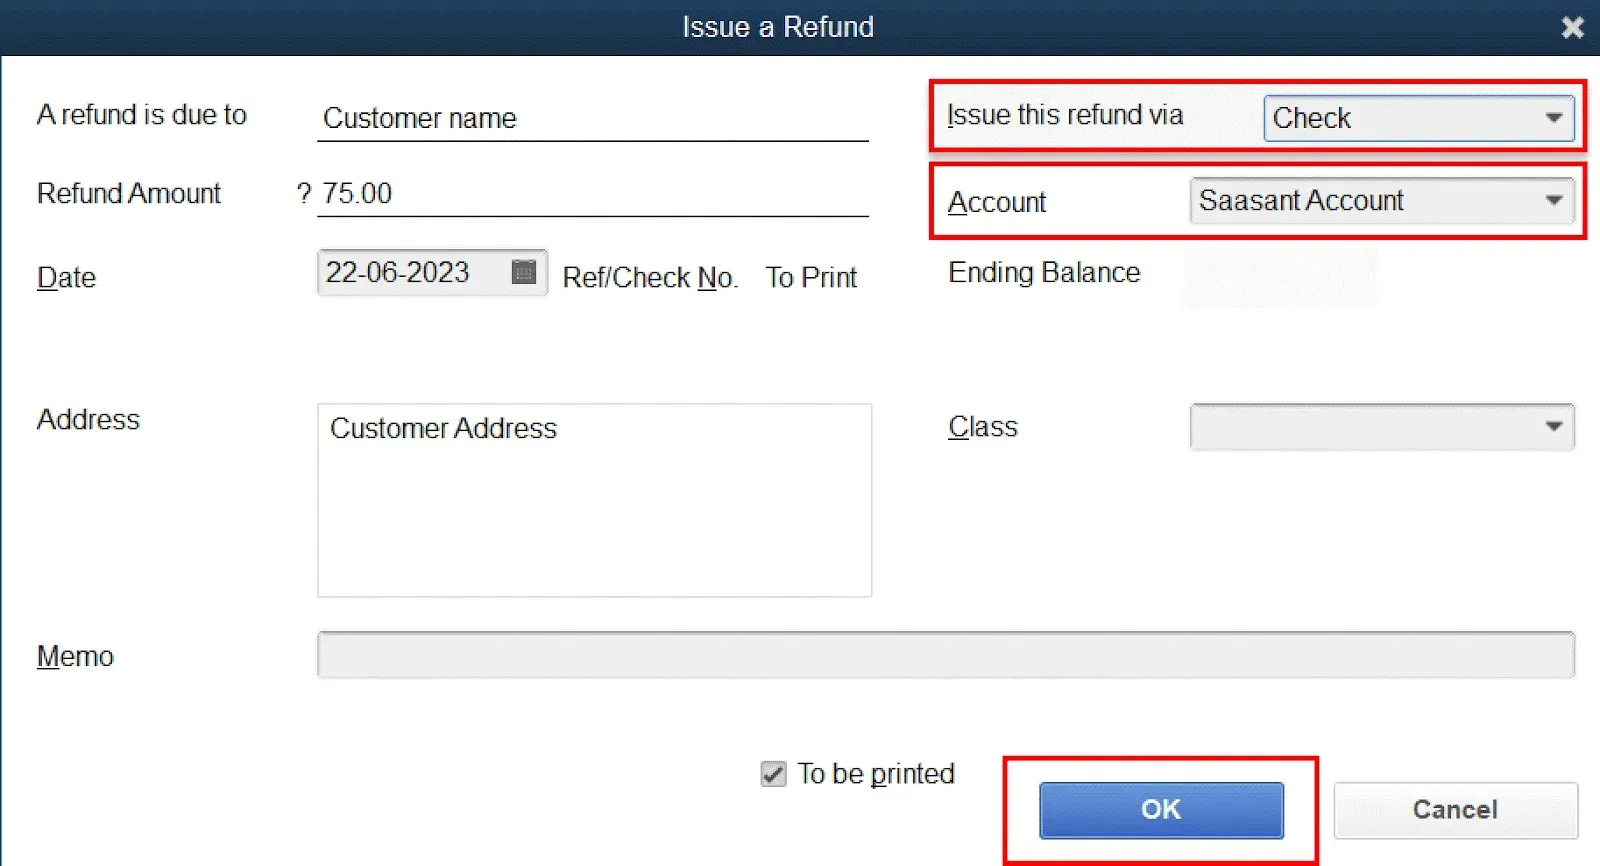
If you choose 'Give a refund,' you'll be prompted to select the payment method for the refund (check or cash) and the account from which the money will be taken.
Click 'OK'.
Step 5: Review the Refund
Finally, it's good practice to review the refund to ensure it has been categorized correctly:
Navigate to the 'Reports' menu at the top, select 'Customers & Receivables,' and then 'Customer Balance Detail.'
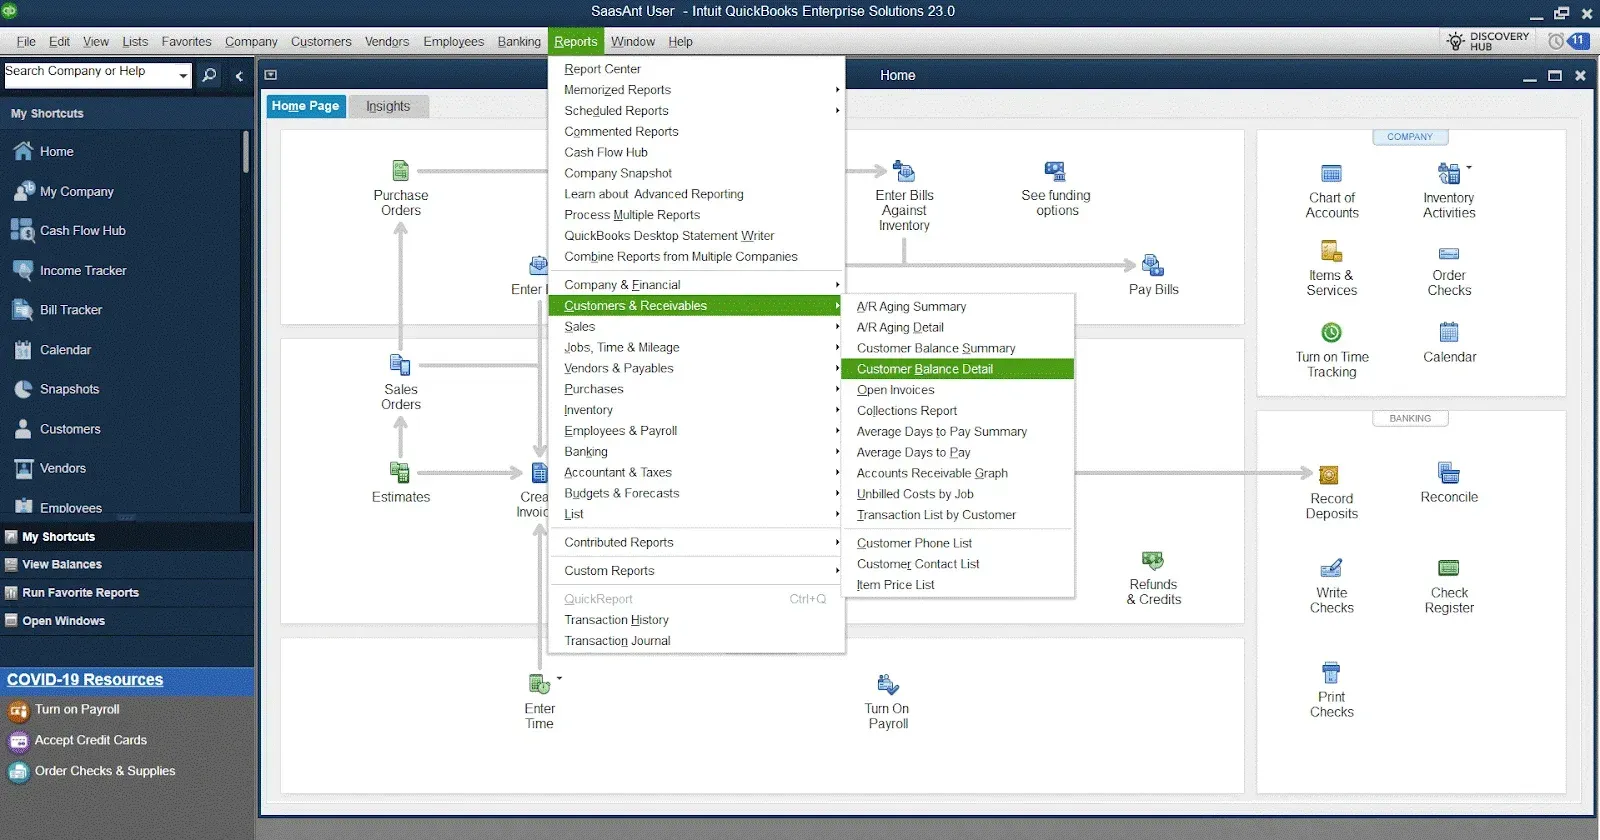
Locate the customer to see the refund.
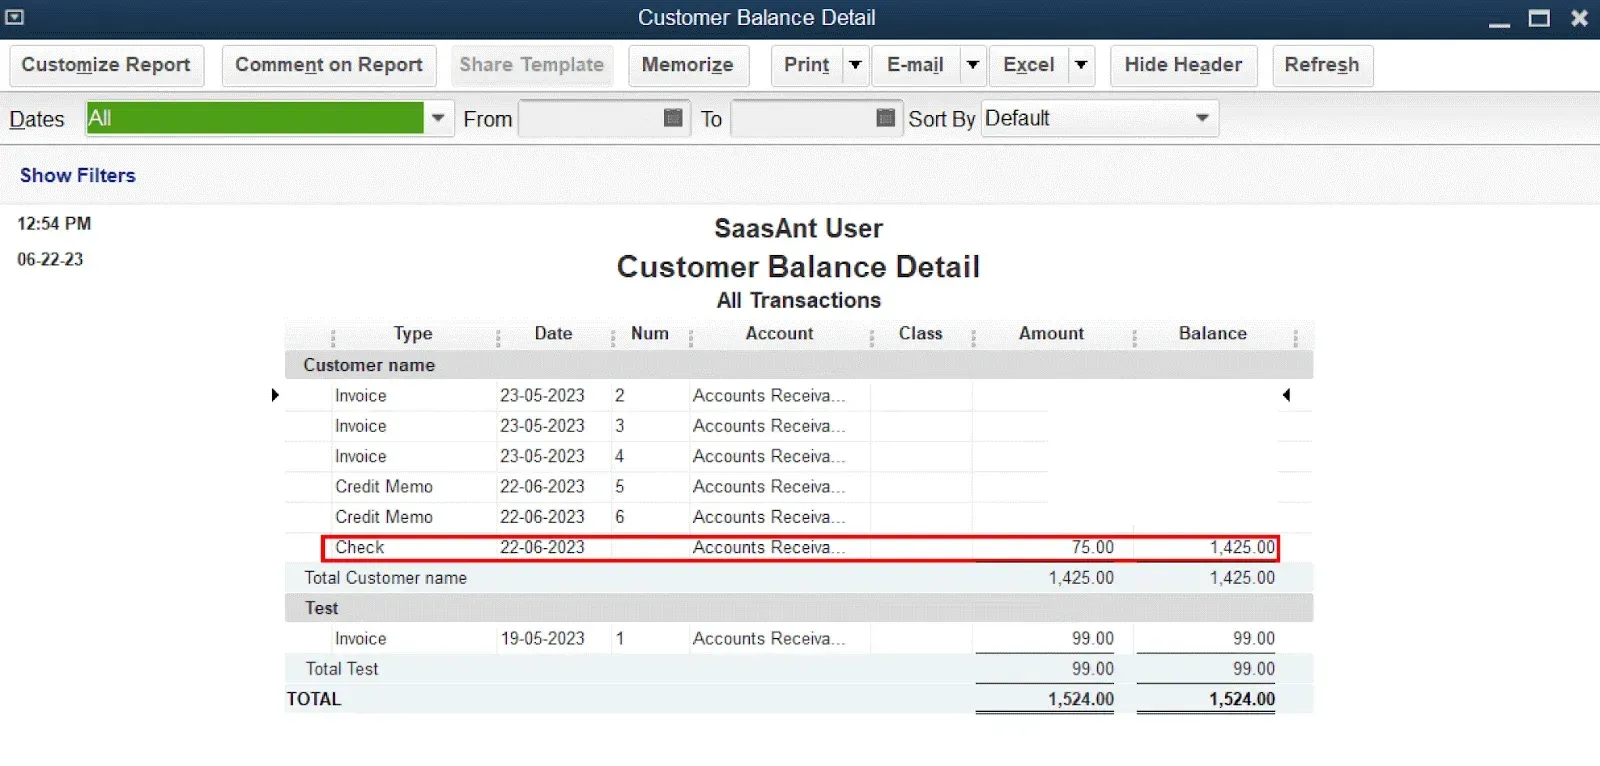
By following these steps, you can effectively record and categorize refunds in QuickBooks Desktop, using QuickBooks to keep your financial records accurate and up-to-date. Remember, these steps might vary slightly depending on the specific version of QuickBooks Desktop you're using.
Financial Accounts Management in Refund Recording and Categorization
In recording and categorizing refunds in QuickBooks Desktop, effectively managing financial accounts is paramount to ensure accuracy and transparency in your records.
Accounts Payable
When issuing refunds to customers, QuickBooks Desktop allows you to track the amount owed back to them through accounts payable. By accurately recording refund transactions, you can keep your accounts payable up-to-date, reflecting the liabilities your business owes to customers awaiting refunds.
Bank Deposit
After processing a refund, you may need to deposit the refunded amount into your bank account. QuickBooks Desktop facilitates this process by enabling you to record bank deposits directly within the software. It ensures that refunded funds are accurately reflected in your bank balances, providing a clear picture of your financial position.
Select the Bank
When recording refund transactions, QuickBooks Desktop allows selecting the specific bank account into which the refunded amount will be deposited. This feature ensures that refunds are allocated to the correct bank account, maintaining accuracy in your financial records and simplifying bank reconciliation processes.
Select Accounts Payable
In cases where refunds are issued for previously recorded expenses or bills, QuickBooks Desktop allows you to select the appropriate accounts payable accounts during the refund recording process. It ensures that the refunded amount is allocated correctly, reflecting the adjustment in your accounts payable balances.
Conclusion
QuickBooks Desktop offers powerful tools for businesses to efficiently manage their financial activities, including recording and categorizing refunds. Following the simple steps outlined in this guide, users can accurately track and process refunds, ensuring their financial records remain organized and up-to-date. With QuickBooks Desktop's user-friendly interface, businesses can streamline their refund management processes and focus on driving growth and success.
Frequently Asked Questions
How do I handle vendor credits and refunds in QuickBooks Desktop?
Vendor credits can be recorded and applied to future bills. When you receive a refund from a vendor, you can record it as a deposit and link it to the vendor credit.
Can I categorize a refund as an income in QuickBooks Desktop?
Generally, refunds are not categorized as income. They are usually applied against the original expense account. However, it's best to consult with an accountant for specific situations.
How do I record a customer refund in QuickBooks Desktop?
Customer refunds can be recorded through the 'Refunds and Credits' option under the 'Customers' menu. You can then apply this refund to the customer's invoice or give it as a standalone refund.
What happens when I record a refund in QuickBooks Desktop?
When you record a refund, the amount is deducted from your accounts receivable or chosen account. It helps keep your financial records accurate.
Can I track refunds from different customers separately in QuickBooks Desktop?
Yes, you can track refunds from different customers separately. Each refund can be linked to a specific customer, making it easy to track and manage. Remember, keeping your financial records accurate and up-to-date is always essential. Correctly categorizing refunds in QuickBooks Desktop ensures that your financial data reflects your business's financial state.
How do I handle vendor credits and refunds in QuickBooks Online?
Vendor credits and refunds in QuickBooks Online can be managed through the following steps:
Navigate to the Expenses tab and select Vendors.
Locate and open the vendor's profile.
Select the specific bill or expense for which you received a credit or refund.
Click on the "Add credit" or "Issue refund" option.
Enter the credit amount and choose the appropriate expense account.
Save the transaction.
How do I record a vendor refund in QuickBooks Desktop?
To record a vendor refund in QuickBooks Desktop, follow these steps:
Go to the "Vendors" menu and select "Enter Bills."
Choose the vendor for whom you received the refund.
Enter the refund amount as a negative number in the "Amount" field.
Select the appropriate expense account for the refund.
Save the transaction.
What are customer payments in QuickBooks Desktop?
Customer payments refer to the funds customers receive for goods or services your business provides. In QuickBooks Desktop, you can record customer payments against invoices or sales receipts to track incoming revenue accurately.
How do I record a bill credit in QuickBooks Desktop?
To record a bill credit in QuickBooks Desktop, follow these steps:
Navigate to the "Vendors" menu and select "Enter Bills."
Choose the vendor for whom you received the bill credit.
Enter the credit amount as a negative number in the "Amount" field.
Select the appropriate account (expense account) for the credit.
Save the transaction to record the bill credit in QuickBooks Desktop.
What should I do if a customer has made an overpayment in QuickBooks Desktop?
If a customer has overpaid in QuickBooks Desktop, you can handle it by applying the excess amount as a credit to their account. To do this:
Go to the "Customers" menu and select "Receive Payments."
Choose the customer who made the overpayment.
Enter the overpayment amount as a negative number in the "Amount" field.
Select the appropriate invoice or sales receipt against which the overpayment was made.
QuickBooks will automatically apply the overpayment as a credit to the customer's account, which can be used for future purchases.
How do I record refunds in QuickBooks?
To record refunds in QuickBooks, follow these steps:
Navigate to the appropriate transaction area, such as the "Customers" or "Vendors" menu.
Select the option to issue a refund or create a credit memo.
Fill in the necessary details, including the customer or vendor information and the refund amount.
Save the transaction to record the refund in QuickBooks.
How do I record refunds I received from customers or vendors in QuickBooks?
To record refunds you received in QuickBooks, follow these steps:
Access the appropriate transaction area, such as "Customer Refunds" or "Vendor Credits."
Select the option to record a refund received.
Enter the refund details, including the customer or vendor information and the refunded amount.
Save the transaction to record the refund you received in QuickBooks.
How can I refund a customer in QuickBooks?
To refund a customer in QuickBooks, proceed as follows:
Access the "Customers" menu and select "Refund Receipt."
Choose the customer to whom the refund is being issued.
Enter the refund details, including the items being refunded and the amount.
Save the refund receipt to complete the process.
What does it mean to reconcile in QuickBooks?
Reconciliation in QuickBooks refers to comparing financial records, such as bank statements, with records in the QuickBooks software to ensure they match. This process helps identify any discrepancies or errors and ensures the accuracy of financial data.
How do I track available credit in QuickBooks?
To track available credit in QuickBooks, you can follow these steps:
Access the customer or vendor profile in QuickBooks.
Navigate to the "Transactions" or "Customer Center" tab.
Review the available credit balance associated with the customer or vendor.
Monitor changes to the available credit balance as transactions are recorded and payments are made.
Can I use a credit card to make purchases in QuickBooks?
Yes, you can use a credit card to make purchases in QuickBooks. When recording transactions, simply select the credit card account as the payment method, and the expense will be charged to the credit card. Ensure that the credit card account is set up and linked correctly in QuickBooks to facilitate accurate recording of transactions.
How do you process partial refunds in QuickBooks Desktop?
Navigate to the Customer Center: Launch QuickBooks Desktop and access the "Customer Center" from the main menu.
Locate the Customer: Select the customer requesting the partial refund from the list of customers in the Customer Center.
Create a Credit Memo: In the customer's profile, click the "Create Credit Memos/Refunds" option. It will open a new window where you can issue a credit memo for the partial refund.
Select the Items to Refund: In the credit memo window, select the items or services returned by the customer. Adjust the quantity or amount to reflect only the portion of the returned order.
Adjust the Refund Amount: Modify the refund amount to match the value of the returned items or services. This amount should only cover the partial refund, not the original transaction.
Save the Credit Memo: Once you've adjusted the refund amount and selected the items to refund, save the credit memo.
Apply the Credit Memo: After saving the credit memo, you can apply it to the customer's outstanding invoices. QuickBooks Desktop will automatically adjust the invoice balances to reflect the partial refund.
Review and Finalize: Double-check the credit memo and invoice balances to ensure accuracy. Once you're satisfied, finalize the transaction.
How do I handle refunds for canceled orders in QuickBooks Desktop?
Identify the Canceled Order: Determine which order has been canceled before fulfillment or shipment.
Reverse the Original Transaction: In QuickBooks Desktop, locate the original transaction related to the canceled order, such as the sales receipt or invoice.
Void or Delete the Transaction: Void or delete the original transaction to reverse its impact on your financial records.
Issue the Refund: Navigate to the 'Customers' menu and select the option to issue a refund or credit memo.
Select the Customer and Order: Choose the customer associated with the canceled order and specify the order for which the refund is being issued.
Adjust Refund Amount: Modify the refund amount to reflect the canceled order accurately. Ensure it covers the entire amount paid by the customer.
Record the Refund: Save the refund transaction to record the refund for the canceled order in QuickBooks Desktop.