How to Record Owner's Draw in QuickBooks Online

Managing owner withdrawals correctly is a crucial part of small business bookkeeping. When business owners take money out for personal use, these transactions — called owner’s draws — must be recorded properly to maintain accurate financial records and clear equity reporting.
If you use QuickBooks Online, the process is straightforward. This guide explains how to set up and record owner’s draw transactions, why they matter, and how tools like SaasAnt Transactions can help you automate and manage them efficiently.
What Is an Owner’s Draw?
An owner’s draw represents funds withdrawn by the business owner from company profits or capital for personal use. It’s common in sole proprietorships, partnerships, and LLCs, where owners aren’t paid a salary but instead take distributions from their equity.
In accounting terms, the draw reduces the owner’s equity in the business. Recording it correctly ensures that your balance sheet reflects accurate ownership value and cash flow.
Owner’s Draw vs. Salary
Owner’s Draw: A withdrawal of profits or invested capital, not considered a business expense.
Salary: Regular wages paid to employees, recorded as an expense and subject to payroll taxes.
In QuickBooks, owner’s draws are recorded as equity transactions, not expenses, meaning they don’t affect your profit and loss report.
Why Recording Owner’s Draws Matters
Properly recording draws ensures:
Accurate representation of business equity and cash flow.
Clarity for tax reporting and financial analysis.
Prevention of confusion during audits or accountant reviews.
Better insight into how much money has been taken out of the business.
Unrecorded or misclassified draws can make your balance sheet inaccurate, affecting decisions about cash management and growth.
Contents
What Is an Owner’s Draw?
Why Recording Owner’s Draws Matters
Step 1: Create an Owner's Draw Account
Step 2: Record an Owner's Draw
Step 3: Review Your Owner's Draw Account
Integrating SaasAnt Transactions for Automation
When to Consult an Accountant
Final Thoughts
Frequently Asked Questions (FAQs)
Step 1: Create an Owner's Draw Account
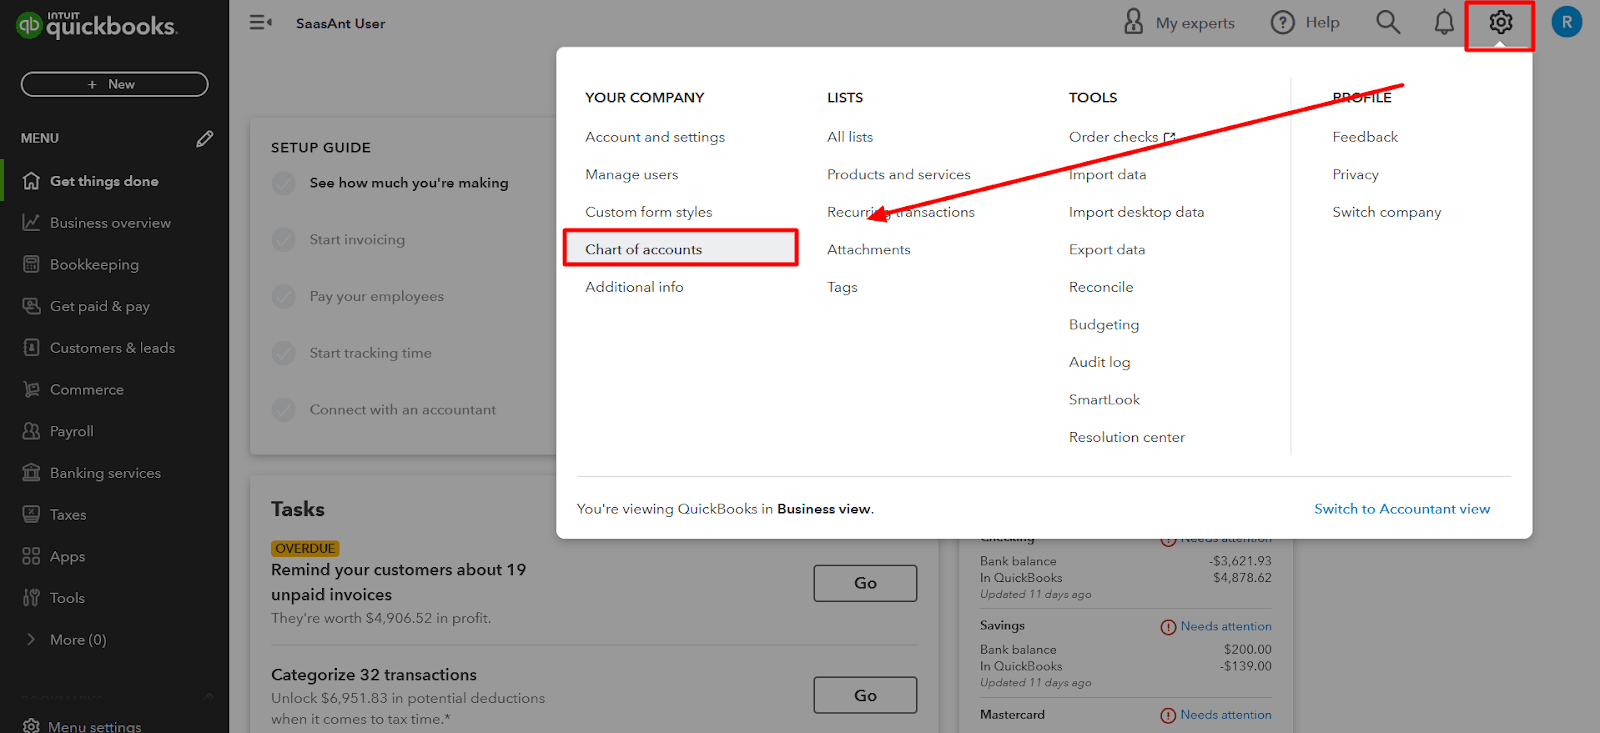
Click on the settings gear icon, and select 'Chart of Accounts.'
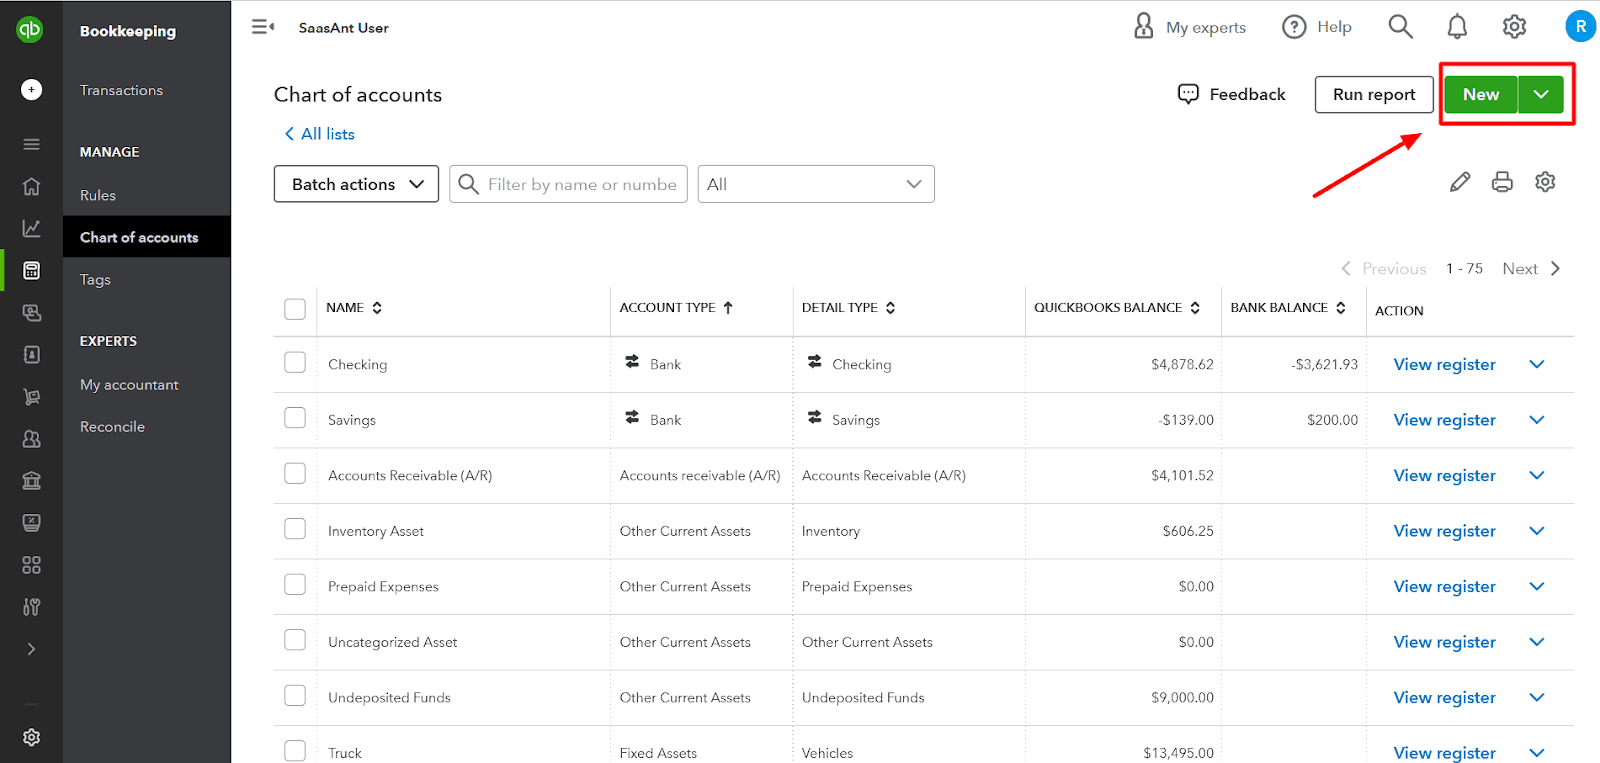
Click the 'New' button in the top right corner to create a new account.
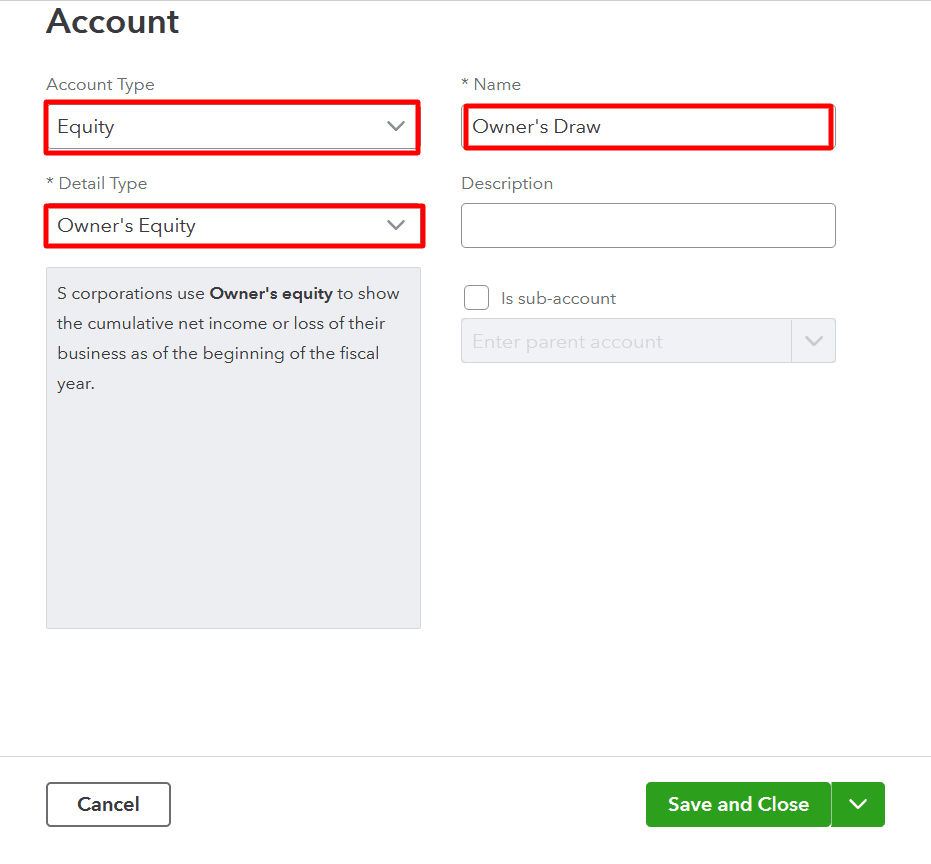
In the 'Account Type' drop-down menu, select 'Equity.'
Navigate to the 'Detail Type' drop-down menu, and select 'Owner's Equity' or 'Partner's Equity' as applicable.
Name the account 'Owner's Draw' or something similar that fits your preference.
Click 'Save and Close' to create the account.
 CTA-Banner-1
Step 2: Record an Owner's Draw
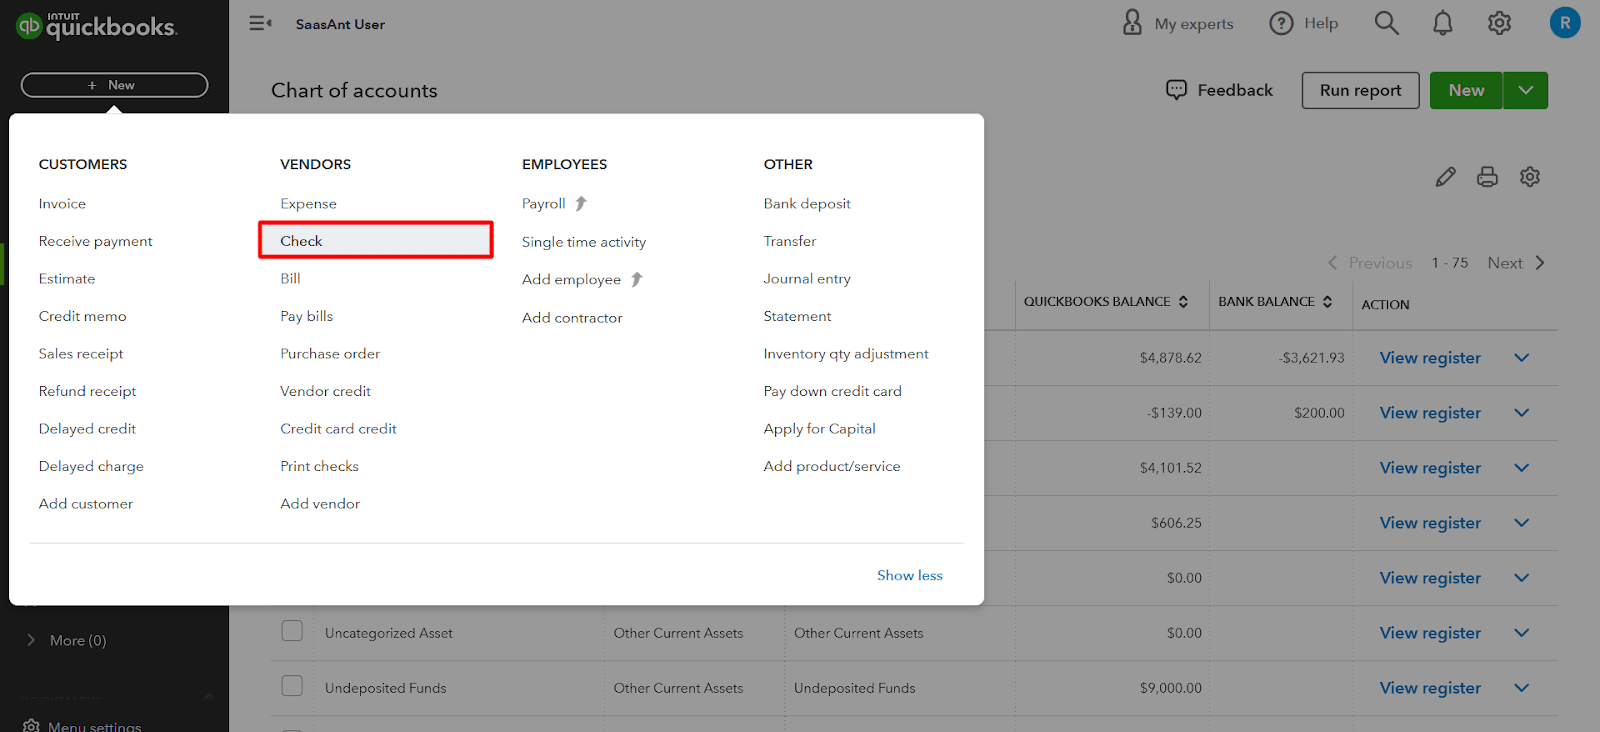
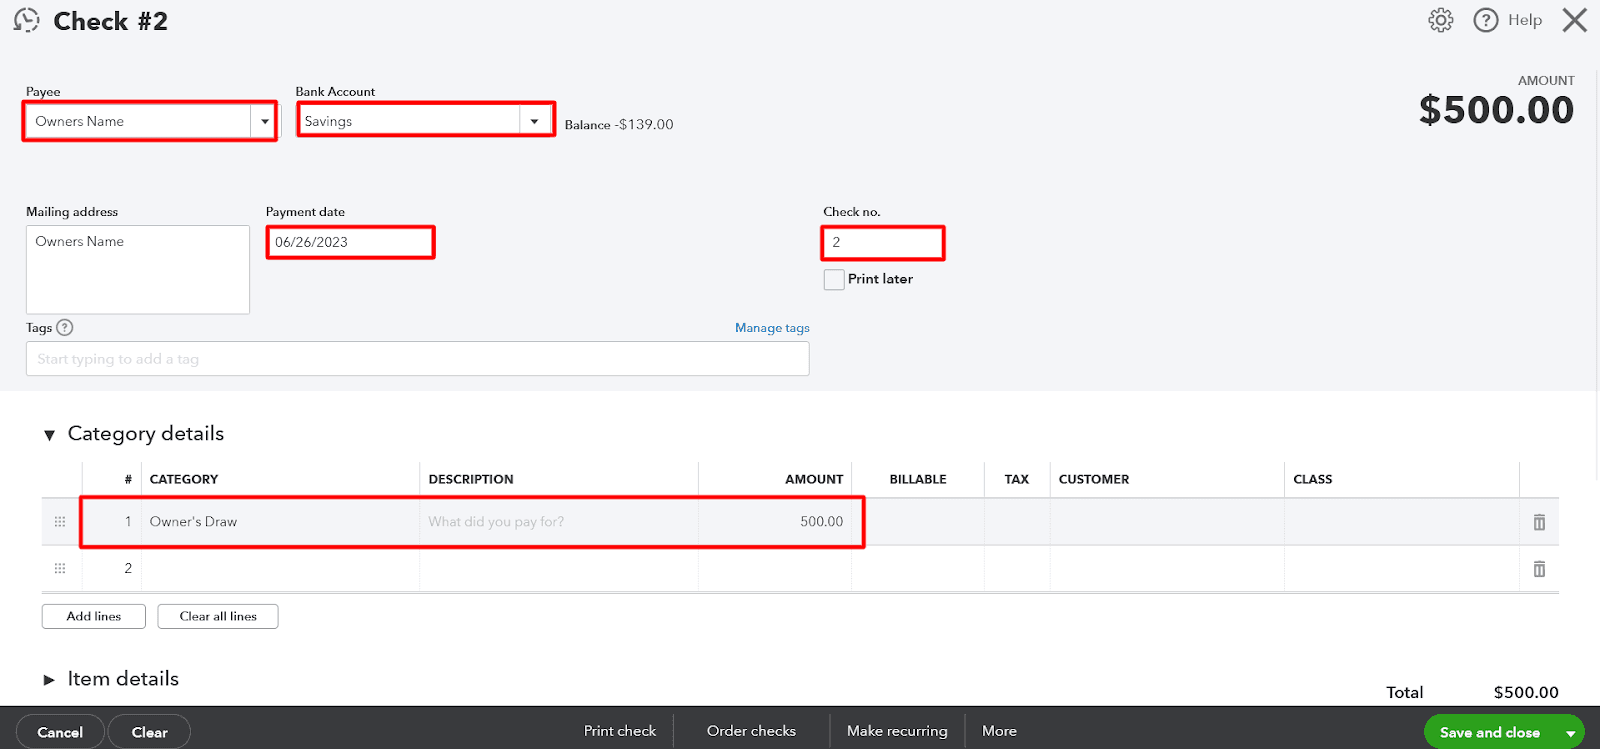
On the QuickBooks Online dashboard, navigate to the 'New' button (+) and select 'Cheque' under the 'Vendors' column.
Select the account to withdraw funds in the 'Bank Account' field.
Input the date and the cheque number, if applicable.
Enter the owner's name in the 'Pay to the Order of' field.
In the 'Category' section, select the 'Owner's Draw' account you created earlier.
Enter the amount of the draw in the 'Amount' field.
Click 'Save and Close' to record the transaction.
Step 3: Review Your Owner's Draw Account
Navigate to the ‘Accounting’ menu and select the ‘Chart of Accounts’ option.
Find the 'Owner's Draw' account and click 'View Register' for the transaction history.
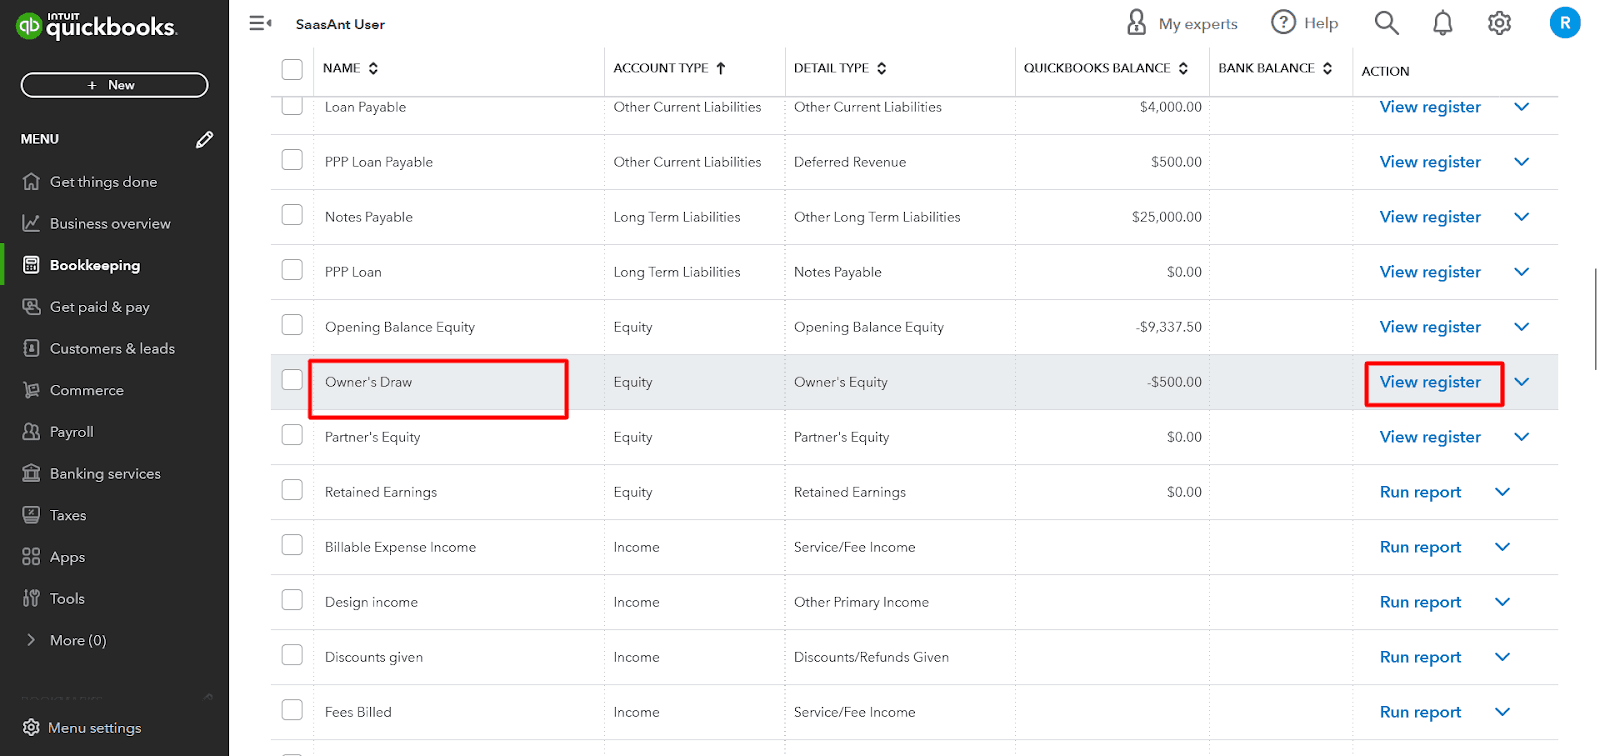
The owner's draw you recorded should be visible in the register, and the account balance will reflect the total of all recorded draws.
With these steps, you can confidently record an owner's draw in QuickBooks Online. Regularly documenting and reviewing these transactions ensures you have an accurate record of the money withdrawn from the business for personal use.
Integrating SaasAnt Transactions for Automation
Here’s how SaasAnt adds efficiency to your owner’s draw process:
Task | Manual in QuickBooks | Automated with SaasAnt Transactions |
Recording each draw | One-by-one entry | Bulk import via Excel/CSV |
Editing past entries | Manual adjustment | Batch modify |
Correcting errors | Delete & recreate | Rollback instantly |
Monthly reporting | Limited filters | Advanced export & filters |
By automating repetitive entries, you can reduce time spent on manual data entry by up to 80% while ensuring accuracy across all equity transactions.
When to Consult an Accountant
Owner’s draws affect your equity and tax obligations, especially in partnerships and LLCs. Consult your accountant for:
Setting up initial capital contributions
Understanding tax treatment of draws
Reviewing annual equity balances
Distributing profits correctly among owners
Professional guidance ensures your books remain compliant with accounting standards.
Final Thoughts
Recording owner’s draws correctly in QuickBooks Online ensures accurate equity reporting and transparency in your business finances. While QuickBooks makes it easy to create and manage draw accounts, using SaasAnt Transactions helps you automate and bulk-manage these entries, saving time and reducing the risk of manual errors.
Whether you’re managing a single-owner firm or a partnership, combining QuickBooks with SaasAnt Transactions gives you the control, speed, and accuracy you need for efficient equity management.
Frequently Asked Questions (FAQs)
1. What is the difference between Owner’s Draw and Owner’s Equity?
Owner’s Draw refers to the money withdrawn by the owner, while Owner’s Equity represents the total value the owner has in the business after accounting for investments and draws.
2. How do I record an owner’s draw from the bank feed in QuickBooks Online?
Go to Banking → Transactions, find the withdrawal, and categorize it under the Owner’s Draw equity account. Save the transaction to ensure it is appropriately recorded.
3. Can I automate owner’s draw tracking in QuickBooks?
Yes. Using SaasAnt Transactions, you can import multiple draw transactions from Excel or CSV files, reducing manual work and improving consistency.
4. Should owner’s draws be recorded as expenses in QuickBooks?
No. Owner’s draws are equity reductions, not business expenses. They don’t appear on your income statement.
5. How can I track draws for multiple owners?
Create separate Owner’s Draw accounts for each individual in your chart of accounts. Record transactions accordingly or import them in bulk using SaasAnt Transactions.
Tags
Read also
How to Convert from Quicken to QuickBooks
How to Set Up Recurring Transactions in QuickBooks Online?
How to Categorize Cash Back Rewards in QuickBooks