How to Record Refunds in QuickBooks Desktop: A Comprehensive Guide
Whether you’re a business owner, accountant, or bookkeeper, recording refunds correctly in QuickBooks Desktop is crucial for keeping accurate financial records. A small mistake can mess up reports, tax calculations, or account balances.
You might be:
✔ Entering a refund for the first time and unsure where it goes.
✔ Fixing a mistake from a previous refund entry.
✔ Reconciling books and need refunds to reflect correctly.
✔ Handling multiple refunds and looking for a faster, automated way.
From customer refunds to vendor credits, knowing where and how to record them ensures clean books and accurate reports. If you deal with bulk refunds, tools like SaasAnt Transactions Desktop can automate imports, edits, and deletions—saving time and reducing errors.
Contents
Scenario 1: Issuing a Refund for Returned Items
Scenario 2: Issuing a Refund for Overpayment
Scenario 3: Issuing a Refund for a Prepayment
Frequently Asked Questions
Scenario 1: Issuing a Refund for Returned Items
Step 1: Log into QuickBooks Desktop
The first step is straightforward: launch your QuickBooks Desktop software and log into your account.
Step 2: Create a New Customer
Before issuing a refund, you need to have a customer refund. If the customer isn't already in your database, you'll need to add them:
Navigate to the 'Customers' menu at the top, then select 'Customer Center.'
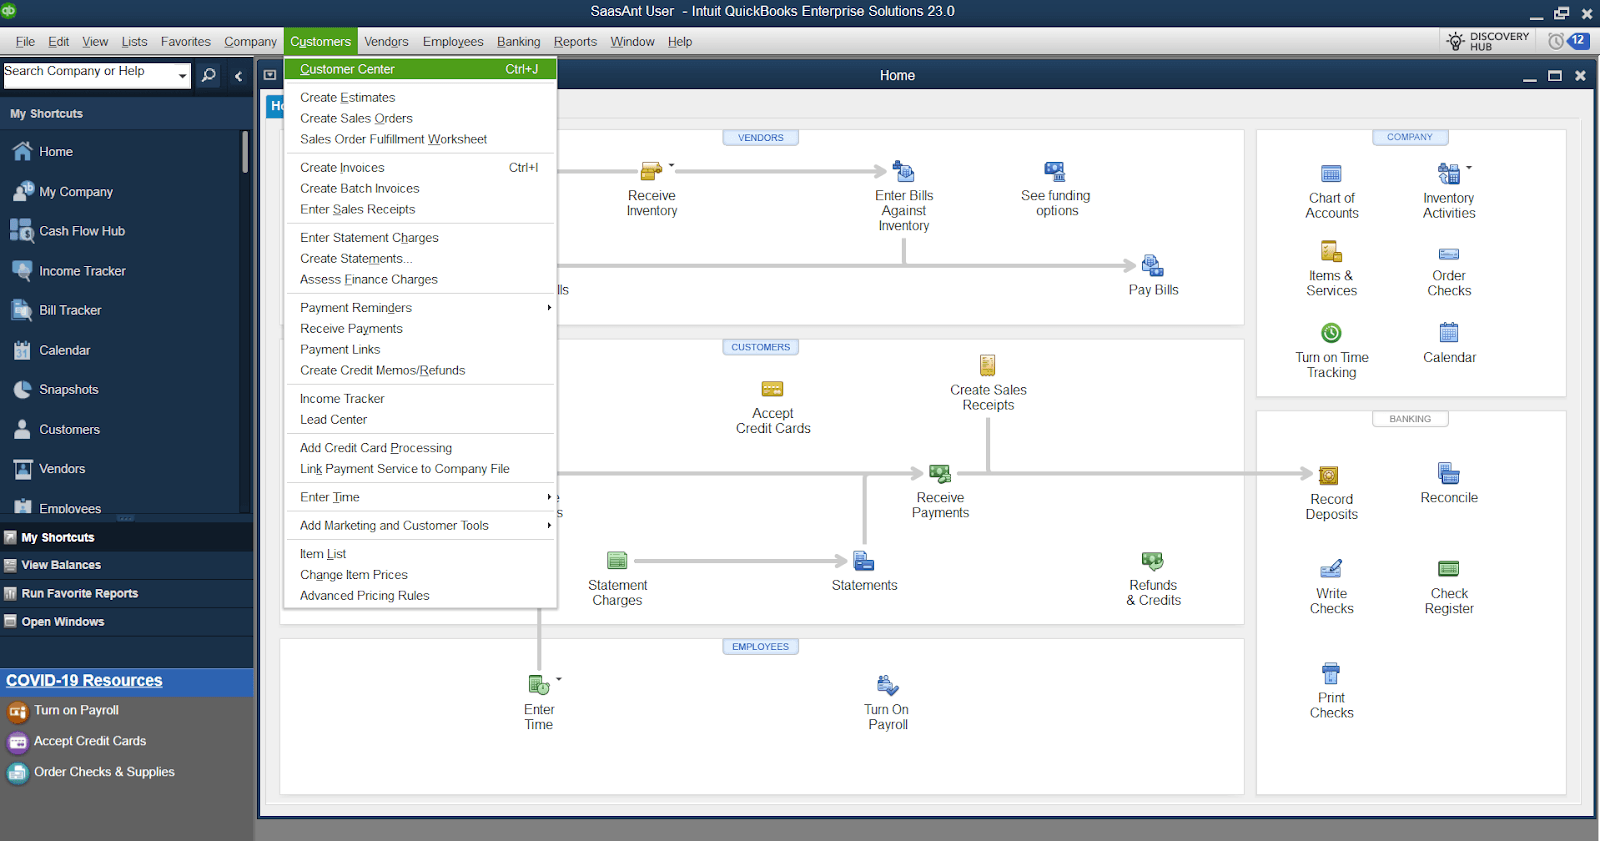
Click 'New Customer & Job' at the top, then select 'New Customer.'

Fill out the customer's details, such as name, address, and contact details.
Click 'OK.'
Step 3: Create a Refund Receipt
Next, you need to create a refund receipt. This step records the money you're returning to the customer:
Navigate to the 'Customers' menu at the top, then select ‘Create Credit Memos/ Refunds.’
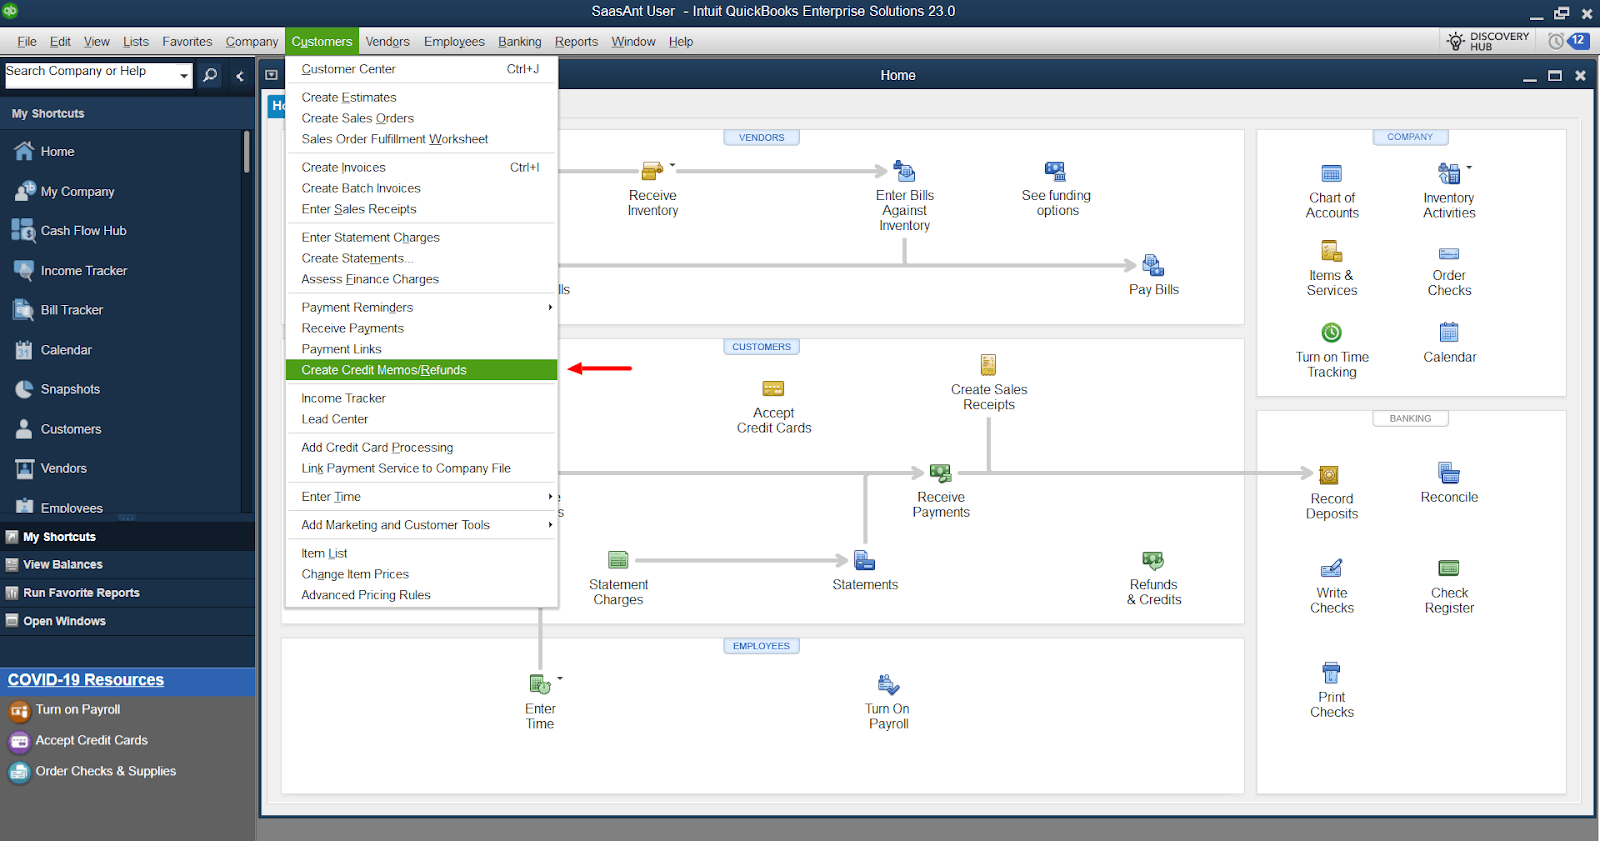
From the ‘Customer: Job’ dropdown, select the customer you're refunding.
In the 'Item' section, select the items being refunded.
Enter the amount of the refund in the 'Amount' column.
Click 'Save & Close.'
Step 4: Apply the Refund to the Customer's Balance or Issue a Refund Check
Once the credit memo is created, you can either apply it to the customer's balance for future purchases or refund the amount right away:
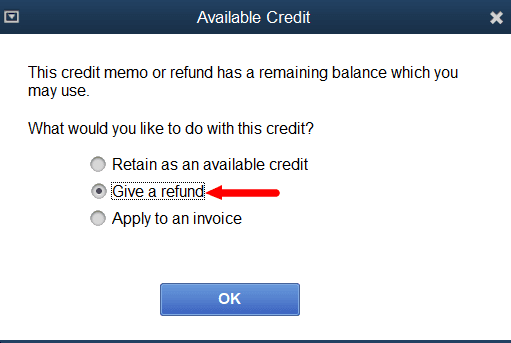
After saving the credit memo, a window will appear asking how you want to handle the refund. Choose 'Apply to an invoice' to use the refund for future purchases or 'Give a refund' to refund the amount now.
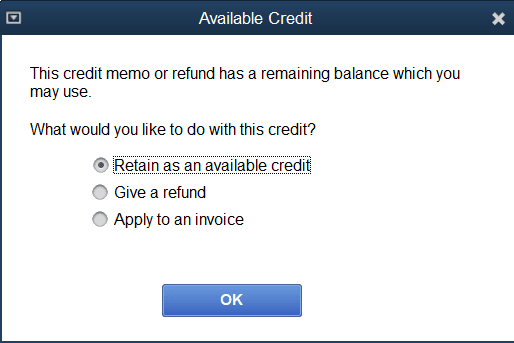
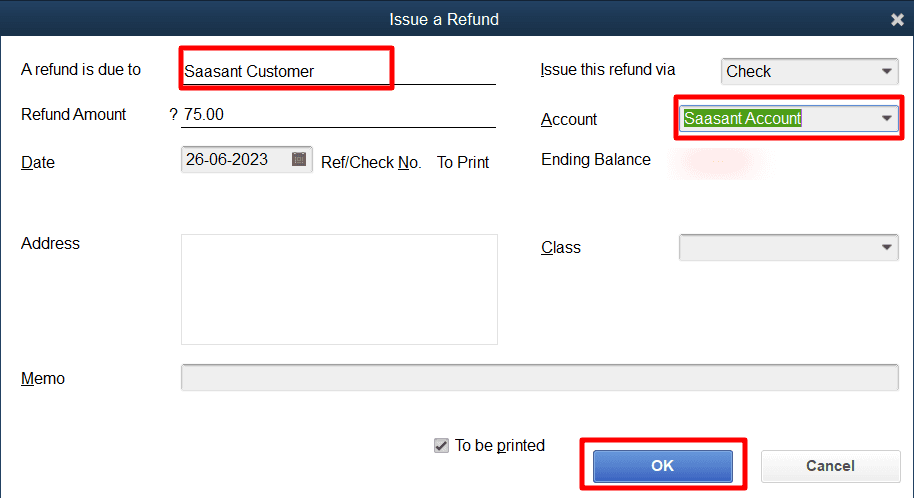
If you choose 'Give a refund,' you'll be prompted to choose the payment method for the refund (check or cash) and the account from which the money will be taken.
Click 'OK'
Step 5: Review the Refund
Finally, it's good practice to review the refund to ensure it has been categorized correctly:
Navigate to the 'Reports' menu at the top, then select 'Customers & Receivables' and 'Customer Balance Detail.'
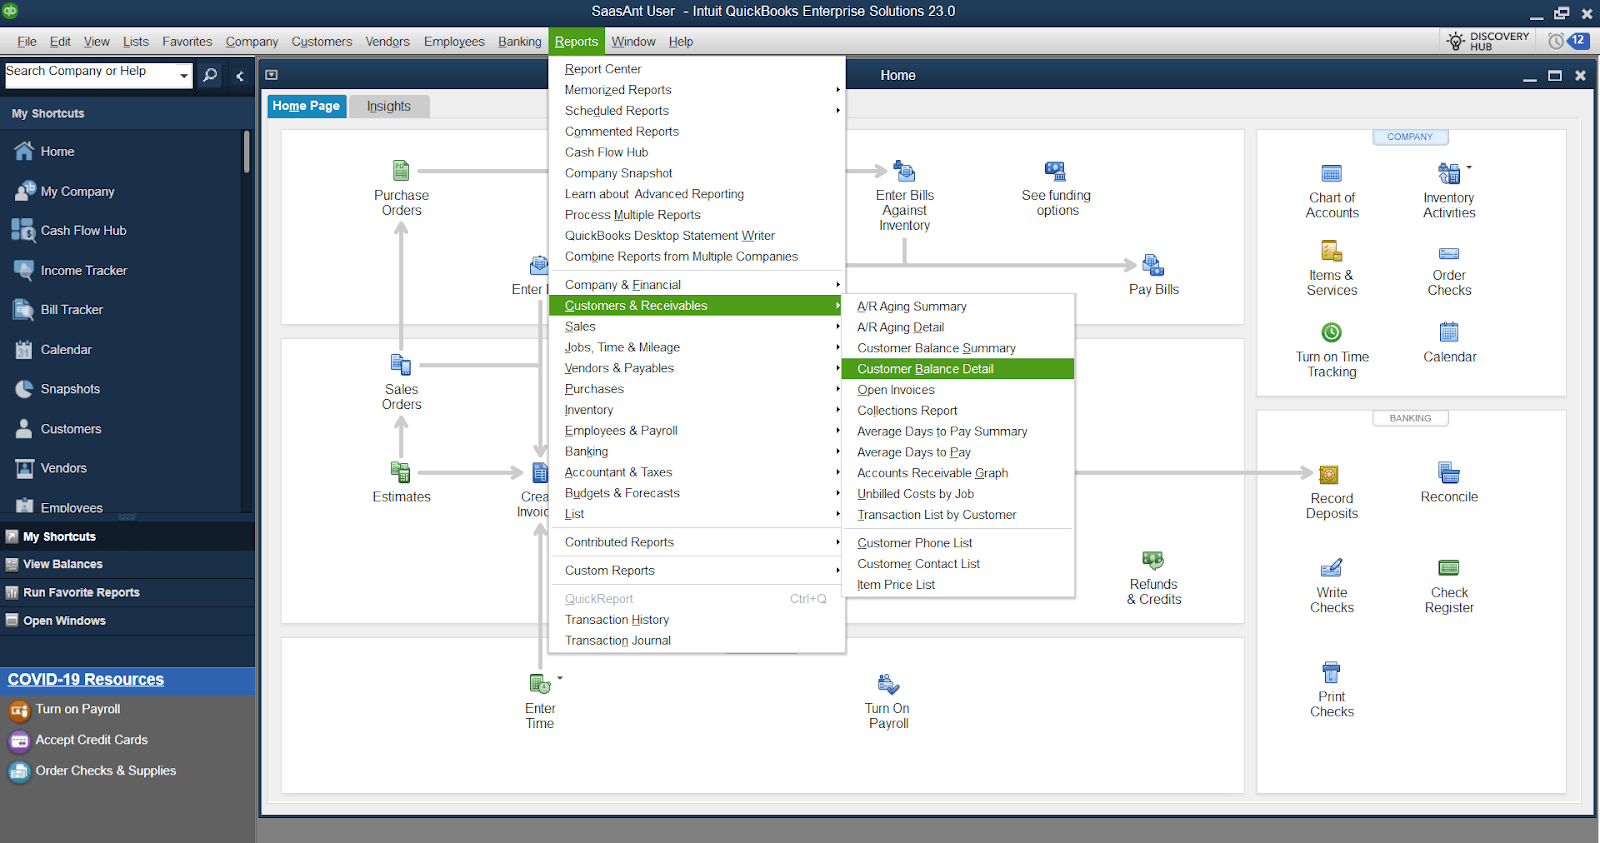
Locate the customer to see the refund.
Scenario 2: Issuing a Refund for Overpayment
Navigate to the ‘Customers’ menu and select ‘Create Credit Memos/Refunds.’
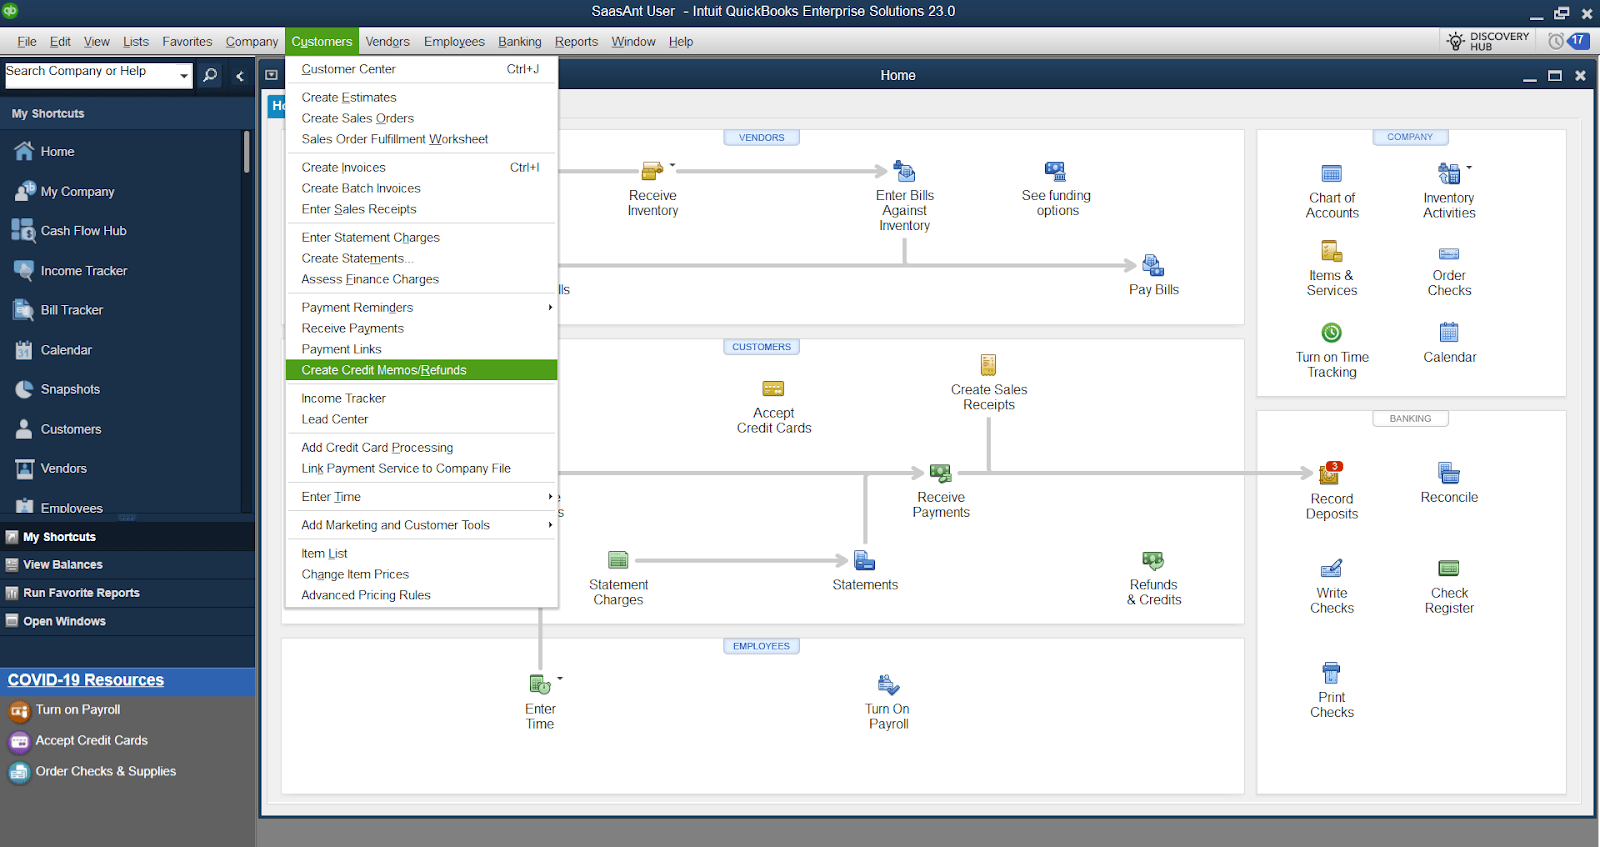
From the ‘Customer: Job’ dropdown menu, choose the customer you wish to issue a refund to.
Now, input the details of the products or services that need to be refunded.
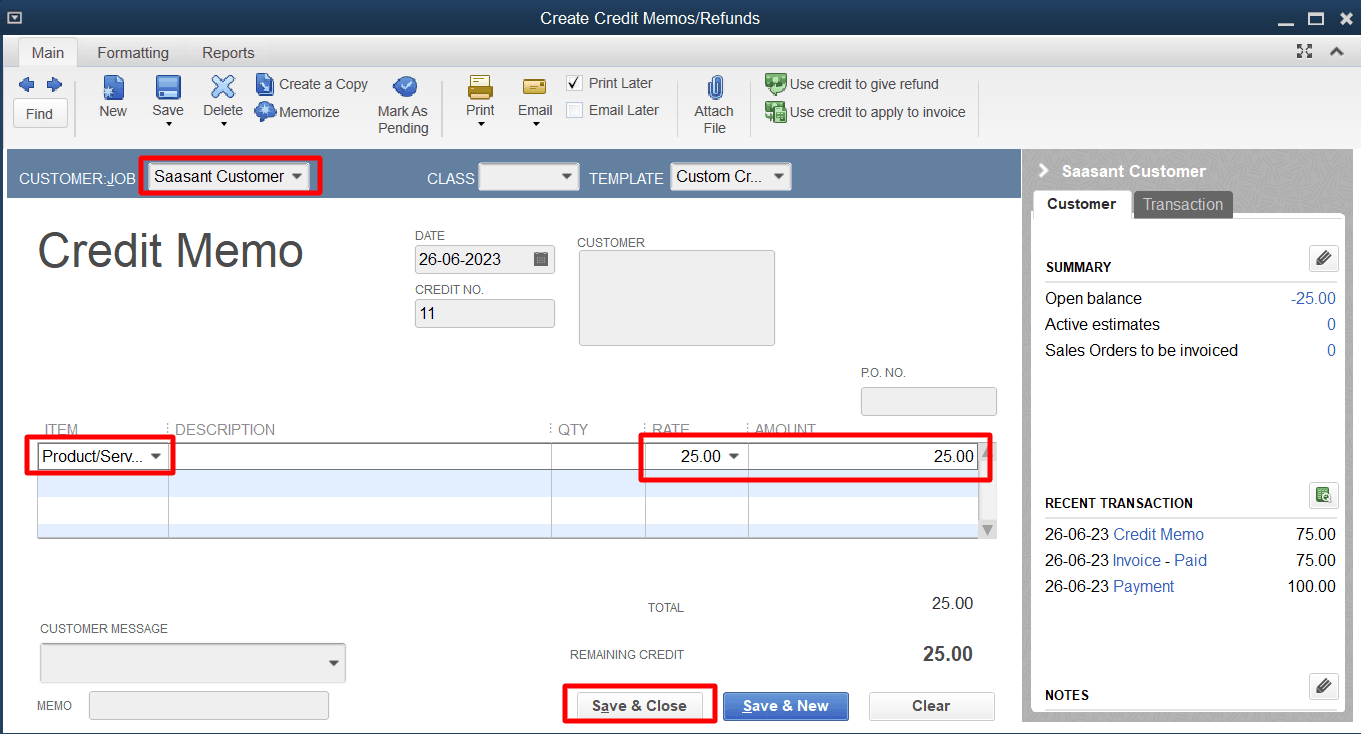
After you've entered all the required details, click ‘Save & Close.’ This action will prompt an ‘Available Credit’ window to appear.
In this window, click ‘Give a refund’ and then ‘OK’ if you wish to provide a refund. Alternatively, if you prefer to offer credit for future payments, select ‘Retain as an available credit’ and then click ‘OK.’
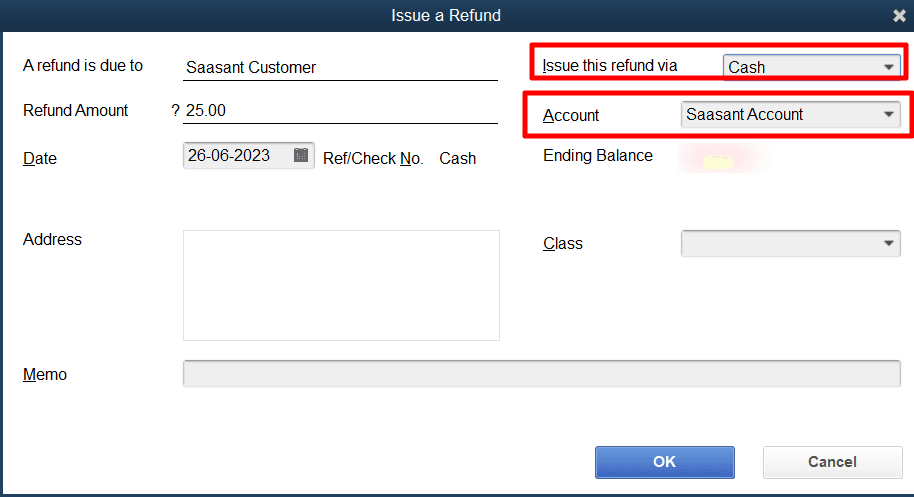
Subsequently, in the 'Issue a Refund' screen, choose the method you want to issue the refund from the ‘Issue this refund via’ field. If you opt for Cash or Check, you must select the account from which the refund will be disbursed.
Finally, when all the details have been correctly entered, click ‘OK’ to process the refund.
Scenario 3: Issuing a Refund for a Prepayment
Select Customer Center from the drop-down menu.
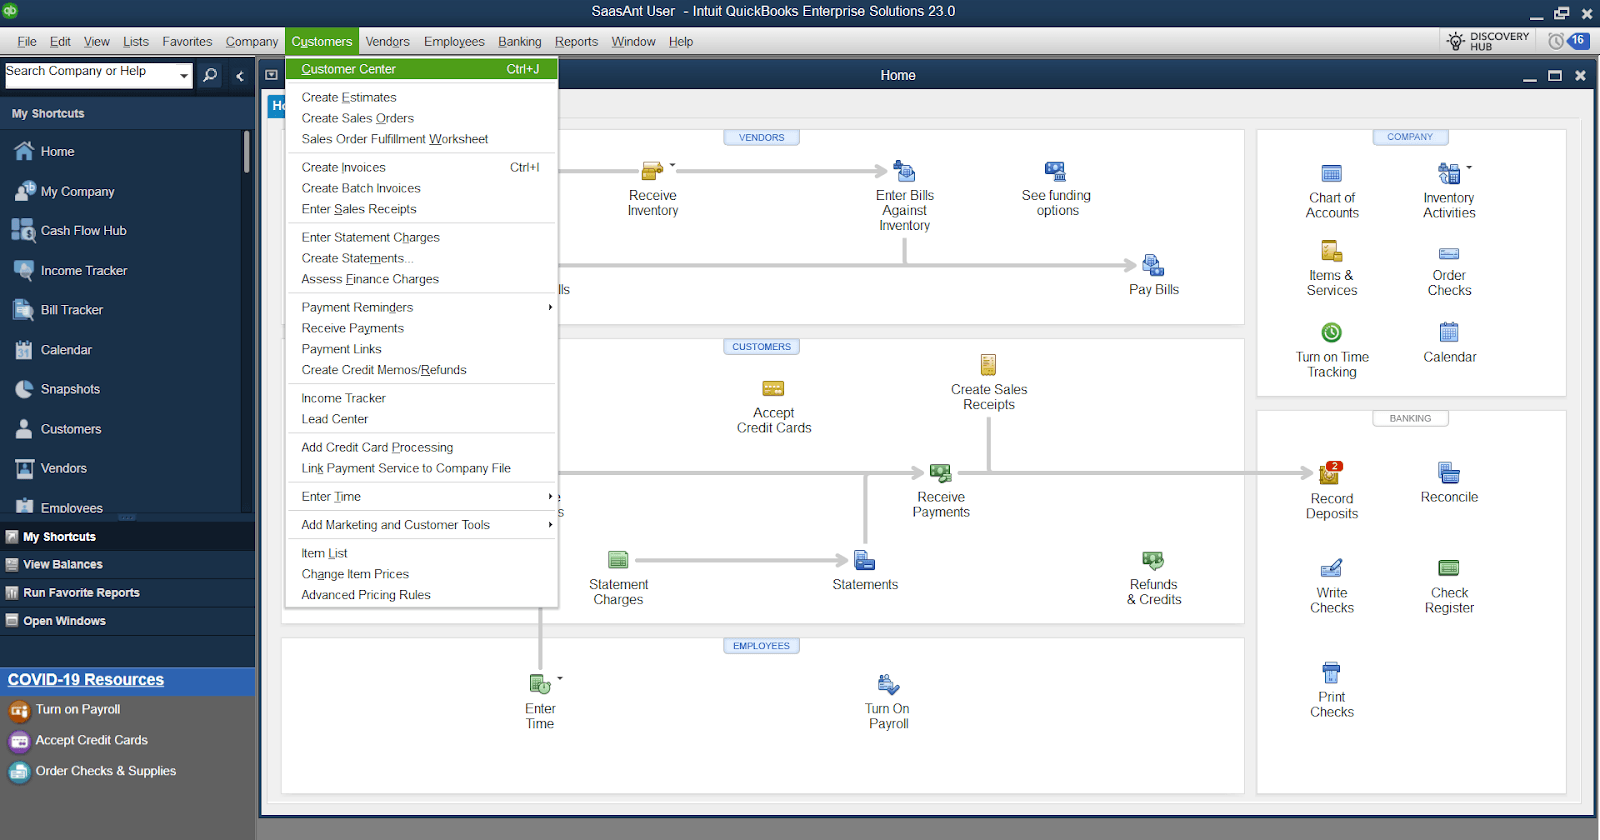
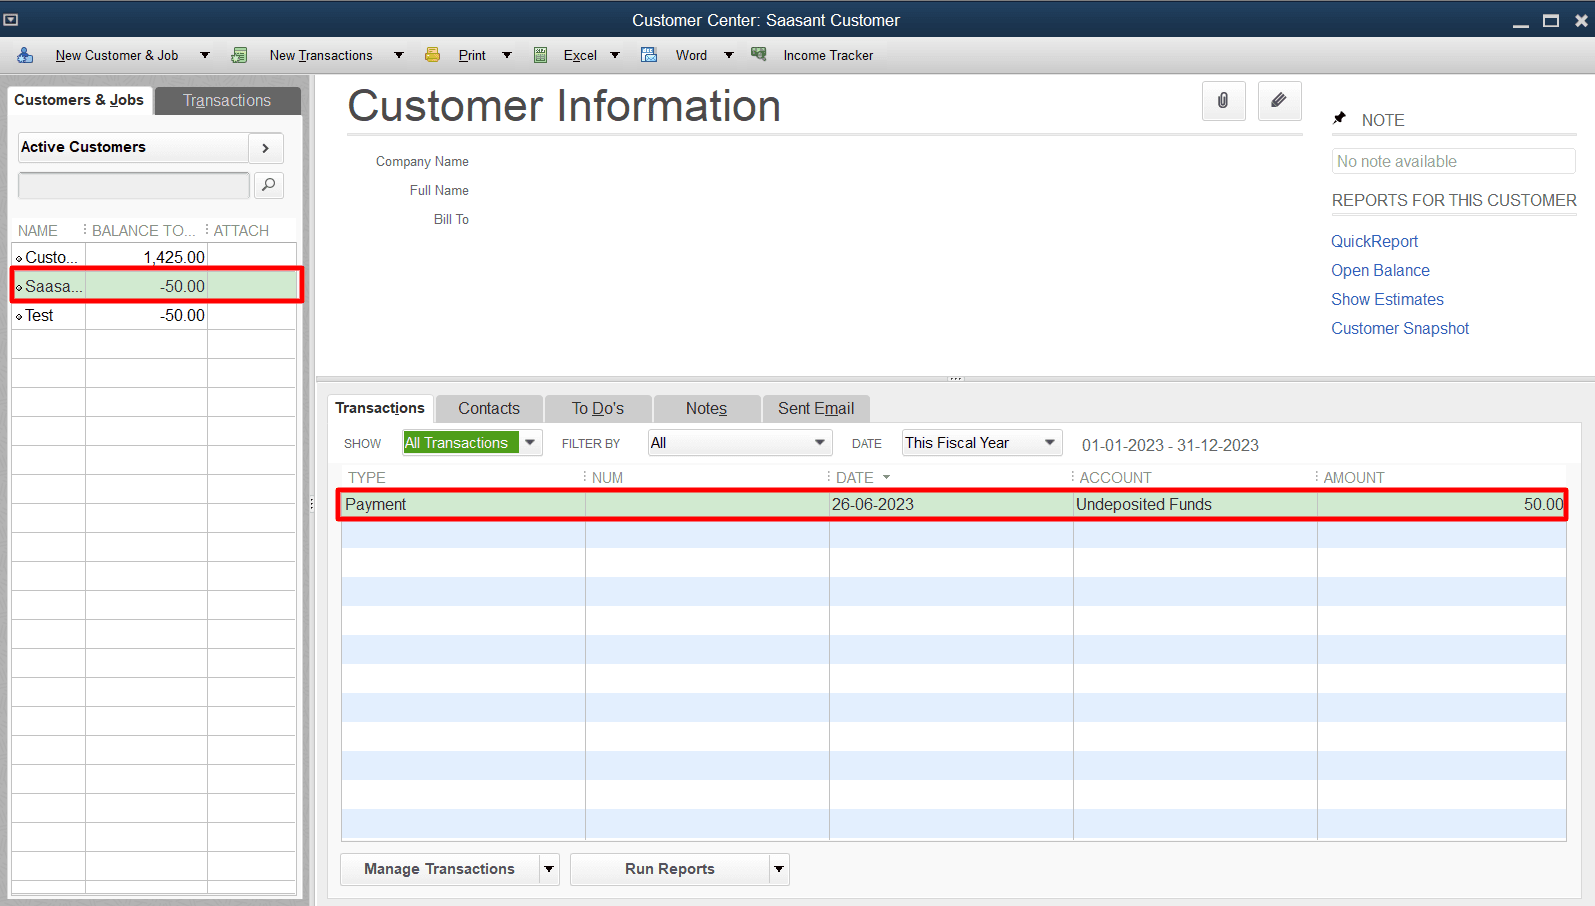
Locate and select the customer who made the prepayment.
In the customer's profile, click on the Transactions tab.
Find and select the original pre-payment transaction.
Click on the ‘Refund’ button at the bottom of the screen.
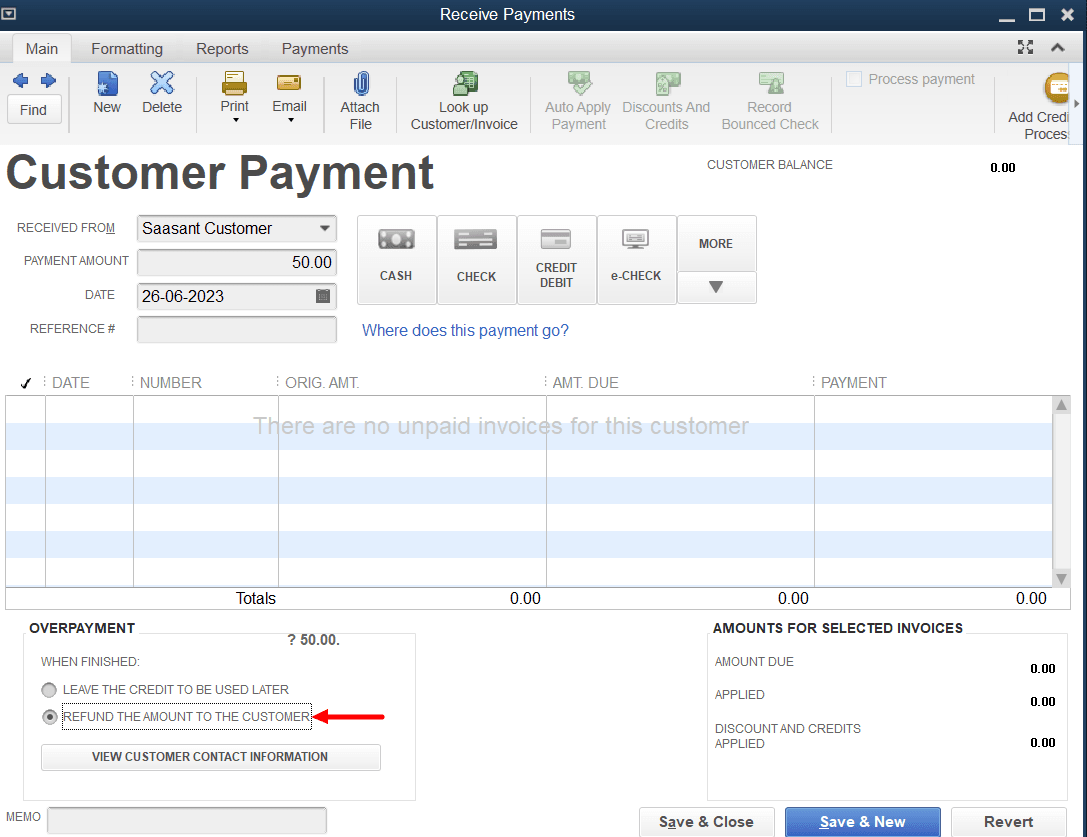
In the ‘Issue this refund via’ section, select the appropriate payment method for the refund (e.g., check, credit card).
Enter the prepayment amount in the ‘Amount to Refund’ field.
If needed, you can add a memo or note in the ‘Memo’ field to provide additional information about the refund.
Review the refund details, make any necessary adjustments, or add relevant notes.
Click the ‘Save & Close’ button to record the refund transaction.
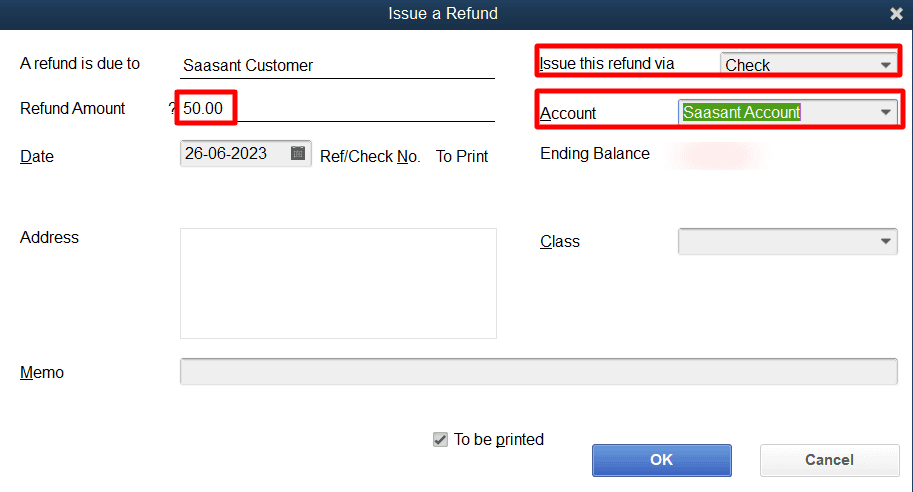
QuickBooks will prompt you to confirm the refund. Review the details and click ‘OK.’
Frequently Asked Questions
Can I record a refund without creating a separate transaction in QuickBooks Desktop?
Yes, you can record a refund without creating a separate transaction in QuickBooks Desktop by applying for the refund directly to an open invoice or credit memo. To do this, open the customer's invoice or credit memo and click the 'Apply Credits' button. Select the appropriate refund and adjust the amount if needed. Save the changes, and the refund will be recorded.
What happens if I accidentally record a refund in the wrong account in QuickBooks Desktop?
If you accidentally record a refund in the wrong account in QuickBooks Desktop, you can correct it by following these steps:
1. Locate the incorrect refund transaction.
2. Open the transaction and click on the 'Edit' button.
3. Update the account field with the correct account.
4. Save the changes to ensure the refund is recorded in the right account.
Can I record a refund for multiple customers in a single transaction in QuickBooks Desktop?
No, QuickBooks Desktop has no built-in feature to record refunds for multiple customers in a single transaction. You need to record individual refund transactions for each customer separately.
How do I record a refund for a returned item in QuickBooks Desktop?
To record a refund for a returned item in QuickBooks Desktop, you can follow these steps:
1. Navigate to the 'Vendors' menu and select 'Enter Bills.'
2. Enter the vendor information and the refund amount as a negative value in the 'Amount' field.
3. Select the appropriate expense account to track the returned item.
4. Save the bill transaction, and the refund for the returned item will be recorded.
Can I record a refund received from a credit card transaction in QuickBooks Desktop?
Yes, you can record a refund from a credit card transaction in QuickBooks Desktop by following the steps below:
1. Select ' Make Deposits ' in the 'Banking' menu and select 'Make Deposits.'
2. Choose the appropriate bank account where the refund was deposited.
3. Enter the refund amount as a positive value in the 'Received From' field.
4. Select the customer or vendor associated with the refund.
5. Save the deposit transaction, and the refund received from the credit card transaction will be recorded.