How to Setup and Use Barcode Scanner in QuickBooks Desktop
Efficient inventory management lies at the heart of any successful business operation, ensuring smooth workflows and accurate data handling. Embracing modern technology can significantly enhance this process, and one such tool that proves invaluable is the barcode scanner. QuickBooks Desktop, a leading accounting software, seamlessly integrates with barcode scanners, empowering businesses to optimize inventory control and streamline operations.
This comprehensive guide will walk you through the step-by-step process of setting up and effectively utilizing barcode scanners in QuickBooks Desktop. By harnessing the power of barcode scanning, you can save time, reduce errors, and improve accuracy, leading to increased productivity and tremendous success for your business. So, let's dive in and unlock the full potential of barcode scanning in QuickBooks Desktop!
Contents
Understanding the Significance of QuickBooks Barcode Management
Discovering Quickbooks Desktop’s Extensive Compatibility with Barcode Scanners
Understanding the Significance of QuickBooks Barcode Management
Barcode scanning in QuickBooks Desktop offers numerous benefits, making it an indispensable tool for businesses. Let's take a closer look at why QuickBooks barcode management is so crucial, particularly for manufacturers:
Enhanced Infrastructure
Implementing a QuickBooks barcode inventory system simplifies inventory management. The system provides tools such as barcode printing functionalities and a QuickBooks barcode generator, contributing to a more organized and streamlined infrastructure.
Seamless Audits
Audits are an essential aspect of any business, though often considered tedious. However, they are necessary to maintain accurate records and prevent financial losses. Auditing with barcodes expedites the entire process. Compared to traditional methods, where auditors manually search for items and document their findings, barcode scanning allows for a quick and systematic review. Auditors can cover more ground in less time, leading to a faster and more efficient audit.
Identifying Supply Chain Issues
QuickBooks barcode management enables you to pinpoint areas in your manufacturing process that may affect your business negatively. You can make informed decisions by enhancing inventory accuracy, automating data entry, streamlining order processing, enabling product traceability and recalls, monitoring supplier performance, identifying inefficiencies, providing real-time visibility, and facilitating data analytics and forecasting to optimize the supply chain by locating bottlenecks and inefficiencies along the production lines.
Product Differentiation
With barcodes, you can store essential product information in a concise format. This feature is precious for manufacturers offering multiple variants of products. Barcodes allow you to distinguish and locate products effortlessly.
Efficient Labeling
Once your QuickBooks barcode inventory system is in place, you can easily print and label items, and it streamlines the process of labeling products, reducing human errors and saving time.
Discovering Quickbooks Desktop’s Extensive Compatibility with Barcode Scanners
QuickBooks Desktop is compatible with a wide range of barcode scanners, including:
Handheld Linear Imagers
Datalogic QuickScan 2130 Linear Imager.
Honeywell HHP 3820 Cordless Linear Imager
Honeywell 1300G Hyperion Linear Imager.
High-Density Laser Scanners
Honeywell Voyager 1202G High-Density Laser.
Symbol LS2208 Laser Scanner.
Metrologic Voyager MS9540 Laser Scanner.
2D Area Imagers
Zebra DS2208 - 2D Area Imager.
Zebra DS2278 - 2D Imager.
Omni-directional Presentation Scanner
Motorola LI4278 Omni-directional Presentation Scanner.
Specialized RS232 Scanner
ID Tech Econoscan II - RS232 Scanner.
Step-By-Step Guide to Setting up Barcode Scanning in QuickBooks Desktop with Advanced Inventory
Now that we understand the importance of QuickBooks barcode management let's explore how to set up and use barcode scanning in QuickBooks Desktop:
Setting up the Barcode Scanner
Before using a barcode scanner with QuickBooks Desktop, ensure it is compatible with your computer and operating system. Connect the scanner to your computer via USB or Bluetooth, and install any necessary drivers per the manufacturer's instructions.
Enabling Barcode Scanning in Advanced Inventory
Step 1: Access Advanced Inventory Preferences
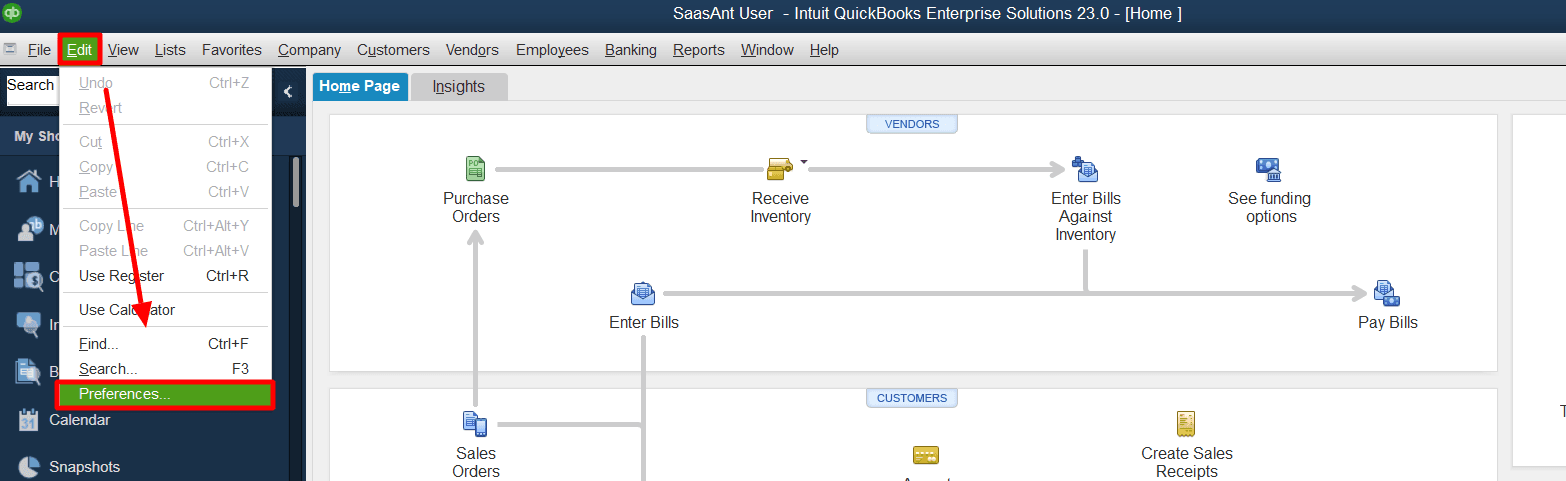
Launch QuickBooks Desktop, navigate to 'Edit' from the menu bar, and select 'Preferences.'
In the left pane, scroll down to ‘Items and Inventory’ and navigate to the ‘Company Preferences’ tab.
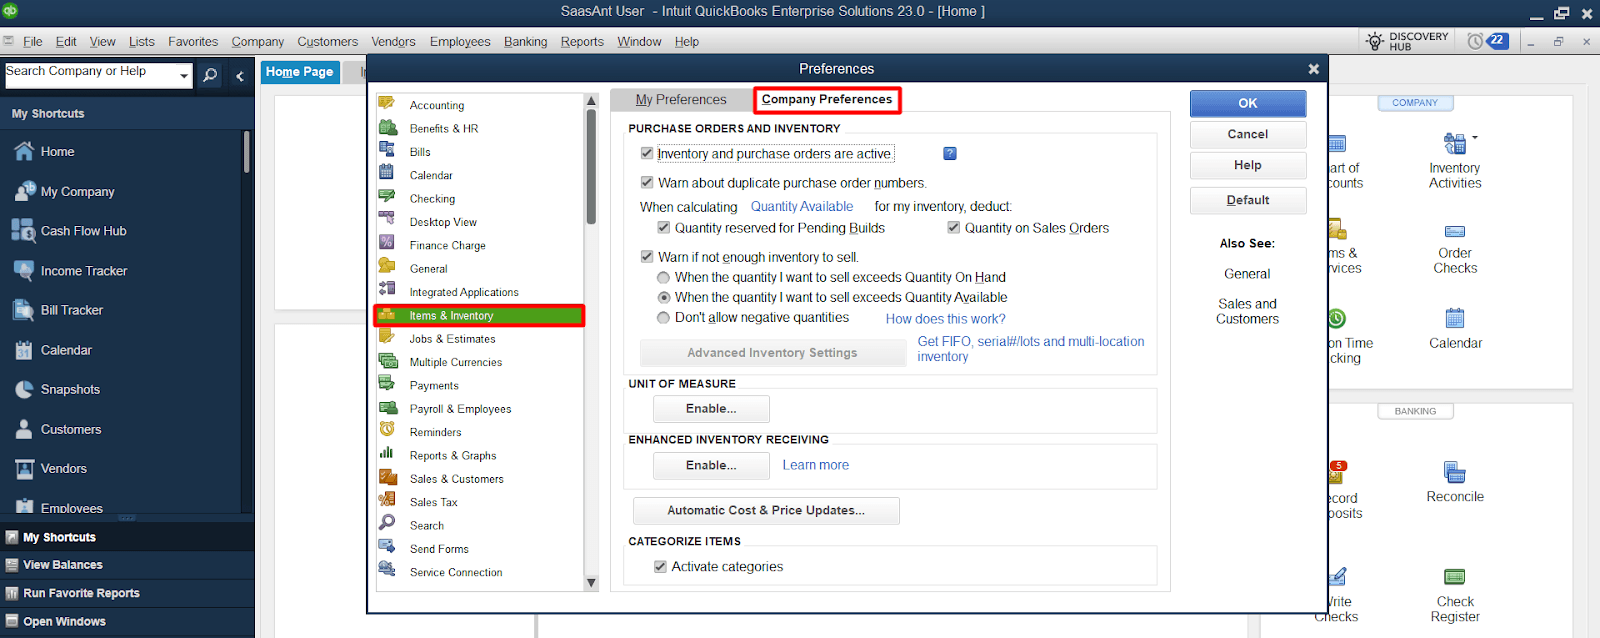
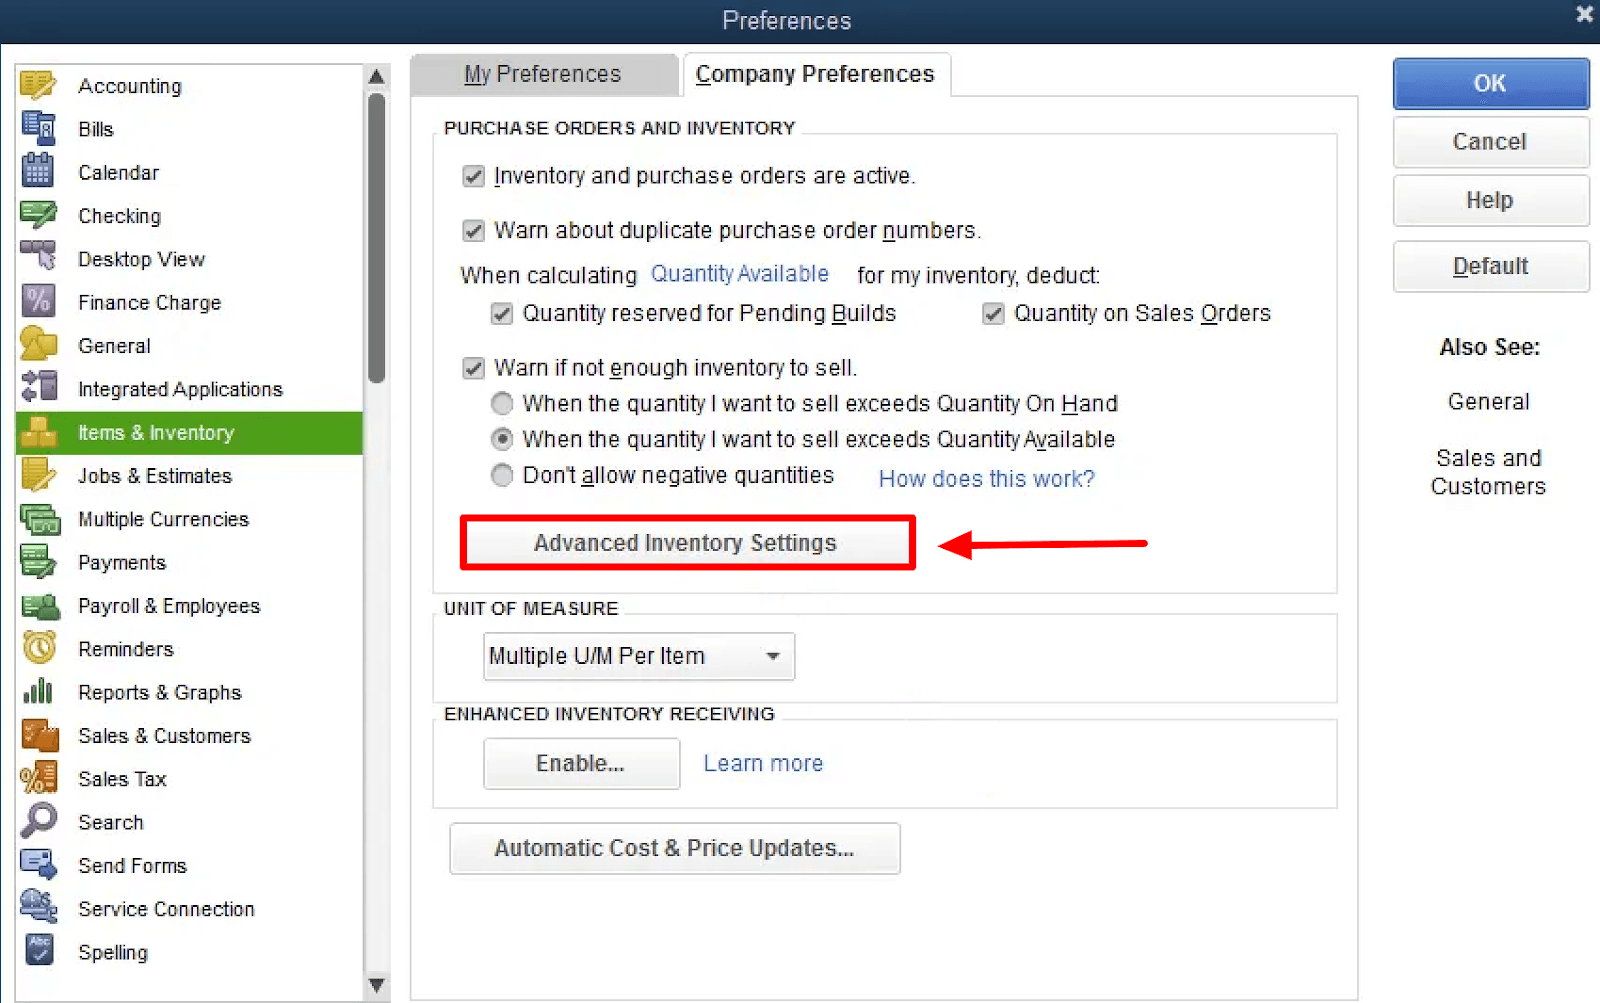
Within the Company Preferences tab, select ‘Advanced Inventory Settings.’
Step 2: Open the Barcode Scanning Setup Wizard
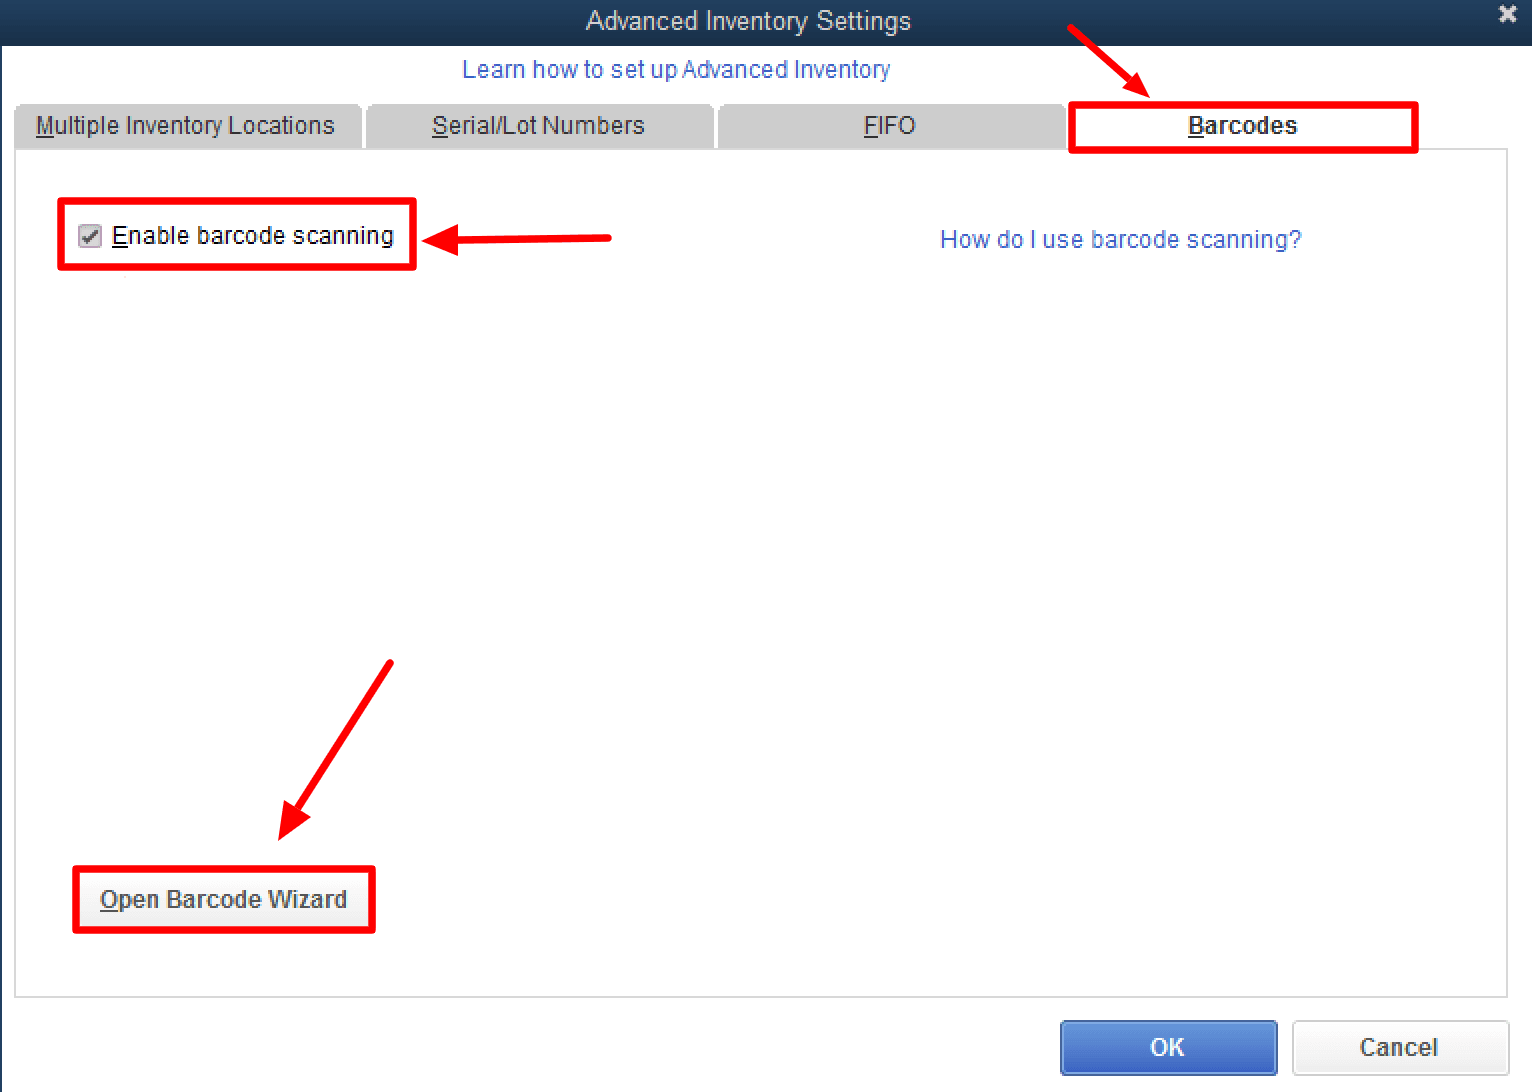
In the ‘Advanced Inventory Settings’ window, navigate to the ‘Barcodes’ tab.
Check the box labeled ‘Enable barcode’ to activate barcode scanning.
Click on ‘Open Barcode Wizard.’
Step 3: Choose Barcode Migration or Creation Options
Within the ‘Barcode Scanning Setup’ wizard, choose one of the following options based on your needs:
I don't currently track barcodes in QuickBooks Desktop.
Copy barcodes from the Item Name field.
Copy barcodes from the Manufacturer's Part Number.
Copy barcodes from Purchase Information.
Copy barcodes from Custom Field XXXXXX – select relevant custom fields with barcodes.

Note: Designate the specific field the Barcode Wizard will search for barcodes. Choose whether the wizard should create items without barcodes or leave them blank.
Step 4: Handling Existing and New Items
The wizard will copy barcodes to the new Barcode Number field while retaining the original location. Any new items added using the barcode feature will store their barcode in the 'Barcode Number' field, not the previous field. Complete the item details in the 'New/Edit Item' window.
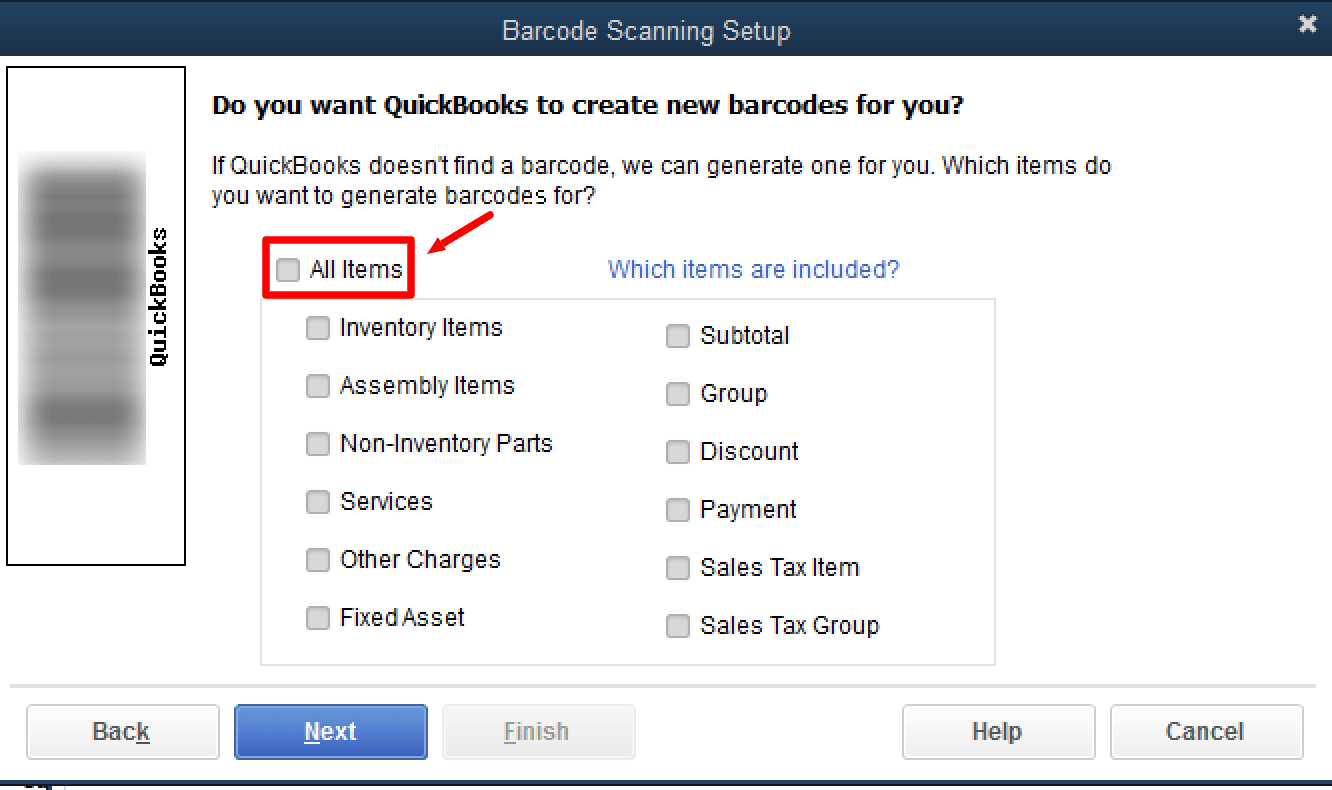
Step 5: Automatic Barcode Creation (Optional)
Decide if you want QuickBooks Desktop to create new barcodes for you. If desired, check the box that says 'All Items' to have the wizard create barcodes for all items automatically or individually select specific items for barcode creation.
Step 6: Finalize Barcode Scanning Setup
Click 'Next' and 'Finish' to complete the Barcode Scanning Setup wizard. Click 'OK' on the wizard windows. Select 'OK' twice to close the 'Advanced Inventory Settings' and 'Preferences' windows.

Step-By-Step Guide to Testing Your USB Barcode Scanner Compatibility with Quickbooks Advanced Inventory
Verify Barcode Scanner Compatibility
Step 1: Check Scanner Specifications
Ensure that your USB Barcode Scanner meets the following criteria to work with QuickBooks Advanced Inventory:
Supports EAN-13 (International Article Number) and Code-128 barcodes.
Produces a single carriage return at the end of the barcode.
Step 2: Run the Barcode Scanner Tester App
Download and launch the Barcode Scanner Tester app. Once you launch the application, run it on your computer.
Step 3: Enter Scanner Information
In the ‘Barcode Scanner Tester’ app, provide the necessary information about your USB Barcode Scanner.
Step 4: Analyze Scanner Compatibility
Click the 'Analyze' option after entering the scanner details. Click on the 'Blank' field provided and scan any barcode using your USB Barcode Scanner. Finally, click the 'Analyze' option to evaluate the scanner's compatibility.
Step 5: Verify Compatibility Results
Your USB Barcode Scanner is compatible with QuickBooks Advanced Inventory if you receive a success message.
Note: If you navigate outside the app to another window on your computer during the test, you may need to redo the test for accurate results.
Step-By-Step Guide on Using the Barcode Scanner Feature in QuickBooks Desktop
Begin utilizing your scanner
With your barcode scanner connected to your computer, you can seamlessly scan items to create new line items in transactions, such as Estimates, Sales Orders, Invoices, Sales Receipts, Refunds & Credits, Purchase Orders, Item Receipts, Bills, Write Checks, and Inventory transfers in QuickBooks Desktop.
Start importing barcodes into QuickBooks
Step 1: Set Up Custom Fields
To import barcodes into QuickBooks, ensure you have admin access and back up your company file before proceeding. Follow these steps:
Access Single-User Mode: Switch to single-user mode by selecting File, then Switch to Single-user Mode.
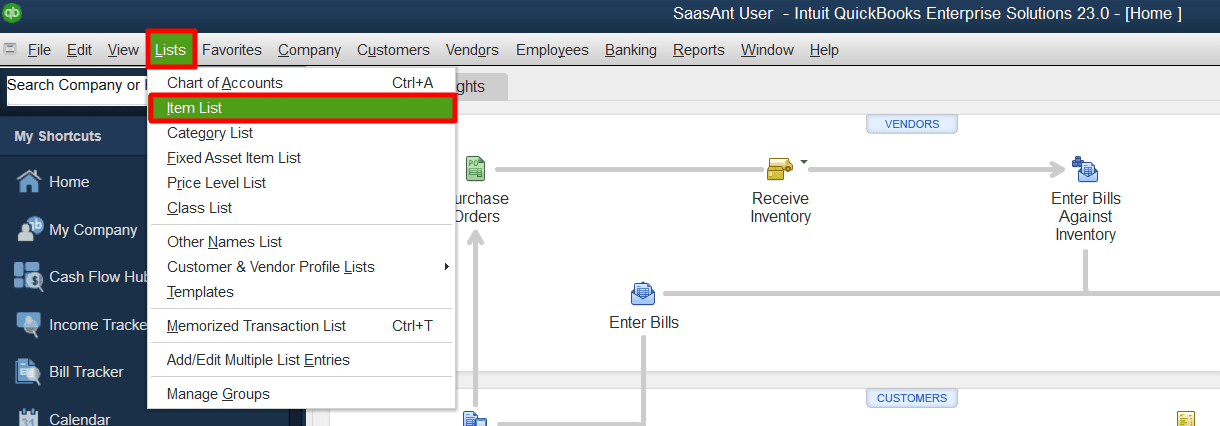
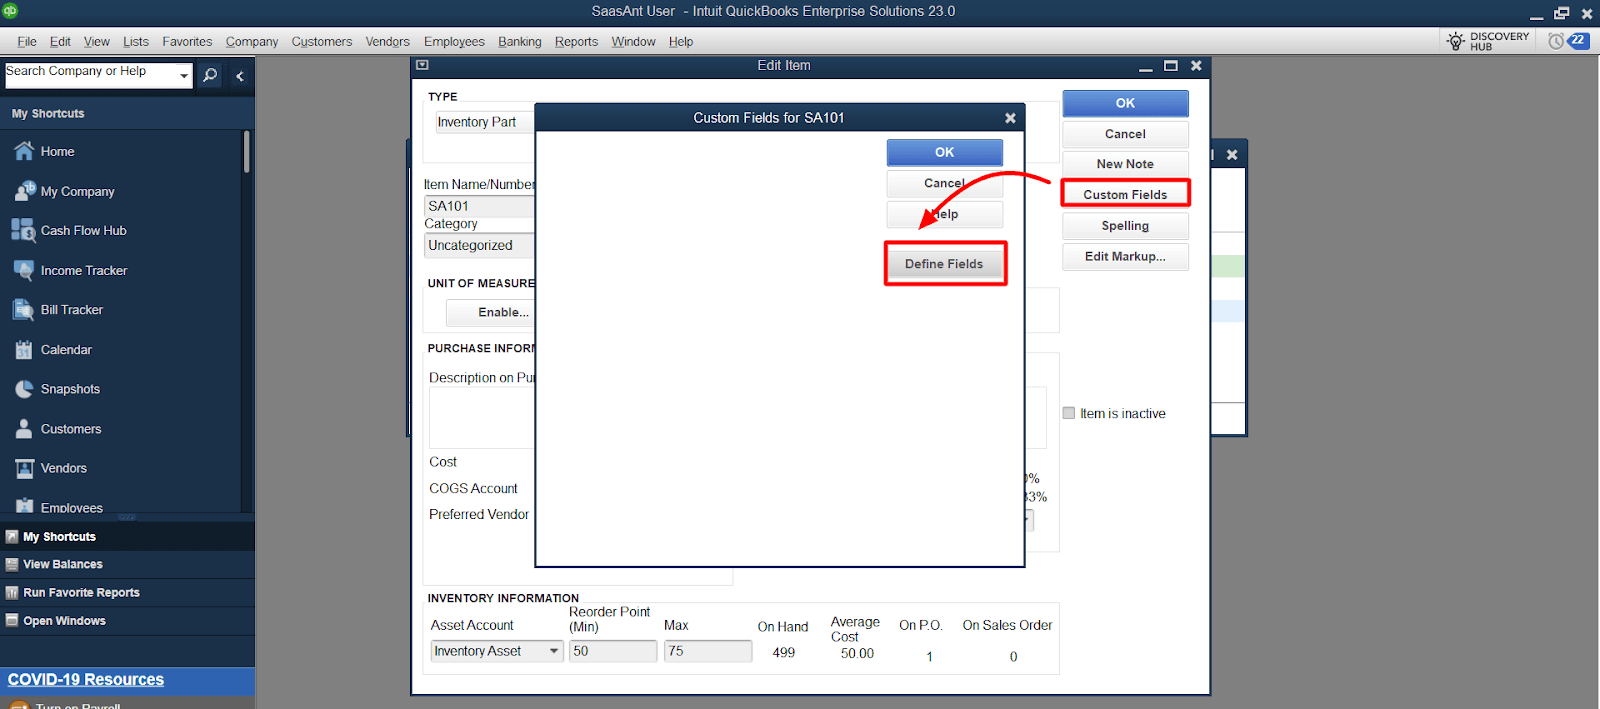
Open Item List: Navigate to the ‘Lists’ and select ‘Item List.’ Double-click on any item, then choose ‘Custom Fields.’

Define New Field: Select ‘Define Fields,’ and on a new line, enter the label name (e.g., "Barcode 2"). Choose ‘Use’ for the label field and click ‘OK.’
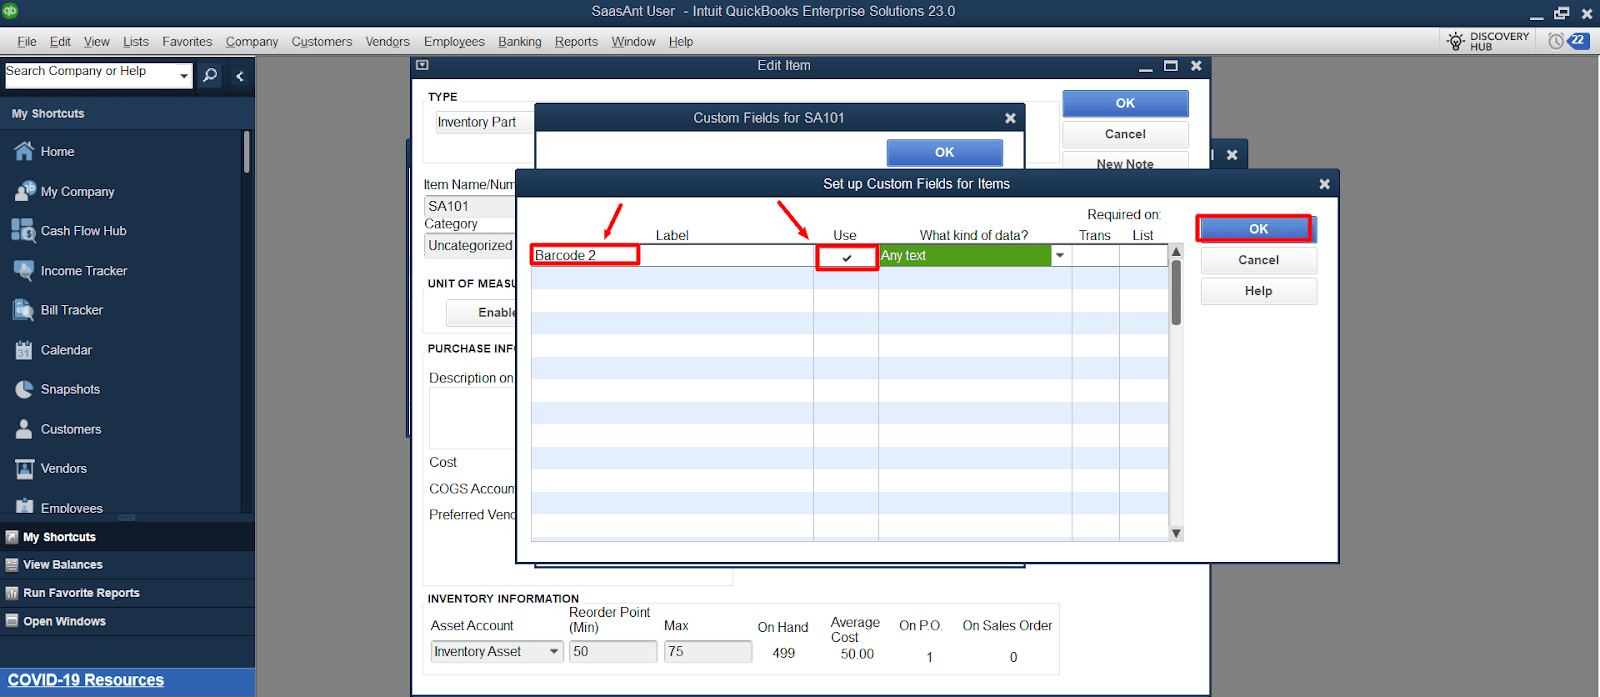
Note: QuickBooks allows up to 12 custom fields. If you already have 12 fields, you must replace one with Barcode 2.
Step 2: Modify the Excel sheet as needed
Follow these steps to edit your items and add the barcodes:
Enter Barcodes: Within the Excel sheet, locate the ‘Barcode2’ column (the custom field you created earlier). Enter the barcodes for each item in this column.

Save and Close: Save the edited file and close it.
Step 3: Import the Barcodes from Excel
Now, import the edited list with barcodes back into QuickBooks:
Access Utilities: Within the QuickBooks Desktop, navigate to the ‘File’ menu and select ‘Utilities.’
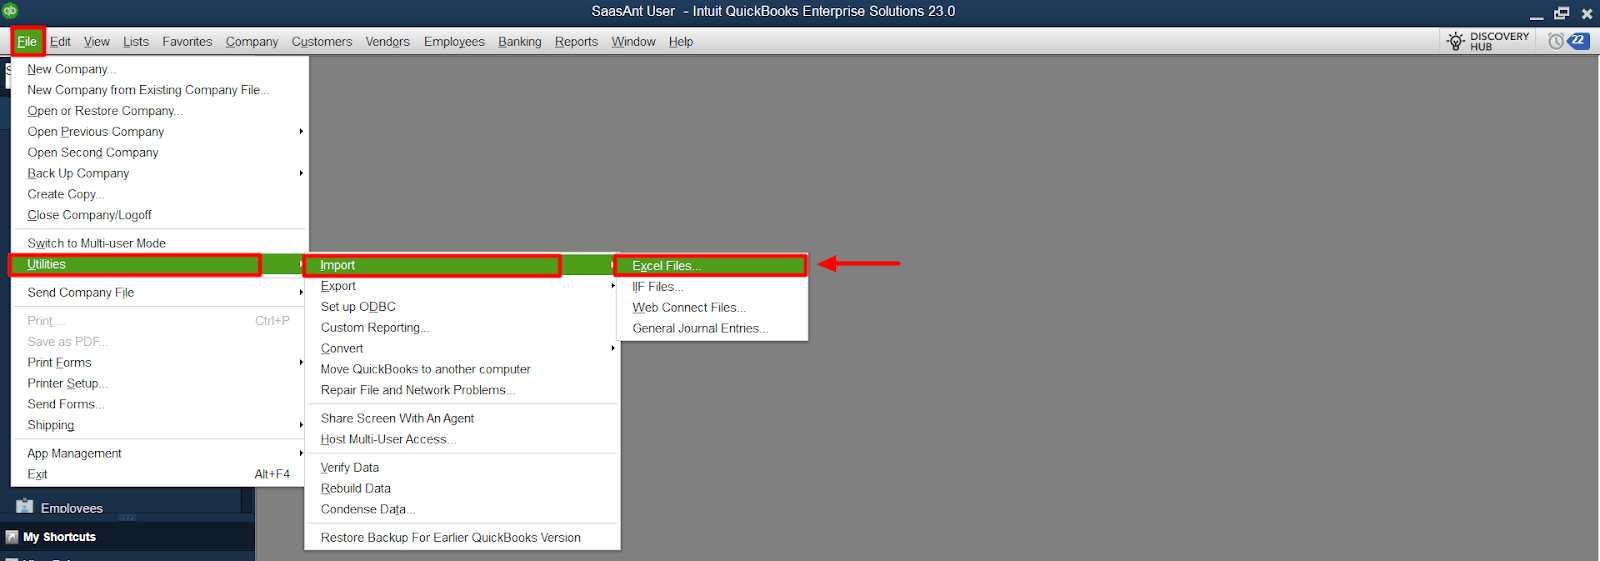
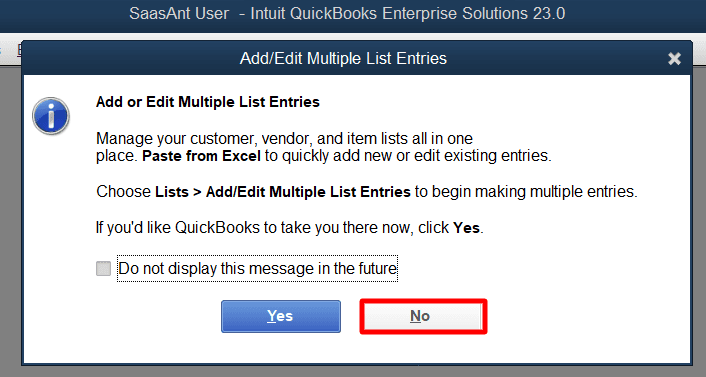
Choose Import Excel Files: Select 'Import Excel Files,' when prompted for 'Add/Edit Multiple List Entries,' choose 'No.'
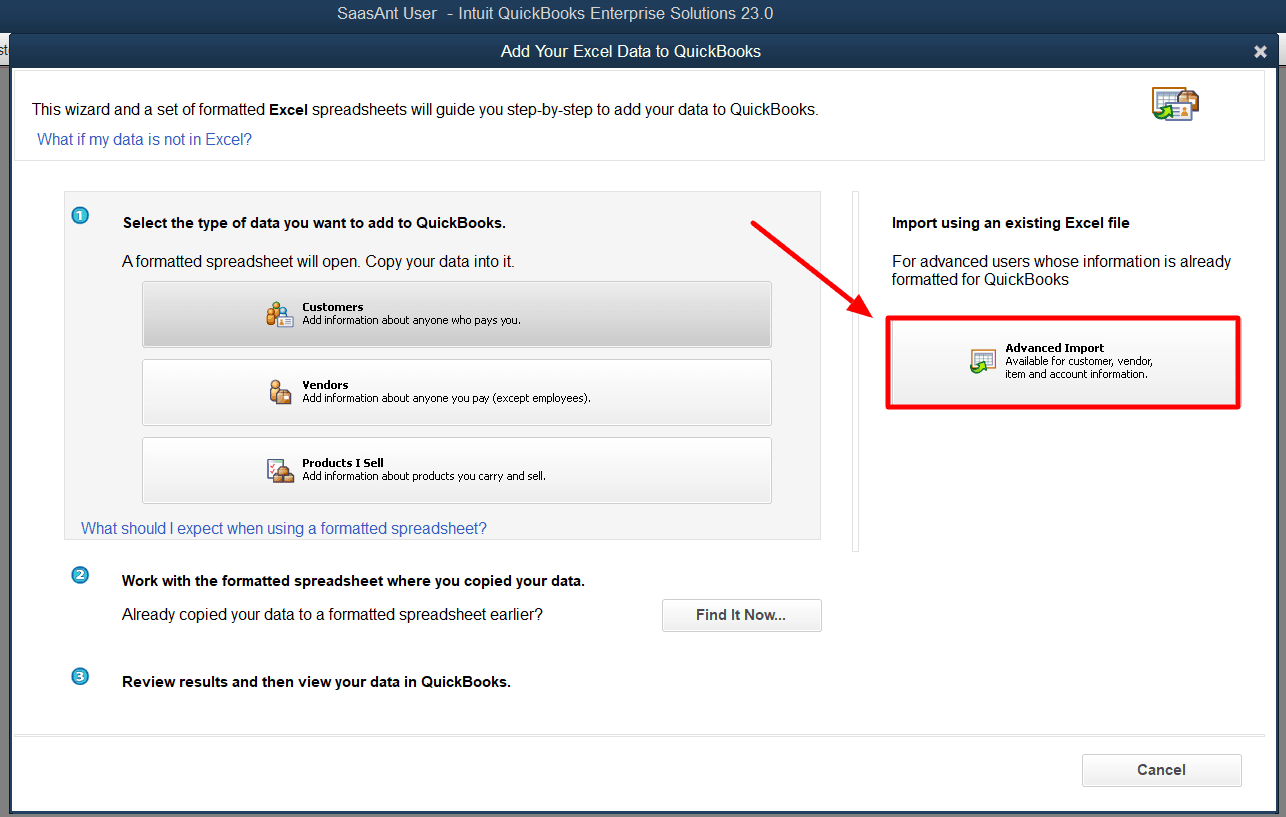
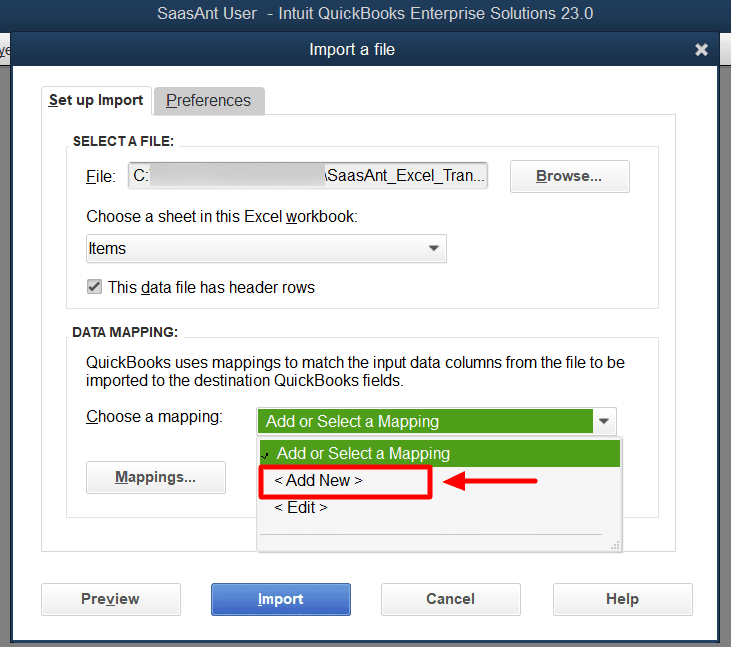
Select Advanced Import: Opt for ‘Advanced Import.’
Locate Excel File: Browse and select the Excel file you saved earlier (Sheet 1 will contain your data).
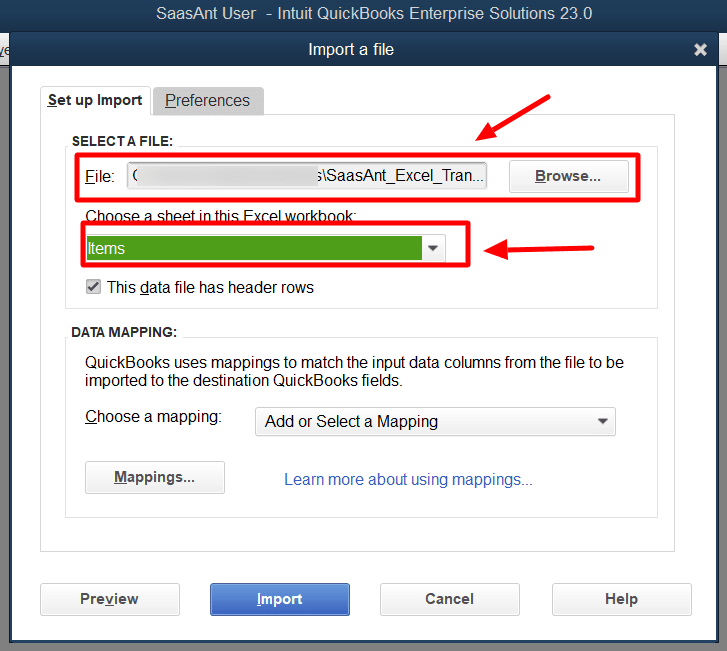
Set Up Mapping: From the ‘Choose a mapping’ dropdown menu, select ‘Add New.’ In the ‘Import type,’ choose ‘Item.’
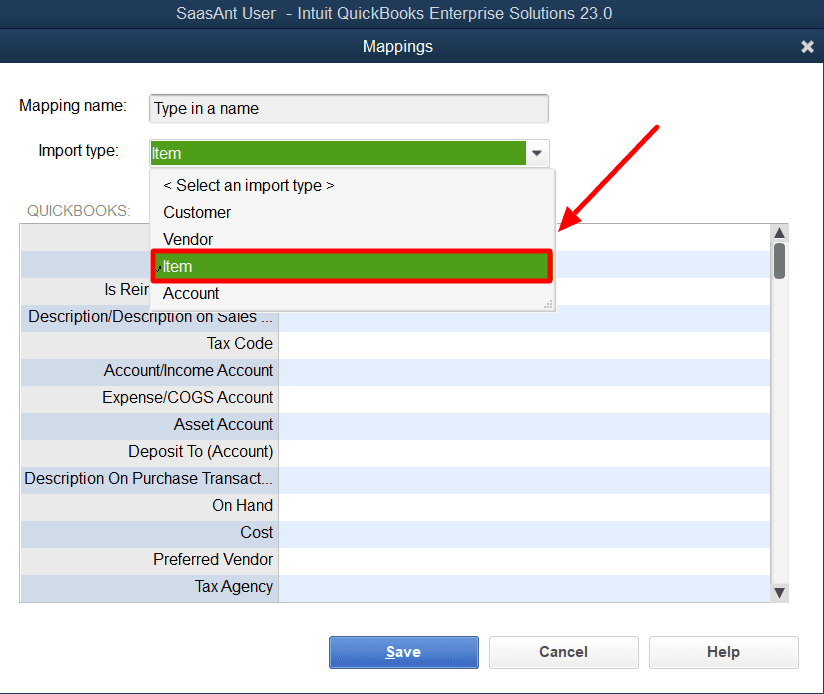
Note: Ensure the QuickBooks and Import Data columns match the Type and Name fields.
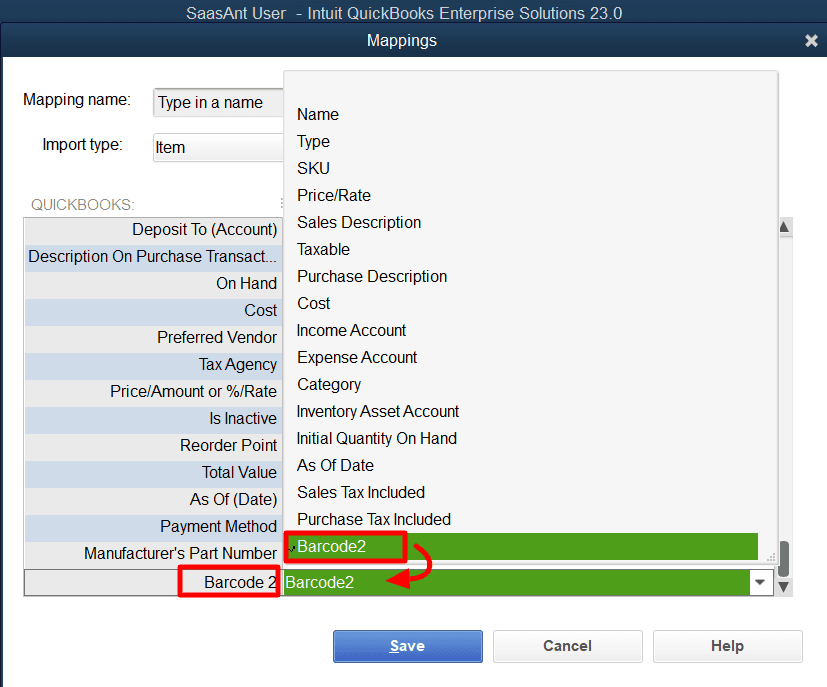
Set Barcode2 Field:
Scroll down to find the 'Barcode2' line.
Set its Import Data field to Barcode2 as well.
Leave other fields empty.
Choose Import Settings: Select 'Replace existing data with import data, ignoring blank fields.' This action ensures that the new Barcode2 values will update your existing items.
Step 5: Enable Barcode Tracking in QuickBooks
To complete the process, follow these steps to enable QuickBooks to track your imported barcodes:
Access Preferences: Navigate to the ‘Edit’ menu and select ‘Preferences.’
Navigate to Items & Inventory: Choose ‘Items & Inventory’ from the ‘Preferences’ menu.
Open Advanced Inventory Settings: On the 'Company Preferences' tab, click the 'Advanced Inventory Settings' button.
Access Barcode Wizard: Within the ‘Barcodes’ tab, open the ‘Barcode Wizard.’
Choose Custom Field: From the dropdown arrow, select ‘Copy barcodes from Custom field Barcode2.’
Complete the Wizard: Follow the prompts and click 'Finish' to save your settings.
Save Changes: Click ‘OK’ twice to confirm and save your changes.
FAQs
Q1: How Does Barcode Scanning in QuickBooks Desktop Improve Inventory Management?
Businesses can significantly enhance inventory management by implementing barcode scanning in QuickBooks Desktop, leading to a more organized and efficient infrastructure. It also facilitates seamless audits, making them more manageable and improving inventory control. Barcode scanning helps identify supply chain issues by pinpointing bottlenecks and inefficiencies along the production lines, enabling informed decisions to optimize the supply chain. Barcodes store essential product information concisely.
Q2: Which Barcode Scanners Are Compatible with QuickBooks Desktop’s Advanced Inventory Feature?
QuickBooks Desktop is compatible with various barcode scanners, including:
Datalogic QuickScan 2130 Linear Imager.
Honeywell HHP 3820 Cordless Linear Imager.
Honeywell 1300G Hyperion Linear Imager.
Honeywell Voyager 1202G High-Density Laser.
Symbol LS2208 Laser Scanner.
Zebra DS2208.
Zebra DS2278.
Motorola LI4278.
ID Tech Econoscan II.
Q3: How Do I Set Up Barcode Scanning in QuickBooks Desktop with Advanced Inventory?
To set up barcode scanning in QuickBooks Desktop with Advanced Inventory, follow these steps:
Ensure your barcode scanner is compatible and connected to your computer.
Launch QuickBooks Desktop, navigate to the 'Edit' menu, and select 'Preferences.'
In the left pane, scroll down to 'Items and Inventory' and navigate to the 'Company Preferences' tab.
Within the Company Preferences tab, select 'Advanced Inventory Settings.'
Check the box labeled 'Enable barcode' to activate barcode scanning.
Click on 'Open Barcode Wizard' and follow the prompts to choose barcode migration or creation options.
Designate the specific field; the Barcode Wizard will search for barcodes and decide if you want QuickBooks to create new barcodes for you.
Complete the setup, save your settings, and close the windows.
Q4: Can I Use Any Barcode Scanner with QuickBooks Desktop, or Are There Specific Requirements?
QuickBooks Desktop is compatible with a wide range of barcode scanners. However, it is essential to ensure that your barcode scanner supports EAN-13 and Code-128 barcodes and produces a single carriage return at the end of the barcode to work seamlessly with QuickBooks Advanced Inventory.
Q5: Can I Import Barcodes into QuickBooks Desktop from an Excel File? If So, How?
Yes, you can import barcodes into QuickBooks Desktop from an Excel file. To do so, follow these steps:
Set up custom fields in QuickBooks Desktop for the barcodes.
Export your item list to an Excel file.
Modify the Excel sheet to include the barcodes for each item.
Import the edited Excel list with barcodes back into QuickBooks.
Enable QuickBooks to track the imported barcodes by configuring the Barcode Wizard.
Q6: Is Barcode Scanning Only Limited to Inventory Management, or Can It Be Used in Other Areas of QuickBooks Desktop?
In QuickBooks Desktop, you can use barcode scanning in various areas beyond inventory management. It enables scanning items and creating new line items in transactions like Estimates, Sales Orders, Invoices, Sales Receipts, Refunds & Credits, Purchase Orders, Item Receipts, Bills, Write Checks, and Inventory transfers, streamlining various processes across the application.
Q7: Are There Any Limitations to the Number of Custom Fields I Can Use for Barcode Management in QuickBooks Desktop?
Yes, QuickBooks Desktop allows up to 12 custom fields. If you need to use custom fields for barcode management, you may have to replace existing custom fields with barcode-related fields.
Tags
Read also
How to Import Invoices into QuickBooks Desktop
Import Journal Entries into QuickBooks Desktop
How to Delete Multiple Transactions in QuickBooks Desktop?
Import Estimates into QuickBooks Desktop