Ultimate Guide on How to Use Class Tracking in QuickBooks
Discover how to activate class tracking in QuickBooks Online Plus and Advanced. Class tracking allows you to categorize parts of your business with significant meaning, such as different store departments or product lines. This feature provides a more detailed understanding of each business segment's sales, expenses, and profitability. Once this feature is activated, you can learn how to assign transaction classes.
Contents
What is Class Tracking in QuickBooks?
Setting Up Class Tracking in QuickBooks
Configure and Use Class Tracking in QuickBooks Desktop
Conclusion
FAQs
What is Class Tracking in QuickBooks?
Class tracking in QuickBooks is a feature that allows businesses to categorize transactions based on different segments or "classes" within their organization. These classes can represent various departments, locations, product lines, or projects. By assigning transactions to specific classes, businesses can track each class's income, expenses, and profitability separately. This enables enterprises to gain deeper insights into their financial performance and make more informed decisions. Class tracking is handy for companies with multiple divisions or cost centers, as it helps them analyze performance more granularly and allocate resources more effectively.
Here are the steps to activate class tracking, enabling you to sort your transactions by class. If you need to associate classes with your employees, guidance will also be provided to allow for class tracking for Online Payroll.
Setting Up Class Tracking in QuickBooks
Implementing class tracking in QuickBooks can significantly enhance your ability to analyze financial data and gain insights into different aspects of your business. You can better understand income, expenses, and profitability across various segments by categorizing transactions into meaningful classes.
Step 1: Enable Class Tracking
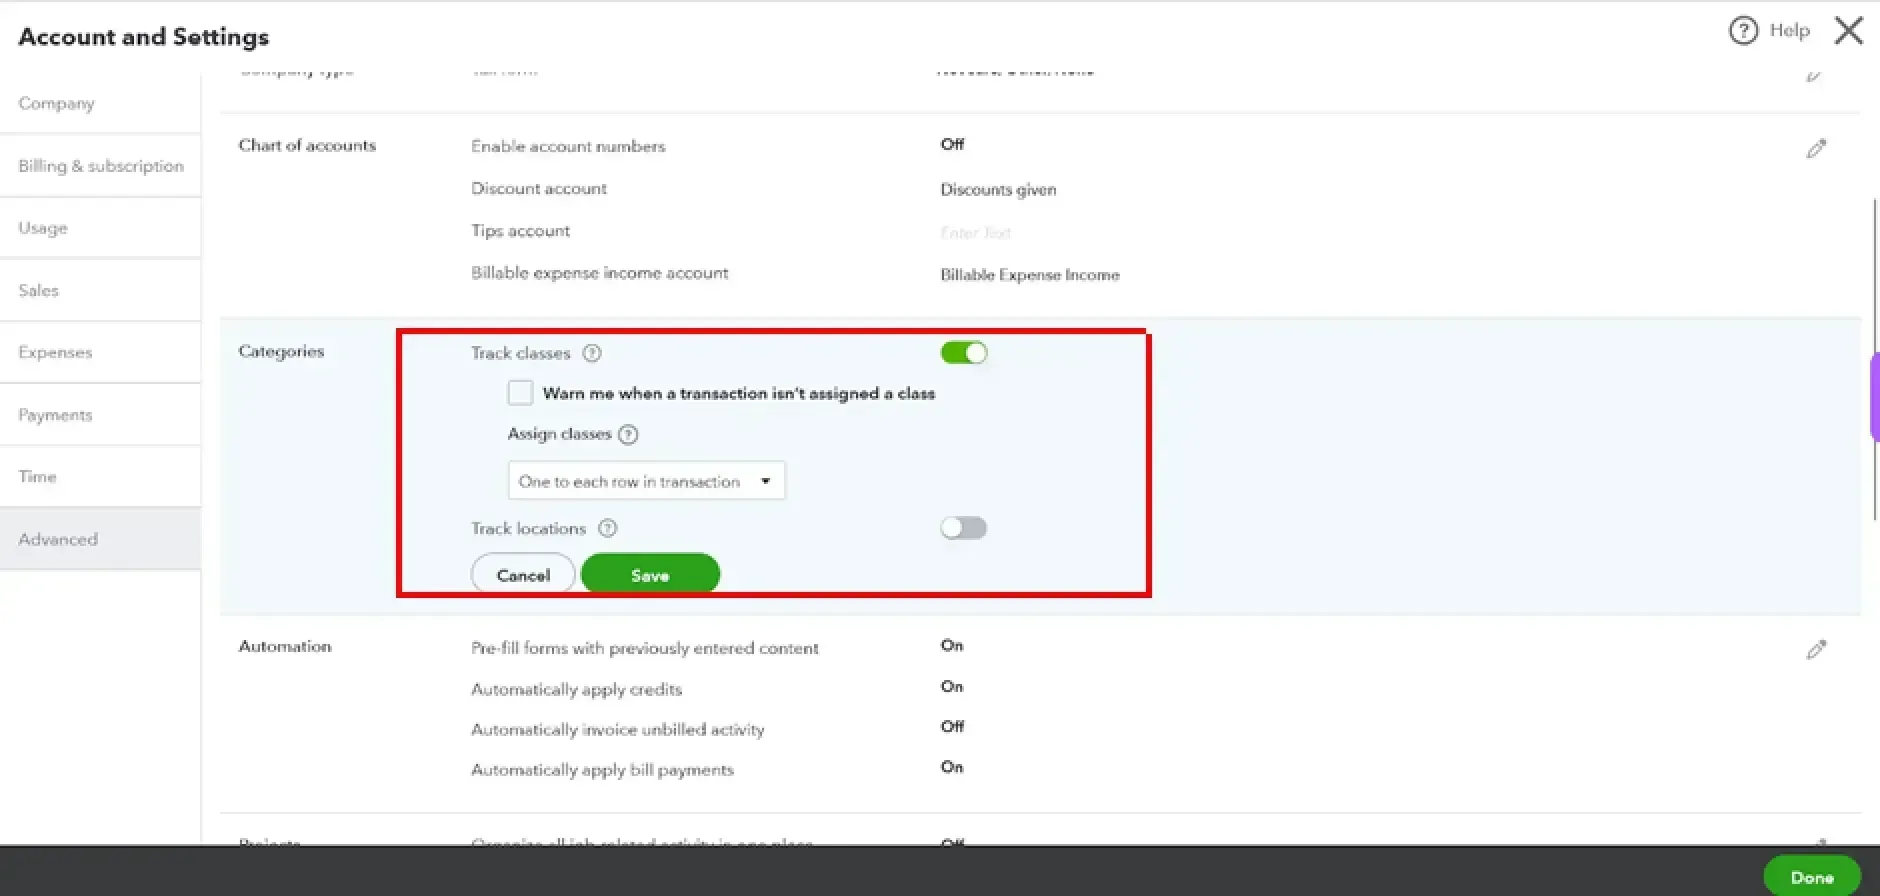
Navigate to Settings, and choose Account and Settings.
Choose Advanced, then hit the Categories section to modify.
Enable Track classes.
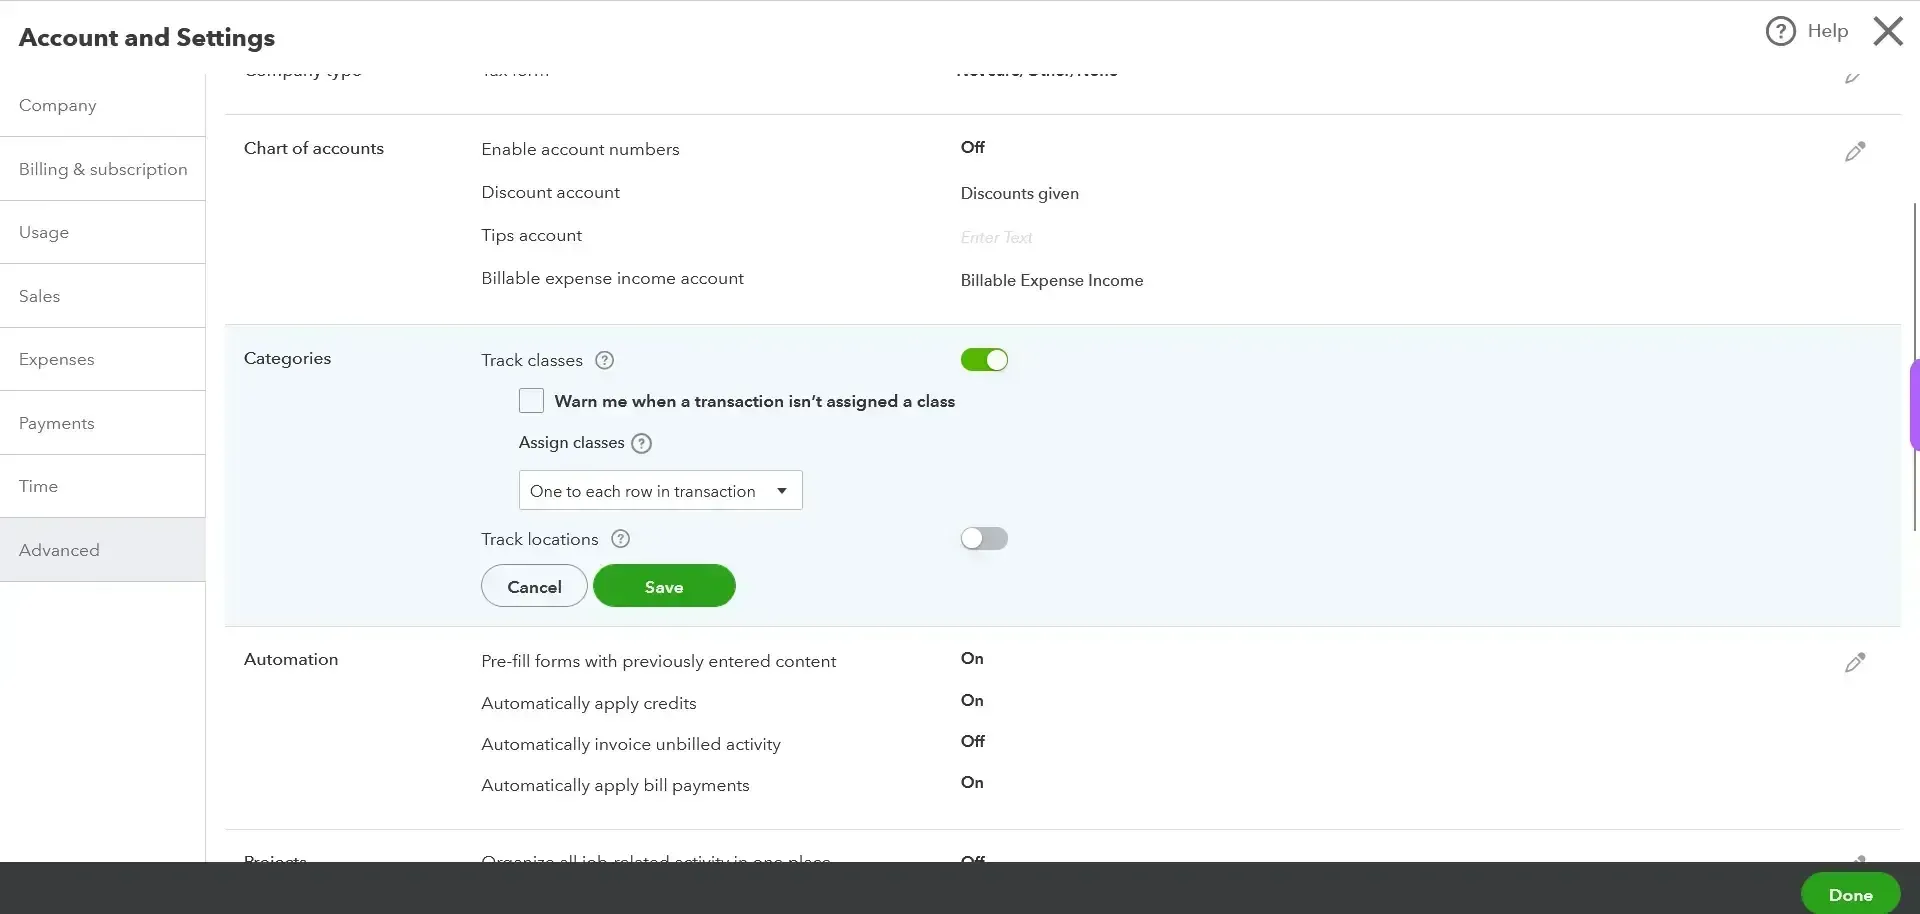
Optionally, enable “Warn Me when a transaction isn't assigned a class.” Activating this is beneficial to ensure all items are correctly classified to understand your reports.
In the Assign classes section, choose One for the entire transaction or One for each row in a transaction. Click Save, followed by Done.
Note: Choose One for an entire transaction if you don't need to specify a class for every product sold to a customer. It allows you to assign a single class to the entire invoice or sales receipt, saving time.
This process adds a class field or column to your forms, enabling you to assign a class to each transaction. Organize your customer and vendor information by assigning appropriate classes to transactions.
Step 2: Configure Your Class List
You can now create classes, forming classes that reflect different aspects of your business. Try to keep your classes simple for easy comprehension of your reports.
Transactions in QuickBooks Online can be easily categorized by assigning a class to the invoice or using the class field or column to specify classes for individual line items.
Once your class list is set up, you can begin assigning classes to transactions in QuickBooks to track income and expenses accurately.
Organize your customer and vendor transactions by associating them with relevant classes.
Turn On Tracking for Online Payroll
To track payroll using classes, activate class tracking for your payroll transactions. Then, you can assign a singular class to all employees or different classes to various employees.
Head to Settings and choose Payroll Settings.
In the Accounting section, click on Edit.
In the Class Tracking section, select Edit to enable it. Then, decide on your class tracking method.
Click Continue, then Done.
Note: If the Class Tracking section is not visible in the Accounting Preferences, ensure class tracking is enabled. If it's off, enable it and follow the above steps again. If it's already on, disable it, log out, log back in, and re-enable class tracking.
Add a class for each employee or assign one for all of them.
To finalize your preferences, select Continue, then Done.
Configure and Use Class Tracking in QuickBooks Desktop
Class tracking helps you analyze financial reports based on departments, business locations, individual properties, or any other significant business segment. This feature facilitates focused observation of particularly important business sectors.
For instance, if your restaurant business operates in three distinct locations, you can establish classes such as Uptown, Midtown, and Downtown to check the metrics for each site. In agriculture, you might create a separate class for each crop or livestock type, like corn, hogs, or soybeans. After the conclusion of an accounting period, you can generate separate reports for each restaurant location or farm enterprise.
Step 1: Enable class tracking
Windows:
Access your company file.
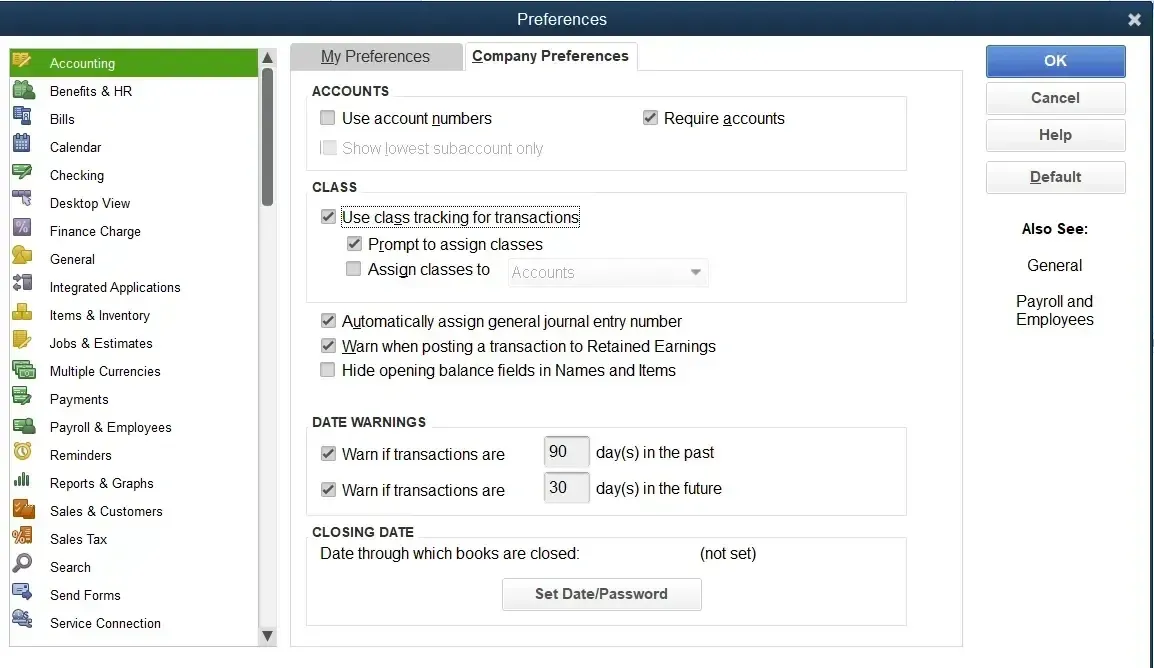
Navigate to the Edit menu and choose Preferences.
Click on Accounting, and then move to the Company Preferences tab.
Enable the checkbox next to Use class tracking for transactions.
If you desire a prompt when a class hasn't been assigned, enable the checkbox next to Prompt to assign classes.
Click OK to save your changes.
Mac:
Navigate to the QuickBooks menu and choose Preferences.
In the Workflow section, select Transactions.
Enable the Use class tracking checkbox, then close the Transactions window to save the alterations.
Step 2: Configure class categories for expenses and accounts
Windows
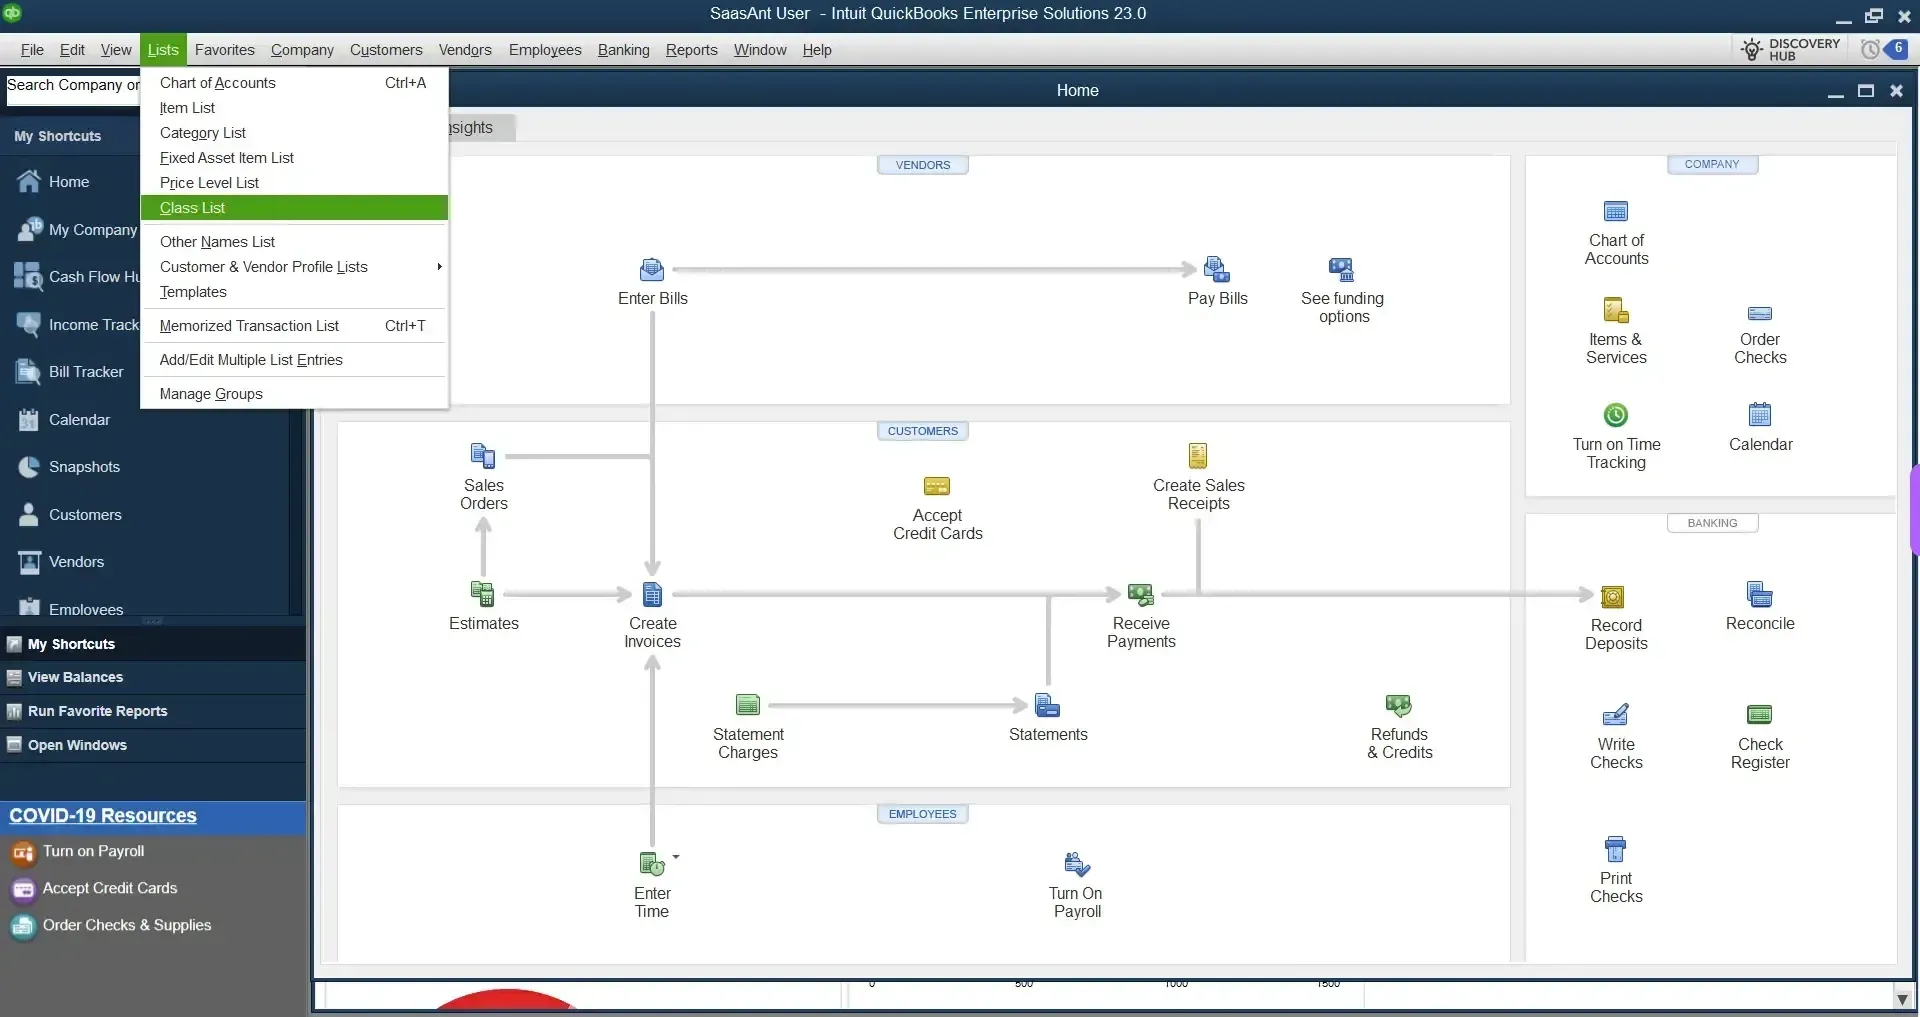
Get to the Lists menu and choose Class List.
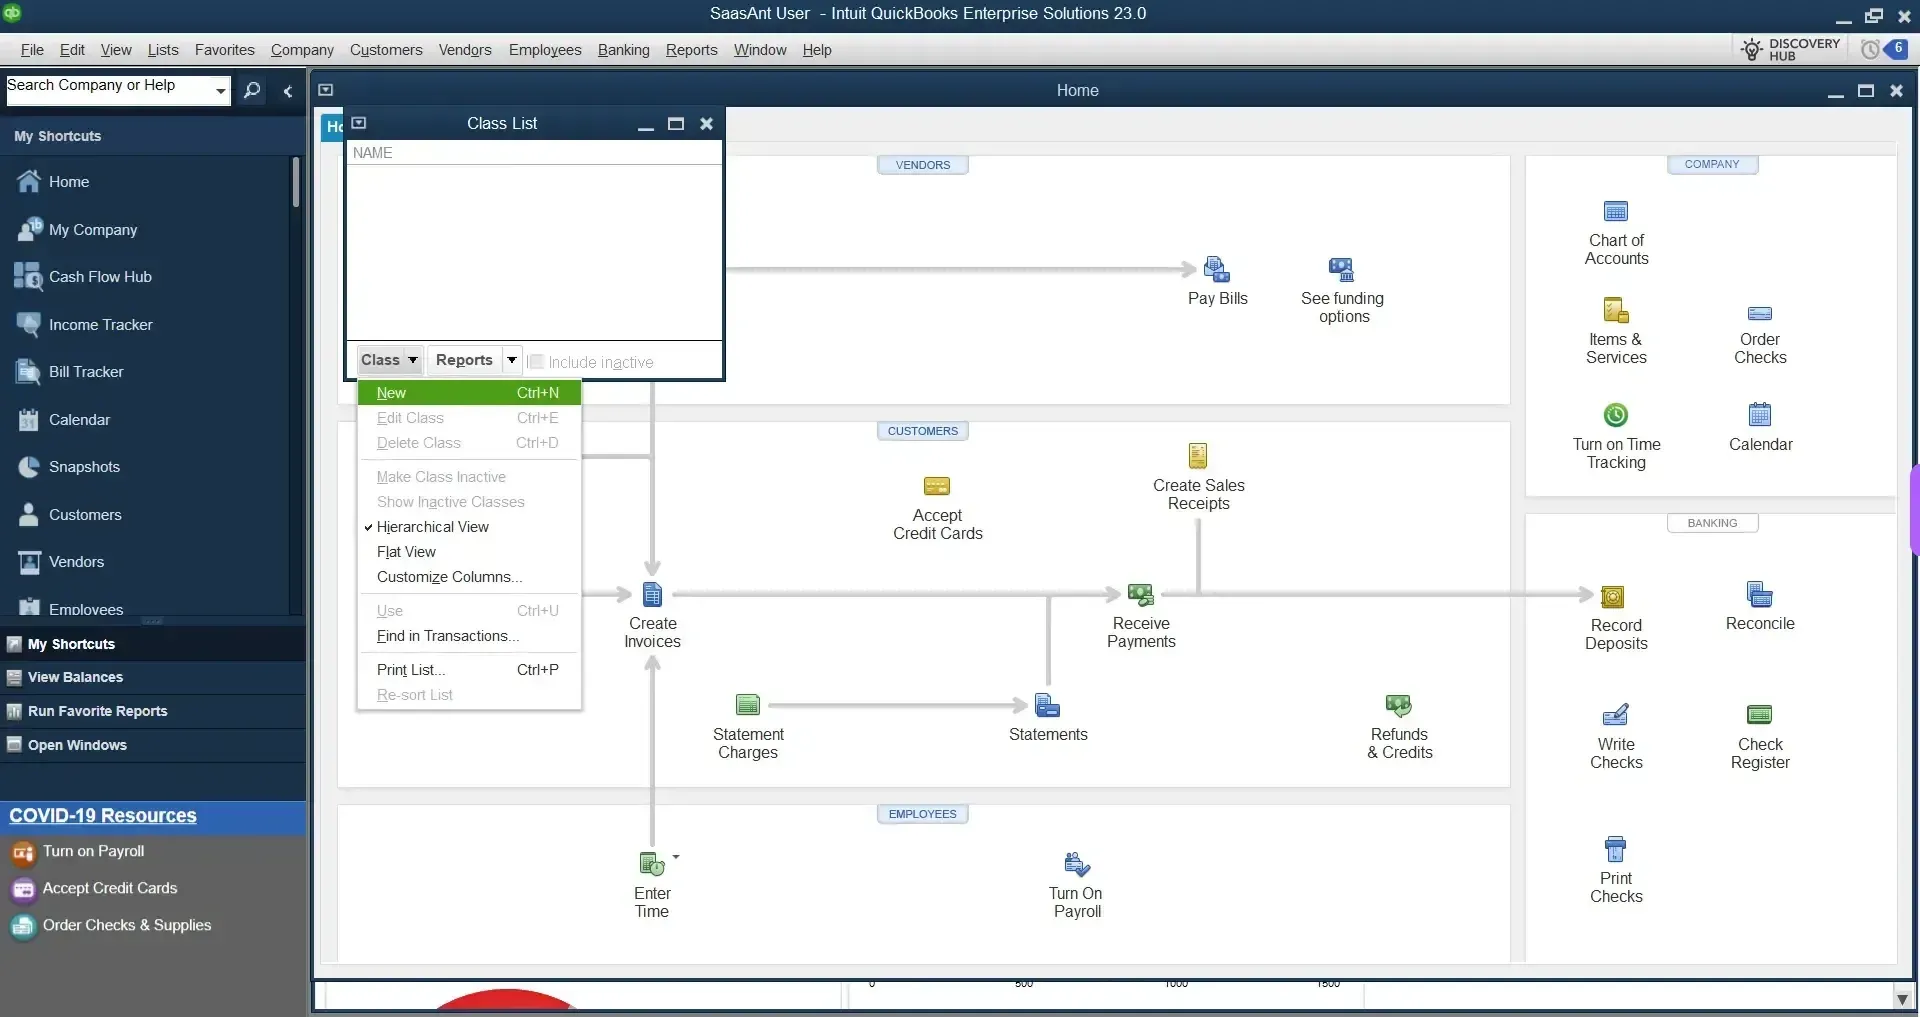
From the Class drop-down menu, select New.
You need to Enter the class name.
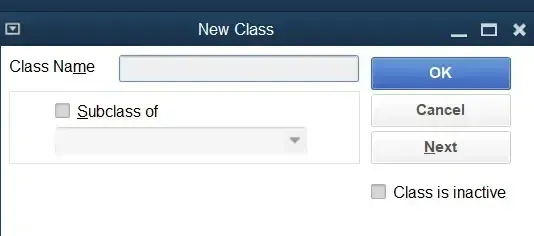
If it's a subclass, select the Subclass checkbox and find the class it's under.
Select OK to add it.
Mac
Go to the Lists menu, then select Classes.
Select the plus + icon to create a new class.
Enter your preferred class name.
Note: To create a subclass, select the checkbox and the class it's under.
Select OK to create a class.
Conclusion
QuickBooks class tracking offers a powerful tool for businesses to gain deeper insights into their financial data. Companies can analyze performance across segments by categorizing transactions into meaningful classes, such as departments, product lines, or locations. This level of granularity enables informed decision-making and a better understanding of profitability drivers. With the step-by-step guide, businesses can easily activate and utilize class tracking to streamline their financial management processes. By leveraging this feature effectively, businesses can optimize their operations, enhance profitability, and drive success in their respective industries.
FAQs
1. What is class tracking in QuickBooks?
Class tracking in QuickBooks allows you to classify your income, expenses, bills, sales receipts, estimates, and purchase orders into different categories. These categories, or "classes," can represent departments, cost centers, separate locations, or any other segments meaningful to your business.
2. How do I enable class tracking in QuickBooks?
To enable class tracking in QuickBooks Desktop, go to Edit > Preferences > Accounting > Company Preferences and select "Use class tracking." In QuickBooks Online, go to Settings > Account and Settings > Advanced > Categories and turn on "Track classes."
3. Can I assign a class to an item or individual line in a transaction?
Yes, you can assign classes to individual lines in a transaction. This lets you track income, expenses, or profitability by class in more detail.
4. Can I use class tracking in QuickBooks for job costing?
While class tracking can provide additional details on income and expenses, it's not a substitute for job costing. Job costing tracks costs and revenue by job, not class or category. However, you can use both features to get more detailed insights.
5. Can I run reports by class in QuickBooks Online?
Yes, QuickBooks allows you to run various reports by class, such as Profit and Loss by Class, Balance Sheet by Class, etc. These reports can provide insights into how different segments of your business are performing.
6. What is the difference between class tracking and location tracking?
Class tracking and location tracking are both ways to segment your business. Class tracking often represents departments, cost centers, or any segments you define. Location tracking typically represents physical locations, like stores or offices. You can use both features to get a detailed view of your business.
7. Can I use class tracking in QuickBooks to track projects?
Class tracking can be used to track projects, but QuickBooks also offers a project-tracking feature that might be more suitable. Class tracking is more general, while project tracking is designed to track individual projects' income, expenses, and profitability.
8. How can I effectively organize transactions for the products I sell and vendor transactions in QuickBooks Online?
You can streamline your transaction organization using the class feature in QuickBooks Online. Here's how you can do it:
Class for Each Product: Assign a specific class to represent each product you sell. This ensures that transactions related to different products are appropriately categorized for better tracking and reporting.
Assign One Class: Simplify your transaction organization by assigning one class to each transaction. This approach makes it easier to categorize transactions and analyze your business's financial data.
Keep Your Classes Simple: Keep your classes straightforward and intuitive. Avoid creating overly complex class structures to ensure ease of use and accurate reporting.
Vendor Transactions by Class: Use classes to categorize vendor transactions based on different vendors or types of expenses. This lets you track costs more effectively and gain insights into your spending patterns.
Different Classes: Leverage the flexibility of QuickBooks Online's class feature to create and assign different classes for various aspects of your business. Whether it's departments, projects, or locations, assigning different classes enables you to analyze your business from different perspectives.
9. What are classes in QuickBooks Online, and why should I use them?
Classes in QuickBooks Online represent meaningful segments of your business, such as store departments or product lines. They help you categorize transactions and get more precise insights into your sales, expenses, or profitability by business segment.
10. How do I add a new QuickBooks Online Plus or Advanced class?
Go to Settings > All Lists > Classes > New to add a new class. Give the class a name, and if needed, specify it as a sub-class by selecting "Is a sub-class" and choosing the main class. Then, save your changes.
11. Can I edit a class after creating it in QuickBooks Online?
Yes, you can edit a class by going to Settings > All Lists > Classes, finding the class you want to edit, selecting the small arrow ▼ next to "Run report," and then choosing "Edit." Make the necessary changes to the name or sub-class, and then save.
12. What if I need to delete or restore a class in QuickBooks Online?
If you no longer need a class, you can make it inactive instead of deleting it. To do this, go to Settings > All Lists > Classes, find the class you want to delete, select the small arrow ▼ next to "Run report," and then choose "Make inactive." If you need to restore a deleted class, go to Settings > All Lists > Classes, select "Settings" next to the Print icon, and then choose "Include inactive." Find the class you want to restore and select "Make active."