Mastering Purchase Order Setup in QuickBooks
Navigating through the complexities of business finances can be a daunting task, particularly when it comes to handling purchase orders (POs). Fortunately, applications like QuickBooks can simplify and streamline the process. This comprehensive guide, 'Mastering Purchase Order Setup in QuickBooks,' will walk you through the necessary steps to establish purchase orders in both QuickBooks Online and QuickBooks Desktop.
With its cloud-based architecture, QuickBooks Online allows on-the-go access from any location, making it an ideal pick for businesses seeking mobility. Conversely, QuickBooks Desktop caters to businesses requiring in-depth accounting features, thanks to its rich functionalities and higher processing power, facilitating a more traditional but powerful approach to accounting.
Before we delve into the step-by-step instructions, let's first understand what a purchase order is and why it's vital to your business operations.
A purchase order is an official document sent by a buyer to a seller, specifying the details about the products or services to be purchased, such as the types, quantities, and agreed prices. A PO creates a legal contract between the buyer and the seller, protecting both parties.
The significance of a purchase order lies in its ability to facilitate efficient tracking and management of orders, providing a clear trail for audit purposes. It helps avoid duplication of orders, assists in budget management, and promotes better communication with vendors.
Whether you're a novice entering the digital accounting world or a seasoned professional seeking a quick brush-up, our goal is to ease your journey through these applications, empowering you to create and manage your POs effectively. Let's embark on this journey of simplifying your business accounting tasks together.
Contents
Setting up and Using Purchase Orders in QuickBooks Online: A Comprehensive Guide
A Detailed Guide on Setting up and Using Purchase Orders in QuickBooks Desktop
Setting up and Using Purchase Orders in QuickBooks Online: A Comprehensive Guide
Effective management of purchase orders (POs) is integral to streamlining business operations, particularly when it comes to tracking and auditing purchases. With QuickBooks Online, you can easily set up and use purchase orders to maintain an efficient inventory and accounting process. This step-by-step guide will walk you through the steps to create and manage your purchase orders in QuickBooks Online, which supports purchase orders in its Plus, Advanced, and Essentials versions.
Enabling Purchase Orders
Before creating a purchase order, ensure you've turned on the purchase order feature in your QuickBooks Online settings.
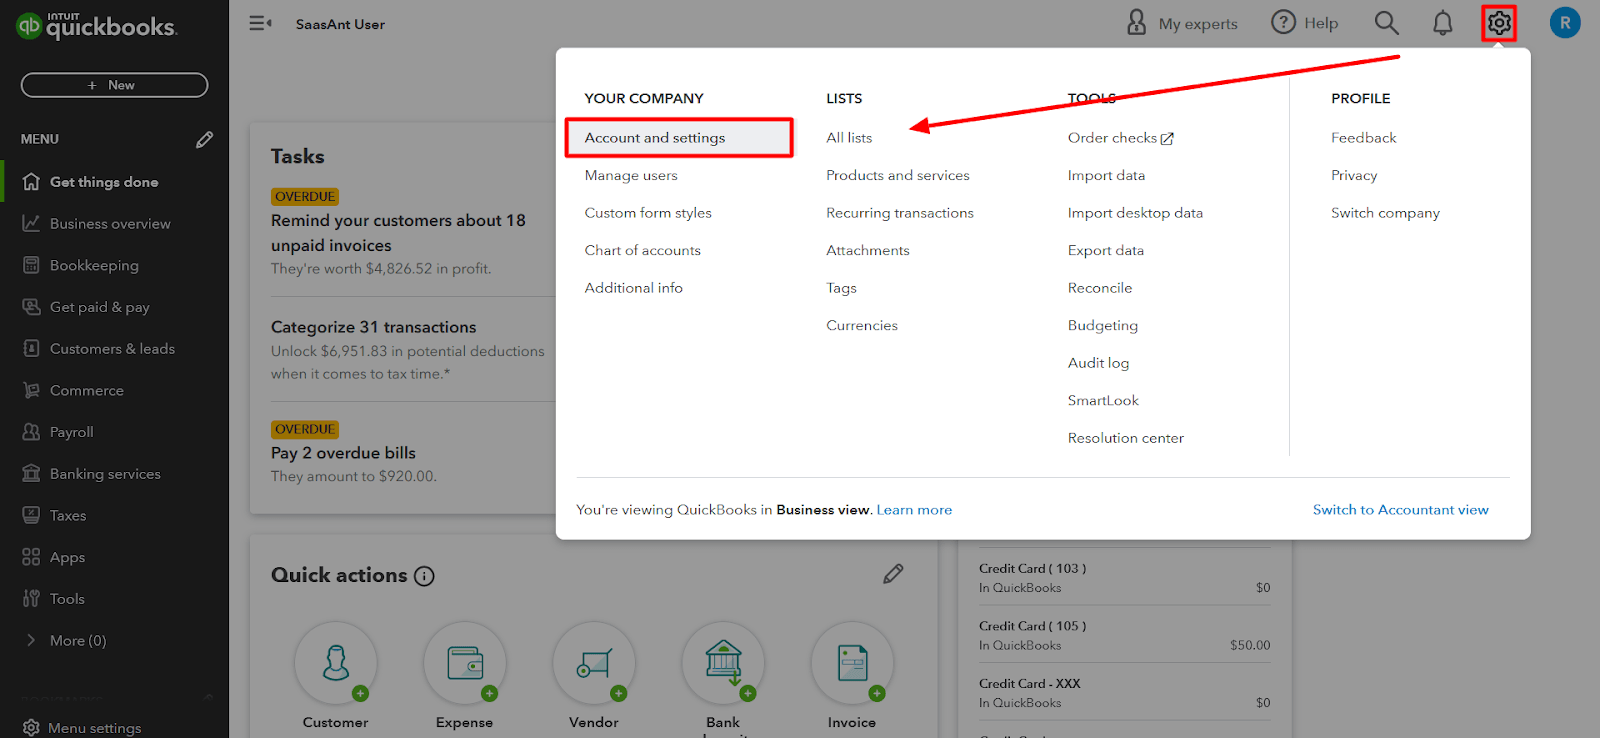
Step 1: Click on the ‘Gear’ icon at the top right of your QuickBooks Online dashboard.
Step 2: Select ‘Account and Settings’ from the drop-down menu.
Step 3: Navigate to the ‘Expenses’ tab.
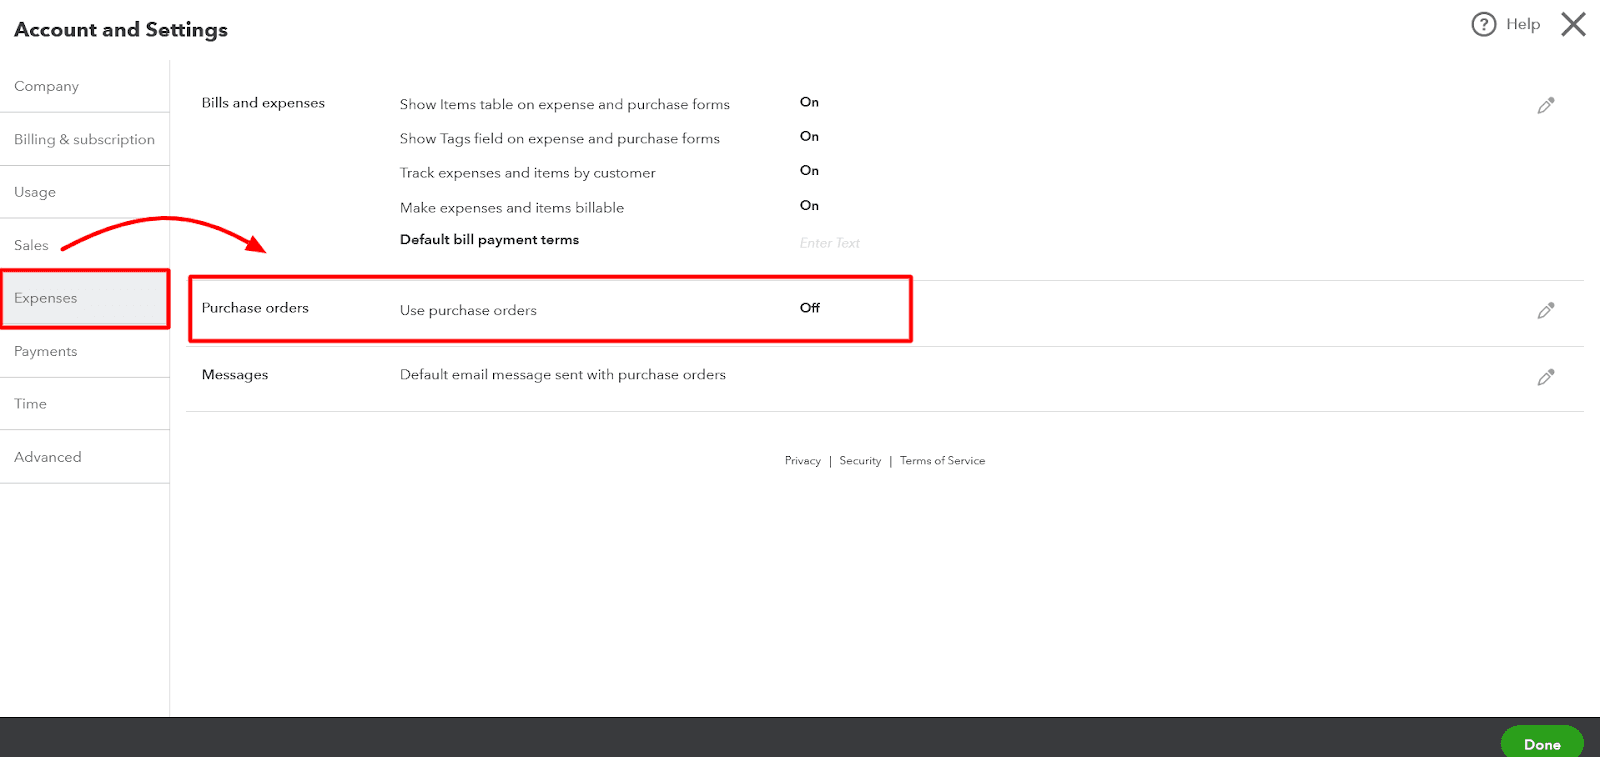
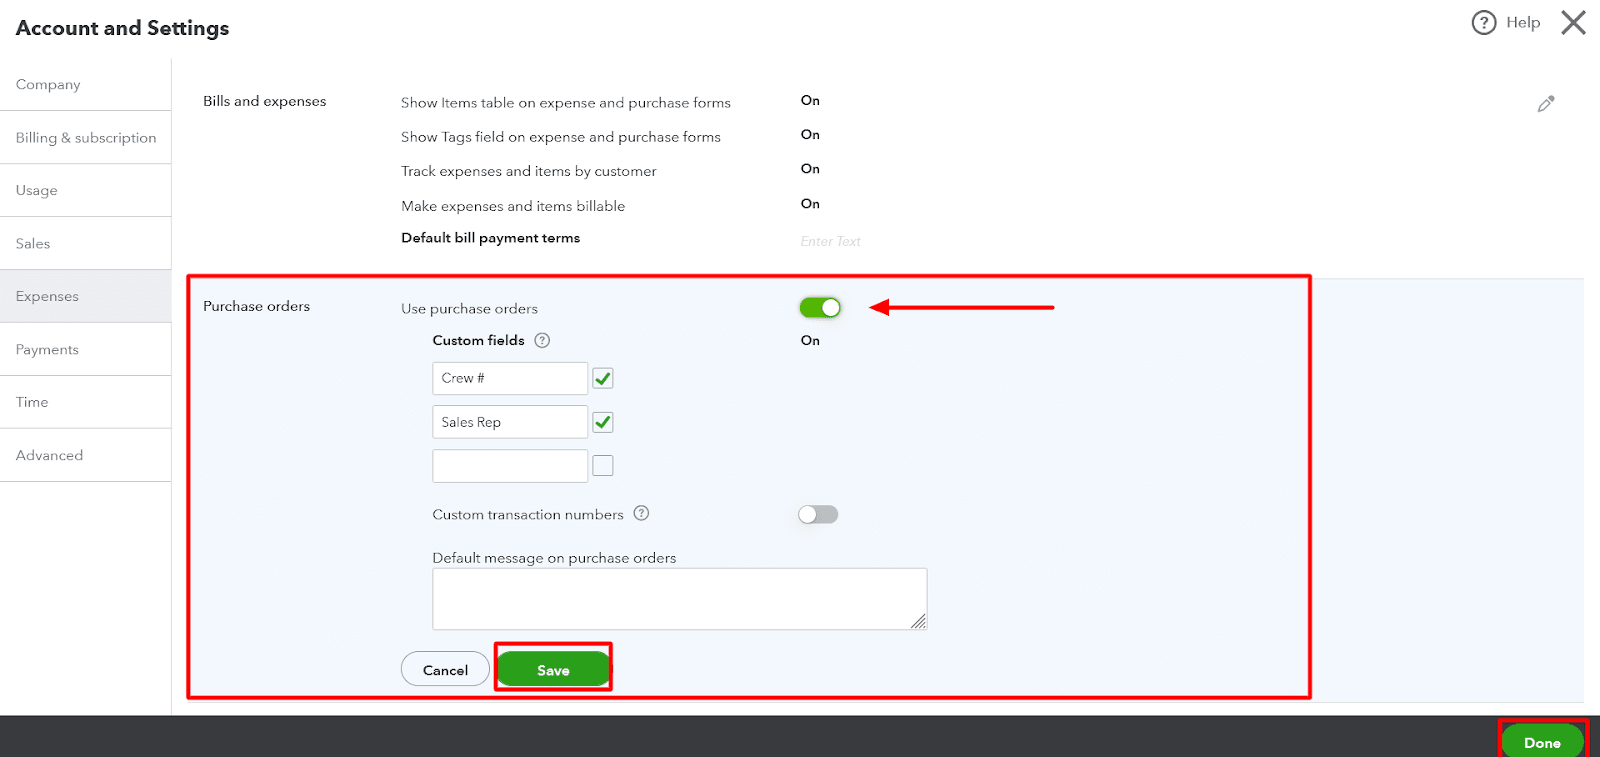
Step 4: Click on the 'Purchase Orders' section and switch the Purchase Order button ‘On.’
Step 5: To confirm your changes, click 'Save' and 'Done.'
Creating a Purchase Order
You are now ready to create a new order with purchase orders enabled.
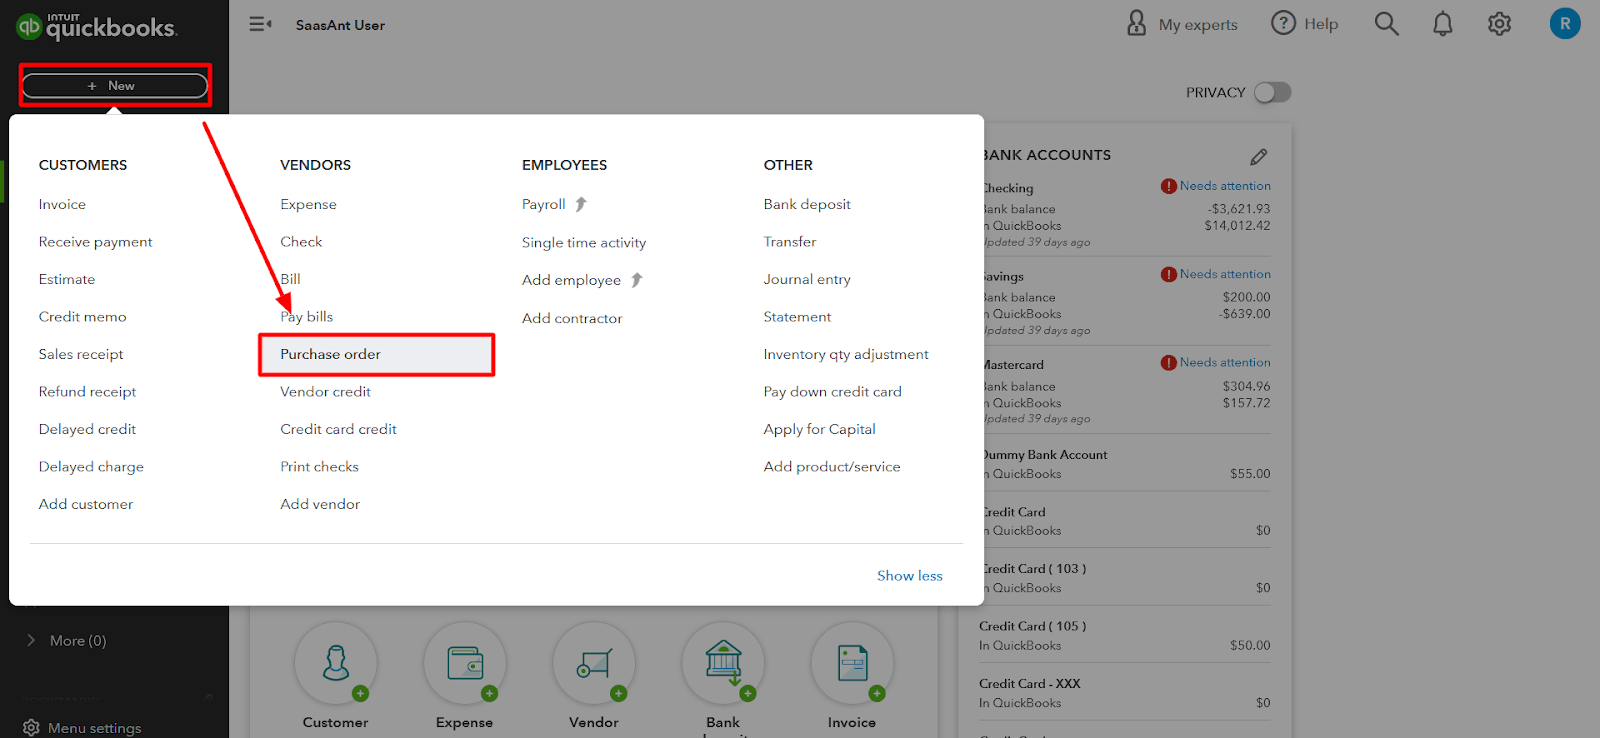
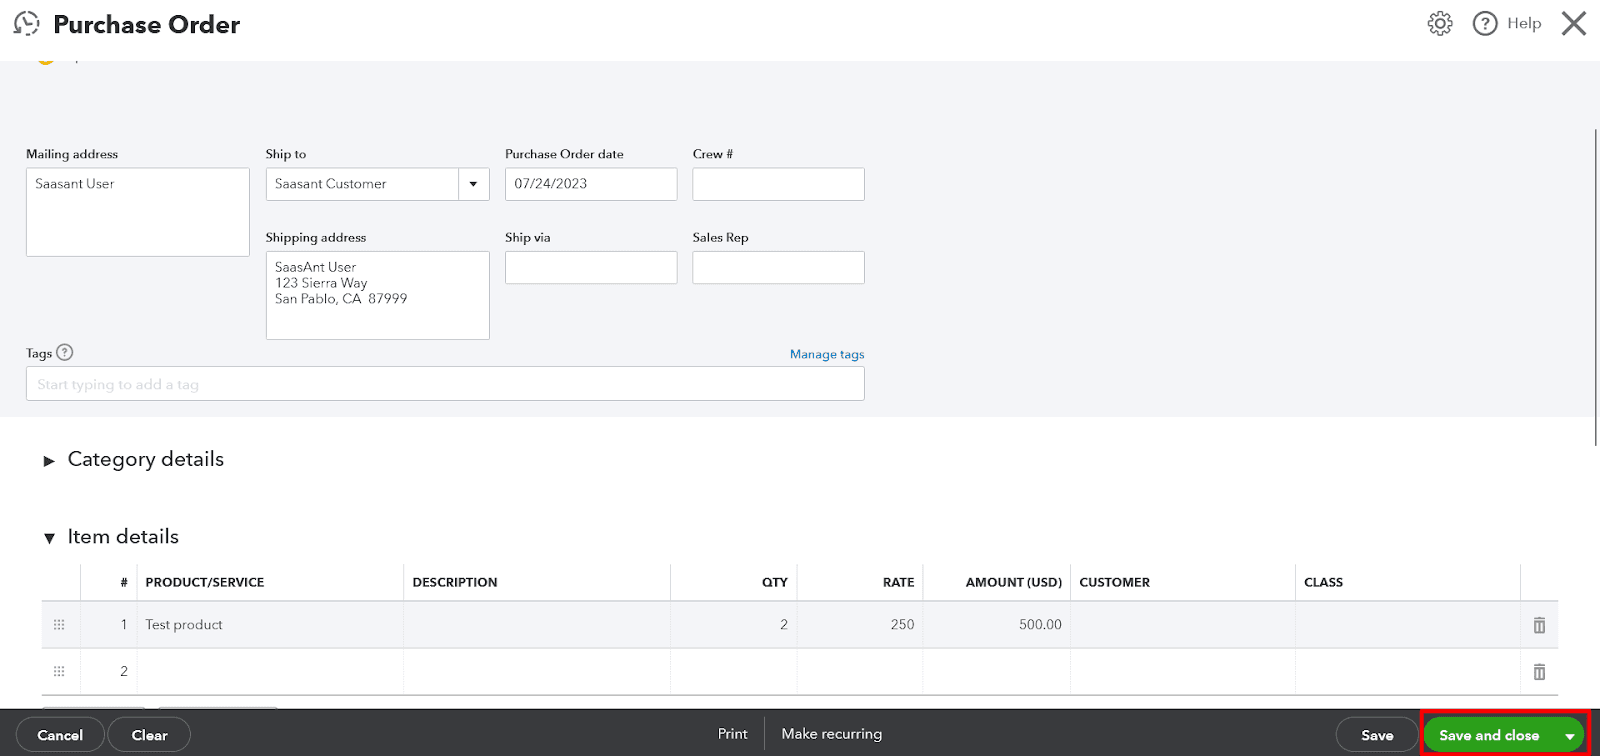
Step 1: Click on the ‘+ New’ button on the left-hand panel of your QuickBooks Online dashboard.
Step 2: From the drop-down menu, select ‘Purchase Order.’
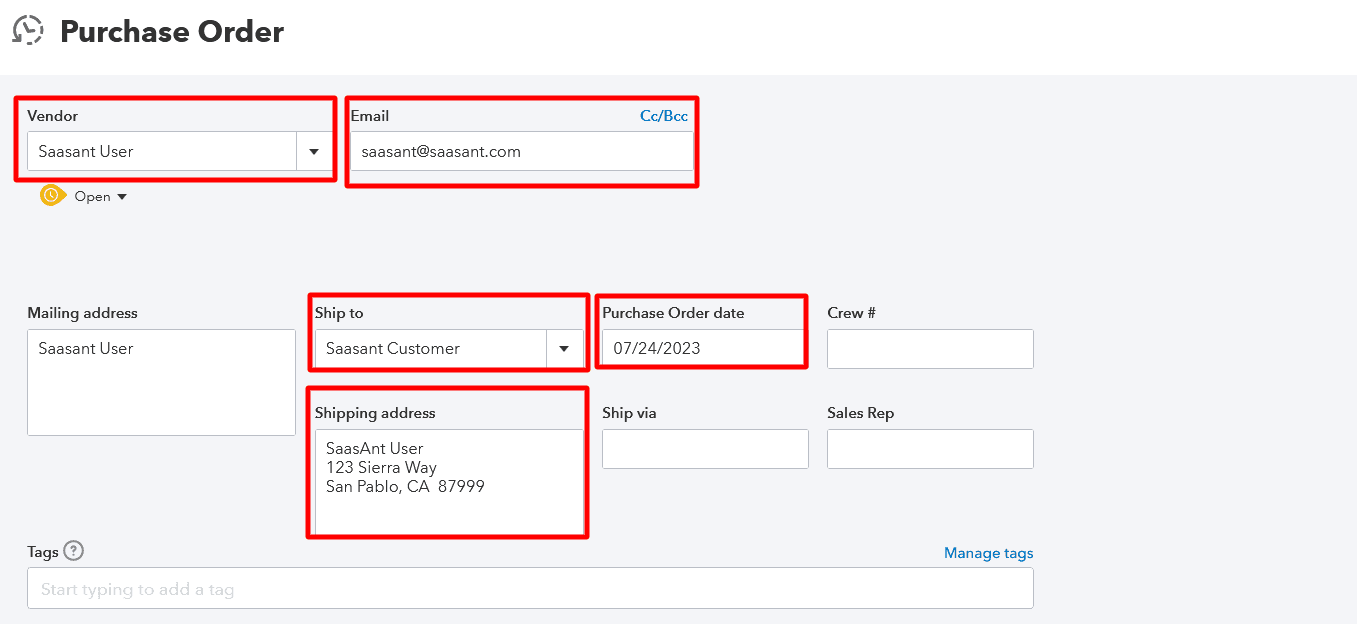
Step 3: Select the supplier from the ‘Supplier’ drop-down menu.
Step 4: Fill in the necessary fields such as the ‘Delivery date,’ ‘PO Number,’ and the shipping address.
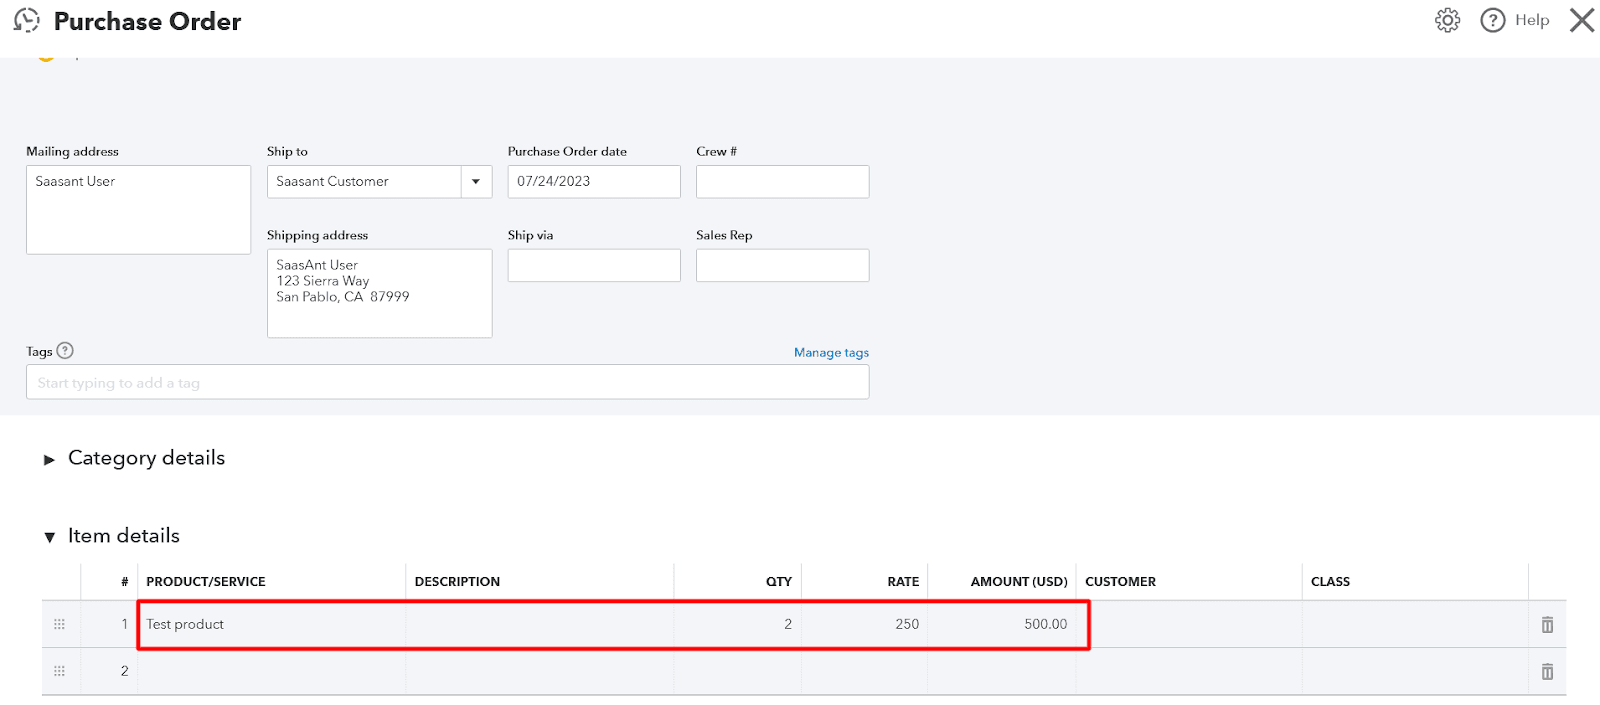
Step 5: Choose the products or services you are ordering within the ‘Product/Service’ section. Input each product or service's 'Qty' and 'Rate.' QuickBooks Online will calculate the amount.
Step 6: Optionally, add more information in the 'Memo' field.
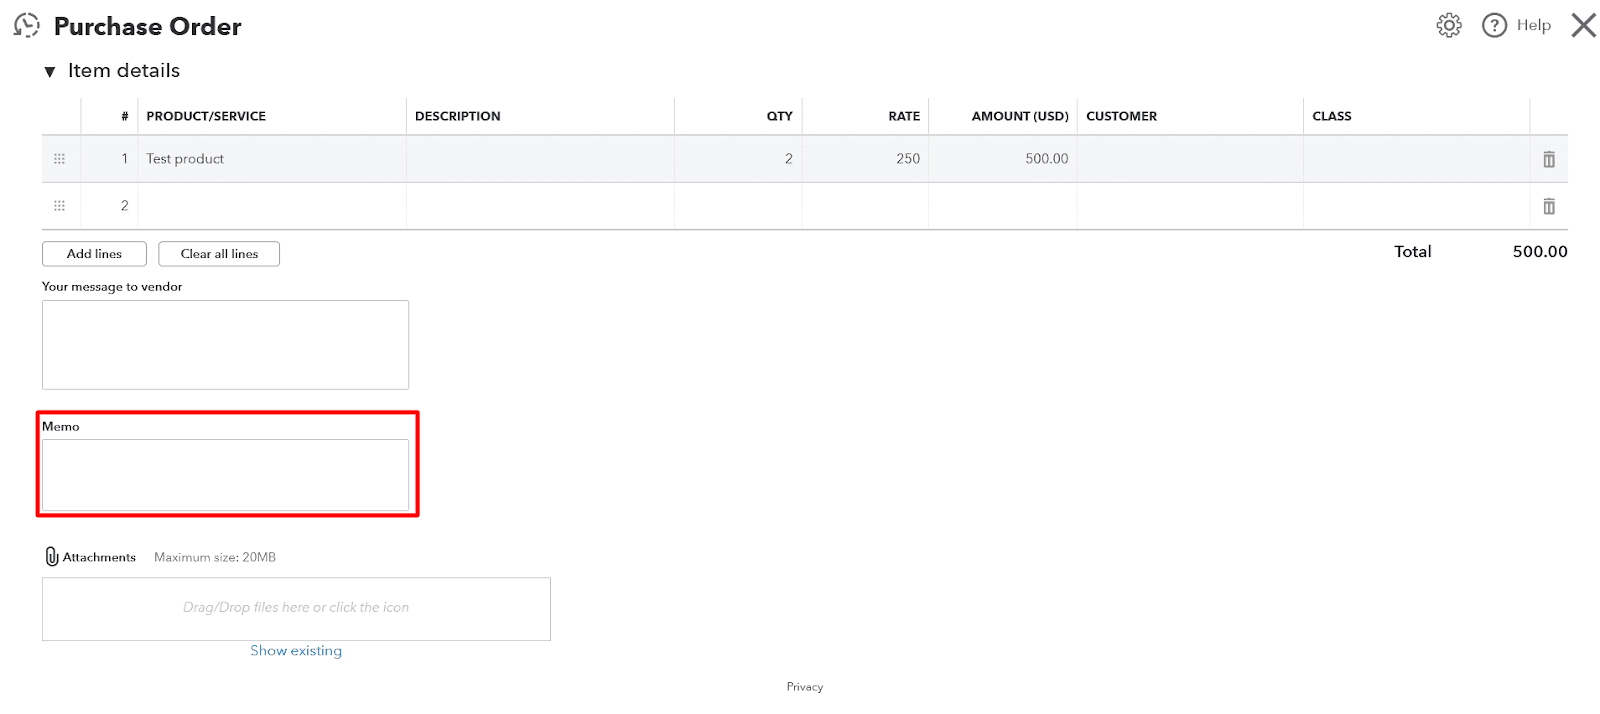
Step 7: After entering all the details accurately, finalize and store your purchase order by clicking on 'Save and close.'
Managing Your Purchase Orders
Once you've created a purchase order, QuickBooks Online provides a way to manage and track them.
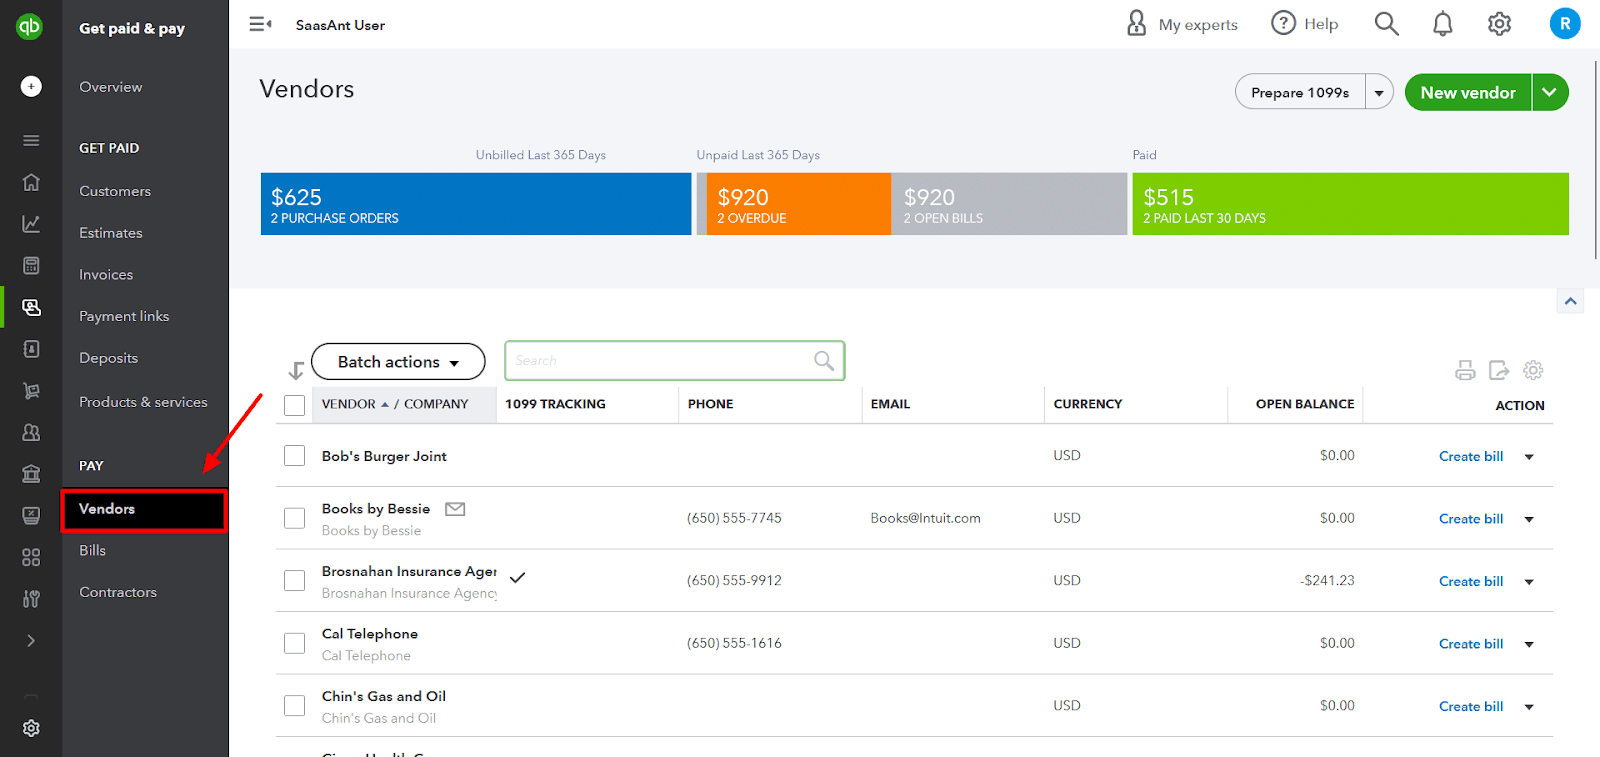
To review a purchase order, click ‘Expenses’ from the left-hand menu and then ‘Vendors.’
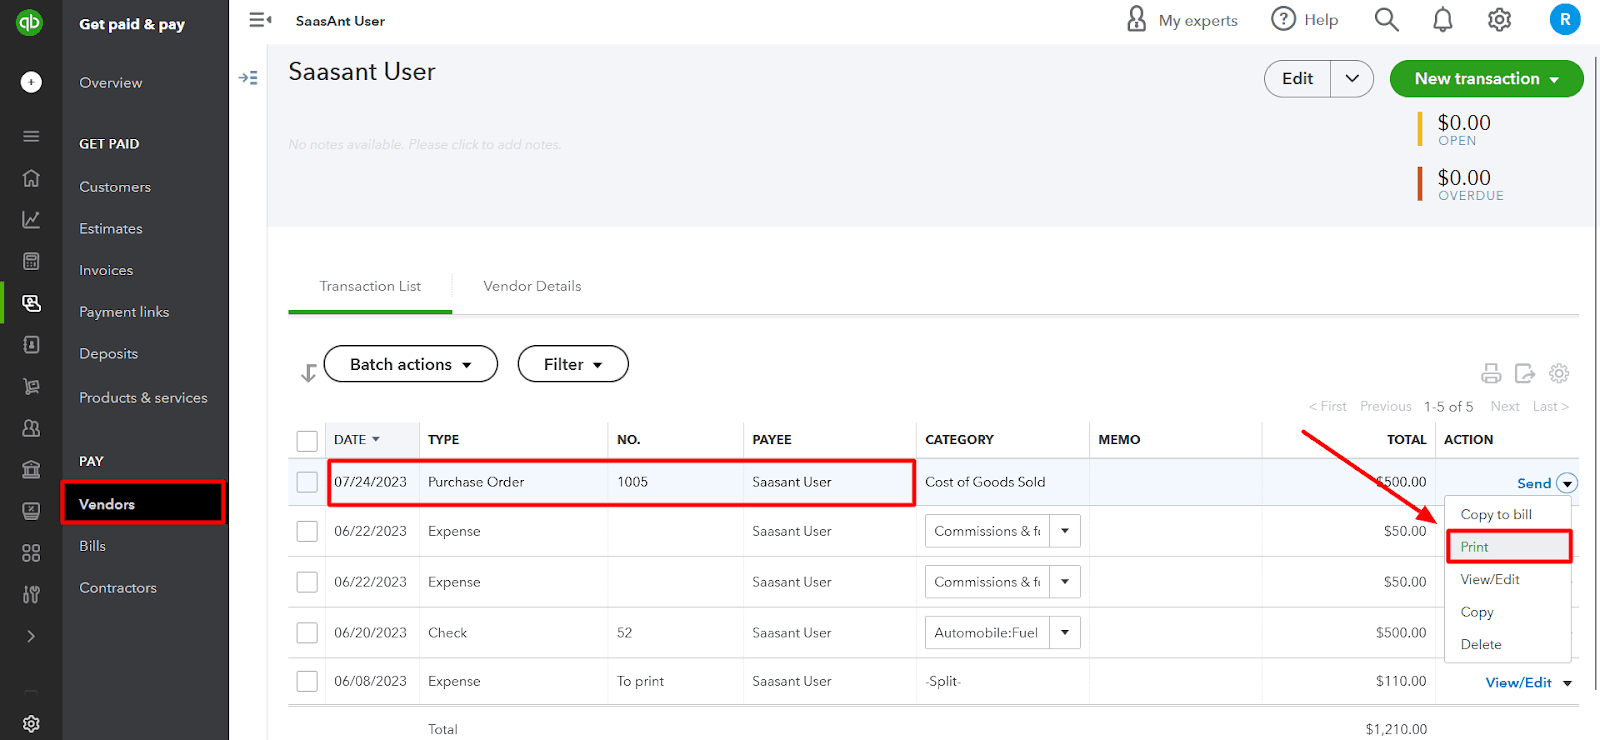
To print the purchase order, navigate to the order you want, click ‘More’ at the bottom, and select ‘Print.’
A Detailed Guide on Setting up and Using Purchase Orders in QuickBooks Desktop
With its robust features, QuickBooks Desktop provides an easy way to set up and use purchase orders. This step-by-step guide will take you through creating and managing your purchase orders in QuickBooks Desktop, supported in the Pro, Premier, and Enterprise versions.
Activating Purchase Orders
Ensure you have activated the Purchase Order feature on your QuickBooks Desktop.
Step 1: Navigate to the ‘Edit’ menu and select ‘Preferences.’
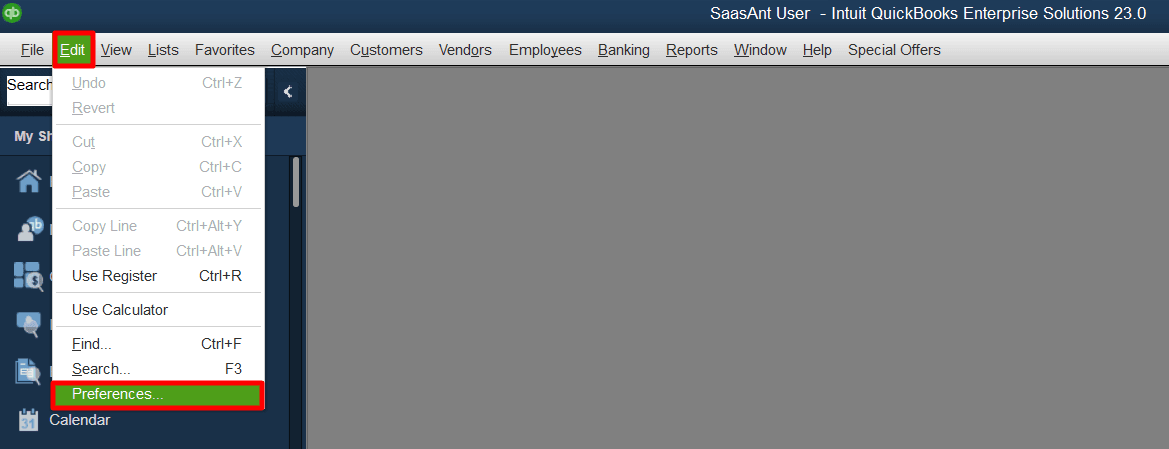
Step 2: Choose ‘Items & Inventory’ and proceed to the ‘Company Preferences’ tab.
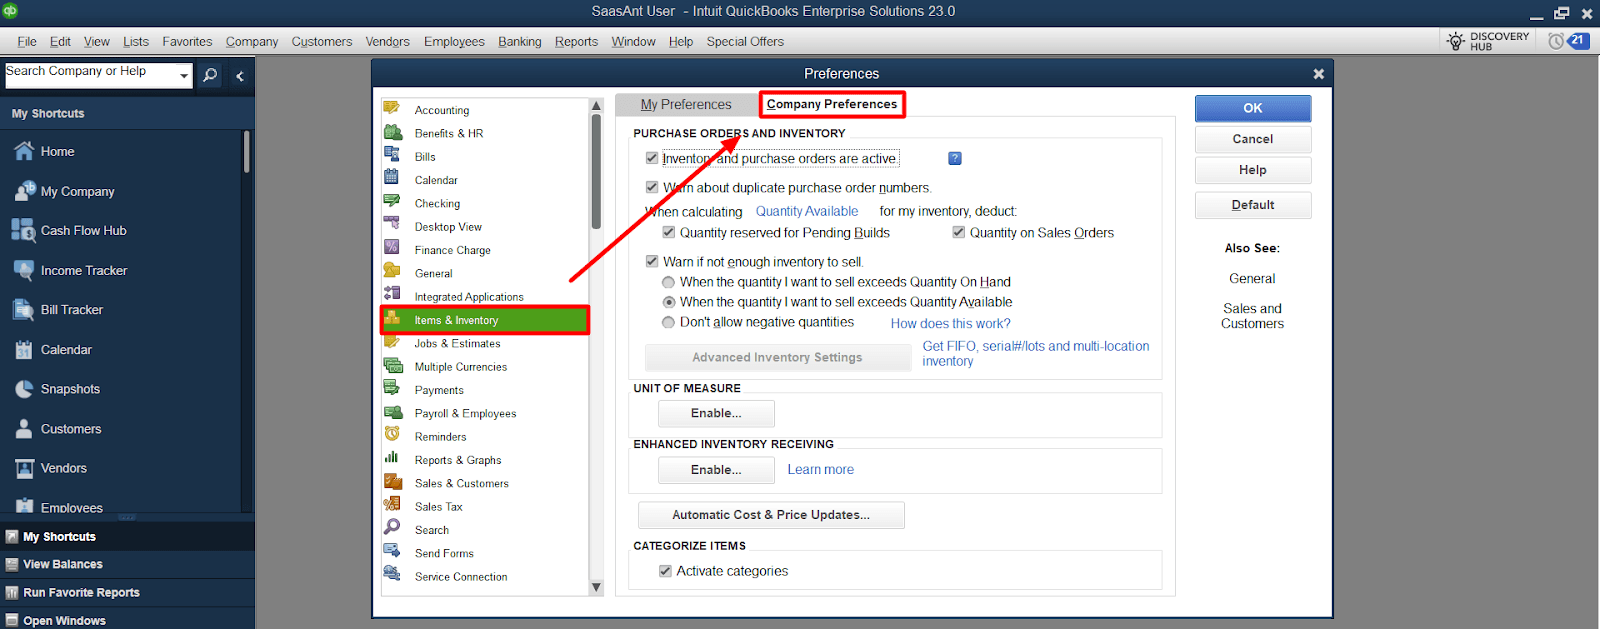
Step 3: Tick the box marked 'Inventory and purchase orders are active' for activation.
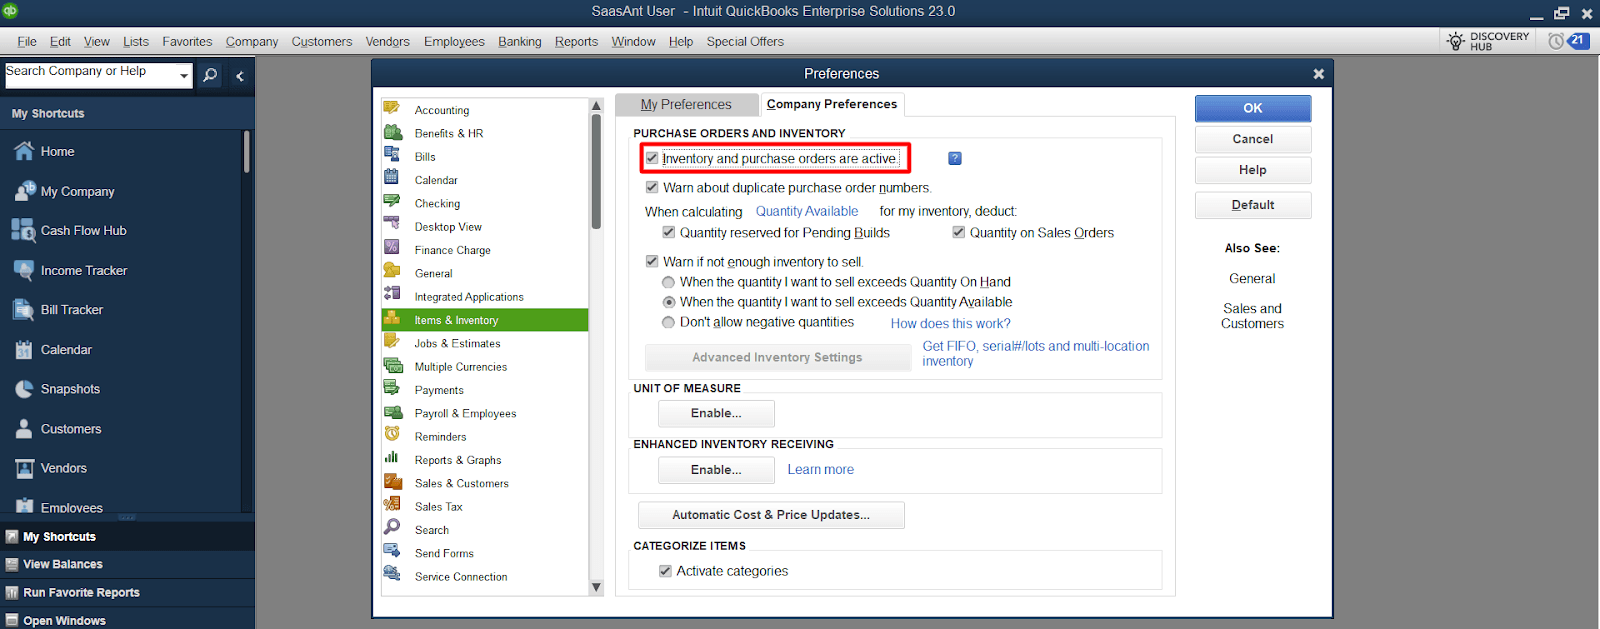
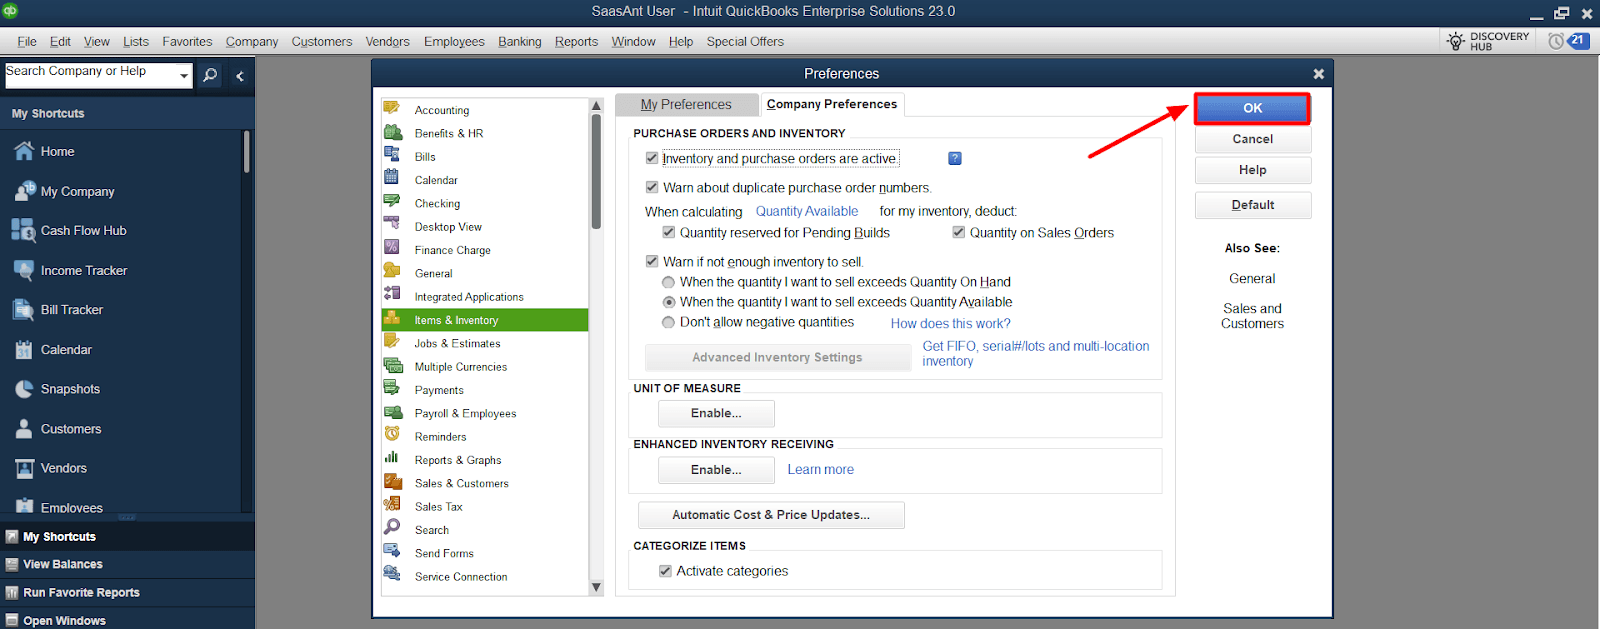
Step 4: Click 'OK' to confirm the changes.
Creating a Purchase Order
Once Purchase Orders are enabled, you can generate a new one.
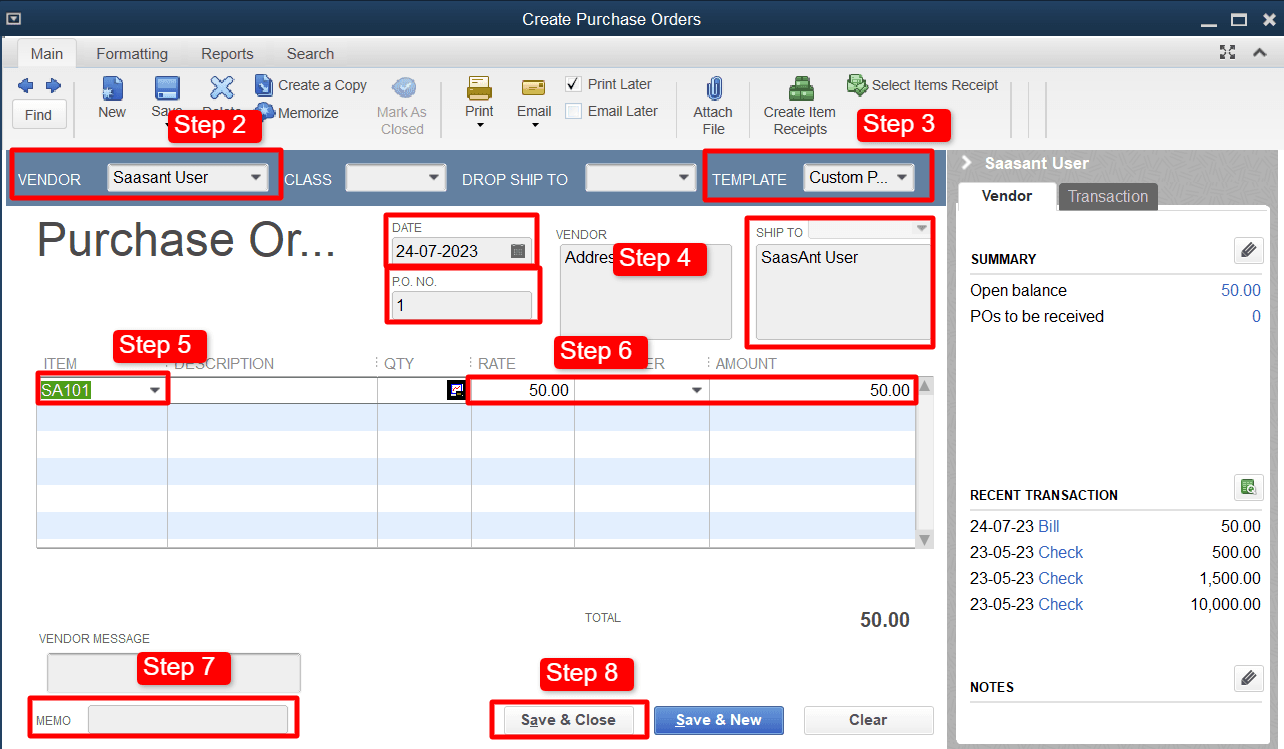
Step 1: Navigate to the 'Vendors' menu and select ‘Create Purchase Orders.’

Step 2: From the ‘Vendor’ drop-down, pick the vendor you're placing an order from.
Step 3: If necessary, alter the template by selecting from the 'Template' drop-down.
Step 4: Fill out the necessary information such as ‘Date,’ ‘P.O. Number,’ and ‘Ship To.’
Step 5: Select the items you want to order in the ‘Item’ section.
Step 6: Define the quantity and rate for each item, and QuickBooks Desktop will compute the amount.
Step 7: You can provide additional information in the ‘Memo’ and ‘Vendor message’ fields if required.
Step 8: Once all the information is appropriately entered, click ‘Save & Close’ to store the purchase order.
Managing Your Purchase Orders
After creating a purchase order, QuickBooks Desktop offers effective management and tracking features.
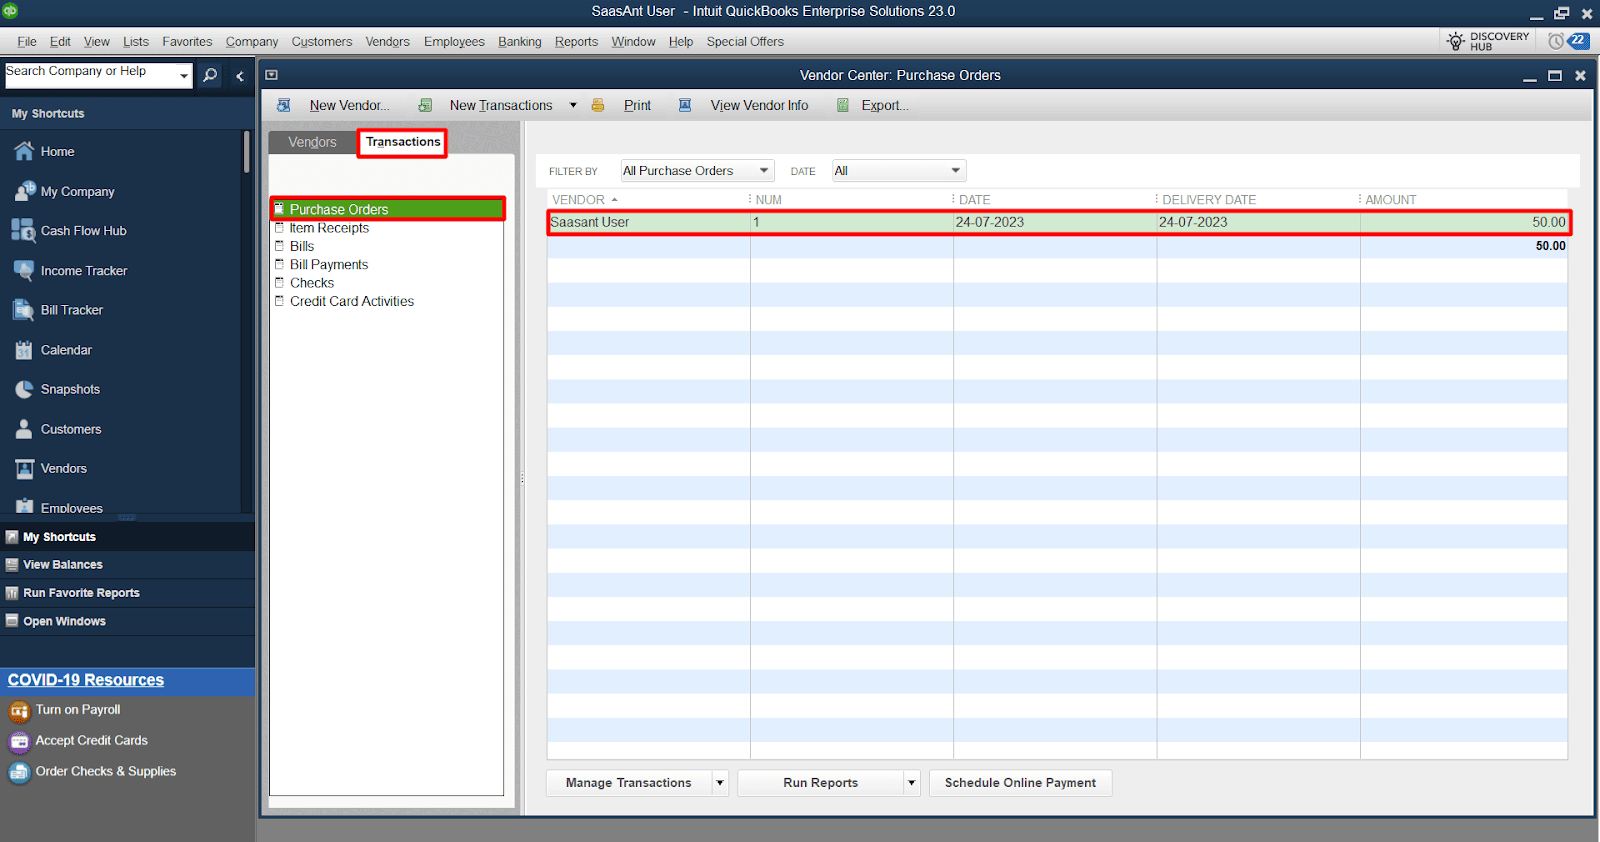
Step 1: To review or modify an existing purchase order, navigate to the 'Vendors' menu, select ‘Vendor Center.’

Step 2: Under the ‘Transactions’ tab, select ‘Purchase Orders’ and click the purchase order you want to review or modify.
Print your purchase order.
To print the purchase order:
Step 1: Navigate to the 'File' menu, choose 'Print Forms,’ and select 'Purchase Orders' from the dropdown.
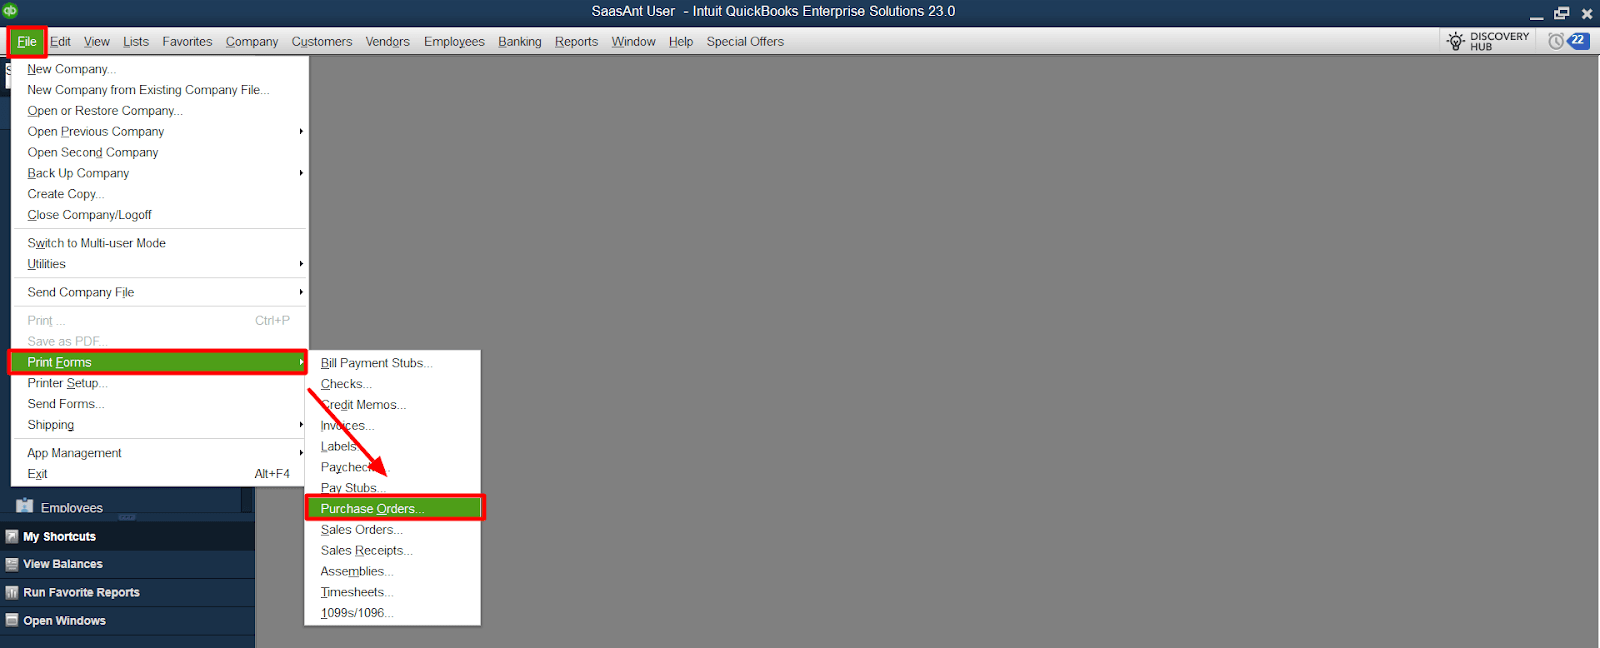
Step 2: Choose the purchase order you want to print by clicking the ‘Checkbox’ and click ‘OK’ to proceed.

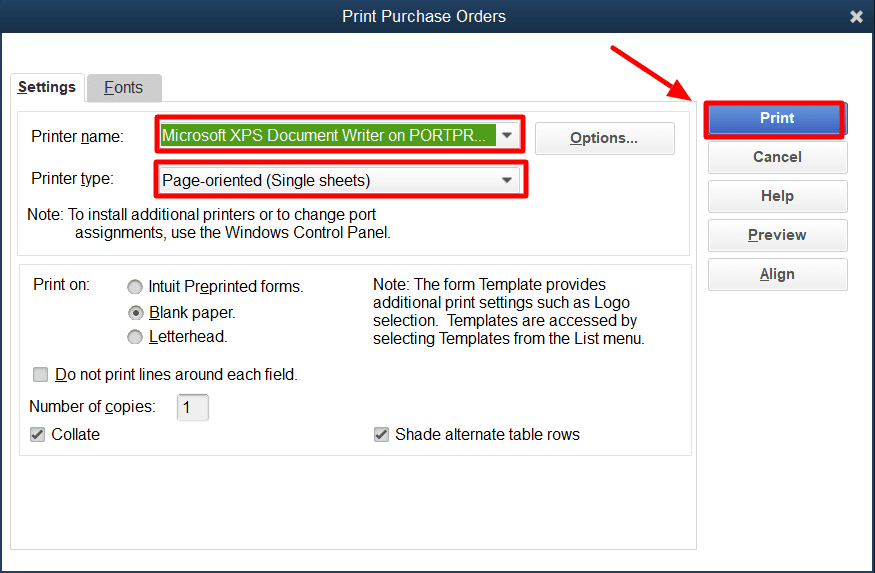
Step 3: Within the ‘Print Purchase Orders’ window, you’ll find various printing options, including printer name, printer type, number of copies, and much more. Once you’ve customized the options, click ‘Print.’
To learn more, check out this article on import purchase orders into QuickBooks.
FAQs
Q1: Can I Create a Purchase Order (PO) In All Versions of QuickBooks?
No, not all versions support the creation of purchase orders. The Plus, Advanced, and Essentials versions in QuickBooks Online allow for POs. This feature is available in the Pro, Premier, and Enterprise versions for QuickBooks Desktop.
Q2: How Do I Enable the Purchase Order Feature in QuickBooks Online?
In QuickBooks Online:
Navigate to ‘Settings’ by clicking the ‘Gear’ icon.
Select ‘Account and Settings,’ then click the ‘Expenses’ tab.
Click on the ‘Purchase Orders’ section, and turn the Purchase Order button ‘On.’
Q3. How Do I Enable the Purchase Order Feature in QuickBooks Desktop?
In QuickBooks Desktop:
Navigate to the ‘Edit’ menu, and select 'Preferences.'
Choose ‘Items & Inventory.’
Under the ‘Company Preferences’ tab, ensure the 'Inventory and purchase orders are active' box is checked.
Q4: How Do I Create a Purchase Order in QuickBooks Online?
In QuickBooks Online:
Click on the ‘+ New’ button
Select ‘Purchase Order.’
Choose the supplier from the 'Supplier' drop-down menu, fill in the required fields, add the products or services you're ordering, input the quantity and rate, and save the purchase order.
Q5: How Do I Create a Purchase Order in QuickBooks Desktop?
Within the QuickBooks Desktop dashboard:
Navigate to the ‘Vendors’ menu, and select ‘Create Purchase Orders.’
Choose your vendor from the drop-down menu.
Fill in the necessary fields, select the items you want to order, specify the quantity and rate, and save the purchase order.
Q6: How Do I Cancel or Delete a Purchase Order in QuickBooks Online?
To delete a purchase order in QuickBooks Online, navigate to the specific order, click ‘More’ at the bottom, and select ‘Delete.’
Q7: Can I Send a Purchase Order to My Vendor Directly from QuickBooks?
Yes, both versions of QuickBooks allow you to email your purchase order directly to your vendor. Open the purchase order, click 'Email,' and fill in the necessary details.
Q8: How Can I Track the Status of My Purchase Orders in QuickBooks?
QuickBooks has a ‘Manage Purchase Order Status’ feature, which allows you to track the status of your purchase orders as open, closed, or partially received.
Q9: Can I Copy a Purchase Order in QuickBooks?
Yes, you can copy a purchase order in QuickBooks. In QuickBooks Online, open the order, click ‘More’ at the bottom, and select ‘Copy.’ In QuickBooks Desktop, open the order, navigate to the top menu, and select ‘Memorize Purchase Order.’