Step-by-step guide on how to fix the issue when QBCFMonitorService is not running
Navigating technical issues can often be daunting when they disrupt your ability to manage your business finances. One such problem that users of QuickBooks sometimes encounter is the "QBCFMonitorService not running" error. This error can limit your ability to access your company file, especially in a multi-user environment, and can significantly hamper your workflow.
Whether you're an accountant trying to balance the books, a small business owner attempting to process payroll, or an administrative assistant updating financial records, this issue can be a significant roadblock. Not promptly addressing issues related to discrepancies in the trial balance can lead to inefficiencies in managing financial records and delays in financial reporting, decision-making, and audit processes.
This guide will walk you through a step-by-step process to resolve this issue, enabling you to get back to managing your company's finances.
Remember that while this guide is thorough, it's always wise to back up your quickbooks data before making any changes to your system. Let's dive in and get this error resolved.
Contents
Step 1: Verify QuickBooks Multi-User Hosting Set up on the Server:
Step 2: Install the Updates of the QuickBooks Database Manager Server:
Step 3: Set up QuickBooks Database Manager Service:
Step 4: Configure Windows & Third-Party Firewall:
Step 5: Ensure Communication Between Server Computer and Workstations
Frequently Asked Questions
Step 1: Verify QuickBooks Multi-User Hosting Set up on the Server:
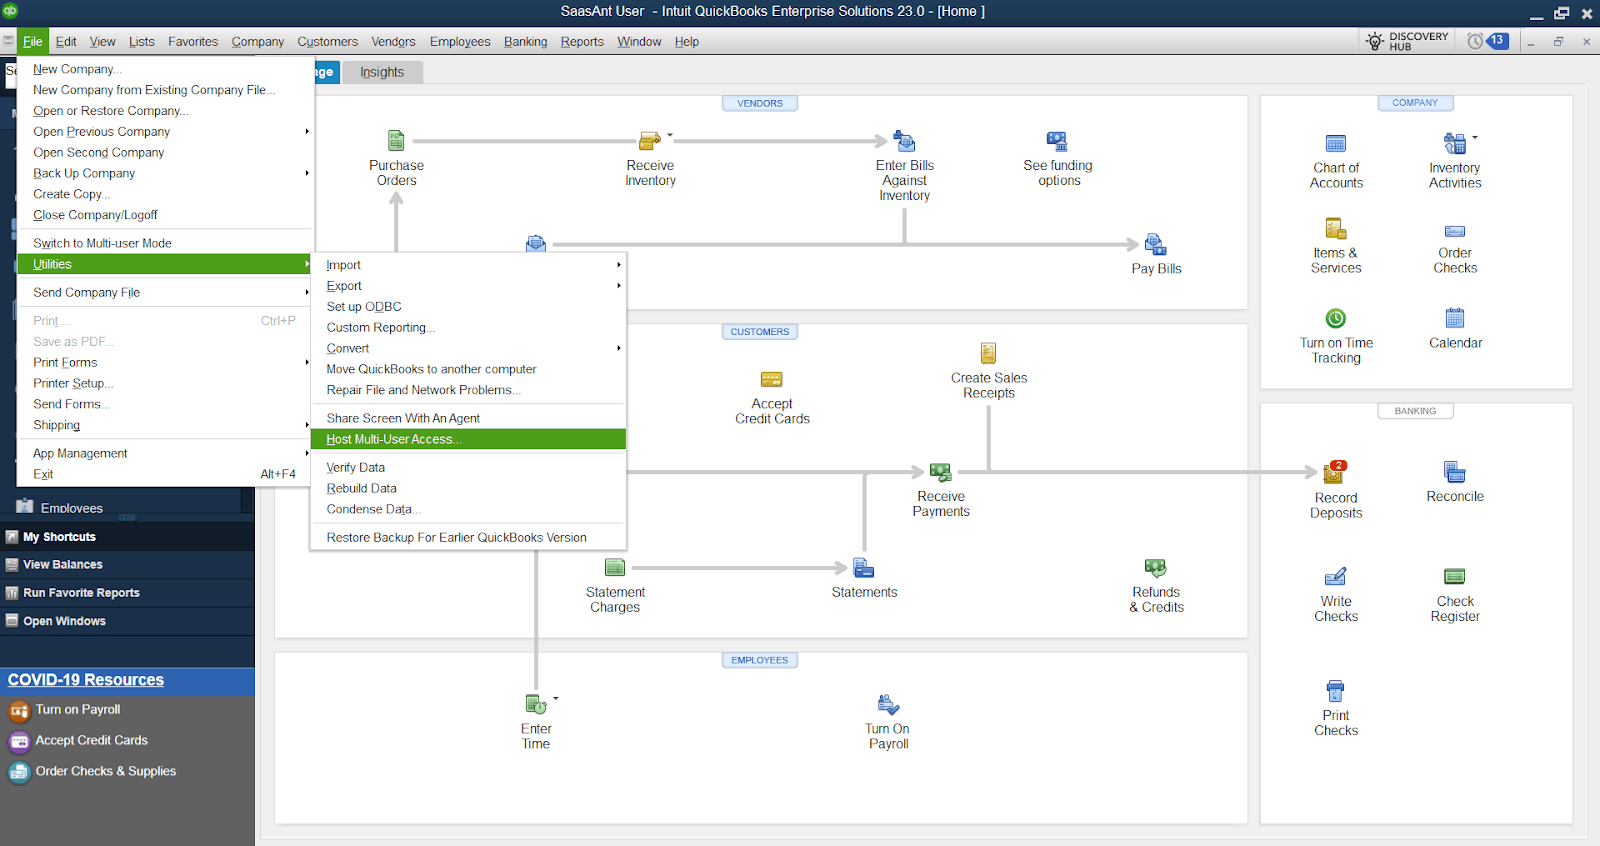
Open QuickBooks Desktop and click the File tab.
Hover over the Utility option.
Select the option that says Host Multi-User Access.
Click Yes once you get the confirmation box on the screen.
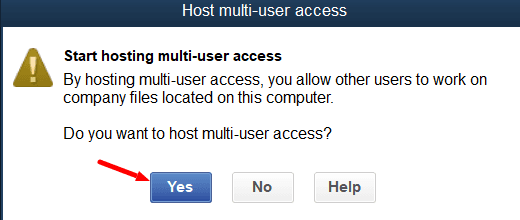
Ensure you are activating hosting only on the server.
Make sure that the Multi-user Hosting is not running on any workstation computers.
To verify, open QuickBooks and go to the File tab.
If you see the option Switch to Single-User mode, it means QuickBooks is running under the multi-user way, and you need to click Switch to Single-User mode.
Do not change the settings if you see the Switch to Multi-user mode option.
Step 2: Install the Updates of the QuickBooks Database Manager Server:
Check out the latest release of the QuickBooks Database Manager server for your QuickBooks version.
Open QuickBooks if you don't have the latest updates and patches installed.
From the Help tab, click Update QuickBooks.
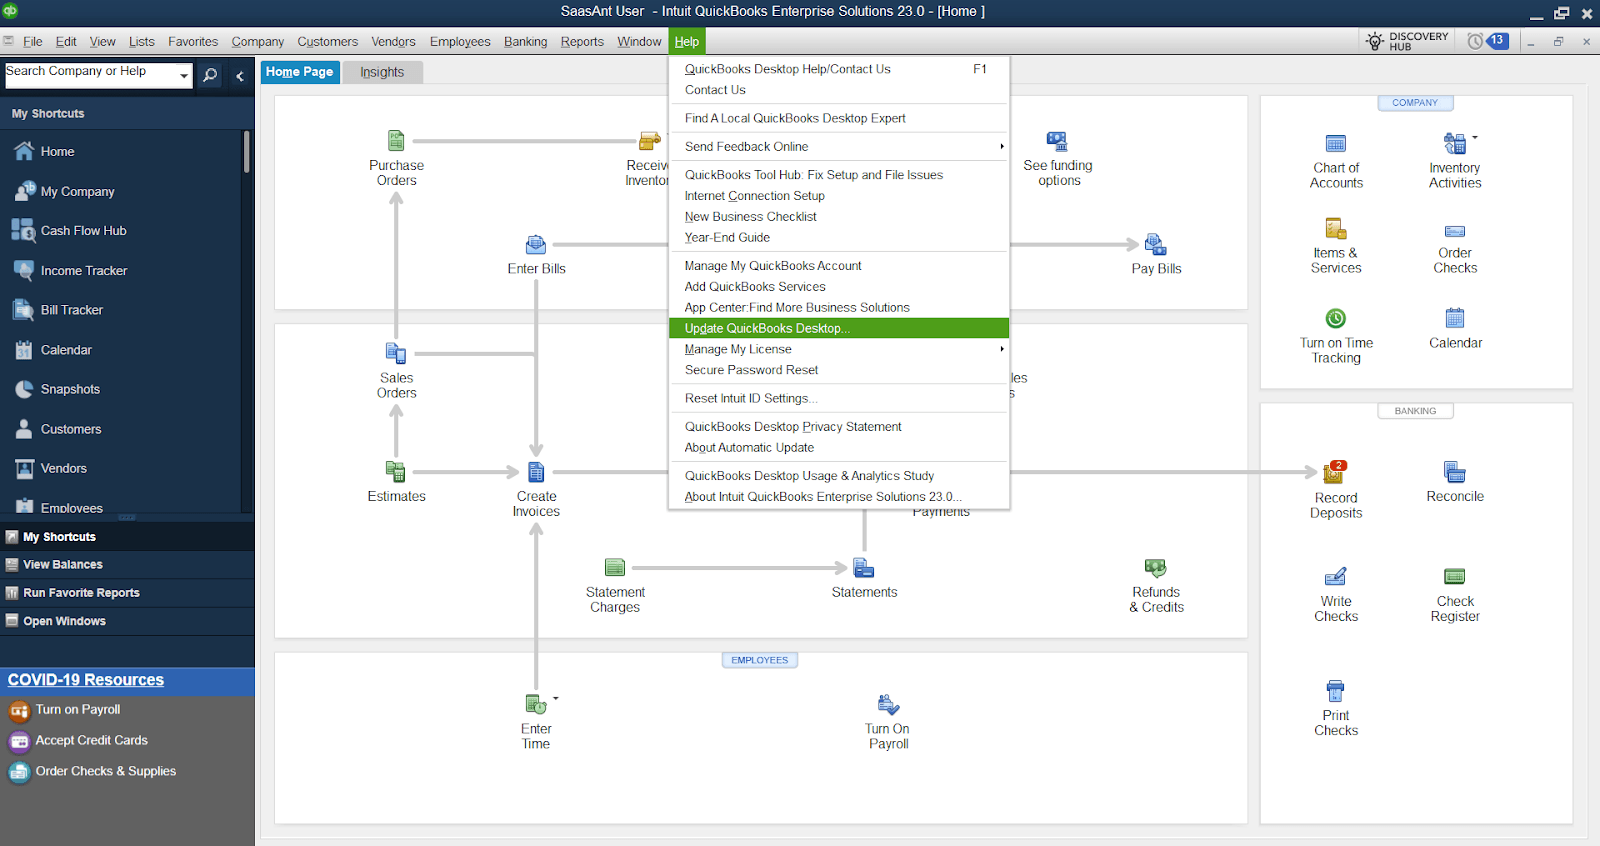
Checkmark all the QuickBooks features and releases under the Update Now tab.
Click the Get Updates option and wait until the application downloads all available updates.
Restart the server and workstations after installing the QuickBooks updates.
Step 3: Set up QuickBooks Database Manager Service:
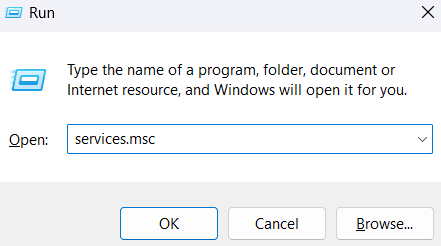
Press Windows + R on your keyboard, type “services.msc” in the run box, then press Enter.
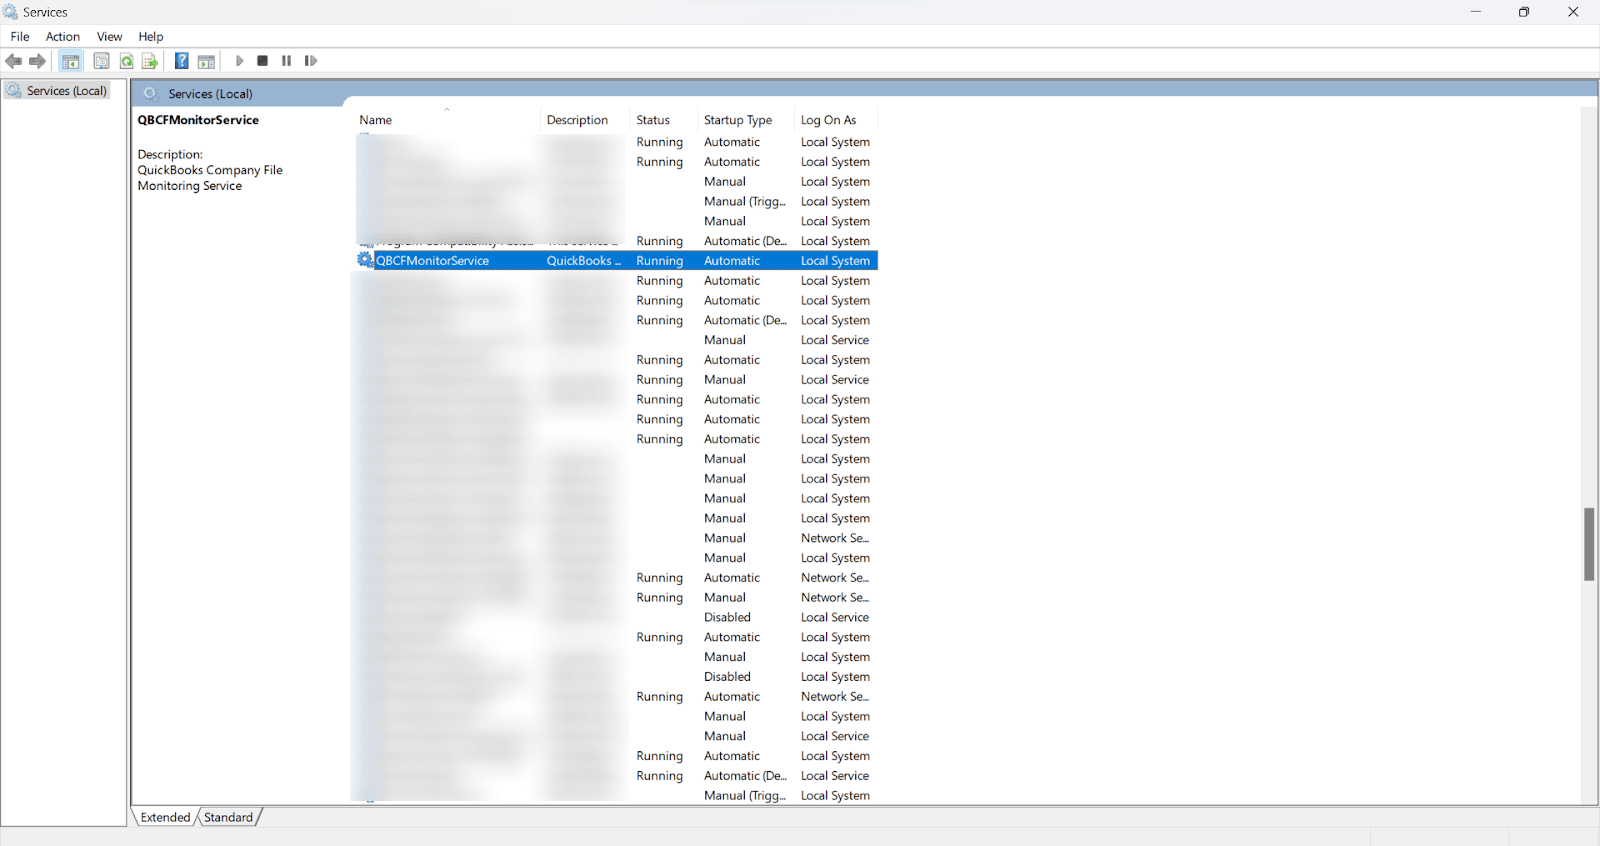
Search for the QuickBooks DBCF service in the list of services to change its properties.
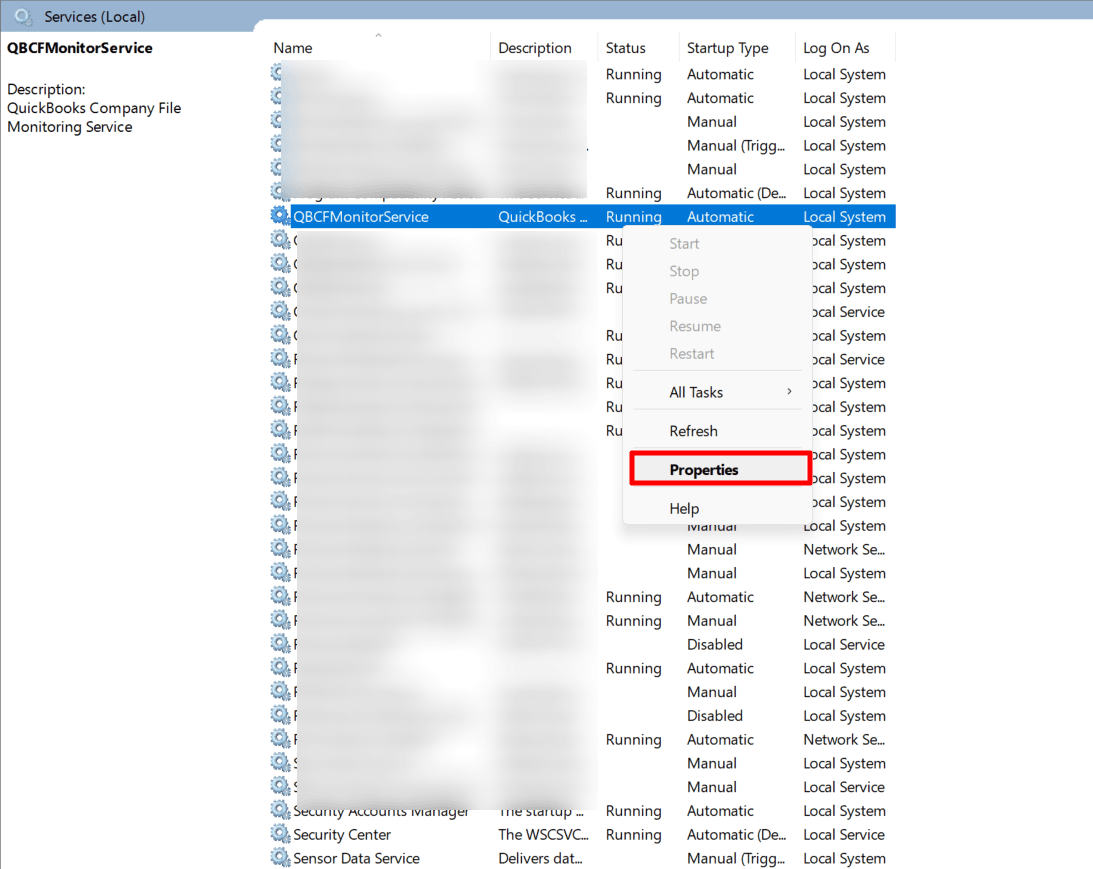
If the service status is stopped, right-click the service and select Properties.
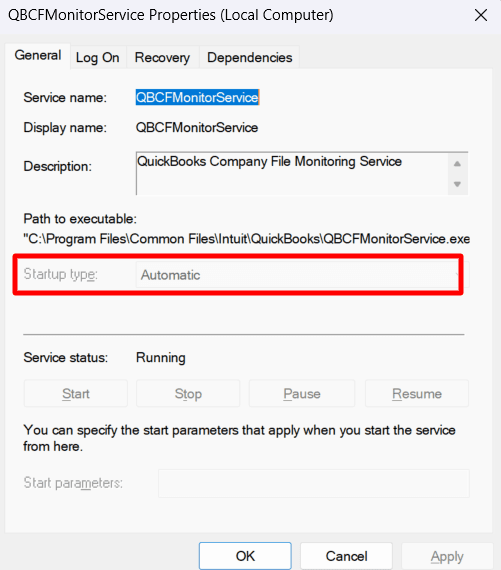
Under the General tab, change the Startup Type to Automatic from Manual.
Go to the Log On tab and select Local System Account from This Account.
Move to the Recovery tab, and from the drop-down list of the first failure, second failure, and subsequent failure, select Restart the Service.
Click Apply and OK.
Step 4: Configure Windows & Third-Party Firewall:
Add Firewall port exception for QuickBooks:
Open the Windows Start menu, enter "Windows Firewall" into the search box, open Windows Firewall, select Advanced Settings, right-click Inbound Rules (later on, you'll create Outbound Rules), choose New Rule, select Port, and then select Next.
Make sure TCP is selected. In the Specific local ports field, enter the ports needed for your QuickBooks year version.
Get dynamic port number:
Open the Windows Start menu, enter "QuickBooks Database Server Manager" into the search, and open QuickBooks Database Server Manager, go to the Port Monitor tab, find your QuickBooks version, and take note of the Port Number. You'll use this for your firewall port exceptions.
After entering the port number, select Next, select Allow the Connection, and Next. If prompted, make sure all profiles are marked. Select Next.
Create a rule, name it "QBPorts(year)," and select Finish. Repeat the steps for outbound rules.
Create Windows firewall exceptions for QuickBooks programs:
QuickBooks uses executable files (.exe) to perform various tasks. Follow the steps to create exceptions for each executable on the table provided.
Open QuickBooks Desktop and switch to multi-user mode. You can also open QuickBooks over your network from one of the host computers.
Close QuickBooks.
Start Windows in selective startup mode. You can do this by clicking the Windows Start button, typing "msconfig" into the search bar, and pressing Enter.
Select the "Selective startup" radio button in the System Configuration Utility window and uncheck the "Load startup items" checkbox. Click OK and restart your computer.
After your computer restarts, insert the QuickBooks CD into your CD drive. If the QuickBooks installation window opens automatically, close it.
Click the Windows Start button, and then click Computer (or My Computer in Windows XP).
Right-click the CD drive and choose Explore. In the QuickBooks CD folder, double-click the QuickBooks folder to open it.
Scroll down the list of files and double-click the setup.exe file to start the QuickBooks installation.
Choose the Repair option when the QuickBooks Installation window appears.
Follow the on-screen prompts to complete the repair installation. When prompted, restart your computer.
Step 5: Ensure Communication Between Server Computer and Workstations
Go to the server computer and open the command prompt by running the CMD command using the Run dialog box.
Type ipconfig, press Enter, and note down the IP address of the server computer.
Now go to the workstation affected by the error and open the command prompt window.
Type PING (Server’s IP address) and press Enter to check the connectivity.
The workstation will send four data packets to the server to verify if it receives them all.
If the server receives all four data packets, it will send the status back to you.
Further troubleshooting of network issues might be necessaryif the status shows any packet loss.
Frequently Asked Questions
What is the QBCFMonitorService in QuickBooks?
The QBCFMonitorService is a QuickBooks service related to the QuickBooks Database Server Manager. It is responsible for keeping track of changes to the company file and coordinating access to that file across multiple users.
Why is my QBCFMonitorService not running?
There could be several reasons for this issue. Some possibilities include problems with your QuickBooks installation, issues with your computer's configuration, or conflicts with other software.
How can I restart the QBCFMonitorService?
You can restart this service through the Services interface in Windows. Simply type "Services" into the Start menu, find the QuickBooks service in the list, right-click it, and select "Restart."
What should I do if restarting the QBCFMonitorService doesn't solve the problem?
If restarting the service doesn't resolve the issue, you might need to reinstall QuickBooks. It's also a good idea to check for any software conflicts or issues with your computer's configuration that might be causing the problem.
Can issues with the QBCFMonitorService affect my QuickBooks data?
While issues with this service can potentially interfere with your ability to access your QuickBooks data, they shouldn't cause data loss. However, it's always a good idea to regularly back up your data to prevent loss.