Export QuickBooks Online to Desktop - A Comprehensive How to Guide
The question of "QuickBooks Online vs. Desktop" is a common one for growing businesses. If you're leaning towards Desktop for its features, cost structure, or simply a different working style, you're likely wondering: "How do I actually move all my data?" The good news is, exporting your QuickBooks Online data to Desktop is a manageable process when you have the right guidance. This guide breaks down the export process into clear, easy-to-follow steps.
We'll show you how to prepare your data, execute the export, and ensure a smooth transition, so you can confidently make the switch to QuickBooks Desktop and keep your business finances running seamlessly. Let's remove the mystery and make this move straightforward for you.
How to Export QuickBooks Online to Desktop: The Initial Steps
Moving your accounting data to QuickBooks Desktop starts with a crucial step: preparing your QuickBooks Online data. Think of it as decluttering before a big move – a little upfront work makes the entire process smoother and more accurate. This preparation ensures your data is clean, consistent, and ready for a seamless transition to Desktop.
Your Data Prep Checklist:
Audit Your Data: Review your QuickBooks Online data for any inconsistencies. Reconcile accounts against bank statements to catch duplicates or missing entries.
Clean Up Discrepancies: Address any errors, missing information, or miscategorized transactions. Correct them directly in QuickBooks Online to ensure data accuracy.
Consolidate Data Formats: If multiple users input data, ensure consistency in formatting (dates, currency, etc.) for a unified dataset.
Backup Your QuickBooks: Before making any changes or exporting, create a complete backup of your QuickBooks Online data. This is your safety net, allowing you to revert to your original data if needed.
Tools to Help: For an even smoother process, consider using specialized applications like SaasAnt Transactions. These tools can streamline data cleanup, automate parts of the export, and guide you through the entire migration with ease.
Export Data From QuickBooks Online to Desktop: Quick Instructions
If you’re hoping to export data from QuickBooks Online, here are the straightforward steps to help you export the data.
Login to your ‘QuickBooks Online account.’
Navigate to ‘Apps’ and Find ‘SaasAnt Transactions.’
Link QuickBooks Online with SaasAnt Transactions.
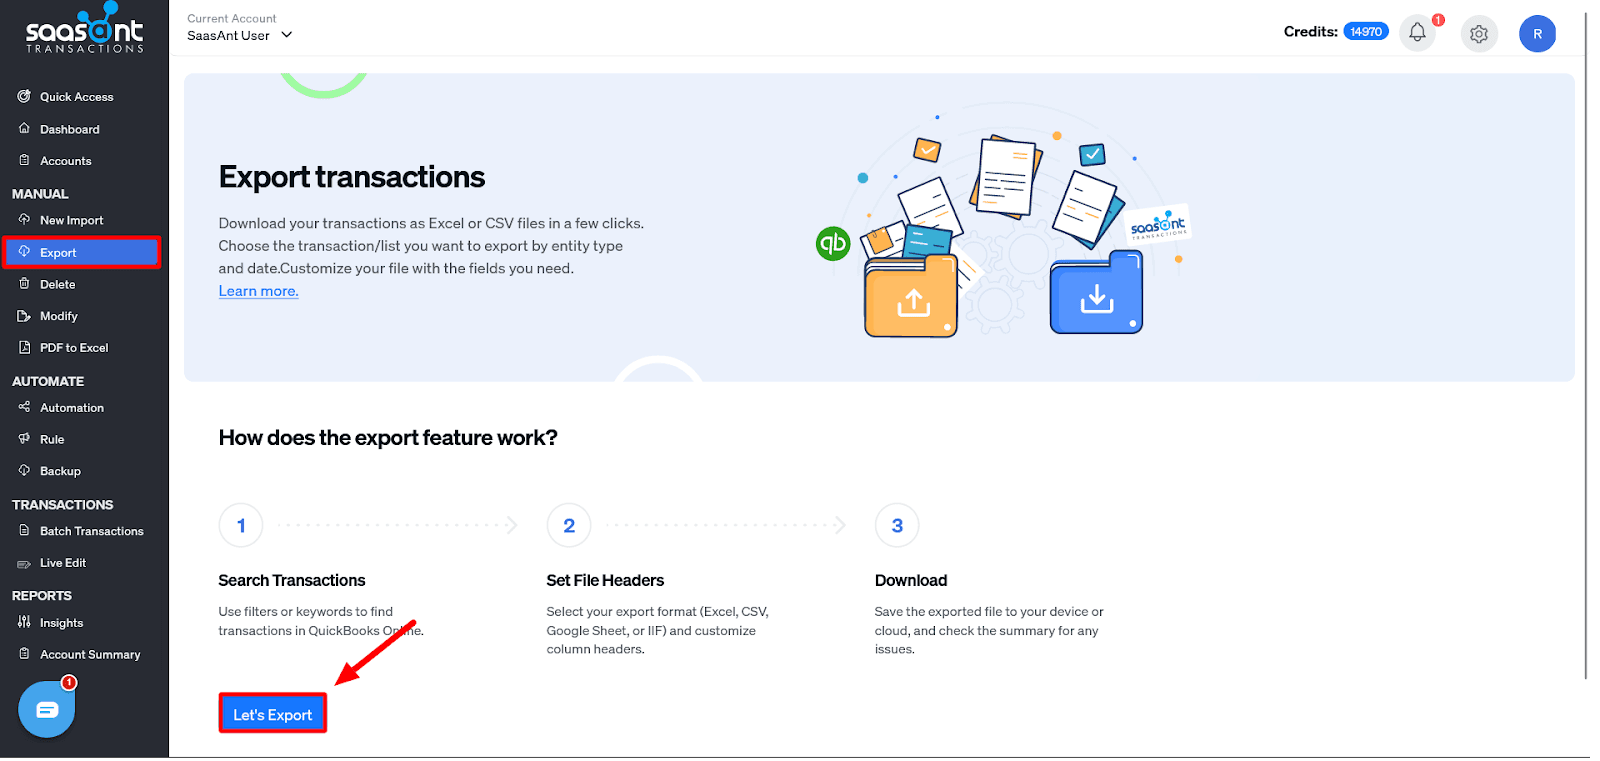
Choose ‘Export’ in SaasAnt Transactions Online to start the export process.
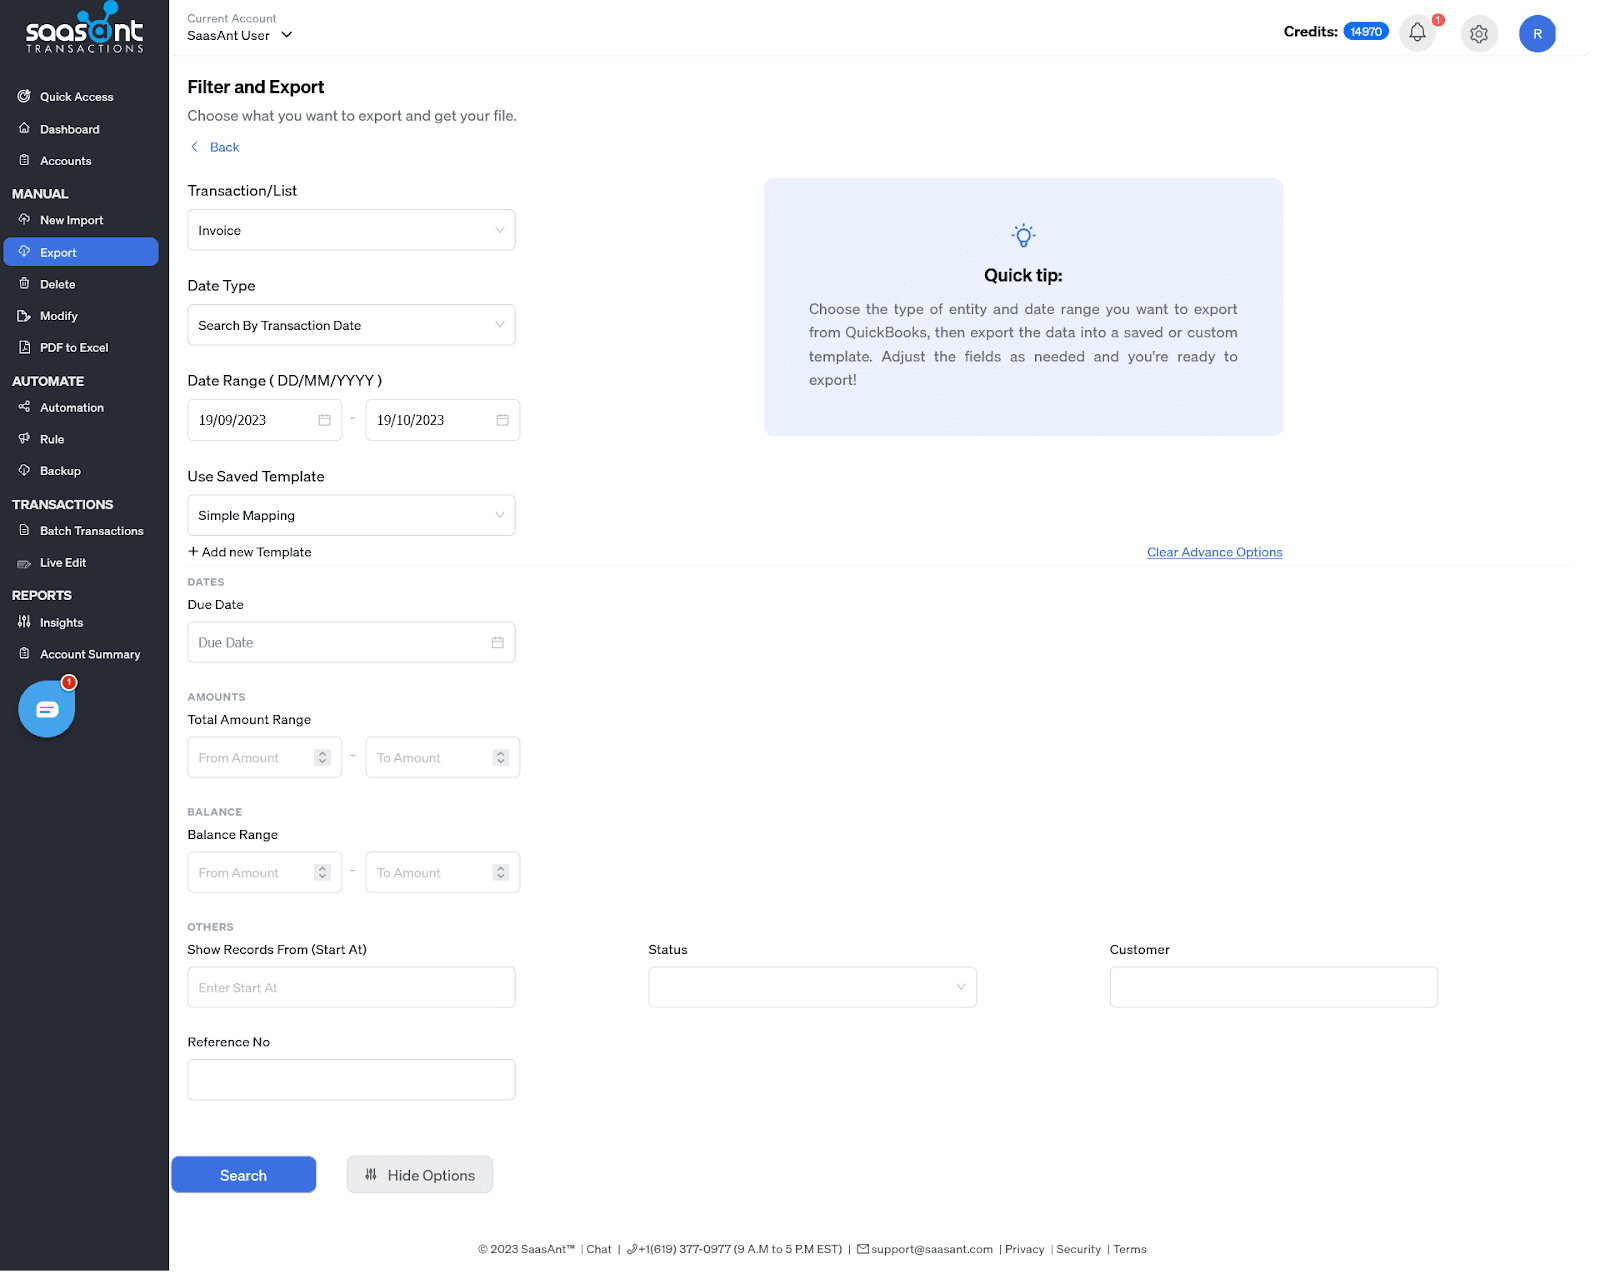
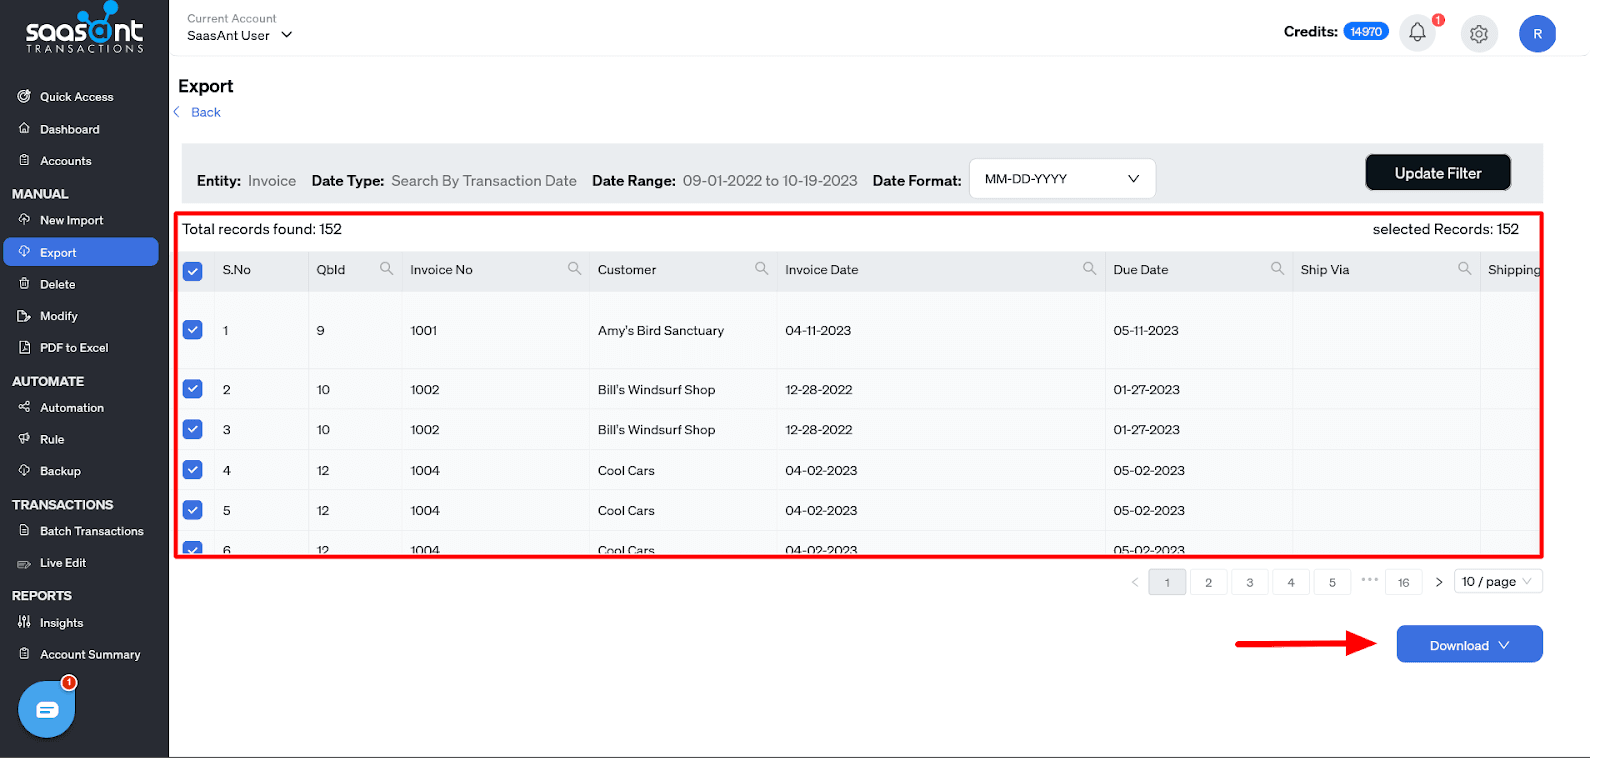
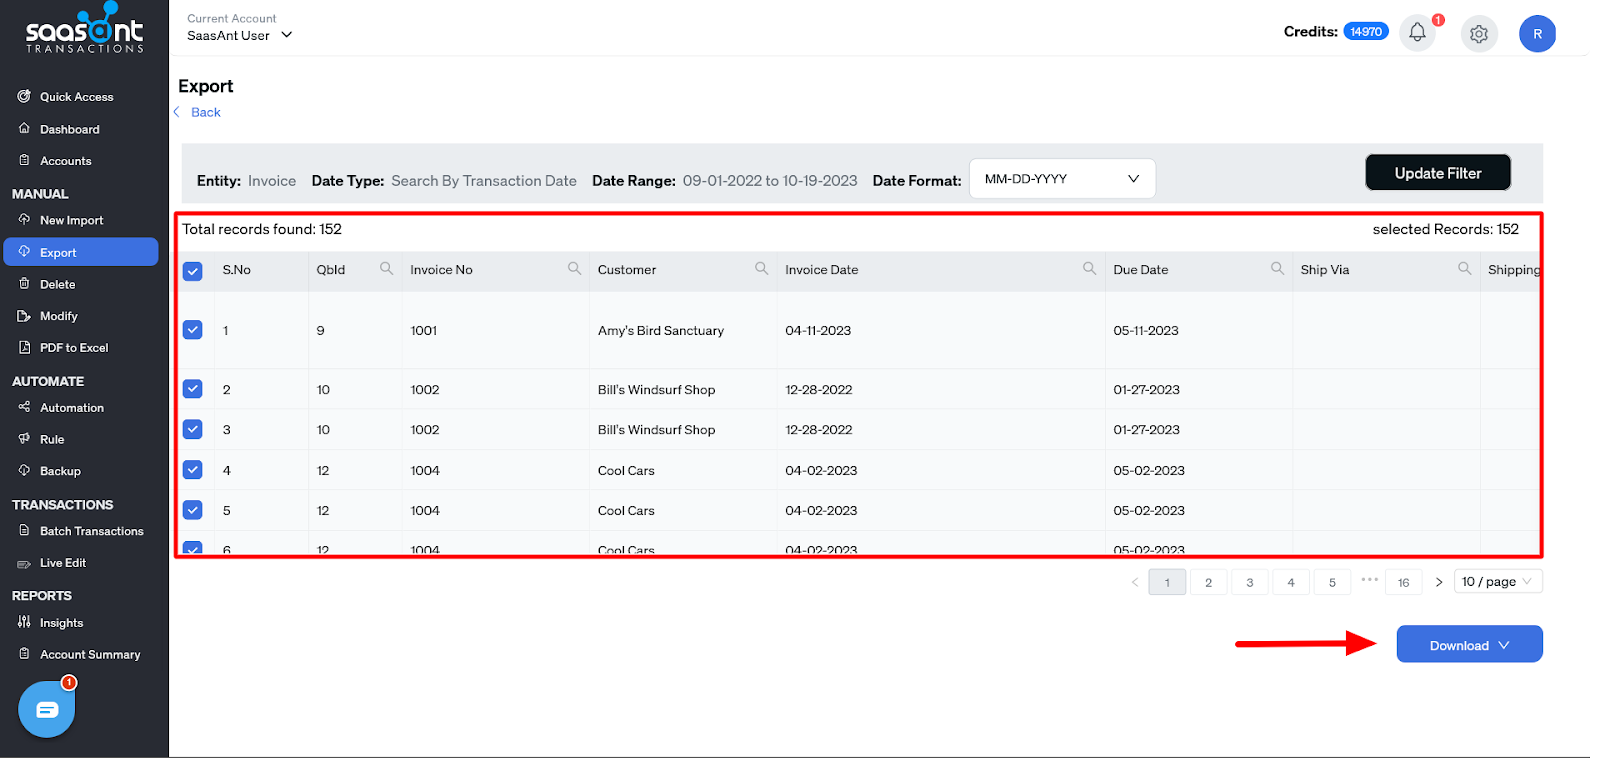
Click ‘Let’s Export,’ and on the succeeding ‘Filter and Export’ page, choose & select your ‘Transaction’ type, ‘Date Range,’ and the necessary information to export and get your file.
After ‘Search,’ select the records you want to export and ‘Download’ the selected records in either .CSV or .XLSX format.
How to Export QuickBooks Online to Desktop: A Step-by-Step Guide
Step 1: Log in to QuickBooks Online
Begin by accessing QuickBooks Online. Navigate to the official QuickBooks Online website and enter your login credentials. Ensure that you have the necessary permissions to perform export operations. You will find the dashboard where you can manage and view your financial data once you log in.
Step 2: Connect SaasAnt Transactions Online
In the QuickBooks Online, navigate to the ‘Apps’ section. Search for ‘SaasAnt Transactions Online.’ Once you find it, click on it and select ‘Get app now.’ It initiates a process integrating SaasAnt Transactions with your QuickBooks Online, allowing the two platforms to synchronize.
Step 3: Start the Export Process
With SaasAnt Transactions Online connected, locate the ‘Export’ option within the SaasAnt transactions in the sidebar of the manual section. Clicking on ‘Let’s Export’ will initiate the data extraction process from QuickBooks Online to be prepared for export.
Step 4: Filter and Export the Data
Before exporting, it’s necessary to specify the data range or Transaction type you want to export. SaasAnt will provide filter options, allowing you to choose specific date ranges, Transaction types (like invoices, expenses, or customer details), or others. Adjust these filters according to your needs, ensuring you only export the data relevant to your operations or reporting requirements.
Step 5: Select the Records and Download
Once the data is filtered and ready for export, a list or preview of the records set for downloading is displayed. Review this list to ensure accuracy and completeness. If everything looks in order, select all the records or specific ones you wish to export.
Finally, click on the ‘Download,’ and SaasAnt Transactions will download a file, often in formats like .CSV or .XLSX, to your local system or cloud storage.
Tips to avoid common pitfalls
Uniform Data Formats: Consistently use formats, especially for dates and currency in the transactions or the file inside QuickBooks Online data, for a smooth exportation process.
Data Integrity Checks: Conduct audits pre- and post-export to spot missing records or duplications. Validation ensures accuracy and supports you to correct them in QuickBooks Online.
Selective Data Export: Utilize data filters effectively. Export only what’s necessary to maintain system efficiency. Also, use advanced filter options to export any particular transactions you require.
Backup Before Export: Always have a current backup to safeguard against potential data issues; you might change the data in the exported file or even make changes to the original QuickBooks Online file. So, having a backup to access the transaction file with that data is better.
Detailed Review: Take a moment to review before finalizing the export. Even a quick double-check can prevent common oversights.
After exporting data from QuickBooks Online, how about importing data into QuickBooks Desktop? No Worries! Follow the below Instructions to import data into QuickBooks Desktop.
Full Data Migration: Importing Your Complete QuickBooks History
Opting for a Full Data Migration means importing all your historical data into QuickBooks Desktop. SaasAnt Transactions Desktop is expertly designed for this comprehensive task, efficiently handling even the most extensive datasets from QuickBooks Online.
Efficient Bulk Importing: SaasAnt Desktop excels at bulk importing, rapidly processing large CSV or Excel files containing your complete financial history, lists, and more. This robust capability is critical for a full migration, guaranteeing a swift and seamless transfer of your entire QuickBooks Online record.
Tailored Templates for Organized Data: SaasAnt Desktop offers pre-built templates specifically designed for various QuickBooks Desktop data types. These include templates for Customer Lists, Invoices, Vendor Bills, Chart of Accounts, and many others. Utilize these templates to meticulously structure your exported data files, aligning them perfectly with QuickBooks Desktop's import requirements. This ensures that every data type is correctly formatted for a flawless transition.
Best Practice Workflow for Full Migration:
Data Preparation: Gather all your exported data files, encompassing historical transactions and lists from SaasAnt Online.
Template Utilization: Select the appropriate SaasAnt Desktop templates to format each data file (e.g., use the "Invoice Template" for your invoice data).
Precise Field Mapping: Within SaasAnt Desktop, meticulously map the columns from your template-formatted files to the corresponding fields in QuickBooks Desktop. Accuracy here is paramount.
Comprehensive Validation: Leverage SaasAnt Desktop’s robust Data Validation feature. This includes a preview grid for visual data inspection and automatic error checking to identify issues such as incorrect date formats, missing mandatory fields, or template errors. It also performs advanced validation for attachments, fiscal year updates, and opening bank balances. Correct any errors flagged during validation.
Seamless Import Execution: Once validated, initiate the import process directly within SaasAnt Desktop to populate your QuickBooks Desktop company file with your data. Monitor the import progress and address any prompts.
Accuracy Through Field Mapping (Key Point): In a full migration, precise field mapping is non-negotiable. SaasAnt Desktop’s intuitive field mapping interface ensures that every detail, every transaction, and every account is accurately placed within your QuickBooks Desktop environment.
Partial Data Migration: Importing Essential Current Data
For a Partial Data Migration, SaasAnt Transactions Desktop offers focused import capabilities, allowing you to selectively bring over only your critical, current data.
Selective File Import Control: SaasAnt Desktop empowers you to import only the specific files containing your essential data. Choose to import customer lists and open invoices, while deliberately excluding historical transactions – giving you complete control over your QuickBooks Desktop starting point.
Streamlined Templates for Key Data: Optimize your import process by using SaasAnt Desktop's templates tailored for the specific data types relevant to your partial migration (e.g., "Customer List" template, "Open Invoices" template). These ensure correct formatting and field alignment for your focused dataset.
Best Practice Workflow for Partial Migration:
Selective Data Compilation: Carefully identify and prepare only the essential data files exported from SaasAnt Online that are necessary for your partial migration scope.
Targeted Template and Mapping: Utilize the relevant SaasAnt Desktop templates to format your data files and meticulously map the fields within the application, focusing on your key data.
Focused Validation and Import: Employ SaasAnt Desktop’s data validation features to rigorously confirm the accuracy of your critical data before proceeding with the import, ensuring a clean and reliable starting point.
Targeted Field Mapping for Essential Data (Key Point): Concentrate your field mapping efforts within SaasAnt Desktop on the fields pertinent to your selected data, guaranteeing the accurate transfer of your essential current information to QuickBooks Desktop.
Opening Balances Migration: Establishing Your Financial Foundation
For an Opening Balances Migration, SaasAnt Transactions Desktop provides a streamlined and efficient method to establish your initial financial position in QuickBooks Desktop.
Adaptable Templates for Balance Imports: SaasAnt Desktop templates are versatile and can be easily adapted for importing opening balances. Utilize a template like the "General Journal Entry" template to import your account balances as journal entries, setting up your accurate financial foundation within QBDT.
Best Practice Workflow for Opening Balances Migration:
Data Preparation: Prepare your opening balance data, such as a trial balance in CSV format.
Template Adaptation and Mapping: Adapt a suitable SaasAnt Desktop template (e.g., "General Journal Entry") and carefully map your account balance data to the appropriate fields within SaasAnt Desktop.
Validation of Starting Balances: Thoroughly validate the opening balances within SaasAnt Desktop to confirm they precisely match your intended starting figures before importing into QuickBooks Desktop, guaranteeing an accurate financial baseline.
Essential Field Mapping for Accuracy (Key Point): Even for opening balances, precise field mapping in SaasAnt Desktop remains crucial. Ensure your account names or numbers are correctly linked to your QuickBooks Desktop Chart of Accounts, guaranteeing the integrity of your starting financial position.
Advanced Export Options with SaasAnt Transactions
Data Filtering
Precision Exports: SaasAnt Transactions doesn’t allow us to fit all export data in a single feature. Instead, it allows users to go deep down into their data types, enabling exports of specific categories, like only sales invoices, vendor bills, or particular month’s payroll data.
User-defined Criteria: You can set rules based on date ranges, transaction types, or custom fields, ensuring the export fulfills your precise needs.
Format Adaptation
Auto-format Adjustment: When transferring data between platforms, it’s common to encounter format discrepancies. SaasAnt detects and adjusts these inconsistencies, ensuring your data remains standardized.
Data Type Recognition: Whether it’s textual data, numerical values, date, or currency formats, SaasAnt’s transactions consider them simultaneously, preserving data integrity during exports.
Batch Processing
High-volume Handling: Businesses with extensive datasets feel free with SaasAnt Transactions, as it can process data in batches. This feature speeds up large-scale data during export, reducing the time.
Field Mapping
Customizable Mapping: SaasAnt Transaction doesn’t rely solely on pre-defined mappings. Users have the choice to map source fields to target fields manually.
Mapping Templates: For recurring exports, users can save mapping templates. It eliminates the need to remap fields with every export, promoting consistency and saving time.
Export Scheduling
Timed Exports: SaasAnt Transaction offers a scheduling feature where businesses can set specific times or intervals for automatic data exports.
Notification Systems: After the scheduled exports, users receive notifications about the export status to keep them in the loop regarding data movements.
Troubleshooting Common Issues
Freezing Screens during Export
It occurs when there is an overload of system resources, a slow internet connection, or interruptions between QuickBooks Online and SaasAnt Transactions. So, before starting the export process, ensure all unnecessary applications are closed. Check your internet connection’s stability or try a different browser if it persists.
Data Mismatch or Incomplete Exports
It is often an outcome of incorrectly mapped fields, skipped rows, or unsupported data formats. Constantly review and confirm field mappings before initiating the export. Ensure that the data format in QuickBooks Online is compatible with SaasAnt Transactions.
Failed Exports
It arises from server timeouts, corrupted data, or an outdated version of SaasAnt Transactions. If server timeouts are frequent, exporting during off-peak hours might be helpful. For corrupted data, it’s essential to identify the corrupt entries and rectify or remove them before the export.
Connection Issues
It occurs rarely; the API connection between the two platforms might be interrupted, leading to incomplete or failed exports. Re-establishing the connection SaasAnt Transactions in the QuickBooks Online App Store can resolve this. If the problem persists, I suggest contacting SaasAnt support.
How to Import Data into QuickBooks Desktop
1. Preparation
Data Review: Ensure your data is accurate and complete. Verify that all necessary information is present and correctly formatted.
Backup: Before making any changes, back up your current QuickBooks Desktop company file to prevent data loss.
2. Installation of SaasAnt Transactions Desktop
Download and Install: Obtain the latest version of SaasAnt Transactions Desktop from the official website and follow the installation instructions.
3. Data Import Process
Launch SaasAnt Transactions Desktop: Open the application to begin the import process.
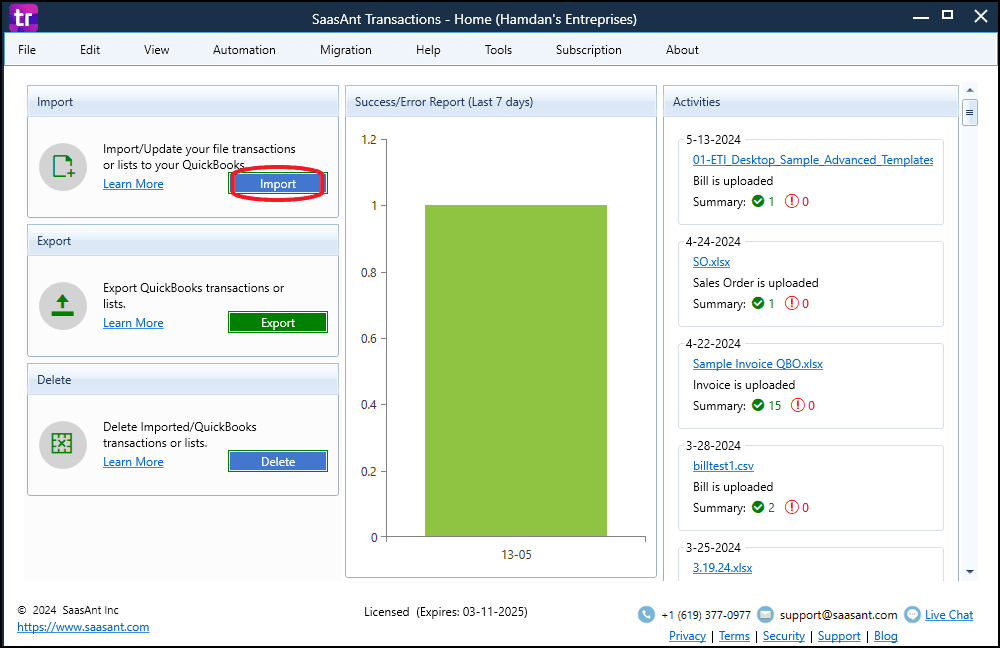
File Selection:
Click on the 'Import' button.
Choose the QuickBooks transaction type you intend to import (e.g., Invoices, Bills, Estimates).
Select your data file by clicking 'Browse File' or use a sample template provided by SaasAnt.
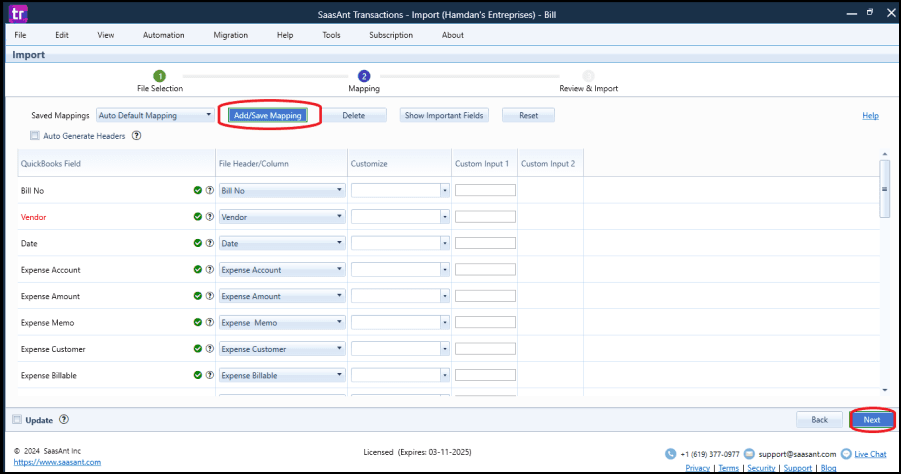
Mapping Fields:
Map the columns from your data file to the corresponding QuickBooks fields.
SaasAnt offers sample templates to assist with accurate mapping.
Data Validation:
Utilize the preview feature to review your data before importing.
Check for errors or discrepancies and make necessary corrections.
Import Execution:
Once validation is complete, proceed to import the data into QuickBooks Desktop.
Monitor the import process and address any issues that may arise.
4. Post-Import Review
Verification: After the import, verify that all data has been accurately transferred by reviewing relevant QuickBooks reports and lists.
Reconciliation: Ensure that imported transactions align with your existing records and reconcile accounts as necessary.
Conclusion
Managing efficient data is done smoothly by SaasAnt Transactions. Offering seamless transitions between QuickBooks Online and Desktop ensures data integrity and accuracy. SaasAnt Transactions is more than just an application that promises streamlined operation in the digital age, enabling businesses to focus on growth with the confidence of smooth data management.
Frequently Asked Questions
Can I maintain my QuickBooks Online version after exporting to a Desktop?
Exporting data from QuickBooks Online to Desktop doesn’t mean you lose access to the online version. You can continue to use both platforms. However, changes made in one will automatically reflect in the other if you sync them again.
Can I export payroll data from QuickBooks Online to QuickBooks Desktop?
Yes, you can export payroll transactions from QuickBooks Online to Desktop. But you might need some additional setup in Desktop for detailed payroll data. SaasAnt Transactions can make this easier.
How do I maintain data integrity during the export?
To maintain data integrity
Review your QuickBooks Online data regularly.
Use field mapping in SaasAnt Transactions to align data fields.
After export, compare key reports on both platforms.
Always back up your data before exporting.
What are the limitations when exporting from QuickBooks Online to Desktop?
Not all data types in Desktop have a counterpart in Online.
Reporting capabilities differ between the platforms.
Some features in the Desktop might not be in the Online.
Will any transactional data be exported, or just a particular transaction?
SaasAnt Transactions allows for data export, including any transactional data, depending on your chosen settings. You can opt to export data for specific periods or the entire transaction to export.
Is support available if I face any issues during the export?
SaasAnt Transactions offers a dedicated support team to assist users through any challenges they may encounter during the export process.
Can I transfer my QuickBooks Online data to QuickBooks Desktop?
Yes, you can transfer your data from QuickBooks Online to QuickBooks Desktop. This process involves exporting your data from QuickBooks Online and then importing it into QuickBooks Desktop. Intuit provides a migration tool to facilitate this transfer.
How do I export my QuickBooks Online company file to QuickBooks Desktop?
To export your company file from QuickBooks Online to QuickBooks Desktop, follow these steps:
Sign in to QuickBooks Online: Use your administrator credentials.
Prepare the Export:
Navigate to the Export Overview page.
Select "Get Started."
Download and install the migration tool as prompted.
Export Data:
Choose the data you want to export (e.g., all financial data or without transactions).
Follow the on-screen instructions to complete the export process.
Import into QuickBooks Desktop:
Open QuickBooks Desktop.
Use the migration tool to import the data file you exported from QuickBooks Online.
For detailed instructions, refer to Intuit's guide on moving data from QuickBooks Online to QuickBooks Desktop.
Can you download QuickBooks Online data to QuickBooks Desktop?
Yes, you can download your QuickBooks Online data and import it into QuickBooks Desktop. This involves exporting your data from QuickBooks Online and then using QuickBooks Desktop's import utilities to integrate the data. Ensure you follow the proper export and import procedures to maintain data integrity.
How do I export all data from QuickBooks Online?
To export all your data from QuickBooks Online:
Sign in to QuickBooks Online: Use your administrator credentials.
Navigate to the Export Feature:
Click on the Gear icon.
Select "Export Data."
Choose Data to Export:
Select the data you wish to export, such as reports, lists, and other financial data.
Export Process:
Follow the on-screen instructions to complete the export.
You can export data to Excel or other formats as needed.
Can I import transactions from Excel to QuickBooks Desktop?
Yes, you can import transactions from Excel into QuickBooks Desktop. Here's how:
Prepare Your Excel File:
Ensure your data is organized and formatted correctly.
It's advisable to use QuickBooks' sample templates for accurate formatting.
Open QuickBooks Desktop:
Navigate to the company file where you want to import the data.
Import Data:
Go to the "File" menu.
Select "Utilities" > "Import" > "Excel Files."
If prompted with the Add/Edit Multiple List Entries window, select "No."
Choose "Advanced Import."
Browse and select your Excel file.
Set up a mapping to match your Excel columns with QuickBooks fields.
Complete the import process.
By following these steps, you can effectively manage data transfers between QuickBooks Online and QuickBooks Desktop, as well as import transactions from Excel into QuickBooks Desktop.
Read also: