Sync Authorize.net with QuickBooks
Are you interested in integrating Authorize.net with QuickBooks Online to enhance financial management? You’re in the right spot! Authorize.net is a reliable payment gateway for processing online transactions, while QuickBooks Online offers robust financial management features. By using PayTraQer, you can connect these two systems to facilitate automatic transfers of sales, expenses, and payments. This integration application comes with a 4.7 rating from 700 users. It reduces the need for manual data entry and helps ensure your financial records are accurate. Let’s look at establishing this connection and improving your business operations.
Contents
How do AuthorizeNet and QuickBooks connect?
What kind of account is Authorize.Net categorized as in QuickBooks?
How to Link Authorize.net to Quickbooks Using Paytraqer: Quick Instructions
How to Connect Authorize.net with QuickBooks Online: Step-by-Step Instructions
Advanced Features of Connecting Authorize.net to QuickBooks using PayTraQer
How do I reconcile Authorize.net payments in QuickBooks Online?
Connect Authorize.net to QuickBooks Today
FAQ
How do AuthorizeNet and QuickBooks connect?
To connect Authorize.net with QuickBooks Online, you can utilize an integration tool like PayTraQer, which links the two platforms. The application comes with a 15-day free trial and enables the integration of Authorize.net and QuickBooks, allowing for the efficient transfer of financial information. Users can connect Authorize.net to QuickBooks Online by logging into both accounts and granting permission to integrate through the selected tool.
Once the connection is established, transactions from AuthorizeNet—including sales, refunds, and processing fees—are automatically imported into QuickBooks. The integration tool organizes and reconciles these transactions, ensuring accurate financial reporting and simplifying overall financial management. This arrangement saves time and helps maintain the accuracy of your financial records.
What kind of account is Authorize.Net categorized as in QuickBooks?
In QuickBooks, AuthorizeNet is generally classified as a "Bank" account. This designation reflects its role as a payment processor temporarily holding funds before they are deposited into your business bank account. When integrating AuthorizeNet with QuickBooks, you can establish a dedicated bank account to monitor incoming payments and any fees related to your AuthorizeNet transactions. This configuration facilitates accurate sales and expense tracking, simplifying the management of your financial records and account reconciliation. By categorizing AuthorizeNet in this manner, you can gain better insights into your cash flow and overall financial health.
How to Link Authorize.net to Quickbooks Using Paytraqer: Quick Instructions
Connect PayTraQer: Open QuickBooks, find "PayTraQer" in the App Store, and authorize the app.
Select Sync Mode: Choose a synchronization mode and connect to your company.
LinkAuthorize.net: In PayTraQer, go to Payment Processor, select ‘Authorize.net,' and log in.
Download & Sync: Download historical transactions, then review and sync to QuickBooks.
How to Connect Authorize.net with QuickBooks Online: Step-by-Step Instructions
Step 1: Connect PayTraQer to QuickBooks Online
Open QuickBooks Online and navigate to the App Store. Search for "PayTraQer" and authorize the connection to your QuickBooks account.
Step 2: Select Authorize.net and Grant Permission
Navigate to the Payment Systems menu screen.
Select the Authorize.net tile and click the ‘Connect’ button.
A new window will open, redirecting you to the Authorize.net permission screen.
Click the "Connect my Authorize.net Account" button to authorize the connection and return to the PayTraQer screen.
Step 3: Configure Authorize.net Sales Preferences
Access the Authorize.net Sales account configuration in PayTraQer.
Set your preferences to determine how sales transactions will be recorded in QuickBooks Online.
Default values will be created automatically for accurate bookkeeping.

Step 4: Set Up Product Settings
Navigate to the Authorize.net Product configuration in PayTraQer.
Turn ON "Create Product/Services automatically" to auto-create missing items in QuickBooks Online during sync.
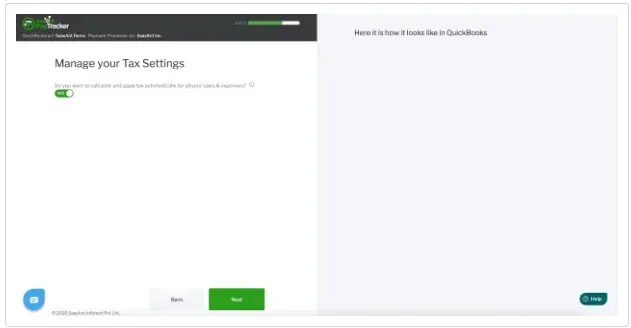
Step 5: Configure Tax Settings
Enable the Authorize.net Tax setting in PayTraQer.
This will ensure tax calculations are recorded during sync.
If disabled, tax amounts will be added to transaction totals without recording.

Step 6: Set Up Fee Settings
Access the Authorize.net Fees configuration in PayTraQer.
Set the default vendor for recording Authorize.net fees.
Define the expense category and expense bank account for creating expense transactions related to Authorize.net fees.
Step 7: Configure Expense Settings
Navigate to the Authorize.net Expenses configuration in PayTraQer.
Set the default vendor for Authorize.net expenses.
Define the expense category and expense bank account for creating expense transactions related to Authorize.net expenses.
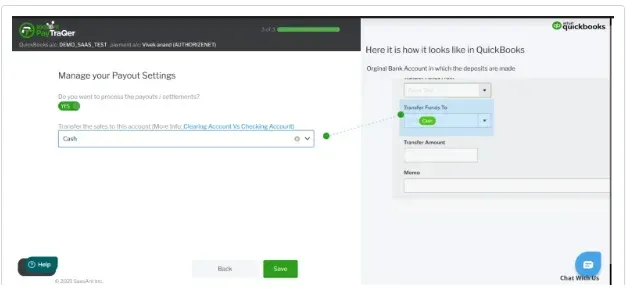
Step 8: Configure Payout Settings
Enable the "Process the Payout" option with the "Transfer To" account.
This will ensure all your Authorize.net payouts are processed as transfer transactions in QuickBooks Online for easier reconciliation.
Step 9: Record Historical Transactions from Authorize.net
Once the above configurations are complete, PayTraQer will automatically pull your last 30 days of transactions from your Authorize.net account.

You can also connect Authorize.net and Xero using PayTraQer. Here are the detailed steps for setting up Authorize.net Xero integration.
Advanced Features of Connecting Authorize.net to QuickBooks using PayTraQer
Instant Transaction Sync and Historical Data Import
Through PayTraQer, you can get real-time synchronization of Authorize.net transactions and effortless import of historical data into QuickBooks, ensuring your financial records are consistently current as you sync QuickBooks and Authorize.net.
Automated Categorization in QuickBooks
Take advantage of automated transaction categorization in QuickBooks for your Authorize.net account integration. PayTraQer syncs relevant metadata from Authorize.net to streamline your bookkeeping process and enhance your QuickBooks and Authorize.net integration.
Error-Free Reconciliation
Achieve accurate reconciliation in QuickBooks with PayTraQer, guaranteeing that all Authorize.net transactions are correctly recorded and matched, reducing discrepancies and errors during the sync of the QuickBooks and Authorize.net process.
Multicurrency Management
PayTraQer facilitates multicurrency transactions, enabling you to manage and record Authorize.net transactions in various currencies effortlessly within QuickBooks. This feature simplifies international sales and reporting as part of your QuickBooks and Authorize.net integration.
Financial Repayment Structure Management
With PayTraQer, you can simplify the management of your financial repayment structures. It ensures that all repayment details from Authorize.net are accurately represented in QuickBooks for enhanced financial oversight.
How do I reconcile Authorize.net payments in QuickBooks Online?
PayTraQer simplifies the reconciliation of Authorize.net payments in QuickBooks Online by automating the synchronization of transactions and categorizing them accurately. Follow these quick steps to get started:
Step 1: Import Your Historic Transactions
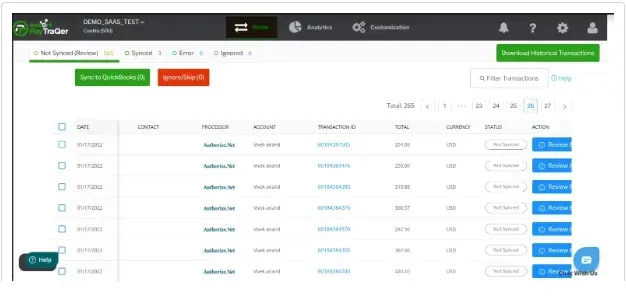
After connecting, your last 30 days of transactions will automatically appear in the Transactions dashboard. For earlier transactions, click the "Download Historical Transactions" button. Enable the "Check Duplicate Transactions" setting to ensure that transactions already in QuickBooks Online are ignored, keeping your books error-free.
Step 2: Tune Your Sync Settings
Utilize the comprehensive settings in PayTraQer to accurately capture and transform your data.
Step 3: Synchronize Transactions
Auto-Sync: Enable the "Sync Automatically" feature to sync ongoing transactions without manual intervention. The Synced tab contains accurate reports of synced transactions.
Manual Sync: Select and sync historic or current Authorize.net transactions manually from the Transactions dashboard for greater control.
Manage Your Data: PayTraQer automatically detects Authorize.net fees and records them in QuickBooks Online. Use the Auto-Create function to create missing Customers, Items, or Vendors during sync and the Tax Management function to configure QuickBooks Online tax rates.
Step 4: Undo/Rollback Transactions
If needed, you can undo the sync partially or completely by clicking the "Undo Selected" button. You can choose to undo just the synced transactions or include created entities (Customers, Items, etc.).
Connect Authorize.net to QuickBooks Today
Linking Authorize.net to QuickBooks using PayTraQer offers businesses a streamlined solution for financial management, improving accuracy and overall efficiency. PayTraQer’s advanced features and customization options enable businesses to address common integration challenges effectively. You can easily get started with a 15-day free trial. The dedicated support team at SaasAnt is readily available to provide prompt assistance and solutions for any technical or subscription-related inquiries that may arise during the integration process.
FAQ
How do I account for Authorize.net fees in QuickBooks?
PayTraQer automatically detects Authorize.net fees in your payment transactions and records them in QuickBooks. This ensures that your financial records accurately reflect the net amounts received after deducting fees.
What’s PayTraQer, and how does it facilitate Authorize.net’s connection with QuickBooks?
PayTraQer is an integration tool that connects Authorize.net with QuickBooks Online, simplifying transaction synchronization. It automates data transfer, allowing for accurate financial management and reducing manual entry errors.
Can PayTraQer handle payments from multiple channels in QuickBooks?
Yes, PayTraQer can manage payments from multiple channels, including payment processors and sales platforms. This allows businesses to consolidate their financial data in QuickBooks for better tracking and reporting.
What types of transactions are synced from Authorize.net to QuickBooks?
PayTraQer syncs various transactions from Authorize.net to QuickBooks, including sales, refunds, and fees. This comprehensive syncing ensures that your QuickBooks account accurately reflects all relevant financial data.