Can I Import Accounts Receivable Payments into QuickBooks Desktop?

This article will explore the challenges faced when importing payments into QuickBooks and how SaasAnt Transactions offers a seamless and efficient solution to these obstacles.
Contents
Import Accounts Receivable Payments into QuickBooks - Quick Instructions
Import Accounts Receivable Payments into QuickBooks Online Steps:
Import Accounts Receivable Payments into QuickBooks Desktop Steps:
Import Accounts Receivable Payments into QuickBooks - Quick Instructions
For those seeking a straightforward method to import their accounts receivable payments into QuickBooks, here’s a simplified procedure to follow:
Begin by installing and launching SaasAnt Transactions.
Connect SaasAnt Transactions with your QuickBooks.
Upload your accounts receivable payment data file, supporting various file formats like Excel and CSV, to SaasAnt Transactions.
Align the fields in your file with the corresponding QuickBooks fields on the mapping screen.
After a meticulous review of the mapping, commence the import process.
Validate the imported data in QuickBooks to ensure precision and completeness.
Initiating Accounts Receivable Payments Imports
Managing accounts receivable payments in QuickBooks Desktop can be a complex task. SaasAnt Transactions Desktop simplifies the import process by providing data mapping, batch imports, and validation checks, reducing the need for manual entry. Whether you’re dealing with a high volume of monthly payments, migrating data from other accounting software, processing batch payments, or handling multiple payment methods, SaasAnt Transactions Desktop streamlines the entire procedure. It ensures that financial records remain accurate and up-to-date, enabling precise financial tracking and reporting.
SaasAnt Transactions Desktop bridges the gap between accounting systems, facilitating easy data migration. It allows for the export of payment data from various sources and seamless integration with QuickBooks Desktop. With SaasAnt Transactions Desktop, you can efficiently reconcile payments through different methods, simplifying financial reporting and analysis. This tool enhances efficiency and accuracy in managing accounts receivable payments within QuickBooks Desktop, making it an invaluable asset for businesses of all sizes.
Importing Accounts Receivable (AR) payments into QuickBooks Online can be efficiently managed using SaasAnt Transactions Online. This tool streamlines the process, ensuring accurate and timely updates to your financial records.
Import Accounts Receivable Payments into QuickBooks Online Steps:
Prepare Your Payment Data: Organize your payment information in a compatible format, such as Excel or CSV. Utilizing the SaasAnt Transactions Sample Template can help structure your data effectively.
Install and Access SaasAnt Transactions Online: Access SaasAnt Transactions Online through the QuickBooks App Store. Click 'Get App Now' to install and connect it to your QuickBooks Online account.
Upload Your Payment Data File: Within SaasAnt Transactions Online, select 'New Import' and choose 'Receive Payment' as the transaction type. Use the 'Browse File' option to upload your payment data file.
Map Data Fields: In the mapping screen, align your file's columns with the corresponding QuickBooks Online fields. Utilize the 'Preview Mapping' feature to verify accuracy.
Review and Import: After confirming the mapping, click 'Upload' to initiate the import process. SaasAnt Transactions Online will transfer your payment data into QuickBooks Online.
Verify Imported Payments: Post-import, verify the accuracy of the imported payments in QuickBooks Online by clicking the 'QuickBooks Access' icon, which provides direct access to your data for review.
Import Accounts Receivable Payments into QuickBooks Desktop Steps:
Step 1: Preparing Your Receivable Payments Data for Import
Organizing your payment data is essential to streamline the process of importing accounts receivable payments into QuickBooks Desktop. Verify that all necessary payment details, including customer names, payment amounts, dates, and payment methods, are accurately formatted and present.
For assistance in structuring your payment data effectively, you can utilize the SaasAnt Transactions Desktop Template, specifically tailored to facilitate accounts receivable payment imports.
Step 2: Install and Launch SaasAnt Transactions Desktop
With your accounts receivable payment data, the next step is installing and launching SaasAnt Transactions Desktop, simplifying the import process. Visit the official SaasAnt Transactions website to download and install the application. Once the installation is complete, launch the application to commence the accounts receivable payment import process into QuickBooks Desktop.
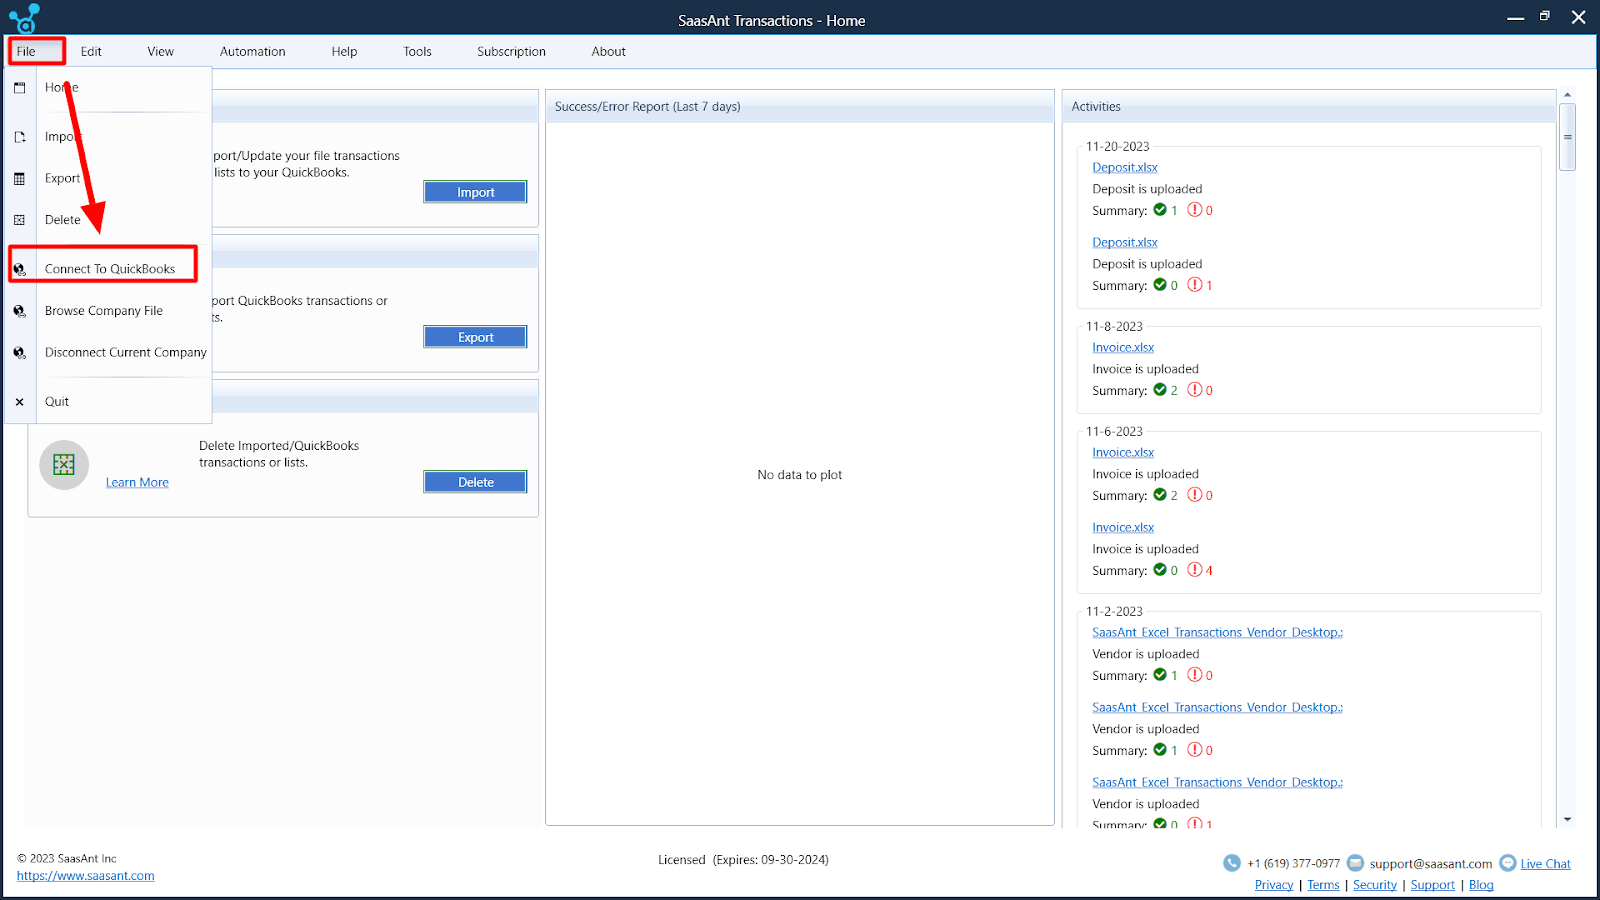
Step 3: Connecting to QuickBooks Desktop
Within the SaasAnt Transactions Desktop interface, locate the ‘File’ menu and opt for ‘Connect to QuickBooks.’ This action initiates a smooth integration between SaasAnt Transactions Desktop and your QuickBooks Desktop application, which supports importing accounts receivable payments. You will receive step-by-step assistance during the connection setup, which encompasses selecting your preferred connection method. It ensures a straightforward process when importing accounts receivable payments into QuickBooks Desktop.

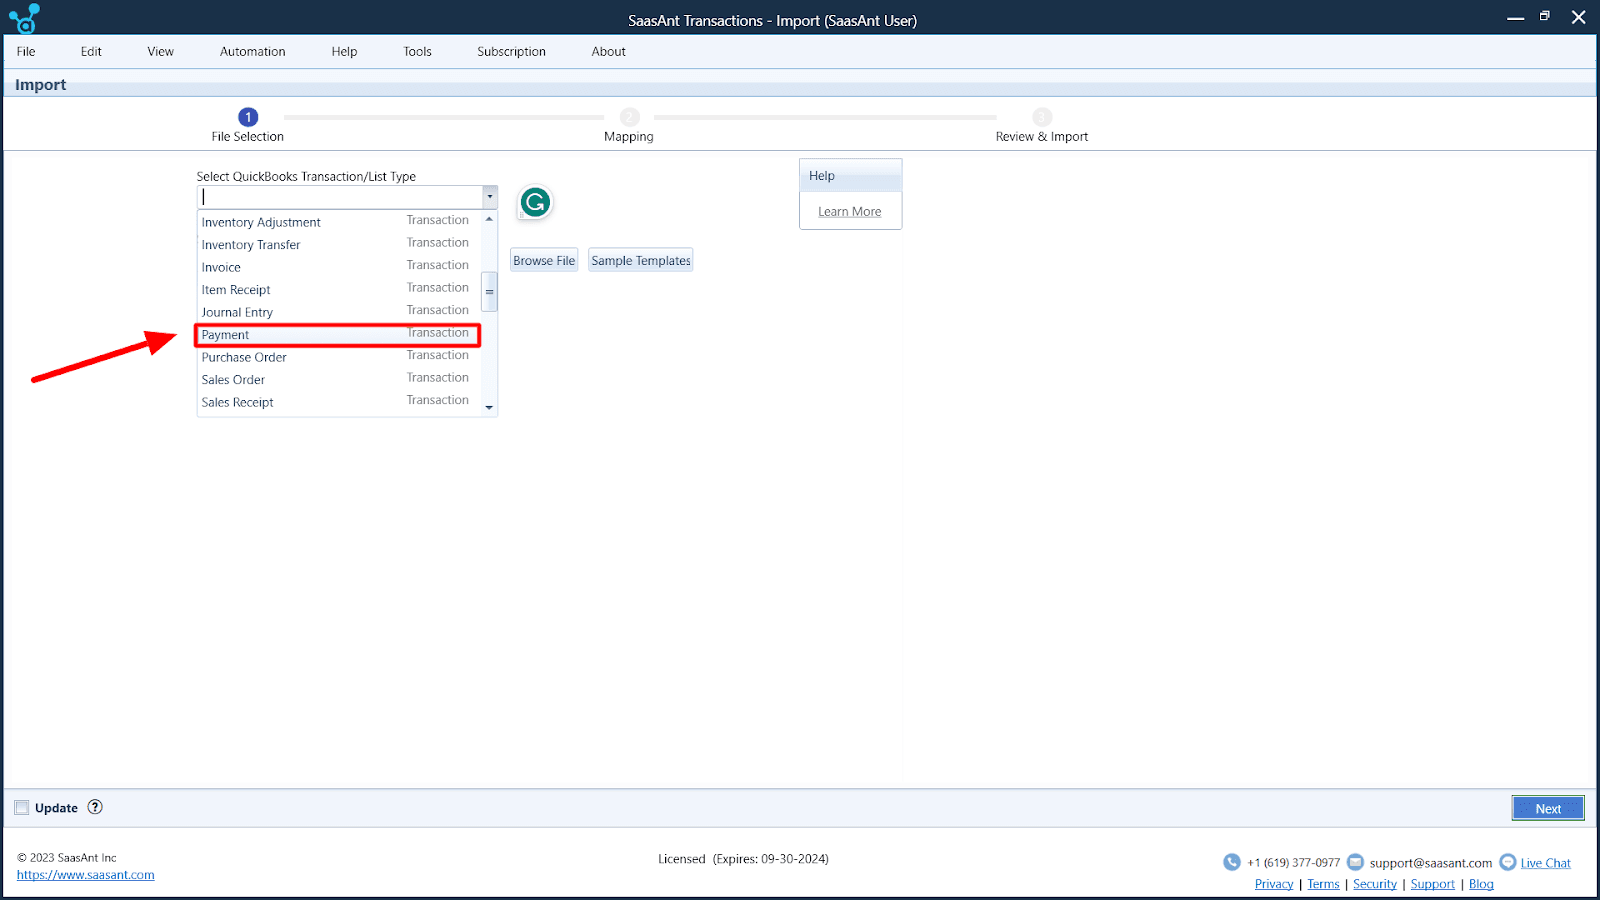
Step 4: Picking Payment Import Option
Next, navigate to the ‘Import’ section and specify the ‘QuickBooks Transaction Type’ as ‘Payments.’ Utilize the ‘Browse File’ functionality to locate and select the payment data file stored on your computer. SaasAnt Transactions Desktop offers convenient templates to streamline and improve the precision of your payment data import, significantly reducing the chances of errors.

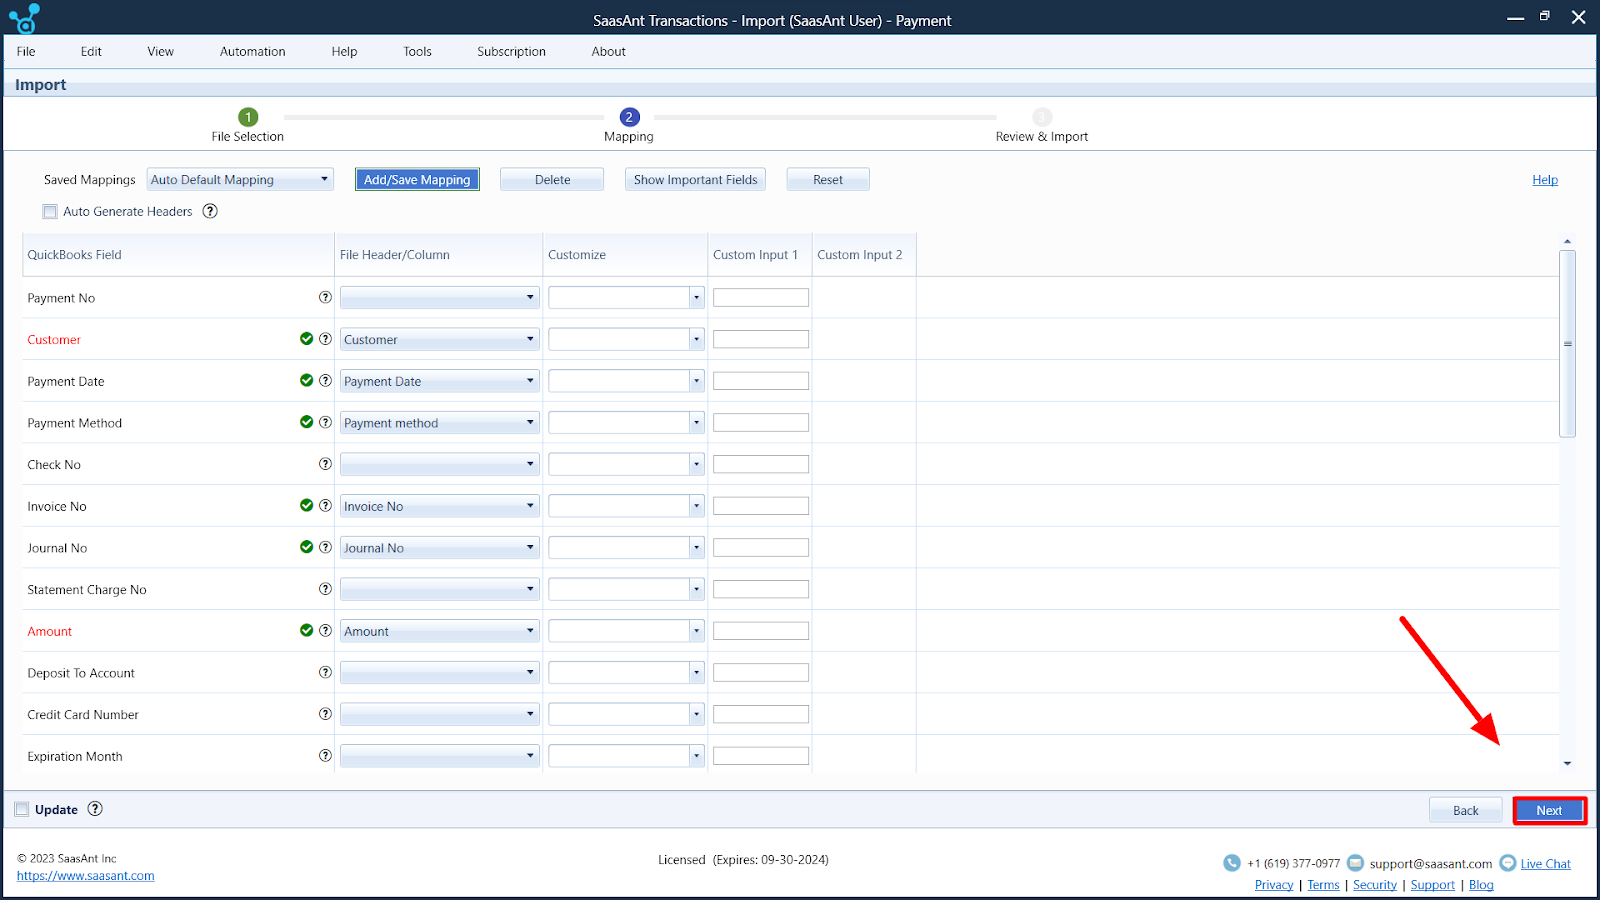
Step 5: Precise Data Mapping for Payment Records
Accurate data alignment is crucial when importing payment records into QuickBooks Desktop. It means ensuring that vital information in your data, like customer names, payment amounts, dates, and payment methods, matches the fields in QuickBooks Desktop. SaasAnt Transactions Desktop simplifies this task with an easy-to-use interface and a helpful “Preview Mapping” feature to prevent potential mistakes. If you need further assistance or want to ensure a smooth import, you can always visit the SaasAnt support portal.
Next, it’s time to align the fields in your payment records with the corresponding fields in QuickBooks Desktop. This precise mapping ensures that all the payment details, including customer names, payment amounts, and dates, are accurately transferred during the import process.

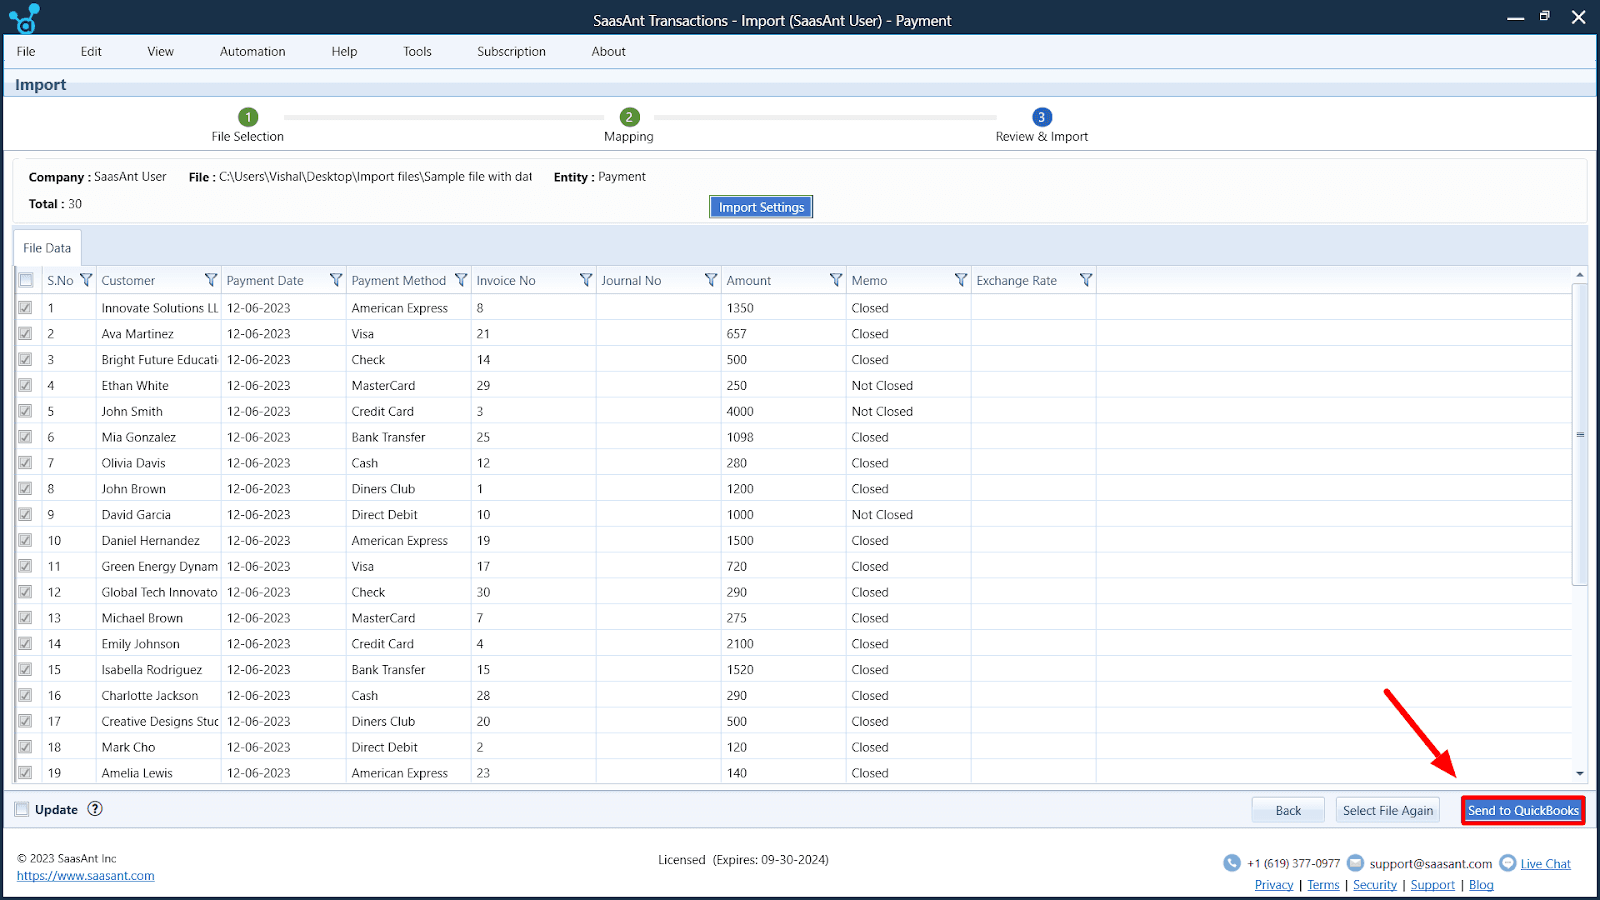
Step 6: Verify and Import Payment Records
Take a brief moment to check that your data mapping is accurate for your payment records. Once you’re confident everything matches up correctly, kick off the import by clicking ‘Send to QuickBooks.’ Then, go to QuickBooks Desktop to double-check your payment records.

Step 7: Verifying Payment Records Import
To confirm the accuracy of your imported payment records, simply click on the ‘QuickBooks Access’ icon. It will grant you direct access to your QuickBooks Desktop account, where you can thoroughly review and verify the reliability of your payment data.
Conclusion
Importing accounts receivable payments into QuickBooks Desktop using SaasAnt Transactions Desktop provides a hassle-free and efficient method. It simplifies the payment record process and offers valuable guidance for better payment management. With this solution, you can enhance your financial operations and ensure accurate accounts receivable data within QuickBooks Desktop. Start streamlining your payment management with SaasAnt Transactions Desktop today.
Frequently Asked Questions(FAQ)
How can I effectively import accounts receivable payments into QuickBooks Desktop accurately and efficiently?
SaasAnt Transactions Desktop streamlines the import process by offering robust data mapping, batch processing, and validation capabilities. Before initiating the import, it guides users to ensure their Payments Datasheet is well-structured and free of missing data and errors to prevent import mishaps.
I have a significant volume of payments to import. Can SaasAnt Transactions (Desktop) handle batch imports?
Absolutely. SaasAnt Transactions Desktop can handle bulk imports efficiently, simplifying the process of importing multiple payments simultaneously.
Is mapping payment data fields to QuickBooks Desktop fields user-friendly with SaasAnt Transactions Desktop?
Yes, SaasAnt Transactions Desktop provides an intuitive interface for mapping data fields, making it a straightforward process. Users must align the headers in their Payments datasheet with the corresponding QuickBooks Desktop Fields.
Can I explore SaasAnt Transactions Desktop through a trial version or demo to assess its suitability for my payment import requirements?
You can often access trial versions or demos to evaluate how SaasAnt Transactions Desktop aligns with your needs for importing payments into QuickBooks Desktop. It allows you to test its functionality and determine if it meets your expectations before purchasing.
What is Accounts Receivable in QuickBooks?
Accounts Receivable in QuickBooks tracks the money your customers owe you for sales made on credit. It's an asset account that QuickBooks manages through invoices and customer payments.
How do I write off Accounts Receivable in QuickBooks?
To write off bad debt in QuickBooks, use a journal entry: debit Bad Debt Expense and credit Accounts Receivable. Then, apply a "Receive Payment" to the uncollectible invoice, linking it to the journal entry to close it. (Alternative methods like credit memos or discounts may be used in older QuickBooks versions).
How do I print an Accounts Receivable report in QuickBooks?
To print an AR Aging report, go to QuickBooks "Reports," find "Accounts Receivable Aging," customize the report's date range and filters, and then select the "Print" icon.
How do I write off Bad Debt Accounts Receivable in QuickBooks?
This is a duplicate question; see "How do I write off Accounts Receivable in QuickBooks?" above. (Using "Bad Debt" in the question clarifies the intent).
QuickBooks says "Please choose a customer when using an accounts receivable account as a line item." Why?
QuickBooks requires a customer selection with Accounts Receivable because AR tracks customer-specific balances. This link ensures accurate reporting of who owes you money. You'll see this prompt in journal entries or direct transaction edits lacking customer assignment.
How do I create a Loan Receivable account in QuickBooks?
To create a Loan Receivable account: go to "Chart of Accounts," click "New," select "Other Current Assets" as the Account Type and "Loan Receivable" as the Detail Type. Name it, for example, "Loans Receivable."
What account type is Accounts Receivable in QuickBooks?
Accounts Receivable in QuickBooks is a Current Asset account. It represents short-term assets – money expected to be received from customers within one year.
How do I change the Accounts Receivable account in QuickBooks Online?
Directly changing the main Accounts Receivable account in QuickBooks Online is generally not recommended and can cause errors. For specific needs like tracking by class, consider using sub-accounts or classes instead. Consult an accounting professional for complex AR account changes.
How do I record Accounts Receivable in QuickBooks?
You record Accounts Receivable in QuickBooks by creating and saving invoices for your sales to customers on credit. Each invoice automatically increases the Accounts Receivable balance for the specified customer.
How do I set up Accounts Receivable in QuickBooks?
Accounts Receivable is automatically part of QuickBooks' default Chart of Accounts. No manual setup is needed. Focus on using invoices and recording payments correctly to manage your AR effectively.
How do I clear a negative balance in Accounts Receivable in QuickBooks?
A negative Accounts Receivable balance usually indicates an overpayment or incorrect credit memo. Investigate the transactions. Correct it by applying the credit to open invoices, issuing a refund, or reclassifying incorrectly categorized transactions.
Read also:
QuickBooks Online Accounts Receivable: Your In-Depth, Practical Guide to Getting Paid