QuickBooks eBay Integration: A Comprehensive Guide
Managing eBay transactions manually can be overwhelming for sellers, especially when keeping track of sales, fees, and taxes. QuickBooks is a great solution for handling accounting, but entering eBay data manually is time-consuming and prone to errors.
This is where PayTraQer makes all the difference. Automating the connection between your eBay store and QuickBooks simplifies syncing sales data, fees, and taxes. With PayTraQer, you can save time, reduce errors, and ensure your financial records stay accurate without the hassle of manual entry.
Contents
eBay QuickBooks Integration: Step-by-step Instructions
Conclusion
FAQs
Why Connect QuickBooks with eBay Using PayTraQer?
Before diving into the steps, let’s explore why this integration is valuable:
Save Time and Reduce Errors: With automatic syncing, PayTraQer eliminates manual data entry, reducing the risk of human errors in your financial records.
Accurate Financial Tracking: Automatically track eBay sales, fees, refunds, and taxes in real-time, eliminating the need for manual reconciliation.
Simplified Accounting: PayTraQer organizes and categorizes every eBay transaction, ensuring your QuickBooks account is always current.
eBay QuickBooks Integration: Step-by-step Instructions
Now, let’s get started with the connection process.
What you'll need:
Your QuickBooks Online login (with admin access).
Your eBay seller account login.
Step 1: Connecting QuickBooks to PayTraQer
QuickBooks Login: Head over to QuickBooks Online and log in.
Find Your New Best Friend (PayTraQer): Go to the "Apps" section (or the Intuit App Store) and search for "PayTraQer." It's the tool that's going to save you hours of data entry.
Get the App: Click "Get App Now." This will whisk you away to the PayTraQer website.
Quick Sign-Up: Use your QuickBooks login to sign up for a PayTraQer account. This makes things super easy.
Granting Access: QuickBooks will pop up asking for permission. Click "Connect" to let PayTraQer access your QuickBooks data.
Success!: You'll get a confirmation message. High five! The first connection is made.
Free Trial Time: If there's a free trial, take advantage of it! It's a risk-free way to see how PayTraQer can transform your bookkeeping.
Step 2: Linking Your eBay Store
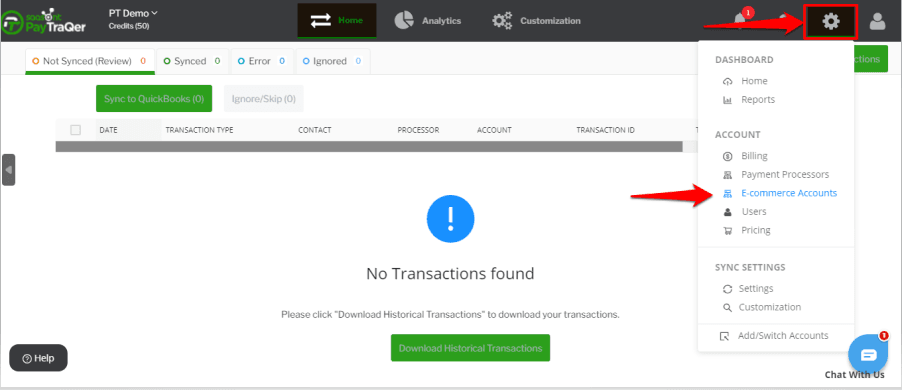
Add Your eBay Store: In your PayTraQer dashboard, click "Add E-commerce Accounts." (If you missed it earlier, go to Settings (gear icon) > E-commerce Accounts).
Choose eBay: Click the eBay tile. You're almost there!
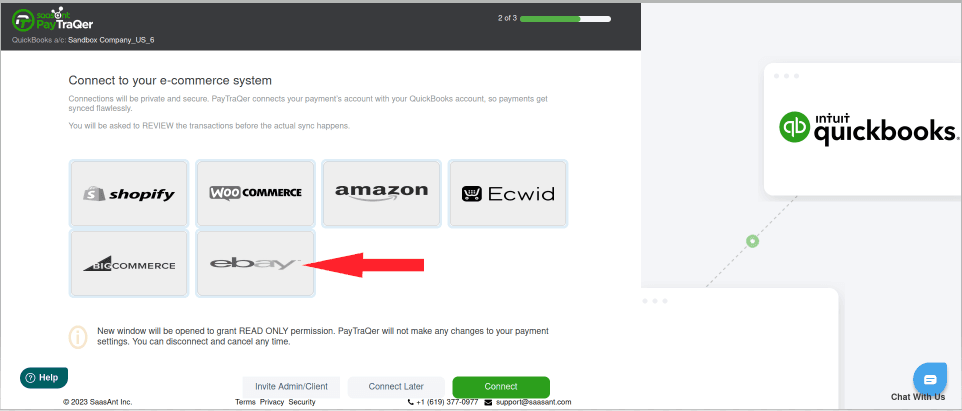
eBay Login: Log in to your eBay seller account.
Permissions: Give PayTraQer permission to access your eBay sales data. This is how the magic happens.
Connected!: You'll see a confirmation message. Your eBay store is now linked.
Step 3: Configuring PayTraQer
Every business is unique. PayTraQer understands this and offers flexible settings.
Option 1: The Easy Route (Express Settings)
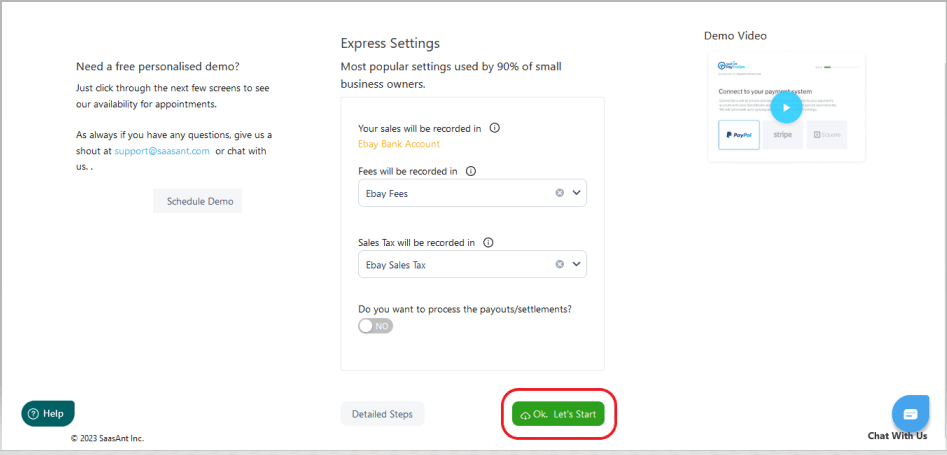
Click "Ok, Let's Start." PayTraQer uses pre-configured settings that work great for most eBay businesses. This is the fastest way to start syncing.
Option 2: The Custom Approach (Detailed Settings)
Click "Detailed Steps."
Sales Settings: Control how sales are recorded in QuickBooks. Choose the right income account, and decide how to handle discounts, shipping charges, and sales tax. Pro-tip: Consult with your accountant if you're unsure about these settings.
Product Settings: Decide how you want to manage your products in QuickBooks. Do you want PayTraQer to automatically create new products if they don't exist in QuickBooks? Or do you prefer to match them manually using SKUs?
Fee Settings: Tell PayTraQer how to handle those pesky eBay fees. Choose the correct expense account and vendor (usually "eBay").
Payout Settings: This is important for reconciliation! Tell PayTraQer which bank account your eBay payouts go into. This will make reconciling your bank statements a breeze.
Save Your Masterpiece: Click "Save." Your custom settings are now locked and loaded.
Step 4: Syncing
Manually syncing data is tedious. PayTraQer offers two ways to sync:
Option 1: Manual Sync (For the Detail-Oriented)
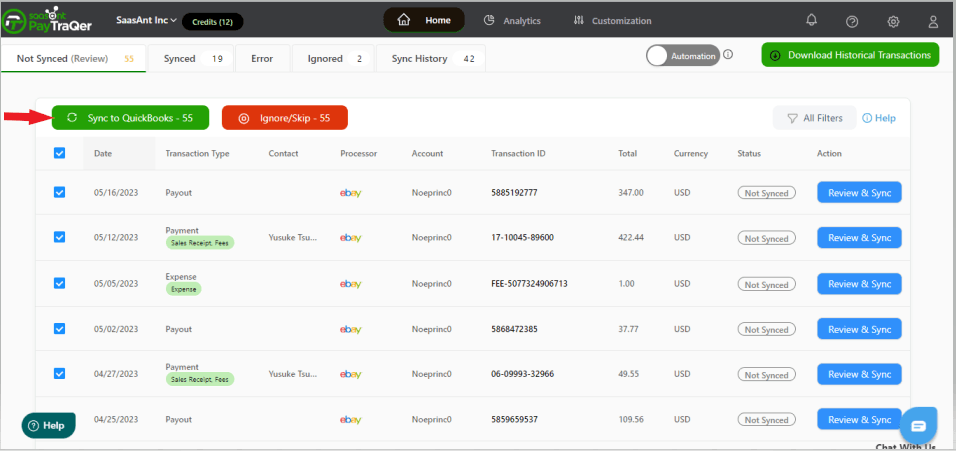
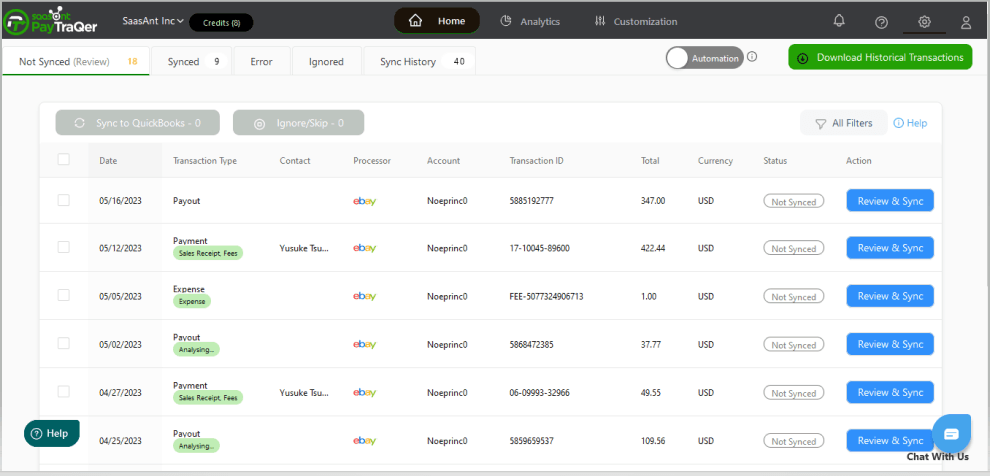
Review Your Transactions: Go to the "Transactions" tab in PayTraQer and look over the downloaded eBay sales.
Pick and Choose: Select the transactions you're ready to send to QuickBooks.
Sync 'Em Up: Click "Sync to QuickBooks Online."
Ignore/Skip (For Later): If there are any transactions you don't want to sync right now (maybe you need to double-check something), select them and click "Ignore/Skip." You can find them later in the "Ignored" tab.
Option 2: Automatic Sync (Set It and Forget It)
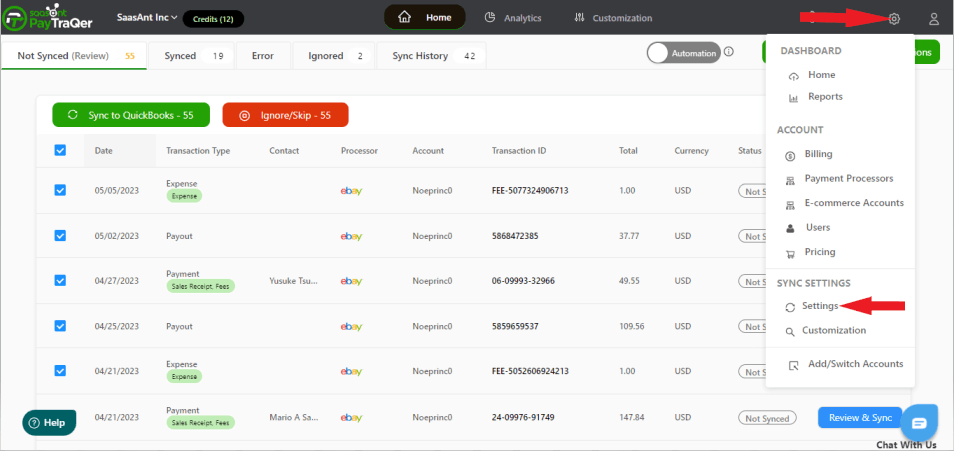
Automation is Your Friend: Go to Settings (gear icon) > Settings > Synchronization Options.
Turn It On: Toggle "Auto-Sync" ON. Now, all your eBay sales will flow automatically into QuickBooks Online in real-time. No more manual clicking!
Step 5: Review Sync Status
Dashboard Overview: Your PayTraQer dashboard shows you the overall sync status.
Dig Deeper: Use the "Not Synced," "Synced," "Error," and "Ignored" tabs to see exactly what's going on. If you see any errors, click on them for more details. Pro-tip: Addressing errors promptly prevents bigger headaches later.
Step 6: Reconciliation in QuickBooks
Reconciliation can be confusing. PayTraQer simplifies it.
Head to QuickBooks: In QuickBooks Online, go to the "Banking" section.
Match It Up: Match the eBay payouts in your bank feed with the sales recorded by PayTraQer. Because PayTraQer has already categorized everything correctly, this should be quick and easy. Pro-tip: Reconcile regularly (weekly or monthly) to keep your books up-to-date.
You're Done! You've successfully connected eBay and QuickBooks Online using PayTraQer. Now you can spend less time on bookkeeping and more time growing your eBay business. If you have any questions, don't hesitate to contact PayTraQer support—they're there to help!
Benefits of Using PayTraQer for QuickBooks and eBay Integration
Automatic Transaction Sync: PayTraQer syncs your eBay sales, fees, refunds, and taxes to QuickBooks automatically, reducing manual labor and keeping your accounts accurate.
Error-Free Bookkeeping: PayTraQer accurately records every transaction, minimizing the risk of human error and ensuring balanced books.
Real-Time Updates: Keep your QuickBooks account updated with real-time eBay transactions, enabling more accurate financial insights.
Multi-Currency Support: PayTraQer handles multi-currency transactions, making managing international sales on eBay easier.
Comprehensive Reporting: With all transactions synced to QuickBooks, you can generate detailed financial reports, including profit and loss statements, tax summaries, and more.
Conclusion
Connecting QuickBooks with eBay using PayTraQer simplifies your payment and accounting process, saves time, and ensures accuracy. Whether you’re a small seller or managing a high-volume eBay store, this integration eliminates the need for manual data entry, reduces errors, and provides real-time financial data to make informed decisions. With just a few simple steps, you can automate your accounting workflow and focus on growing your eBay business with PayTraQer.
FAQs
How does PayTraQer help eBay sellers manage transactions with QuickBooks?
PayTraQer automates the syncing of eBay sales, fees, refunds, and taxes into QuickBooks. This eliminates the need for manual data entry, reducing errors and ensuring accurate financial records. Sellers benefit from real-time updates, simplified bookkeeping, and the ability to generate detailed financial reports easily.
What are the benefits of integrating eBay with QuickBooks using PayTraQer?
The integration saves time by automating the syncing process, reduces human errors in financial records, and ensures real-time updates. PayTraQer also supports multi-currency transactions and enables accurate financial tracking with comprehensive reports for taxes, profits, and more.
How do I connect my eBay store to QuickBooks using PayTraQer?
First, log in to your QuickBooks Online account. Install PayTraQer from the Intuit App Store, then connect it to QuickBooks. Next, link your eBay store by logging into PayTraQer, navigating to eCommerce Accounts, and selecting eBay. After logging in with your eBay credentials, the connection will be complete.
Can PayTraQer handle international eBay transactions in multiple currencies?
Yes, PayTraQer supports multi-currency transactions, making it easier for eBay sellers who handle international sales. It ensures that all sales, fees, and taxes from different currencies are accurately synced and tracked in QuickBooks, allowing sellers to manage global transactions seamlessly.
What reports can I generate after syncing eBay transactions with QuickBooks using PayTraQer?
With PayTraQer, eBay sellers can generate comprehensive financial reports, including profit and loss statements, tax summaries, and transaction details. These reports help in tracking the overall performance of the eBay store, providing clear insights into revenue, fees, taxes, and profits.