How to Create a Credit Memo in QuickBooks
Starting a credit memo in QuickBooks Online is essential for managing returns, refunds, or any invoice adjustments that reduce the amount a customer owes you. In this blog post, we'll explore how to create a credit memo in QuickBooks.
Contents
How to Create a Credit Memo in Quickbooks: Step-by-Step Guide
Bulk Import Credit Memos in QuickBooks Online: Step-by-Step Guide
Conclusion
FAQs
How to Create a Credit Memo in Quickbooks: Step-by-Step Guide
In QuickBooks Online, a credit memo is a document that reduces the amount owed by a customer due to a prior overpayment, return of goods, or any other reason that decreases the billed amount. Follow the instructions given below to create a credit memo in QuickBooks Online:
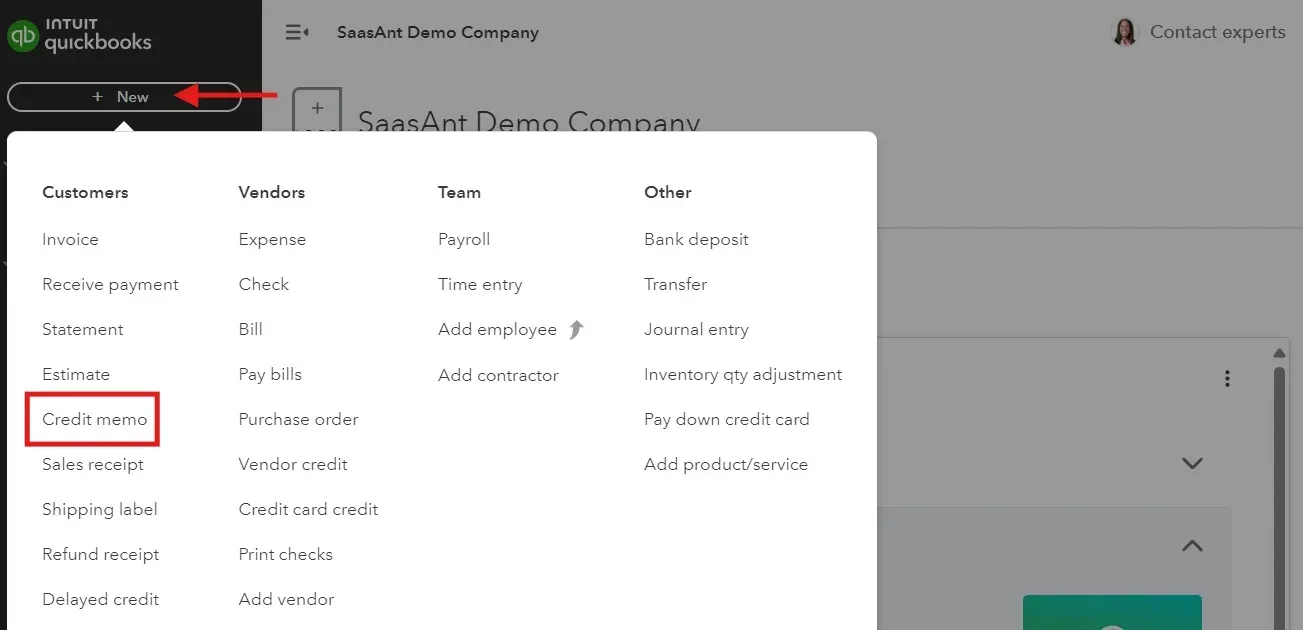
Step 1: Log in to your QuickBooks Online account and select ‘+ New’ - ‘Credit Memo.’
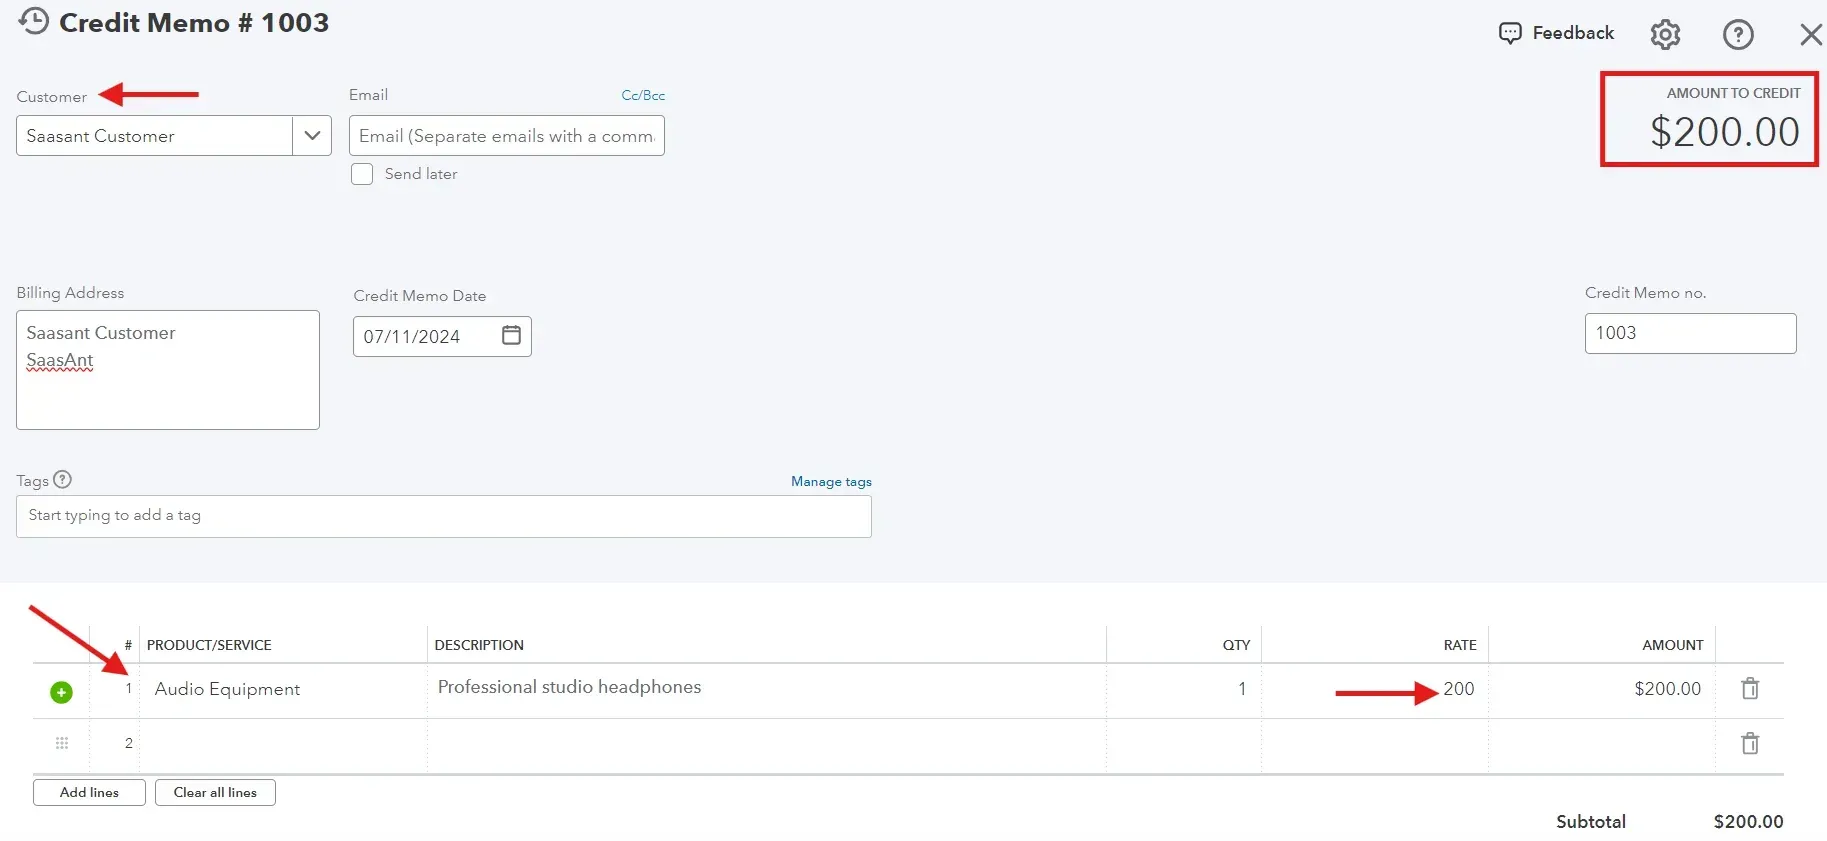
Step 2: We use credit memos to change the client’s balance. Select the customer for whom you want to send a credit memo.
Step 3: Then select the product and services you want to give credit to. If this credit relates to a specific invoice, you should use the same products and services you used on the invoice.
Step 4: Add the credit amount you want to give a customer.
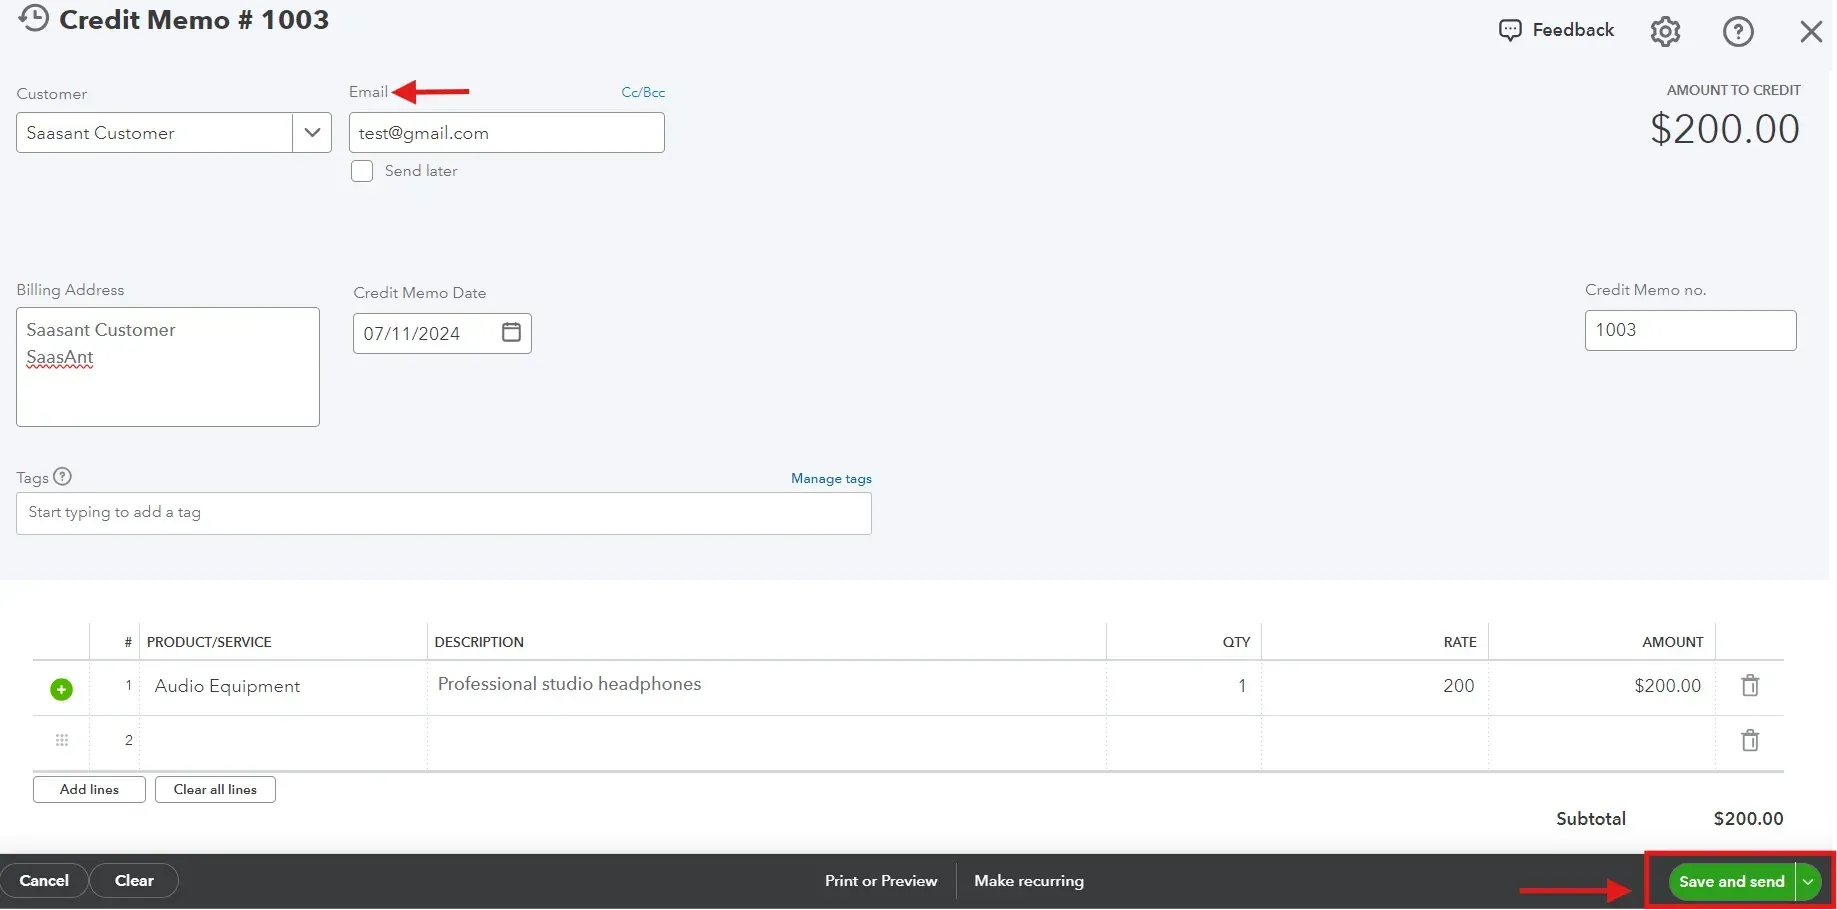
Step 5: To send a credit memo to a customer, enter their email address and click ‘Save and Send.’
Note: Read the blog to apply the credit memo to an invoice in QuickBooks Online.
Bulk Import Credit Memos in QuickBooks Online: Step-by-Step Guide
Importing credit memos into QuickBooks Online using SaasAnt Transactions simplifies the process and enhances data accuracy. Follow these detailed steps to ensure an easy import:
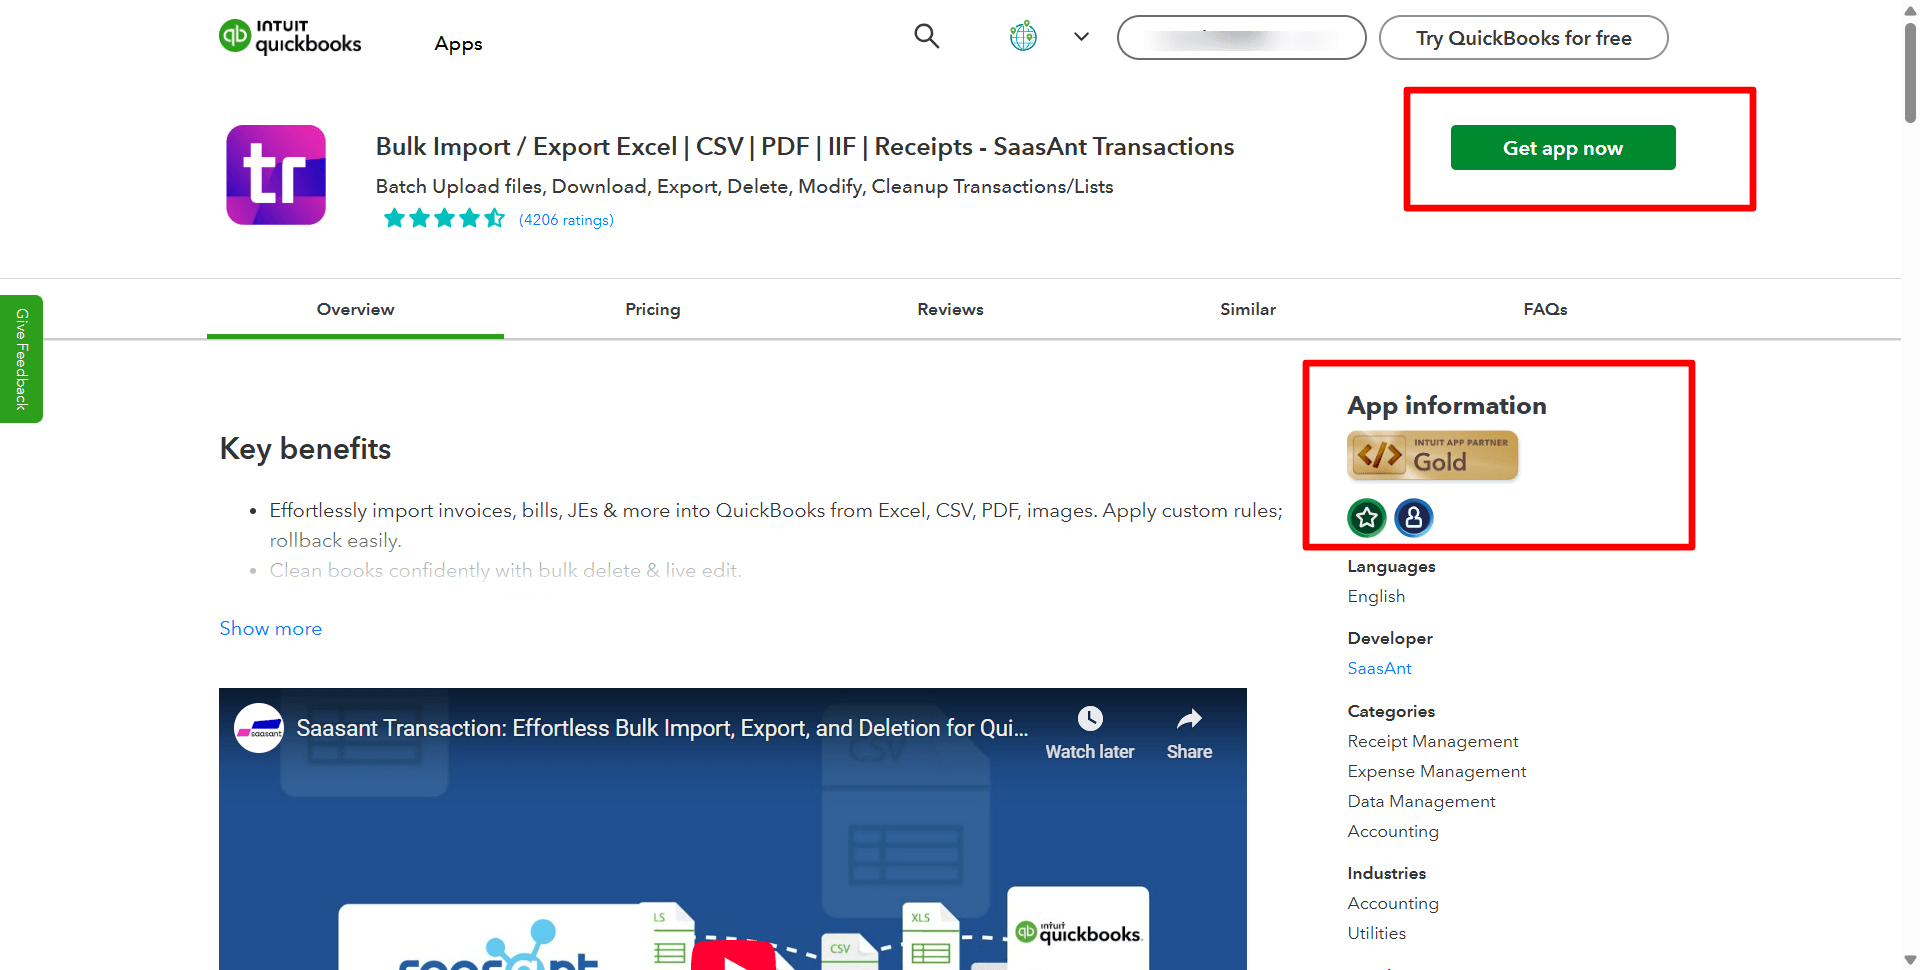
Step 1: Connect SaasAnt Transactions
Start by connecting SaasAnt Transactions with your QuickBooks account to ensure it integrates seamlessly with your financial data.
Step 2: Access Import Tools
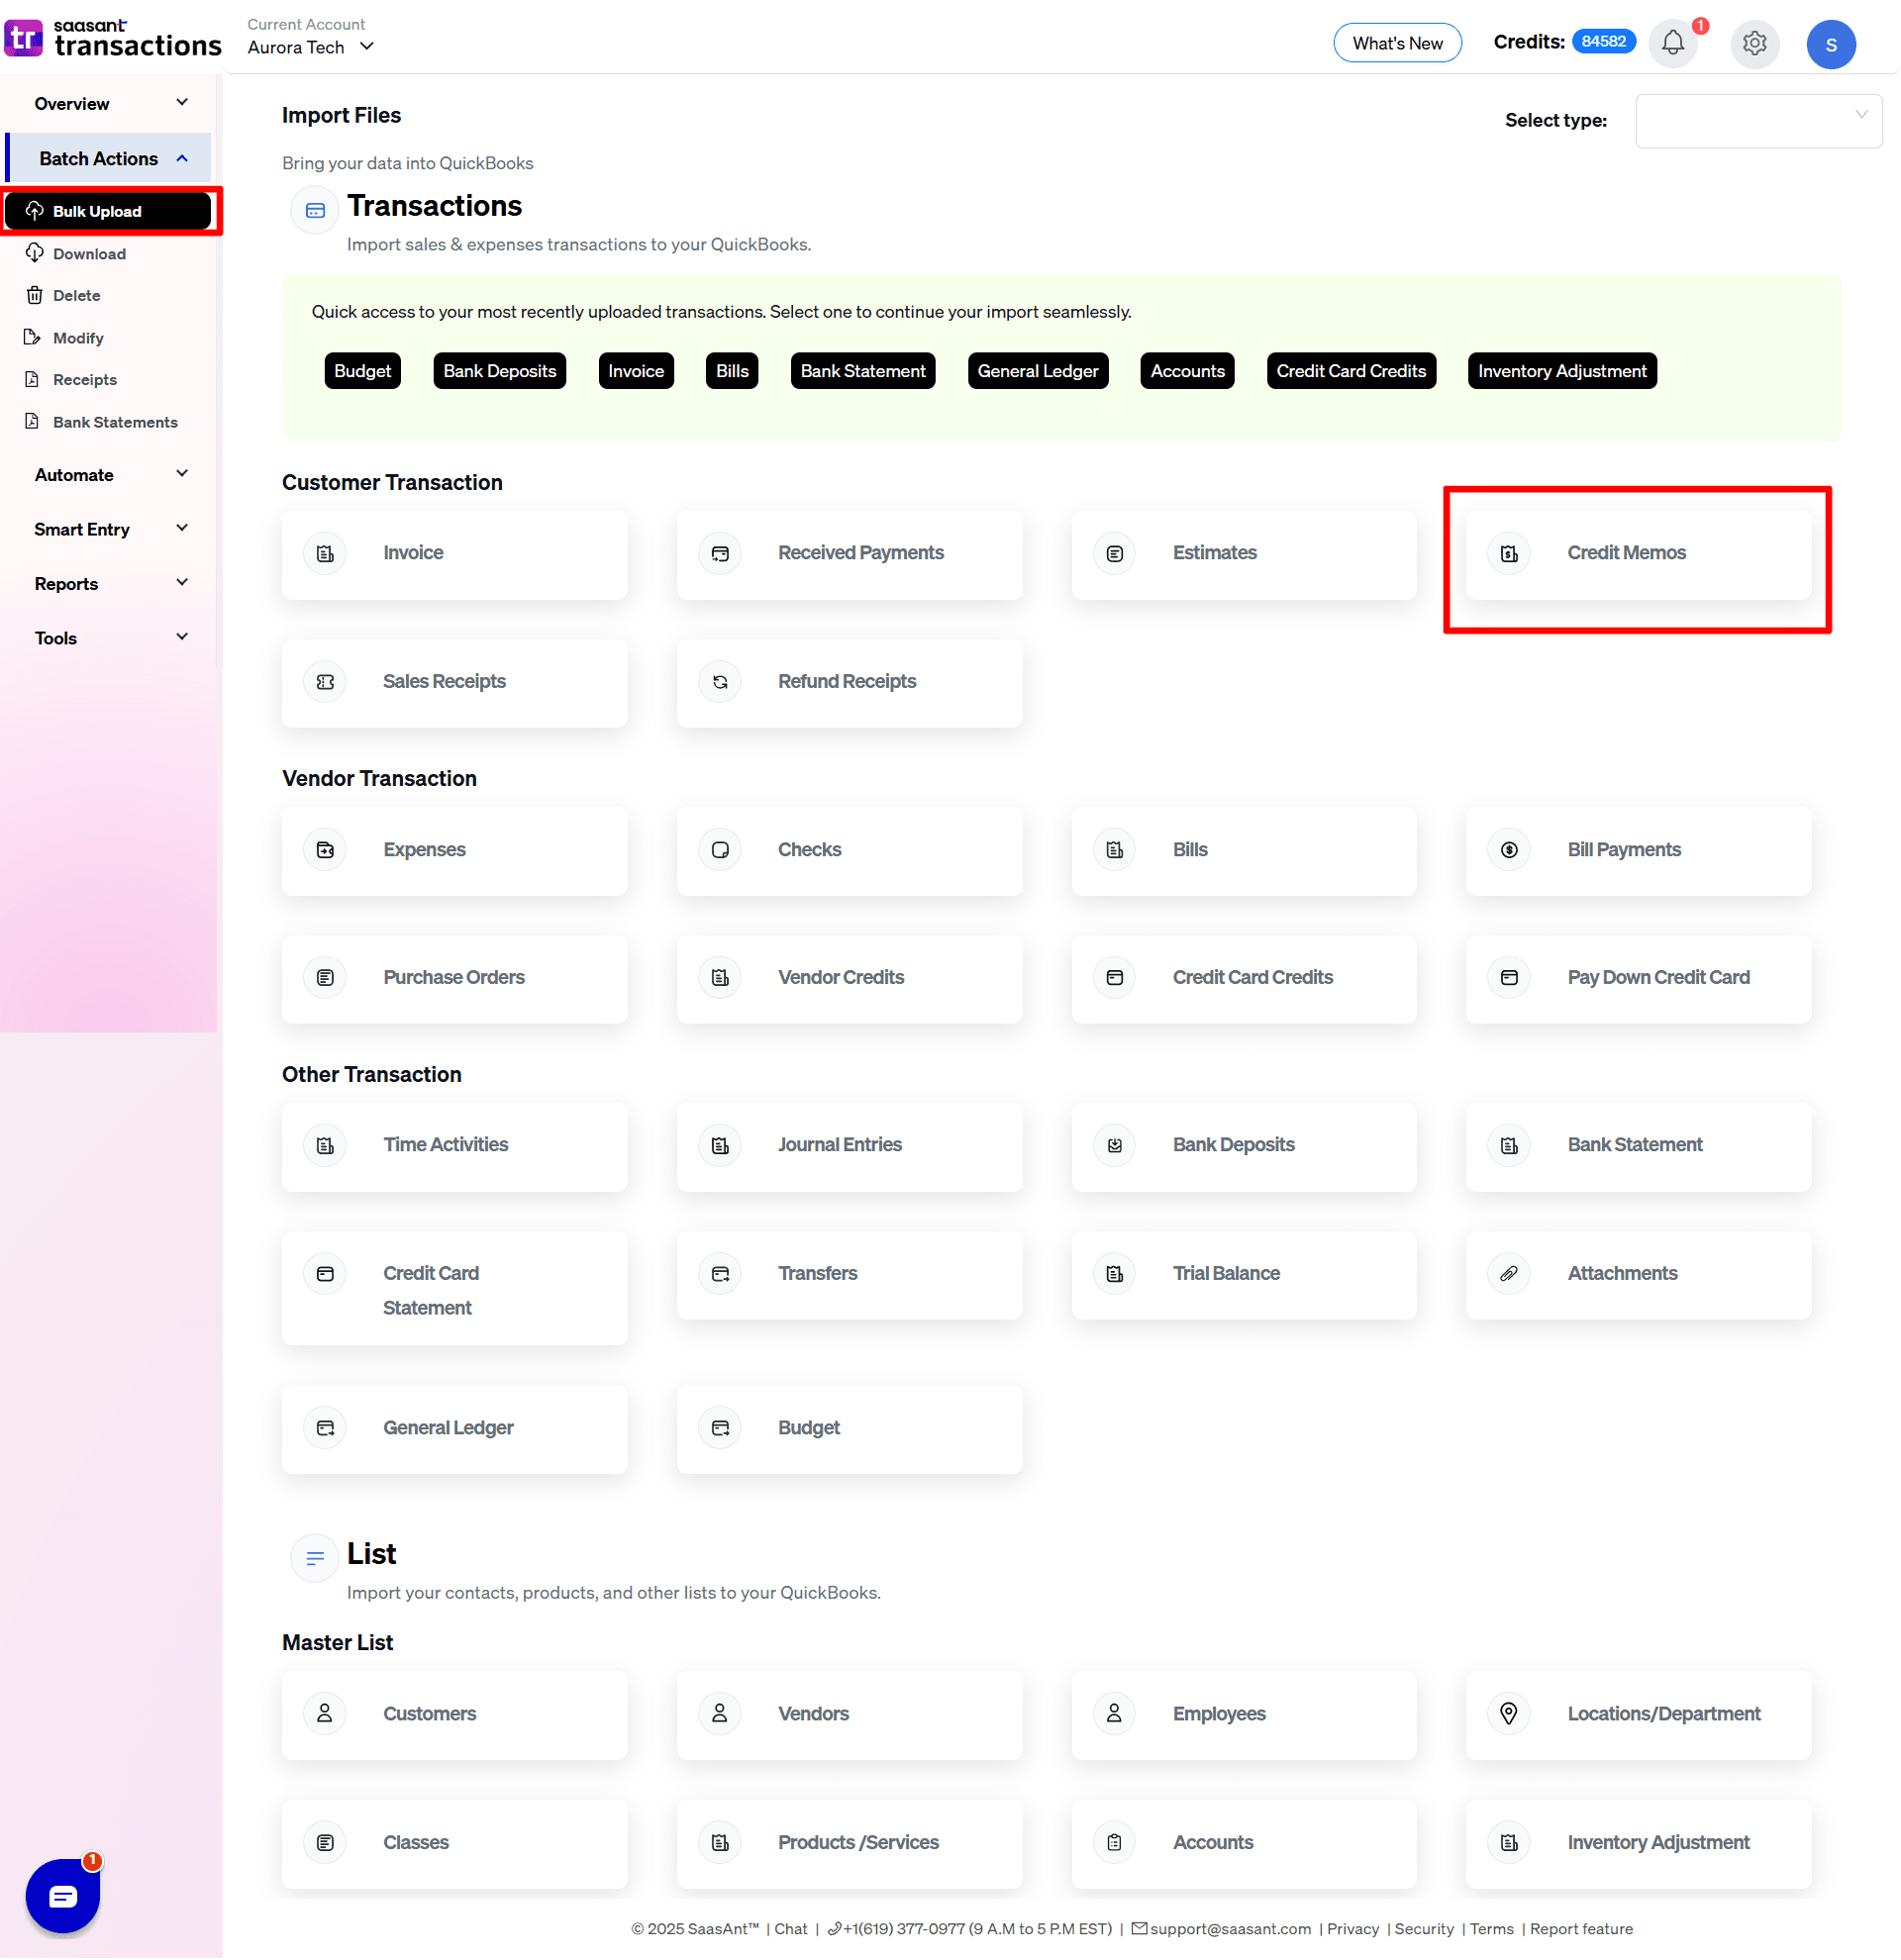
Navigate to the SaasAnt Transactions Dashboard. Select ‘Bulk Upload from the main menu and click on ‘Credit Memo.’
Step 3: Prepare Your Data File
Prepare your credit memo data file. Ensure it is formatted correctly, typically in CSV or Excel format. You can also upload the Google Sheet link to match the SaasAnt Transactions requirements. This step is crucial for successful data integration.
Step 4: Upload the Data
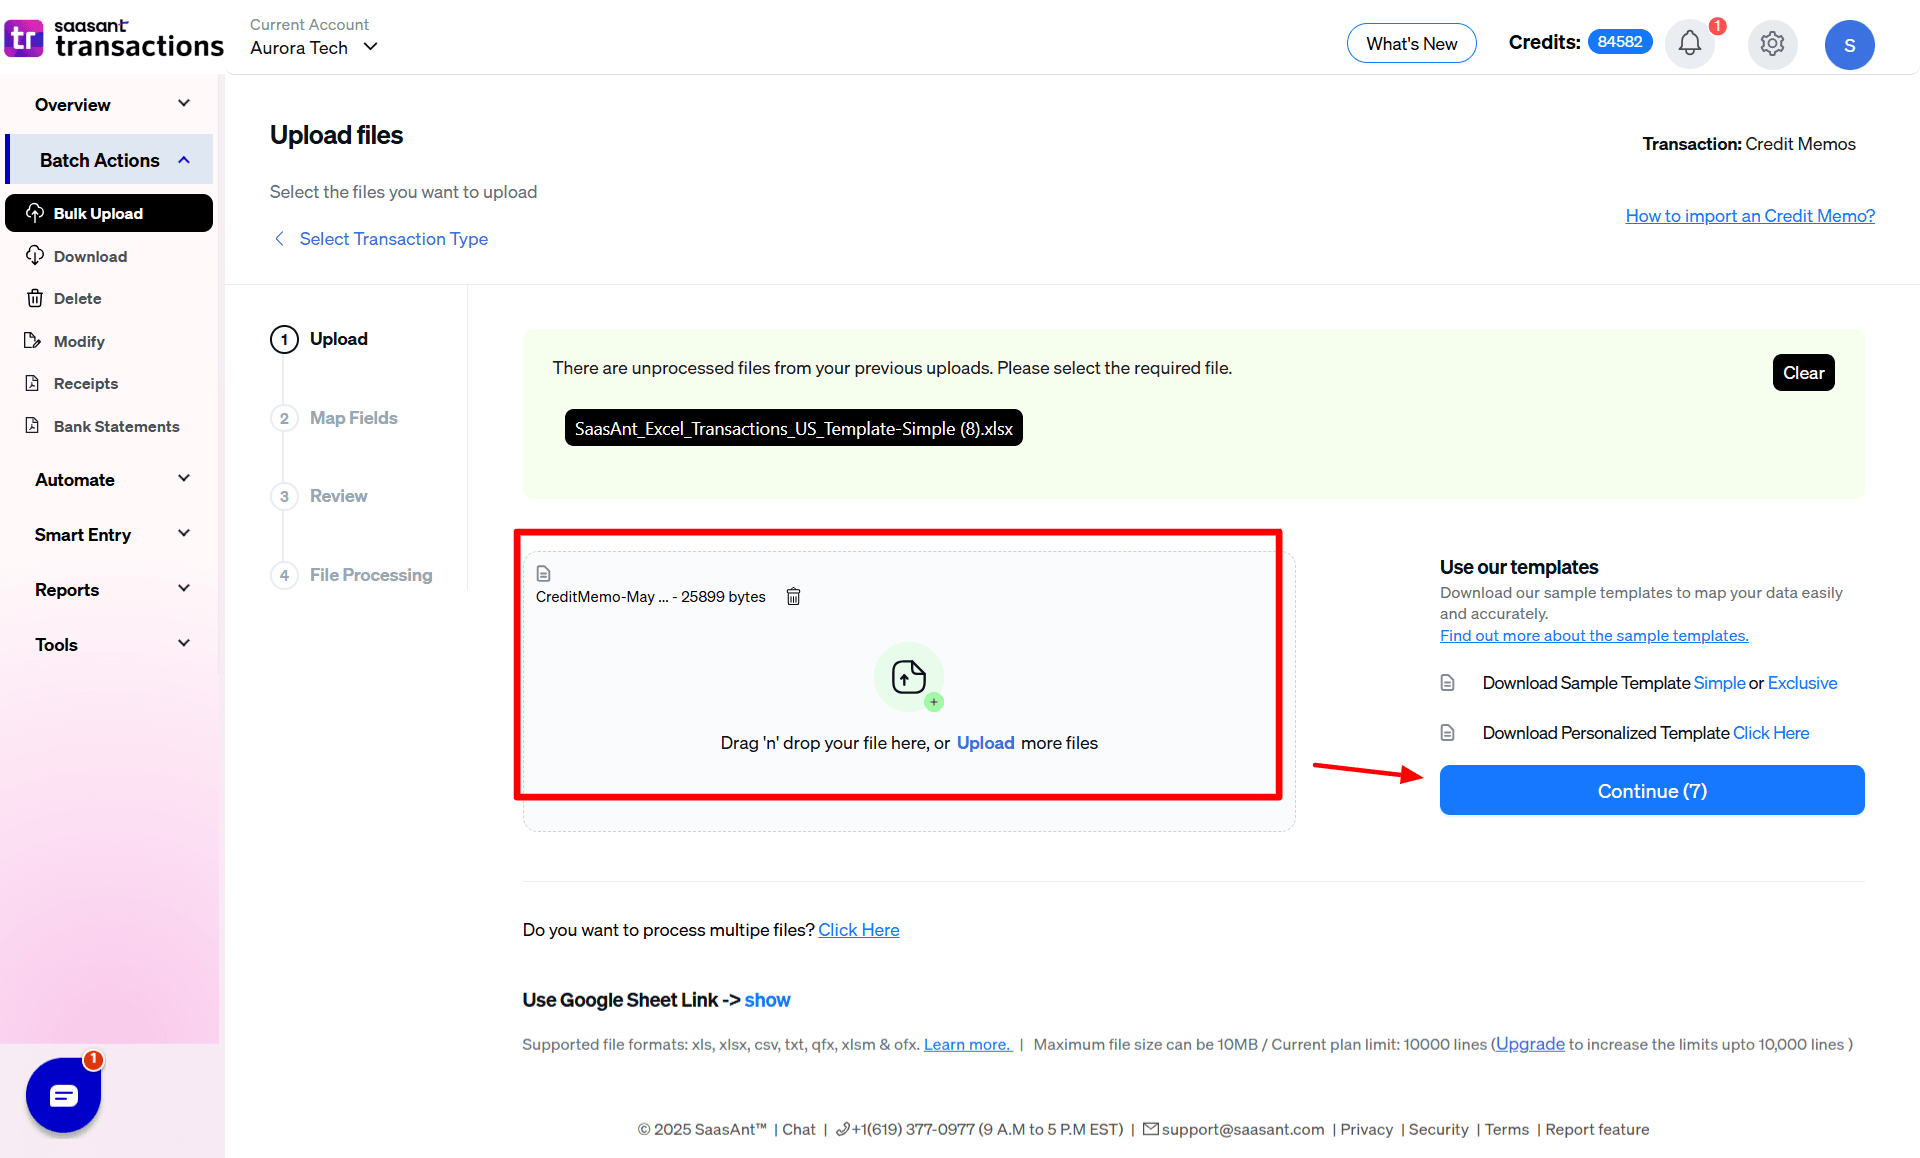
Click on ‘Upload File’ and select your prepared data file
Step 5: Map Your Data
Once uploaded, map the data fields in your file to the corresponding fields in QuickBooks Online via SaasAnt Transactions. Proper mapping ensures that each piece of information is accurately placed in your accounting system.
Step 5: Review and Confirm Import
Before finalizing the import, review all details for accuracy and make any necessary adjustments. Once satisfied, confirm the import to integrate the credit memos into your QuickBooks Online account.
Step 6: Verify Import Success
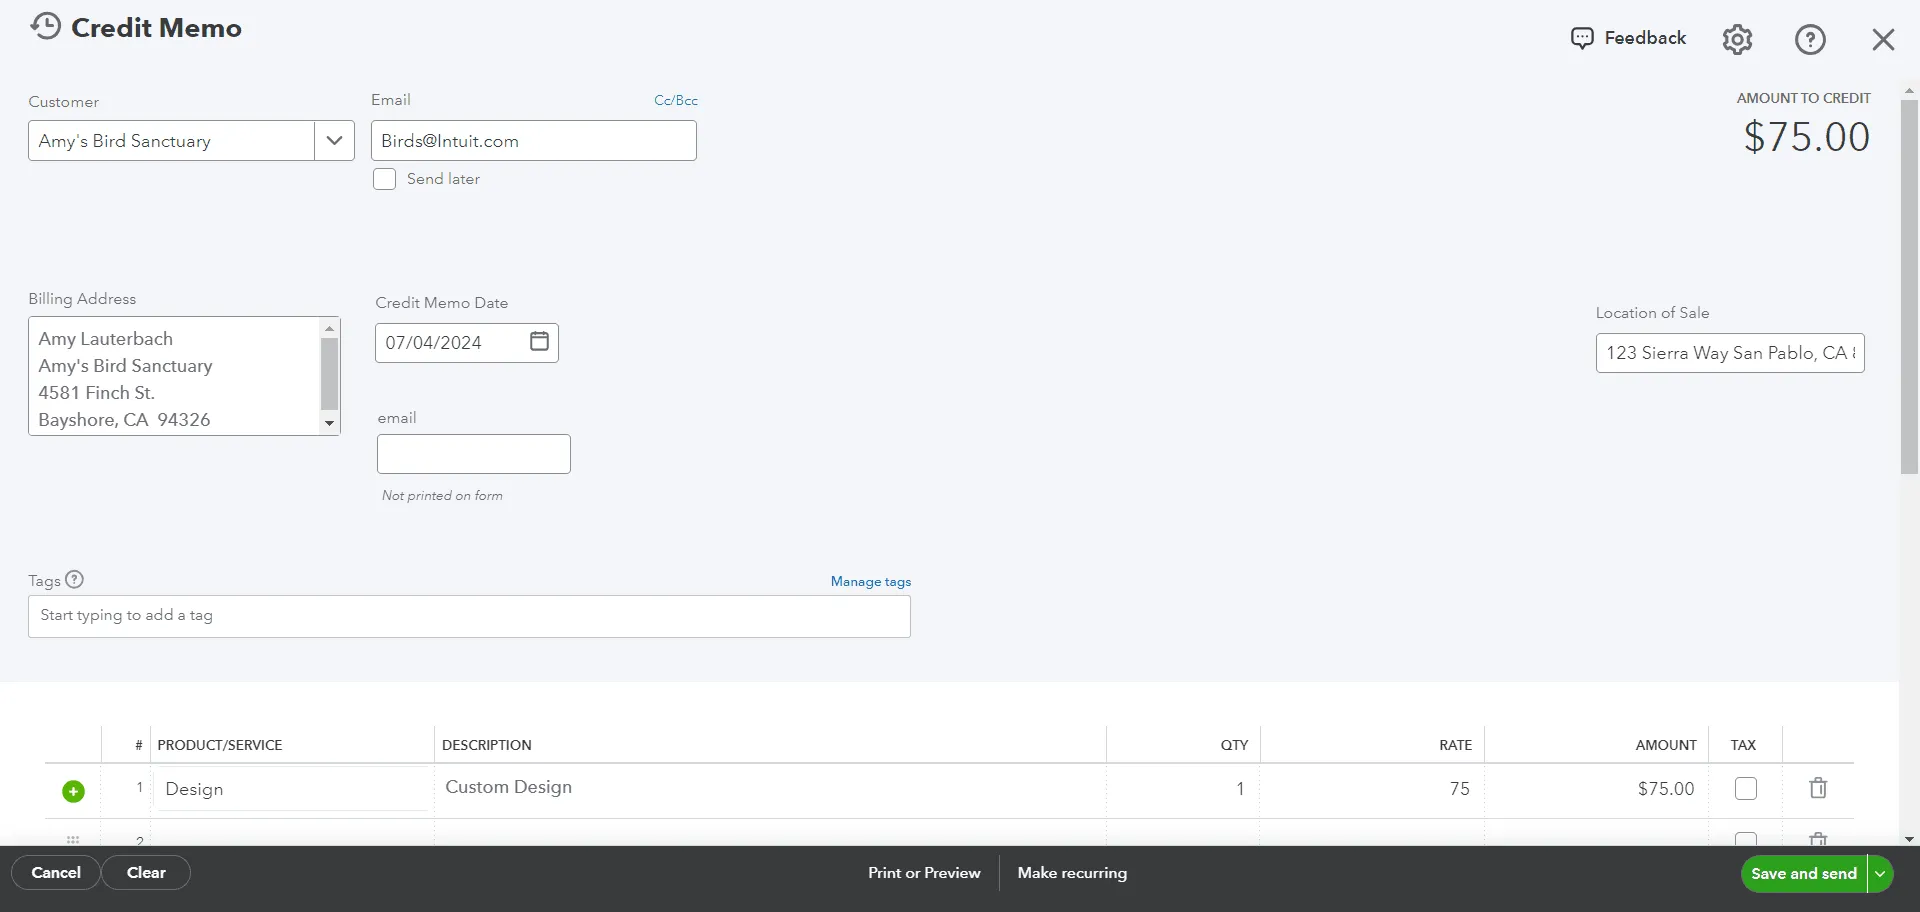
After the import process completes, verify that all credit memos have been accurately imported into your system. Check for discrepancies and ensure the data reflects your transaction records.

Conclusion
In conclusion, creating a credit memo in QuickBooks Online is a straightforward process vital for maintaining accurate financial records and ensuring customer satisfaction. By following the steps outlined, you can efficiently address any discrepancies in billing, such as overpayments or returns.
FAQs
How to Create a Credit Memo in QuickBooks Online?
To create a credit memo, Click ‘+New’ and select ‘Credit Memo.’ Choose the customer for whom you want to create the credit memo. Find the original invoice or sales receipt in the transaction list and click the "Create credit memo" option next to it. Enter the necessary details and save the memo.
What are two ways to create a credit memo in QuickBooks?
In QuickBooks, you can create a credit memo using two common methods. The first method is through the Customers menu, where you navigate to Customers and select Create Credit Memos/Refunds. You then choose the appropriate customer from the dropdown, enter the details of the items or services being credited, such as quantities and amounts, and save the credit memo. The second method is through the Customer Center. Here, you open the Customer Center from the toolbar or the Customers menu, select the customer from the list, and click on New Transactions to choose Credit Memos/Refunds. Once selected, you enter the required details and save the memo. Both methods allow you to efficiently manage customer credits for returns, adjustments, or overpayments, ensuring accurate financial records.
What is a credit memo with an example?
A credit memo is a document issued to a customer, noting a credit to their account. For example, if a customer returns a product worth $100, a credit memo would be created for $100, which can then be applied to their next invoice or refunded.
What is the purpose of a credit memo?
The primary purpose of a credit memo is to acknowledge that a customer has been credited for a particular amount. This can be due to a return, an overpayment, or a billing error. It adjusts the customer’s balance and ensures the financial statements are accurate.
What is a credit memo vs an invoice?
A credit memo and an invoice are two different receipts. An invoice requests payment for goods or services, increasing a customer’s balance. At the same time, a credit memo reduces the amount owed by a customer, either by providing a previous invoice or a credit for future purchases.
How to Add a Credit Memo in QuickBooks?
To add a credit memo in QuickBooks Online:
Log into your QuickBooks account.
Click '+New' and choose 'Credit Memo.'
Enter the customer name, date, product/service, and the credited amount.
Ensure all entered details are correct.
Click 'Save and Close' or 'Save and Send' to email it directly.
How to Import Credit Memos in QuickBooks Online?
To import credit memos into QuickBooks Online:
Connect to SaasAnt Transactions.
Navigate to 'Import Section' > 'Credit Memos.'
Upload the credit memo document.
Click on the ‘Rollback’ option if needed.
How to Export Credit Memos from QuickBooks Online?
To export credit memos from QuickBooks Online using SaasAnt Transactions:
Connect to SaasAnt Transactions.
Go to 'Export Section' and choose 'Credit Memos.'
Select the format (CSV, Excel) and customize the fields.
Initiate the export and download your file.
How to Delete Credit Memos in QuickBooks Online?
To delete credit memos in QuickBooks Online:
Connect to SaasAnt Transactions.
Navigate to ‘Delete’ > ‘Initiate Clean Up.’
Use ‘Date by Searching’ to pick memos within a specific date range.
Click ‘Ok’ to permanently remove the selected memos.
How to Edit Credit Memos in QuickBooks Online?
To edit credit memos in QuickBooks Online:
Log Into QuickBooks: Access your account.
Go to ‘Credit Memos,’ select a memo, and hit edit.
Change details like customer name, date, or amount.
Confirm the changes and update the record.
Read also
How to Edit Multiple Transactions in QuickBooks
Import Invoices into QuickBooks Online: Step-by-Step Guide
Batch Transactions in QuickBooks Online - Detailed Guide
Accounting Automation with SaasAnt Transactions: Streamline Your Financial Processes