How to Create a Sales Receipt in QuickBooks Online
Creating a sales receipt in QuickBooks not only serves as proof of purchase but also contributes to maintaining accurate financial records. This step-by-step guide will walk you through the process of how to create sales receipts in QuickBooks, ensuring you understand the best practices for recording your sales effectively.
By following these instructions, you'll simplify your accounting processes and maintain clear records of all your sales transactions.
How to Create a Sales Receipt in QuickBooks Online: Quick Instructions
+New -> Sales Receipt
Enter the customer’s details and date
Select the payment method and enter product details
Save the sales receipt or send it
How to Create a Sales Receipt in QuickBooks Online - Step-by-Step Guide
Step 1: Entity selection
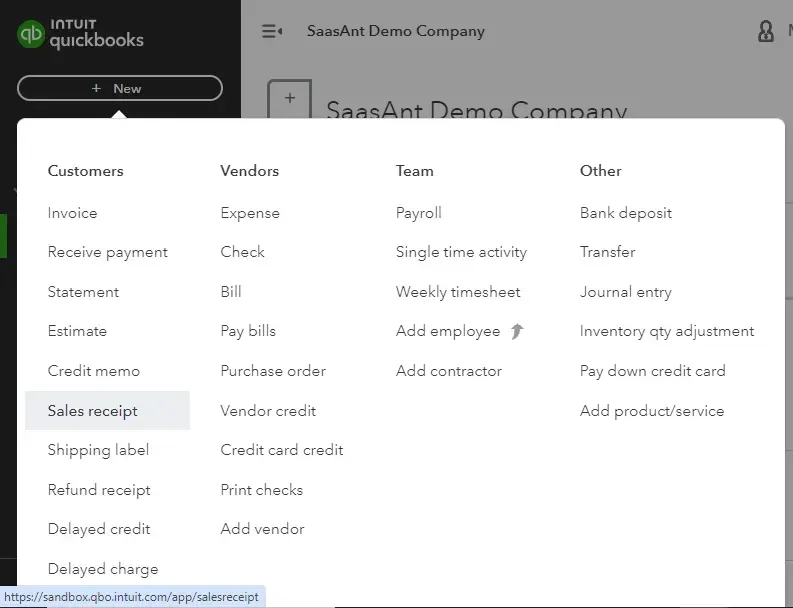
Go to QuickBooks Dashboard -> +New -> Sales Receipt
Step 2: Customer Details
Enter the customer's name or create a new entry if the customer still needs to be registered in QuickBooks.The default date is today, but you may change it if the sale occurred on a different date.
Step 3: Payment Method
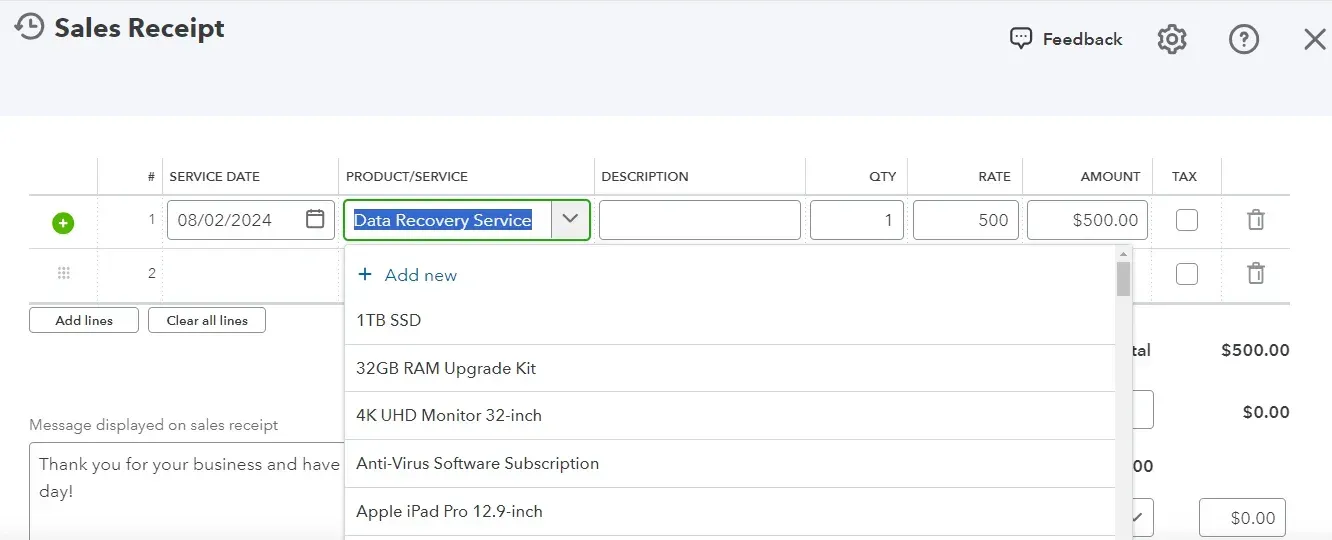
Select the payment method. For check payments, enter the check number in the reference number field. In the "Deposit to" dropdown, select "Undeposited Funds" to temporarily hold the payment until it is deposited in the bank.
Step 4: Product Details
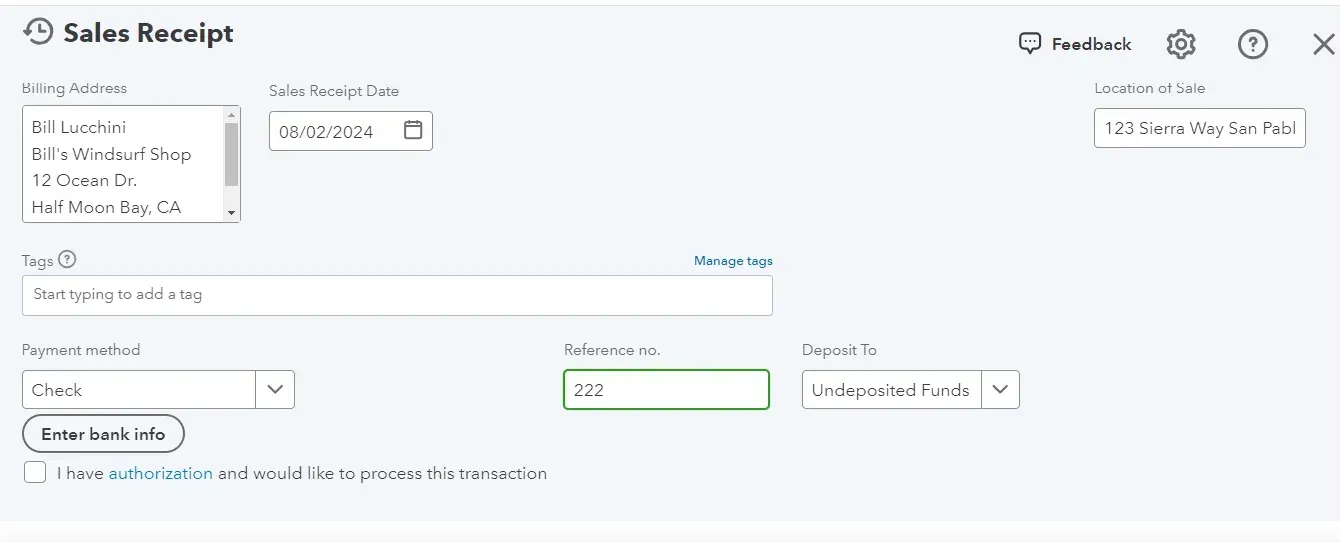
Enter the product name, and you will see all the registered details for that product. To enter a new product, select "Add New" and input all necessary information. Include all products in the specific sale.

Step 5: Save the Sales Receipt
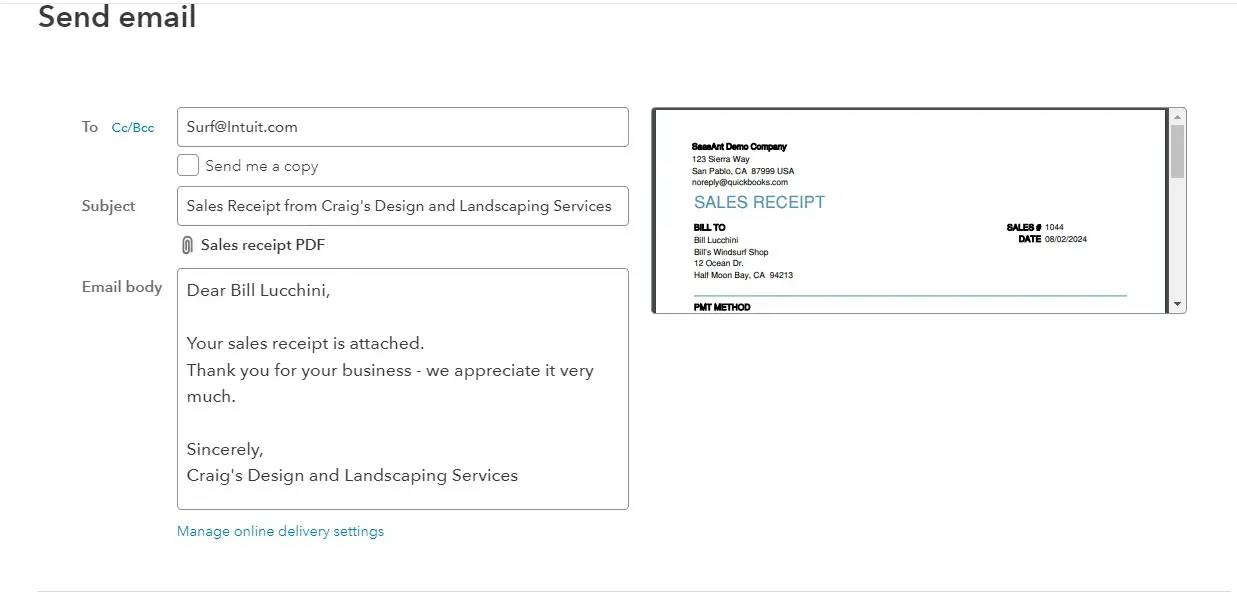
Select "Save and Send" to email the sales receipt. You can customize the subject line and body of the email by using the customize option or simply save the receipt. You can also save and close the sales receipt or use save and new to create a new one right away.
Best Practices for Creating Sales Receipts in QuickBooks
To ensure accuracy and efficiency when creating a sales receipt in QuickBooks, keep these best practices in mind:
Create sales receipts as soon as possible after the transaction to ensure accuracy and avoid errors.
Verify customer and transaction information to avoid errors.
Capture all necessary details like taxes and payment methods.
Match receipts with bank statements periodically.
You can duplicate the existing sales receipt for recurring transactions instead of creating a new one.
For better data accuracy, consider bulk importing of sales receipts.
How to Bulk Import Sales Receipt into QuickBooks Online: Step by Step Guide
Step 1: Preparing Your Sales Receipts Data for Import
Ensure your sales receipts data is prepared in a compatible format (Excel, CSV, or IIF) and use the SaasAnt Transactions Sample Template to map data fields accurately and avoid import issues.
Step 2: Setting Up the SaasAnt Transactions
To connect SaasAnt Transactions to QuickBooks Online, open QuickBooks, go to the ‘Apps’ tab, locate SaasAnt Transactions, and click ‘Get app now’ to enable efficient sales receipt imports.
Step 3: Uploading Your Sales Receipts File
Open SaasAnt Transactions Online, click ‘New Import’, select 'Sales Receipts' as the transaction type, and use ‘Browse’ to upload your file in Excel, CSV, or IIF format.
Step 4: Complete the Mapping
Next, map the fields from your file to the corresponding fields in QuickBooks Online. SaasAnt Transactions provides a user-friendly interface with a ‘Preview Mapping’ option to help prevent errors during import.
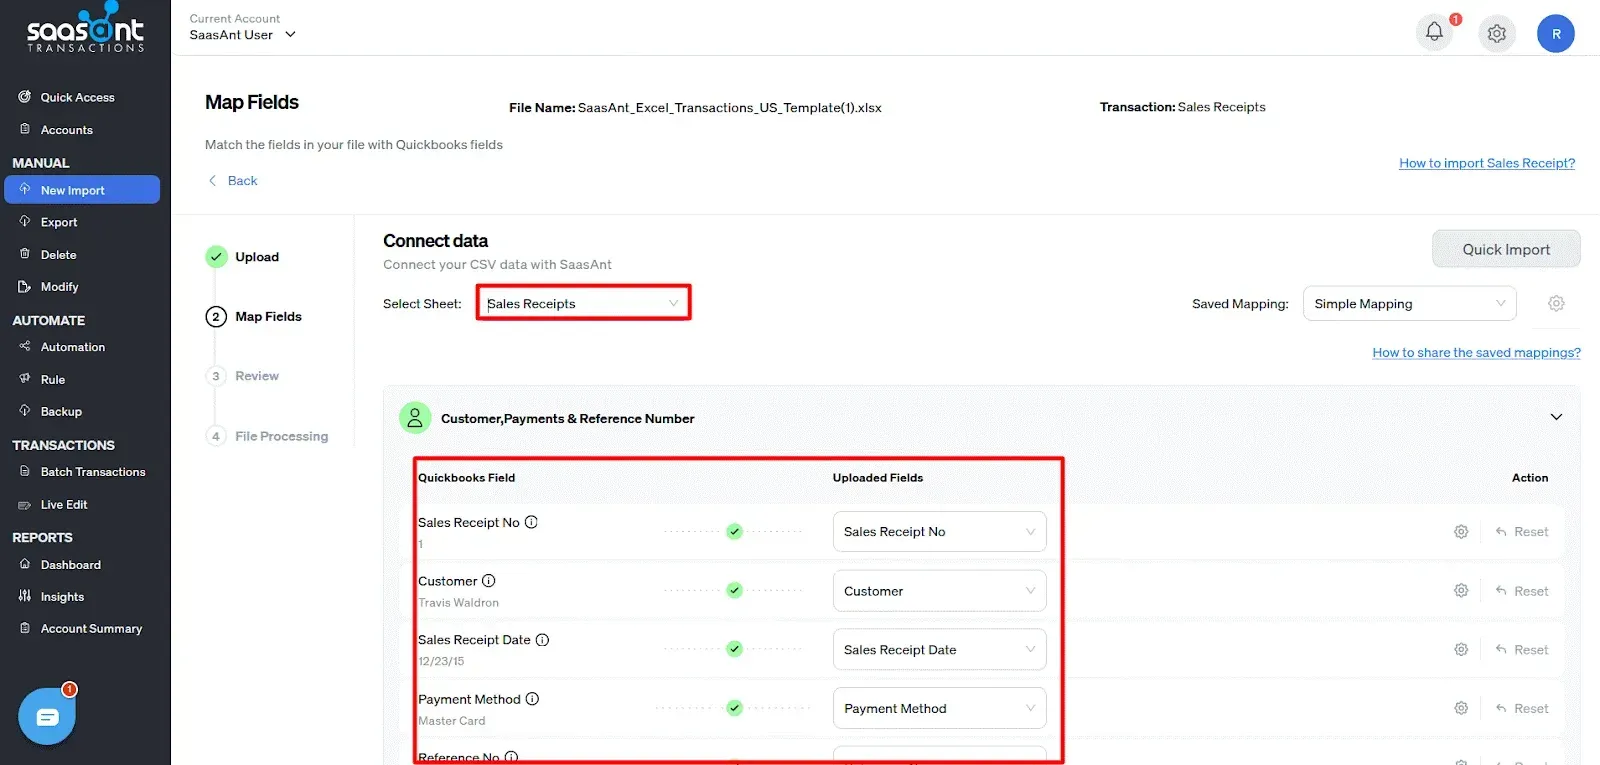
Step 5: Reviewing Your Data Before Final Import
Review the imported data to ensure accuracy and proper alignment of details. SaasAnt Transactions facilitates easy data review and corrections, helping you identify and resolve any errors.
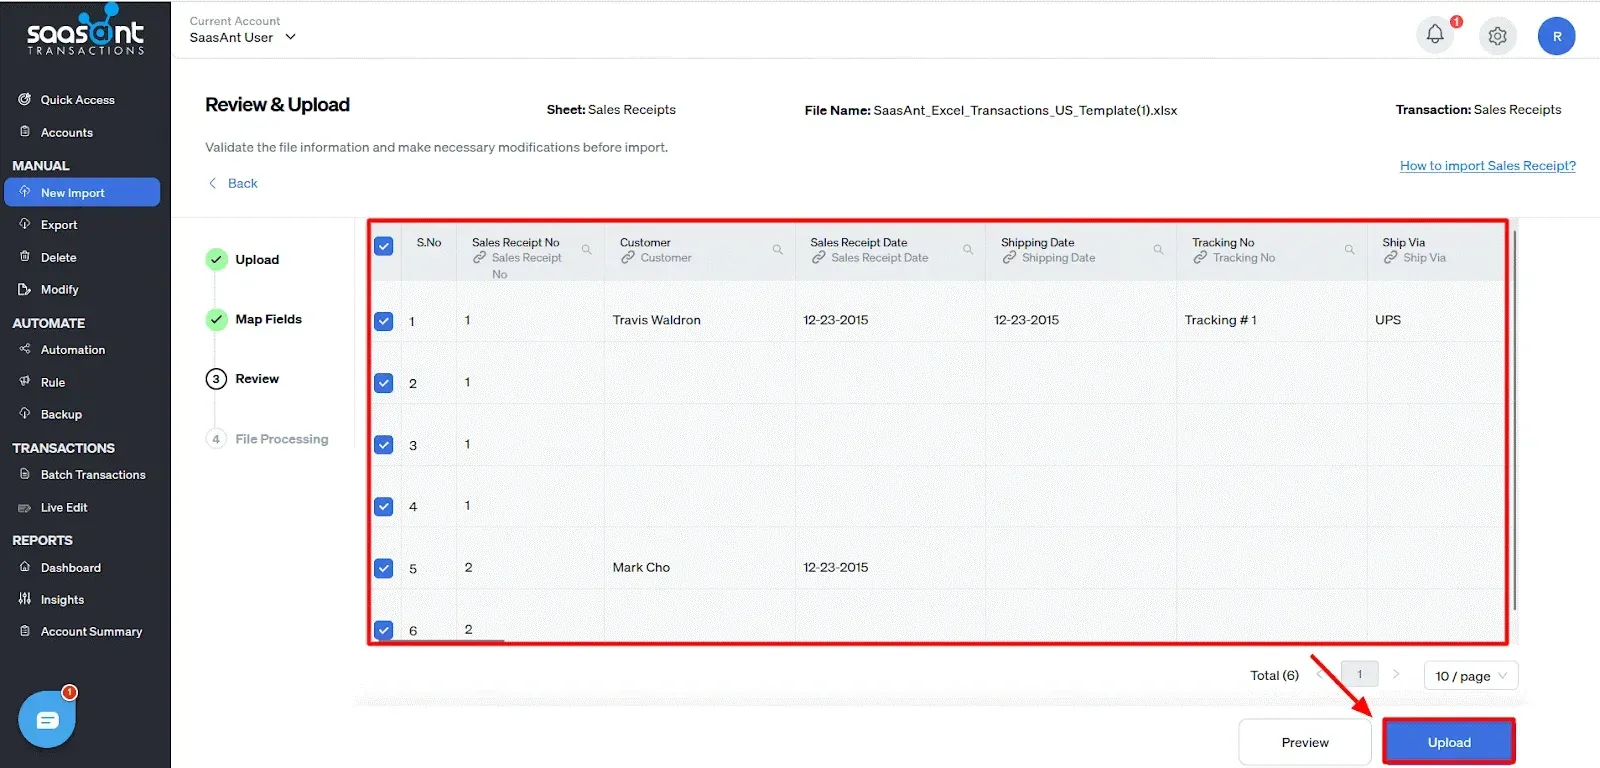
Step 6: Completing the Import Process
Once you have confirmed the data's accuracy, click ‘Upload’ to import your sales receipts data into QuickBooks Online.
Step 7: Verifying the Imported Sales Receipts
After importing, if successful, a QuickBooks Response ID will appear next to the S.No column. Click the ID to view the imported data in your QuickBooks account.
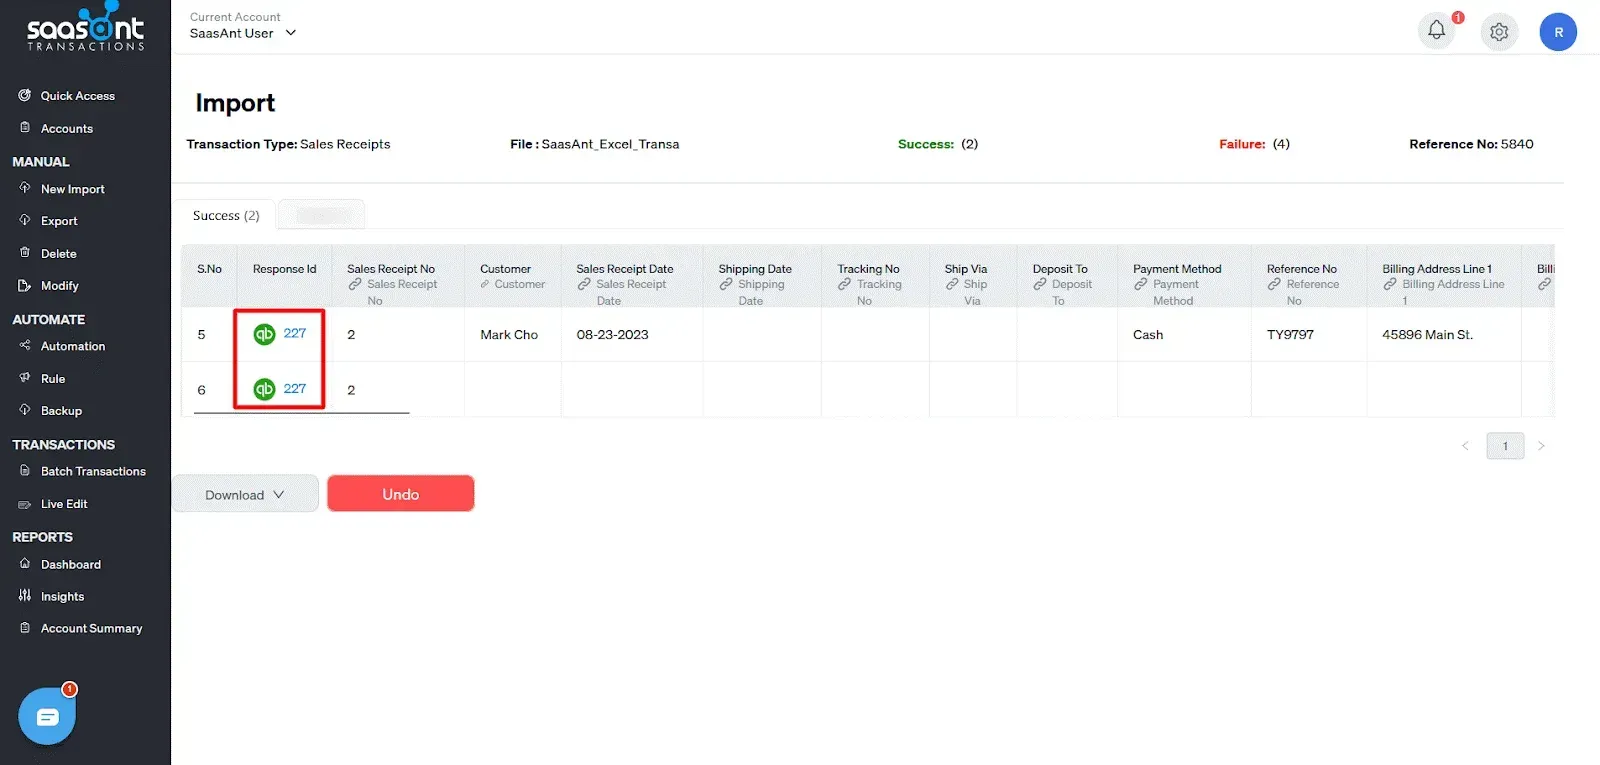
Step 8: Undo or Rollback Changes (if required)
If you believe the sales receipts were imported incorrectly, or if the imported receipts are no longer required, no need to worry. Our undo feature allows you to easily reverse the sales receipt import process, ensuring that your QuickBooks account returns to its previous state before the import. Click the ‘Undo’ button next to the ‘Download’ button to start reversing the changes made during the import.
Bulk importing sales receipts into QuickBooks Online with SaasAnt Transactions simplifies your financial management, saving you time and reducing manual errors. By allowing you to map data fields seamlessly, you ensure accurate records and smoother operations. The platform's support for various file formats and automated imports means you can focus more on growing your business and less on administrative tasks. With a 4.9-star rating from over 4000 users, the application has helped reduce errors, save time, and manage sales receipts seamlessly in QuickBooks.
Conclusion
By following the step-by-step instructions outlined in this guide, you can ensure that each receipt is correctly entered and documented. Implementing best practices such as using bulk import applications, verifying details, and setting up recurring transactions will simplify your workflow and maintain clear records. With these practices in place, you'll be better equipped to manage your sales and keep your accounting processes running smoothly. Also, it's better to opt for bulk import with SaasAnt Transactions, and you can get started with it right away since the 30-day free trial doesn’t require any credit card details.
FAQ
How to Create a Sales Receipt in QuickBooks?
Go to QuickBooks Dashboard -> +New -> Sales Receipt. Enter the customer’s name and date, select undeposited funds, enter all the product details, and save the sales receipt.
Can you import sales receipts into QuickBooks online?
Yes, you can bulk import sales receipts into QuickBooks online by using SaasAnt Transactions. This application lets you import PDF, Excel, CSV, or IIF files, and you can also automate the bulk import using email, FTP/SFTP, or Zapier.
Can a sales receipt be customized in QuickBooks?
Yes, you can customize a sales receipt in QuickBooks. You can open an existing sales receipt using the edit option or create a new one. The customize option is at the bottom of the screen, letting you change the template, logo, font, and email content.
How do I make a receipt for a sale?
You can create a sales receipt using QuickBooks. Go to QuickBooks Dashboard -> +New -> Sales Receipt. Enter the customer’s name and date, select undeposited funds, enter all the product details, and save the sales receipt.
How do I edit a sales receipt in QuickBooks?
To edit sales receipts in QuickBooks online, go to QuickBooks dashboard -> sales -> all sales -> select sales receipts, and you will see the list. Click on the edit option next to the sales receipt you wish to edit.
Can I delete a sales receipt in QuickBooks?
Yes, you can delete a sales receipt in QuickBooks. Go to QuickBooks dashboard -> Sales -> All sales -> select sales receipt from the drop-down menu. The list of sales receipts will appear. Click on the more option to find the delete option.
How to Export Sales Receipts from QuickBooks?
You can export sales receipts from QuickBooks using SaasAnt Transactions. Integrate SaasAnt Transactions with QuickBooks -> select the entity as sales receipts to export -> search for sales receipts based on the created date or transaction date -> enter a date range. Select whether you want to download it in .XLSX or .CSV format.
Read also
Scan Receipts into QuickBooks - How to Guide
How to Import PDF Bank Statements into QuickBooks Online
Accounting Automation with SaasAnt Transactions: Streamline Your Financial Processes
How to Edit Multiple Transactions in QuickBooks