How to Delete a Bill in QuickBooks Online
As an accountant, bookkeeper, or small business owner, you could be dealing with hundreds of bills every day. Imagine having to delete bills in QuickBooks one by one. While QuickBooks is a powerful accounting tool, it has limitations, such as the inability to delete multiple bills at once.
In this blog, we’ll explore two methods for deleting bills: the tedious process of removing them individually in QuickBooks and the more efficient option of bulk deletion using SaasAnt Transactions. With a 4.9-star rating from over 4000 users, SaasAnt Transactions offers a user-friendly solution that simplifies the process while keeping your data secure.
Contents
How to Delete Bills in QuickBooks One by One?
How to Delete Multiple Bills in QuickBooks Online - Quick Instructions
How to Delete Multiple Bills in QuickBooks Online: Step-by-Step Guide
Conclusion
FAQ
How to Delete Bills in QuickBooks One by One?
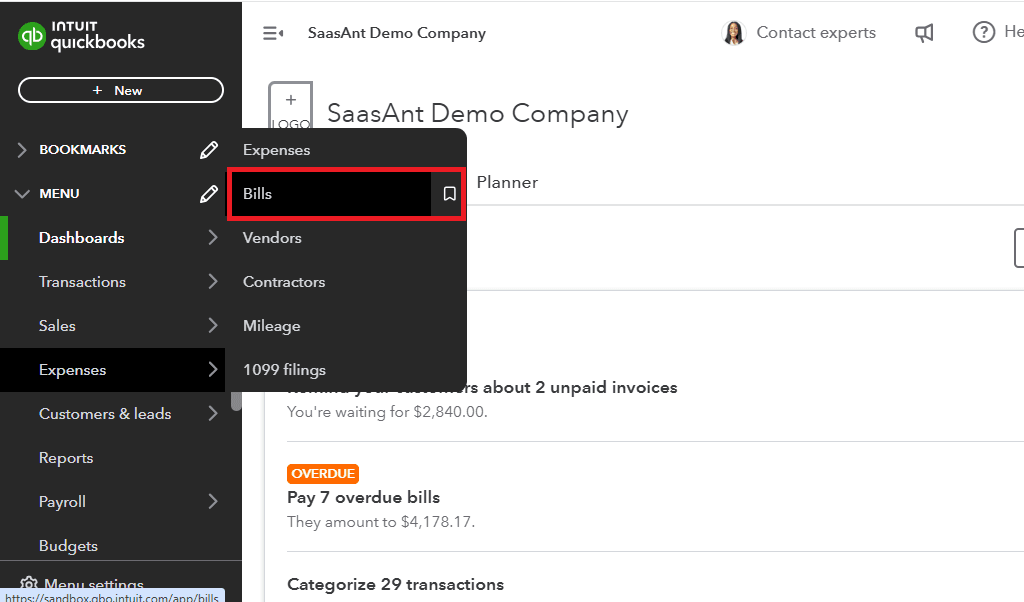
Step 1: Go to QuickBooks dashboard -> "Expenses" -> "Bills." This will display a comprehensive list of both paid and unpaid bills.
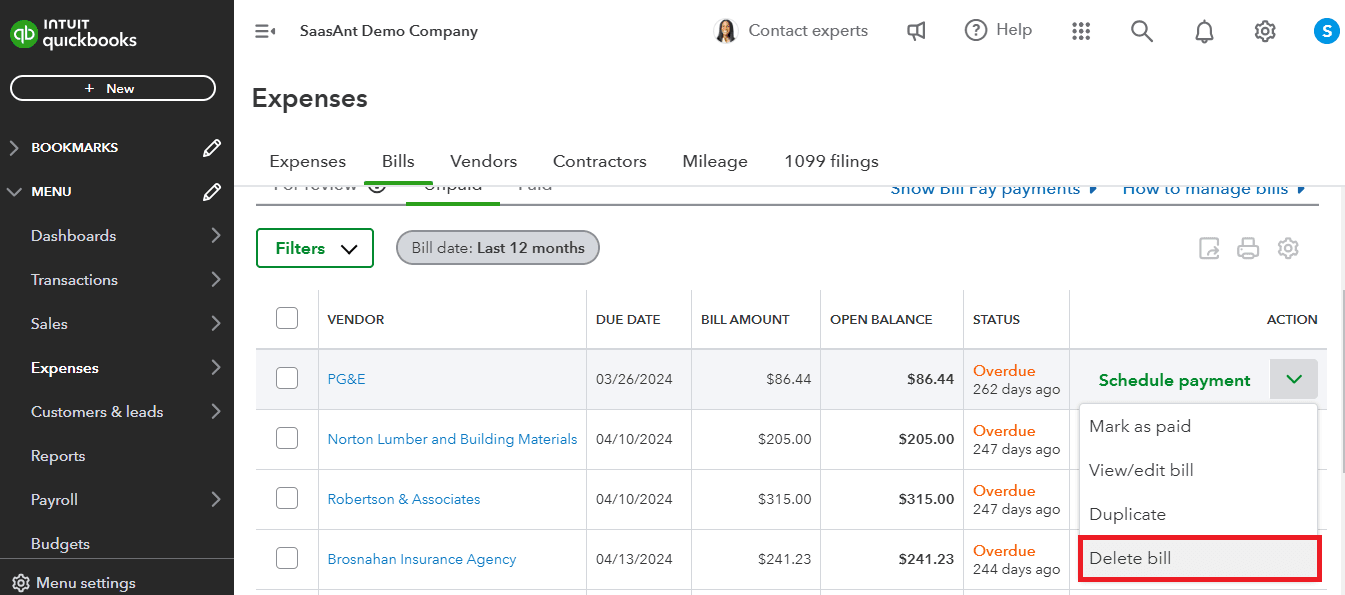
Step 2: To delete an unpaid bill, click on the dropdown arrow of "Schedule Payment" and select "Delete."
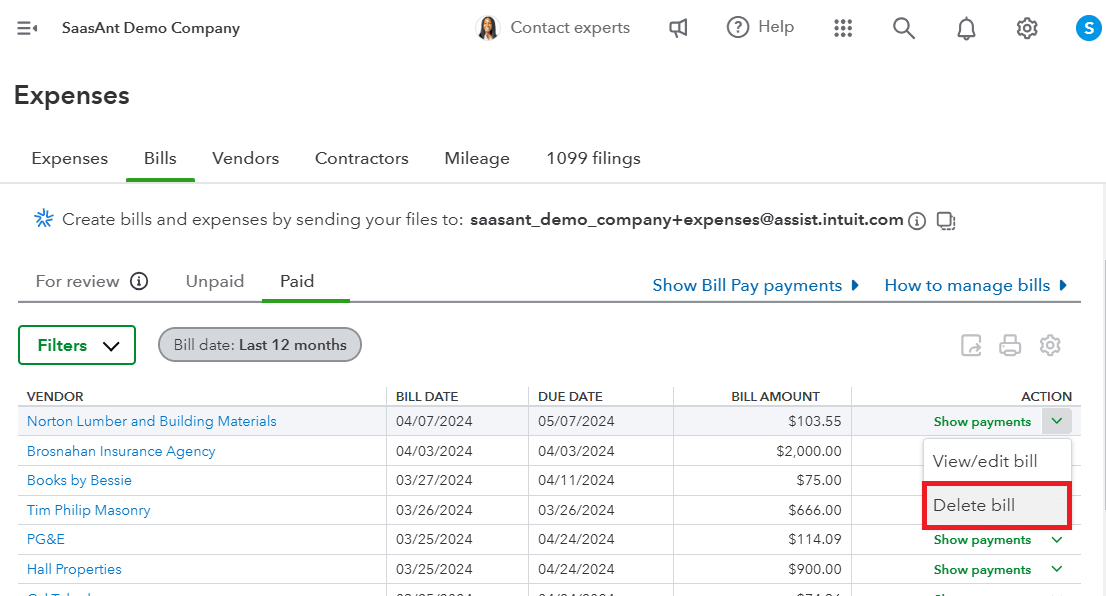
Step 3: For deleting a paid bill, click on the dropdown arrow of "Show Payments" and choose "Delete."
How to Delete Multiple Bills in QuickBooks Online - Quick Instructions
Connect SaasAnt Transactions with QuickBooks
Select the required entity as Bills
Use the advanced filter to search.
Bulk delete
How to Delete Multiple Bills in QuickBooks Online: Step-by-Step Guide
Step 1: Connect with SaasAnt Transactions
Find SaasAnt Transactions in the QuickBooks App Store and connect it to your QuickBooks account. This certified, secure app keeps your data safe and well-managed.
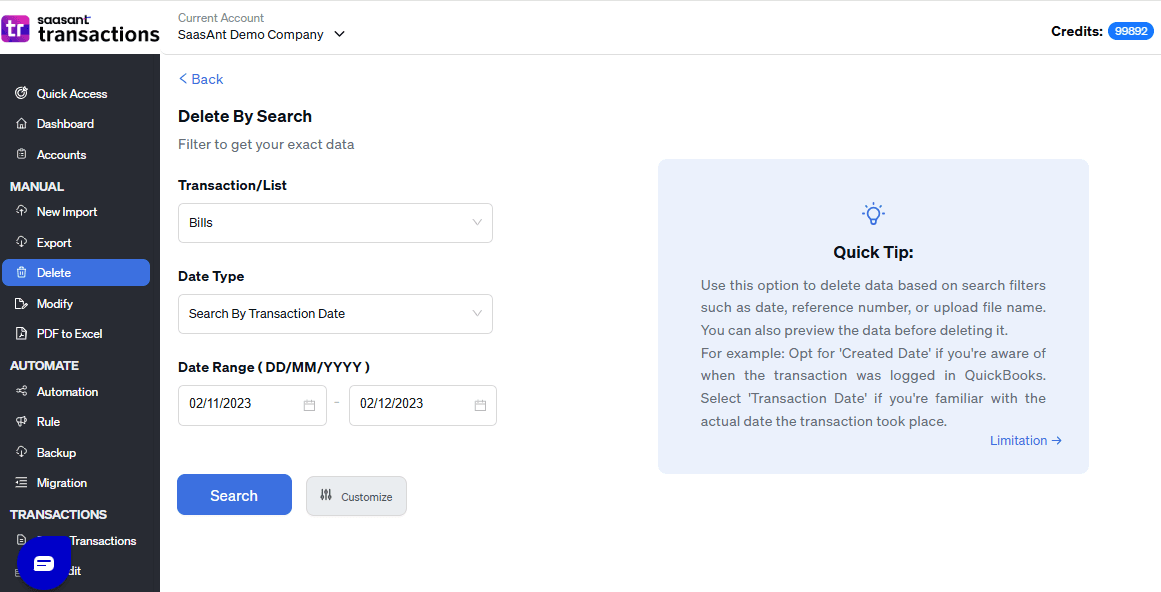
Step 2: Filter by Date
Go to SaasAnt Transactions Dashboard -> Delete.
Select Delete by Searching if you want to delete using date type and date range. Select Bills in the transaction/list dropdown box. Choose whether you want to delete based on the created date, transaction date, or last updated date, and select a date range.
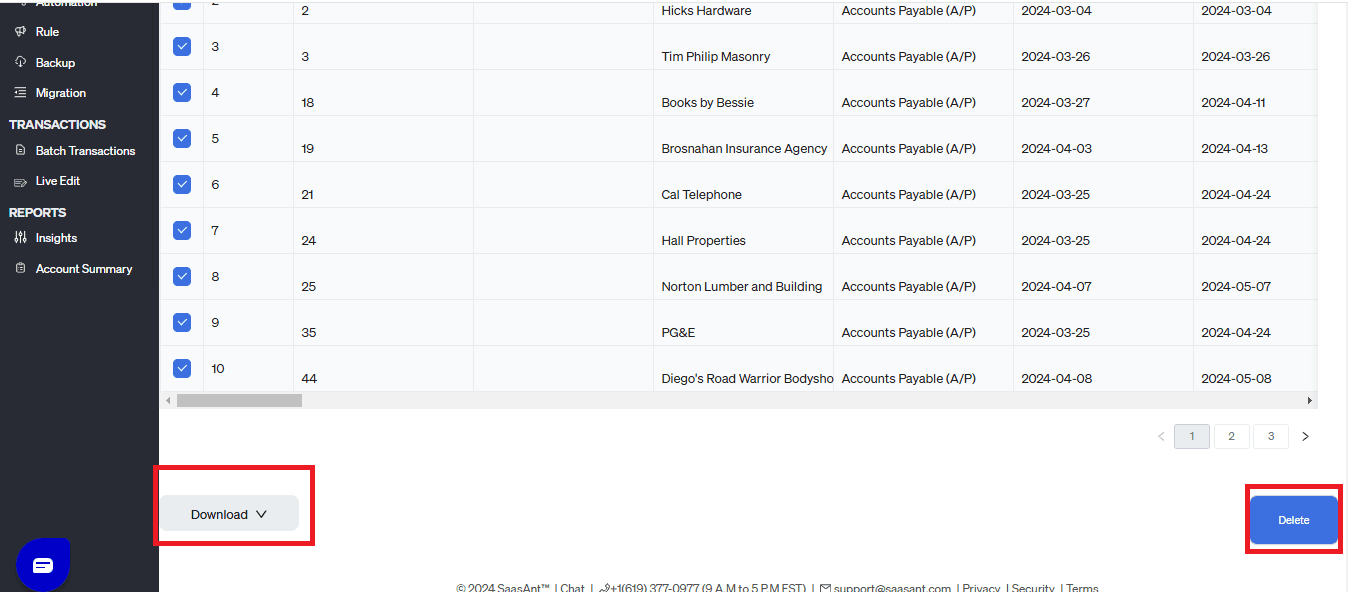
Step 3: Bulk Delete
A list of Bills for the chosen date type and range will be displayed. Click on delete. You can also uncheck the check box of a particular Bill if you wish not to delete it.
Important: Always back up your sales receipts before deleting them. You can use the export function in SaasAnt Transactions to create a backup copy.
Best Practices to Follow When Deleting Multiple Bills
Before proceeding with deletion, carefully examine each bill to confirm that its removal is necessary and will not result in discrepancies in your financial records.
Always back up your QuickBooks data prior to deleting bills to safeguard against accidental data loss. You can easily create a backup using the export feature in SaasAnt Transactions or the download feature just before deleting multiple bills in QuickBooks Online.
Ensure that the bills are not linked to other records. Understanding the implications of deletion on these linked records is essential.
When deleting bills in bulk, take extra care to avoid inadvertently removing important records. Double-check your selections to ensure accuracy.
Alternatives to Deleting Bills in QuickBooks
You can easily edit bills one at a time in QuickBooks by selecting the "View/Edit" option from the "Schedule Payment" or "Show Payment" dropdown menu. However, editing bills individually can be time-consuming and cumbersome, especially if you have a large number to update.
You can always take advantage of the export feature of SaasAnt Transaction for bulk edits and download your bills. After making the necessary changes to the downloaded file, simply use the "Modify" feature to upload the updated information back into QuickBooks. This method saves you time and ensures your records are accurate.
Conclusion
In conclusion, managing your bills in QuickBooks can be made easier with the right approach. This guide has shown you how to delete bills individually or in bulk, helping you keep your records tidy. By following best practices—like reviewing bills and backing up your data—you can maintain accuracy in your financial records. While deleting bills one by one can be tedious, using tools like SaasAnt Transactions for bulk deletions offers a more efficient alternative. You can try SaasAnt Transactions with a 30-day free trial, no credit card required, to see how it can simplify your bill management process.
FAQ
How to export multiple bills from QuickBooks?
You can export multiple bills from QuickBooks using SaasAnt Transactions. Integrate SaasAnt Transactions with QuickBooks -> select the entity as bills to export -> search for bills based on the created date or transaction date -> enter a date range or use the advanced filter. Select whether you want to download it in XLSX or CSV format.
How do I delete multiple bills in QuickBooks?
Connect SaasAnt Transactions with QuickBooks. Go to SaasAnt Transactions Dashboard -> delete -> select the required transaction entity as bills -> use date range filter or advanced filter to search -> delete.
How to bulk import bills in QuickBooks?
To bulk import bills into QuickBooks, Integrate SaasAnt Transactions with QuickBooks. Go to SaasAnt Transactions dashboard -> New Import -> Select the transaction entity as bills -> Browse and select the file (All formats supported, PDF, Images, IIF, CSV, Excel) -> Map the fields in the file to QuickBooks fields -> Upload the file to import Transactions into QuickBooks.
Can I bulk-edit bills in QuickBooks?
Yes, you can bulk edit the bills in QuickBooks by integrating SaasAnt Transactions. Go to the SaasAnt Transactions dashboard -> export -> select the entity as bills -> use the filter to search by date or reference number. A list of bills matching the filter will be displayed. Select whether you want to download the file in XLSX or CSV format. Make changes to the downloaded file and use the modify feature to upload the modified file.
How do I mass delete bills in QuickBooks?
Connect SaasAnt Transactions with QuickBooks. Go to SaasAnt Transactions Dashboard -> delete -> select the required transaction entity as bills -> use date range filter or advanced filter to search -> delete.
How to enter bills in QuickBooks?
You can enter bills into QuickBooks manually or you can integrate SaasAnt Transactions to bulk import bills into QuickBooks. Go to SaasAnt Transactions dashboard -> New Import -> Select the transaction entity as bills -> Browse and select the file -> Map the fields in the file to QuickBooks fields -> Upload the file to import bills into QuickBooks.
Read also: