How to Download Bank Statements into QuickBooks Online
You're looking for how to download bank statements into QuickBooks Online because you know that manually entering transactions is inefficient. The goal is to import your bank data accurately and quickly to simplify bookkeeping and reconciliation.
However, many users encounter challenges with QuickBooks' standard import methods, such as problems with certain file formats (like PDFs or complex CSVs), mapping errors, or the inability to undo mistakes easily.
This guide will provide simple steps for downloading or importing bank statements into QuickBooks Online.
Download Bank Statements into QuickBooks
We will use SaasAnt Transactions (available from the QuickBooks App Store) to provide a more flexible, reliable, and forgiving import process, especially if you face issues with other methods or deal with PDF statements or large files.
Step 1: Connect the App to QuickBooks
First, find 'SaasAnt Transactions' in the QuickBooks App Store (usually via the 'Apps' tab in QBO).
Install the app and follow the prompts to securely authorize and link it to your QuickBooks Online company file.
Log in to the SaasAnt Transactions web application.
Step 2: Select QuickBooks Transaction Type
Before uploading, you'll need to tell SaasAnt what kind of data you are importing.
Choose the relevant QuickBooks transaction type from the list provided, such as 'Bank Statement', 'Check', 'Deposit', or 'Credit Card Charge'. For general bank statements containing both inflows and outflows, 'Bank Statement' is often appropriate.
Step 3: Prepare and Upload Your Bank File
In SaasAnt, navigate to the 'Import' or 'New Import' section.
Click the upload button or area.
Select the bank transaction file from your computer. SaasAnt supports various formats, including Excel (XLS, XLSX), Comma Separated Values (CSV), IIF files, and crucially, PDF bank statements and Images. This PDF capability is a major advantage if your bank only provides statements in that format.
Step 4: Map File Columns to QuickBooks Fields
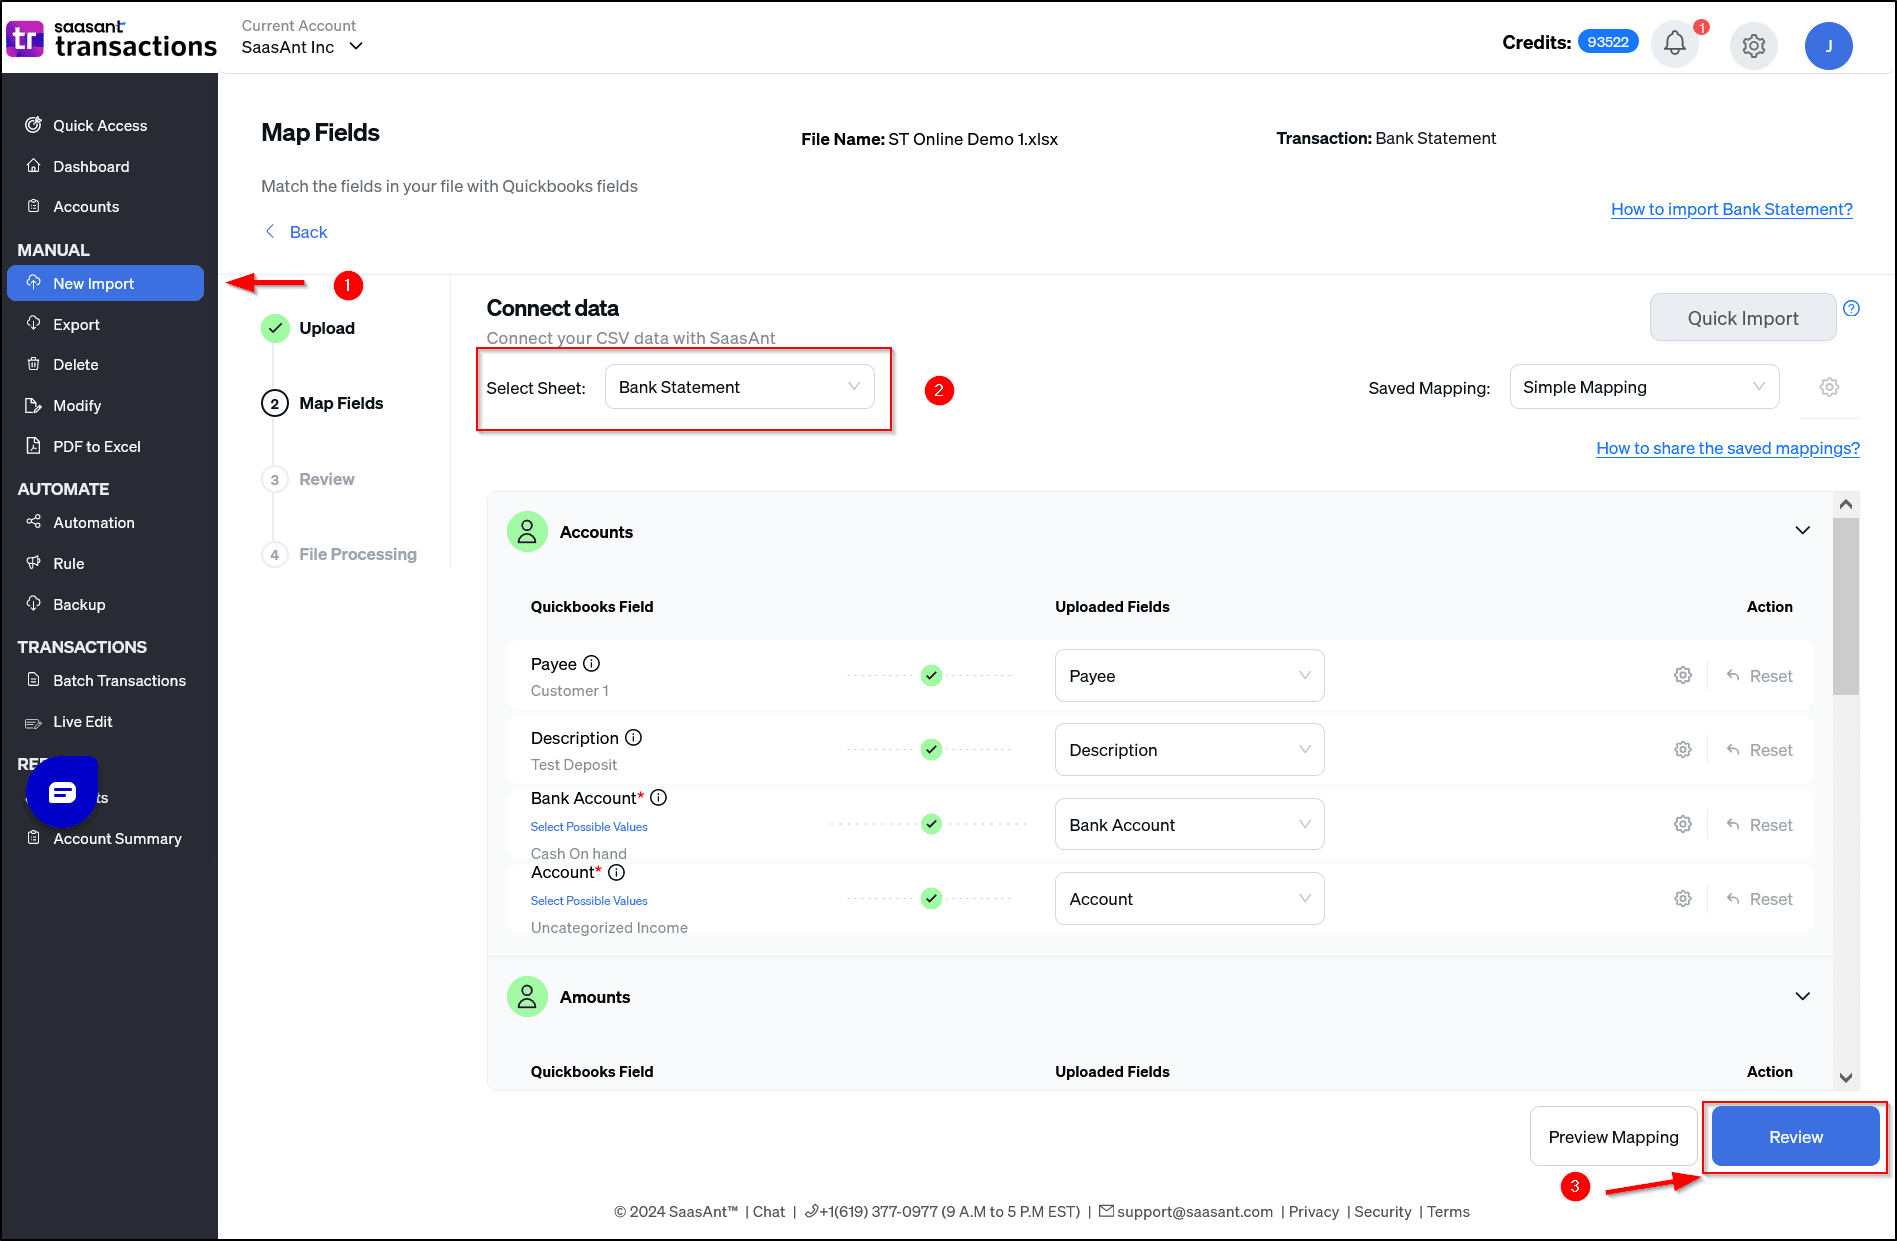
This is where you match the data from your file to the fields inside QuickBooks. SaasAnt displays columns from your uploaded file (like 'Date', 'Description', 'Amount Debited', 'Amount Credited') alongside corresponding QuickBooks fields.
Select the correct QuickBooks field for each relevant column in your file. SaasAnt often provides intelligent suggestions and makes mapping more flexible than the native QBO CSV importer, especially for unusual date formats or combined debit/credit columns.
You can typically save your mapping settings for specific bank file layouts, saving significant time on future imports.
During mapping, match your file columns (Date, Description, Amount, Check No) to the corresponding QuickBooks fields. Crucially, if you added 'Account', 'Payee', or 'Transaction Type' columns to your file, map these as well. This tells the app exactly how to categorize the transactions during the import. Remember, you can save mappings for future use.
Step 5: Preview, Validate, and Edit Data

Before the final import, SaasAnt shows your data in a preview grid exactly how it will be imported based on your mapping.
Carefully review this preview. Check dates, amounts, and descriptions for accuracy.
A key benefit here is that SaasAnt often allows you to edit data directly within this grid. You can fix typos, standardize payee names, or correct errors before they enter QuickBooks.
Step 6: Import Transactions into QuickBooks
Execute the import. Based on your mapping:
If you did not map specific 'Account' and 'Payee' details, the app uses the Amount column (Positive = Deposit, Negative = Expense/Check) to determine the type, and transactions will typically land in QuickBooks' 'For Review' tab under Banking, ready for you to categorize manually.
If you did map 'Account' and 'Payee' columns (and optionally 'Transaction Type'), the app will attempt to create fully categorized transactions (like Deposits, Expenses, or Checks) directly in the relevant QuickBooks registers, potentially bypassing the 'For Review' step for many items and saving significant time..
Step 7: Review Import Results and Handle Errors
After the import attempt, SaasAnt provides a detailed report.
This report clearly shows how many transactions were successfully imported and highlights any that failed.
For failed transactions, the report usually provides specific error messages and guidance on what needs to be fixed in your source file or mapping, making troubleshooting much easier.
Step 8: Undo Import If Necessary
Made a mistake? Imported the wrong file, selected the wrong date range, or realised a mapping error after importing? SaasAnt includes a vital 'Undo' or 'Rollback' feature.
Simply navigate to your import history within SaasAnt, find the specific import batch, and click 'Undo'. SaasAnt will safely remove the transactions it just imported into QuickBooks, providing a crucial safety net and preventing hours of manual deletion.
Alternative Method 1: QuickBooks Native Bank Feeds (Direct Connection)
This is QuickBooks' built-in automated method. It can be convenient if your bank connects reliably.
How it works: Links QBO directly to your online banking to download transactions automatically. Access via Banking > Link Account.
Potential Issues: Connection errors, limited bank support/history, duplicates, syncing delays can occur.
Alternative Method 2: QuickBooks Native Manual File Upload
QuickBooks allows manual uploads, primarily useful if bank feeds fail and you don't use a tool like SaasAnt.
How it works: Download a file (QBO, QFX, OFX, or CSV) from your bank. Upload via Banking > ▼ next to Link account > Upload from file. Map fields carefully, especially for CSV.
Potential Issues: QBO is strict about CSV formatting, mapping can be difficult, no support for importing transaction data from PDF files, and no easy 'Undo' for incorrect imports.
Final Step (All Methods): Review Transactions in QuickBooks
No matter how you import, transactions land in the For Review tab under Banking. You must process them:
Match: Link to existing entries.
Add: Add as new entries (categorizing income/expense).
Exclude: Remove duplicates/irrelevant items.
Conclusion
Importing bank transactions is essential for efficient bookkeeping in QuickBooks Online. While native Bank Feeds and Manual Upload options exist, they come with potential challenges that users frequently search for solutions to. Using a specialized tool like SaasAnt Transactions provides a more robust and flexible approach, effectively handling difficult CSV files, enabling direct import from PDF statements, and offering a critical 'Undo' feature for peace of mind. Consider your bank's file formats and the volume of your transactions to choose the method that best ensures your data gets into QuickBooks accurately and with minimal hassle.
How can I efficiently import bank transactions into QuickBooks Online?
While QuickBooks offers import options, the most efficient and flexible way, especially when dealing with various file types or large volumes, is often through a specialized application like SaasAnt Transactions. It streamlines the process by allowing uploads from multiple formats, including complex CSVs and even PDFs. It features advanced mapping, data preview with editing capabilities, and robust error handling, ensuring your bank transactions get into QuickBooks accurately and quickly with minimal manual effort.
What file format is best for uploading bank statements to QuickBooks Online?
QuickBooks natively prefers QBO, QFX, or OFX files. However, banks don't always provide these formats. While CSV is an option, it often requires careful formatting. SaasAnt significantly broadens your options, easily handling standard Excel (XLS, XLSX) and CSV files, IIF files, and crucially, allowing direct import of transaction data from PDF bank statements. This flexibility ensures you can import your data regardless of the format your bank provides.
Can I upload a PDF bank statement directly into QuickBooks Online for transactions?
Yes, absolutely. SaasAnt is specifically designed to solve this common challenge. You can directly upload your PDF bank statement file through the app. It intelligently extracts the transaction data (dates, descriptions, amounts) from the PDF layout, allowing you to then map this data and import it seamlessly into your QuickBooks Online account, saving you from tedious manual transcription.
How do I upload bank transactions from a file into QuickBooks Online?
Using SaasAnt simplifies this process significantly. Connect the app to QuickBooks, navigate to the import section, and upload your bank file (PDF, Excel, CSV, etc.). For faster processing, you can optionally add columns for 'Account' and 'Payee' to your Excel/CSV file beforehand. Then, use the intuitive mapping interface to match your file columns (like Date, Description, Amount, and optionally Account/Payee/Transaction Type) to the QuickBooks fields. After reviewing the data in the preview screen (where you can even make edits), initiate the import to send the transactions directly to your designated QuickBooks account.
How can I fix errors when importing a CSV bank file into QuickBooks?
CSV import errors are often due to formatting inconsistencies or mapping difficulties. SaasAnt helps prevent and fix these issues effectively. Its flexible mapping handles various date formats and column layouts common in bank CSVs. The crucial preview step lets you visually inspect and even edit data before importing, catching potential errors early. If any transactions fail during import, the detailed error reports provide clear explanations and guidance, making it much easier to troubleshoot and correct your file or mapping compared to basic import methods.
Is there a way to import bank transactions from a PDF into QuickBooks?
Yes, definitely. If your bank only provides statements in PDF format, SaasAnt offers a direct and efficient solution. Simply upload the PDF file containing your transactions into the application. It extracts the necessary data, allowing you to proceed with mapping and importing into QuickBooks Online without needing to manually re-type everything.
How do I categorize downloaded bank transactions in QuickBooks Online?
SaasAnt offers flexibility here. You can prepare your import file (Excel/CSV) by adding columns for the specific QuickBooks 'Account' (Income/Expense) and 'Payee' (Customer/Vendor) for each transaction. When you map these columns during import using the app, the transactions can be created directly as categorized entries (Deposits, Expenses, Checks) in QuickBooks. Alternatively, if you import without mapping these details, the transactions will land in the 'For Review' section within QuickBooks Online's Banking tab, where you can then use QuickBooks' standard tools to match or add and categorize them manually.
Can I undo a bank statement import in QuickBooks Online?
Yes, a key safety feature of SaasAnt is the ability to easily undo or rollback an entire import. If you accidentally import the wrong date range, use incorrect mapping, or simply change your mind, you can navigate to your import history within the app and select the specific batch to undo. SaasAnt will then safely remove those imported transactions from your QuickBooks Online file, preventing time-consuming manual deletions and keeping your books accurate.
How does SaasAnt determine if an imported transaction is a Deposit or an Expense/Check?
By default, SaasAnt intelligently determines the transaction type based on the amount in your import file. If the transaction amount is POSITIVE, it's treated as a Deposit. If the amount is NEGATIVE, it's treated as an Expense or Check. For more control, you can optionally add a 'Transaction Type' column to your Excel/CSV file and explicitly enter 'Deposit', 'Expense', or 'Check' for each row to override this automatic detection.
Read also
How to Import PDF Bank Statements into QuickBooks Online
How to Import Bank Transactions into QuickBooks Online?
How to convert PDF to CSV Files for Accounting
How to Upload Bank Statements to QuickBooks Online: A Comprehensive Guide