How to Export Checks from QuickBooks Online
 In today's digital age, managing your finances is crucial for maintaining the health of your business. QuickBooks Online, a leading accounting software, provides many features to streamline financial operations. One such feature is the ability to export checks, significantly simplifying your bookkeeping and reporting processes. This guide will walk you through the steps to export checks from QuickBooks Online, ensuring you can fully leverage this functionality.
Contents
How to Export Checks from QuickBooks Online: Step-by-Step Guide
Why Export Checks from QuickBooks Online?
Tips for Efficient Check Exporting in QuickBooks Online
Wrap Up
FAQs
How to Export Checks from QuickBooks Online: Step-by-Step Guide
Step 1: Launch SaasAnt Transactions
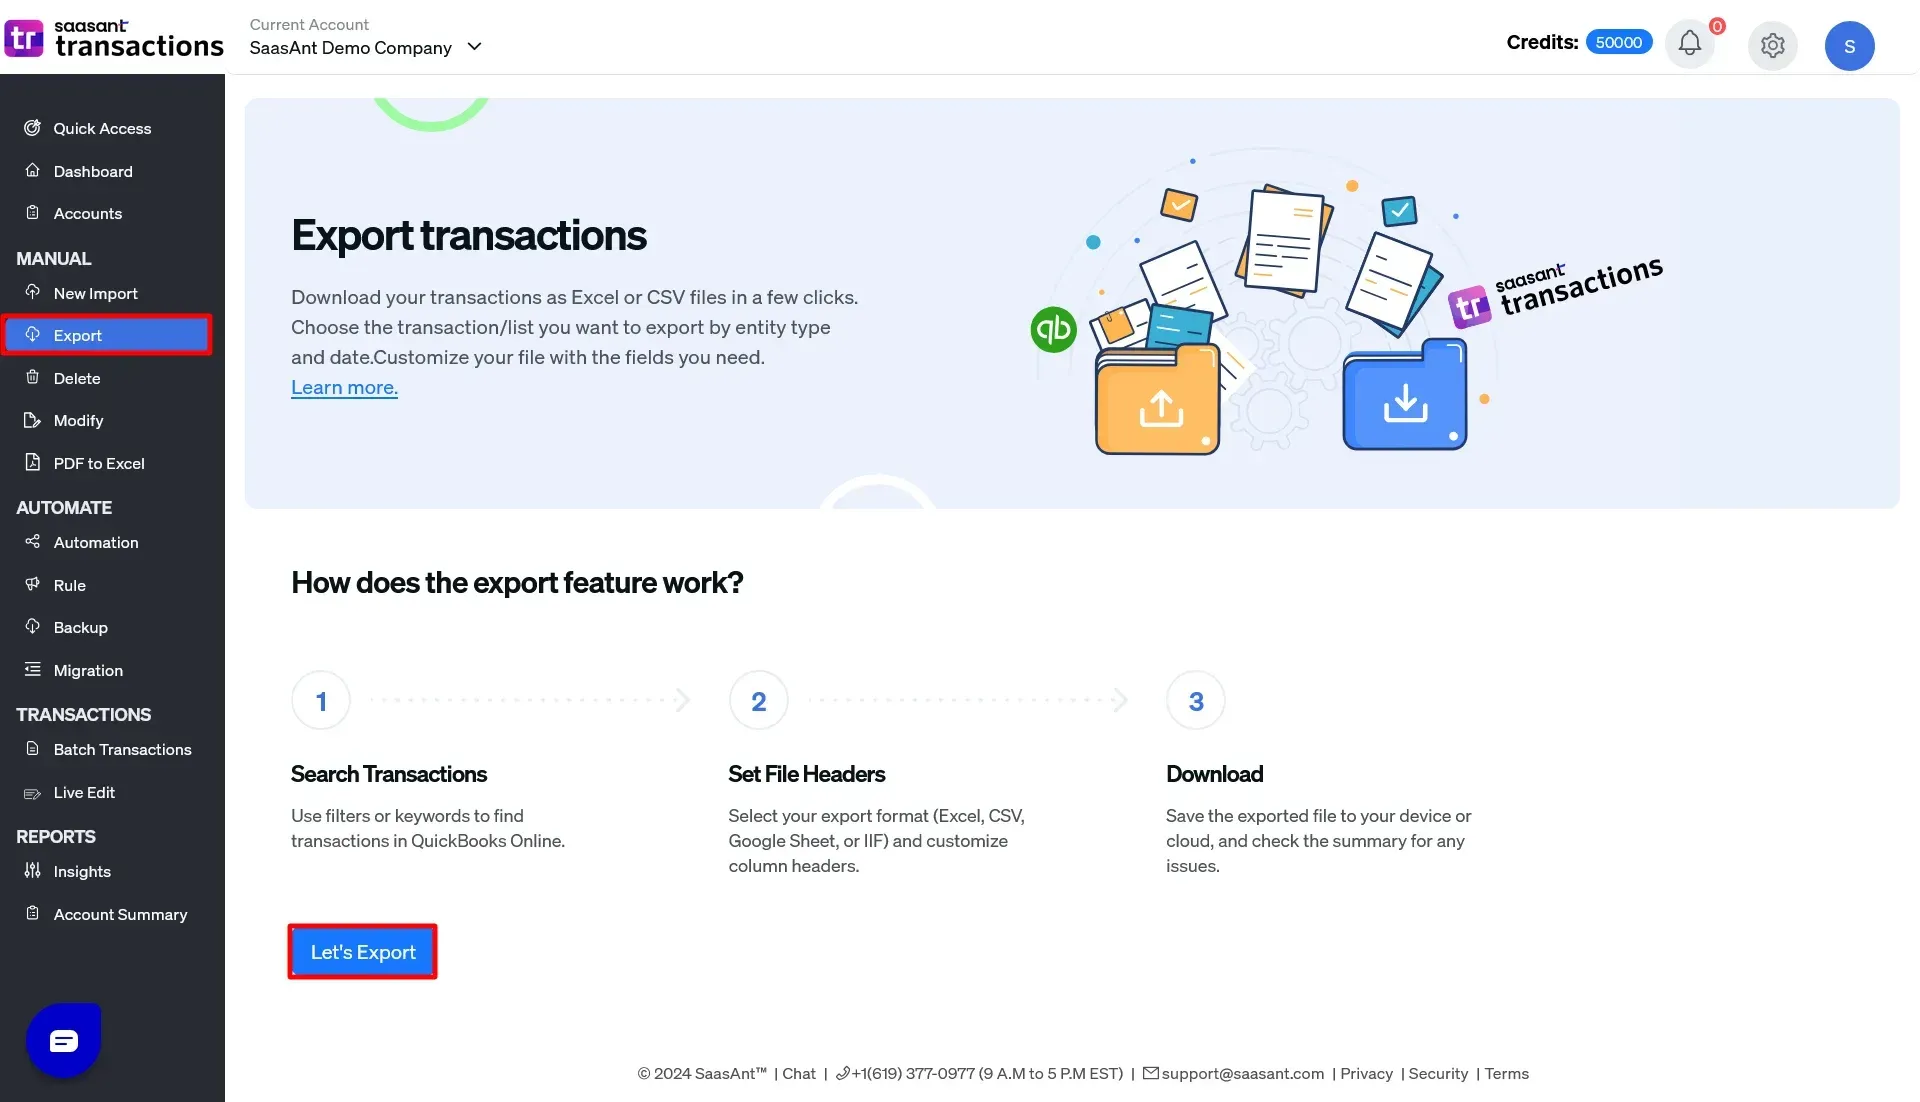
Begin by opening SaasAnt Transactions on your computer. Ensure it is connected to your QuickBooks Online account. Then, navigate to the ‘Export’ option to export your checks.
Step 2: Initiate the Export Process
Click the ‘Let’s Export’ button to commence the export procedure.

Step 3: Choose Transaction Type
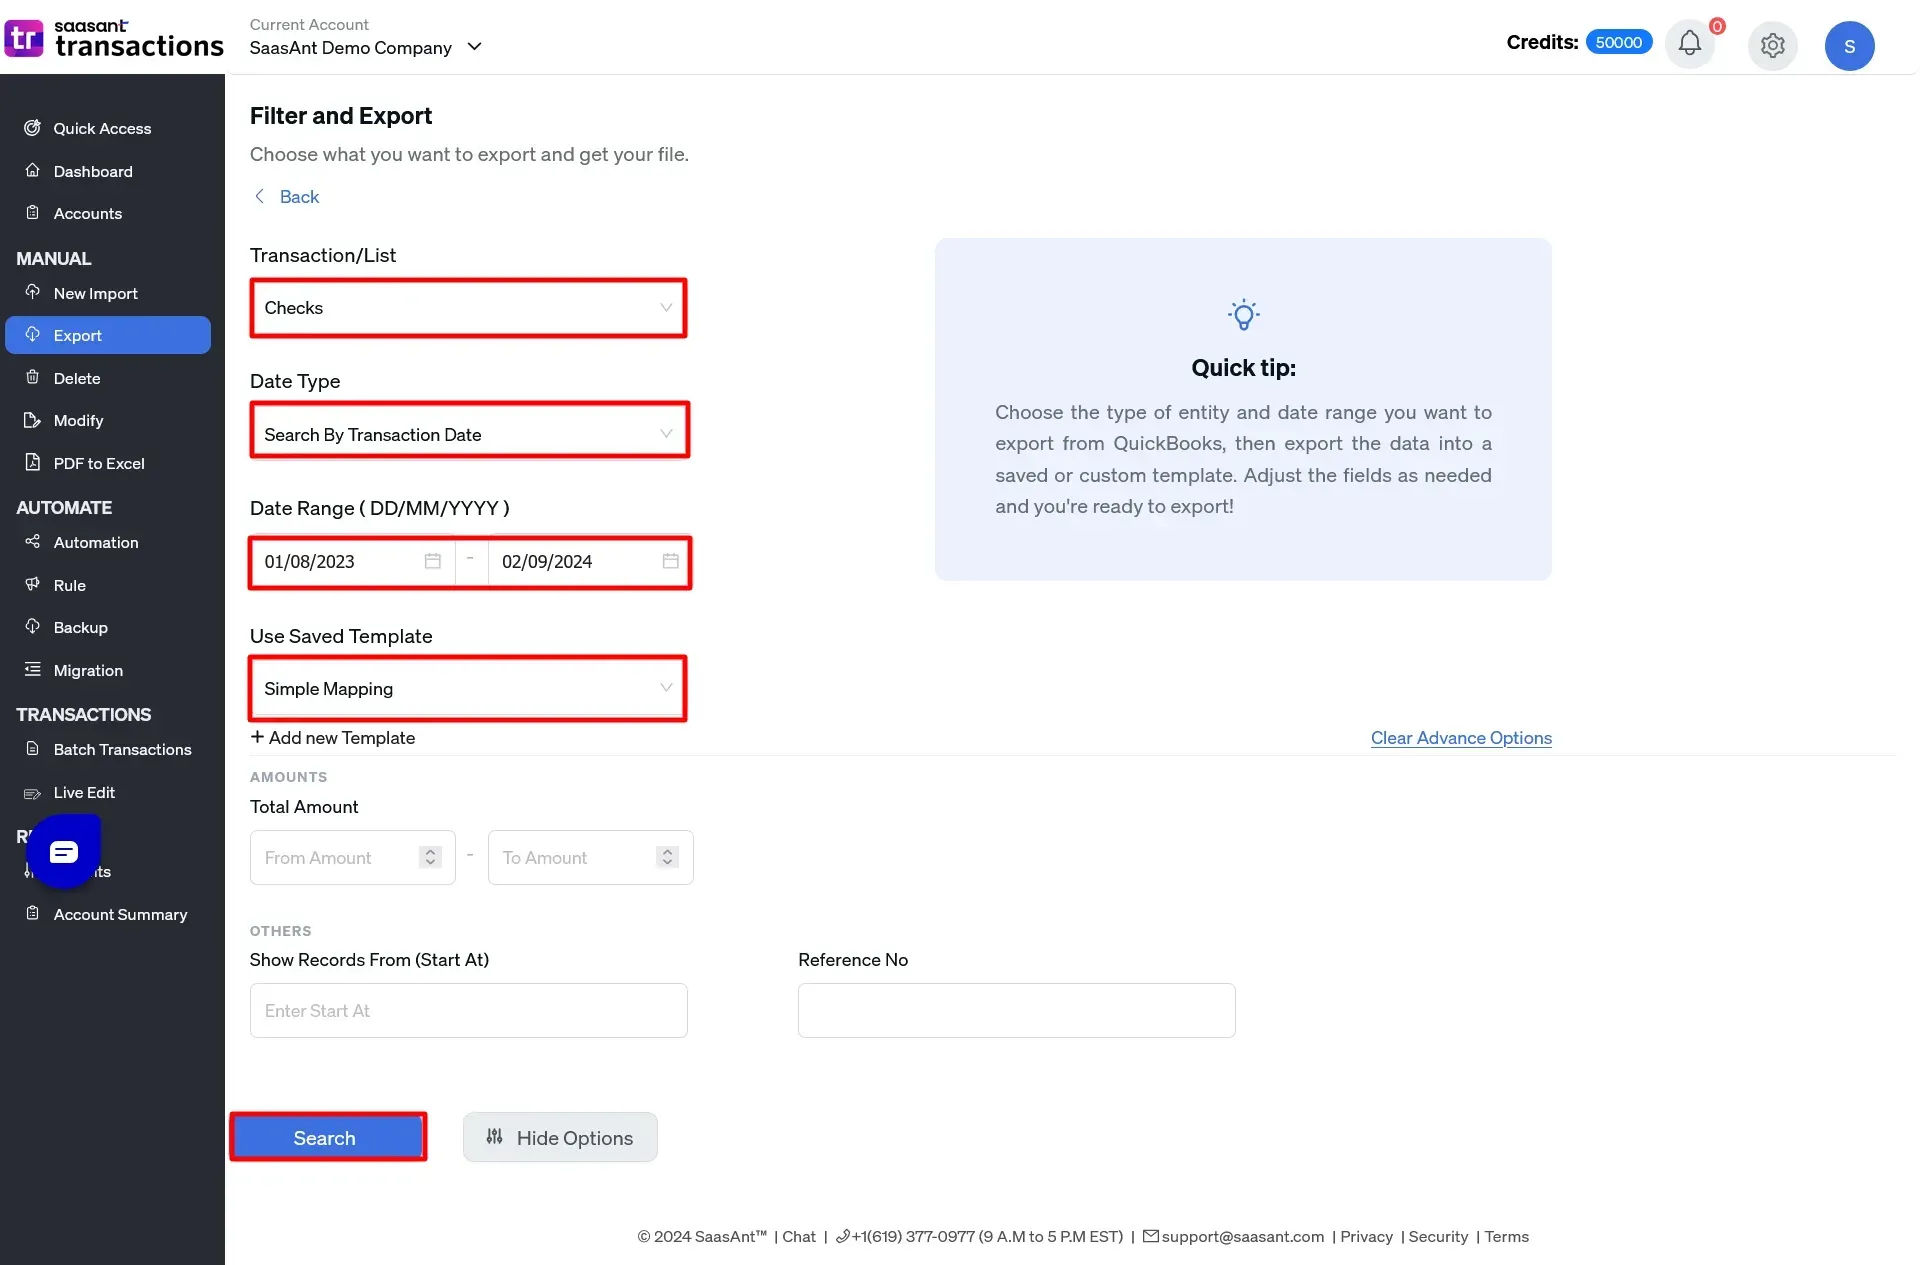
From the available options, select ‘Checks’ as the transaction type you wish to export.
Step 4: Specify Date Type
Select your preferred date type from the dropdown menu. You can choose from:
‘Search by Created Date’
‘Search by Transaction Type’
‘Search by Last Updated Date’
Step 5: Define the Date Range
Use the calendar box to set your desired date range. Choose the start and end dates for the checks you wish to export.
Step 6: Select the Template
You can opt for the 'Simple Mapping' template or upload your custom template. To add a new template, click ‘+Add new template’ and follow the instructions to upload your file.
Step 7: Execute the Search
After entering all necessary details, click the ‘Search’ button to begin the export process.

Step 8: Download the Exported Data
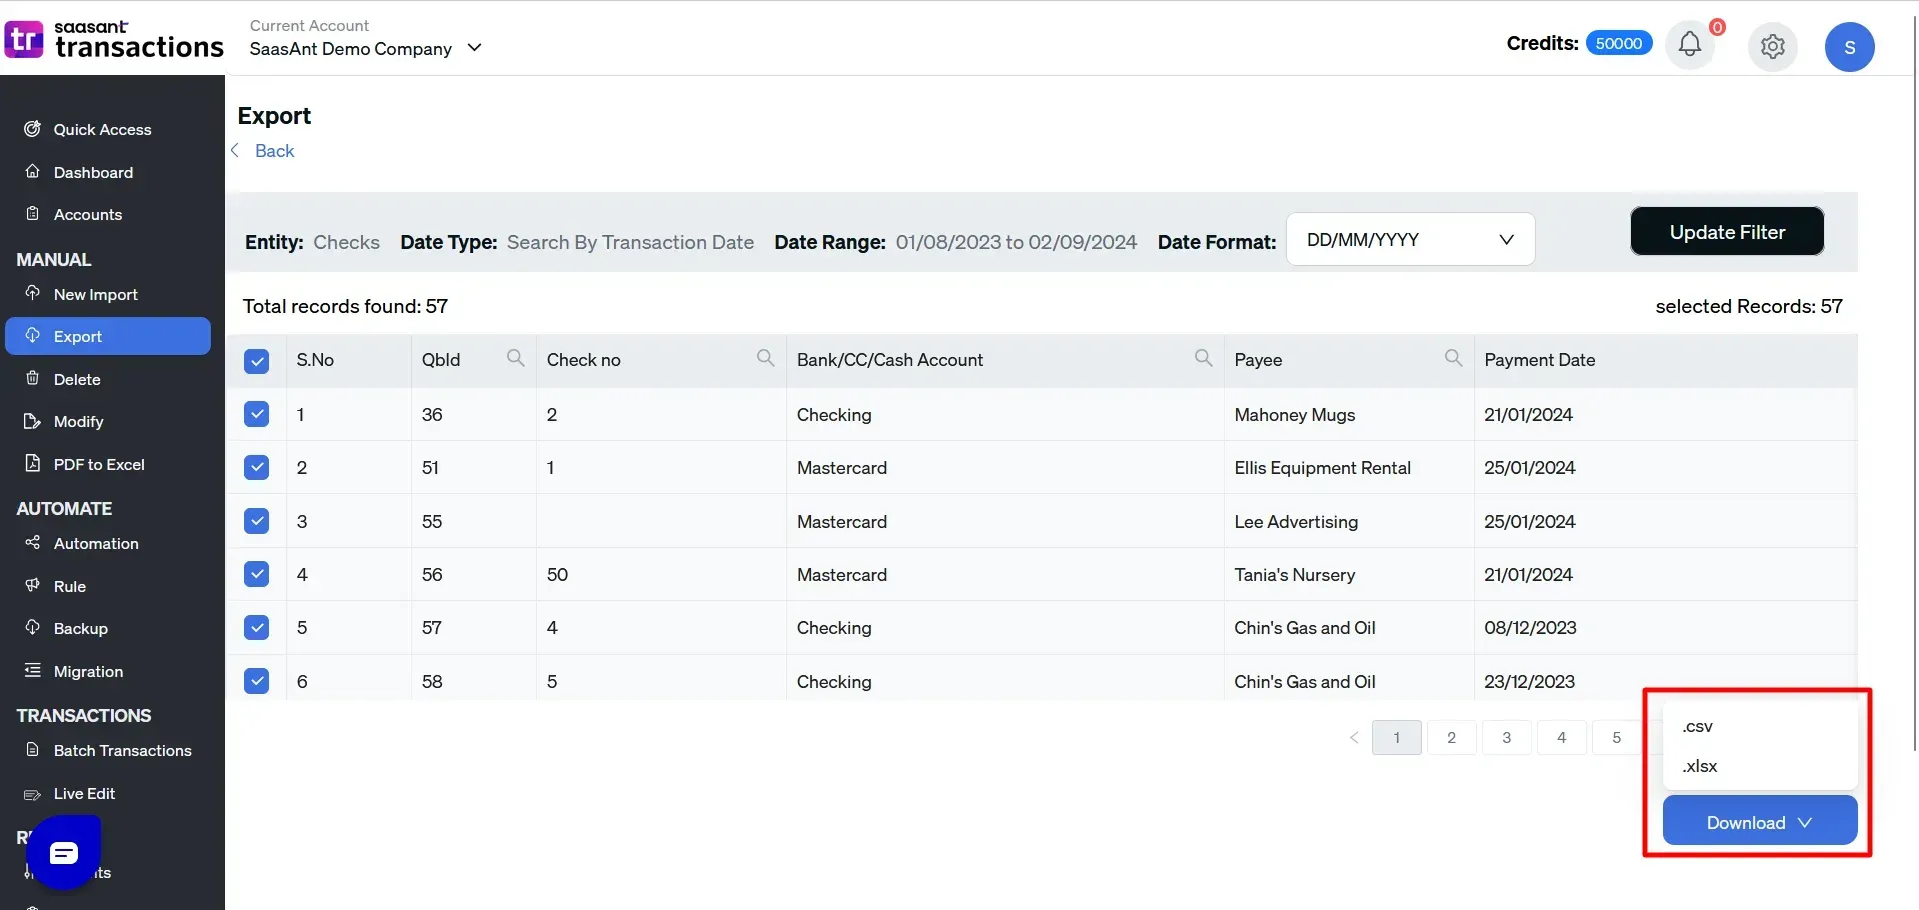
Once the search is complete, download the exported checks in CSV format. Click on the ‘Download’ button at the bottom right corner of the screen to save the file to your computer.

Why Export Checks from QuickBooks Online?
Exporting checks from QuickBooks Online is a convenient feature and a crucial component of effective financial management. Here’s a closer look at the significant advantages of exporting checks and how it can enhance your business operations:
1. Streamlined Record-Keeping
Efficient Transaction Management: Exporting checks from QuickBooks Online allows you to maintain a comprehensive and organized record of all your transactions. This streamlined approach to record-keeping ensures that every check payment is accurately documented and readily accessible.
Improved Bank Reconciliation: With exported check data, reconciling your bank accounts becomes more straightforward. You can easily match the checks in QuickBooks with your bank statements, reducing discrepancies and ensuring that your financial records are precise and up-to-date.
Enhanced Expense Tracking: By keeping a detailed log of all check payments, you gain better control over your expenses. This organized record lets you track spending patterns, identify cost-saving opportunities, and manage your cash flow more effectively.
2. Enhanced Reporting
Detailed Financial Insights: Exported checks can be leveraged to create detailed financial reports that provide valuable insights into your business’s cash flow. These reports can include information on expenditures, payment frequencies, and vendor transactions, helping you to understand your financial position more clearly.
Customizable Reports: QuickBooks Online offers customization options for your exported reports, allowing you to tailor the data to meet specific reporting needs. Whether you need to generate expense summaries, analyze spending trends, or prepare financial statements, having access to detailed check data enhances your reporting capabilities.
Informed Decision-Making: Comprehensive reports from exported check data can help you make more informed financial decisions. These insights help in budgeting, forecasting, and strategic planning, ultimately contributing to better financial management and business growth.
3. Simplified Tax Preparation
Organized Tax Records: An organized record of all check payments simplifies the tax preparation process. By having a clear and accessible record of your checks, you can more easily compile the necessary information for tax filings, reducing the time and effort required during tax season.
Accurate Reporting to Tax Authorities: Exported check data ensures that your financial reports are correct and complete. This accuracy is crucial for complying with tax regulations and avoiding potential issues with tax authorities. Detailed records help verify expenses and ensure all deductions are accounted for correctly.
Efficient Audit Preparation: If your business undergoes an audit, having a well-organized record of check transactions can make the process smoother and less stressful. Auditors can review the exported check data to verify transactions, providing a clear and transparent record of your financial activities.
Exporting checks from QuickBooks Online is a strategic practice that supports effective financial management. By streamlining record-keeping, enhancing reporting capabilities, and simplifying tax preparation, exporting checks helps you maintain accurate financial records, make informed decisions, and prepare for tax season with confidence. Embrace the benefits of exporting checks to optimize your accounting processes and drive better financial outcomes for your business.
Tips for Efficient Check Exporting in QuickBooks Online
Exporting checks from QuickBooks Online is crucial for maintaining accurate financial records. To maximize the benefits of this feature and ensure a smooth accounting process, follow these best practices:
1. Regular Exports
Consistency in Record-Keeping: To keep your financial records accurate and up-to-date, you must export your checks regularly. Regularly exporting check data ensures that your records reflect current transactions, facilitating easier reconciliation and financial analysis.
Simplified Reporting: Exporting checks consistently helps in simplifying end-of-month and end-of-year reporting. Maintaining up-to-date records allows you to generate timely financial reports and analyses without the stress of last-minute data gathering.
Timely Data Review: Regular exports also allow for periodic reviews of your financial data. This practice helps identify discrepancies or issues early, enabling timely corrections and preventing potential accounting problems.
2. Backup Your Data
Data Security: Always keep a backup of your exported files to protect against data loss. Data backups ensure you can access your check records even if unforeseen issues arise, such as system failures or accidental deletions.
Multiple Backup Locations: Consider storing backups in various locations, such as cloud storage and external hard drives. This multi-layered approach enhances data security and ensures reliable access to your records.
Regular Backup Schedule: Establish a routine for backing up your exported check files. Regular backups, aligned with your check export schedule, help maintain the integrity and availability of your financial data.
3. Use File Formats Wisely
Excel Files for Data Manipulation: Excel files are highly recommended when exporting checks for further analysis or manipulation. Excel's functionality allows for extensive data manipulation, such as sorting, filtering, and creating pivot tables, making it ideal for detailed financial analysis.
PDF Files for Reporting: PDF files are more suitable for sharing reports with stakeholders or archival purposes. PDFs preserve the formatting of your reports and are universally accessible, ensuring that the information is presented consistently across different devices and platforms.
Choosing the Right Format: Evaluate your needs before selecting a file format. Consider factors such as the data's intended use, the tools available for data analysis, and your stakeholders' preferences.
4. Verify Data Accuracy
Review Exported Data: After exporting your checks, always review the data to ensure accuracy. Verify that all transactions are correctly recorded and that the information matches your expectations.
Error Checking: Implement error-checking procedures to identify and correct any discrepancies or errors in the exported data. This practice helps maintain the reliability of your financial records and ensures accurate reporting.
5. Organize Exported Files
File Naming Conventions: Use clear and consistent naming conventions for your exported files. This practice helps you quickly locate and identify specific check records when needed.
Folder Structure: Organize your exported files into well-structured folders. Create separate folders for different periods, accounts, or types of transactions to enhance accessibility and organization.
Documentation: Maintain documentation that outlines the contents and purpose of each exported file. This additional context can be valuable for future reference and auditing purposes.
6. Automate Where Possible
Scheduled Exports: Use QuickBooks Online's automation features to schedule regular exports. Automating the export process helps ensure consistency and reduces the manual effort required.
Integration Tools: Explore integration tools that can streamline the export process. Applications like SaasAnt Transactions offer features that simplify data exports and enhance integration with QuickBooks Online.
7. Stay Updated with Software Changes
Monitor Updates: Keep abreast of any updates or changes to QuickBooks Online that may affect the export functionality. Staying informed about software updates ensures you use the latest features and best practices.
Adapt to New Features: As QuickBooks Online evolves, adapt your export practices to leverage new features and improvements. This proactive approach helps maintain efficiency and fully utilize the software’s capabilities.
Wrap Up
Exporting checks from QuickBooks Online is essential for maintaining precise financial records and optimizing accounting processes. By leveraging QuickBooks Online's powerful features and integrating applications like SaasAnt Transactions, you can streamline your check exporting tasks, enhance your reporting capabilities, and simplify tax preparation.
Regularly exporting checks facilitates accurate record-keeping, supports detailed financial reporting, and ensures organized tax preparation. This practice helps manage finances more effectively and provides valuable insights that contribute to informed decision-making and strategic planning.
Adopting best practices such as regular exports, backing up data, choosing the correct file formats, verifying data accuracy, organizing exported files, automating exports, and staying updated with software changes ensures you fully capitalize on the advantages of check exporting. These practices enhance the reliability and efficiency of your financial management processes.
Embracing these strategies will enable you to maintain accurate records, streamline your financial operations, and ensure readiness for audits and tax seasons. Integrating advanced applications like SaasAnt Transactions can further amplify these benefits, offering seamless data export features and enhanced functionality.
To further optimize your check exporting process and explore additional features, consider leveraging SaasAnt Transactions with QuickBooks Online. Take advantage of the 30-day free trial with no credit card required to experience firsthand how SaasAnt Transactions can enhance your accounting practices.
FAQs
How Do I Export Checks from QuickBooks?
Open SaasAnt Transactions on your computer and ensure it's connected to QuickBooks Online.
Click the ‘Let’s Export’ button to start exporting your checks.
Select ‘Checks’ from the transaction type options.
Choose your date type from ‘Created Date,’ ‘Transaction Type,’ or ‘Last Updated Date.’
Set your desired date range using the calendar box.
Choose the ‘Simple Mapping’ template or upload your custom template.
Click ‘Search’ to begin the export process.
Download the exported checks in CSV format by clicking the ‘Download’ button.
How Do You Delete Checks in QuickBooks?
Start by logging in to SaasAnt Transactions, ensuring the app is connected to QuickBooks.
Navigate to the ‘Delete’ option.
Click ‘Ready to Clean up?’ to initiate the process.
You can delete checks by either using advanced filters (Delete by Searching) or by reference numbers or names (Delete by Reference).
Select ‘Checks’ as the transaction type, specify the date and range, and then click ‘Search’ to retrieve the relevant checks.
Review the results, select the checks to delete, and click the ‘Delete’ button to remove them.
Before proceeding, it’s advisable to back up your data by clicking the ‘Download’ button next to ‘Delete.’
Finally, confirm that the deletion was successful by reviewing the displayed results.
How to Import Checks in QuickBooks Online?
To import checks in Quickbooks,
Log In: Access SaasAnt Transactions with your QuickBooks credentials.
Go to Import Section: Select “Import” > “Checks.”
Prepare File: Ensure your file is in CSV or Excel format with all check details. (All formats supported, PDF, Images, IIF, CSV, Excel)
Map Fields: Match your file columns to QuickBooks fields.
Validate and Import: Review for errors, fix any issues and complete the import.
How to Edit Checks in QuickBooks?
Method 1: Using Your File
Upload your file containing the checks to SaasAnt Transactions.
Map the fields, including the reference number, to match QuickBooks Online data.
Review and upload the file to apply modifications to the checks.
If needed, use the 'Undo' feature to roll back any changes made.
Method 2: Export and Modify
Export the checks from QuickBooks Online using SaasAnt Transactions.
Modify the exported file with necessary updates.
Re-upload the modified file to SaasAnt Transactions.
If required, utilize the 'Undo' feature to reverse the changes.
How to Create Checks in QuickBooks?
Log in to QuickBooks and go to the 'Banking' menu.
Select 'Write Checks' or 'New Check' depending on your version.
Enter the payee’s name in the 'Pay to the Order of' field.
Choose the bank account from which the check will be issued.
Input the check date, amount, and memo details.
Categorize the payment by selecting the appropriate account or expense category.
Review the details and click 'Save and Close' or 'Save and New' to finalize.