How to Export QuickBooks to Excel: Complete Guide
There could be any number of reasons you could be looking for QuickBooks export to Excel, starting from the need to create custom reports, sharing the financial information with team members who don’t have access to QuickBooks, backup purposes, data migration, or maybe even for bulk editing.
The trouble is the native export feature of QuickBooks doesn’t let you export every QuickBooks entity. It is constricted to exporting the general ledger, profit and loss, balance sheet, trial balance, and journal entries altogether. There is no way of exporting other entities, and there is no way of filtering the data that you want.
This is where you would need an application like SaasAnt Transactions. It is CPA recommended, has a 4.9-star rating from around 3700 users, and has advanced filter options to export. This blog will walk you through how to export QuickBooks to Excel in an easy step-by-step guide.
Contents
Export QuickBooks to Excel: Quick Instructions
How to Export QuickBooks to Excel: Step-by-Step Instructions
Export QuickBooks to Excel Today With SaasAnt Transactions
FAQ
Export QuickBooks to Excel: Quick Instructions
Connect with SaasAnt Transactions. Get started with a 30-day free trial.
Select the required entity
Search using the advanced search filter
Download
How to Export QuickBooks to Excel: Step-by-Step Instructions
Step 1: Connect with SaasAnt Transactions
Find SaasAnt Transactions in the QuickBooks App Store and connect it to your QuickBooks account. Get started with a 30-day free trial immediately. SaasAnt Transactions is a certified, secure app that keeps your data safe and well-managed.
Step 2: Entity Selection
Go to SaasAnt Transactions Dashboard -> Export. Select the required entity in the Transaction List drop-down menu.
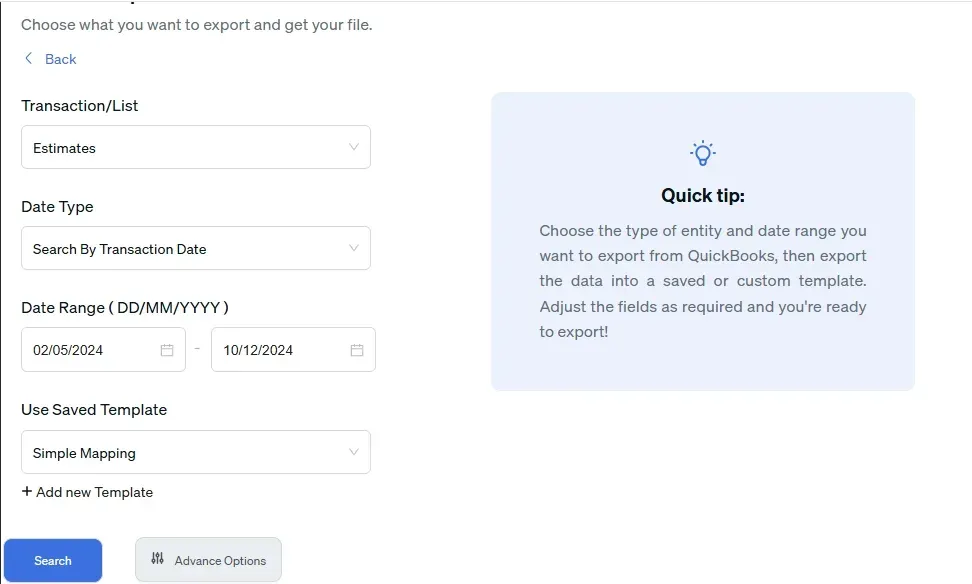
Step 3: Search Using Advanced Filter
Choose a date type: search by transaction date, search by created date, or search by last updated date. Select the date range and mapping template. You can also use advanced search filters like specific amounts and reference numbers to search.
Step 4: Select Download Format
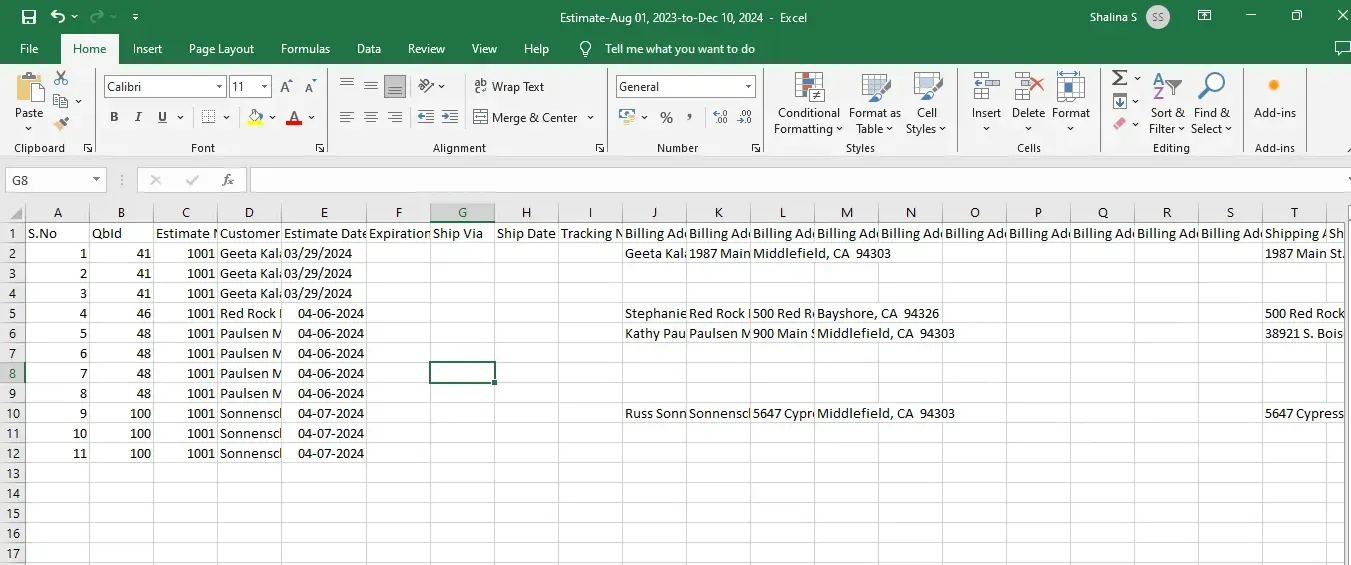
A list of transactions for the chosen date type and range will be displayed. Click on Download and select whether you want to download it in .XLSX or .CSV format.
 Step 5: View the Downloaded File
Check your downloads folder to view the downloaded file.
Benefits of Converting QuickBooks to Excel
Enhanced Data Analysis: Excel provides powerful tools for data manipulation and analysis, such as pivot tables, charts, and advanced formulas. By exporting QuickBooks data to Excel, users can perform in-depth analyses, identify trends, and generate insights that may not be readily achievable within QuickBooks.
Custom Reporting: Yes, QuickBooks offers standard reporting features, but Excel allows for greater customization. Users can create tailored reports that meet specific business needs, format them according to preferences, and include additional data or calculations unavailable in QuickBooks reports.
Improved Data Visualization: Excel's robust charting and graphing capabilities enable users to create visually appealing representations of financial data. This can help stakeholders better understand financial performance, making communicating insights and supporting decision-making easier.
Data Integration and Collaboration: Exporting data to Excel facilitates more straightforward integration with other software and systems, such as CRM tools or data analysis platforms. Additionally, Excel files can be easily shared and collaborated on among team members, allowing for collective input and review of financial data and reports.
Export QuickBooks to Excel Today With SaasAnt Transactions
SaasAnt Transactions makes it extremely easy for QuickBooks to Excel conversion with its advanced features. Just ensure you use the filters effectively for QuickBooks export to Excel.
SaasAnt Transactions also helps with bulk import, delete, and edit features for any QuickBooks entity. Get started with a risk-free 30-day free trial to check out its features and experience seamless data management that enhances your accounting efficiency and accuracy.
FAQ
What formats are available for exporting transactions from QuickBooks to Excel?
SaasAnt allows you to export data in either CSV or Excel format. Choose CSV for essential compatibility with most systems or Excel if you plan to perform more complex data analysis.
How to Import Transactions in QuickBooks?
To import transactions in QuickBooks, Integrate SaasAnt Transactions with QuickBooks. Go to SaasAnt Transactions dashboard -> New Import -> Select the required entity -> Browse and select the file -> Map the fields in the file to QuickBooks fields -> Upload the file.
How to Edit Transactions in QuickBooks?
Firstly, export transactions using SaasAnt Transactions. Go to SaasAnt Transactions Dashboard -> select the required entity to export -> search for transactions based on the created date or transaction date and download. Make changes to the downloaded file. Use the Modify feature to upload the edited file.
How to Delete Transactions in QuickBooks?
To bulk delete transactions in QuickBooks, integrate SaasAnt Transactions. Go to SaasAnt Transactions Dashboard -> Delete -> Select the required entity -> Use filter to search by date or reference number. Bulk delete the transactions that are displayed for the chosen filter.