How to Backup QuickBooks Online: Step-by-Step Guide
If you are searching for how to back up QuickBooks online, you must be a small business owner or accountant looking to maintain accurate and secure financial records. This could be due to some data security issues, sometimes slow performance, or bugs that push you to think about backing up and restoring your QuickBooks Online data.
Yes, QuickBooks Online has an inbuilt backup feature. Still, you could face technical issues like incomplete or missing backup files, sometimes slow or stalled backup processes, and backup failed error messages. You might also feel vulnerable and reluctant to trust third-party solutions. Note that the built-in backup feature isn’t available for the Simple Start, Essential, and Plus plans.
This is where you need an easy fix like SaasAnt Transactions, a certified secure app with a 4.9 rating from 4000 users in the QuickBooks app store.
This blog will walk you through how to backup using SaasAnt Transactions and how to backup QuickBooks Online the default way.
Feel free to skip to the section you want using the Table of Contents below.
Contents
Why Back Up Your QuickBooks Online Data?
How to Make a Backup of QuickBooks Online using SaasAnt Transactions?
How to Back Up QuickBooks Online? (Default Method)
Best Practices for QuickBooks Online Backups
Conclusion
FAQ
Why Back Up Your QuickBooks Online Data?
Here are some compelling reasons to prioritize regular backups of your QuickBooks Online data:
Data Loss Prevention: Accidents happen. A misplaced keystroke, a sudden power outage, or even a malicious attack can lead to accidental data deletion or corruption.
Security Breaches: Safeguard your sensitive financial information from cyber threats. Regular backups can help you recover your data in case of a security breach.
System Errors: Unexpected system failures or software glitches can compromise your data integrity. Backups provide a safety net to restore your data to a previous working state.
Human Error: Mistakes are inevitable. A backup can undo the damage and prevent significant financial repercussions, whether it's an accidental deletion or an incorrect entry.
Compliance and Auditing: Many industries have strict data retention and security regulations. Regular backups can help you meet these compliance requirements and facilitate audits.
How to Make a Backup of QuickBooks Online using SaasAnt Transactions?
You can get stated with a 30-day free trial immediately.
Step 1: Install SaasAnt Transactions
Find SaasAnt Transactions in the QuickBooks App Store and connect it to your QuickBooks account.SaasAnt Transactions is a certified, secure app that keeps your data safe and well-managed.
Step 2: Initiate the Backup Process
Go to SaasAnt Transactions Dashboard -> Backup -> Secure now.
Step 3: Define Backup Criteria
Select a Transaction/List from the dropdown menu, and select whether you want to search by transaction, created, or last updated date.
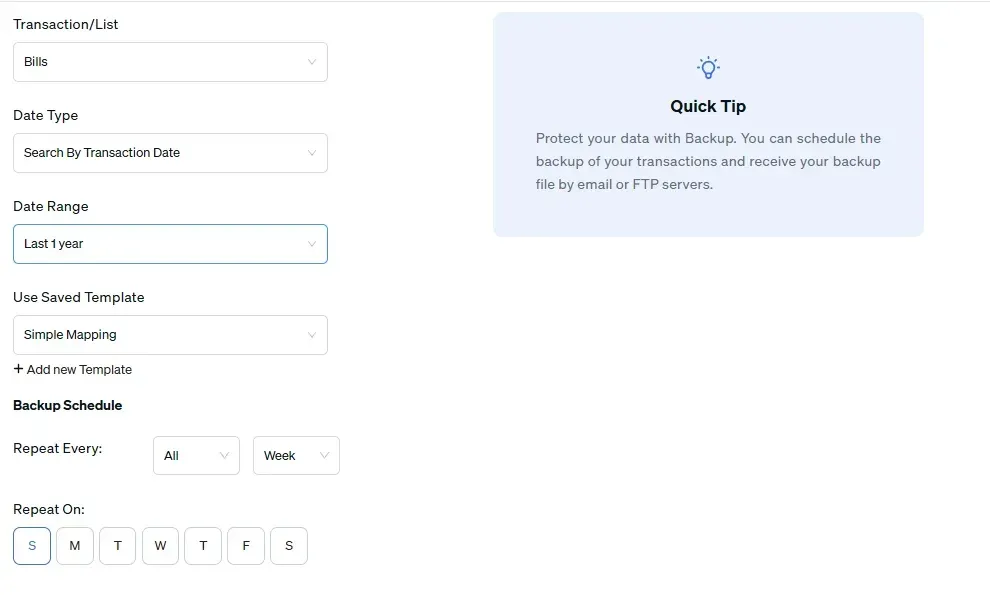
Step 4: Choose the Date Range and Template
Set the date range and choose an existing template or create a new one. A template maps QuickBooks fields to corresponding fields in the backup file, ensuring accurate data transfer.
Step 5: Schedule Backups
Set a backup schedule by selecting whether you want the backup to happen every day weekly, or monthly.
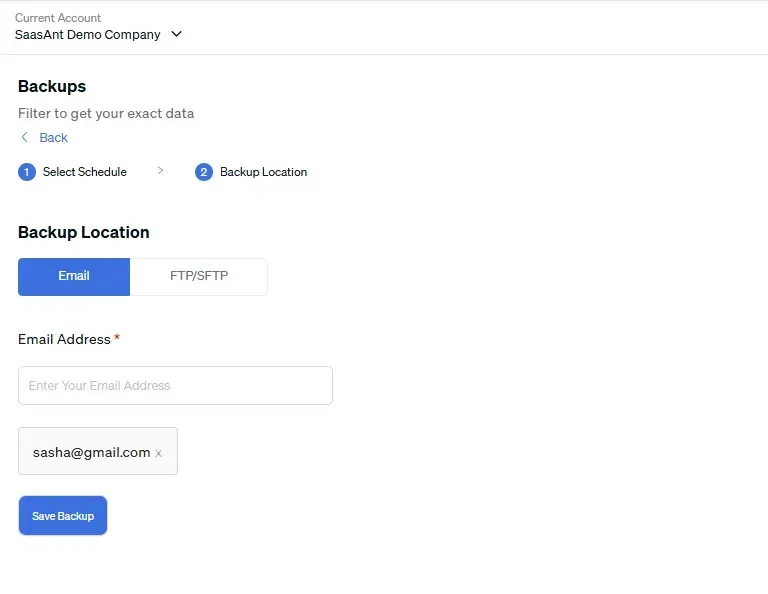
Step 6: Specify Backup Destination
Select if you want the backup location to be an Email Address or an FTP/SFTP path, and hit ‘Save Backup.’
Step 7: Access and Secure Backups
You will be taken to the All Scheduled Backups screen, where you can copy the password for the backup file. Use the ‘Create new backup’ button to create a new one.
How to Back Up QuickBooks Online? (Default Method)
Note: This feature is only available in the ‘Advanced’ plan.
Click the Settings gear icon and click ‘Backup Company.’
In the Action column, click the three-dot menu and choose Turn on Backup.
Then, click Add Company. From the Select Company dropdown menu, pick the company to back up. Click Continue.
In the Action column, click the three-dot menu and select Run Backup.
Go to the User menu.
Decide where to save your backup file and Link your Google Drive.
Best Practices for QuickBooks Online Backups
To ensure the effectiveness and security of your QuickBooks Online backups, consider the following best practices:
Frequency of Backups
Regular Backups: Schedule regular backups, such as daily or weekly, to maintain up-to-date data.
Before Major Changes: Create a backup before making significant changes to your QuickBooks data, like importing large data sets or altering the chart of accounts.
Storage Location
Secure Storage: Utilize secure storage providers to store your backups.
Multiple Storage Locations: Consider storing backups in multiple locations to minimize the risk of data loss due to system failures or security breaches.
Security Considerations
Strong Passwords: Use unique passwords to protect your backup files and cloud storage accounts.
Encryption: Encrypt your backup files to add an extra layer of security, especially if storing them locally.
Access Controls: Limit access to your backup files to authorized personnel.
Regular Review: Review your backup strategy to ensure its effectiveness and adapt it as needed.
Conclusion
Following the steps outlined in this guide and adhering to best practices, you can effectively safeguard your QuickBooks Online data. Remember, a proactive approach to data backup is essential to protect your business from potential data loss and ensure its continuity.
Take the necessary steps to secure your financial future. Implement a reliable backup strategy today with SaasAnt Transactions automated backup. You can also get started immediately with a 30-day free trial.
FAQ
Can QuickBooks Online be backed up?
Yes, QuickBooks Online can be backed up using SaasAnt Transactions, which creates regular data backups. This app allows you to schedule automatic backups, choose specific data to back up, and select your preferred backup destination (email or FTP/SFTP). The application provides a reliable backup solution by protecting your valuable QuickBooks Online data from accidental loss or breaches.
How do you back up QuickBooks Online to a flash drive?
Login to SaasAnt Transactions and navigate to ‘Export’ in the dashboard. Select the type of transaction/list from the dropdown menu and select whether you want to search by transaction, created, or last updated date. Set the date range and select a mapping template. Now download the file and copy it to a flash drive.
How do I send a backup copy of QuickBooks Online to my accountant?
To manually back up your QuickBooks Online data using SaasAnt Transactions, log in to your account and navigate to the "Export" section. Choose the specific transactions or lists you want to back up and define the desired date range. Select a suitable mapping template to ensure accurate data transfer. Download the generated file and email it to your accountant.
How to make a backup of QuickBooks online
Integrate SaasAnt Transactions with QuickBooks to create regular backups. This app allows you to schedule automatic backups, choose specific data to back up, and select your preferred backup destination (email or FTP/SFTP).
How do I export everything from QuickBooks Online?
Integrate SaasAnt Transactions with QuickBooks. Dashboard -> Export -> Select the entity you wish to export. Since you want to export ‘everything,’ set the date range accordingly and click on export. You can also use the ‘backup’ feature to backup your entire data using your email address or FTP/SFTP path as the backup destination.
How do I backup my online data to my computer?
Connect SaasAnt Transactions with QuickBooks to set up regular backups. This app enables you to schedule automatic backups, select specific data for backup, and choose your preferred backup destination (email or FTP/SFTP).