How to Create Checks in QuickBooks Online: A Detailed Guide
 Checks remain a fundamental financial tool for businesses, facilitating the transfer of funds from a bank account to various recipients. Properly managing and recording these transactions in QuickBooks is essential for maintaining accurate financial records, ensuring smooth bank reconciliations, and achieving overall financial accuracy. This comprehensive guide provides a step-by-step approach to creating and recording checks in QuickBooks.
How to Create Checks in QuickBooks Online: A Step-by-Step Guide
Creating a check in QuickBooks involves several vital steps to ensure accurate recording and tracking of payments. Follow these detailed instructions to manage check payments efficiently:
Step 1: Accessing the 'Checks' Screen
Log In to QuickBooks:
Open QuickBooks and sign in to your account using your credentials.
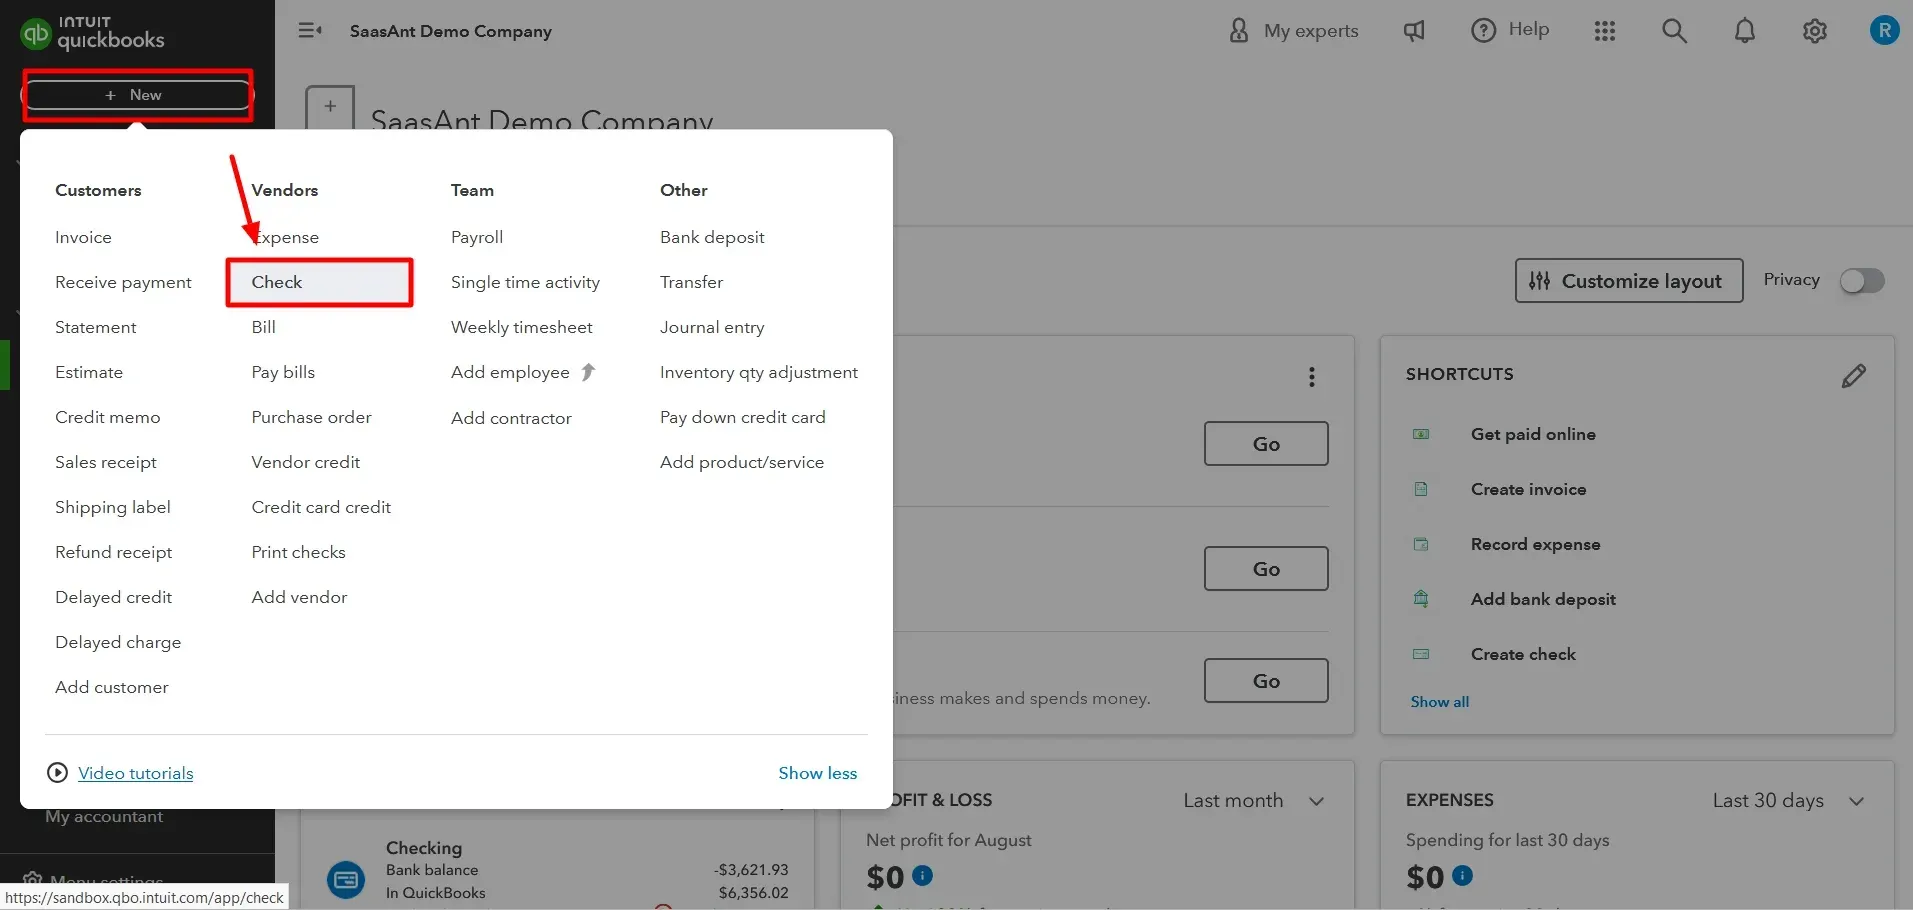
Navigate to the 'Checks'
Click the ‘+New’ icon at the top left of the screen.
Select ‘Checks’ under the ‘Vendors.’

Step 2: Entering Payee Information
Input Payee Details:
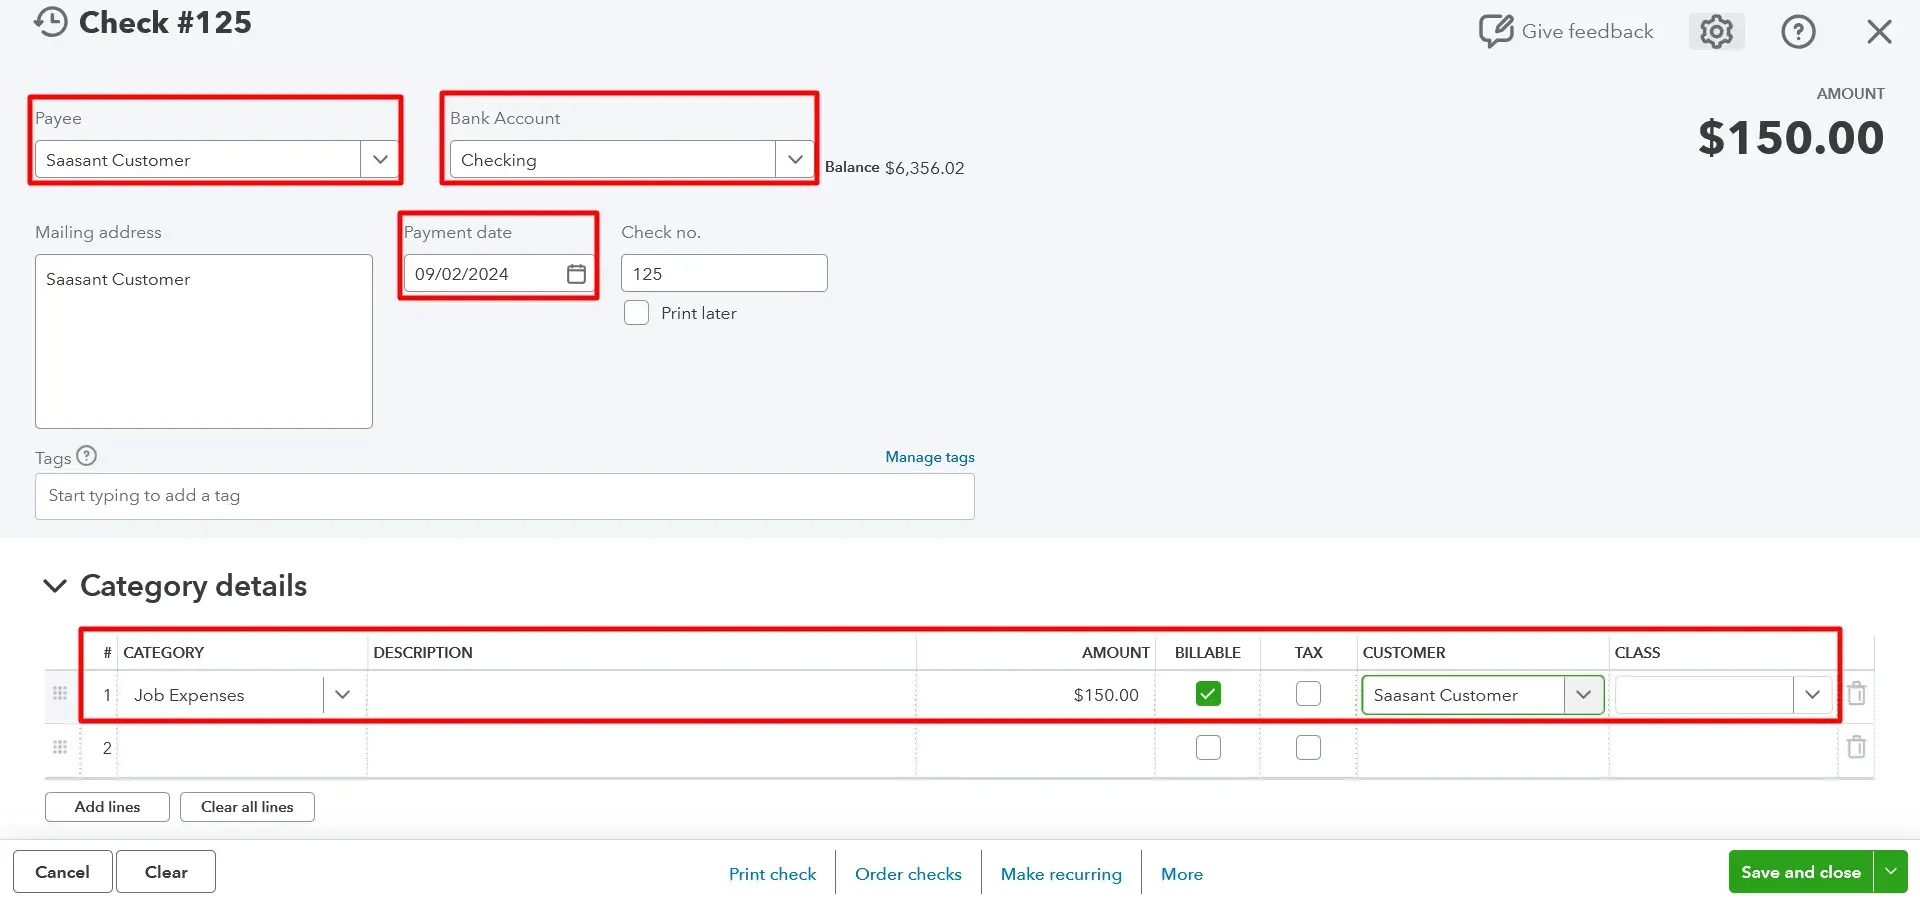
In the ‘Payee’ field, type the name of the individual or business receiving the payment. Ensure that this information is accurate to avoid any issues with the payment.
Verify Payee Information:
Double-check the payee’s details to ensure correctness, reducing the risk of errors and ensuring smooth transaction processing.
Step 3: Selecting the Bank Account
Choose the Bank Account:
From the 'Bank Account' drop-down list, select the bank account from which the check will be issued. This step ensures that the payment is recorded against the correct financial account.
Confirm the Account Selection:
Verify that you have selected the appropriate account to prevent discrepancies in financial tracking.
Step 4: Detailing the Payment Information
Enter the Date:
In the 'Date' field, input the date the check is issued. This ensures that the payment is recorded in the correct accounting period.
Input the Amount:
Enter the payment amount in the 'Amount' field. Accurately entering this amount is crucial for maintaining correct financial records.
Add a Memo or Description:
Include a memo or description in the provided field to offer context for the transaction. This information can be helpful for future reference and auditing.
Step 5: Categorizing and Adding Items to the Check
Select the Account or Expense Category:
To categorize the payment correctly, choose the appropriate expense category from the 'Category' drop-down list. This step is vital for accurate financial reporting and analysis.
Add Items or Services:
If applicable, add specific items or services related to the payment to provide detailed records of what the check is for. This can aid in detailed financial tracking and reporting.
Step 6: Saving and Closing the Check
Review the Information:
Carefully review all entered information to ensure accuracy. Confirm that all fields are correctly filled and match the intended transaction details.
Save the Check:
Click 'Save and Close' to complete the check creation process. If you need to create additional checks, select 'Save and New' to enter new check details.

Understanding the Role of Checks in Business Finance
Checks are used in numerous business scenarios, each with its unique purpose:
Vendor Payments: Businesses often issue supplier checks as payment for goods or services. This ensures a straightforward, documented transaction that reflects the expense in the company's financial records.
Employee Reimbursements: Employees might incur out-of-pocket expenses for business-related activities. Issuing a check for these reimbursements ensures proper documentation and financial tracking.
Rent and Utilities: Regular payments for office space, utilities, and other recurring expenses are often managed through checks, providing a reliable paper trail for financial audits and record-keeping.
Loan Repayments: Checks can be used to manage periodic payments on business loans or credit lines, ensuring timely payments and accurate financial tracking.
Understanding these use cases helps businesses effectively manage their check payments in QuickBooks, ensuring that financial records remain organized and accurate.
The Importance of Accurate Check Recording in QuickBooks
Accurate recording of checks in QuickBooks is essential for several reasons:
Maintaining Accurate Financial Records
Proper recording prevents discrepancies in financial statements and ensures that all transactions are correctly documented and reflected in your accounts.
Facilitating Effective Bank Reconciliation
Accurate check recording simplifies matching bank statements with QuickBooks records, making reconciling accounts and identifying discrepancies easier.
Supporting Accurate Financial Reporting
Reliable check recording contributes to precise financial analysis and reporting, aiding in better decision-making and financial management.
By following these detailed steps, businesses can ensure precise check management and recording in QuickBooks, contributing to accurate financial operations and reliable record-keeping.
Creating Bulk Checks in QuickBooks
Managing financial transactions is crucial for any business, and QuickBooks is a powerful solution designed to streamline these processes. However, the standard QuickBooks functionality may require repetitive data entry, consuming valuable time and resources when creating bulk checks. This is where SaasAnt Transactions can be a game-changer, providing a seamless solution for creating multiple checks simultaneously, saving time and effort.
Understanding the Need for Bulk Check Creation
In any growing business, the need to issue multiple checks can arise frequently, whether for paying suppliers, vendors, or employees. Manually entering each check into QuickBooks can be time-consuming and prone to errors. These errors could lead to discrepancies in your financial records, potentially affecting cash flow management and financial reporting. With Saasant, you can import checks in bulk into QuickBooks.
How SaasAnt Transactions Simplifies Bulk Check Creation?
SaasAnt Transactions offers a streamlined approach to bulk check creation in QuickBooks. By leveraging its powerful import capabilities, you can create multiple checks in one go without manually inputting each transaction. Here’s how SaasAnt Transactions facilitates this process:
Batch Import: With SaasAnt Transactions, you can import a batch of checks from an Excel or CSV file directly into QuickBooks. This eliminates the need for repetitive data entry, significantly reducing the time spent on this task.
Error-Free Entries: The tool ensures that all data is accurately mapped and validated before importing, minimizing the risk of errors. This accuracy is crucial for maintaining clean financial records.
Customizable Templates: You can use templates to match your business needs, ensuring that each check is created with the correct details, including payee information, check amounts, and account allocation.
Time-Saving Automation: Once set up, creating bulk checks becomes almost entirely automated, freeing up your time to focus on other essential aspects of your business.
Integration with QuickBooks
SaasAnt Transactions seamlessly integrates with QuickBooks, ensuring that all bulk checks created are recorded in real time within your QuickBooks account. This integration maintains the integrity of your financial data and ensures that your accounts are always up to date.
Creating bulk checks in QuickBooks using SaasAnt Transactions is an efficient way to manage your financial processes. Automating this task saves time and reduces the likelihood of errors, ensuring accurate financial records. SaasAnt Transactions provides a reliable solution that enhances your QuickBooks experience, whether for payroll, supplier payments, or vendor transactions.
Wrap Up
Efficiently managing and recording checks in QuickBooks is pivotal for maintaining accurate financial records and ensuring smooth financial operations. Following the detailed steps outlined in this guide, businesses can streamline their check processing, enhance financial accuracy, and simplify bank reconciliations. Proper check management facilitates precise financial reporting and supports overall financial health and transparency.
Integrating advanced tools like SaasAnt Transactions with QuickBooks can offer additional benefits for businesses seeking to optimize their financial management processes further. SaasAnt Transactions provides robust features for efficiently importing and categorizing financial transactions, enhancing your overall bookkeeping experience. With its 30-day free trial and no credit card requirement, exploring SaasAnt Transactions is a risk-free way to improve your financial operations.
By implementing these practices and leveraging advanced tools, businesses can achieve greater financial accuracy and operational efficiency. Ensure your check management processes are streamlined and adequate to support your company's economic success.
FAQs
How Do I Create/Record a Check in QuickBooks?
To create a check in QuickBooks, follow these steps:
Log in to QuickBooks and go to the 'Banking' menu.
Select 'Write Checks' or 'New Check' depending on your version.
Enter the payee’s name in the 'Pay to the Order of' field.
Choose the bank account from which the check will be issued.
Input the check date, amount, and memo details.
Categorize the payment by selecting the appropriate account or expense category.
Review the details and click 'Save and Close' or 'Save and New' to finalize.
Can I Create Bulk Checks in QuickBooks?
QuickBooks does not offer a built-in feature to create bulk checks directly within the platform. However, you can efficiently create multiple checks simultaneously using integration applications like SaasAnt Transactions. This application allows you to import a batch of checks from an Excel or CSV file into QuickBooks, enabling you to create bulk checks quickly and accurately without manual data entry. This approach saves time and ensures that your financial records remain accurate and up-to-date.
How to Import Checks in QuickBooks Online?
To import checks into QuickBooks Online using SaasAnt,
Launch SaasAnt Transactions: Open SaasAnt Transactions on your computer and ensure it's connected to QuickBooks Online.
Initiate the Import Process: Click the ‘Let’s Import’ button to start exporting your checks.
Choose Transaction Type: Select ‘Checks’ from the transaction type options.
Specify Date Type: Choose your date type from ‘Created Date,’ ‘Transaction Type,’ or ‘Last Updated Date.’
Define the Date Range: Use the calendar box to set your desired date range.
Select the Template: Choose the ‘Simple Mapping’ template or upload your custom template.
Execute the Search: Click ‘Search’ to begin the import process.
Download the Imported Data: Download the exported checks in CSV format by clicking the ‘Download’ button.
How to Export Checks in Quickbooks Online?
To export multiple checks in QuickBooks Online using SaasAnt Transactions, connect your QuickBooks Online account to SaasAnt, navigate to the "Export" section, select "Checks" as the transaction type, specify the desired date range, and proceed to download the data in your preferred format.
How to Delete Checks in QuickBooks?
To delete checks in QBO using SaasAnt Transactions, connect your QuickBooks Online account to SaasAnt, navigate to the "Delete" section, select "Checks" as the transaction type, use filters to locate the specific checks, and proceed to delete them.
How to Edit Checks in QuickBooks?
To edit checks in QuickBooks using SaasAnt Transactions, connect your QuickBooks Online account to SaasAnt, navigate to the "Modify" section, upload a file containing the updated check details with their reference numbers, map the fields accordingly, and proceed to update the checks.
Read also
How to Print Checks in QuickBooks: A Step-by-Step Guide
How to Reprint Checks in QuickBooks: A Step-By-Step Guide
How to Void a Check in QuickBooks Online