How to Create an Estimate in QuickBooks Online
Creating estimates in QuickBooks Online is essential for managing your business finances effectively. However, crafting estimates one by one can be tedious and prone to errors, leading to potential miscommunication with clients. If you're looking for a more efficient solution, consider exploring the option of bulk importing estimates using SaasAnt Transactions, which boasts a strong rating of 4.9 stars from over 4000 users. This guide will provide you with step-by-step instructions on how to create estimates in QuickBooks one by one.
How to Create an Estimate in QuickBooks Online: Quick Instructions
+New -> Estimates
Enter the customer's details
Enter the estimate details
Save the estimate or send it
How to Create an Estimate in QuickBooks: Step-by-Step Instructions
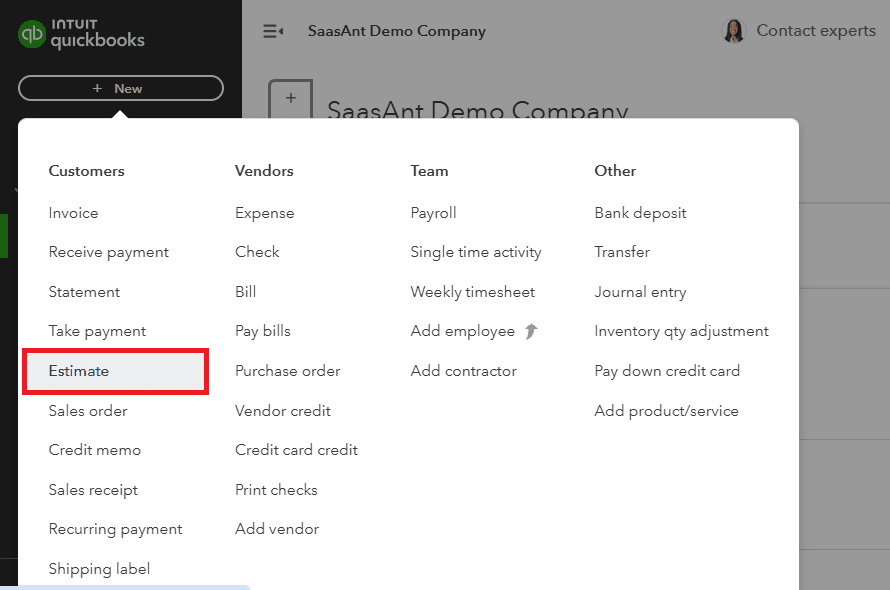
Step 1: Entity Selection
Go to QuickBooks Dashboard -> +New -> Estimate.
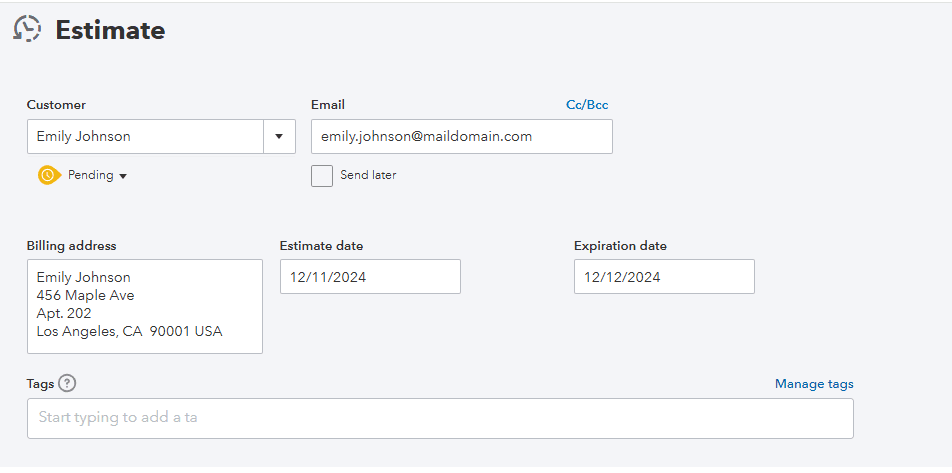
Step 2: Customer Details
Enter the customer’s name or create a new entry if the customer is not yet registered in QuickBooks. The default estimate date is set to today, but you may change it to a different date if needed and enter the expiration date if applicable.
Step 3: Product Details
Enter the service date, product/service, and quantity. In case the product/service you are looking for isn’t there, you can always create a new one by clicking on the “Add new” option in the dropdown. Adjust the quantity and rate if needed.
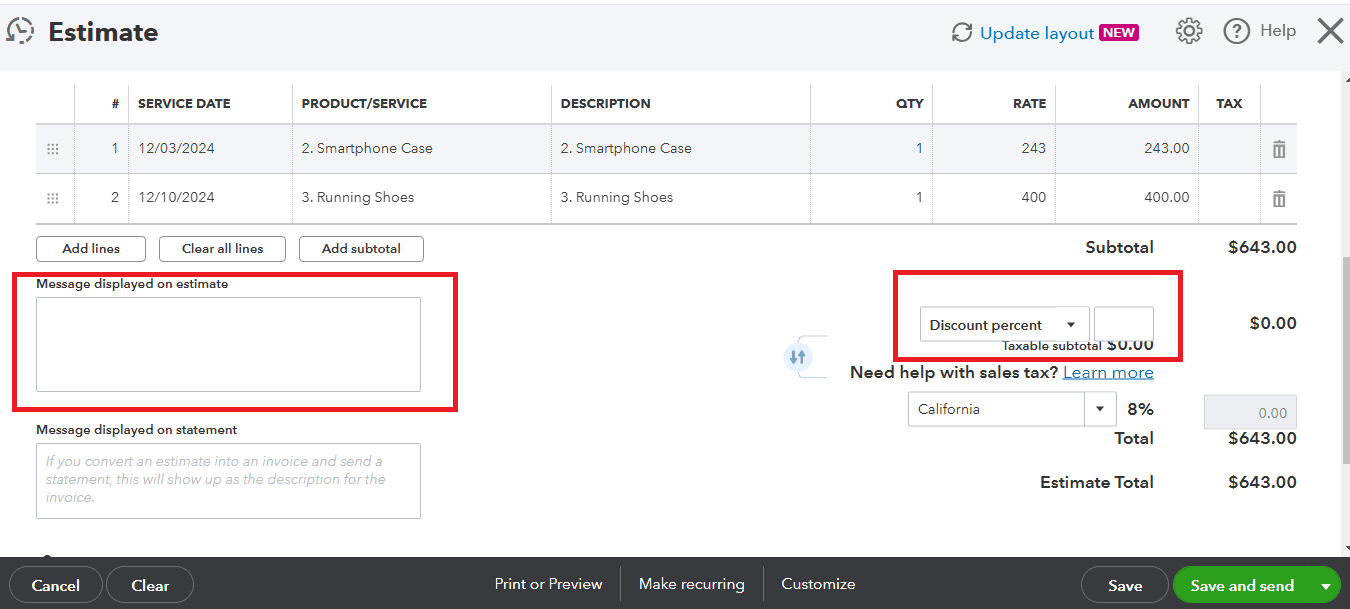
Step 4: Apply Discounts and taxes and add a Memo (Optional)
If applicable, apply discounts or tax rates to the estimate. You can customize fields for additional information, such as notes or terms. You can also add a message to the customer in the ‘Message displayed on estimate’ field.
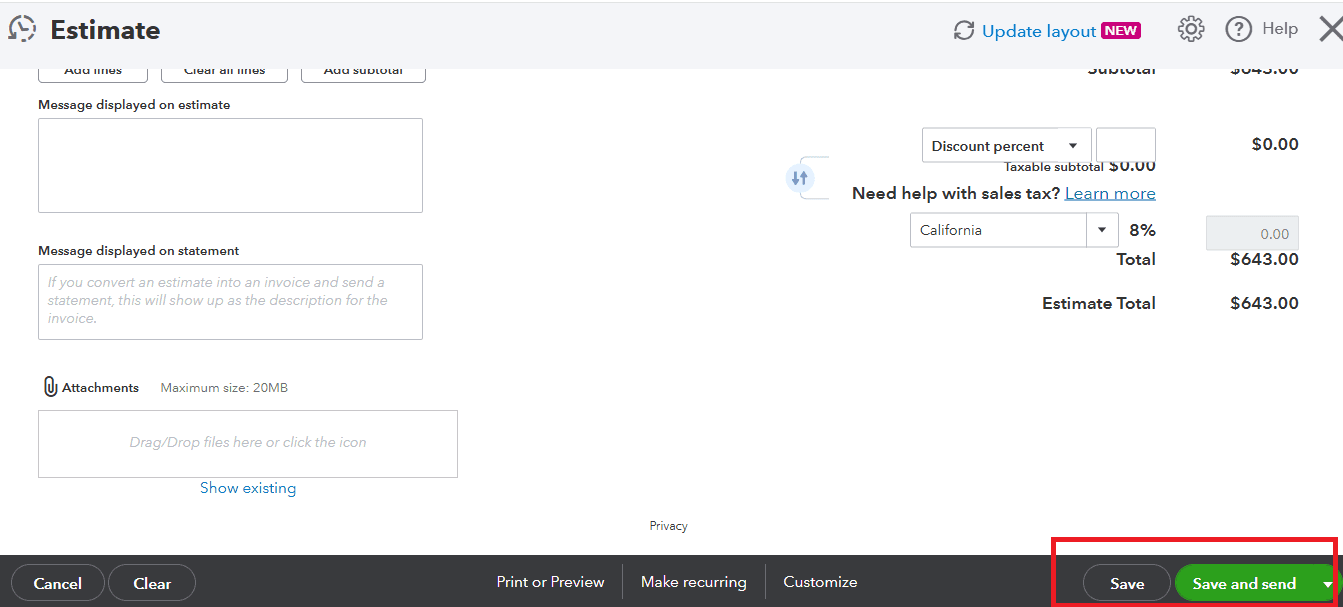
Step 5: Save or Send the Estimate
Once all the details are filled in, you have the following options:
Save and Send: Send the estimate directly to the customer via email.
Save and Close: Save the estimate without sending it immediately.
Save and New: Save the current estimate and start a new one.
Step 6: Track the Estimate Status
You can track the status of your estimates (e.g., pending, accepted, declined) from the Sales > Estimates section.
Alternatives to Creating Estimates One by One: Bulk Import Using SaasAnt Transactions
Instead of creating estimates individually, consider bulk importing them using SaasAnt Transactions. This integration with QuickBooks allows you to efficiently upload multiple estimates at once.
Start by connecting SaasAnt Transactions to your QuickBooks account, then click 'New Import' and select 'Let’s Import.' On the 'Import Files' tab, choose 'Transactions' and 'Estimates.' Upload your Excel or CSV file, map the columns to the corresponding QuickBooks fields, and click 'Upload' after reviewing. Additionally, you can automate the import process using email, FTP/SFTP, or Zapier, making it even more convenient.
Best Practices and Tips to Create Estimates in QuickBooks Online
Customize Your Estimates: Use the Custom Form Styles settings to brand your estimates with your logo, colors, and layout.
Follow Up on Estimates: Use reminders to follow up with customers on pending estimates.
Convert Approved Estimates to Invoices: Once a customer approves an estimate, easily convert it into an invoice with just a few clicks.
Utilize Bulk Importing: For businesses handling numerous estimates, consider bulk importing with tools like SaasAnt Transactions. This method can save time and minimize errors, making the process more efficient.
Conclusion
In conclusion, creating estimates in QuickBooks Online is a crucial task for effective financial management. By following the step-by-step instructions in this guide, you can ensure that your estimates are accurate and professional. Additionally, implementing best practices such as customizing your estimates, following up with clients, and utilizing bulk importing with SaasAnt Transactions can help reduce errors and save time. For those looking to simplify the process further, SaasAnt Transactions offers a 30-day free trial—no credit card required—allowing you to explore its features without any commitment. With
FAQ
How to export Estimates from QuickBooks?
You can export estimates from QuickBooks using SaasAnt Transactions. Integrate SaasAnt Transactions with QuickBooks -> Export -> select estimates from the dropdown ->search for estimates based on the created date or transaction date -> enter a date range or use the advanced filter. Select whether you want to download it in XLSX or CSV format.
How do I delete multiple Estimates in QuickBooks?
To delete estimates in QuickBooks, Connect SaasAnt Transactions with QuickBooks. Go to SaasAnt Transactions Dashboard -> delete -> select estimates from the dropdown -> use date range filter or advanced filter to search -> delete.
How to bulk import Estimates in QuickBooks?
Integrate SaasAnt Transactions with QuickBooks. Go to SaasAnt Transactions dashboard -> New Import -> Select Estimates -> Browse and select the file -> Map the fields in the file to QuickBooks fields -> Upload the file to import Transactions into QuickBooks.
Can I edit multiple Estimates in QuickBooks?
Yes, you can edit multiple estimates in QuickBooks by integrating SaasAnt Transactions. Go to SaasAnt Transactions dashboard -> export -> select Estimates from the dropdown -> use the filter to search by date or reference number. A list of Estimates matching the filter will be displayed. Select whether you want to download it in XLSX or CSV format. Make changes to the downloaded file and use the modify feature to upload the modified file.
Read also
How to Convert Estimate to Invoice in QuickBooks Online
How to Delete Multiple Transactions in QuickBooks Online
Importing Excel into QuickBooks : Detailed Guide
How to Export Transactions from QuickBooks Online