How to Create Expenses from QuickBooks: Step-by-Step Guide
Effective expense management is crucial for maintaining a healthy financial state in any business. QuickBooks offers robust features to help you track and record expenses seamlessly. This blog will walk you through creating expenses in QuickBooks, ensuring your financial records are accurate and up-to-date.
Contents
Create Expenses from QuickBooks Online - Quick Instructions
How to Create Expenses from QuickBooks: Step-by-Step Guide
How to Create Bulk Expenses in QuickBooks?
Common Mistakes to Avoid When Creating Expenses
Conclusion
FAQ’s
Create Expenses from QuickBooks Online - Quick Instructions
Go to the QuickBooks Dashboard, click ‘+New,’ then select ‘Expenses.’
Please fill in the payee details, payment method, date, amount, and customer name. Then click ‘Save and Close.’
Click ‘Expenses,’ then ‘View/Edit’ to manage the expense.
How to Create Expenses from QuickBooks: Step-by-Step Guide
Here are the steps to create and send sales receipts in QuickBooks
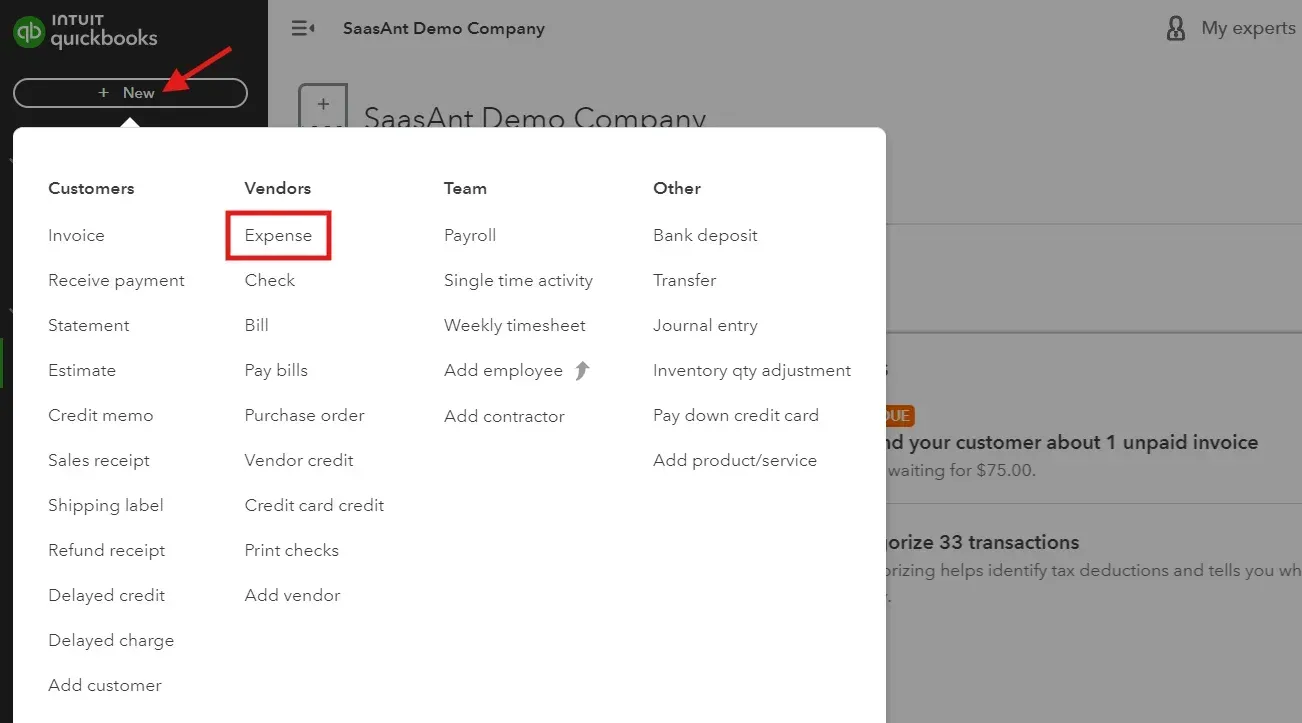
Step 1: Access Expense Menu
Go to QuickBooks Dashboard, click ‘+New,’ then select ‘Expenses.’
Step 2: Input Expense Details
Enter the payee's name, payment method, payment date, and payment method category details, enter the amount customer name, and click ‘Save and Close.’ Please refer to the image below.
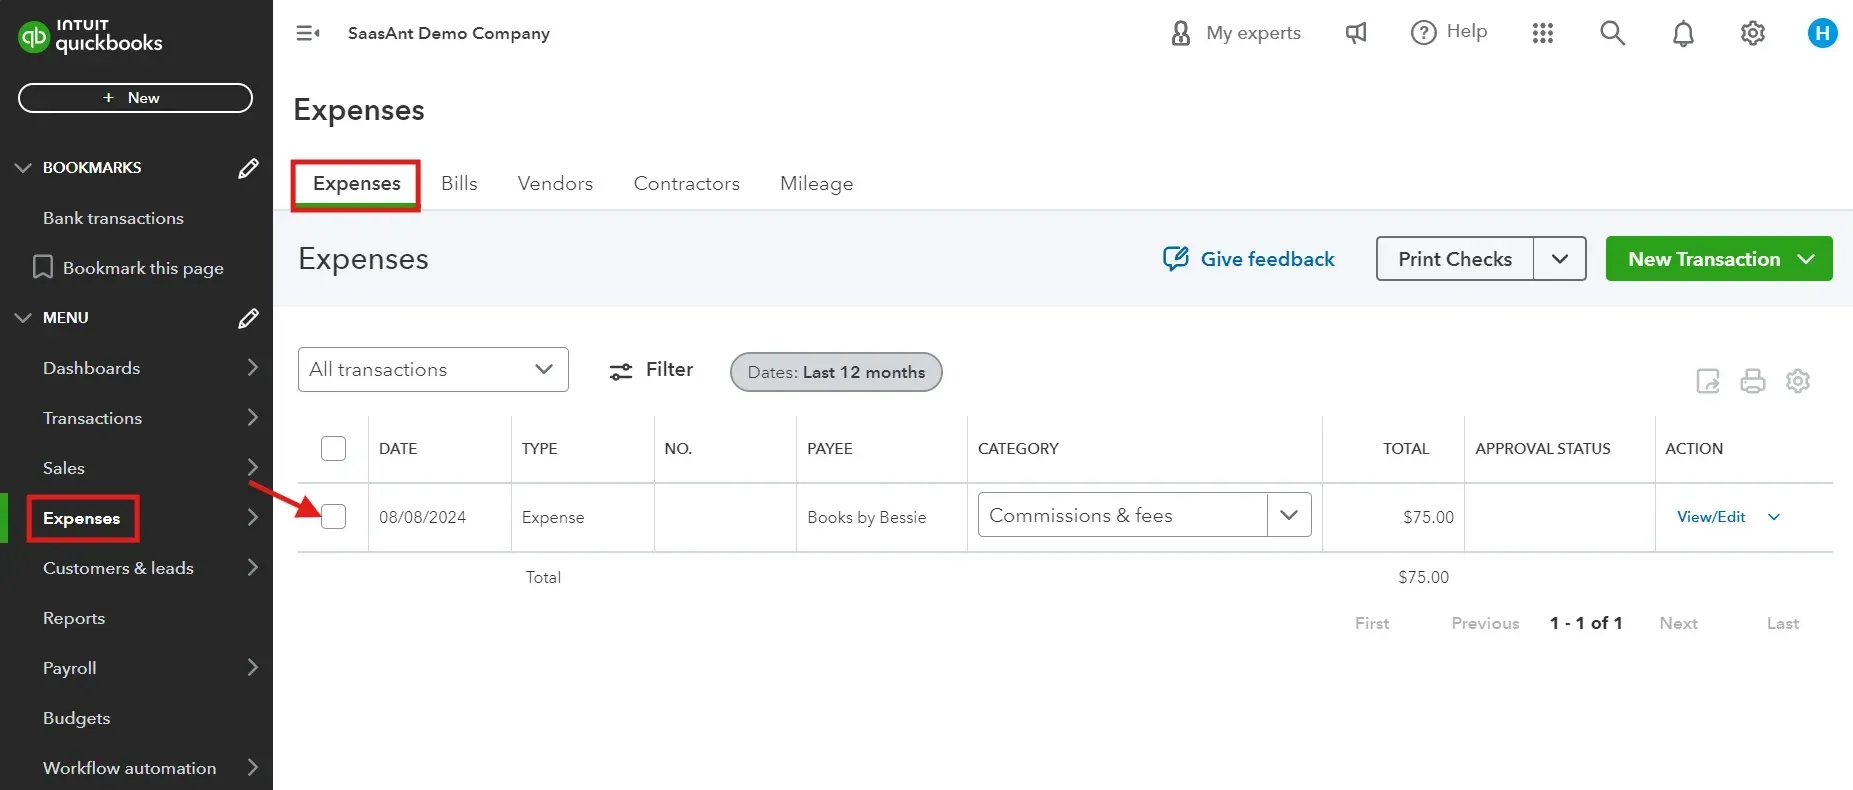
Step 3: Review or Modify Expenses
To view the created expense, click ‘Expenses.’ To view/ edit the expense, click ‘View/Edit.’ To understand more about editing expenses, read the blog ‘How to edit expenses in QuickBooks Online.’
How to Create Bulk Expenses in QuickBooks?
Below are the quick instructions to create bulk expenses in QuickBooks:
Step 1: Format your expense data in a CSV, Excel, or TXT file with essential details like date, amount, payee, and account.
Step 2: In SaasAnt Transactions, connect to QuickBooks and upload your prepared file.
Step 3: Map your file columns to the corresponding fields in QuickBooks using SaasAnt’s intuitive mapping features.
Step 4: Review the data for accuracy, make necessary adjustments, and import it into QuickBooks.
Step 5: Check the expenses in QuickBooks to ensure they’ve been recorded correctly. Also, if you’ve mistakenly added any expenses, click ‘Rollback.’
Benefits of Using SaasAnt Transactions to Create Bulk Expenses
Let’s look into the benefits of using SaasAnt Transactions to create bulk expenses:
Automates the entry of multiple expense records, saving time and increasing efficiency.
Lowers the likelihood of manual errors with automated data entry and thorough pre-import reviews.
Keeps financial records accurate and up-to-date, enhancing the reliability of financial reporting.
Handles increasing volumes of transactions effortlessly as your business grows.
Saves on the costs associated with manual data entry errors and time while helping in better cash flow management.
Common Mistakes to Avoid When Creating Expenses
Below are some of the common mistakes to avoid when creating expenses to maintain accuracy:
Misclassifying Expenses:
One of the most common errors is misclassifying expenses. This can lead to inaccurate financial reports and tax filings. Double-check your categories to ensure each expense is correctly classified.
Overlooking Small Expenses:
Small expenses can add up over time. Ignoring these can lead to discrepancies in your financial records. Make sure to record all costs, no matter how minor they seem.
Not Reconciling Accounts Regularly:
Regularly reconciling your accounts ensures that all expenses are recorded correctly and helps identify discrepancies. Set a schedule to reconcile your accounts, ideally monthly.
Using Personal Accounts for Business Expenses:
Mixing personal and business expenses can confuse and complicate your financial records. Keep separate accounts for business transactions to maintain clear and accurate records.
Neglecting to Update Expense Policies:
As your business grows, your expense policies may need updating. Ensure your policies reflect current business practices and are communicated to all employees involved in expense reporting.
Conclusion
Effectively managing expenses in QuickBooks is vital for maintaining accurate financial records and ensuring the financial health of your business. Following the steps outlined in this blog, you can create and track expenses efficiently, enabling better budgeting and financial planning.
FAQ’s
How do I create expenses from QuickBooks?
Log in and navigate to the dashboard to create an expense in QuickBooks.
Click on ‘+New’ and select ‘Expense’. Enter details such as Payee, Payment Method, Date, Category, and Amount.
Optionally, link the expense to a customer.
Conclude by clicking ‘Save and Close’ to record the expense.
How do I export expenses from QuickBooks to Excel?
To export expenses from QuickBooks Online via SaasAnt Transactions, follow these steps:
Log Into SaasAnt Transactions: Begin by signing in.
Navigate to Export: Access the 'Export Section' and select 'Credit Memos'.
Apply Filters: Use filters such as date or category to refine your selection.
Select Output Format: Choose your desired file format (CSV, Excel) and customize the fields as necessary.
Download: Start the export process and download the file to your system.
How to Delete Multiple Expenses in QuickBooks?
To delete multiple expenses in QuickBooks, follow these steps:
Open SaasAnt Transactions and connect it with your QuickBooks account.
In SaasAnt Transactions, click ‘Delete’ and then select ‘Initiate Clean Up.’
Choose ‘Date by Searching’ and set the preferred date range for the expenses you want to delete.
Use the customization option if needed.
Click ‘Ok’ to confirm and delete multiple expenses in QuickBooks.
How to Import Expenses in QuickBooks Online?
To import expenses in QuickBooks Online, follow these steps:
Connect your Intuit account to SaasAnt Transactions
Upload the Expenses in .CSV or Excel or PDF.
Click on ‘Import’ and begin the import process.
Click on ‘Rollback/ Undo’ if needed.
How do I record an expense in QuickBooks?
To record an expense in QuickBooks, follow these steps:
Open QuickBooks: Go to your QuickBooks dashboard.
Click on ‘+New’: Find and click the ‘+New’ button.
Select ‘Expense’: Choose ‘Expenses’ from the dropdown menu.
Enter Expense Details: Fill in the details such as payee name, payment method, payment date, expense amount, and category.
Save the Expense: Click ‘Save and Close’ to record the expense.
How do I set up personal expenses in QuickBooks?
Setting up personal expenses in QuickBooks involves separating them from business expenses to maintain clarity. Here’s how you can do it:
Create a Personal Expense Account: Go to ‘Chart of Accounts’ and click ‘New.’ Select ‘Expense’ as the account type and name it ‘Personal Expenses.’
Record Personal Expenses: When entering expenses, choose the ‘Personal Expenses’ account to categorize them appropriately.
Maintain Separate Records: Ensure personal expenses are recorded separately from business expenses to avoid confusion and maintain accurate financial records.
Recommended reading