How to Create Journal Entry in QuickBooks Online

Journal entries are fundamental to maintaining accurate financial records in QuickBooks. They allow you to record transactions that don’t fit into standard forms, such as invoices, bills, or checks. Whether correcting an error, recording a complex transaction, or making end-of-year adjustments, knowing how to create journal entries is crucial for accurate accounting.
This guide will walk you through the process of creating journal entries in QuickBooks Online and provide some best practices for ensuring your financial records are precise and compliant.
Contents
How to Create Journal Entry in QuickBooks Online: Step-by-Step Guide
How to create Journal Entries in Bulk?
Conclusion
FAQs
How to Create Journal Entry in QuickBooks Online: Step-by-Step Guide
QuickBooks Online simplifies the process of creating journal entries. Follow these steps to ensure your entries are accurate and complete.
Step 1: Log in to QuickBooks Online
Access Your Account: Log in to your QuickBooks Online account using your credentials. Ensure you have the permission to create journal entries, especially in a multi-user environment.
Step 2: Navigate to the Journal Entry Screen
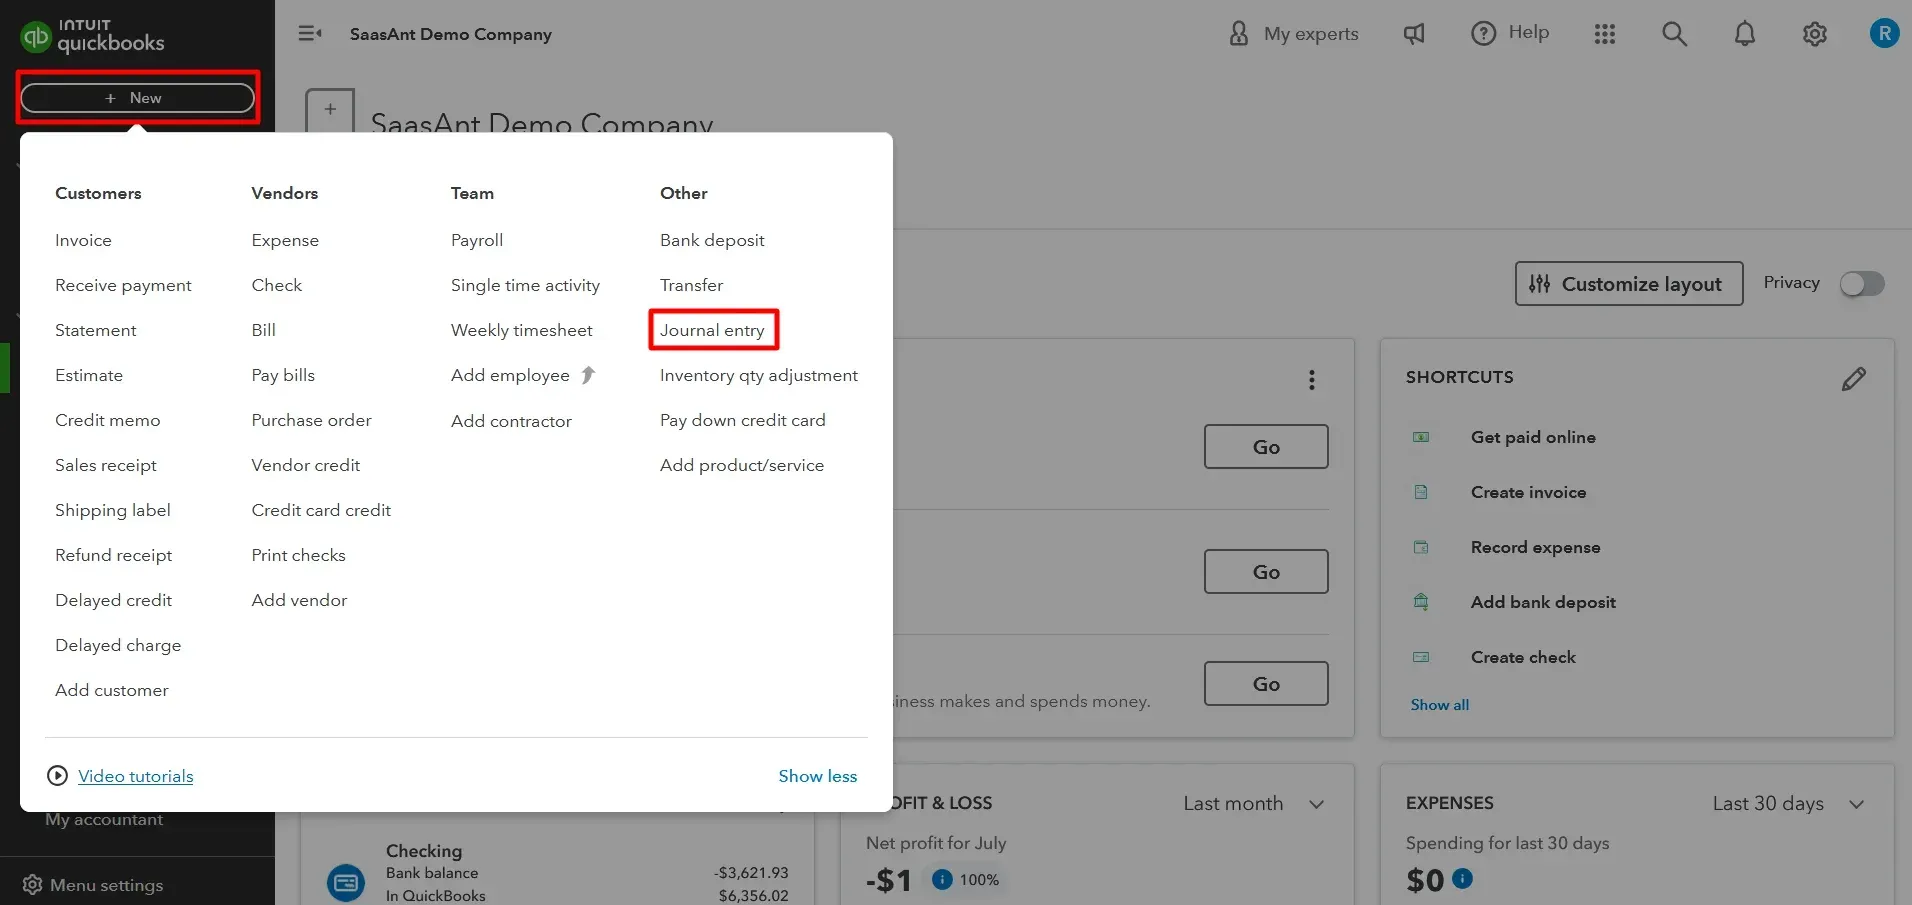
Go to '+ New': From the left-hand menu, click the ‘+ New’ button to open the list of available transaction types.
Select 'Journal Entry': In the dropdown menu under 'Other,' select ‘Journal Entry.’ This will open the journal entry form.
Step 3: Enter the Journal Entry Details
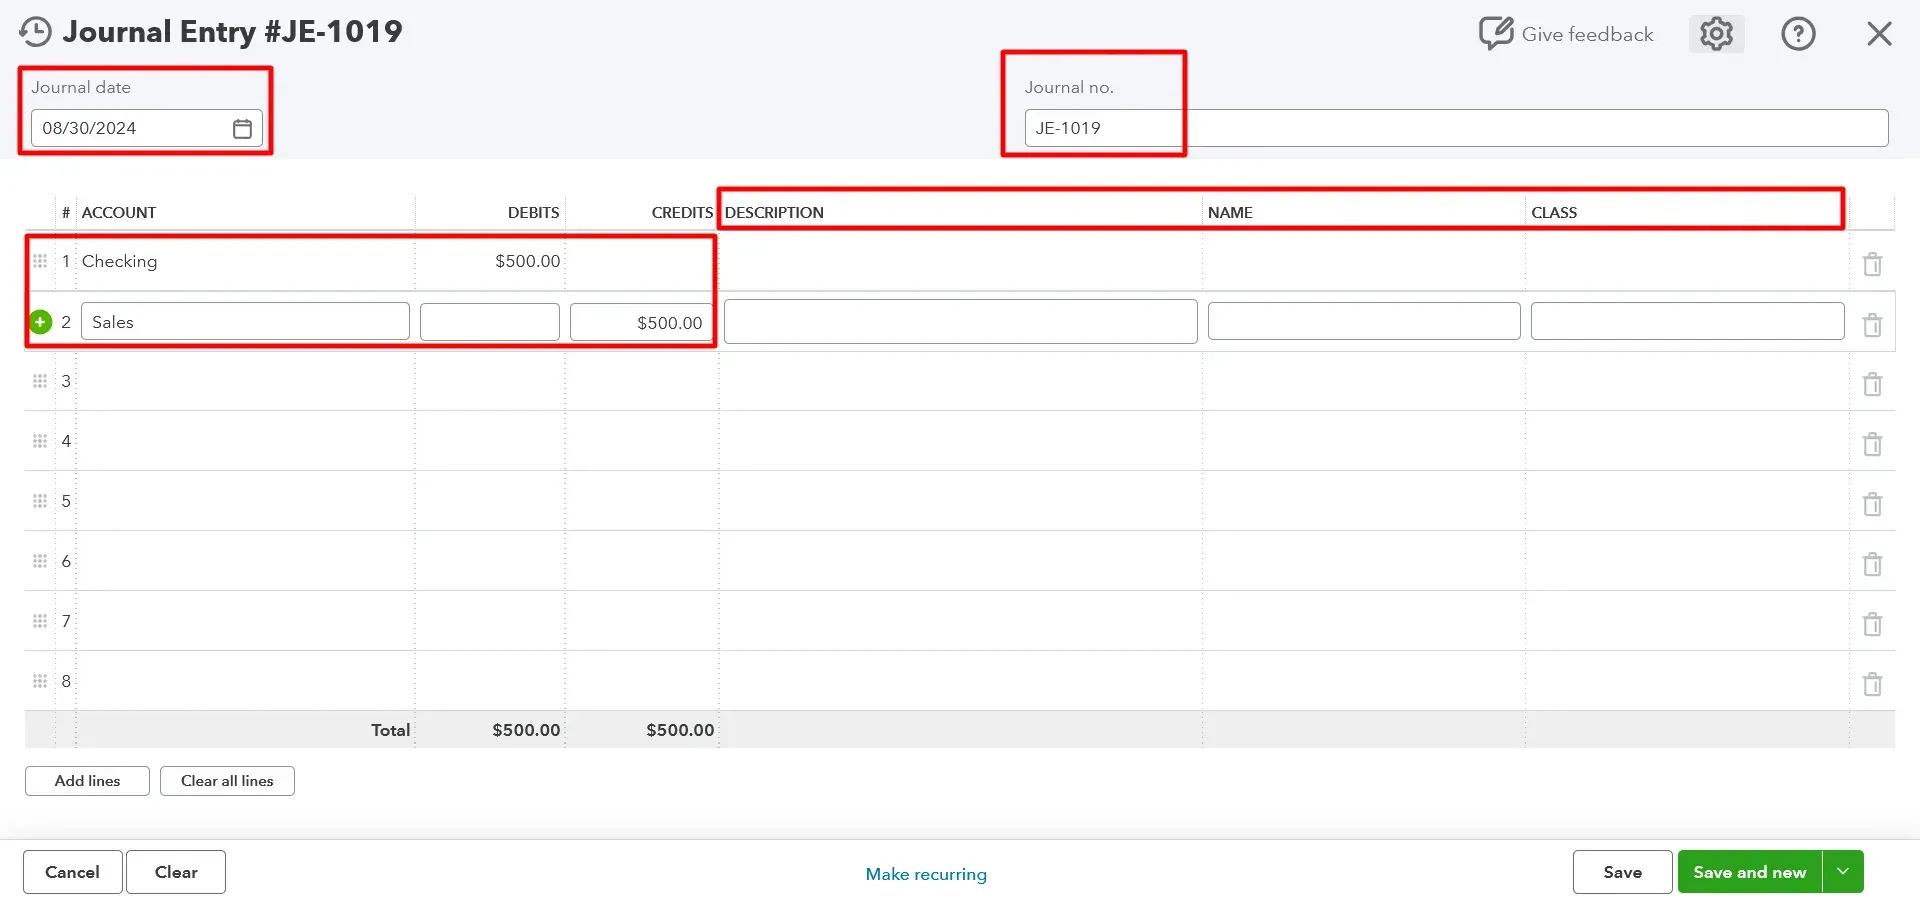
Date: Start by entering the date of the transaction. This date should reflect the actual occurrence of the transaction.
Accounts: In the ‘Account’ column, select the first account involved in the transaction. Enter the corresponding debit or credit amount in the appropriate column. Then, select the second account and enter the corresponding debit or credit to ensure the entry balances.
Memo: Add a description or memo explaining the purpose of the journal entry. This is useful for future reference, especially during audits.
Class/Location: If your business tracks transactions using classes or locations, select the appropriate options here.
Step 4: Review and Save
Review for Accuracy: Double-check that the debits and credits are balanced and that all information is correct.
Save the Entry: Once everything looks accurate, click ‘Save and Close’ to save the entry. Select ' Save and New ' if you need to create another journal entry.
How to create Journal Entries in Bulk?
SaasAnt Transactions makes bulk journal entry creation in QuickBooks Online efficient and straightforward. Follow these steps to ensure accuracy and streamline your workflow:
Step 1: Log in to QuickBooks Online and Connect SaasAnt Transactions
Log in to your QuickBooks Online account using your credentials. Once logged in, ensure SaasAnt Transactions is connected by navigating to the QuickBooks App Store and following the connection prompts.
Step 2: Prepare Your Data for Import
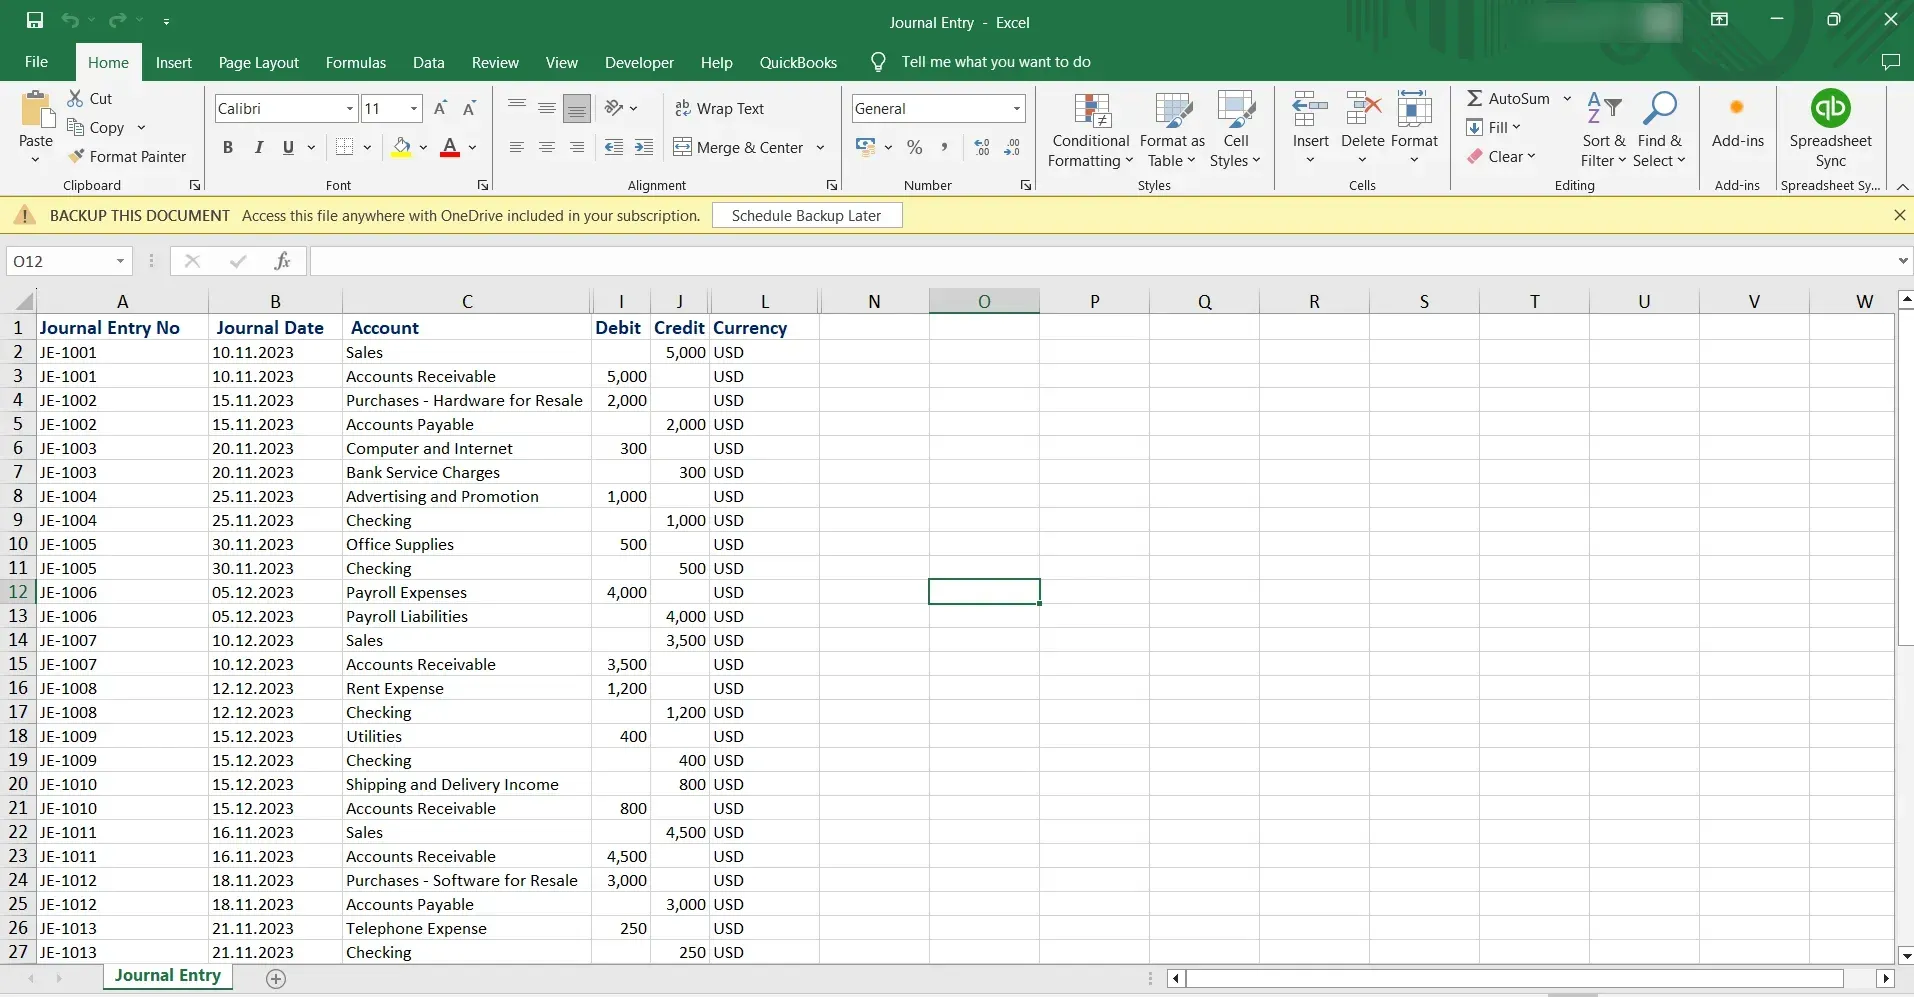
Before creating journal entries, organize your data into a spreadsheet (CSV, Excel, or similar format). Each row should represent a separate entry, with columns for the date, accounts, debits, credits, memos, and any class/location details needed.
Step 3: Upload Your Data to SaasAnt Transactions
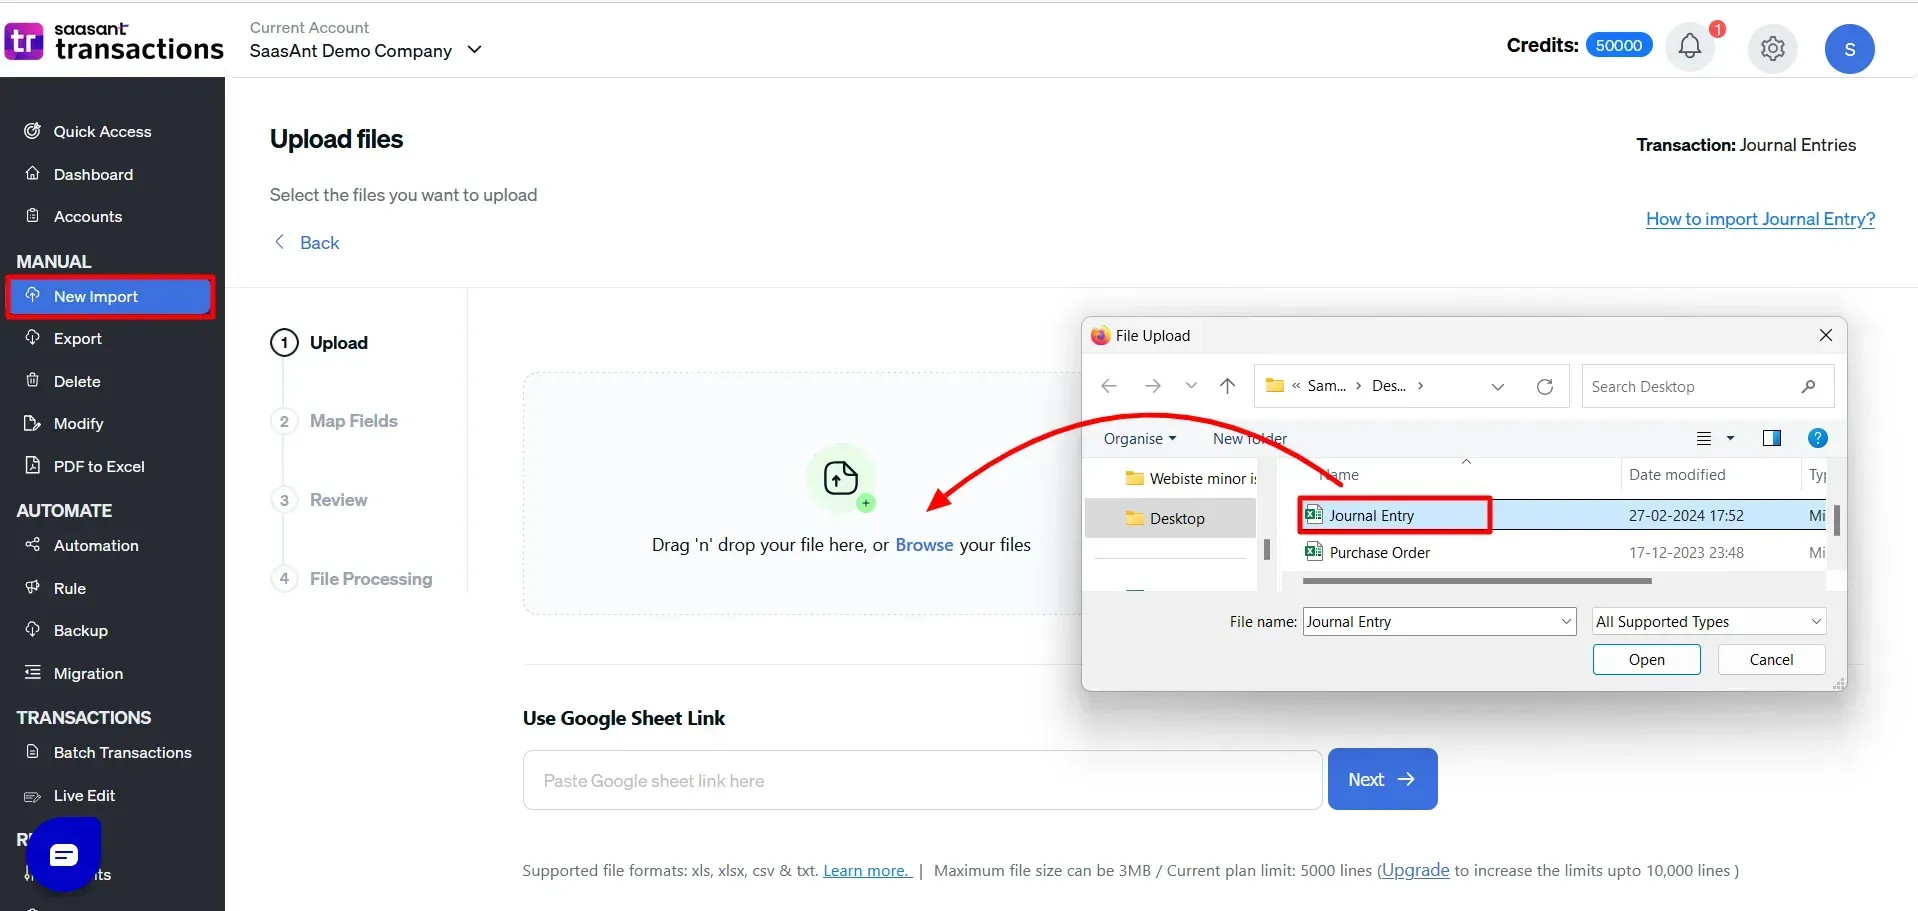
Access SaasAnt Transactions from within QuickBooks Online. Choose the 'Import' option and upload your prepared spreadsheet. The tool will map your data to the appropriate QuickBooks fields.
Step 4: Map and Validate Your Data
SaasAnt Transactions will prompt you to map your spreadsheet columns to the corresponding QuickBooks fields during the import process. Ensure all data is correctly mapped and validated for errors or missing information.
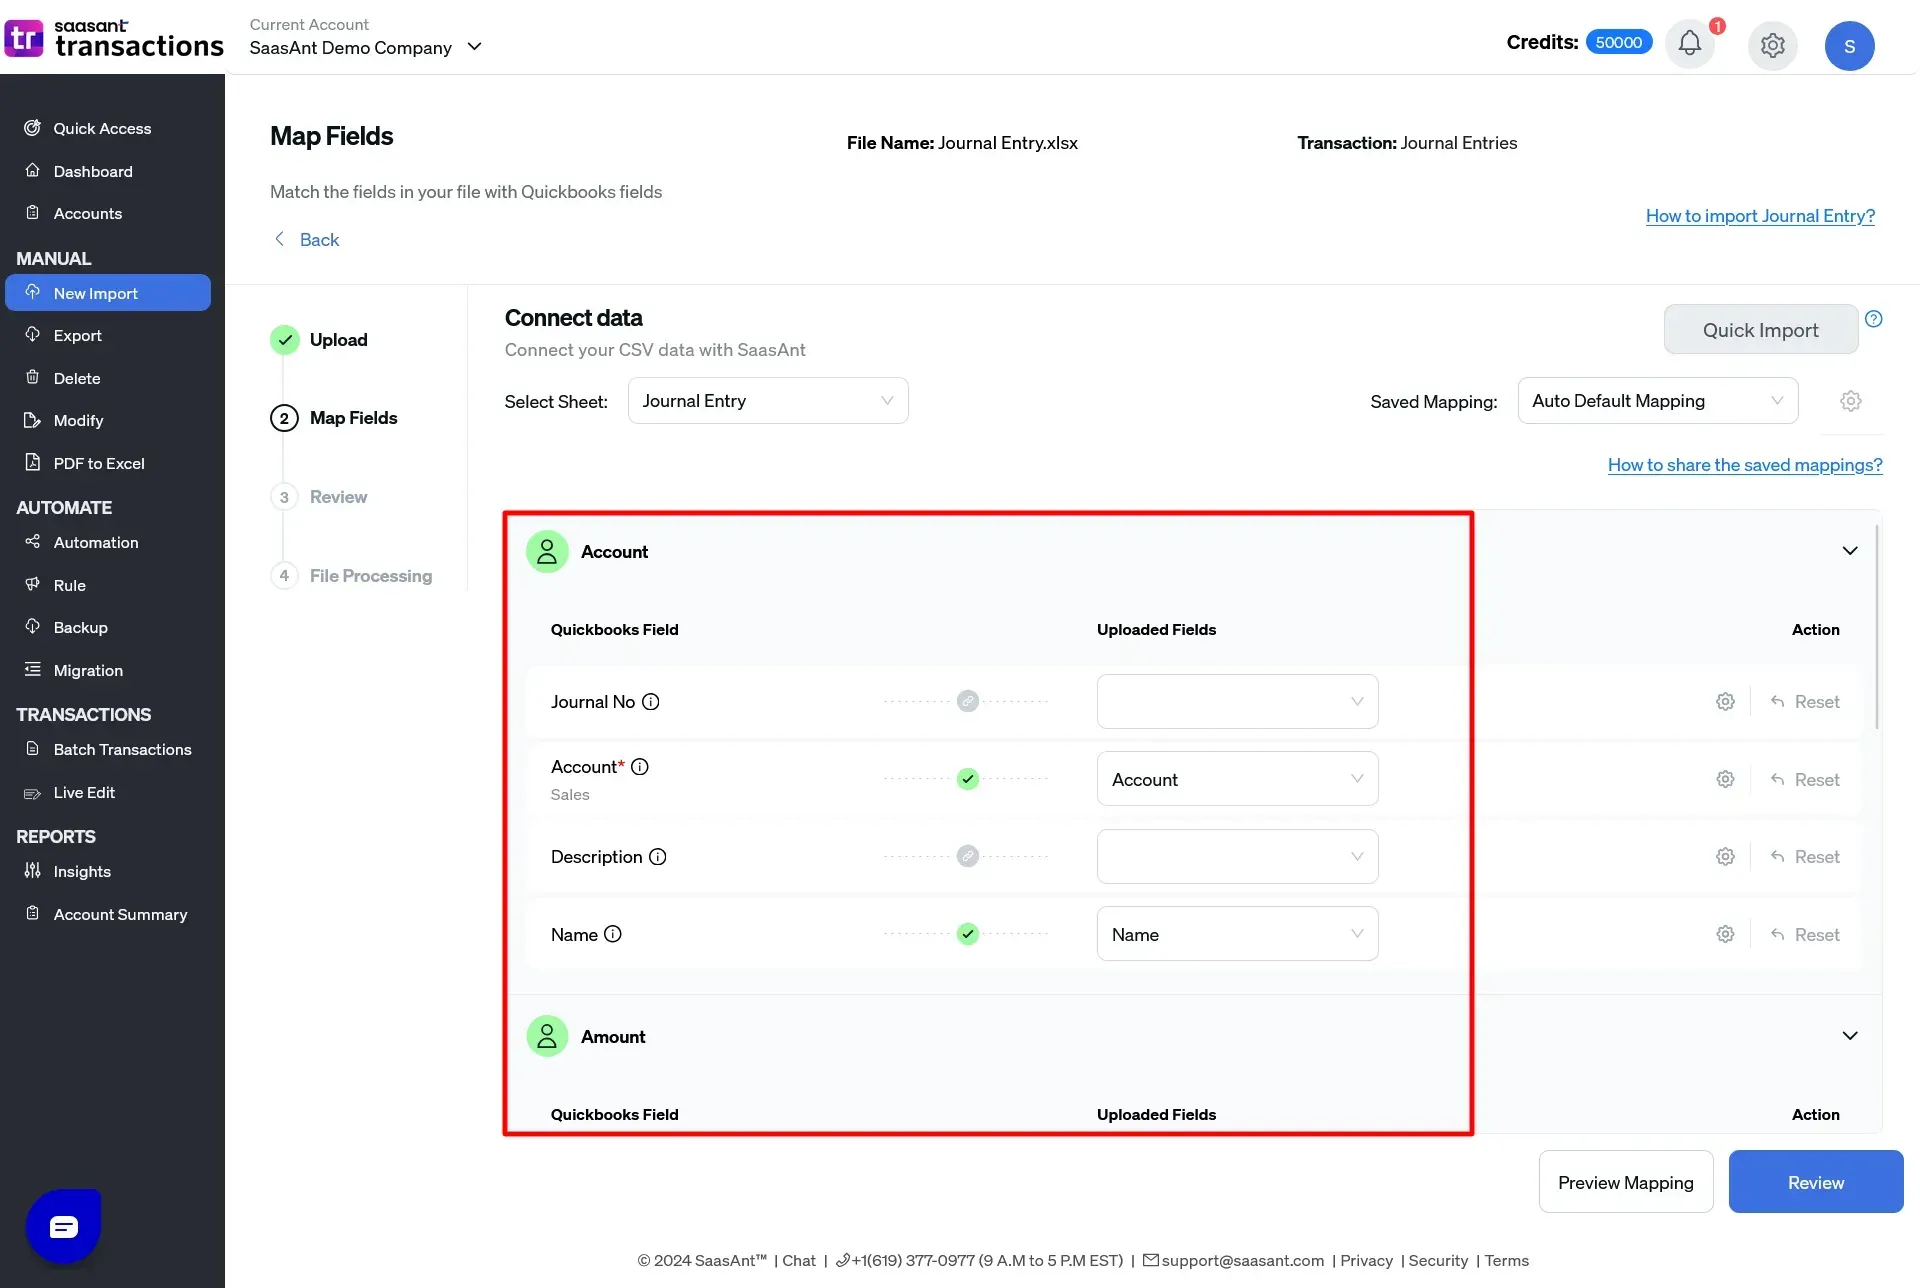
Step 5: Review and Import Entries
Once your data is mapped and validated, initiate the import. SaasAnt Transactions will create the journal entries in bulk, saving you significant time. After the import, review the entries in QuickBooks Online to confirm accuracy and completeness.
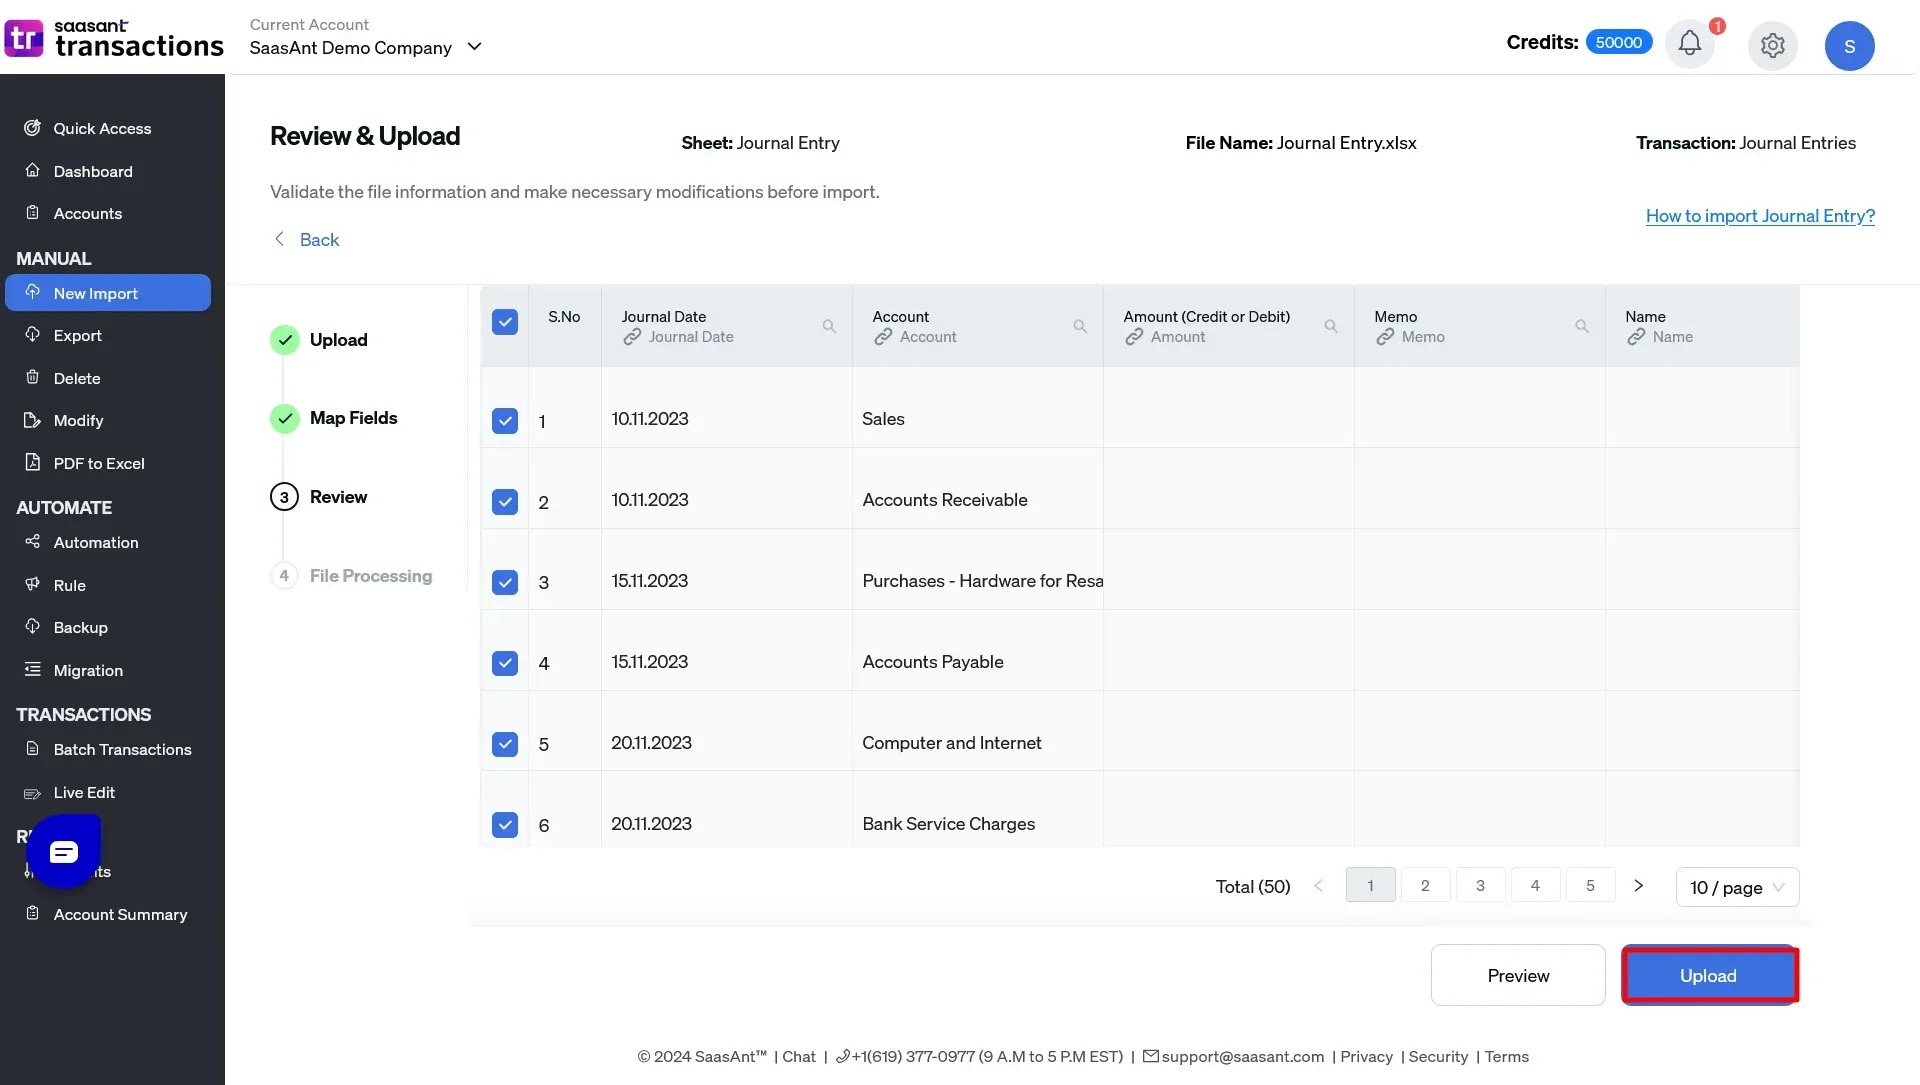
Step 6: Save and Finalize
After reviewing, ensure that all journal entries are balanced and accurate. Your entries are now saved in QuickBooks, allowing you to maintain accurate and up-to-date financial records with minimal effort.
Using SaasAnt Transactions, you can efficiently create journal entries in bulk, drastically reducing manual entry time and minimizing the risk of errors.
Best Practices for Creating Journal Entries
To ensure that your journal entries are accurate and compliant, consider the following best practices:
Use Clear Descriptions: Always provide a clear and detailed journal entry description. This will help you understand its purpose when reviewing it later.
Reconcile Regularly: Regularly reconcile your accounts to catch any errors or discrepancies in your journal entries.
Document Supporting Evidence: Organize and attach all supporting documents (e.g., receipts and invoices) to the relevant journal entry.
Avoid Frequent Adjustments: While journal entries are helpful for adjustments, try to minimize frequent use by ensuring your day-to-day entries are accurate.
Conclusion
Creating journal entries in QuickBooks Online is critical for maintaining accurate financial records. Following the steps outlined in this guide, you can confidently create and manage journal entries, ensuring that your accounting records are precise and reliable. Understanding when and how to use journal entries will help you easily handle complex transactions and adjustments, supporting better financial reporting and decision-making. To explore these risk-free features, SaasAnt offers a 30-day free trial, allowing you to experience the tool's full capabilities before committing. To learn more, read about managing journal entries in QuickBooks.
FAQs
How to Create Journal Entries in QuickBooks Online?
Creating journal entries in QuickBooks Online is straightforward. Log in, navigate to the '+ New' button, and select 'Journal Entry.' Fill in the necessary details, such as the date, accounts, and memo, then review and save your entry.
How to Import Journal Entries in QuickBooks Online?
Yes, you can import journal entries into QuickBooks Online using tools like SaasAnt Transactions. Prepare your entries in a CSV or Excel file, and then upload them through the import function, ensuring that all fields are correctly mapped.
How to Export Journal Entries in QuickBooks Online?
Exporting journal entries from QuickBooks Online can be done efficiently using SaasAnt Transactions. This tool allows you to customize, filter, and export your journal entries in various formats, such as Excel or CSV, according to your needs.
How to Delete Journal Entries in QuickBooks Online?
Deleting journal entries in QuickBooks Online is possible by locating the entry in your Chart of Accounts, opening it, and selecting the 'Delete' option. Be cautious, as deletion is permanent and affects your financial records.
How to Edit Journal Entries in QuickBooks Online?
Editing journal entries in QuickBooks Online involves accessing the entry through your account, making the necessary adjustments, and saving the updates. For bulk editing, SaasAnt Transactions offers a more efficient solution.
How to create journal entries in bulk?
You can create bulk journal entries in QuickBooks Online using third-party applications like SaasAnt Transactions. First, prepare your data in a spreadsheet (e.g., Excel or CSV format) with all necessary details like dates, accounts, debits, credits, and memos. Then, upload the file through SaasAnt Transactions, map the columns to the appropriate QuickBooks fields, and import the entries. This process allows you to create multiple journal entries simultaneously, saving time and ensuring accuracy.
Recommended reading:
Read also
Batch Transactions in QuickBooks Online - Detailed Guide
How to Edit Multiple Transactions in QuickBooks
How to Export Transactions from QuickBooks Online
Accounting Automation with SaasAnt Transactions: Streamline Your Financial Processes