How to Delete Journal Entry in QuickBooks Online
Managing financial records in QuickBooks is essential for maintaining accurate and up-to-date financial statements. However, there may be instances where you need to delete journal entries, whether due to errors, redundancy, or data cleanup efforts.
This article provides a detailed guide on how to delete journal entries in QuickBooks using SaasAnt Transactions, an Accountant's Favorite and User's choice award-winning app. Its purpose is to ensure that you maintain the integrity of your financial data while performing necessary deletions.
How to Delete Journal Entry in QuickBooks Online
Here’s how you can delete a journal entry in QuickBooks Online:
Log In to QuickBooks Online: Sign in to your QuickBooks Online account.
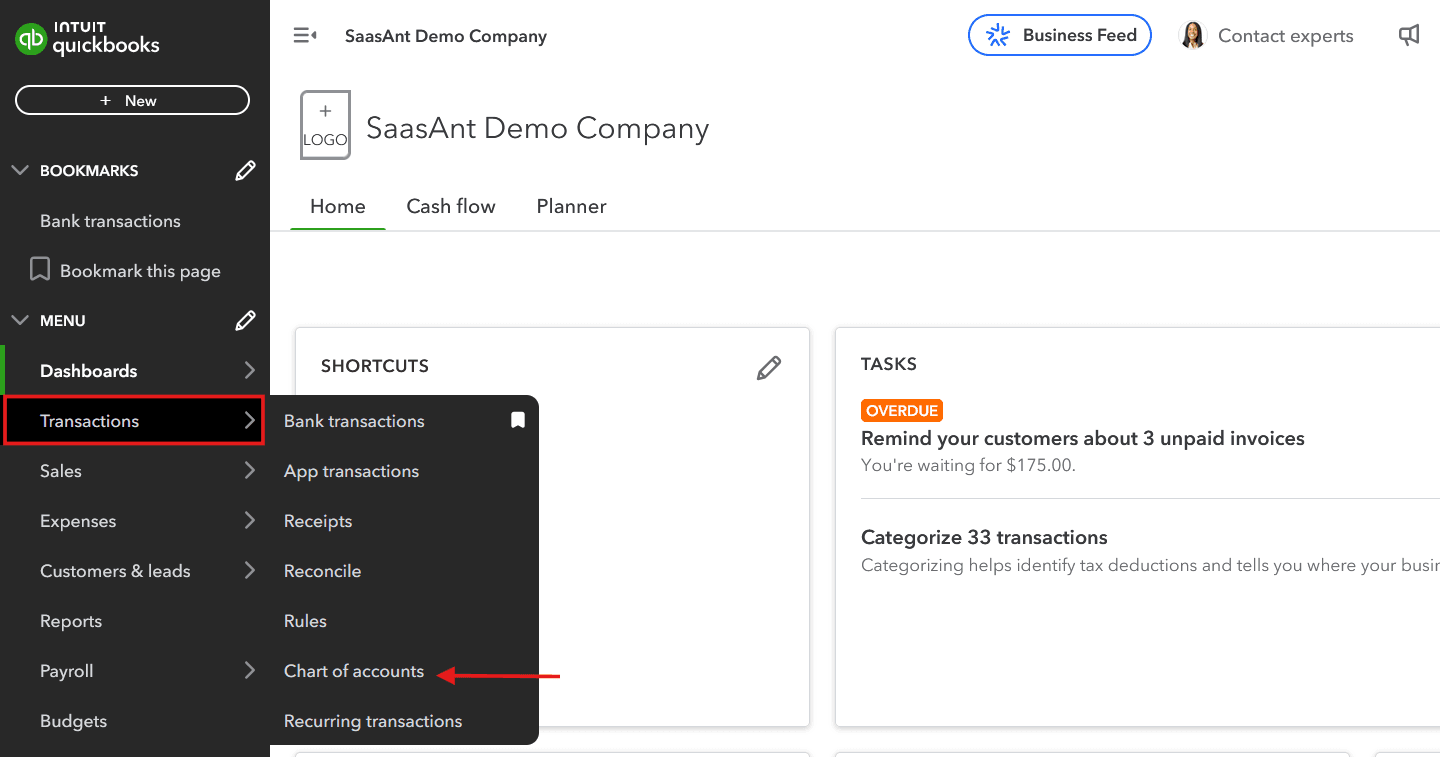
Go From the left-hand menu, click on Transactions, then select Chart of Accounts.
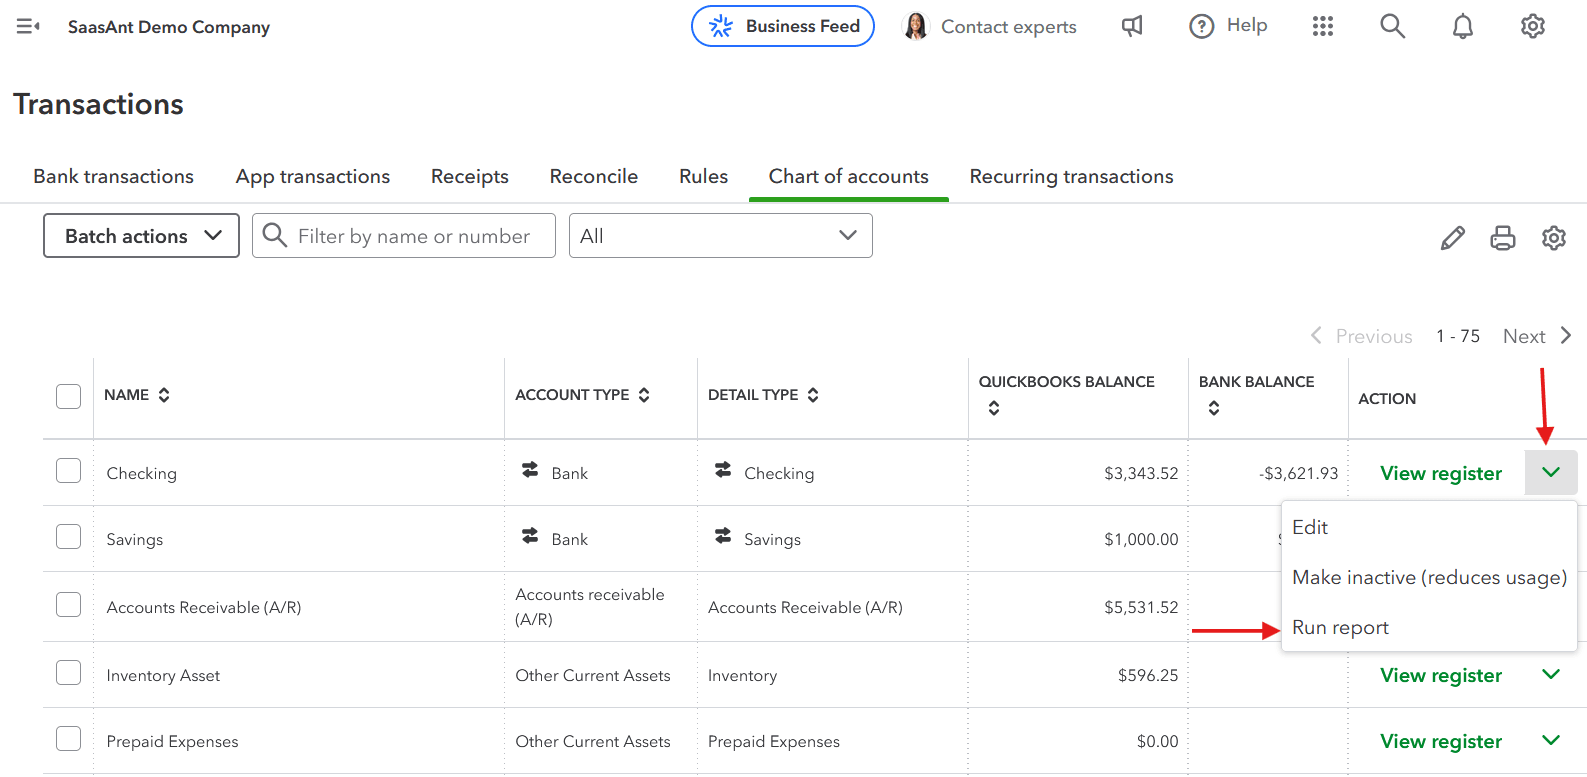
Find the Account: Locate the account associated with the journal entry. Click View register or Run report to find the entry.
Locate the Journal Entry: Search for the journal entry in the account's transaction list. You can use the search or filter options to narrow it down.
Open the Journal Entry: Click on the journal entry to open it.
Delete the Entry: In the opened journal entry window, click the More button at the bottom (or the trash icon if visible), and select Delete. Confirm the deletion when prompted.
Save Your Changes: Once deleted, the entry will no longer appear in your records.
If you don’t see the option to delete, you may need appropriate permissions or check if the entry is locked due to reconciliation. If it’s tied to a closed period, you might need to adjust the closing date settings or consult your accountant.
How to Delete a Journal Entry in QuickBooks Online: Step-by-Step Guide
Step 1: Log in to QuickBooks Online
Access your QuickBooks Online account using your credentials.
Step 2: Connect SaasAnt Transactions
Go to the QuickBooks App Store, search for "SaasAnt Transactions," and connect the app by following the prompts in the "Apps" section of QuickBooks Online.
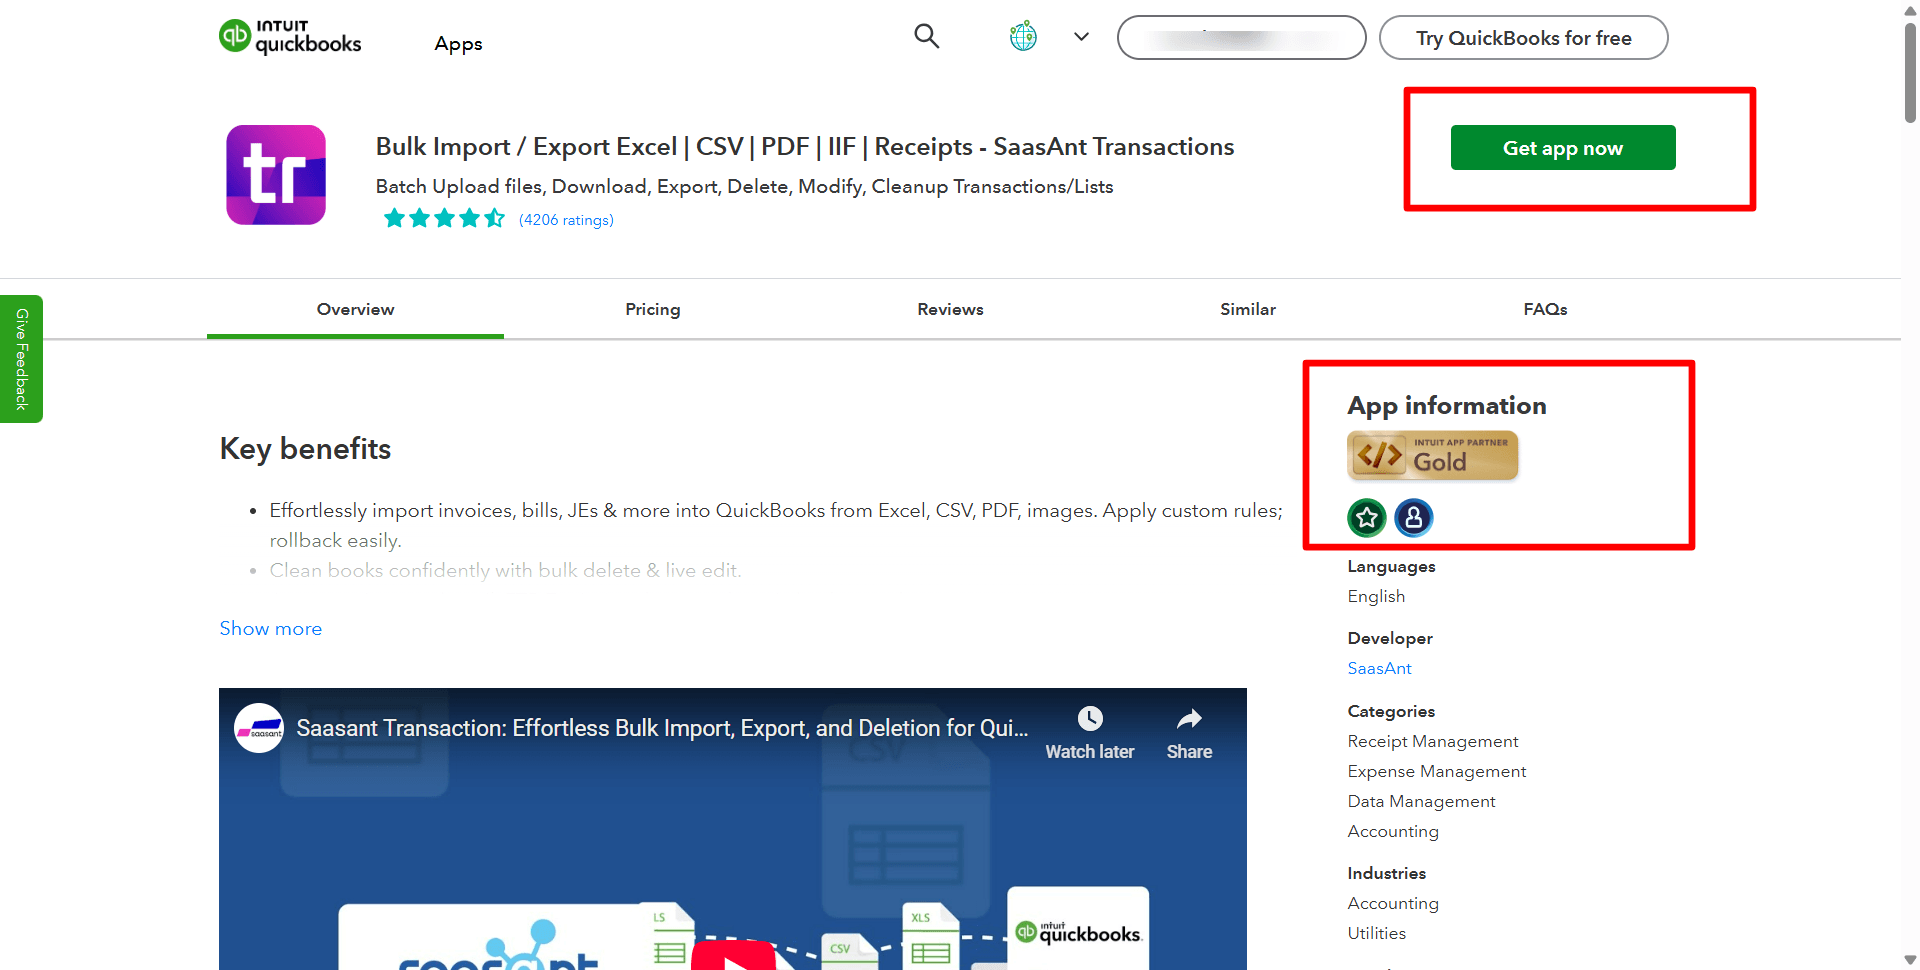
Step 3: Access SaasAnt Transactions
Once connected, access SaasAnt Transactions directly from within your QuickBooks Online account.
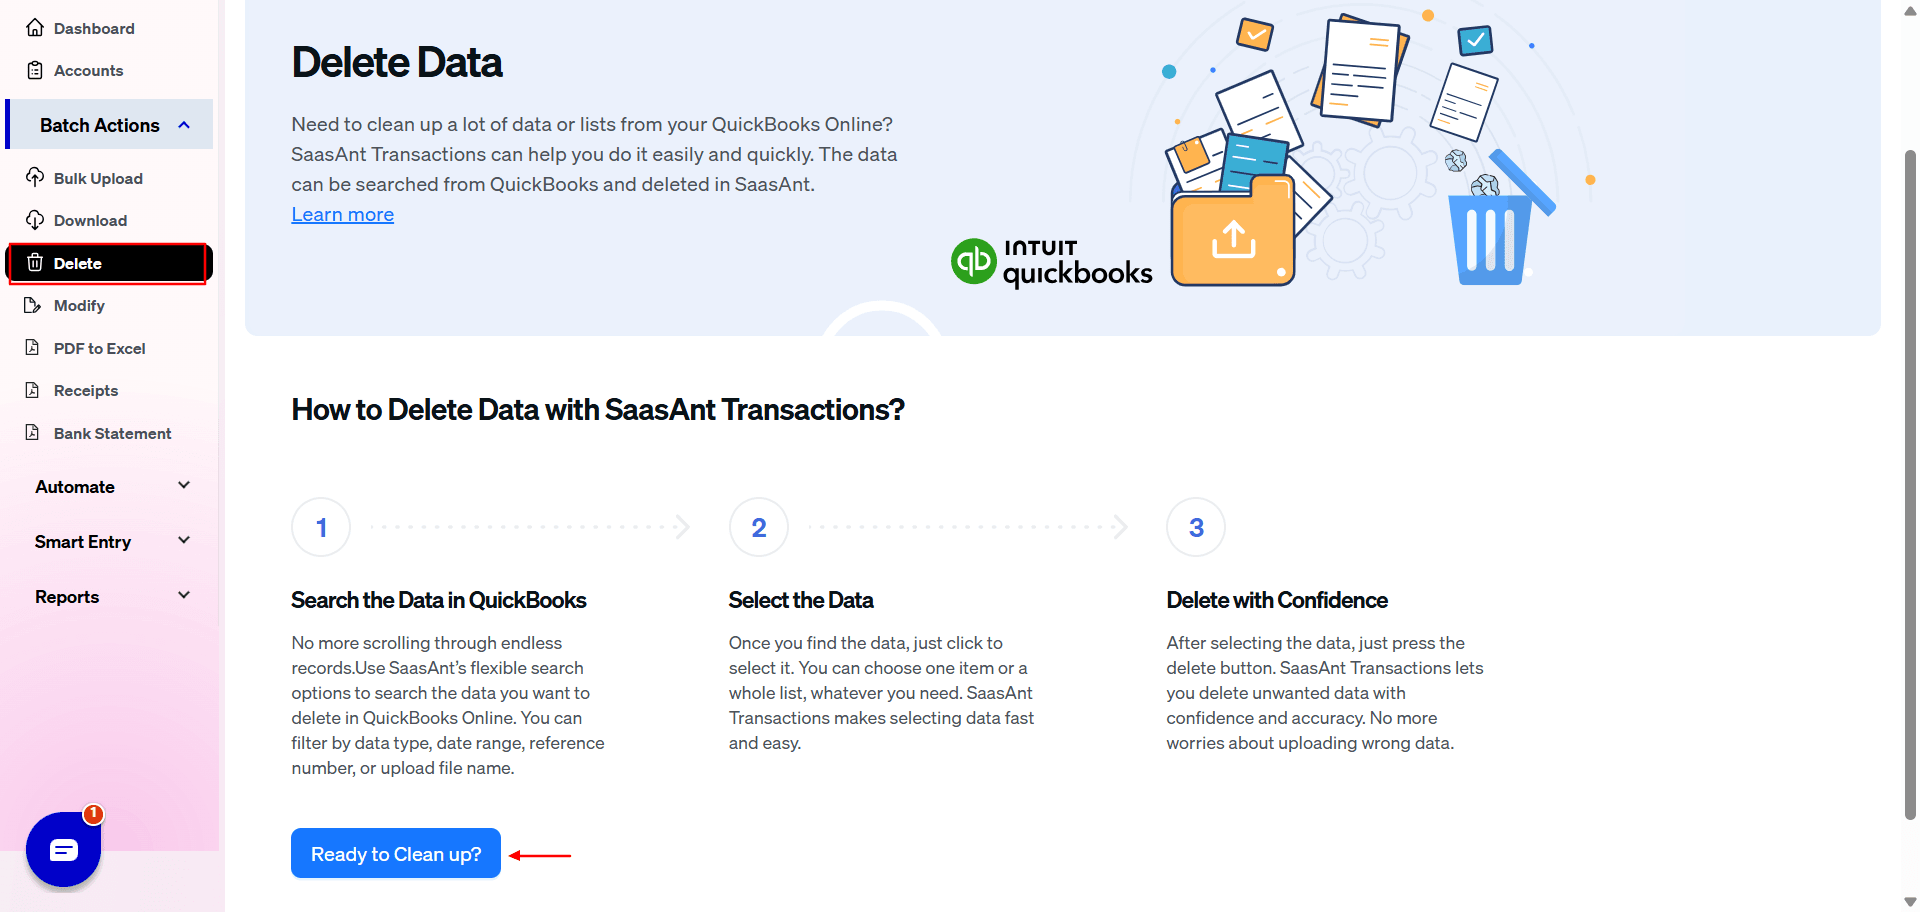
Step 4: Navigate to the Delete Feature
Inside SaasAnt Transactions, find the 'Delete' option to manage your journal entries.
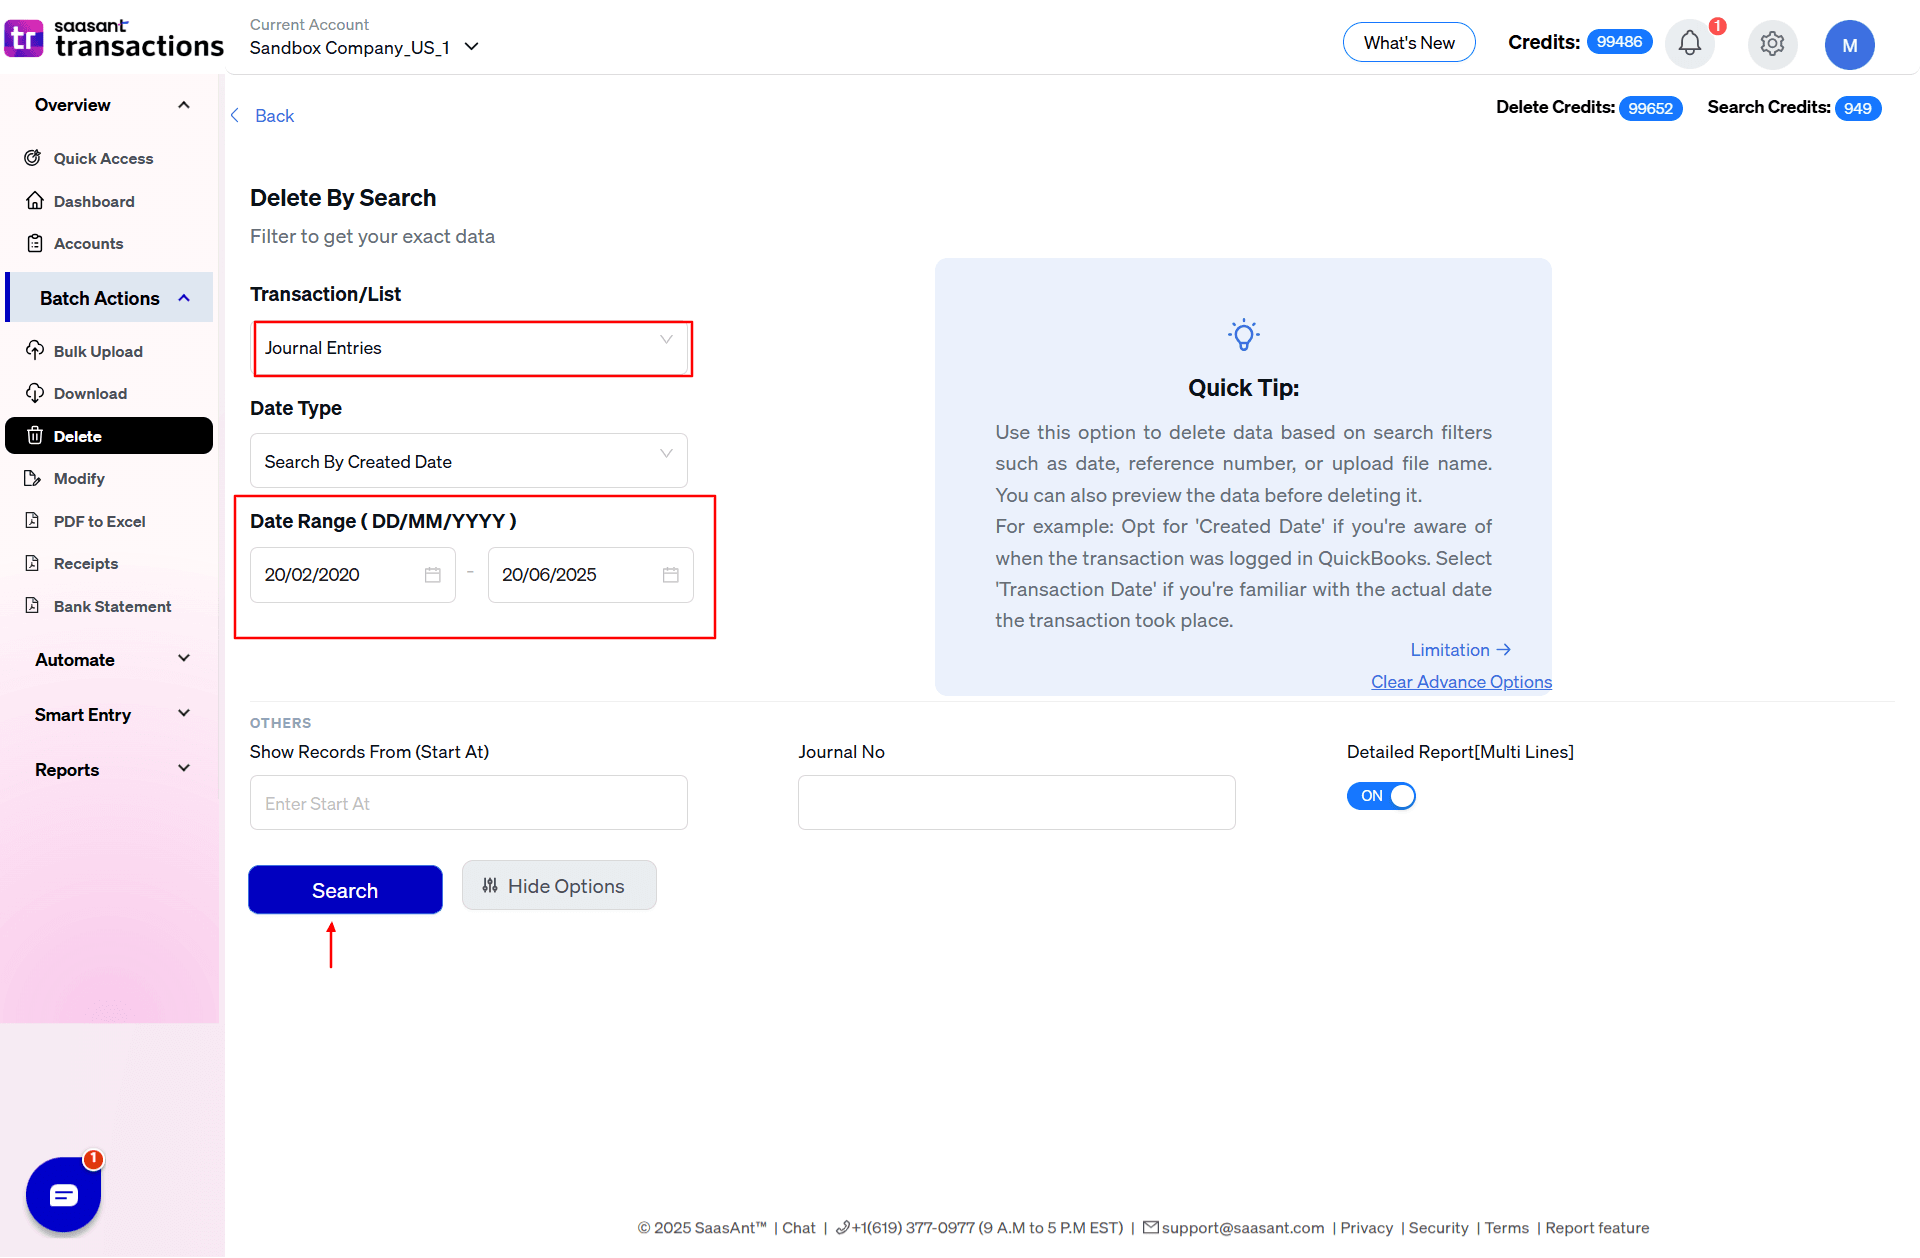
Step 5: Filter and Select Entries
Use the advanced search and filter tools to locate the journal entries you want to delete. You can filter by criteria such as date, type, or amount.
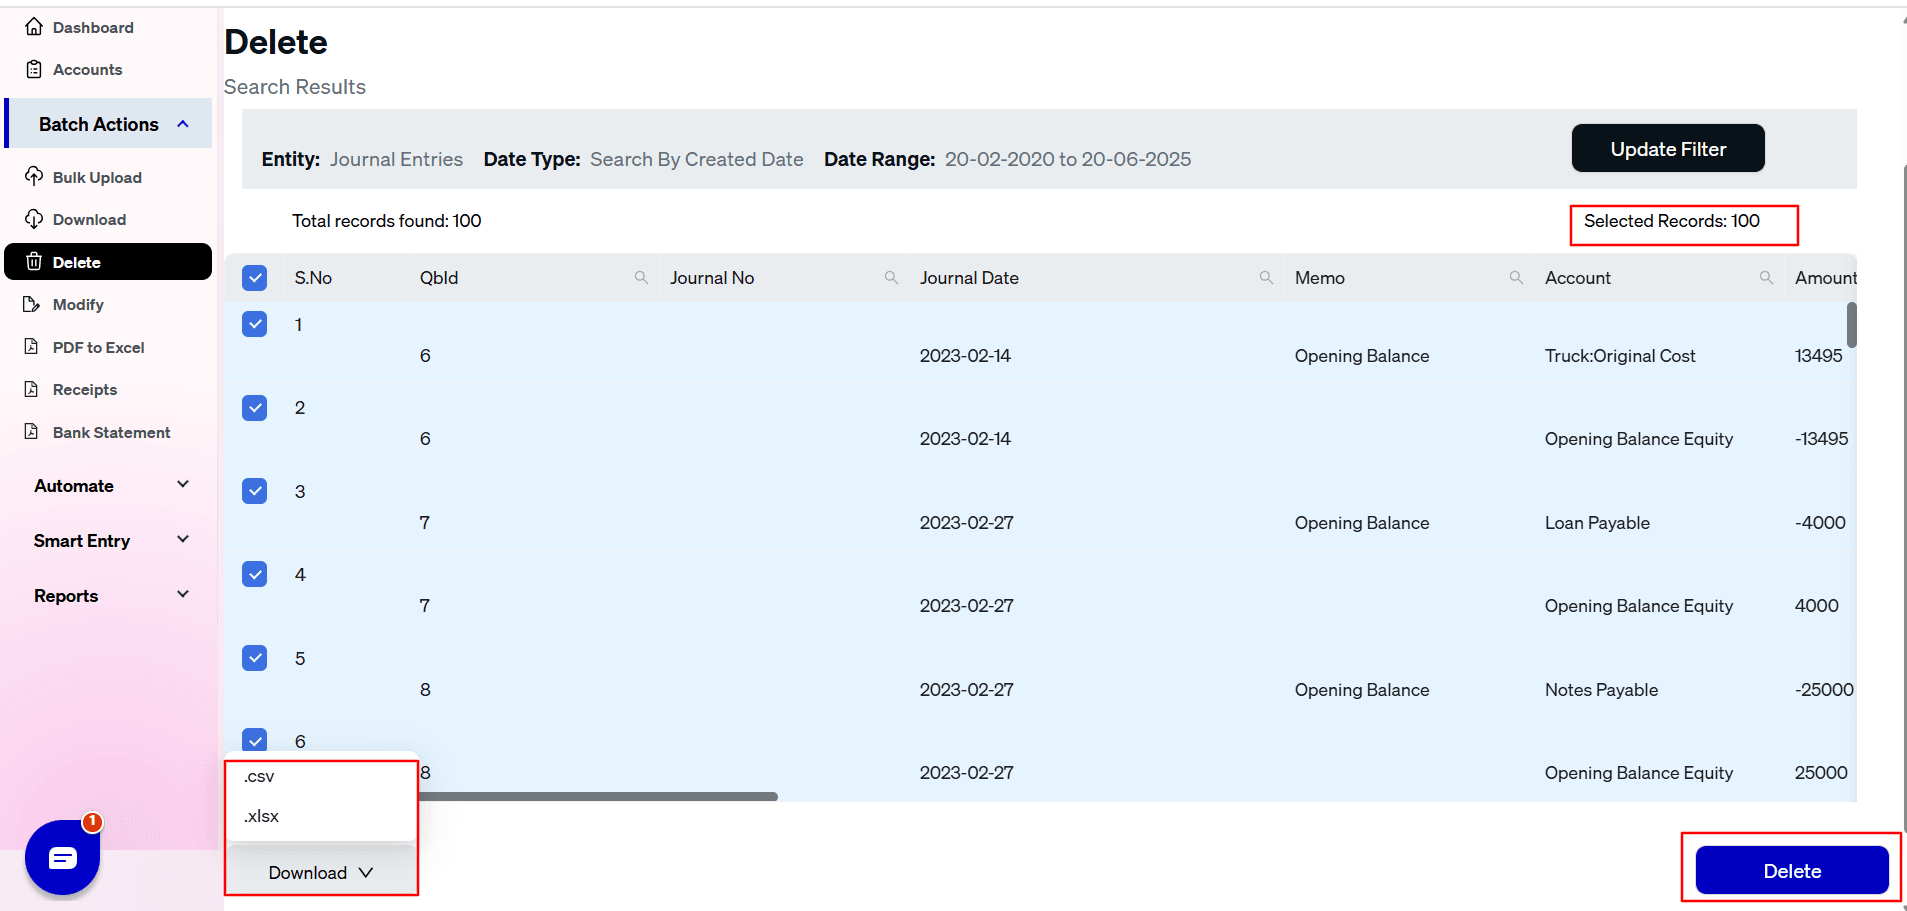
Step 6: Delete the Entries
You can back up the journal entries by clicking on Download them in excel before you delete them. After you back up the data, select the desired journal entries and confirm the deletion to complete the process.

Reasons for Deleting Journal Entries in QuickBooks Online
There are several scenarios where deleting journal entries becomes necessary:
Data Entry Errors: Mistakes like duplicate entries or incorrect amounts may occur during data entry.
Redundant Entries: Over time, you might accumulate entries that are no longer relevant or have been superseded by other records.
Data Cleanup: When organizing and streamlining your financial records, you may need to remove outdated or unnecessary entries.
How to Prepare Before Deleting Journal Entries in QuickBooks Online?
Before you begin the process of deleting journal entries, it's crucial to take the following preparatory steps:
Backup and Safety Measures
Why Backup is Important:
Using SaasAnt Transactions, creating backups becomes essential to protect your financial data. Backups allow you to restore deleted journal entries in QuickBooks, safeguarding against data loss. In case of accidental deletions or errors, you can quickly revert to the original data, preventing financial discrepancies and ensuring accurate financial reporting.Why Reviewing Entries is Important:
SaasAnt Transactions emphasizes the importance of reviewing journal entries before deletion. This careful review process prevents unnecessary gaps in your financial records, maintaining data integrity. By ensuring that deletions are intentional and necessary, you avoid disrupting your accounts or creating imbalances, which is crucial for the accuracy of your financial statements. SaasAnt Transactions provides the tools to review and manage entries effectively, helping you maintain a reliable financial record.
Benefits of Using SaasAnt Transactions for Deleting Journal Entries
SaasAnt Transactions offers several key benefits for managing and deleting journal entries in QuickBooks Online:
Efficient Deletion: SaasAnt Transactions streamlines the deletion process, allowing you to delete multiple journal entries in bulk, saving time and reducing manual effort.
Error Reduction: The advanced filtering and search tools help you accurately identify the entries you need to delete, minimizing the risk of accidental deletions and ensuring data accuracy.
Data Integrity: By providing a clear overview and control over your entries, SaasAnt Transactions helps maintain the integrity of your financial records, supporting consistent and accurate financial reporting.
Conclusion
Deleting journal entries in QuickBooks Online is a critical task that requires careful attention. By following the steps outlined in this guide and leveraging tools like SaasAnt Transactions, you can efficiently manage and delete journal entries while maintaining the accuracy and integrity of your financial records. To explore these risk-free features, SaasAnt offers a 30-day free trial, allowing you to experience the tool's full capabilities before committing. To learn more, read about managing journal entries in QuickBooks.
Youtube tutorial on how to delete data in QuickBooks:
FAQ’S
How Do I Delete a Journal Entry in QuickBooks Online?
To delete a journal entry in QuickBooks Online, follow these steps:
Go to the Accounting section.
Select Chart of Accounts and find the account associated with the journal entry.
Open the account register and locate the journal entry using the journal number or the date.
Once found, click on the journal entry to open it.
Click the Delete button at the bottom of the screen and confirm by selecting Yes.
Make sure you're absolutely sure you need to delete the journal entry, as this can impact your company’s financial records.
How Can I Reverse a Journal Entry in QuickBooks Online?
To reverse a journal entry in QuickBooks Online, follow these steps:
Locate the original journal entry by going to the account register.
Open the entry and select Reverse to automatically create a new journal entry that swaps the debits and credits.
Make sure to review the new entry before saving it to ensure accuracy in your financial reporting.
Reversing is a great way to fix a mistake without permanently deleting the original journal entry.
Can I Delete Multiple Journal Entries at Once in QuickBooks Online?
Unfortunately, QuickBooks does not offer the option to delete multiple journal entries at once. You must delete each journal entry individually. For bulk corrections or deletion, it’s recommended to get the help of your accountant or consider using a third-party tool.
What Should I Do If I Accidentally Created a Journal Entry between Two Accounting Periods?
If you've created a journal entry between two accounting periods, you may need to correct or allocate a transaction to ensure your financial statements remain accurate. You can either reverse the original journal entry or create a new journal entry to balance the accounts across the periods. Always double-check your balance sheets and consult your accountant to ensure everything is reconciled correctly.
What Does It Mean If I Cannot Delete a Journal Entry Because It’s Reconciled?
If you're unable to delete a journal entry in QuickBooks because it's marked as reconciled, it means the entry has been included in a completed reconciliation process. To address this:
First, ensure you're absolutely sure you need to delete the entry.
You may need to reverse the entry rather than deleting it.
Alternatively, create a new journal entry to adjust the debits and credits if needed.
How Can I Fix a Debit and Credit Error without Deleting the Journal Entry?
If you made a debit and credit error in a journal entry but prefer not to delete it, you can fix the error by editing the journal entry:
Locate the journal entry in the account register.
Open the entry and make the necessary changes to correct the debits and credits.
Save the updated entry to ensure your financial records are accurate.
If the error spans two accounting periods, consider creating a new entry to allocate a transaction correctly.
How Do I Find a Specific Journal Entry in QuickBooks Online?
To find a journal entry in QuickBooks Online:
Go to the Accounting section and click on Chart of Accounts.
Open the relevant account register.
Use filters such as the journal number, type column, or date (e.g., "first day of the month") to locate the specific journal entry.
For faster navigation, use the search feature in QuickBooks to input keywords like the ref number or debit amount.
What Are the Steps to Permanently Delete a Journal Entry in QuickBooks Online?
To permanently delete a journal entry in QuickBooks Online, ensure the entry isn’t reconciled or crucial for financial data:
Go to the account register.
Locate the journal entry you wish to delete.
Click on the entry, then select ‘Delete’ at the bottom of the screen.
Confirm the deletion by clicking ‘Yes.’
Deleting journal entries can quickly unbalance your accounts, so be sure to consult with your accountant if you're unsure.
Why Does QuickBooks Sometimes Create a New Journal Entry after a Deletion?
QuickBooks might create an adjusting journal entry if you delete an entry that affects your reconciled transactions or accounting periods. This ensures the accuracy of your financial records and balances your accounts accordingly. If this happens, review the new journal entry to understand the changes and consult your accountant if necessary.
What Should I Do If I Need to Delete a Journal Entry That Affects Two Accounting Periods?
If you need to delete a journal entry that impacts two accounting periods, it’s important to take the following steps:
Reverse the journal entry rather than directly deleting it to maintain your financial records.
If deletion is necessary, ensure to create a new journal entry that appropriately balances the debits and credits across both periods.
Always consult with an accountant to confirm that your income statement and general ledger remain accurate.
How to Edit Journal Entries in QuickBooks Online?
To edit a journal entry in QuickBooks Online, navigate to the 'Accounting' tab, select 'Chart of Accounts,' and locate the account containing the journal entry. Find the specific entry, click to open it, make your changes, and then save the updates. For bulk edits, you can use tools like SaasAnt Transactions to streamline the process.
How to Create a Journal Entry in QuickBooks Online?
To create a journal entry in QuickBooks, go to the 'New' button on the left-hand menu, select 'Journal Entry' under the 'Other' category, and fill in the required details, such as accounts, debits, credits, and memos. Once completed, click 'Save and Close' to record the entry.
Can I Import Journal Entries into QuickBooks Online?
Yes, you can import journal entries into QuickBooks Online using tools like SaasAnt Transactions or QuickBooks’ built-in import feature. Prepare your journal entries in a CSV or Excel format, then follow the import steps to upload and map the data to the appropriate fields in QuickBooks.
Recommended reading: