How to Delete Multiple Expenses in QuickBooks Online
QuickBooks is a great tool for managing your business finances, but deleting multiple expenses or sorting through lots of data can take time and effort. This is where SaasAnt Transactions comes into play. This tool helps by adding features that make it much easier to handle lots of transactions at once, like deleting many expenses quickly and finding specific transactions easily.
This blog will further walk you through how to delete multiple expenses in QuickBooks using SaasAnt Transactions and the benefits of using SaasAnt Transactions for this deletion process.
Contents
How to Delete Multiple Expenses in QuickBooks Online: Quick Instructions
How to Delete Multiple Expenses in QuickBooks Online: Step-by-Step Guide
Conclusion
FAQs
How to Delete Multiple Expenses in QuickBooks Online: Quick Instructions
Log in to SaasAnt Transactions with your Intuit credentials.
Navigate to 'Delete' and select 'Initiate Cleanup.'
Identify and select unwanted transactions/lists with advanced filters
Select the expenses you wish to delete, click 'Delete,' and confirm by clicking 'Ok.'
Deleting multiple expenses in QuickBooks using SaasAnt Transactions
Deleting multiple expenses is often necessary for correcting errors, removing duplicates, or reorganizing accounts. However, it can be challenging due to time constraints, risk of data loss, impact on linked transactions, and disruption of audit trails. QuickBooks Online (QBO) lacks native bulk deletion tools, making the process tedious.
SaasAnt Transactions simplifies bulk expense management in QBO through its automation and customization features. It allows users to efficiently filter, select, and delete multiple expenses in a few clicks, saving significant time.
How to Delete Multiple Expenses in QuickBooks Online: Step-by-Step Guide
Let’s look into the detailed step-by-step process of deleting multiple expenses in QuickBooks Online using SaasAnt Transactions. SaasAnt offers a user-friendly interface and makes the process straightforward.
Step 1: Connect to SaasAnt Transactions
Connect your QuickBooks account with SaasAnt Transactions. Then, click on the company you want to delete the transaction from.
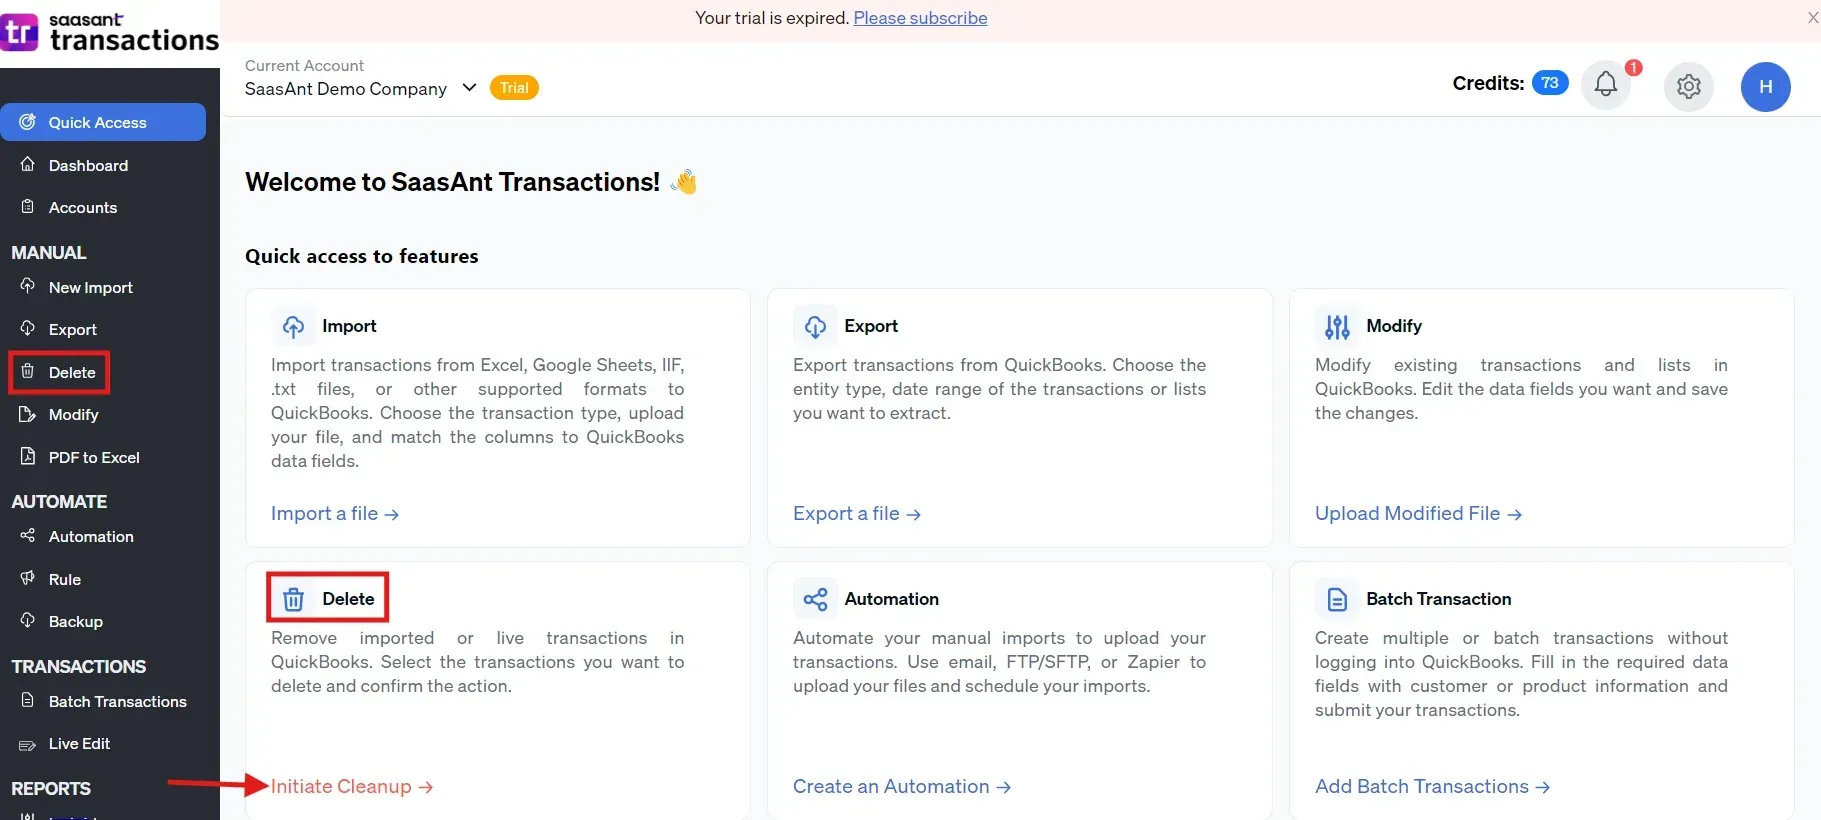
Step 2: Initiate Cleanup
Click on Delete and select ‘Initiate Cleanup.’
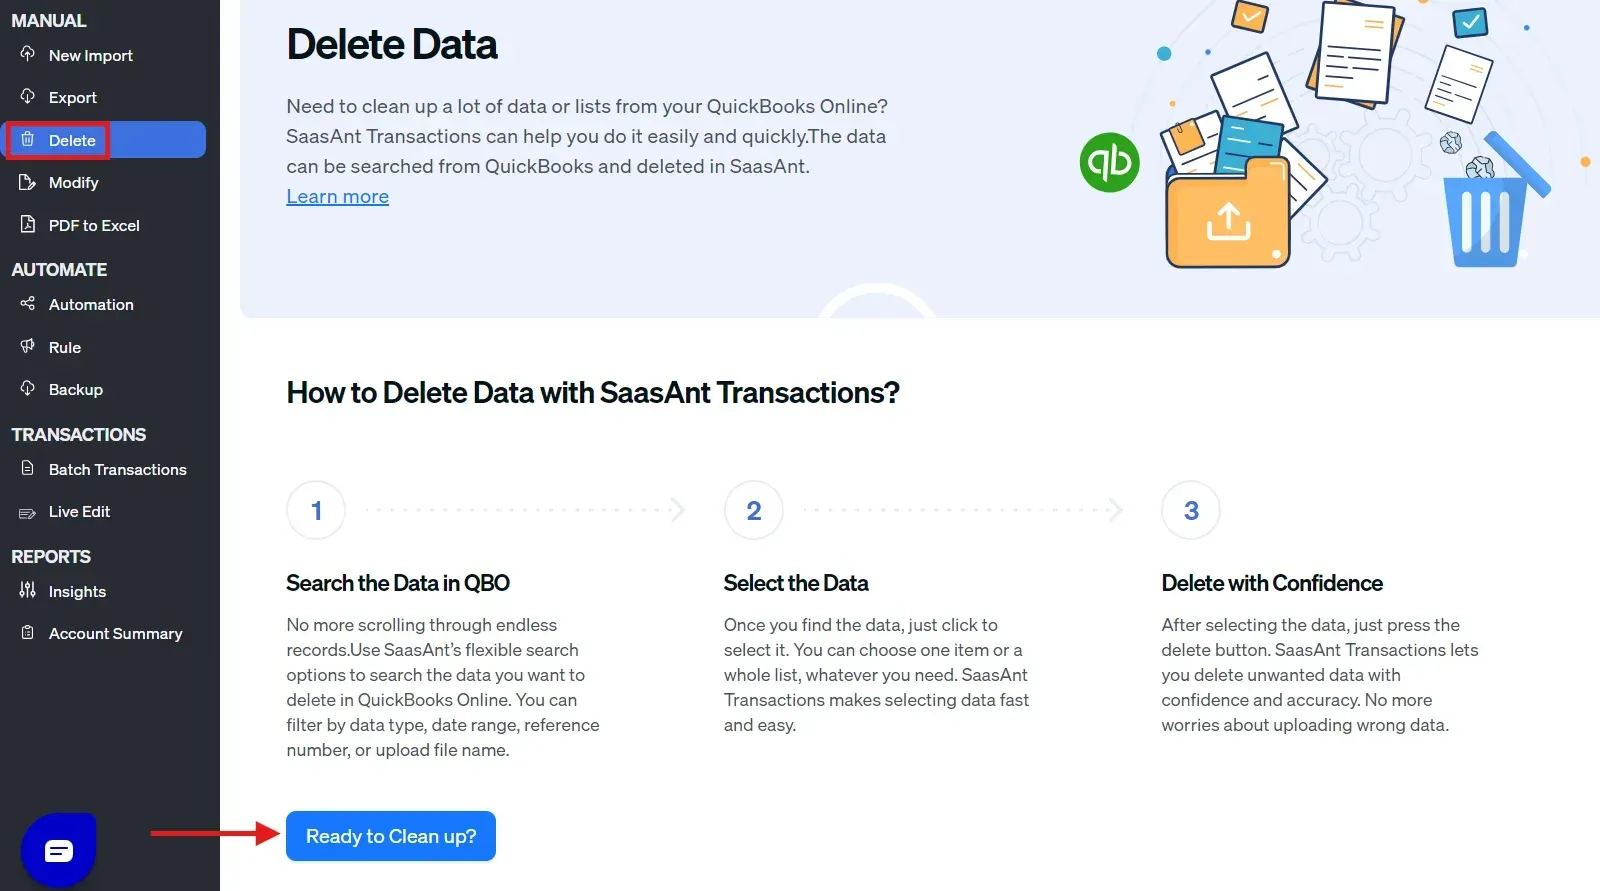
Step 3: Prepare for Deletion
Click ‘Ready to clean up,’ select ‘Delete by Searching,’ and click ‘Next.’
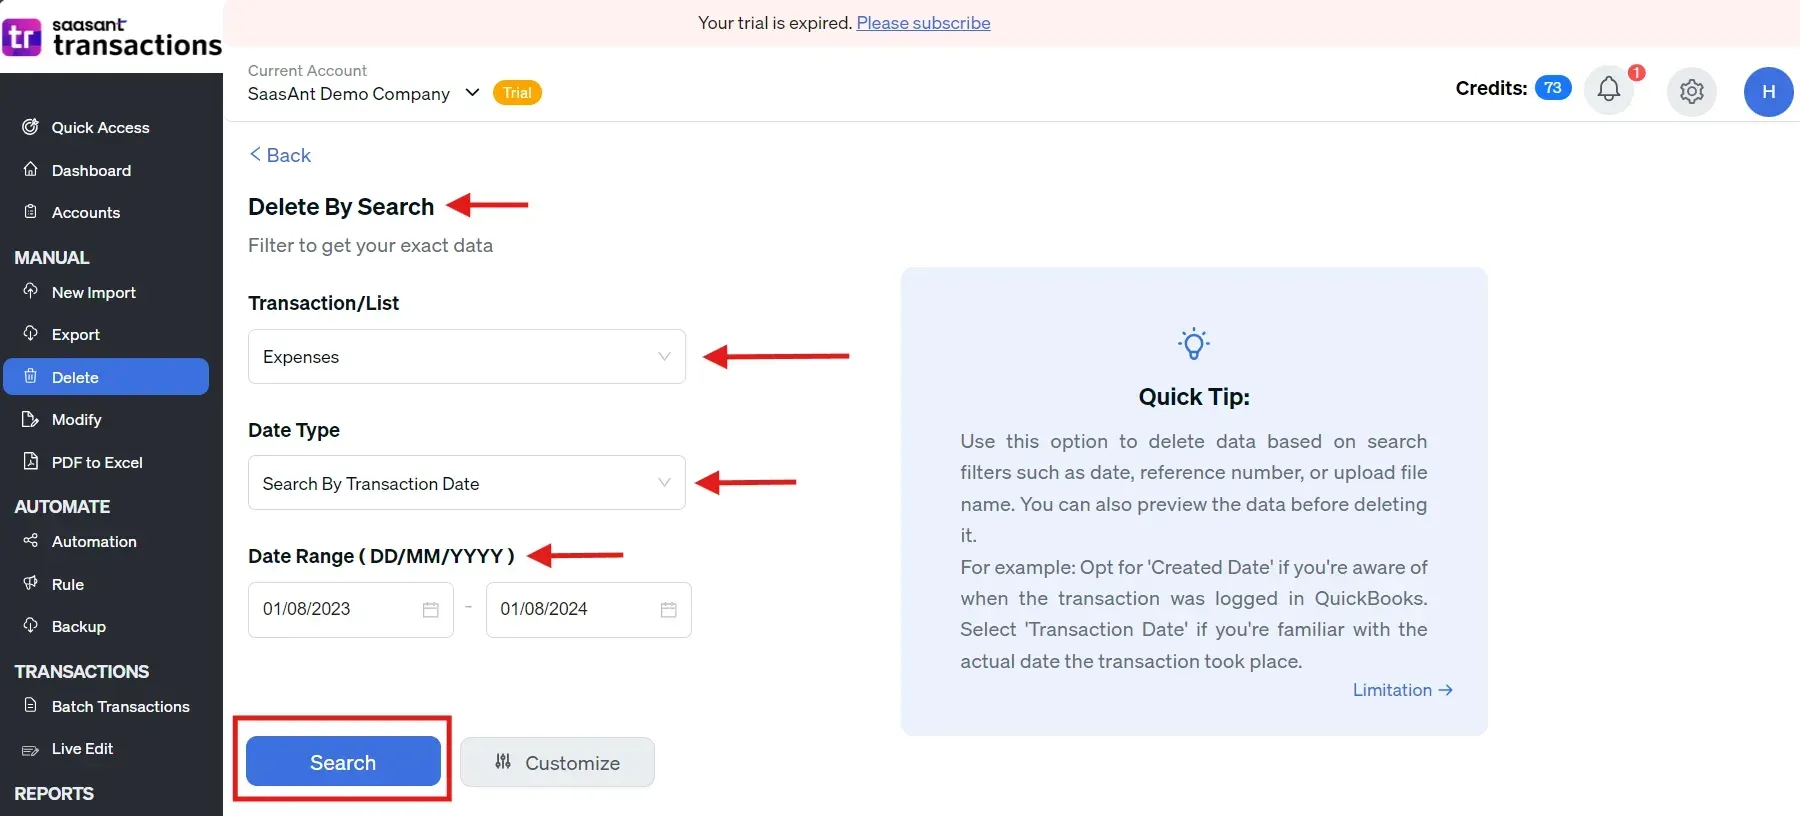
Step 4: Select Transactions
Now choose ‘Expenses’ from the transaction/list, select ‘Search by Transaction Date,’ choose the date range you want to delete the transaction and click ‘Search.’ Also, you can use the advanced filter to search filters such as date, reference number, or upload file name.
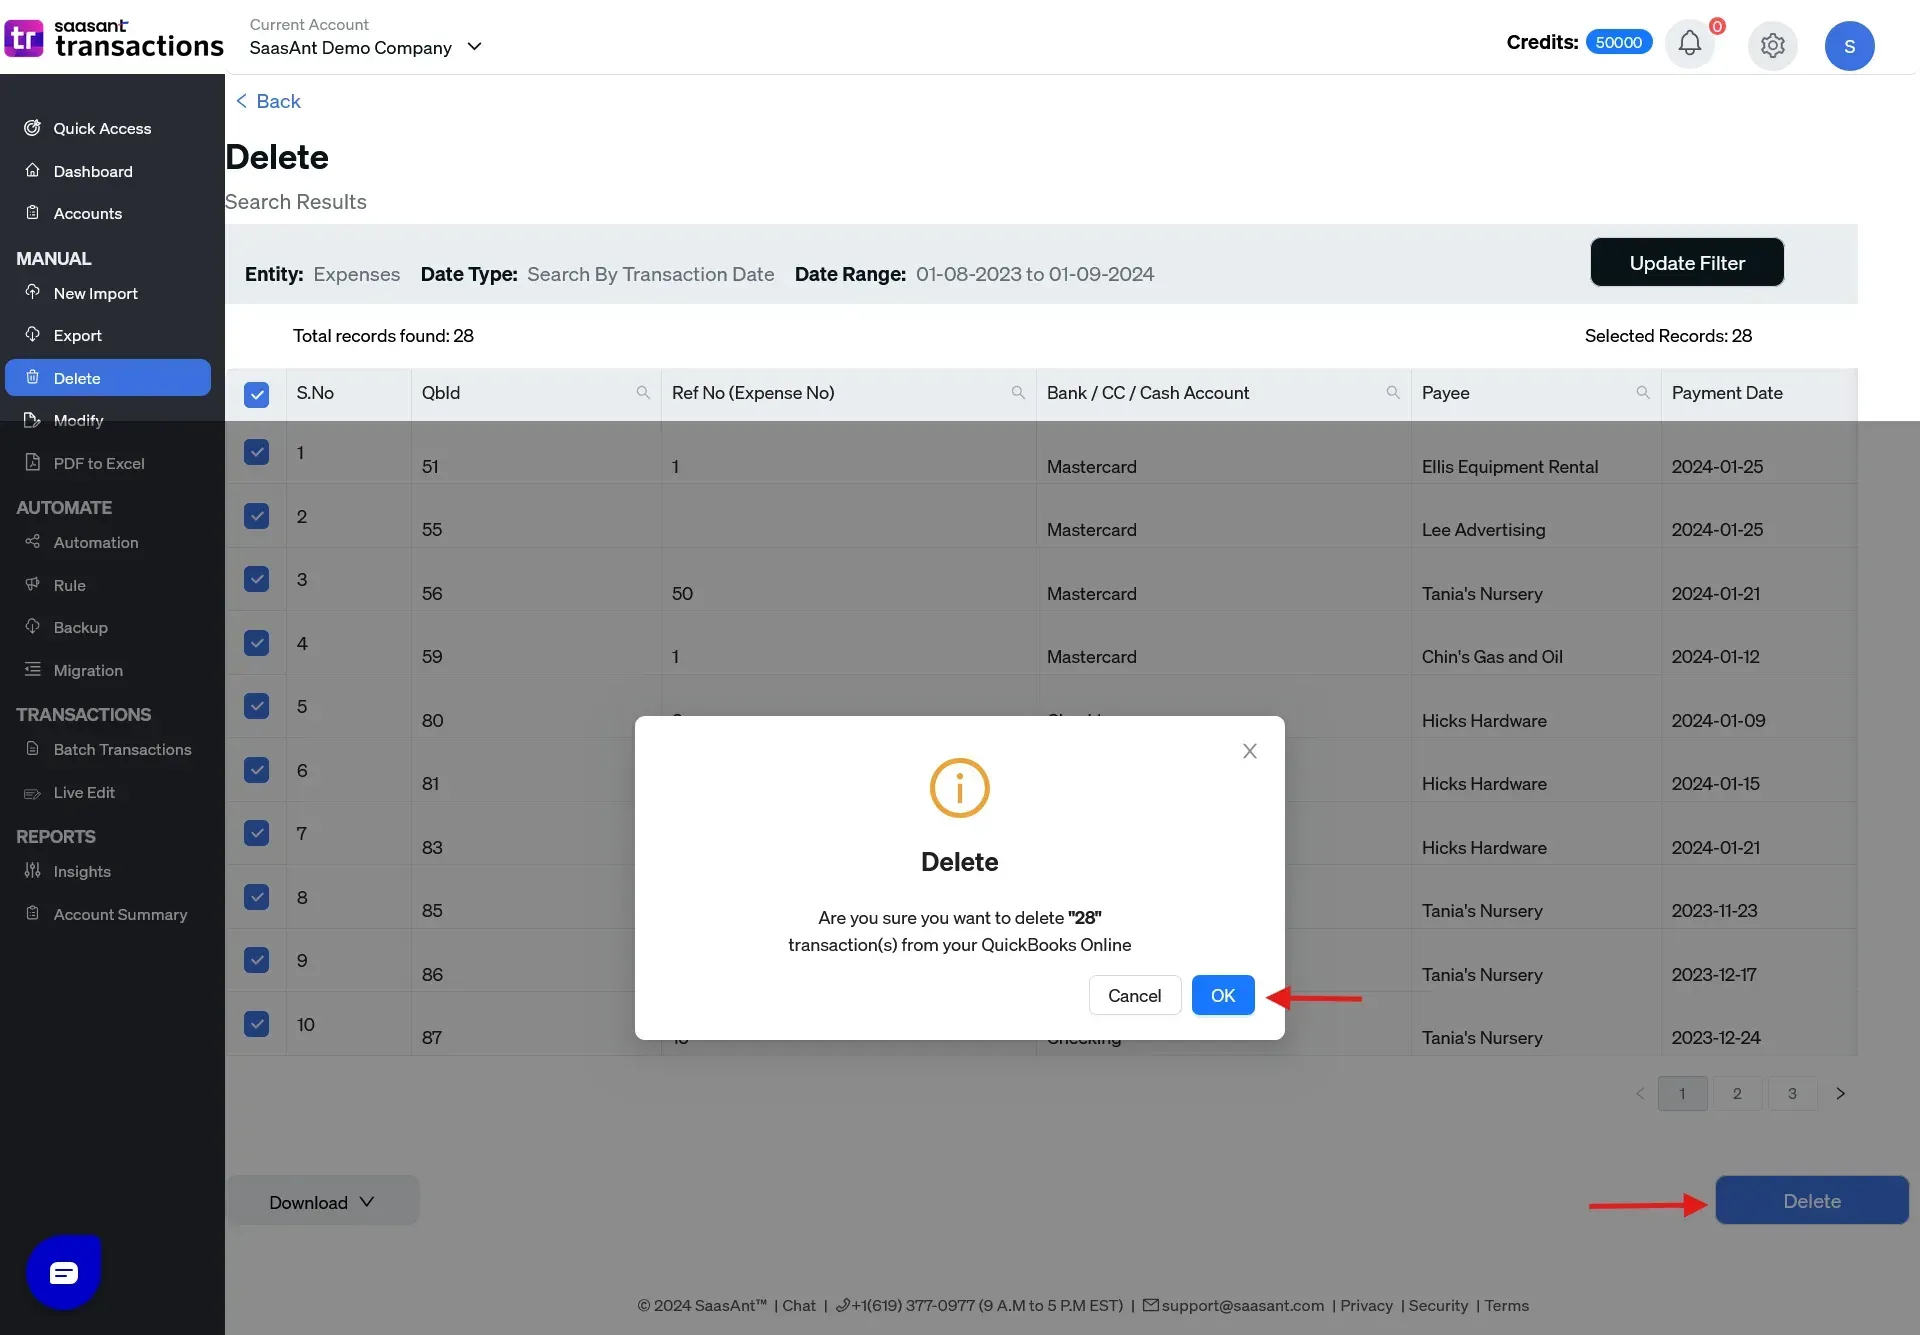
Step 5: Confirm Deletion
Once selected, click on ‘Delete’ and click on ‘Ok’ to confirm the deletion. Note: Ensure to use the download feature to back up your data before completely deleting the transactions.
Benefits of Connecting SaasAnt Transactions to QuickBooks for Deleting Expenses
Let’s look at the benefits of connecting SaasAnt Transactions to QuickBooks for deleting expenses.
Bulk Deletion for Efficiency
One of the primary advantages of using SaasAnt Transactions with QuickBooks is the ability to perform bulk deletions. This feature allows users to remove multiple expenses at once, significantly saving time and reducing the manual effort typically required to clean up financial records.
Data Backup Before Deletion
SaasAnt Transactions stands out with its unique feature that allows users to download data for backup before deletion. This ensures that businesses have a secure copy of their expense data, offering peace of mind in case of accidental deletion or needing to review historical records.
Flexible Deletion Methods
The application provides flexible options for deleting expenses. Users can delete by searching directly for specific transactions or using a reference. This flexibility ensures precise control over which records are removed, aligning with the business’s needs.
Advanced Filters for Targeted Deletion
Advanced filters are available within SaasAnt Transactions, enabling users to delete expenses based on specific criteria such as date range, reference number, or the name of the upload file. These filters allow for targeted deletion, only removing the intended data.
Data Preview Before Deletion
Before finalizing any deletion, SaasAnt Transactions offers a preview of the data. This feature allows users to verify the selected transactions, ensuring that the correct data is being removed, which helps prevent costly mistakes.
Best Practices for Managing Deleted Expenses and Maintaining Accurate Records
Properly managing deleted expenses is crucial for maintaining the integrity of your financial records. Here are some best practices to follow:
Document the Reason for Deletion: Always note why an expense was deleted. This documentation helps maintain transparency and provides context for future audits or reviews.
Use the Audit Trail: QuickBooks has an audit trail feature that tracks changes to your financial records. Review the audit trail regularly to ensure all deletions are justified and documented.
Backup Your Data: Before making significant changes, such as deleting multiple expenses, ensure you have a backup of your QuickBooks data. This precaution allows you to restore your records if necessary.
Regular Reconciliation: Regularly reconcile your accounts to identify discrepancies early. This practice helps catch errors that might otherwise lead to the unnecessary deletion of expenses.
Set Permissions: Set user permissions to control who can delete transactions in QuickBooks. Limiting deletion rights to only a few trusted individuals can reduce the risk of accidental deletions and maintain data integrity.
Conclusion
Managing and deleting multiple expenses in QuickBooks is a straightforward process that greatly enhances financial management efficiency. By using SaasAnt Transactions, you can maintain a clean and accurate ledger, saving time and reducing potential errors. To safeguard your financial records, regularly backup your data before performing deletions. To further explore these benefits, SaasAnt offers a 30-day free trial, allowing you to experience these features firsthand before committing.
FAQs
How to delete multiple expenses in QuickBooks?
To delete multiple expenses in QuickBooks, follow the below steps:
Open SaasAnt Transactions and connect it with your QuickBooks account.
Open SaasAnt Transactions, click on ‘Delete,’ and click on ‘Initiate Clean Up.’
Select ‘Date by Searching’ and choose the preferred date range.
Click on ‘Ok’ to confirm deleting multiple expenses in QuickBooks.
How do I clear all expenses in QuickBooks?
To clear all expenses in QuickBooks, follow the below steps:
Launch SaasAnt Transactions and link it with your QuickBooks account.
In SaasAnt Transactions, select ‘Delete,’ then click ‘Initiate Clean Up.’
Choose ‘Date by Searching’ and set your desired date range.
Click ‘Ok’ to confirm the deletion of multiple expenses in QuickBooks.
How to Import Expenses in QuickBooks Online using SaasAnt Transactions?
To import expenses in QuickBooks Online using SaasAnt Transactions:
Log into SaasAnt Transactions using your Intuit QuickBooks credentials.
Navigate to the Import Section and select 'Expenses'.
Ensure the expense data file is in the required format (All formats supported, PDF, Images, IIF, CSV, Excel).
Match the columns in your file to the corresponding fields in QuickBooks.
Validate the data and confirm the import. Check for any errors and make necessary adjustments.
How to Export Expenses in QuickBooks Online using SaasAnt Transactions?
To export expenses in QuickBooks Online using SaasAnt Transactions:
Access SaasAnt Transactions and sign in with your credentials.
Go to the Export Section and choose 'Expenses'.
Filter the expenses by date, category, or other relevant parameters.
Select the Export Format (e.g., CSV, Excel) and customize the data fields to include in the export.
Initiate the export and download the file once complete.
How to Edit Expenses in QuickBooks Online?
To edit expenses in QuickBooks, follow the below steps:
Login to your QuickBooks account.
Click on ‘Expenses,’ select the Expense, and choose the edit option.
Make Necessary Changes to the expense details such as amount, category, or date.
Confirm the modifications and update the record in QuickBooks.
What convenience does SaasAnt offer when downloading backups?
SaasAnt Transactions makes downloading backups easy with just a few clicks, providing data in accessible formats like Excel or CSV. This convenience allows you to quickly safeguard your data without interrupting your workflow, allowing you to focus on other important tasks.
Recommended reading:
Online