How to Edit a Check in QuickBooks Online
 Editing checks in QuickBooks Online is an essential task to keep your records accurate and up-to-date. Whether you need to correct a single entry or make changes to multiple checks at once, there’s an easy way to streamline the process. This guide will walk you through how to quickly find and edit checks, saving time and reducing errors in your financial records.
Contents
How to Edit Checks in QuickBooks Online: Step-by-step guide
Utilizing the Live Edit Feature in SaasAnt Transactions
Edit Transactions in QuickBooks Online Using Live Edit: Step-by-Step Guide
Wrap Up
FAQs
How to Edit Checks in QuickBooks Online: Step-by-step guide
In QuickBooks Online, there are scenarios where you may need to update your existing checks. Modifying these checks can be efficiently done using the SaasAnt Transactions application. Below, we outline two methods for updating your transactions:
Method 1: Using Your File.
Method 2: Export and Modify.
Method 1: Using Your File
This method is ideal if you have a reference number (Check No) associated with your transactions. SaasAnt Transactions uses this reference number to locate and update the relevant transactions.
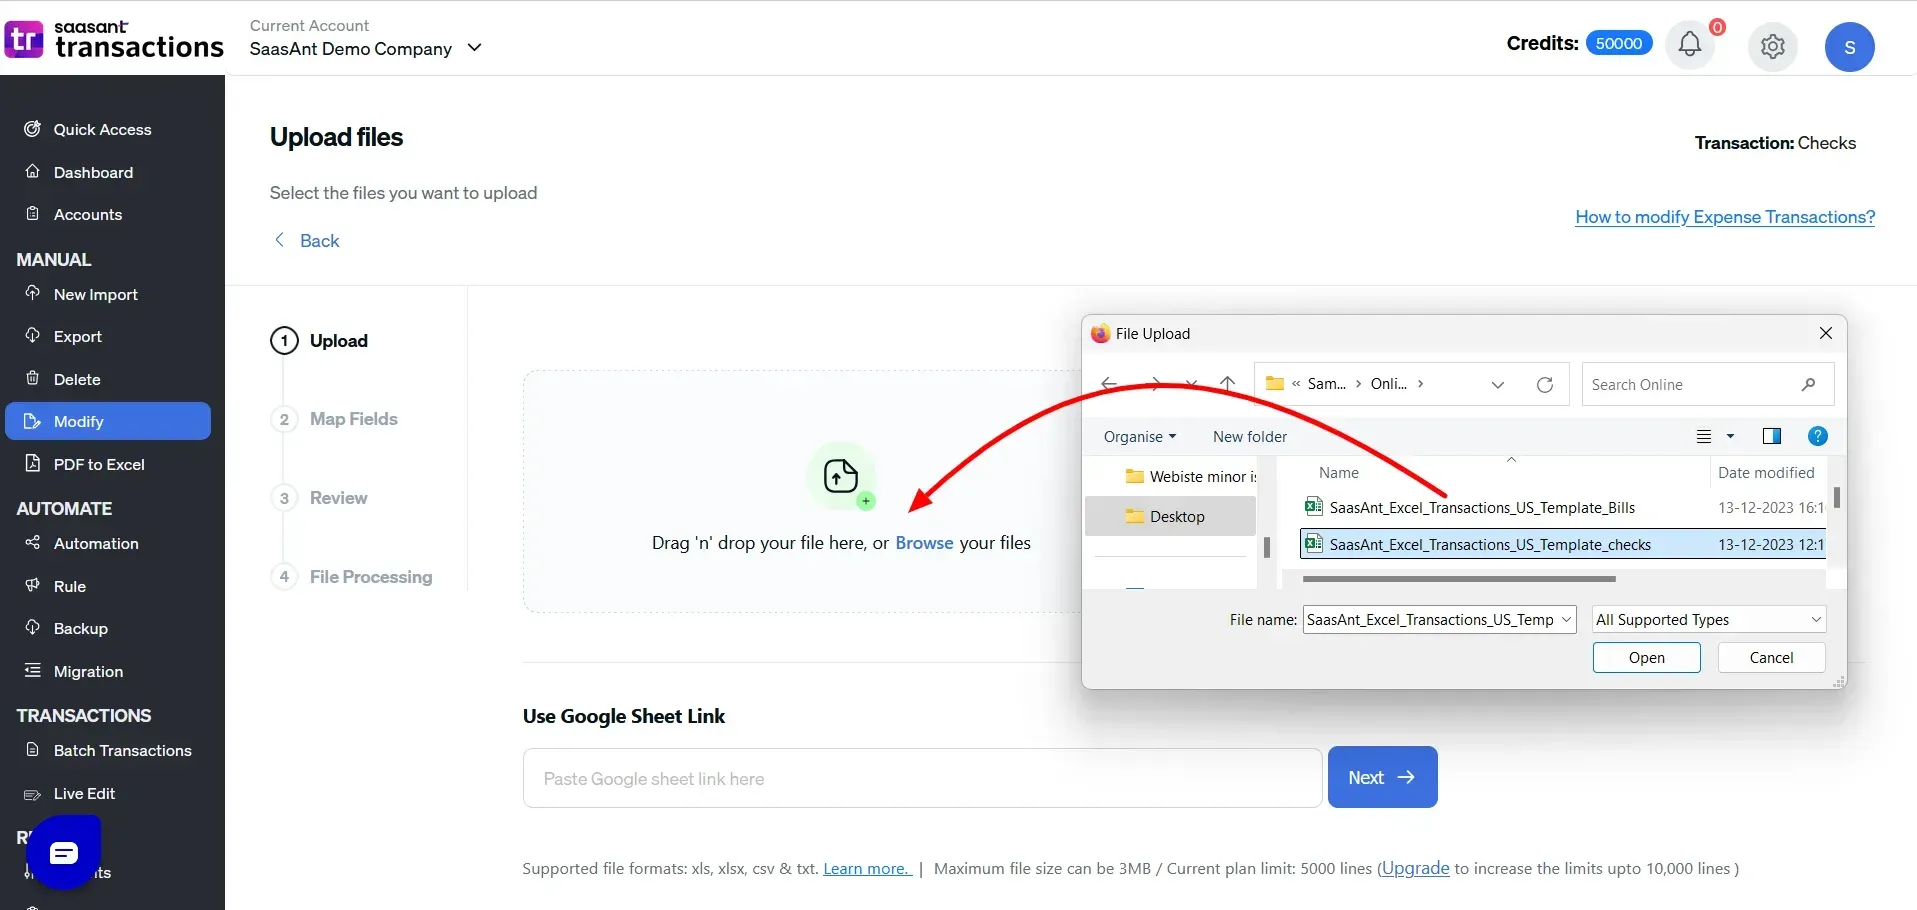
Step 1: Upload Your File
Navigate to the ‘Modify’ menu in SaasAnt Transactions and select ‘Checks.’
Upload the file containing the transactions you wish to update.
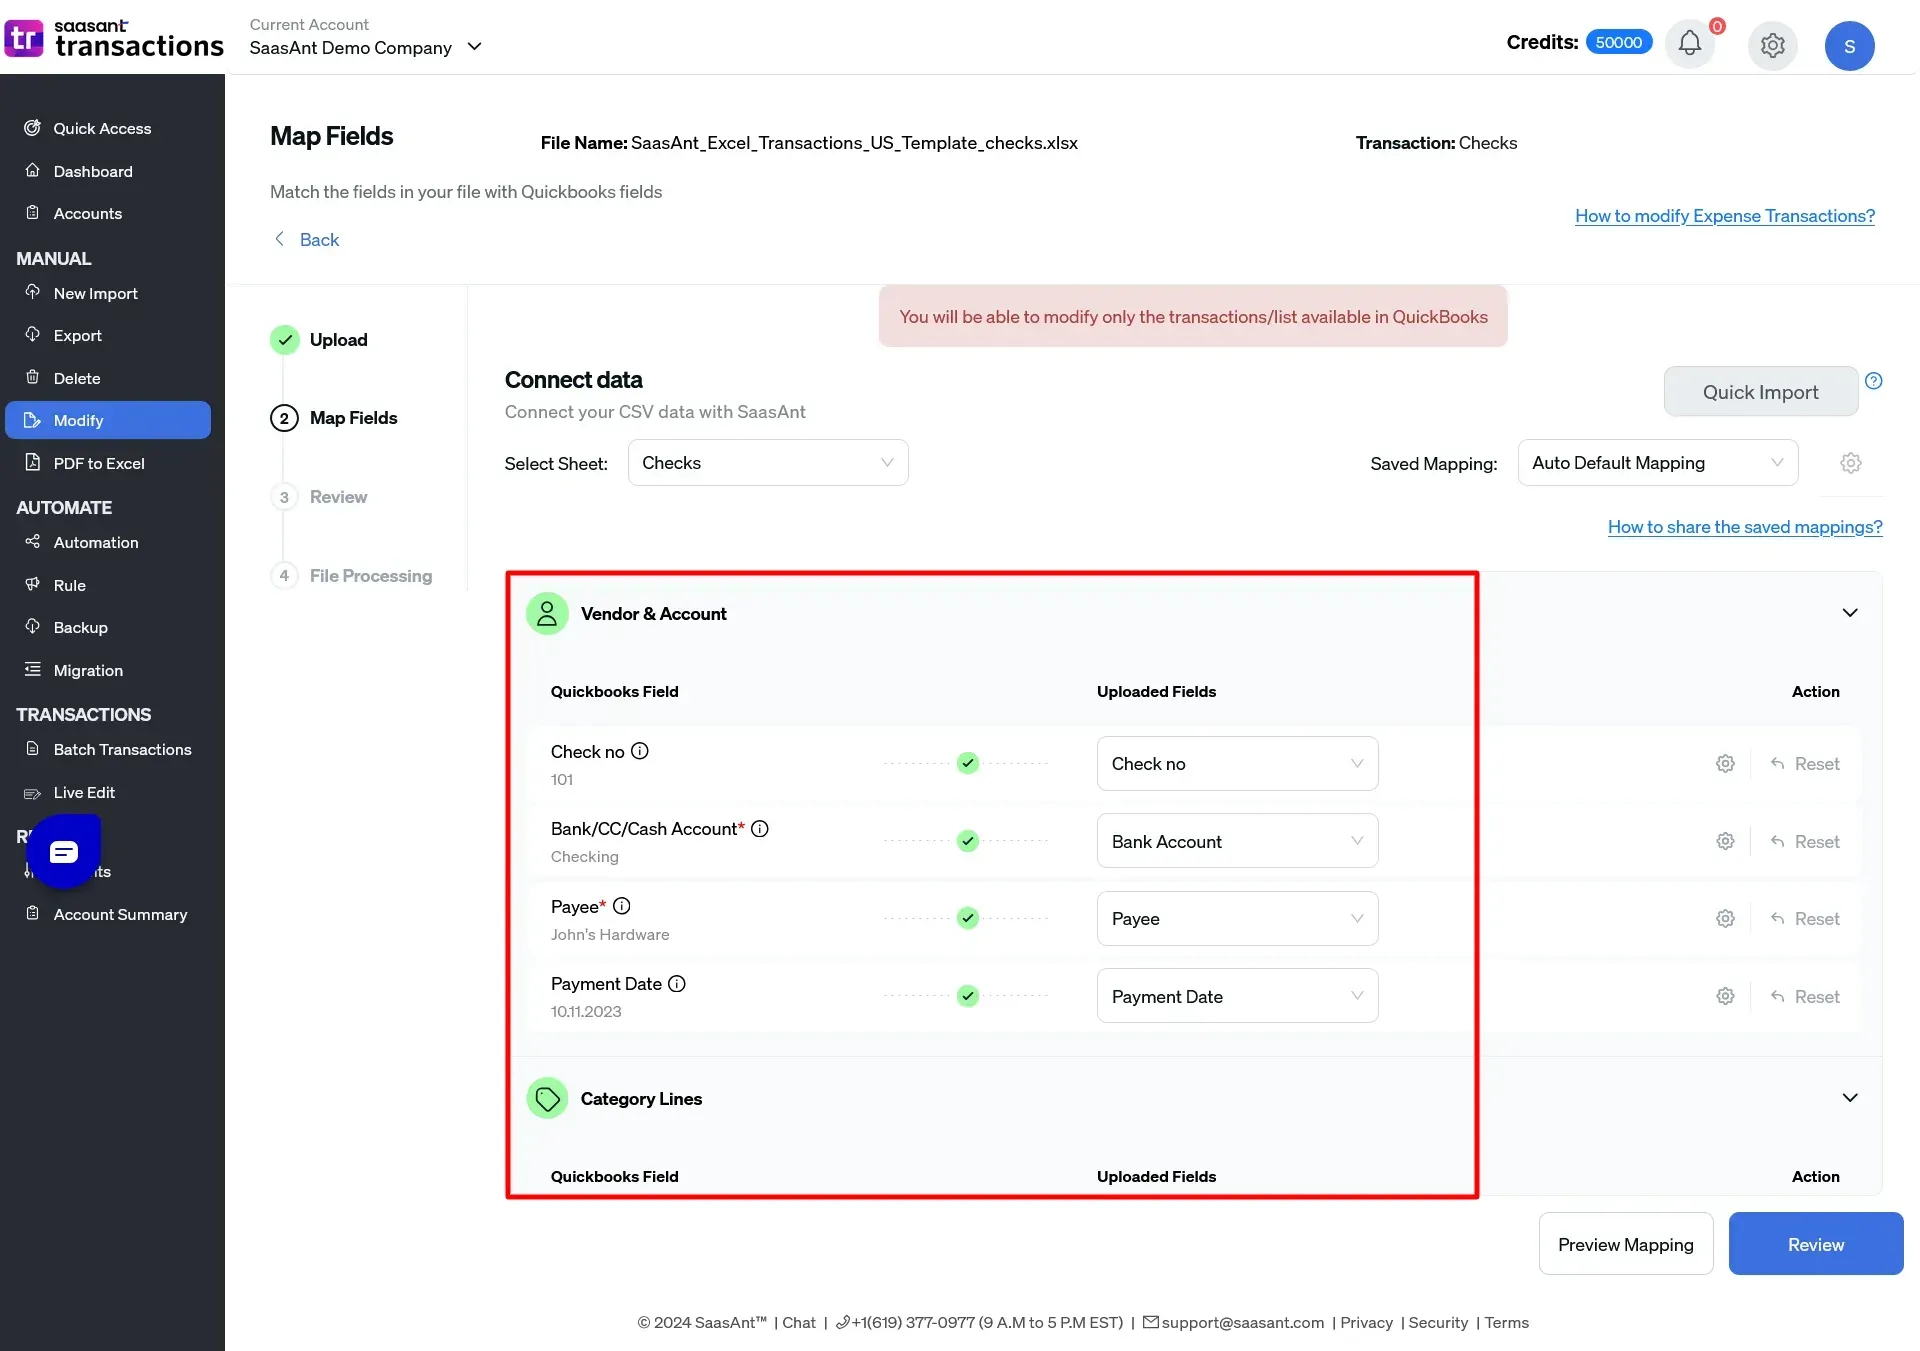
Step 2: Map the Fields
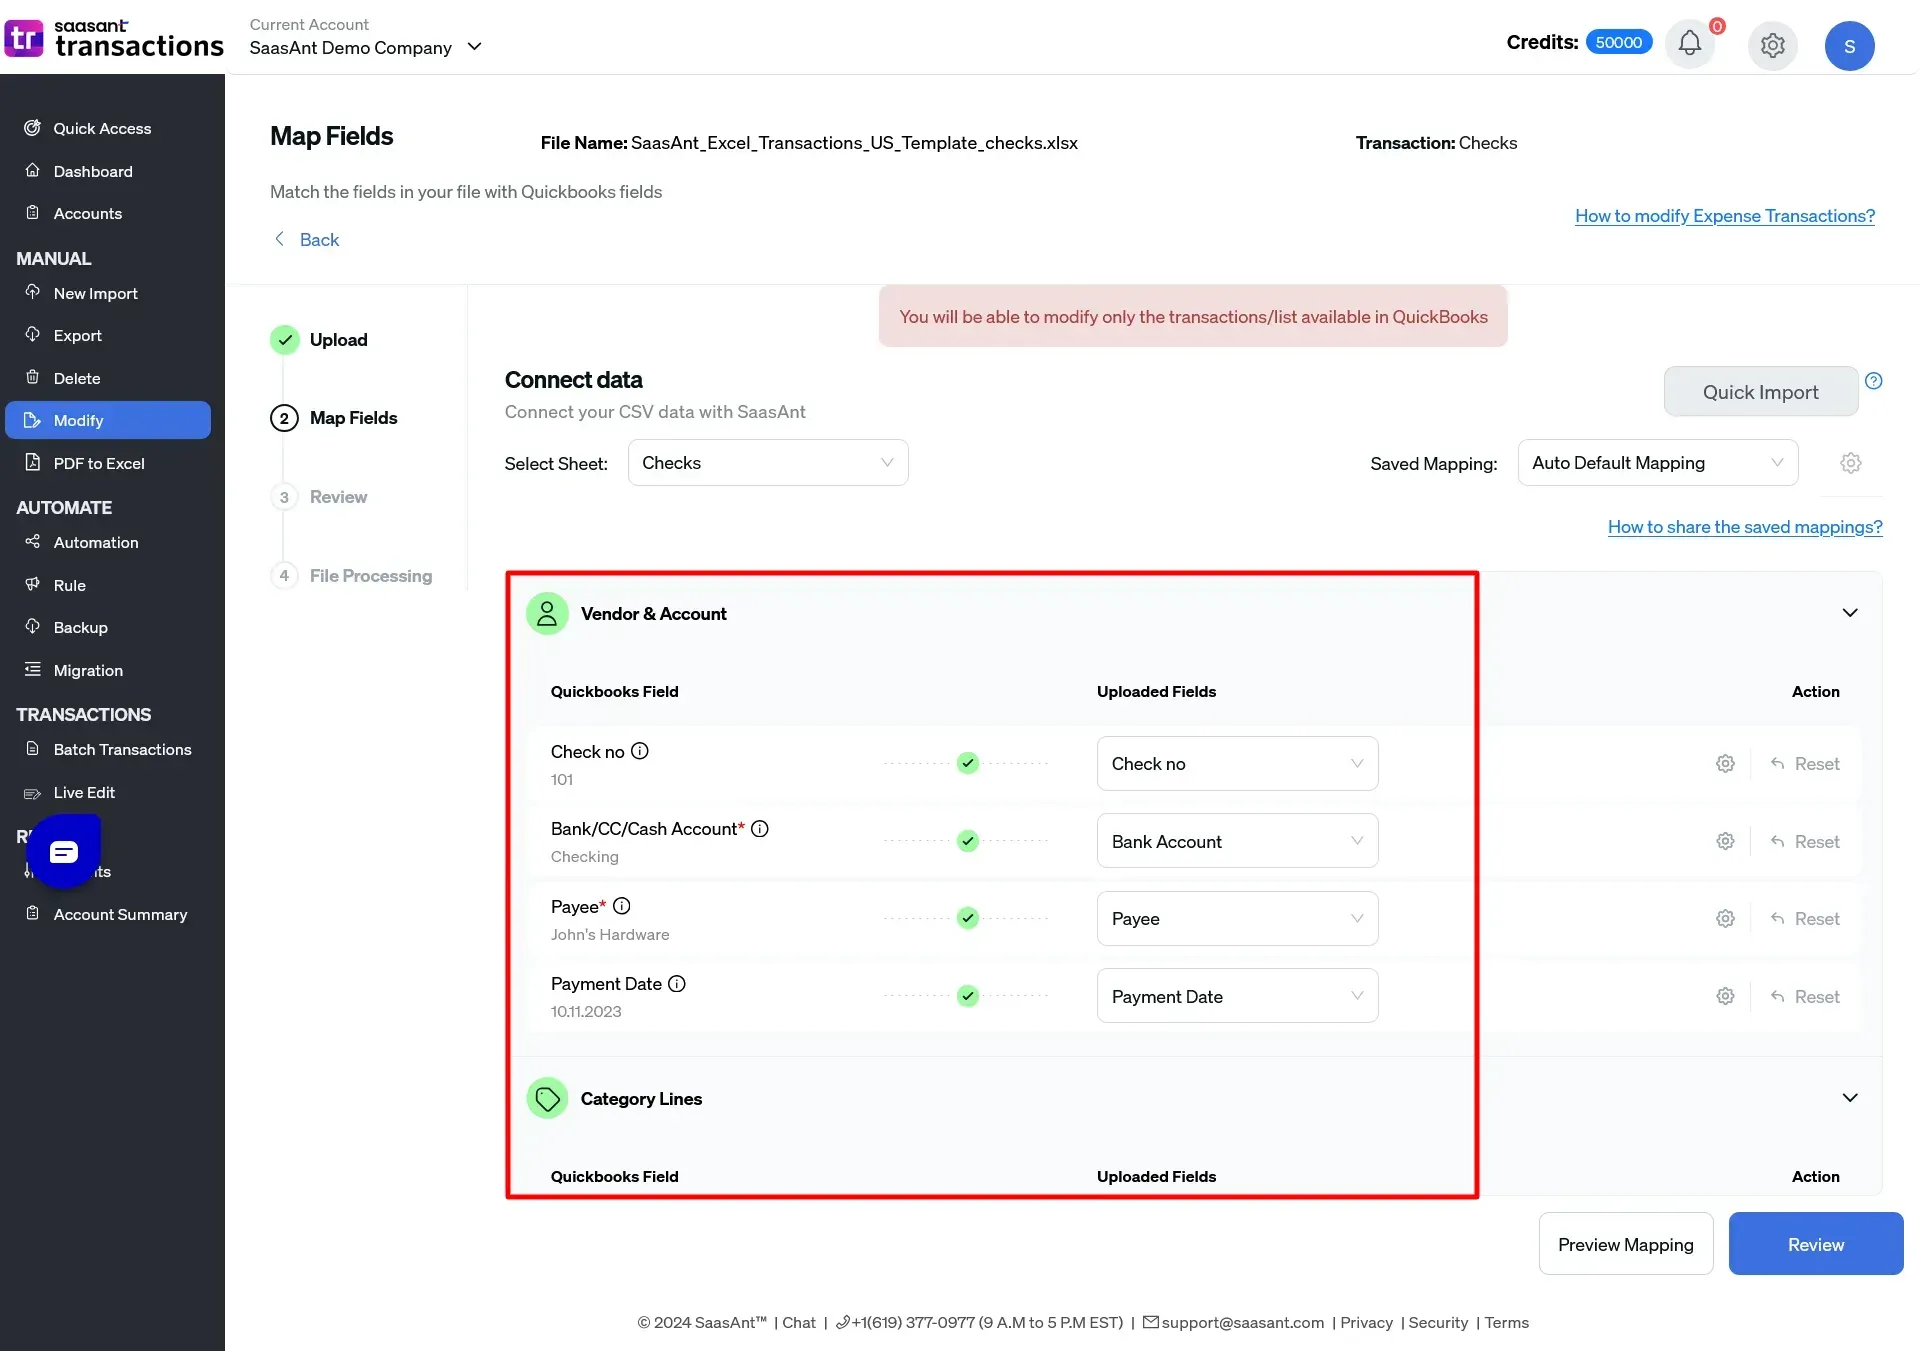
In the Field Mapping screen, map the Ref No (Check No) and any other relevant fields to ensure accurate matching with the existing transactions in QuickBooks Online.
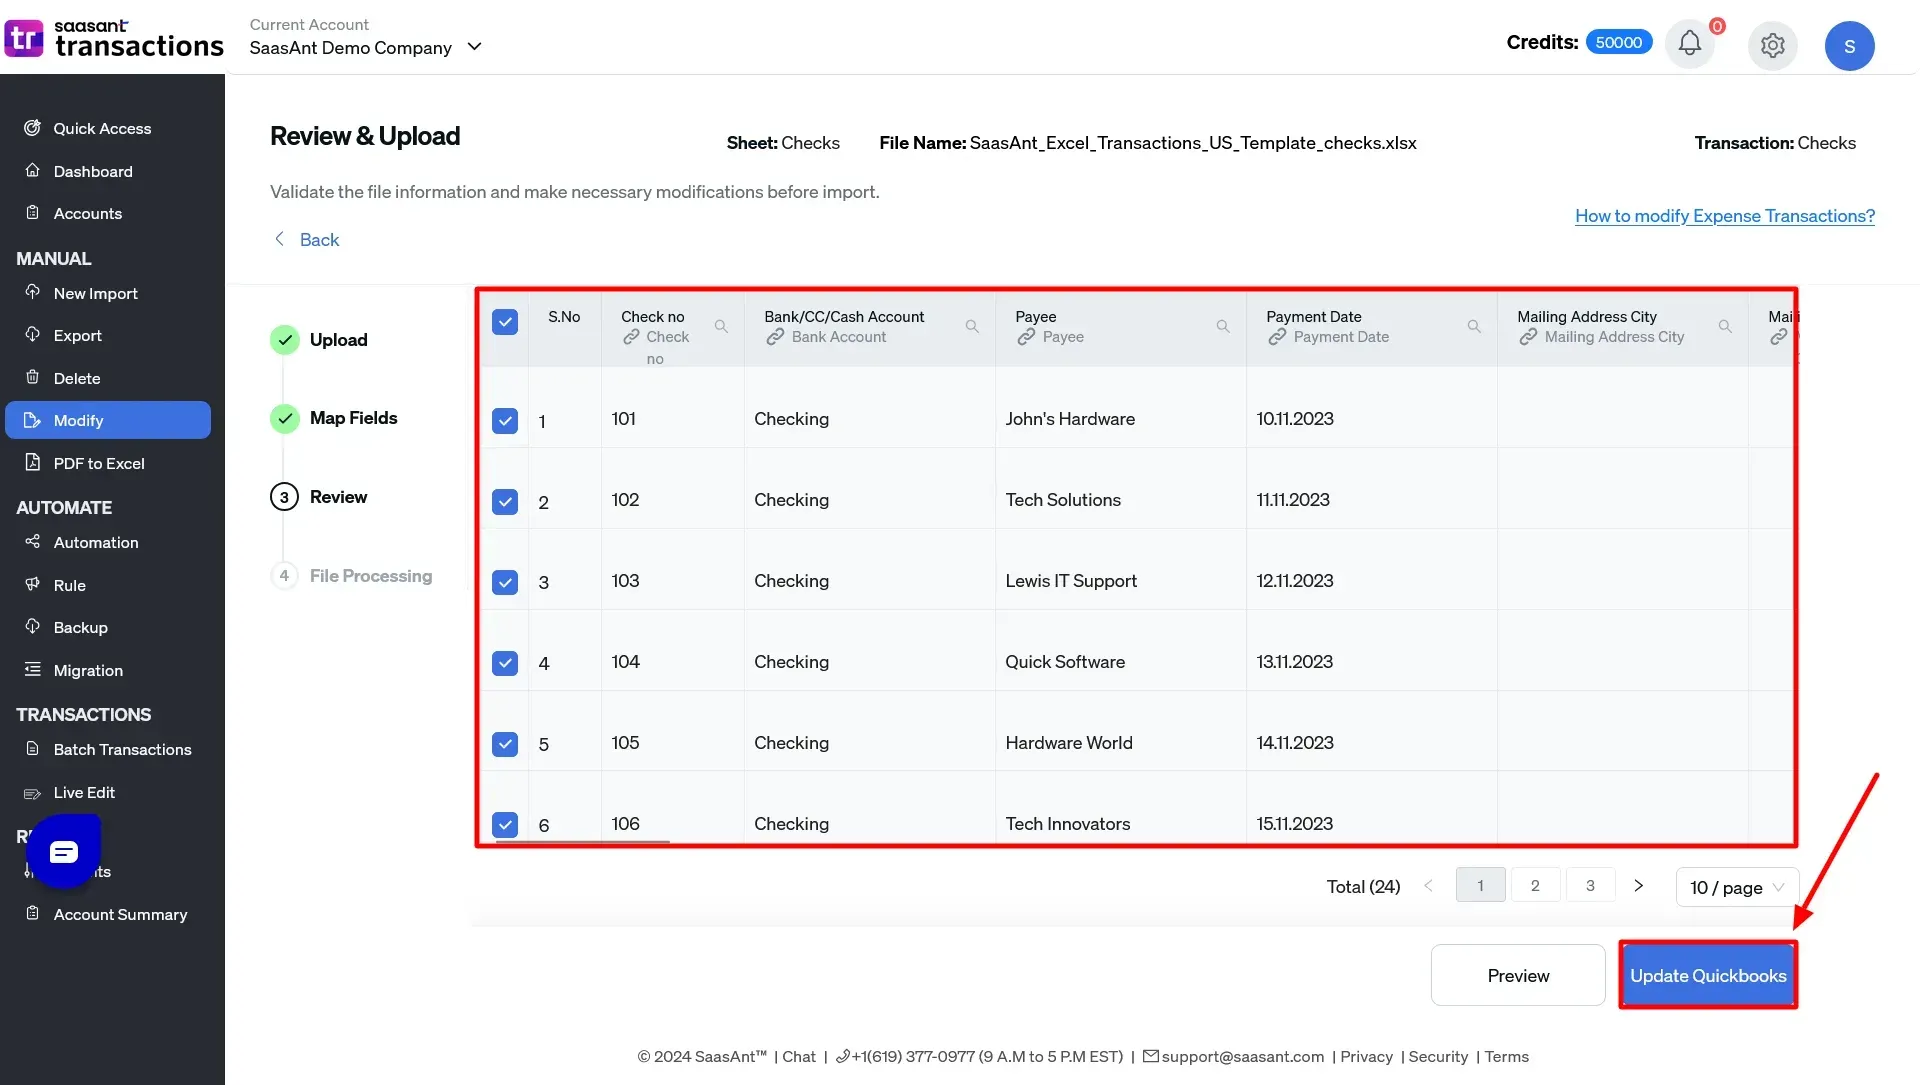
Step 3: Review and Upload
Review the mapped fields to confirm accuracy.
Once satisfied, upload the file, allowing SaasAnt Transactions to modify the corresponding transactions in QuickBooks Online.
Step 4: Undo or Rollback (If needed)
If you realize that the modifications made to the checks were inaccurate or if further adjustments are required, there's no need to be concerned. The 'Undo' feature allows you to effortlessly undo the changes, restoring your QuickBooks account to its prior state. Click the 'Undo' button next to the 'Download' button to initiate rolling back the changes applied to the checks.
Note: If duplicate reference numbers are possible for the same checks, the second method is recommended to avoid conflicts.
Method 2: Export and Modify
If your transactions do not have a reference number, such as Bill Payments, or if you prefer to work with existing data, this method provides a streamlined approach by first exporting the relevant transactions from QuickBooks Online.
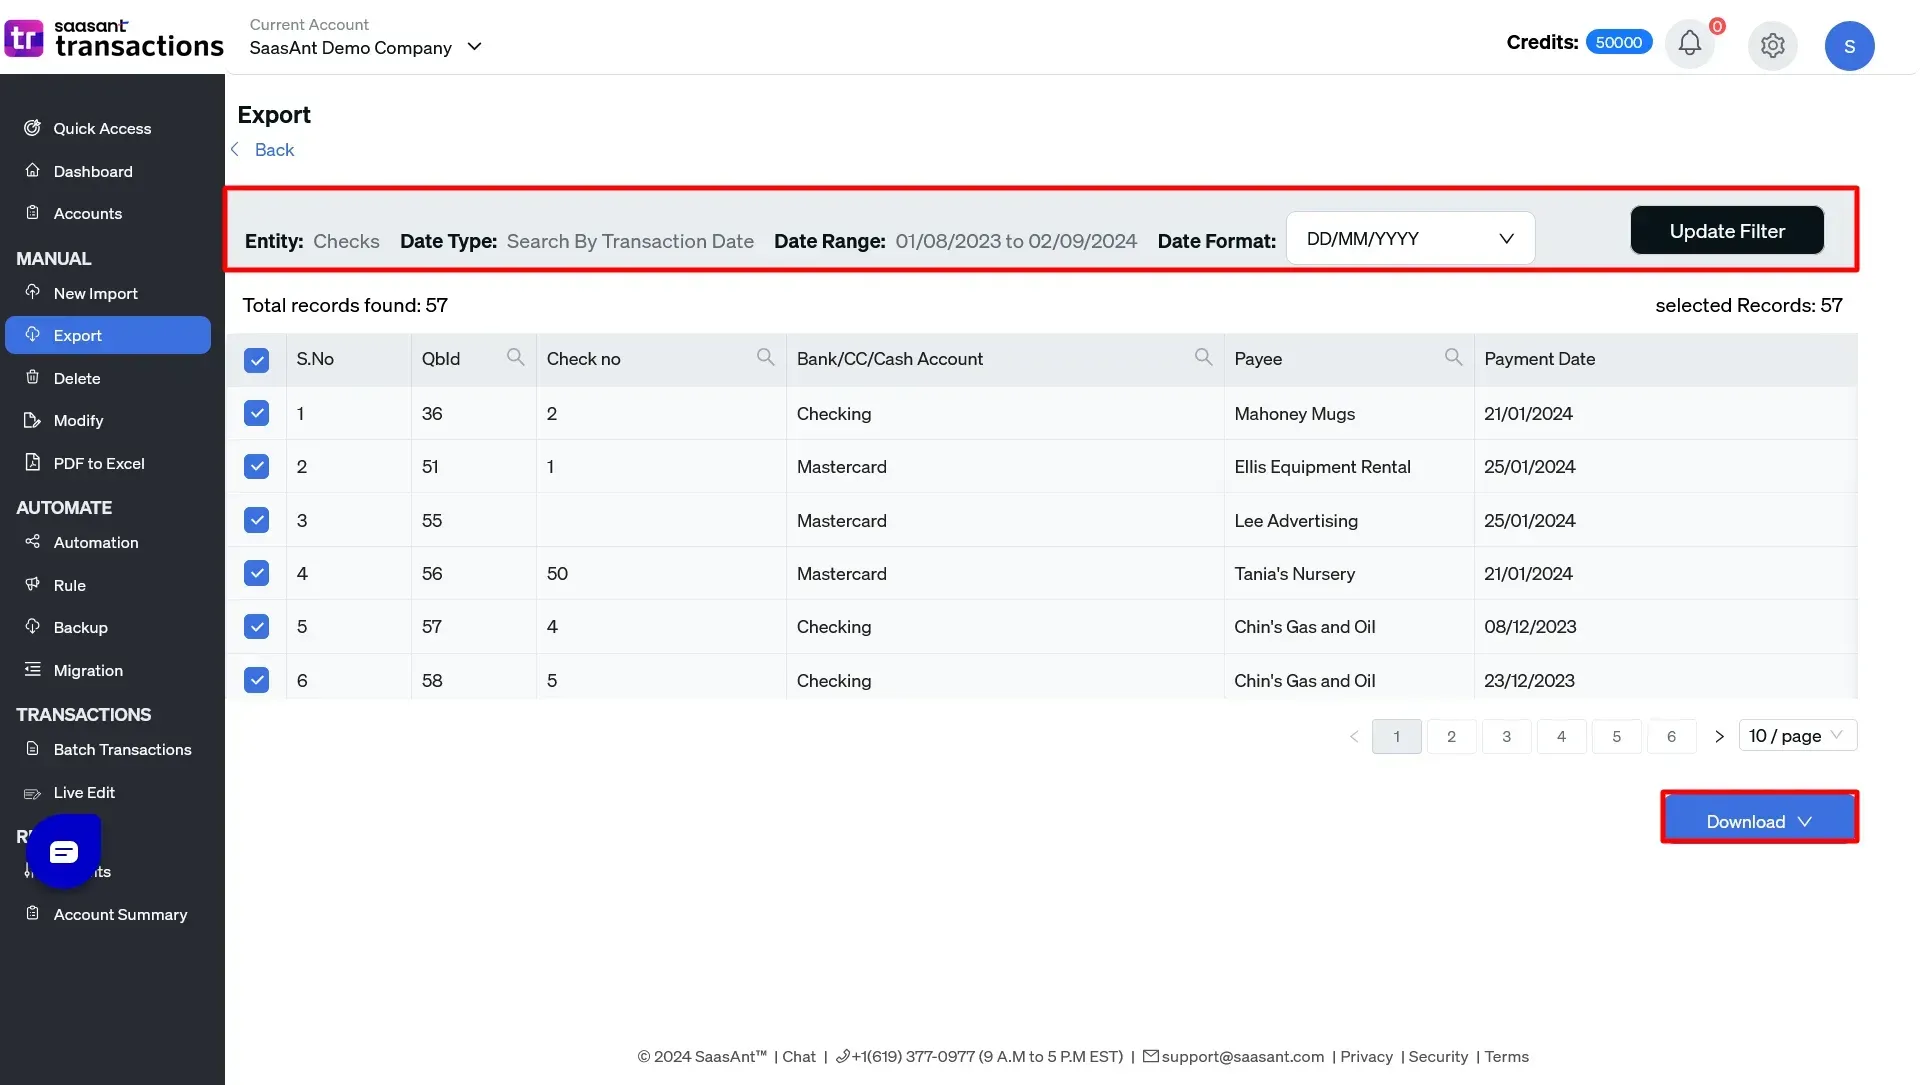
Step 1: Export Transactions
Navigate to the ‘Export’ menu in SaasAnt Transactions.
Search for the ‘Checks’ based on a specific date range or criteria.
Download the file containing these checks.
Step 2: Modify the Exported File
Open the downloaded file and make the necessary changes to the checks, such as updating dates, amounts, or other details.
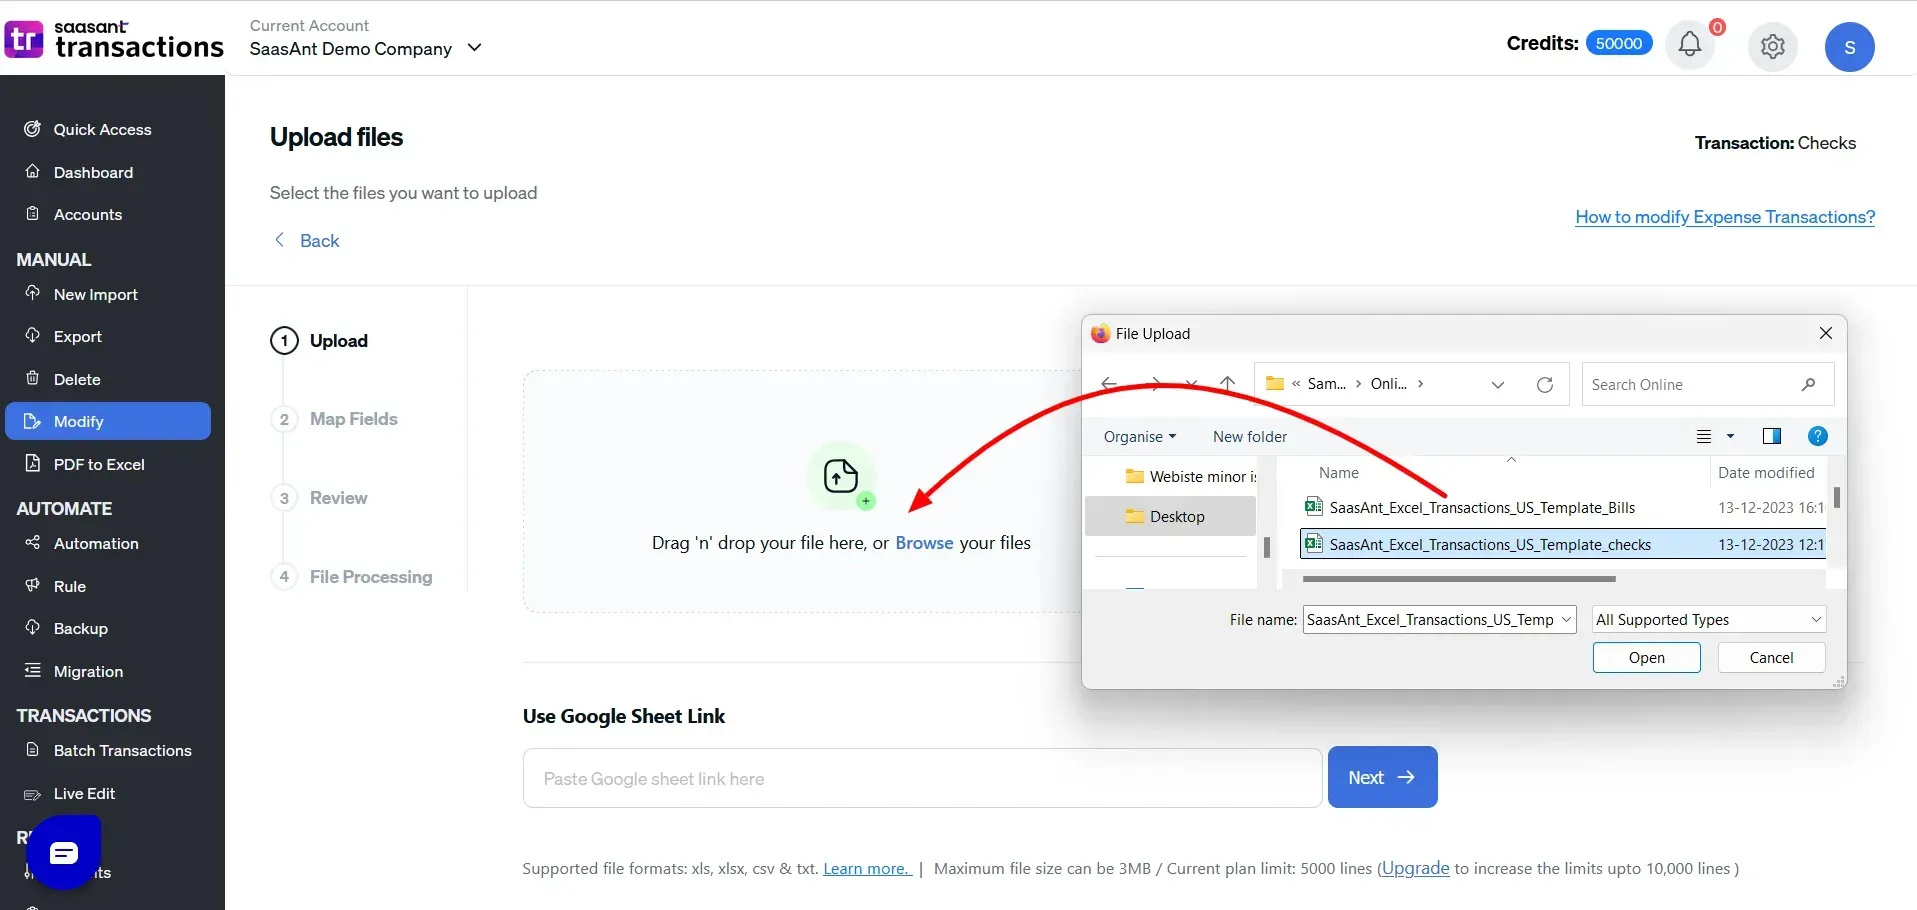
Step 3: Upload the Modified File
Return to the ‘Modify’ menu in SaasAnt Transactions.
Upload the file with your changes.
Step 4: Review and Upload
Carefully review the modifications in the ‘Field Mapping’ screen to ensure everything is mapped correctly.
Once verified, upload the file to apply the updates to your transactions in QuickBooks Online.
Step 5: Undo or Rollback (If required)
If you determine that the modifications made to the checks were inaccurate or if additional adjustments are necessary, there is no need for concern. The 'Undo' feature enables you to seamlessly reverse the changes, restoring your QuickBooks account to its previous state. To initiate this process, click the 'Undo' button, conveniently located next to the 'Download' button, to roll back the changes applied to the checks.
Utilizing the Live Edit Feature in SaasAnt Transactions
Managing large volumes of transactions in QuickBooks Online can sometimes result in errors. Correcting these errors can be time-consuming. However, the SaasAnt Transactions’ Live Edit feature allows you to efficiently edit transactions directly within the application without exporting and modifying them in external software like Excel.
Why Use the Live Edit Feature?
The Live Edit feature is particularly beneficial for accountants and bookkeepers who need to quickly adjust uploaded or existing transactions in QuickBooks Online. Whether correcting an invoice number, updating customer details, or fixing errors in bulk transactions, Live Edit allows you to manage these changes easily in SaasAnt Transactions (Online).
Edit Transactions in QuickBooks Online Using Live Edit: Step-by-Step Guide
Step 1: Log in to SaasAnt Transactions
Begin by logging into your SaasAnt Transactions account.
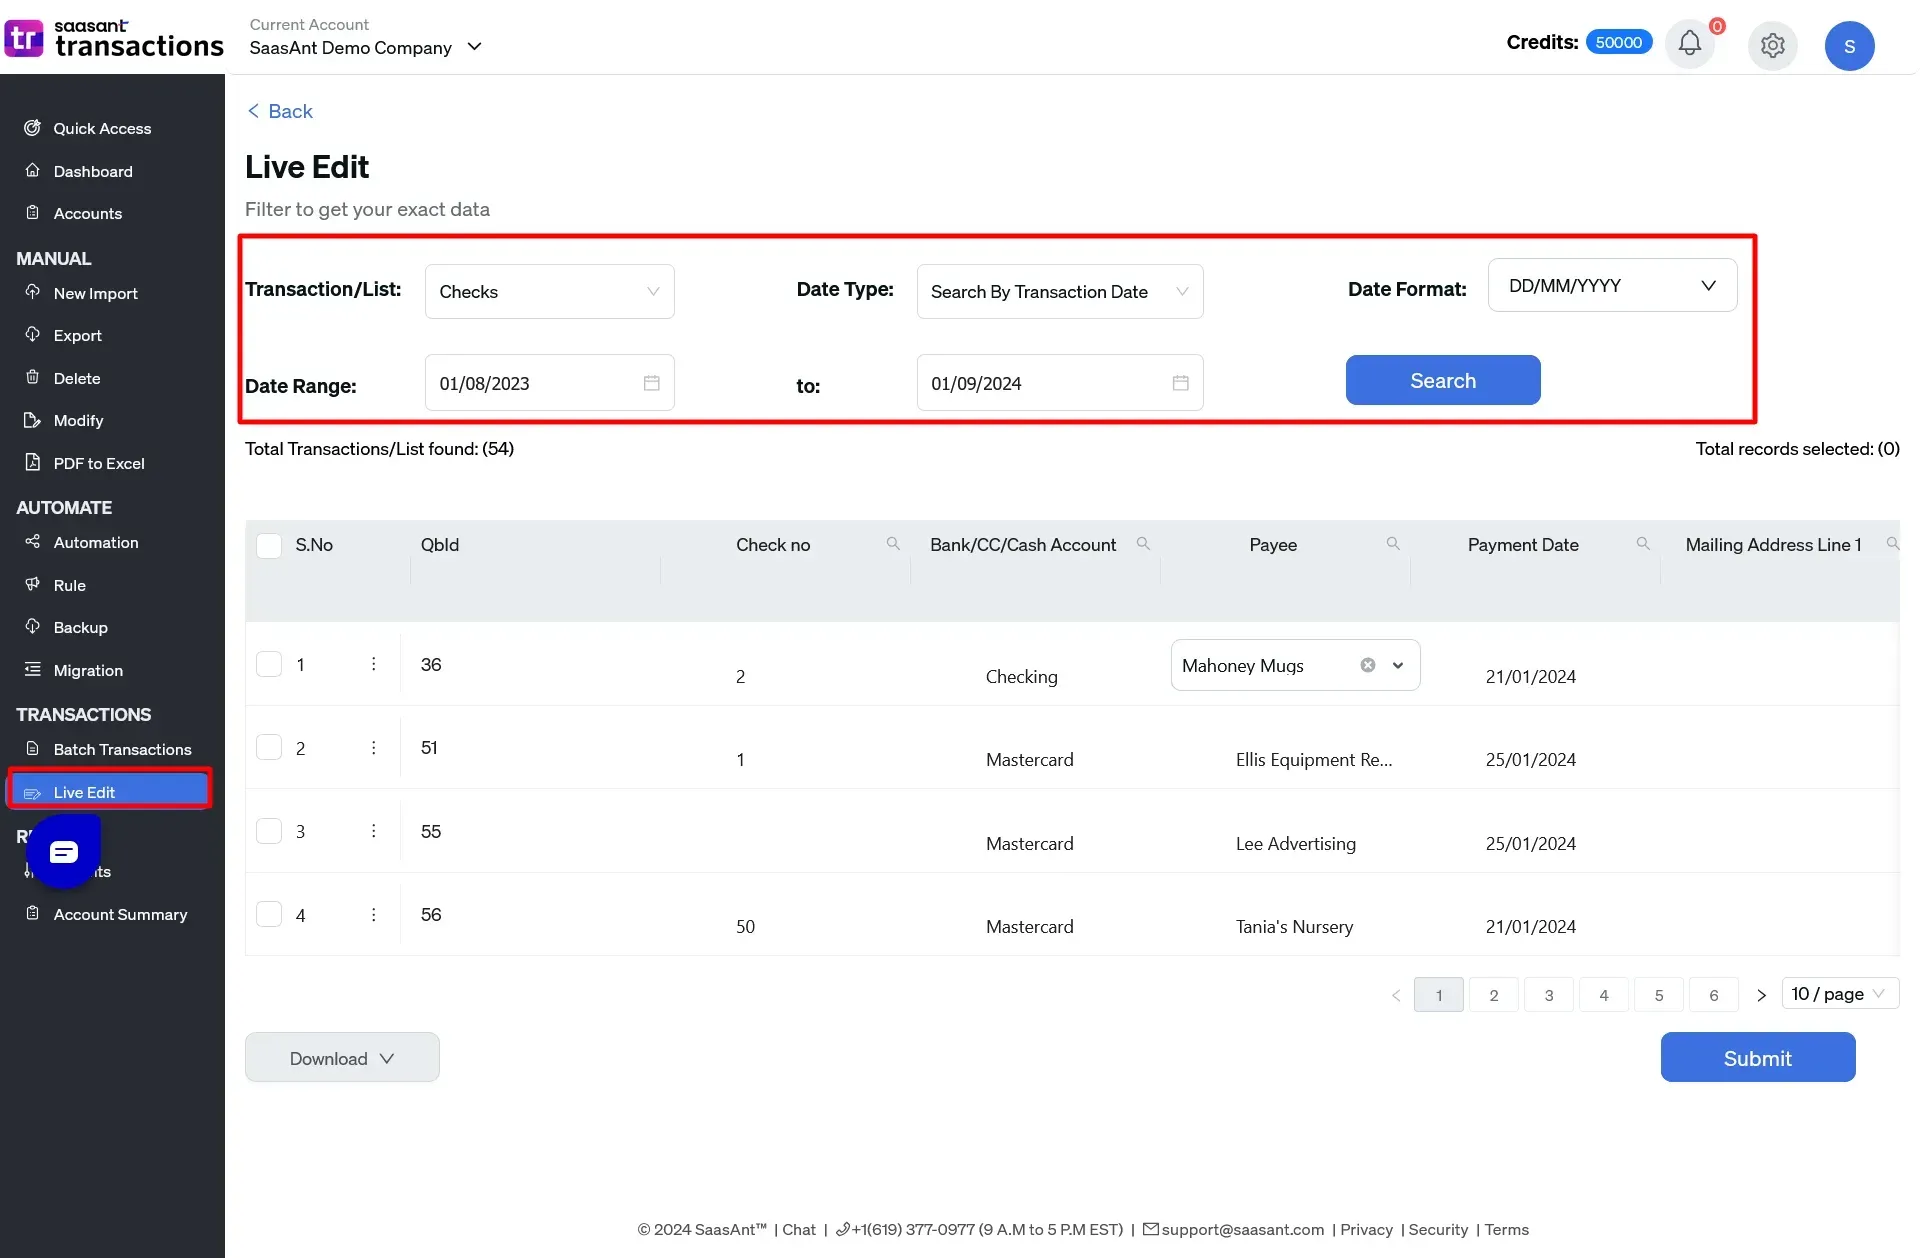
Step 2: Access the Live Edit Feature
Navigate to the Live Edit menu in SaasAnt Transactions.
Step 3: Select Entity Type and Date Range
To streamline the process, you can ‘Search and Edit’ by locating and selecting transactions or lists using advanced filtering options in QuickBooks Online. For even greater precision, utilize the ‘Edit by Reference’ feature to find and modify specific transactions or lists using reference numbers or names. You can efficiently identify and edit the needed transactions after refining your search with the appropriate edit type.
Choose the Entity Type (e.g., Invoice, Bill, Expense) you want to edit.
Select the appropriate ‘Date Range’ and ‘Date Type’ to filter the transactions you wish to modify.
Step 4: Search and Filter Transactions
Use the search function to locate the specific transactions you need to edit.
Filter the results as necessary to display the relevant transactions in a tabular format on your screen.
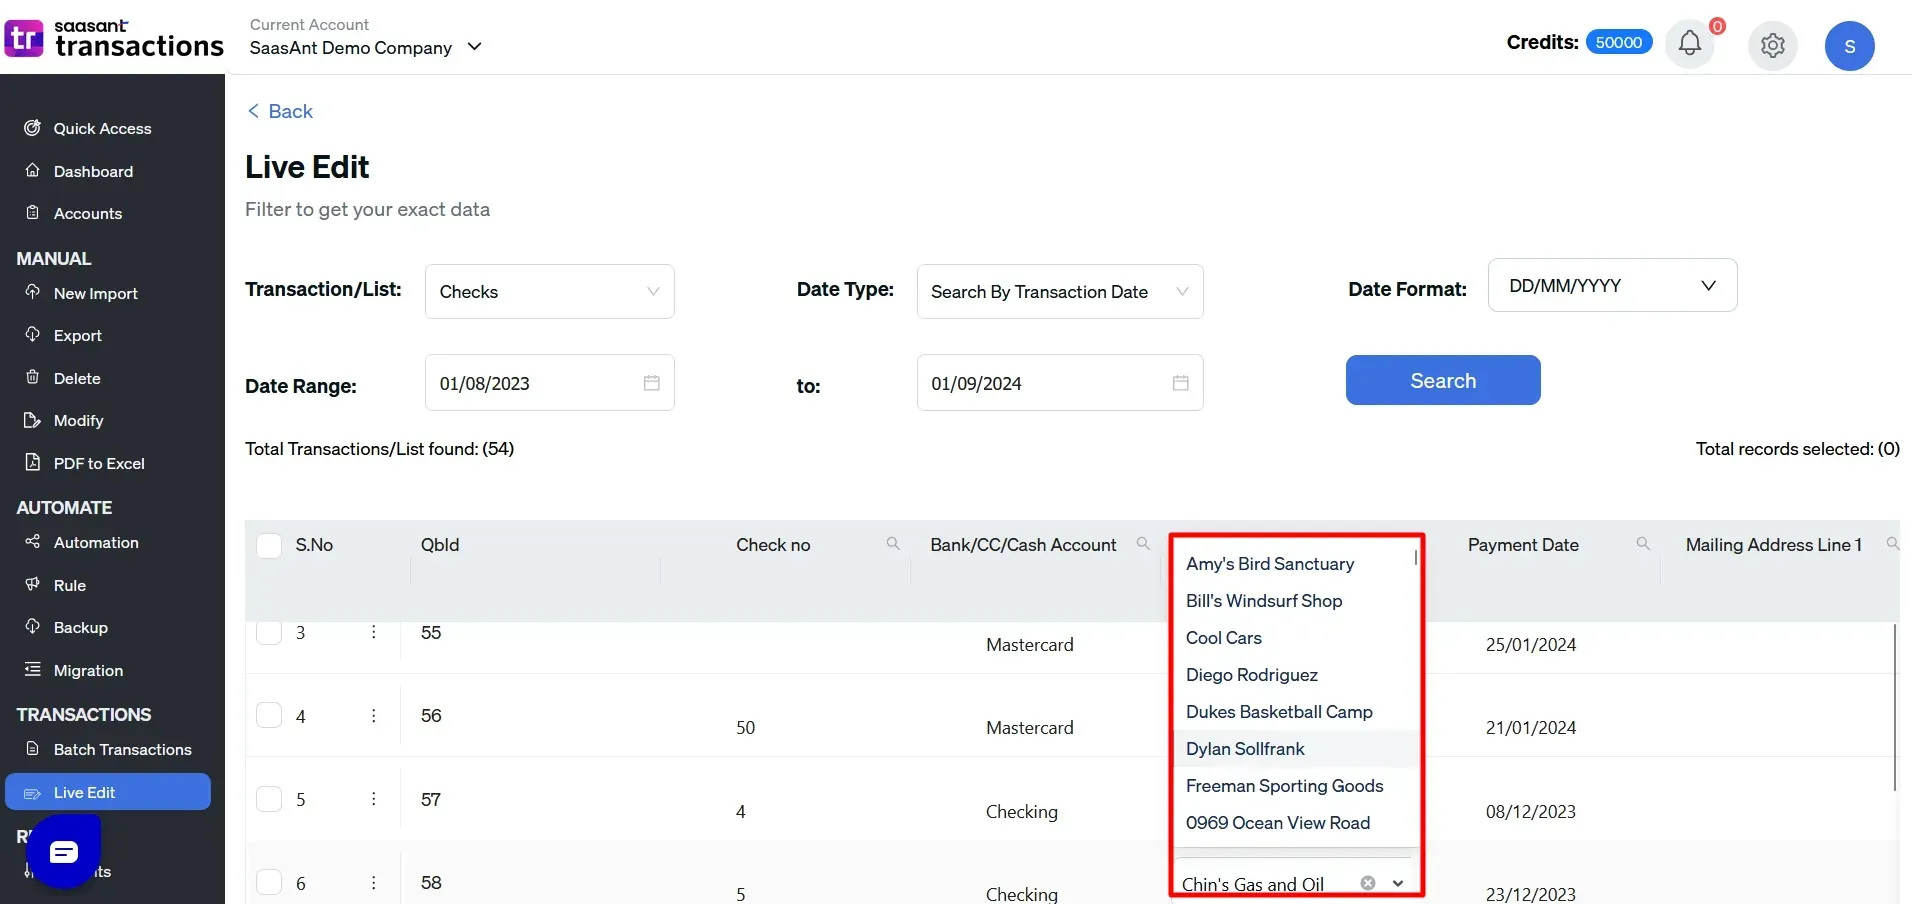
Step 5: Edit the Transactions
Select the transactions you wish to edit directly from the table.
Make the necessary changes by updating the transaction details.
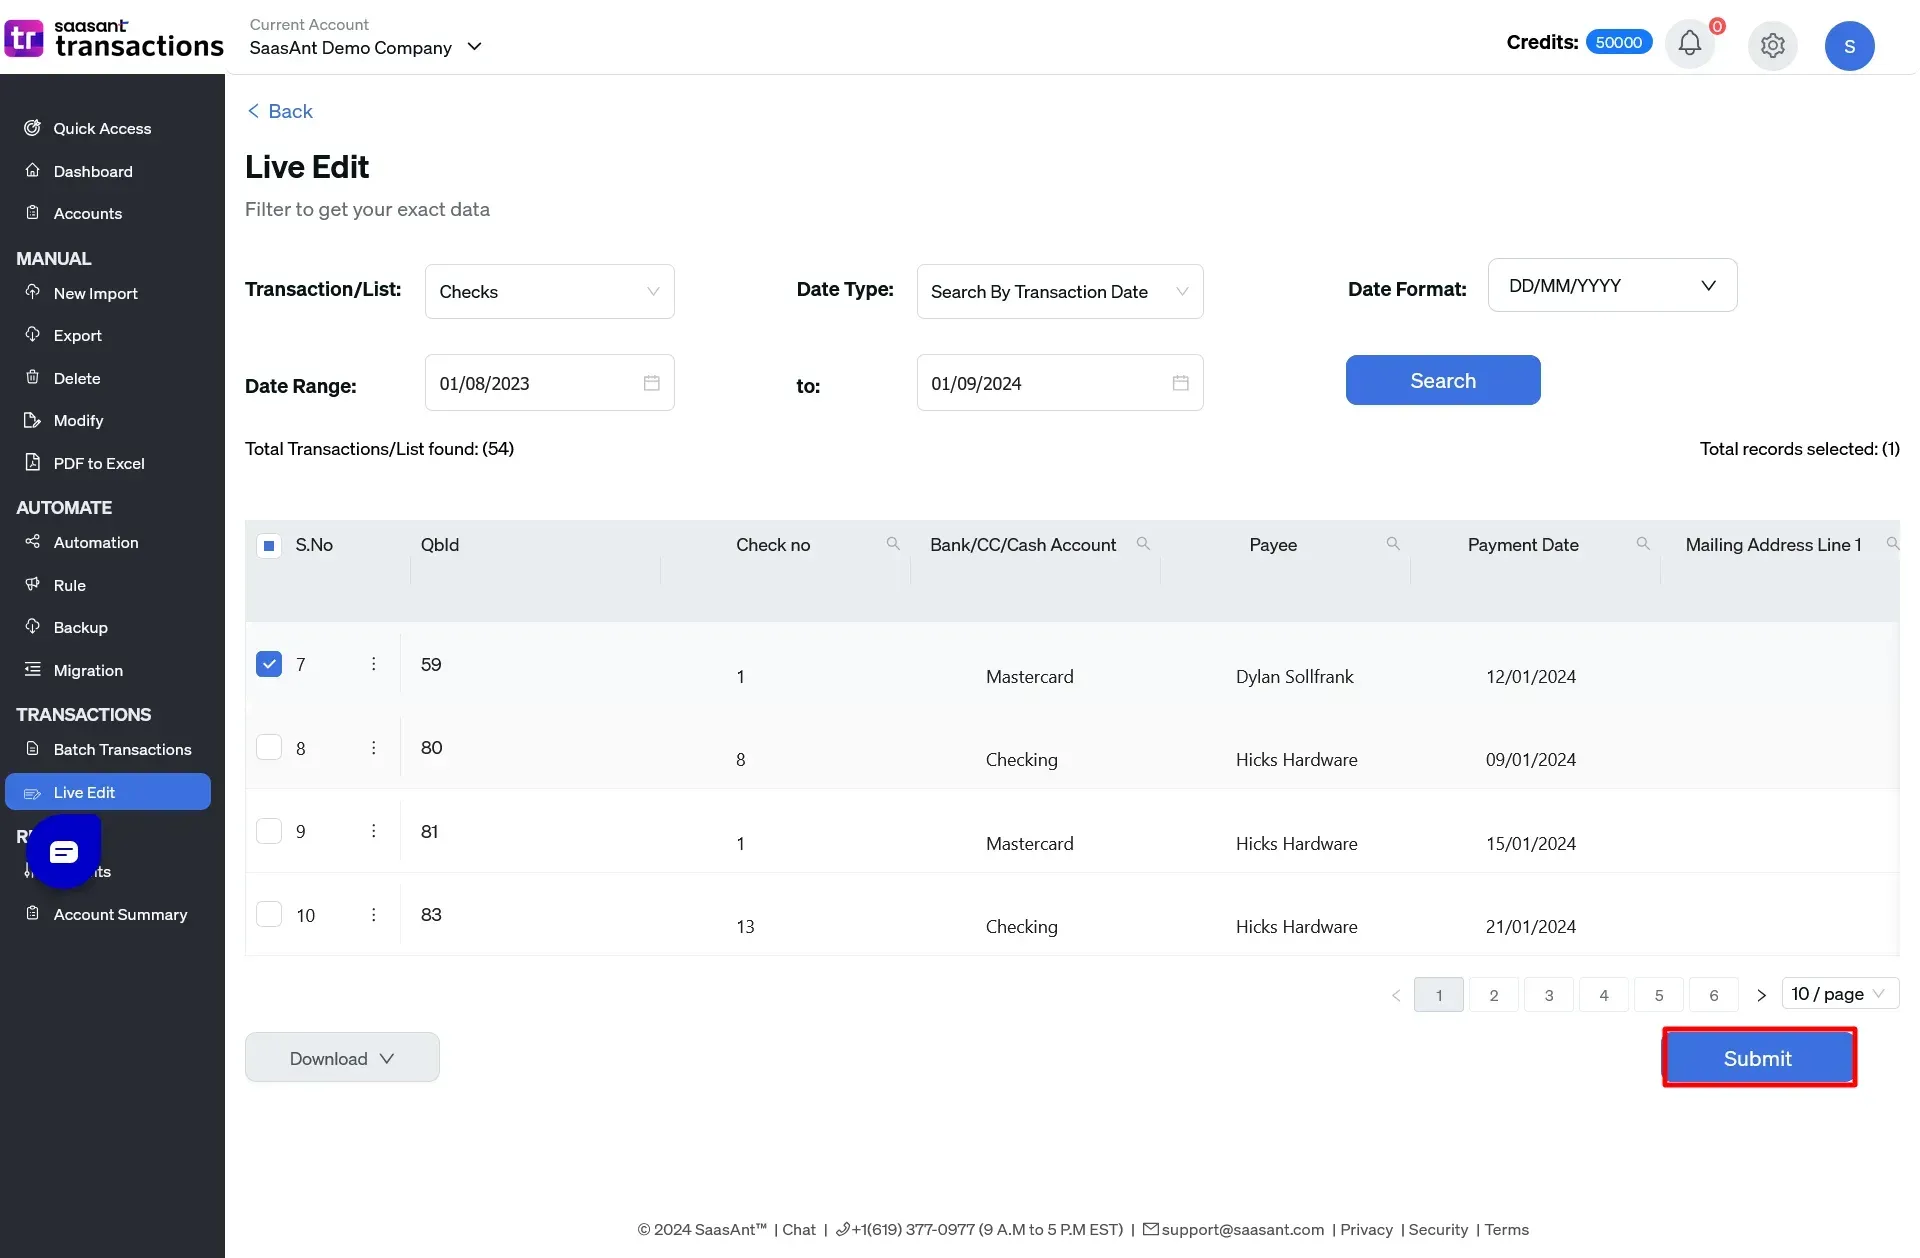
Step 6: Submit Changes
After editing, click ‘Submit’ to apply the changes.
The modifications will be processed and updated in QuickBooks Online.
Step 7: Verify the Modified Data
Use the download option to export the modified data for verification if required.
Check the upload status to ensure the changes were successfully implemented, including any success or error records.
Step 8: Review Job History
Select ‘Show Results’ to navigate to the Job History page.
Review the success and error records to confirm that the file has been accurately updated in QuickBooks Online.
Importance of Accurate Check Editing in QuickBooks
Editing checks in QuickBooks is not merely a matter of convenience but a critical component of maintaining precise financial records. Inaccuracies in check details can lead to significant issues, including distorted financial statements, budgeting errors, and complications during bank reconciliations. Ensuring that all check entries are accurate helps prevent these problems and supports the overall integrity of your financial reporting.
Common Scenarios for Editing a Check
Editing checks in QuickBooks is often necessary to maintain accurate financial records. Various issues may arise that necessitate such edits. Below are the typical situations that require you to make changes to a check, along with the implications of these issues and recommended solutions.
Discrepancy in Check Amount
What Happens: Errors in the check amount can occur during issuance or due to subsequent adjustments, such as invoice corrections or discounts.
Why It Matters: An incorrect amount can distort financial statements, disrupt budgeting, and create challenges during bank reconciliations.
How to Fix It: Promptly adjust the amount to reflect the transaction value accurately. This correction is crucial for maintaining the integrity of your financial reporting and preventing potential errors.
Incorrect Payee Details
What Happens: Mistakes may occur in the payee’s name or details, often due to clerical errors or when dealing with vendors with similar names.
Why It Matters: Incorrect payee information can lead to misallocated payments or expenses and complicate vendor reconciliation.
How to Fix It: Update the payee details to ensure the transaction is attributed to the correct party. This adjustment is essential for accurate vendor management and expense tracking.
Wrong Transaction Date
What Happens: An incorrectly dated check may result from oversight or issuance before the transaction date.
Why It Matters: A wrong date can misplace transactions in the incorrect financial period, impacting monthly or quarterly financial reports and potentially leading to inaccuracies in financial analysis.
How to Fix It: Adjust the date to reflect the transaction date. This ensures that transactions are recorded in the correct accounting period, maintaining accurate financial records.
Errors in Memo or Notes
What Happens: The memo field, which provides additional context about a transaction, may contain errors or be left blank.
Why It Matters: Incorrect or missing memos can lead to misunderstandings about transaction details and affect financial analysis.
How to Fix It: Revise the memo field with accurate and relevant information to enhance clarity and support comprehensive financial reviews.
Misclassification of Expenses
What Happens: Errors in categorizing expenses or assigning accounts can occur, especially when multiple accounts or categories are involved.
Why It Matters: Misclassification affects financial analysis, reporting accuracy, and tax calculations, potentially leading to erroneous financial statements and tax issues.
How to Fix It: Correct the expense categories to ensure transactions are allocated to the appropriate accounts. Accurate categorization is vital for precise financial statements and compliance with tax regulations.
Wrap Up
Regularly reviewing and updating your checks is essential for maintaining accurate financial records and ensuring smooth business operations. Ensuring that all check details are correct helps in avoiding errors, maintaining precise financial statements, and supporting overall business success.
To further streamline your financial management processes, consider integrating SaasAnt Transactions with QuickBooks. SaasAnt Transactions offers powerful features to simplify data import, export, and reconciliation tasks, ensuring that your financial records are accurate and up-to-date. With features like bulk transaction import and automated data synchronization, SaasAnt Transactions can enhance your efficiency and accuracy in financial management.
Experience the benefits of SaasAnt Transactions with a 30-day free trial; no credit card is required. Try it today and see how it can transform your financial workflows and support your business success.
FAQs
Can You Edit Checks in QuickBooks?
Yes, you can edit checks in QuickBooks Online, but there are some limitations, especially with reconciled transactions. QuickBooks allows modifications to checks that haven't been reconciled. However, editing reconciled checks can disrupt your financial records and lead to discrepancies in future reconciliations. Therefore, it's advisable to consult with your accountant before making changes to reconciled transactions.
To efficiently edit multiple checks at once, you can use SaasAnt, which facilitates bulk editing. SaasAnt enables you to update numerous transactions simultaneously, streamlining your workflow and ensuring consistency across your financial data. By leveraging such tools, you can overcome the limitations inherent in QuickBooks Online's native editing capabilities.
Method 1: Using Your File
Upload your file containing the checks to SaasAnt Transactions.
Map the fields, including the reference number, to match QuickBooks Online data.
Review and upload the file to apply modifications to the checks.
Use the 'Undo' feature to roll back any changes made if needed.
Method 2: Export and Modify
Export the checks from QuickBooks Online using SaasAnt Transactions.
Modify the exported file with the necessary updates.
Re-upload the modified file to SaasAnt Transactions.
If required, utilize the 'Undo' feature to reverse the changes.
How to Import Checks in QuickBooks Online?
To import checks in QuickBooks,
Log In: Access SaasAnt Transactions with your QuickBooks credentials.
Go to Import Section: Select “Import” > “Checks.”
Prepare File: Ensure your file is in CSV or Excel format with all check details. (All formats supported, PDF, Images, IIF, CSV, Excel)
Map Fields: Match your file columns to QuickBooks fields.
Validate and Import: Review for errors, fix any issues and complete the import.
How to Export Checks in QuickBooks Online?
To export checks in QuickBooks Online,
Open SaasAnt Transactions on your computer and ensure it's connected to QuickBooks Online.
Click the ‘Let’s Export’ button to start exporting your checks.
Select ‘Checks’ from the transaction type options.
Choose your date type from ‘Created Date,’ ‘Transaction Type,’ or ‘Last Updated Date.’
Set your desired date range using the calendar box.
Choose the ‘Simple Mapping’ template or upload your custom template.
Click ‘Search’ to begin the export process.
Download the exported checks in CSV format by clicking the ‘Download’ button.
How to Delete Checks in QuickBooks?
To delete checks in QuickBooks,
Start by logging in to SaasAnt Transactions, ensuring the app is connected to QuickBooks.
Navigate to the ‘Delete’ option.
Click ‘Ready to Clean up?’ to initiate the process.
You can delete checks by either using advanced filters (Delete by Searching) or by reference numbers or names (Delete by Reference).
Select ‘Checks’ as the transaction type, specify the date and range, and click ‘Search’ to retrieve the relevant checks.
Review the results, select the checks to delete, and click the ‘Delete’ button to remove them.
Before proceeding, it’s advisable to back up your data by clicking the ‘Download’ button next to ‘Delete.’
Finally, confirm that the deletion was successful by reviewing the displayed results.
How Do I Change Check Information in QuickBooks?
Launch the SaasAnt Transactions tool on your computer and ensure it is connected to your QuickBooks Online account.
Navigate to the ‘Import’ section to update check details.
Select ‘Checks’ as the transaction type you wish to modify.
Prepare a CSV file with the updated check information. Upload this file into SaasAnt Transactions.
Ensure the fields in your CSV file are correctly mapped to the corresponding fields in QuickBooks.
Click ‘Import’ to apply the changes to your check information in QuickBooks.
After completing the import process, review your QuickBooks records to ensure the check information has been updated correctly.
How to Create Checks in QuickBooks?
To create checks in QuickBooks,
Log in to QuickBooks and go to the 'Banking' menu.
Select 'Write Checks' or 'New Check' depending on your version.
Enter the payee’s name in the 'Pay to the Order of' field.
Choose the bank account from which the check will be issued.
Input the check date, amount, and memo details.
Categorize the payment by selecting the appropriate account or expense category.
Review the details and click 'Save and Close' or 'Save and New' to finalize.