How to Edit Expenses in QuickBooks Online: Step-by-Step Guide
 Maintaining accurate financial records is essential for businesses using QuickBooks. QuickBooks provides an intuitive platform for overseeing expenses effectively. Sometimes, you may need to update or correct an expense record.
This blog will walk you through how to edit an expense in QuickBooks, including why edits are necessary, a step-by-step tutorial, and tips for ensuring accuracy.
Contents
Edit Expenses in QuickBooks Online - Quick Instructions
How to Edit Expenses in QuickBooks Online: Step-by-Step Guide
Wrap Up
Frequently Asked Questions
Edit Expenses in QuickBooks Online - Quick Instructions
Link SaasAnt Transactions with your QuickBooks account.
Select 'Expense' as the entity type.
Use advanced filters to locate specific Expense.
Download the expenses, make any necessary bulk modifications, and re-upload them.
If errors occur, use the rollback feature to revert changes.
Editing Expense in QuickBooks Online
Managing and editing multiple expenses in QuickBooks can be complex, mainly when dealing with a high volume of transactions. This is where SaasAnt Transactions Online comes in, streamlining the process. To efficiently edit expenses in QuickBooks Online, SaasAnt Transactions offers a secure, certified application that simplifies data management, helping to reduce errors and save valuable time. Whether updating old entries, correcting inaccuracies, or handling bulk edits, SaasAnt Transactions ensures that your expense data is managed efficiently and accurately.
Next, we’ll explore a detailed step-by-step guide on using SaasAnt Transactions to simplify the process of editing expenses.
How to Edit Expenses in QuickBooks Online: Step-by-Step Guide
Always back up your QuickBooks Online data before you begin. Even though SaasAnt is designed to be safe and reliable, a backup provides an added layer of security. Follow the steps below to get started.
Step 1: Log In to Your QuickBooks Account
Log in to your QuickBooks account.
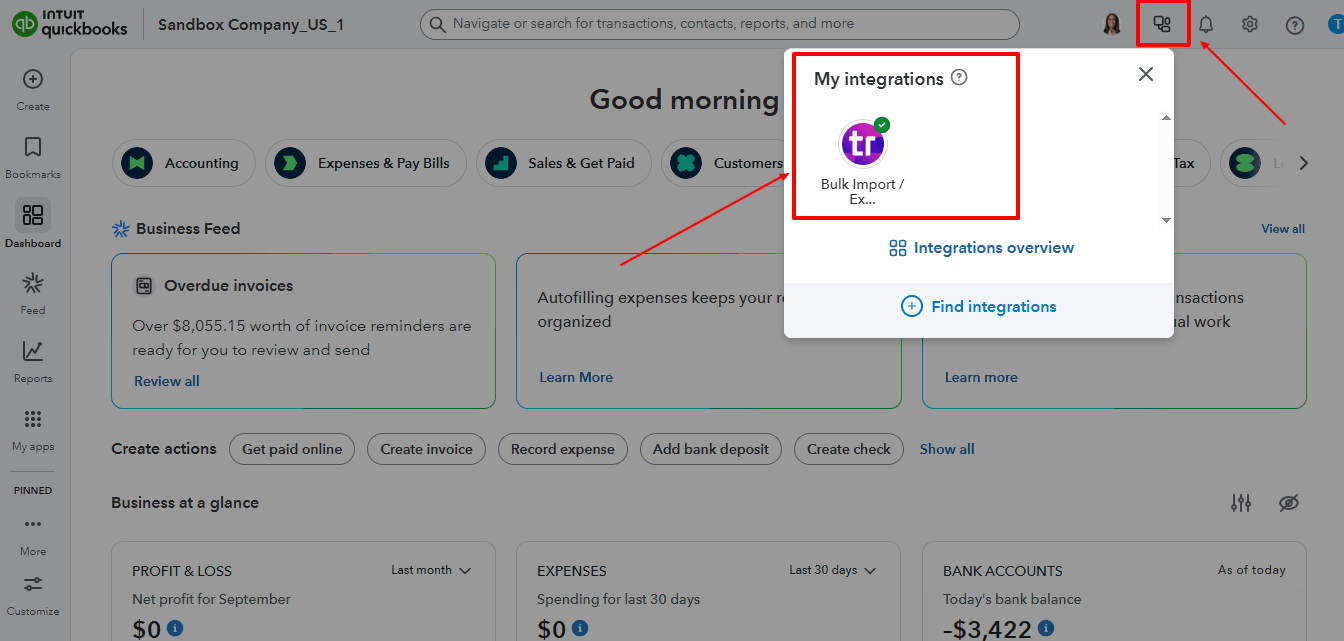
Step 2: Navigate to the Apps Menu
On the left side of the QuickBooks dashboard, you can see the menu bar with various options.
Select “Apps.” Click the dropdown and select “Find Apps.”
Step 3: Search and Install SaasAnt Transactions
In the search bar, type “SaasAnt Transactions” as shown by the arrow in the image below.
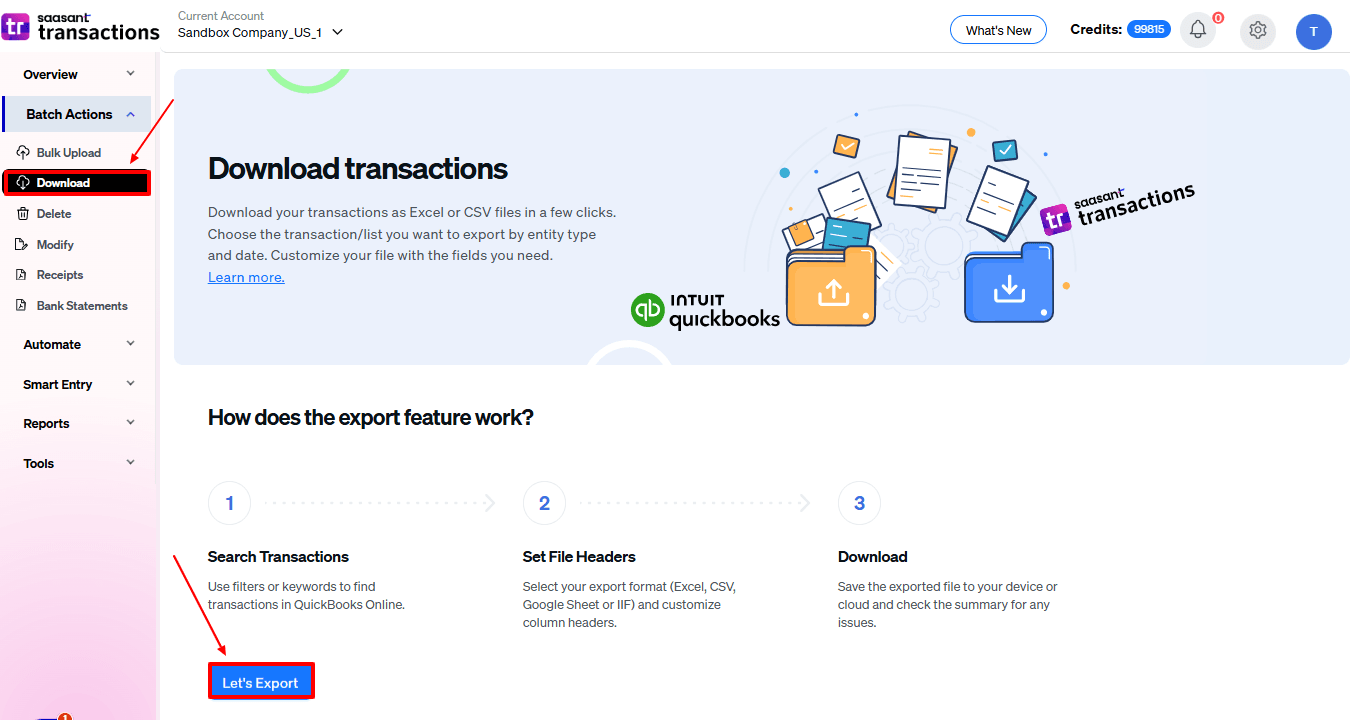
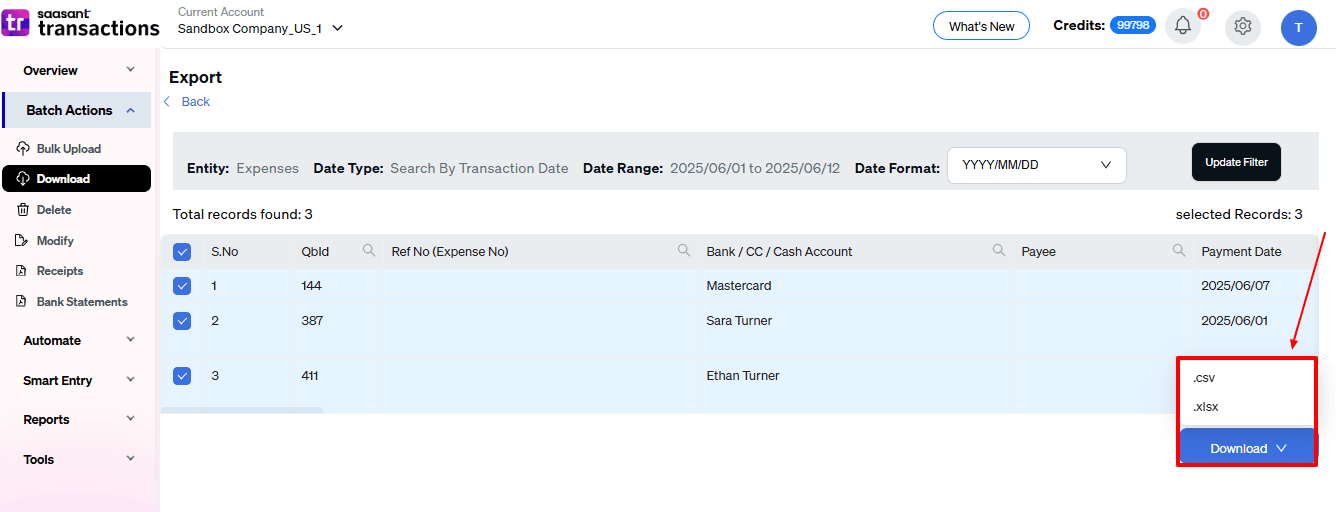
Step 4: Download existing Expense
On the SaasAnt dashboard:
On the left side of the SaasAnt Transactions dashboard, you can see the menu bar with various options.
Select “Download.”
At the bottom right, click on “Let’s Export.”
In SaasAnt Transactions, choose the entity "Expense"
Use filters to pick the right date range, customer(s), or status of the expense you want to modify.
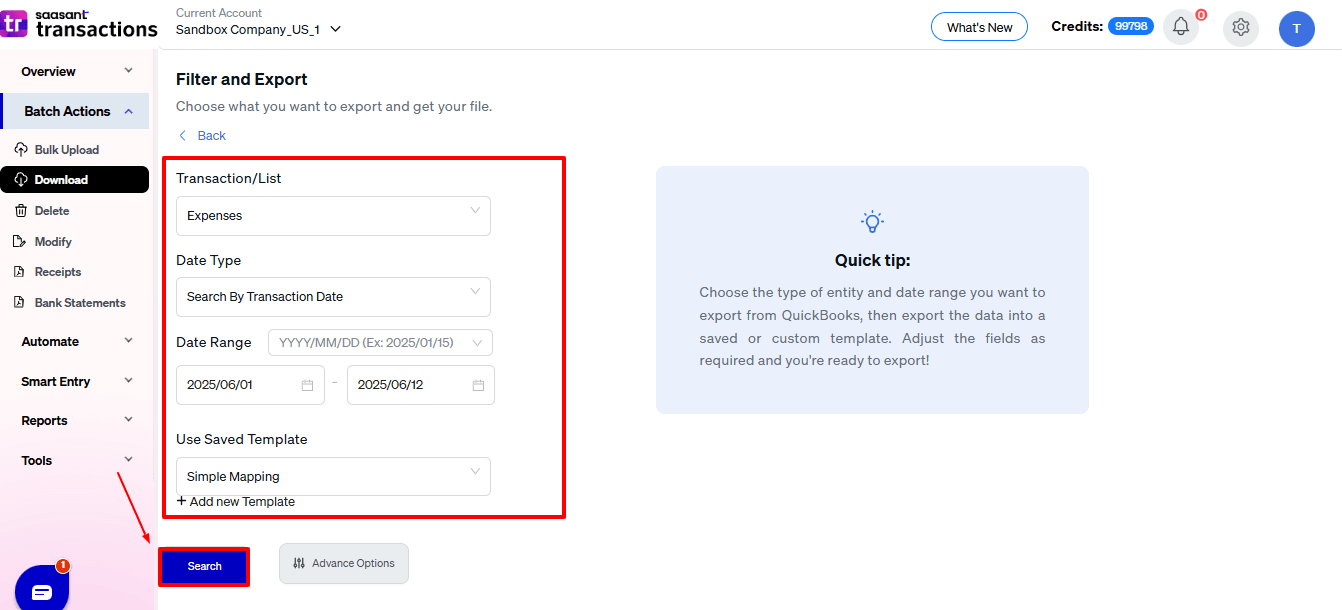
Export the expense to Excel (.xlsx) or CSV for editing.
Step 5: Make edits in the spreadsheet
Open the exported file using Excel or Google Sheets.
Find the expense you need to change (by number, customer, or date).
Make the necessary adjustments: change amounts, dates, line items, customer information, etc.
Save the file as a CSV (if SaasAnt requires it).
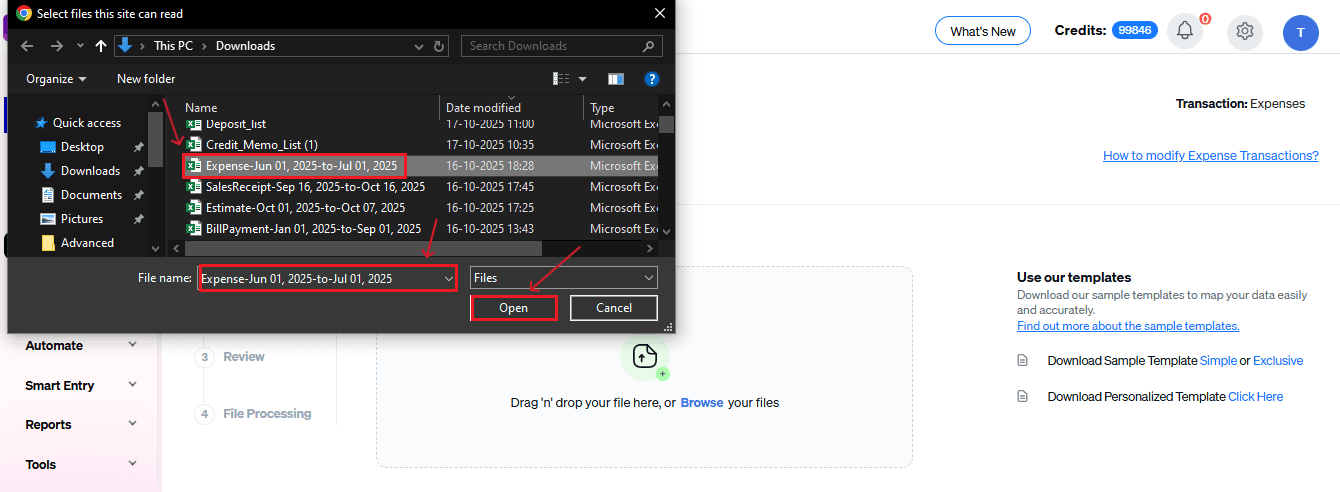
Step 6: Re-import the edited Expense
Return to SaasAnt Transactions.
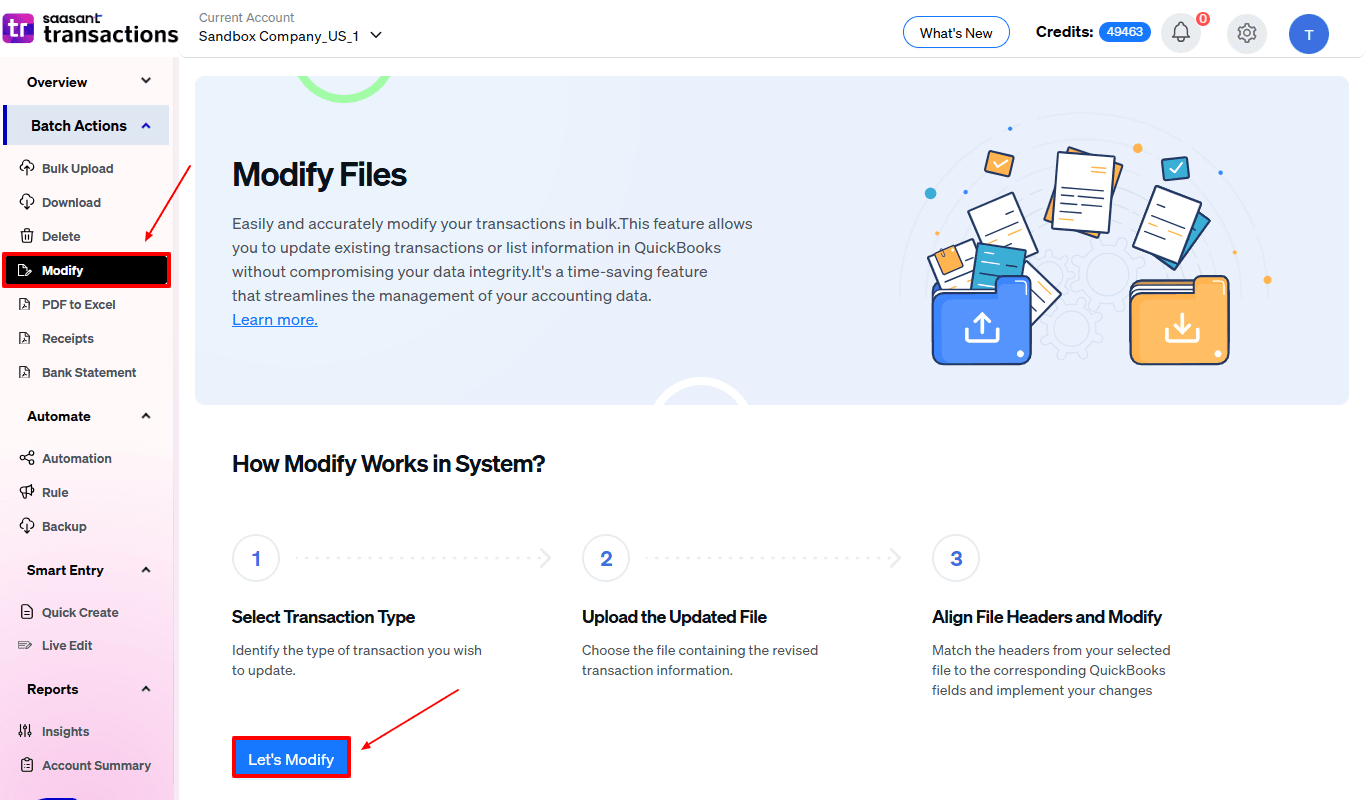
On the SaasAnt dashboard:
On the left side of the SaasAnt Transactions dashboard, you can see the menu bar with various options.
Select “Modify.”
At the bottom right, click on “Let’s Modify.”
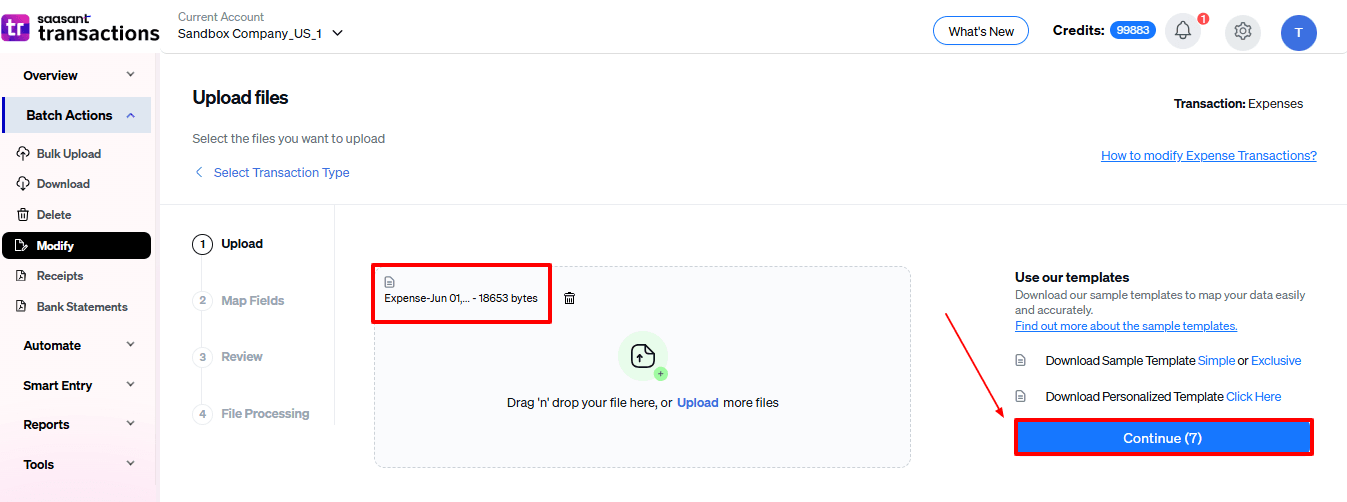
Select “Expenses” under the Vendor Transactions section.
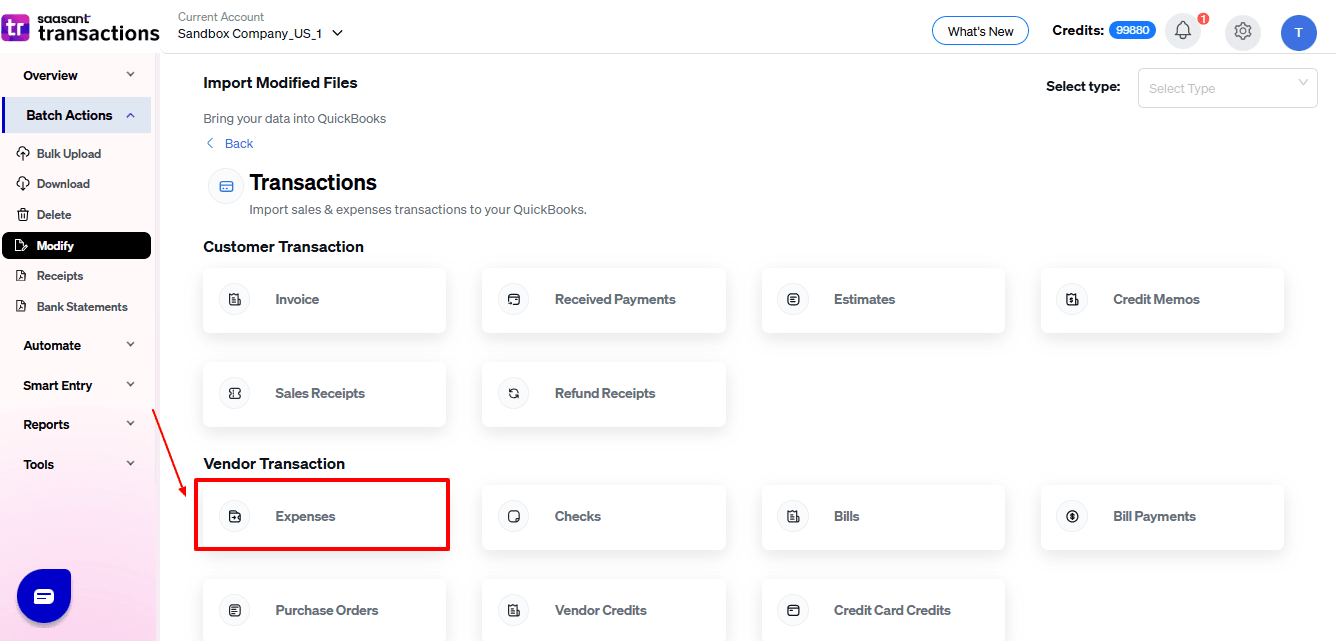
Browse and select the file you want to edit in QuickBooks.
Now, upload your respective expense files from your device and click “Continue”.
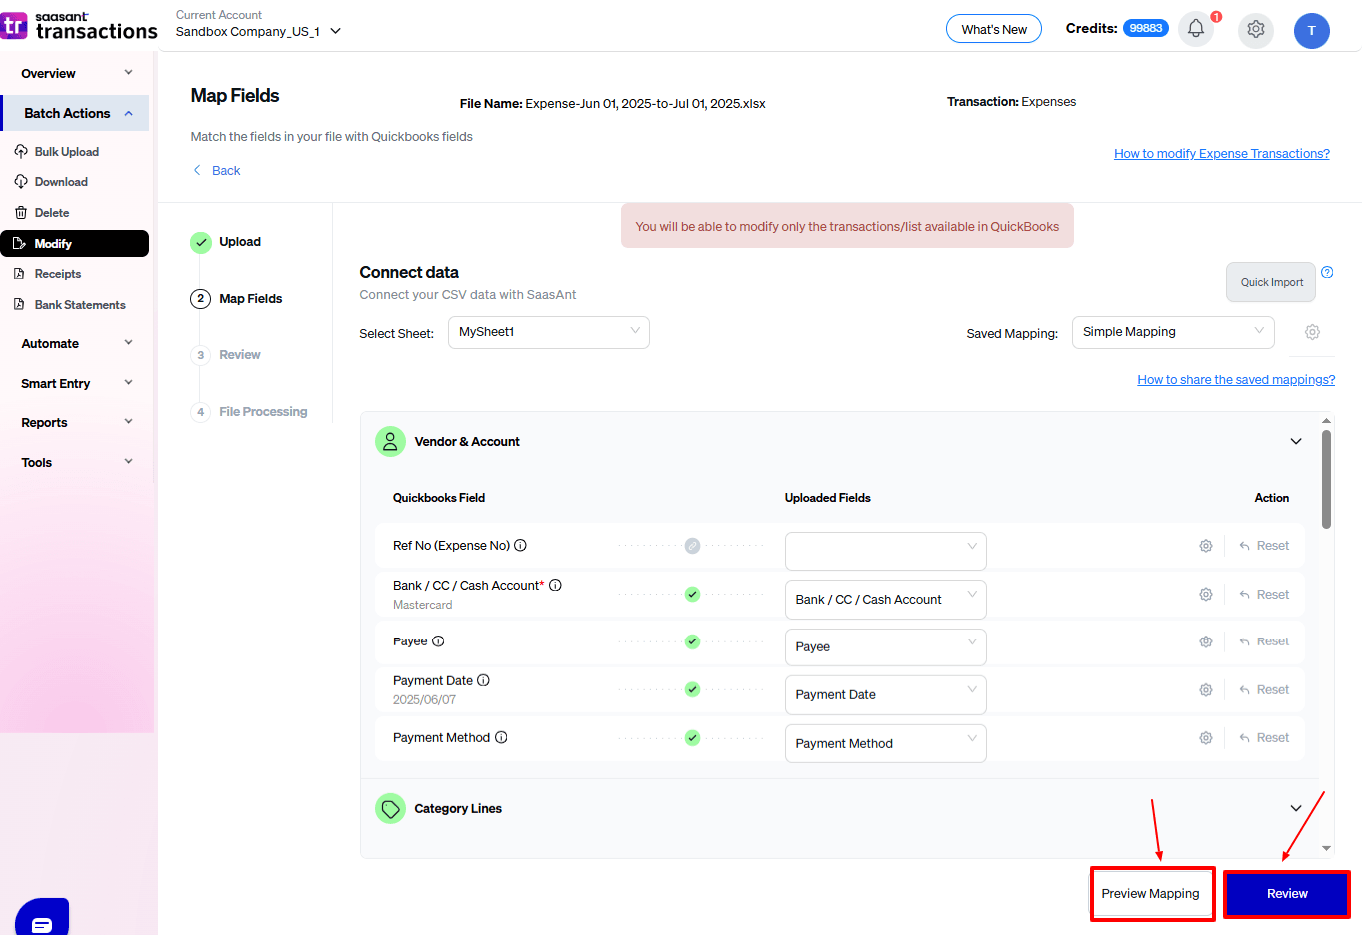
Step 7: Mapping Fields And Review
Ensures accurate mapping of essential fields, sales receipt number, sales receipt date, and payment method, among others.
The ‘Preview Mapping’ feature allows users to verify field alignment before review.
Select “Review” after finalizing the mapping of all fields.
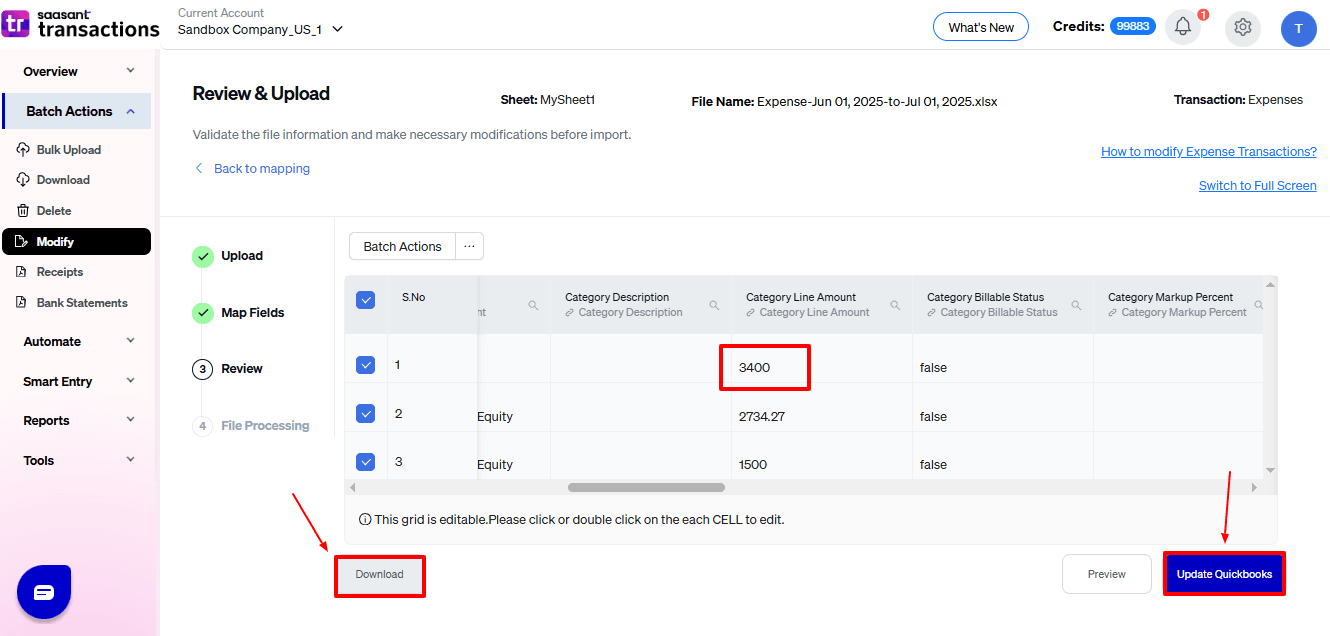
Step 8: Review And Update
Review the modified “Expenses” data and select “Update QuickBooks”.
At the bottom left, there is a “Download” option, where you can download this modified data for your future reference.
Your modified “Expenses” data will be updated in QuickBooks Online. Click “Show Results”.
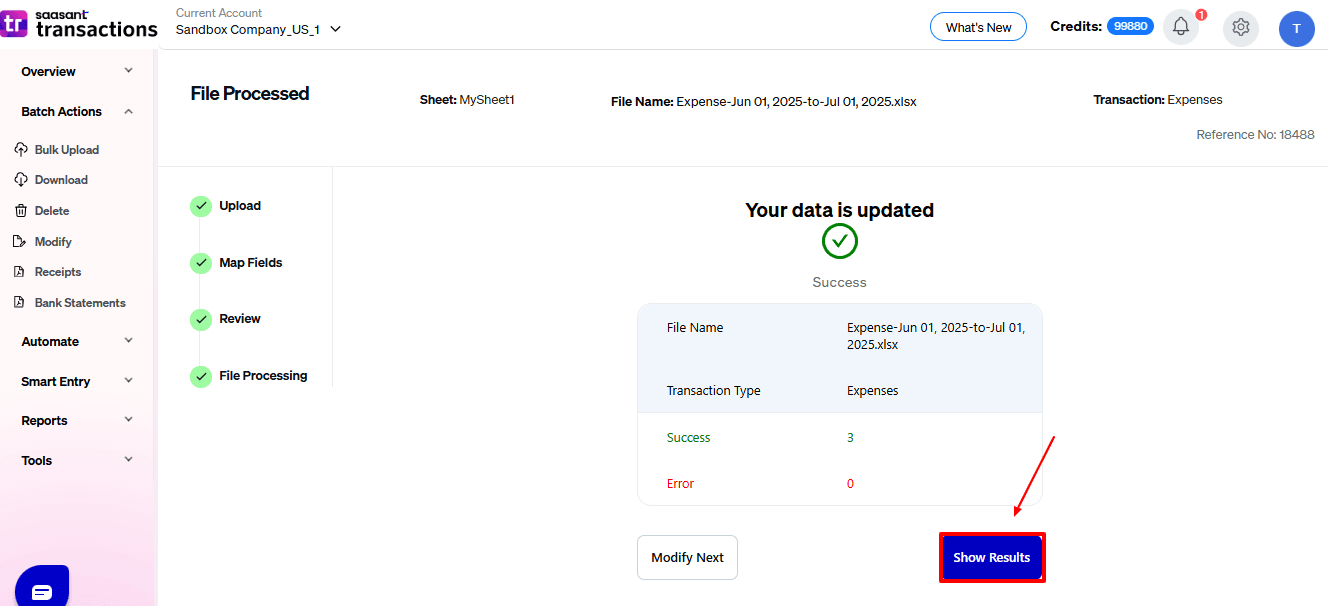
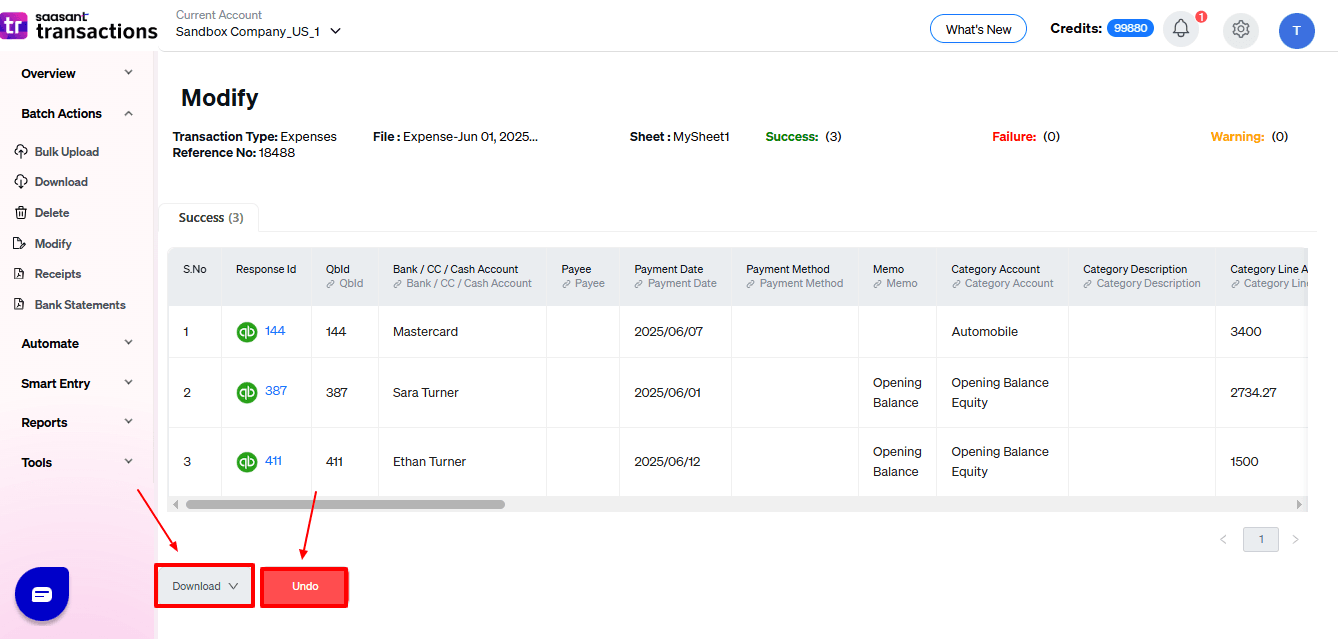
Step 9: Modify
Your modified “Expenses” data appears. At the bottom left, there is a “Download” option, where you can download your modified sales receipts data for future reference.
Additionally, next to “Download”, you can see “Undo”, which allows you to roll back your “Expense” data.
Now in the QuickBooks Online dashboard, select “My Apps”, choose “Expenses and Bills” dropdown and select “Expense Transaction” as shown in the image below.
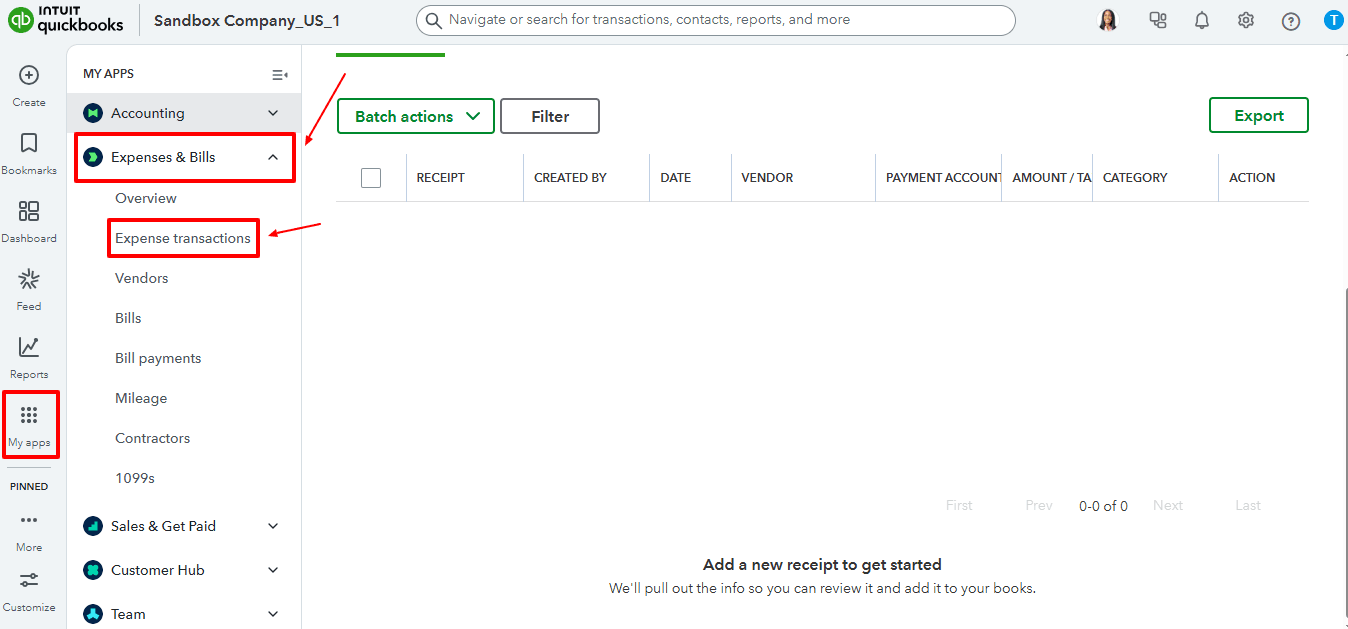
Modified “Expense” data are reflected in the QuickBooks Online as shown in the image below.

Advantages of Using SaasAnt Transactions to Edit Expenses in QuickBooks
The advantages of using SaasAnt Transactions to edit expenses in QuickBooks are:
Bulk Edit Capabilities: SaasAnt Transactions allows you to modify multiple expense entries simultaneously. This feature simplifies updating expenses, especially when dealing with large data or when corrections are needed across several entries.
Time Efficiency: Using SaasAnt Transactions for bulk edits, you can achieve what would traditionally take hours in significantly less time. The tool is designed to handle complex modifications quickly, saving up to 90% of the time compared to manual entry or editing.
Rollback Feature: If an error is made during the bulk editing process, SaasAnt Transactions provides a rollback feature. This allows you to undo changes and revert your expense data to its original state, offering a safety net that prevents permanent mistakes.
Wrap Up
Editing expenses in QuickBooks Online has become effortless with SaasAnt Transactions Online. By utilizing SaasAnt, accountants, bookkeepers, and small to medium-sized business owners can efficiently adjust multiple expense entries in bulk, saving time and minimising errors. Its user-friendly interface facilitates smooth field mapping, transaction previewing, and reviewing before updating QuickBooks Online. The undo feature and downloadable audit trail enhance security and transparency. Whether managing vendor bills, receipts, or recurring expenses, SaasAnt Transactions Online guarantees efficiency, accuracy, and peace of mind, making it an essential tool for optimising bookkeeping processes and ensuring financial integrity in your QuickBooks Online operations.
If you have inquiries regarding our products, features, trial, or pricing, or if you require a personalised demo, contact our team today. We are ready to help you find the ideal solution for your QuickBooks workflow.
Frequently Asked Questions
1) Will modifying expenses affect my previous financial reports?
All modifications are recorded in the Audit Log of QuickBooks Online. Reports will show the updated figures, but you can revert to the original data using the undo feature in SaasAnt.
2) Can I preview changes before updating QuickBooks Online?
Of course. The preview mapping and review processes allow you to check all changes before finalising in QuickBooks Online.
3) How do I undo changes after modifying expenses?
SaasAnt has an undo function next to the download button, which lets you go back any bulk edits to how they were before.
4) What types of expenses can I edit using SaasAnt?
With SaasAnt Transactions, you can easily edit vendor bills, sales receipts, checks, and general expense transactions.
5) Does SaasAnt support multiple users in QuickBooks Online?
Indeed, many users can access SaasAnt Transactions online, with role-based permissions that ensure safe management of workflows.
Read Also
How to Delete Multiple Expenses in QuickBooks Online
How to Enter Expenses in QuickBooks: Step-by-Step Guide
Import Expenses into QuickBooks Desktop from Excel
How to Export Expenses from QuickBooks to Excel