How to Export Journal Entries in QuickBooks Online

Exporting journal entries in QuickBooks is essential for businesses that need to share their financial data with external parties, perform detailed analysis, or keep backup records outside of QuickBooks. If you’re using QuickBooks Online, exporting journal entries is straightforward, but following each step carefully is essential to ensure accuracy.
Contents
How to Export Journal Entries in QuickBooks Online: Step-by-Step Guide
How to Prepare Before Exporting Journal Entries?
Benefits of using Saasant Transactions to Export Journal Entries
Conclusion
FAQs
How to Export Journal Entries in QuickBooks Online: Step-by-Step Guide
Exporting journal entries in bulk is easy with SaasAnt Transactions. Follow these steps to export your data efficiently:
Step 1: Login and Connect
Access your SaasAnt Transactions account and ensure you have the necessary permissions for exporting data. If you still need to connect, link SaasAnt Transactions to your QuickBooks Online account. This connection allows seamless access to your QuickBooks data.
Step 2: Set Up for Export
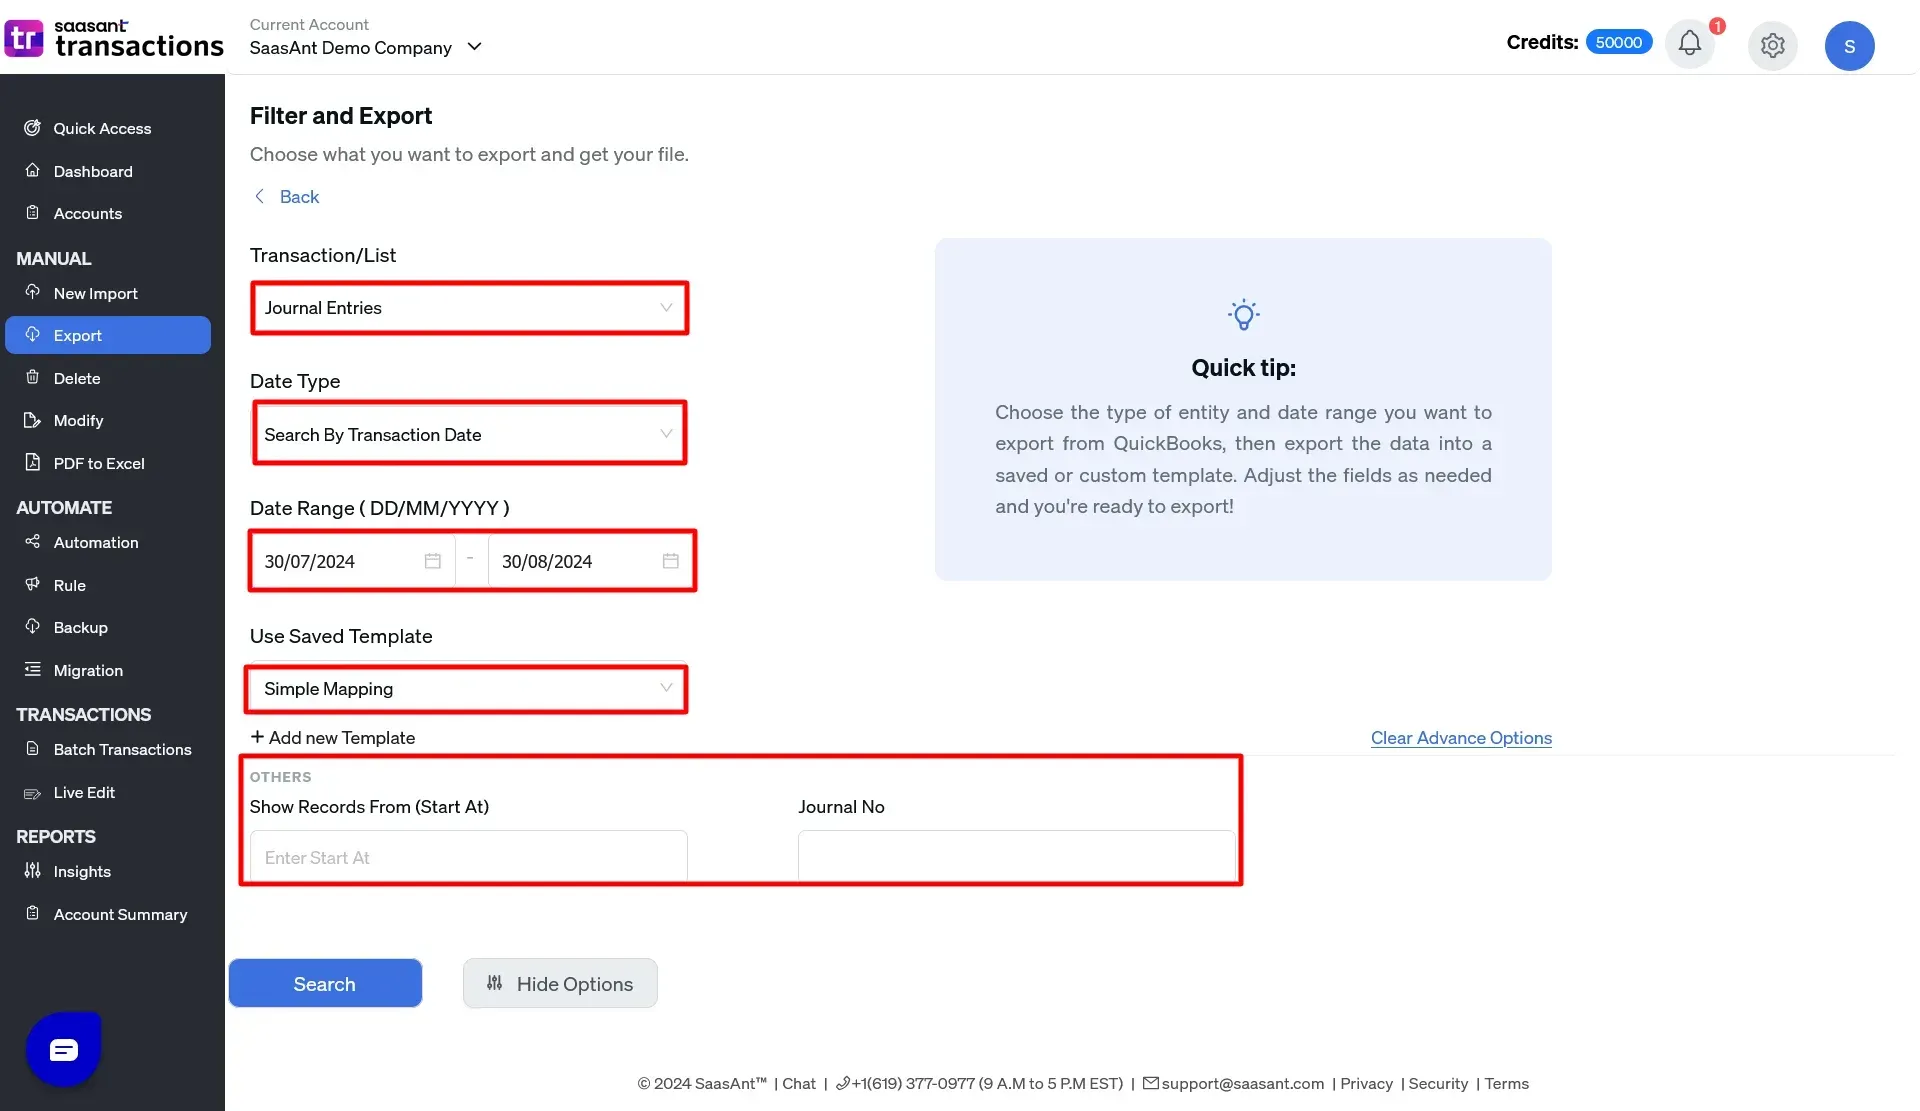
Navigate to the export feature within the SaasAnt Transactions dashboard. Select 'Journal Entries' as the data type you wish to export, preparing for a focused and efficient export process.
Step 3: Customize Your Export
Utilize SaasAnt Transactions’ advanced filtering options to refine your data selection. Filters can be applied based on criteria like date range, accounts, or transaction types, ensuring you export only the needed data. Choose your preferred export format, such as Excel or CSV, depending on how you intend to use the data. For recurring exports, set up templates to save your filter settings and format preferences, making future exports even faster.

Step 4: Execute the Export
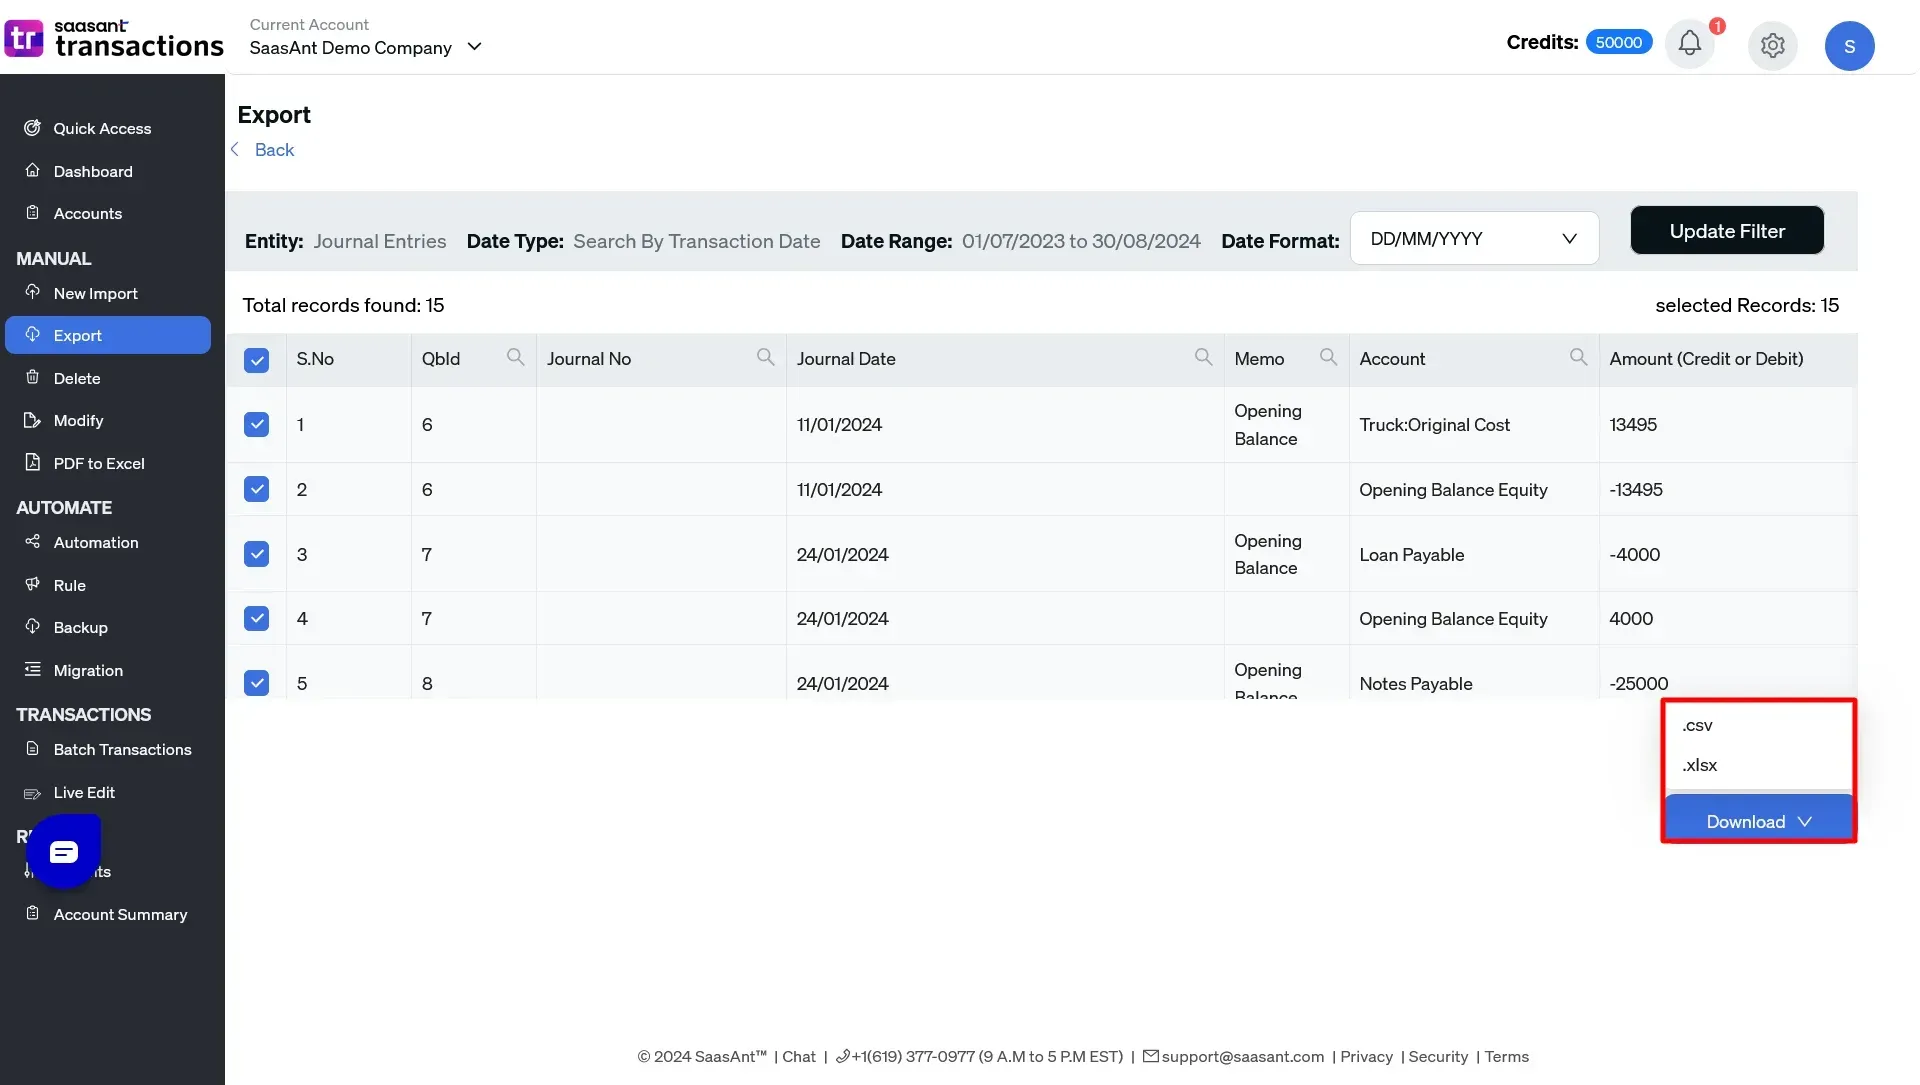
After customizing your settings, execute the export. SaasAnt Transactions will compile and download the data according to your specifications. Once the export is complete, save the file to your preferred location with a clear, descriptive name that reflects its content and date range.
Following these steps, you can efficiently export journal entries in bulk, streamlining your financial data management with SaasAnt Transactions.

What are the Reasons for Exporting Journal Entries?
There are several scenarios where exporting journal entries might be necessary:
External Analysis: Exporting data to Excel or another tool allows for deeper analysis, custom reporting, or integration with other financial systems.
Sharing with External Parties: You might need to send journal entries to your accountant, auditor, or business partners for review or compliance.
Backup and Record-Keeping: Keeping a backup of your journal entries outside of QuickBooks ensures additional security. You can access your data even if your QuickBooks data is lost or corrupted.
Data Migration: When transitioning to a new accounting system, exporting journal entries is often a necessary step in the migration process.
How to Prepare Before Exporting Journal Entries?
Before exporting journal entries, it’s vital to prepare by backing up your data and reviewing the entries you plan to export.
Best Practices for Exporting Journal Entries
To ensure a smooth and accurate export process, consider the following best practices:
Regular Exports: Schedule regular exports of your journal entries as part of your data management routine. This practice ensures that your financial data is always up-to-date and readily available when needed.
Double-Check Data: Always review the data to ensure accuracy and completeness before exporting. This step helps avoid errors leading to incorrect financial analysis or reporting.
Secure Storage: Once exported, store your files securely, preferably with backup copies. Consider using encrypted storage solutions for sensitive financial data.
Benefits of using Saasant Transactions to Export Journal Entries
Efficiency and Time Savings: SaasAnt Transactions allows you to export journal entries in bulk, drastically reducing the time spent on manual data handling. With just a few clicks, you can export large volumes of data quickly and accurately.
Advanced Filtering: The tool’s advanced filtering options enable you to refine your export by specific criteria, such as date range, accounts, or transaction types. This ensures that you export only the needed data, making the process more efficient and focused.
Customizable Export Formats: SaasAnt Transactions offers flexibility in export formats, allowing you to choose between Excel, CSV, and other formats. This adaptability makes manipulating or using data directly in reports or analyses easier.
Template Creation: You can create and save templates in SaasAnt Transactions for recurring export tasks. These templates store your preferred settings, streamlining future exports and maintaining consistency in your data management.
Seamless Integration with QuickBooks Online: SaasAnt Transactions integrates seamlessly with QuickBooks Online, providing a smooth and uninterrupted data flow. This integration ensures that your exports are accurate and up-to-date, reflecting current financial information.
Data Integrity: SaasAnt Transactions minimizes the risk of errors during the export process. The tool’s robust features ensure that your exported data maintains its integrity, supporting reliable financial reporting and analysis.
Conclusion
Exporting journal entries from QuickBooks Online is vital for effective financial management. Following the steps outlined in this guide, you can easily export your data, ensuring it’s ready for analysis, sharing, or backup. Utilizing tools like SaasAnt Transactions can further enhance your exporting capabilities, primarily if you deal with large volumes of data. To explore these features without commitment, SaasAnt offers a 30-day free trial, allowing you to experience the tool's full potential. By adhering to best practices, you can maintain the accuracy and integrity of your financial records, making informed decisions more straightforward and reliable. To learn more, read about managing journal entries in QuickBooks.
FAQs
How to Export Journal Entries in QuickBooks Online?
Exporting journal entries from QuickBooks Online can be efficiently managed using tools like SaasAnt Transactions. Connecting SaasAnt Transactions to your QuickBooks account allows you to customize, filter, and export your journal entries in various formats, such as Excel or CSV. This process ensures you have precise control over the data you export.
How to Create a Journal Entry in QuickBooks Online?
Creating a journal entry in QuickBooks Online is straightforward. You can do this by navigating to the ‘New’ button, selecting ‘Journal Entry,’ and filling out the necessary details such as accounts, debits, and credits. Once done, save the entry to update your financial records.
Can I Delete a Journal Entry in QuickBooks Online?
Yes, you can delete a journal entry in QuickBooks Online. To do this, find the entry in your Chart of Accounts, open it, and select the ‘Delete’ option. Deleting an entry is permanent and can impact your financial reports.
Can I Edit a Journal Entry in QuickBooks Online?
Editing a journal entry in QuickBooks Online is simple. Locate the entry in your account, make the necessary changes to accounts, amounts, or descriptions, and save the updates. If you need to edit multiple entries, consider using SaasAnt Transactions for bulk editing.
Can I Import Journal Entries into QuickBooks Online?
Yes, you can import journal entries into QuickBooks Online using tools like SaasAnt Transactions. Prepare your entries in a CSV or Excel file, and then upload them through the import function, mapping the fields correctly to ensure accurate data integration.
Recommended reading: