How to Find Journal Entries in QuickBooks Online
Welcome to our comprehensive guide on finding journal entries in QuickBooks Online. Whether you're a small business owner managing your own books, an accountant ensuring your clients' records are accurate, or a finance manager reconciling complex transactions, this guide is designed for you. Most readers at this stage are well-versed in QuickBooks fundamentals but now need to dig deeper to verify adjustments, audit entries, and troubleshoot discrepancies.
You might be facing challenges like not knowing exactly where to locate journal entries, dealing with mis-posted transactions, or spending too much time on manual reconciliations. Your primary focus is on achieving efficiency, ensuring data accuracy, and maintaining reliable financial reports that support informed business decisions.
In this guide, we'll walk you through every step of locating journal entries in QuickBooks Online. Additionally, we’ll explore how automation tools like SaasAnt Transactions can streamline this process—helping you reduce manual errors and save valuable time. Let’s dive in and make your financial records as precise and hassle-free as possible.
By the end of this guide, you will have the knowledge and tools to effortlessly find and view any journal entry in your QuickBooks Online software.
How to See a List of All Journal Entries in QuickBooks Online
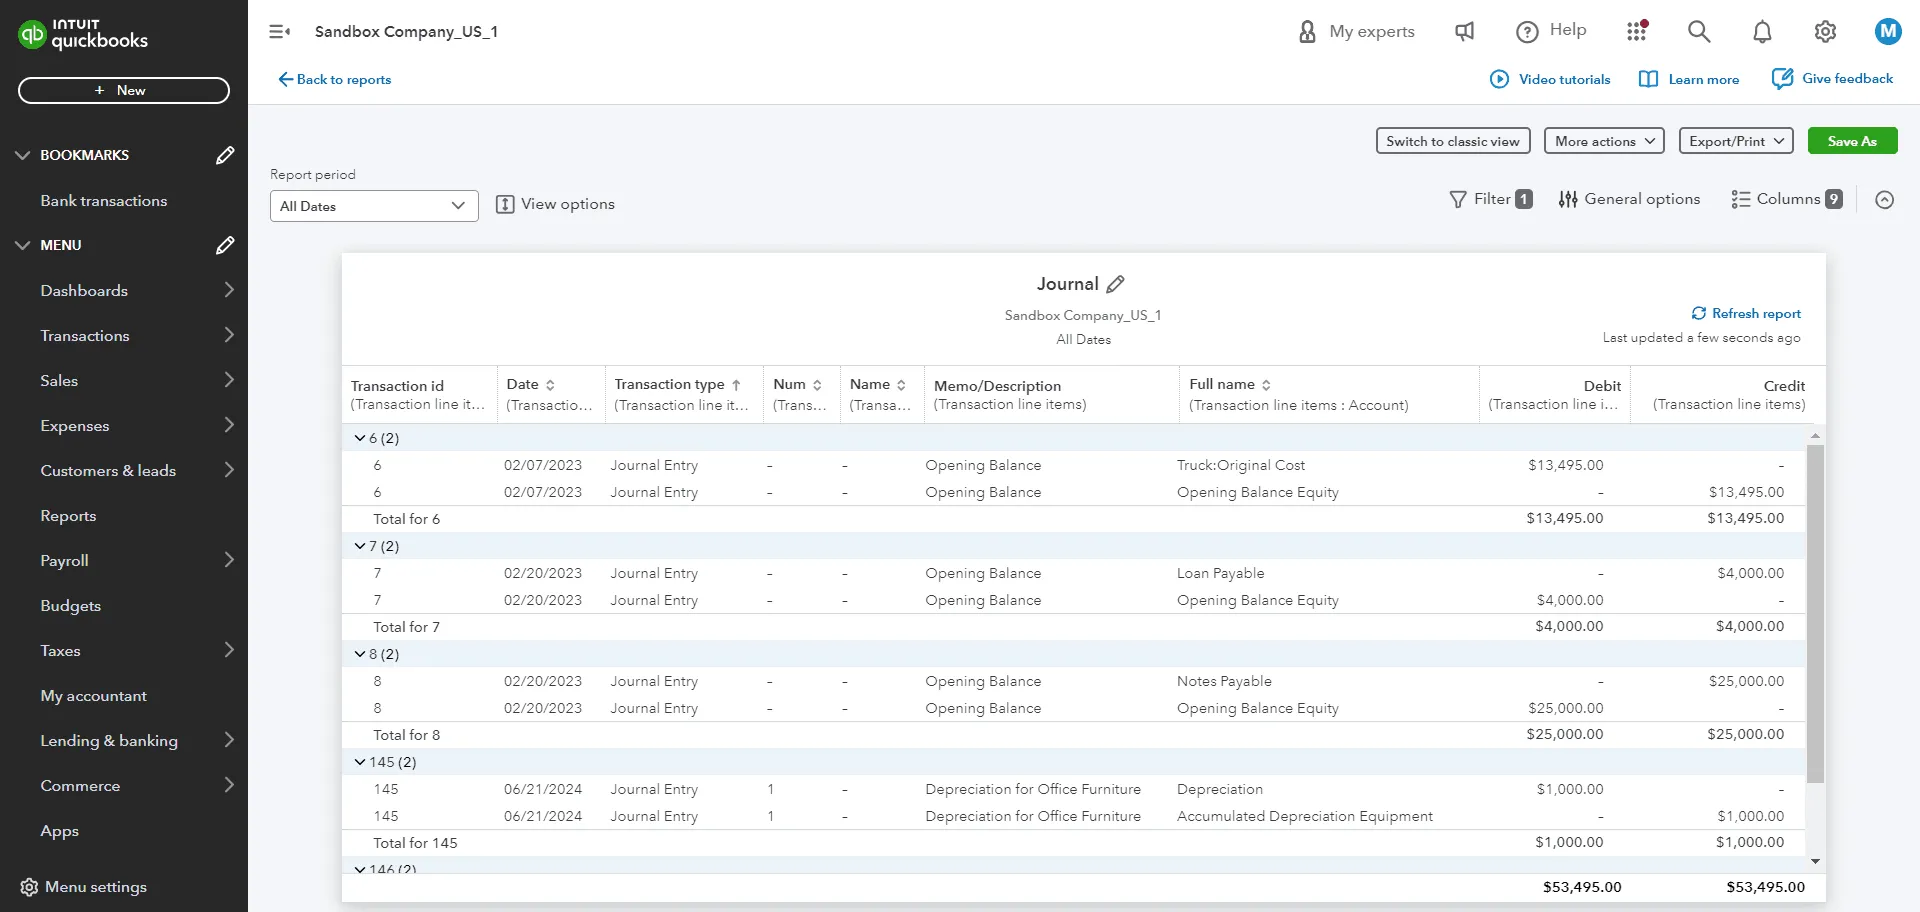
To see a list of all journal entries in QuickBooks Online, you can run a Journal Report. This report shows all the transactions entered through journal entries, along with their dates, accounts, amounts, and memos.
Steps to Run a Journal Report:

Go to Reports:
Navigate to the Reports menu and select Accountant & Taxes, then choose Journal.
Customize the Report:
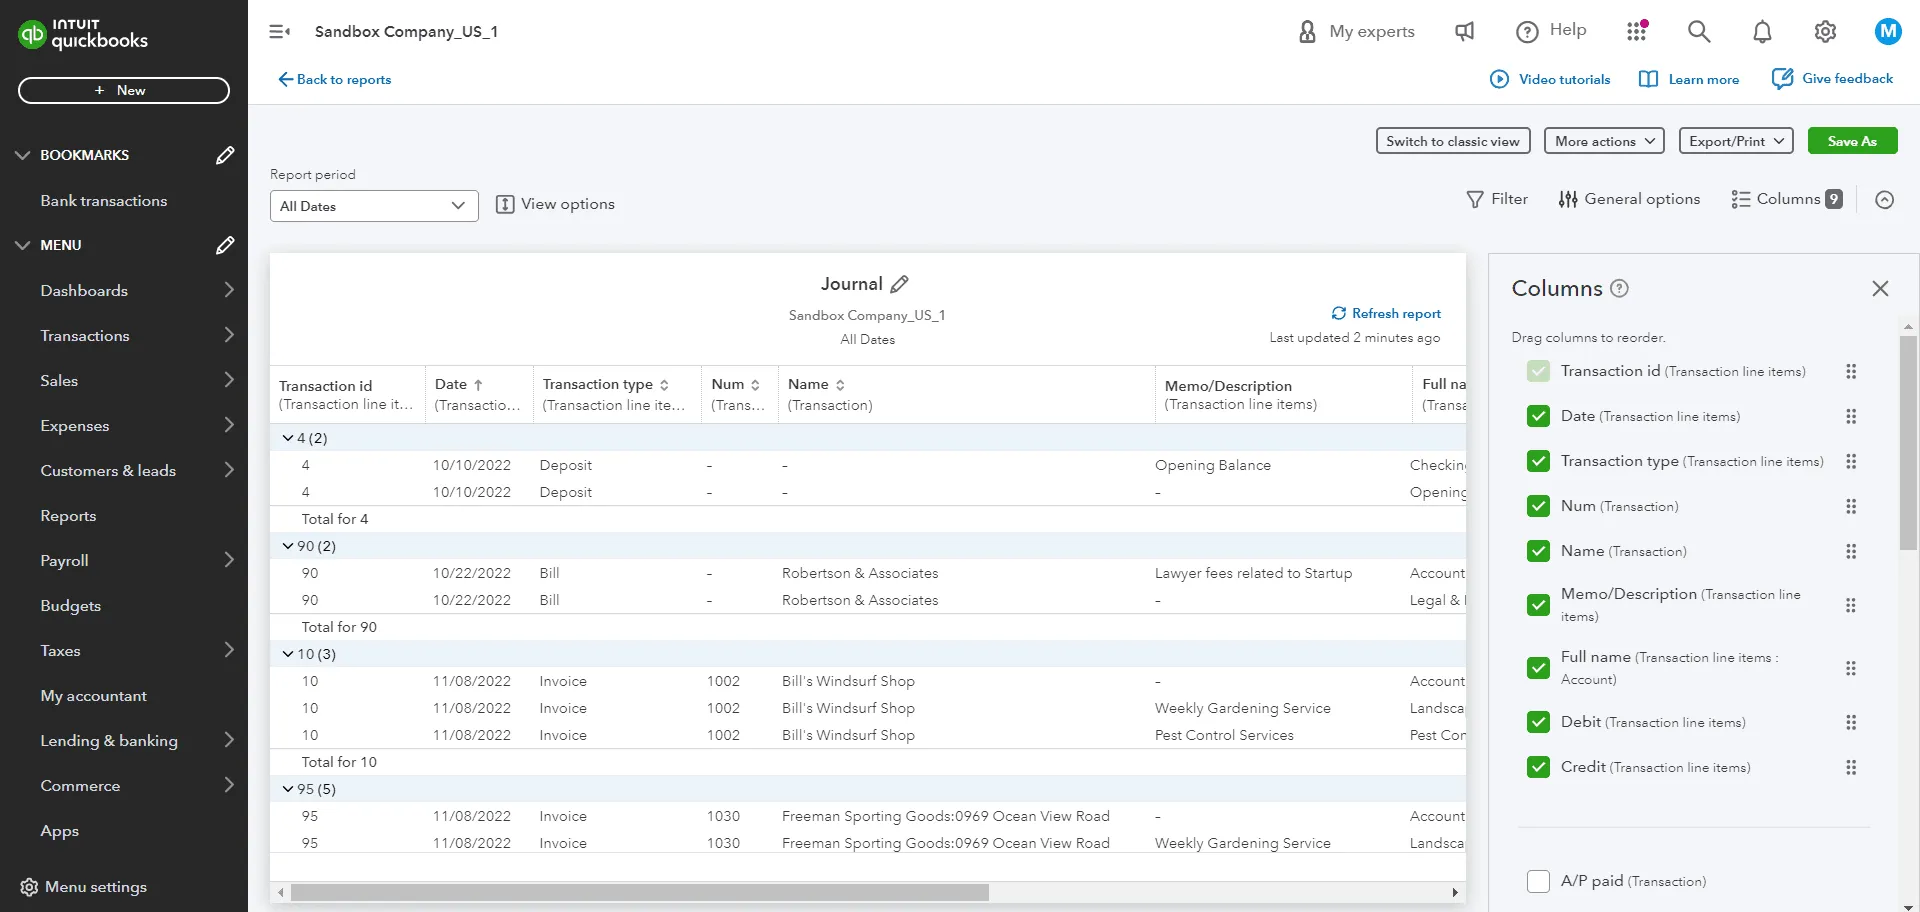
Change the date range, filter by transaction type, or add/remove columns as needed.
Export, Print, or Email:
You can export, print, or email the report as required.
How to Find a Specific Journal Entry in QuickBooks Online
If you need to find a specific journal entry in QuickBooks Online, you can use the Search function. This tool allows you to search for transactions by various criteria, such as date, amount, reference number, memo, or account.
Steps to Use the Search Function:
Access Search:
Click on the magnifying glass icon at the top right corner of the screen, then enter your search term or select Advanced Search.
Alternatively, press Ctrl+F on your keyboard to access the search.
Refine Your Search:
Use filters to narrow down your search results by entry type, amounts, or account names.
Sort the results by date, type, or amount.
How to View or Edit the Details of a Journal Entry in QuickBooks Online
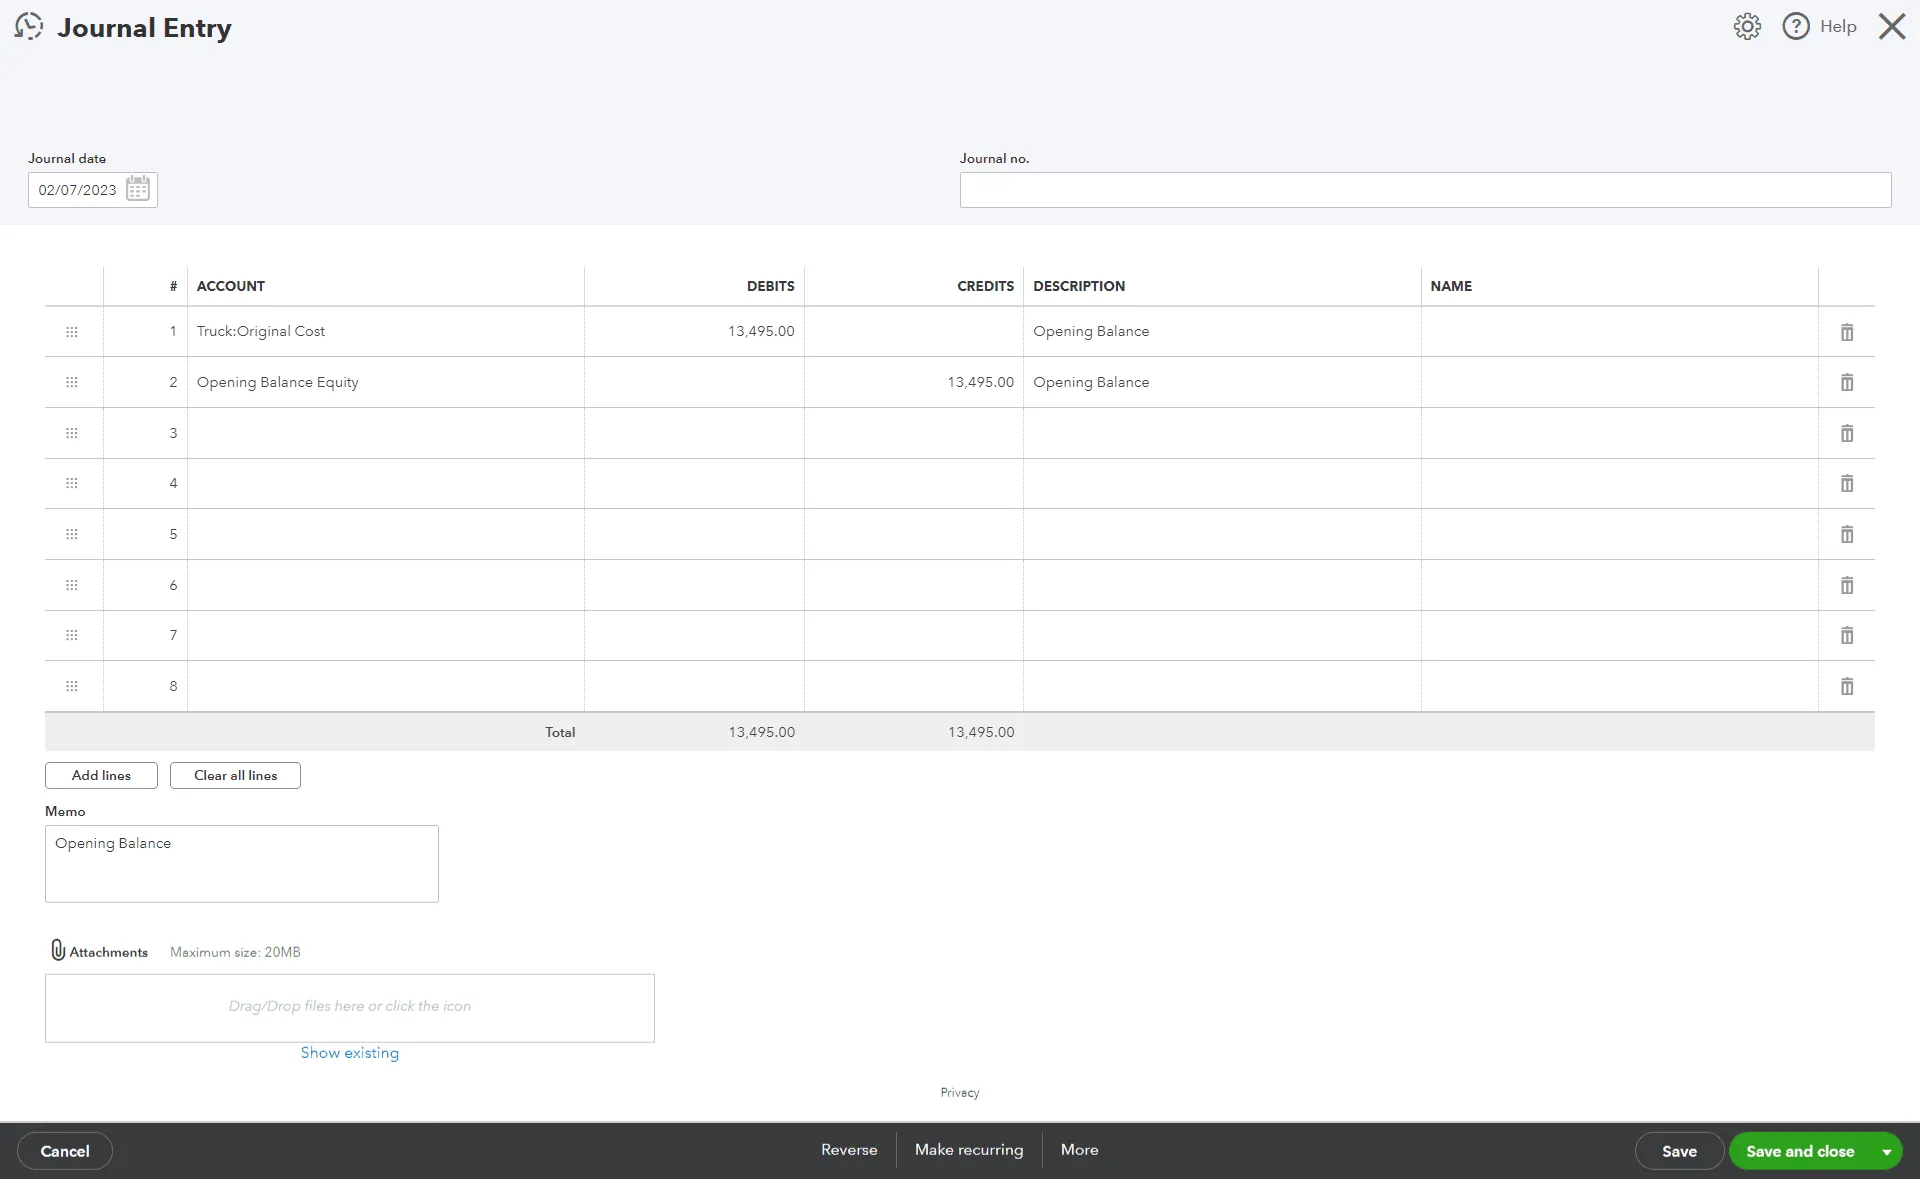
To view or edit the details of a journal entry in QuickBooks Online, you can open it from the Journal Report or the Search results. You can also delete or reverse a journal entry if needed.
Steps to View or Edit a Journal Entry:

Open the Entry:
From the Journal Report or the Search results, click on the amount or the transaction link to open the journal entry form.
Edit Details:
Change the information, such as the date, accounts, amounts, or memo.
Delete or Reverse:
Click on the More button at the bottom of the form and select the appropriate option.
Save Changes:
Click on ‘Save and close’ when you are done.
How to Run a Journal Entry Report in QuickBooks Online
Running a journal entry report helps you analyze and review your journal entries in an organized way. You can customize the report to suit your needs and preferences.
Steps to Run a Journal Entry Report:
Go to Reports:
Navigate to the Reports menu and select Accountant & Taxes, then choose Journal.
Customize the Report:
Change the date range, filter by transaction type, or add/remove columns.
Group the report by date, account, or entry type, and sort by date, type, or amount.
Export, Print, or Email:
Export, print, or email the report as needed.
How to Use Filters to Find Journal Entries in QuickBooks Online
Using filters to find journal entries in QuickBooks Online helps you narrow down your search results and focus on relevant transactions.

Steps to Use Filters:
Access Advanced Search:
Click the magnifying glass icon at the top right corner of the screen, then select Advanced Search.
Alternatively, press Ctrl+F on your keyboard and click the Advanced Search link.
Set Filters:
Specify criteria for your search, such as date range, entry type, amounts, or account names.
Enter keywords in the search box to further refine your search results.
How to Access Past Journal Entries in QuickBooks Online
Accessing past journal entries in QuickBooks Online helps you review and verify your previous transactions, ensuring accuracy and consistency in your financial records.
Ways to Access Past Journal Entries:
Journal Report:
Go to the Reports menu and select Accountant & Taxes, then choose Journal.
Customize the report by changing the date range, filtering by transaction type, or adding/removing columns.
Search Function:
Click the magnifying glass icon at the top right corner of the screen, then enter your search term or select Advanced Search.
Alternatively, press Ctrl+F on your keyboard.
Audit Log:
Go to the Settings menu and select ‘Audit Log’.
View the history of changes made to your journal entries, along with the user, date, and time of each change.
Filter the Audit Log by date, user, or event type.
By following these steps and leveraging the various tools in QuickBooks Online, you can efficiently find and manage your journal entries. Whether you are looking to run a comprehensive report, locate a specific entry, or access past transactions, QuickBooks Online provides the features you need for accurate financial record-keeping.
If you need help with uploading journal entries into QuickBooks from Excel, you can use SaasAnt Transactions. It’s one of the most trusted integrations in QuickBooks Appstore trusted by thousands of accountants.
Manage Journal Entries Better with SaasAnt Transactions
Finding and managing journal entries in QuickBooks Online can sometimes feel overwhelming, especially when dealing with numerous transactions. If you often need to edit, delete, or export multiple entries, the process can become tedious. Fortunately, SaasAnt Transactions can help simplify this task using advanced filters for bulk editing, deletion and exporting.
Also, instead of creating journal entries one by one, you can bulk import manually or use the automation import feature, saving you time and reducing the chance of errors. This approach allows you to focus on more important aspects of your business while ensuring your financial records remain accurate and up-to-date.
FAQ
How Do I Create Multiple Journal Entries in QuickBooks Online?
To create multiple journal entries:
Click ‘+ New’ and select ‘Journal Entry.’
Enter details for the first transaction.
Add more lines for additional entries.
Ensure the debit and credit amounts are equal for each transaction.
Repeat the process for each entry.
How Do I Import Journal Entries into QuickBooks Online?
To import journal entries into QuickBooks:
Ensure your file is in CSV or Excel format.
Use QuickBooks’ import feature by navigating to Settings > Import Data.
Select Journal Entries and upload your file.
Map the fields, review the data, and click Import.
Can I Edit a Journal Entry in QuickBooks Online?
Yes, you can edit a journal entry in QuickBooks Online:
Use Advanced Search to find the journal entry.
Open the entry and click Edit.
Make necessary changes, ensuring that the debit and credit amounts remain balanced.
How Do I Create a Journal Entry in QuickBooks Desktop?
To create a journal entry in QuickBooks Desktop:
Navigate to Company and select ‘Make General Journal Entries.’
Enter the date, debit/credit amounts, and choose the appropriate accounts.
Ensure the entry is balanced before saving.
Recommended reading:
Read also
Batch Transactions in QuickBooks Online - Detailed Guide
How to Import Transactions into QuickBooks from Excel
How to Edit Multiple Transactions in QuickBooks
How to Export Transactions from QuickBooks Online