How to Import Bills into QuickBooks Desktop

October 24, 2023

blog_images1703128916574_How-to-Import-Bills-into-QuickBooks-Desktop.webp

This guide will walk you through importing bills into QuickBooks Desktop.

Contents

Versatile Solutions: Importing Bills for Businesses of All Sizes

Small Businesses Simplifying Bill Management

Accountants and Bookkeepers Enhancing Efficiency

Real Estate Companies Handling Property Expenses

Manufacturing Firms Processing Purchase Invoices

Construction Companies Tracking Subcontractor Bills

Healthcare Practices Managing Supplier Payments

Freelancers and Self-Employed Professionals Managing Business Expenses

Step-By-Step Guide: Importing Bills into QuickBooks Desktop with SaasAnt Transactions

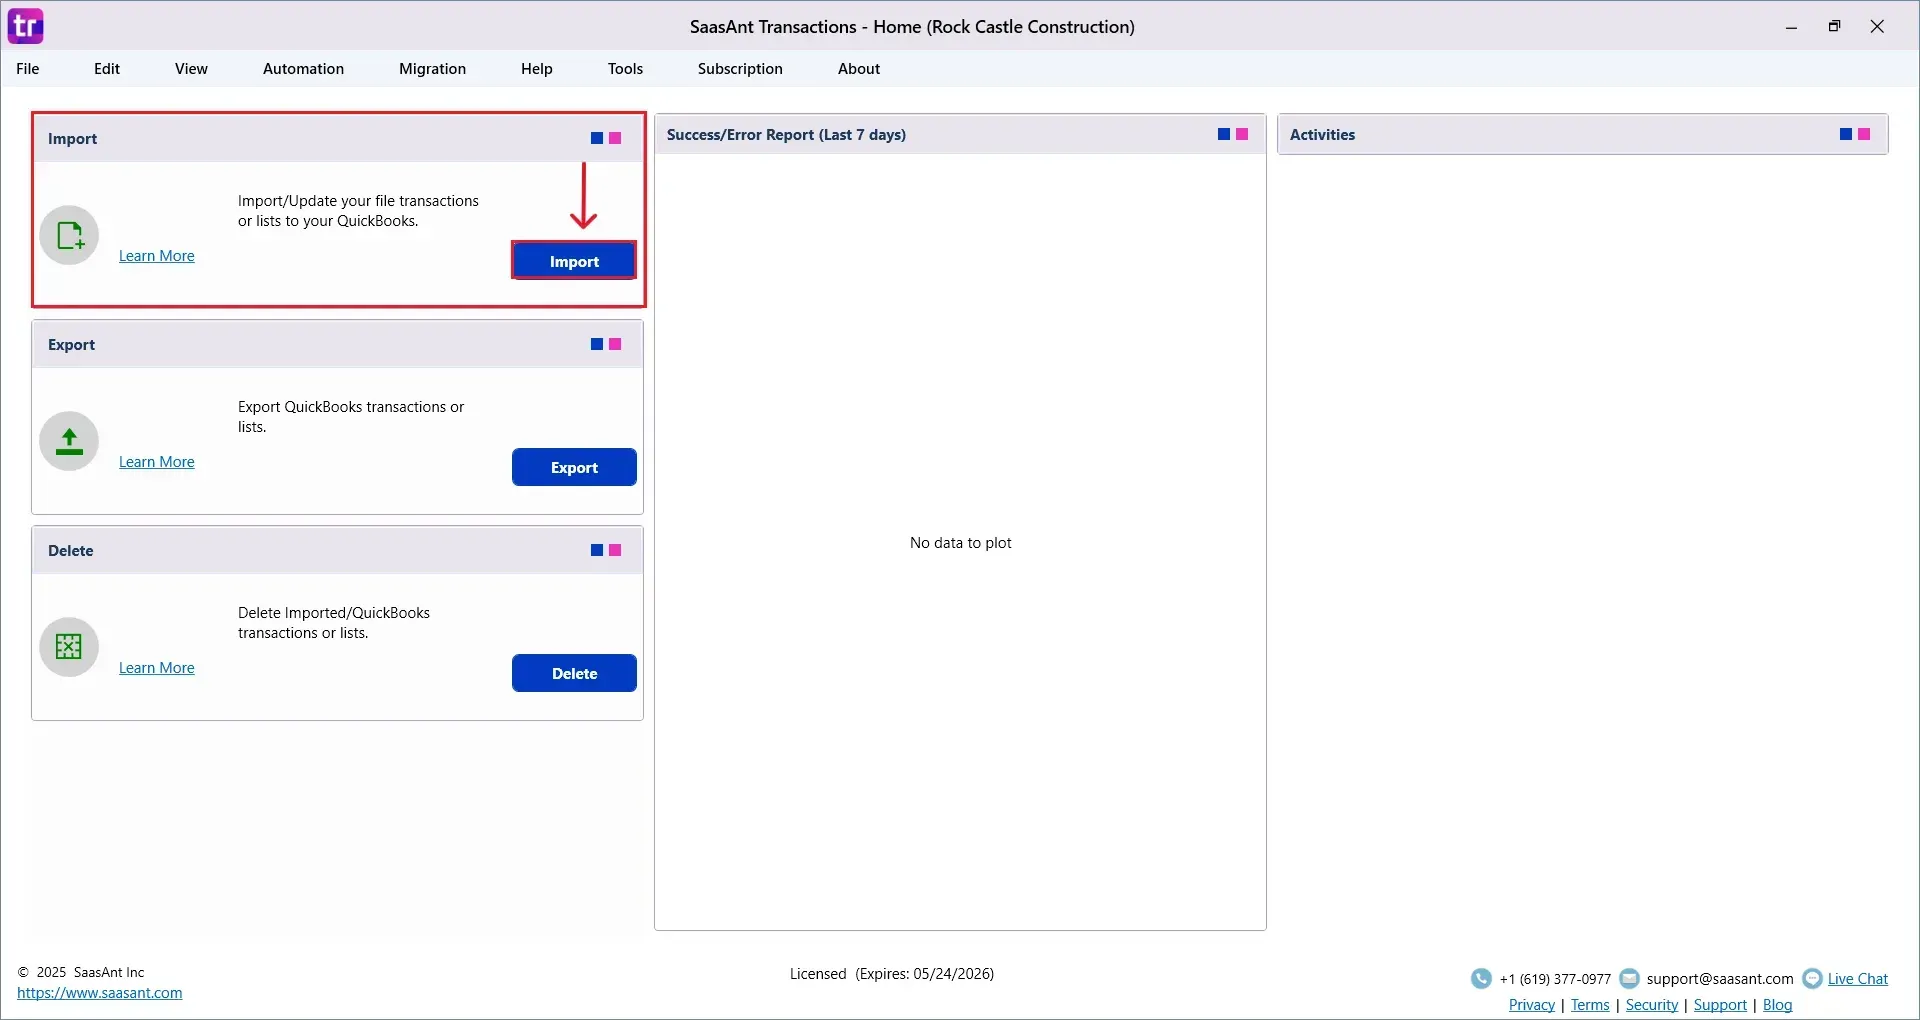
Step 1: Launch SaasAnt Transactions Desktop and Begin Import

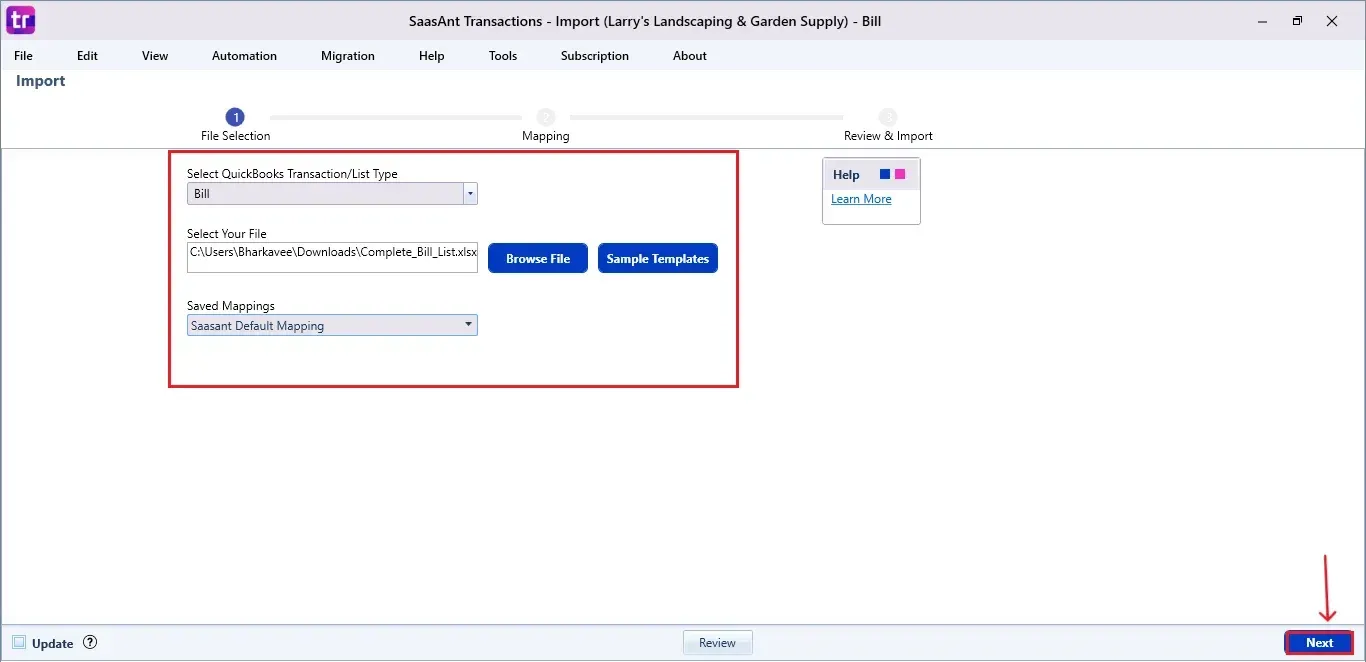
Step 2: Select the Right QuickBooks Transaction Type

Step 3: Effortlessly Upload Your Bill File

Step 4: Handpick the Relevant Sheet from a CSV File

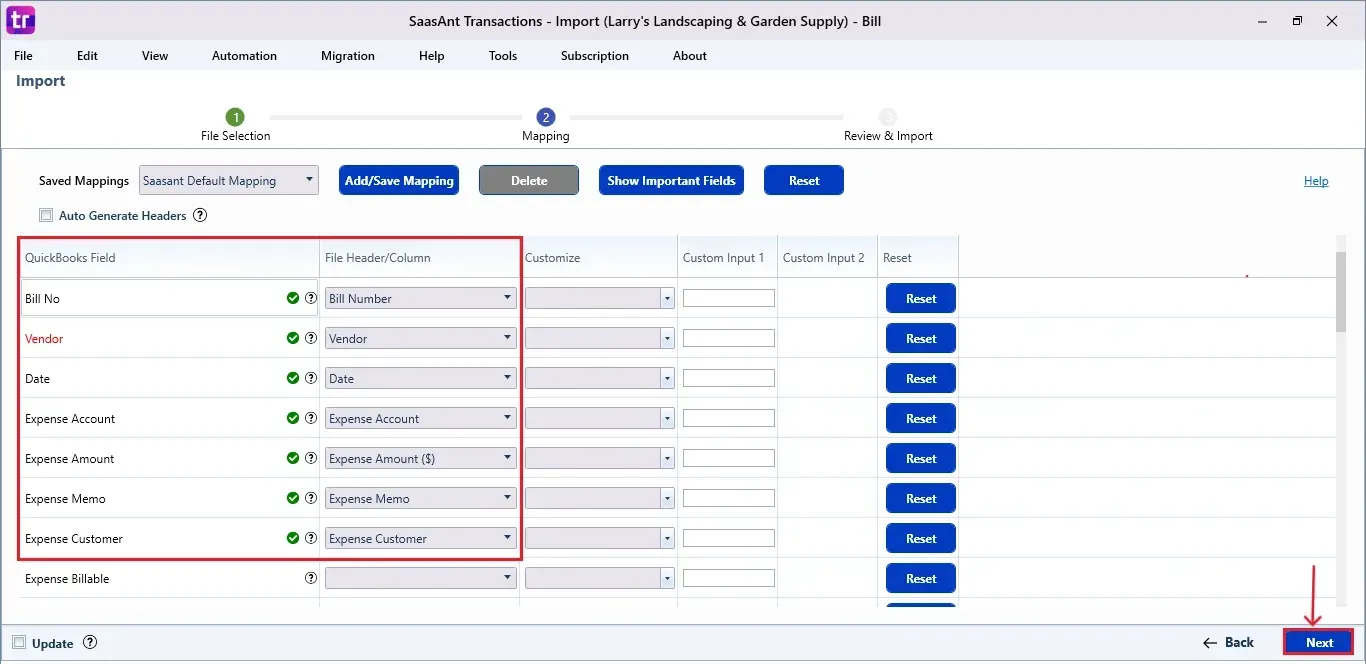
Step 5: Map Essential QuickBooks Fields with Ease

Step 6: Streamline Data Mapping Configuration

Step 7: Configure Preferences and Verify Accuracy

Step 8: Address Errors (If Necessary)

Step 9: Successfully Conclude the Import

Wrap Up

FAQs

Quick Instructions for Importing Bills into QuickBooks Desktop

  • Download & install SaasAnt Transactions.

  • Launch SaasAnt Transactions, click ‘File’ and select ‘Connect to QuickBooks.’

  • Click 'New Import' & upload your file(supports various file formats, including Excel, CSV, and IIF).

  • Choose 'Bills' as your ‘QuickBooks Transaction Type.’

  • Map critical QuickBooks fields like 'Date,' 'Payee,' and 'Amount.’

  • Review the mapping and initiate the import.

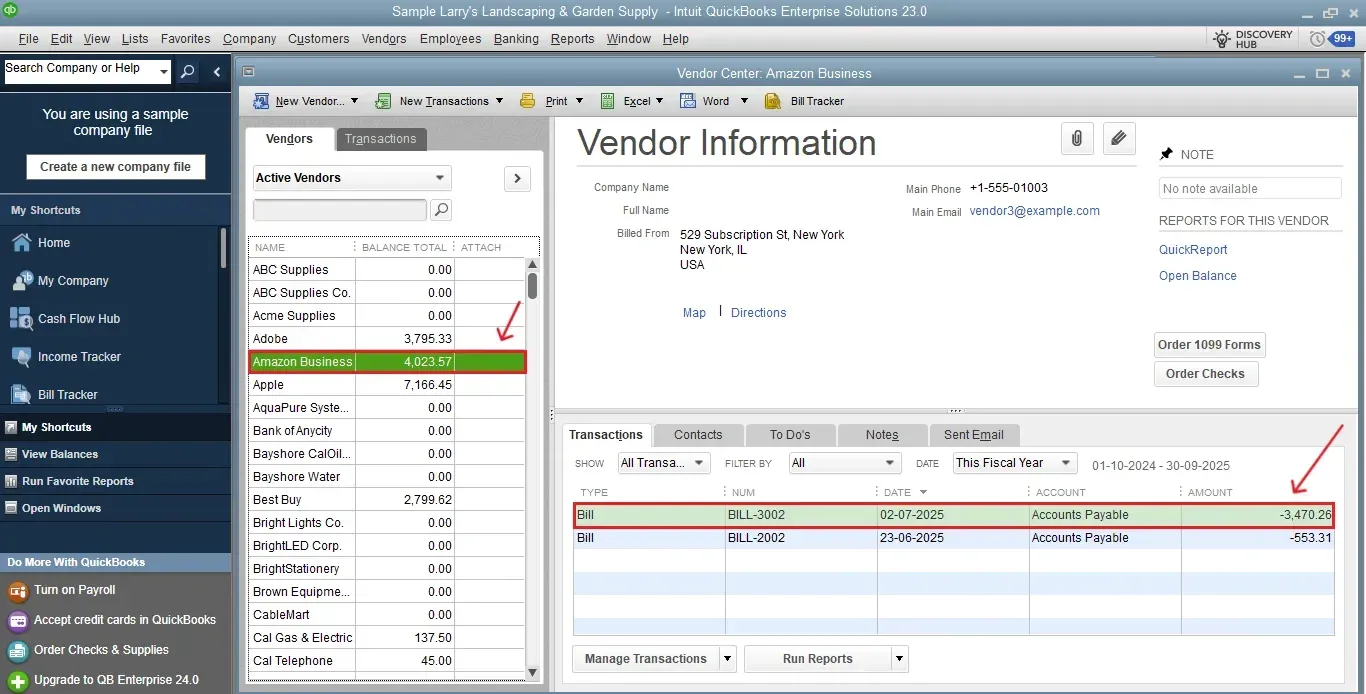
  • Validate the imported data in QuickBooks Desktop to ensure accuracy.

Versatile Solutions: Importing Bills for Businesses of All Sizes

Small Businesses Simplifying Bill Management

Small businesses with limited resources can simplify their accounts payable process by importing bills into QuickBooks Desktop. SaasAnt Transactions helps them streamline their finances efficiently, allowing them to focus on growth.

Accountants and Bookkeepers Enhancing Efficiency

Accountants and bookkeepers handling multiple clients can benefit from SaasAnt Transactions to import bills. This tool streamlines their workflow, reduces manual data entry, and ensures accuracy across various client accounts.

Real Estate Companies Handling Property Expenses

Real estate companies can use SaasAnt Transactions to import bills related to property expenses such as maintenance, utilities, and repairs. It simplifies expense tracking for each property, enhancing financial transparency.

Manufacturing Firms Processing Purchase Invoices

Manufacturing firms often receive numerous purchase invoices for raw materials and production expenses. SaasAnt Transactions allows them to import these invoices seamlessly, ensuring the accurate accounting of production costs.

Construction Companies Tracking Subcontractor Bills

Construction companies that work with subcontractors can use SaasAnt Transactions to import subcontractor bills into QuickBooks Desktop. It simplifies expense tracking and ensures the accurate recording of subcontractor payments.

Healthcare Practices Managing Supplier Payments

Healthcare practices, including clinics and medical offices, can streamline the management of supplier payments by importing bills with SaasAnt Transactions. It ensures the accurate recording of medical supplies and equipment expenses.

Freelancers and Self-Employed Professionals Managing Business Expenses

Freelancers and self-employed professionals can use SaasAnt Transactions to import their business expenses into QuickBooks Desktop. It simplifies tax preparation and ensures the proper recording of deductible expenses.

Step-By-Step Guide: Importing Bills into QuickBooks Desktop with SaasAnt Transactions

Step 1: Launch SaasAnt Transactions Desktop and Begin Import

Initiate your journey by opening the SaasAnt Transactions Desktop application. You're ready to start with just a click on the prominent 'Import' button on the homepage.

Step 2: Select the Right QuickBooks Transaction Type

In the 'Import' window, navigate to the 'QuickBooks Transaction Type' section. Enhance categorization by choosing 'Bills' from the dropdown menu that best aligns with your expenses.

Step 3: Effortlessly Upload Your Bill File

Smoothly progress by uploading your bill file. Click the 'Browse File' button, and your desired file will be on its way to seamless integration.

Step 4: Handpick the Relevant Sheet from a CSV File

Leverage the 'Select Sheet' option for CSV files comprising multiple sheets. Choose the appropriate sheet from the dropdown menu containing the data you intend to import.

Step 5: Map Essential QuickBooks Fields with Ease

Click 'Next' to navigate to the 'Data Mapping' window. Here, easily configure critical data mapping for essential QuickBooks fields such as 'Date,' 'Bank Account,' 'Check Number,' 'Description,' 'Payee,' 'Account,' and 'Amount.'

Step 6: Streamline Data Mapping Configuration

In the 'Data Mapping' window, leverage the user-friendly 'Auto Generate Headers' feature to simplify handling files without headers. For tailored adjustments, utilize the 'Customize' option for fine-tuning specific fields.

Step 6.1: Tailor Specific Fields for Advanced Flexibility (Optional)

Harness advanced flexibility using the 'Customize' option. Customize conditions to match your requirements, whether it's 'Set value if empty,' 'Override,' or 'Replace if matches.'

Step 6.2: Initiate the Seamless Import Process

With data mapping perfected, confidently move forward by clicking 'Next,' seamlessly transitioning to the 'Review & Import' phase.

Step 7: Configure Preferences and Verify Accuracy

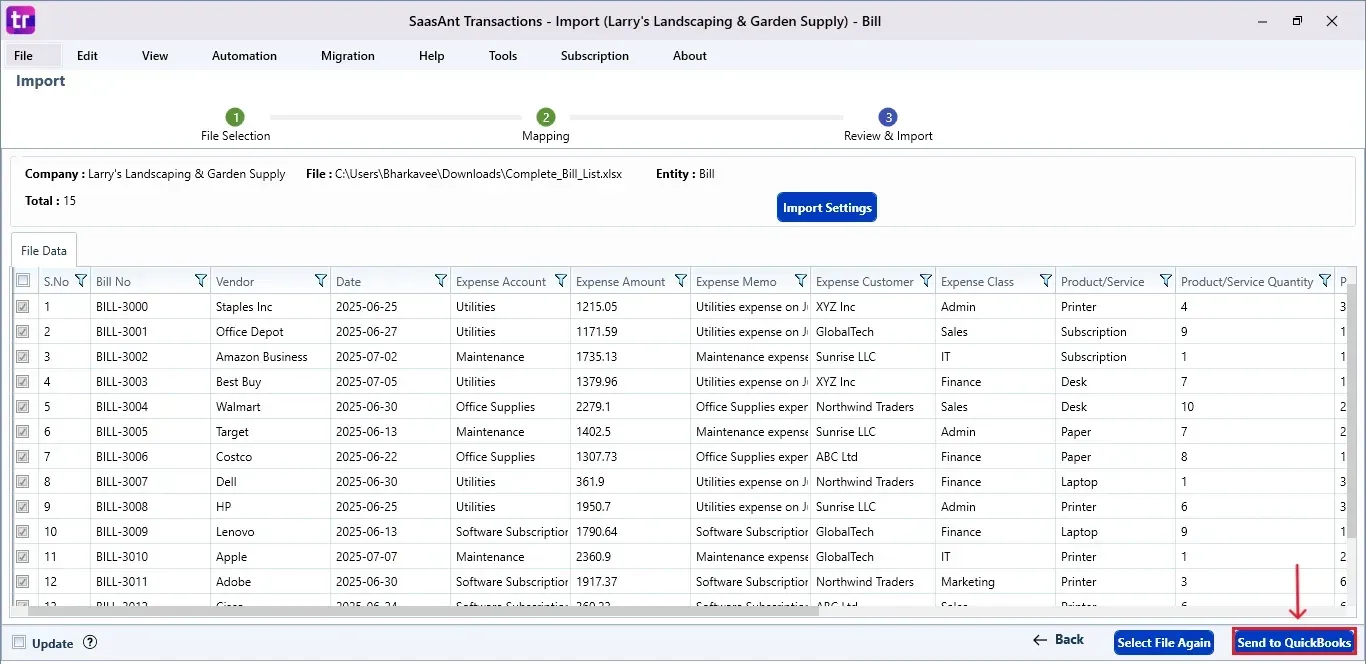
Set preferences and meticulously review the preview. When ready, propel your bill management process by clicking the 'Send to QuickBooks' button at the bottom.

Step 8: Address Errors (If Necessary)

Encounter errors? No worries. Access the 'Error Log' section, view displayed errors, and start the resolution process by clicking the integrated 'Fix' button.

Step 9: Successfully Conclude the Import

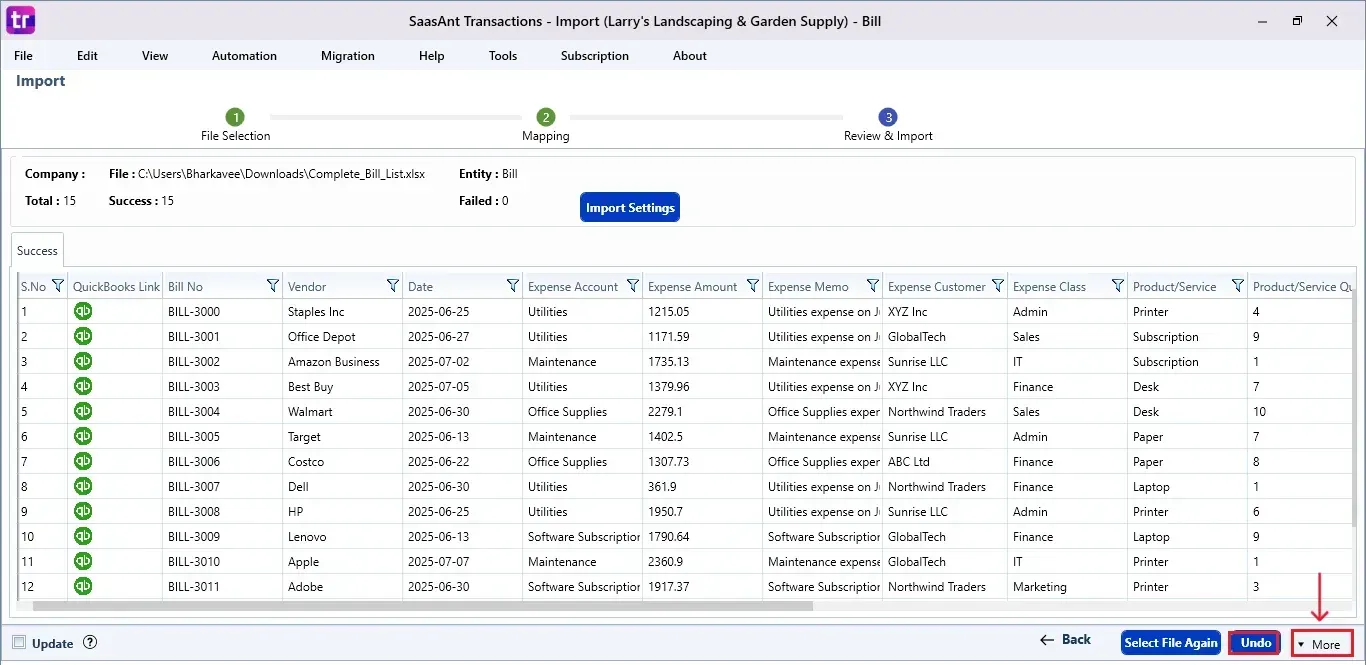
With errors resolved and data aligned accurately, finalize your import journey by clicking 'Send to QuickBooks.'

To learn more, check out this article on import bills into QuickBooks.

Wrap Up

Efficiently managing your bills within QuickBooks Desktop is crucial for maintaining accurate financial records and saving valuable time. Importing bills provides a streamlined approach to this task, significantly reducing the risk of errors associated with manual data entry. By leveraging the power of SaasAnt Transactions, this process becomes even more seamless and efficient.

The benefits of importing bills into QuickBooks Desktop are manifold. Automation ensures accuracy and eliminates the need for tedious manual input. Bulk importing accelerates the process, allowing you to handle multiple bills simultaneously. Additionally, the precise digital trail left by imported bills enhances audit readiness and overall financial transparency.

By following this guide, you can confidently navigate the import process with SaasAnt Transactions, transforming bill management into a streamlined, error-free procedure. Integrating bills into QuickBooks Desktop through this method offers enhanced financial recordkeeping, improved accuracy, and increased efficiency - all crucial aspects of maintaining a healthy economic ecosystem for your business.

FAQs

Q1: How Does Importing Bills in Bulk Save Time?

Importing bills in bulk significantly speeds up entering multiple bills into QuickBooks Desktop. Instead of inputting each bill individually, you can upload a file containing all the bills simultaneously. This streamlined approach reduces the time required for data entry, making it especially useful when dealing with a large volume of bill data.

Q2: What Is the Importance of a Clear Digital Trail for Imported Bills?

An accountable, transparent, and audit-ready environment requires a clear digital trail. Importing bills into QuickBooks Desktop creates traceable digital records, contributing to a comprehensive and precise financial history. This streamlined recordkeeping simplifies audits and ensures adherence to financial regulations.

Q3: Which QuickBooks Transaction Type Should I Select for Importing Bills?

When using SaasAnt Transactions to import bills, navigate to the 'QuickBooks Transaction Type' section within the 'Import' window. Choose the 'Bills' option from the dropdown menu. This selection ensures the system processes the imported data as bills within QuickBooks Desktop.

Q4: How Can I Import My Bills in QuickBooks Desktop Using SaasAnt Transactions?

Importing your bills is straightforward with SaasAnt Transactions.

  • Launch the SaasAnt Transactions Desktop app to begin the import process.

  • In the 'Import' window, choose 'Bills' from the dropdown to categorize expenses accurately.

  • Upload your bill file by clicking 'Browse File.'

  • For CSV files, handpick the specific sheet containing the data you want to import.

  • Navigate to 'Data Mapping' and configure critical fields like 'Date,' 'Bank Account,' and more.

  • Use the 'Auto Generate Headers' feature to simplify handling files without headers.

  • Tailor fields with the 'Customize' option for advanced flexibility.

  • Click 'Next' to transition to the 'Review & Import' phase for seamless progress.

  • Set preferences, meticulously review the preview, and verify accuracy.

  • Propel your bill management process by clicking 'Send to QuickBooks' for integration.

  • Access 'Error Log,' view errors, and resolve issues by clicking 'Fix' when needed.

  • After resolving errors and ensuring accurate data alignment, click 'Send to QuickBooks' to complete your import process seamlessly.

Q5: What Is the Purpose of the ‘Select Sheet’ Option for CSV Files?

If your bill data is stored in a CSV file with multiple sheets, you can utilize the 'Select Sheet' option to identify the precise sheet that holds the relevant bill data. This action guarantees the import of accurate and intended information.

Q6: Can I Customize Field Mapping for Specific Needs?

Absolutely. SaasAnt Transactions offers the 'Customize' option in data mapping, allowing you to tailor the mapping of specific fields to meet your unique requirements. You can set conditions for actions like 'Set value if empty,' 'Override,' or 'Replace if matches,' providing advanced flexibility in data integration.

Scale Your Bookkeeping

Download the guide to scale and streamline your bookkeeping business.

Automated data Import / Export to QuickBooks Online
Say goodbye to the hassle of managing transactions manually
Grow exponential with Clear Financial Visibility