How to Import Deposits in QuickBooks Online
Import Deposits into QuickBooks Online: Quick Instructions
Log in to your SaasAnt Transactions account.
Navigate to the 'Import' section.
Select 'Deposits' from the available options.
Upload your deposit file in the specified format.
Map the fields from your file to the corresponding fields in the application.
Review the data for accuracy.
Confirm the import and check the dashboard to ensure all entries appear correctly.
How to Import Deposits in QuickBooks Online? Step-by-Step Guide
Importing deposits into QuickBooks Online using SaasAnt Transactions streamlines the process and ensures accuracy. Follow these detailed steps:
Step 1: Install SaasAnt Transactions
Install SaasAnt Transactions from the QuickBooks App Store. Connect it to your QuickBooks Online account for seamless integration with your financial data.
Step 2: Access Import Tools
Go to the SaasAnt Transactions Dashboard. Select ‘Import’ from the main menu and click on ‘Deposits.’
Step 3: Prepare Your Data File
Prepare your deposit data file. Ensure it is formatted correctly, typically in CSV or Excel format. You can also upload the Google Sheet link to meet SaasAnt Transactions requirements. Proper formatting is essential for a smooth import.
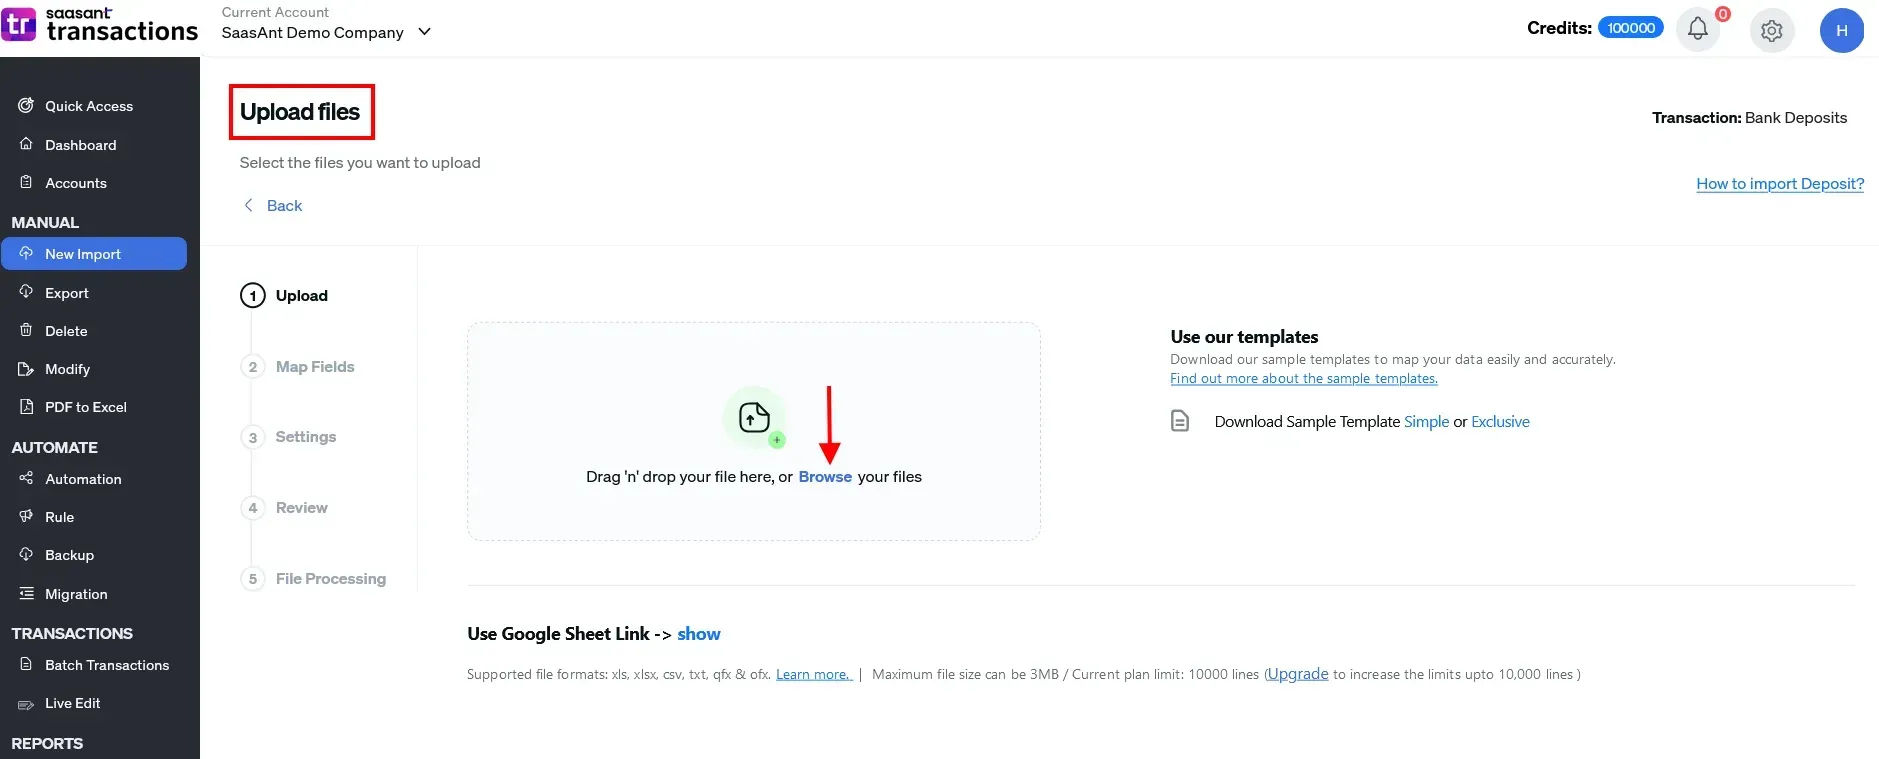
Step 4: Upload and Map Your Data
Click ‘Upload File’ and select your prepared data file. Using SaasAnt Transactions, map the data fields in your file to the corresponding fields in QuickBooks Online. Accurate mapping ensures data is placed correctly in your accounting system.
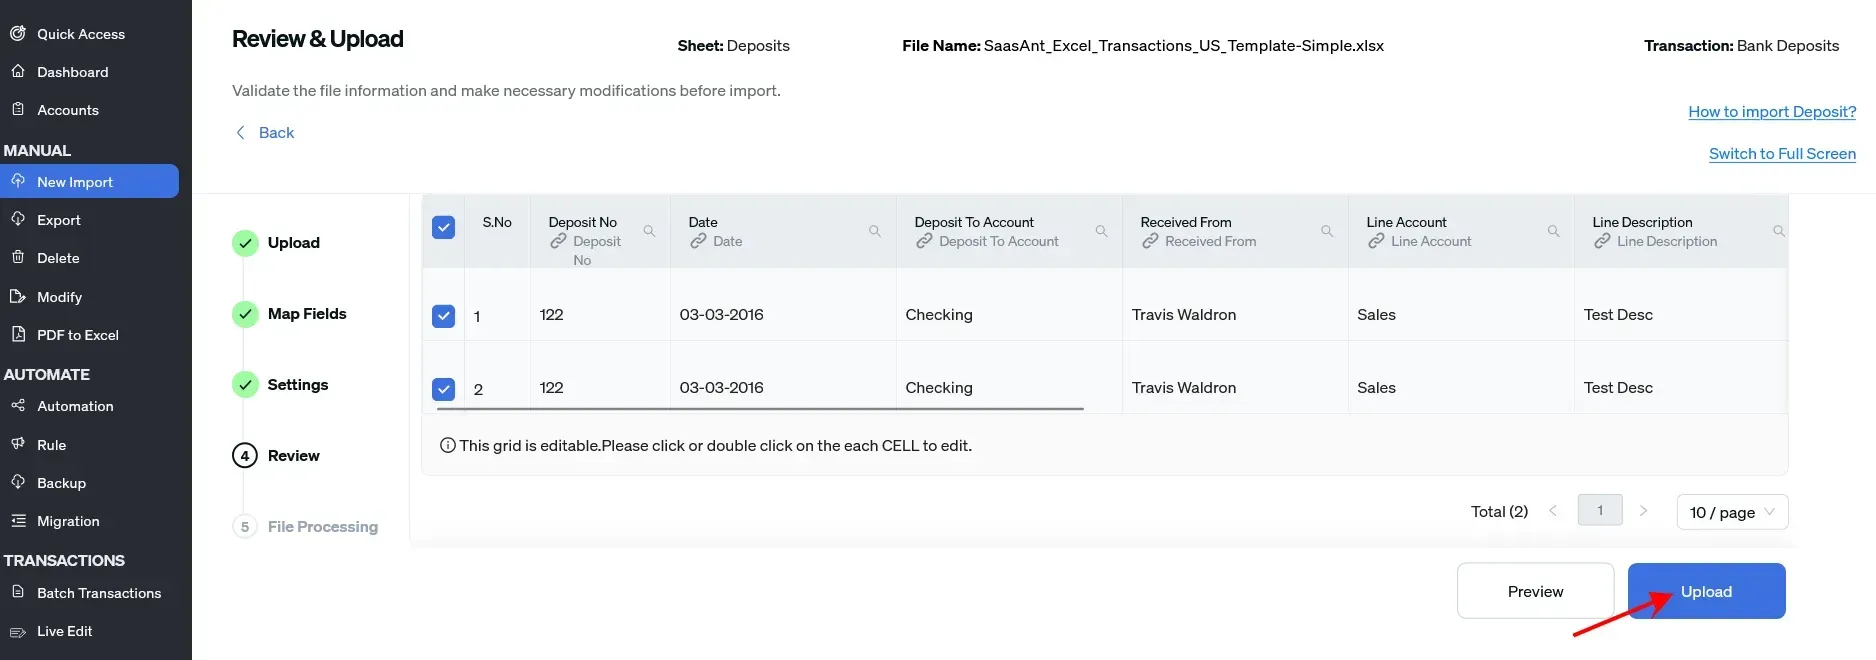
Step 5: Review and Confirm Import
Review all details for accuracy before finalizing the import. Make necessary adjustments, then confirm the import to add the deposits to your QuickBooks Online account.
Step 6: Verify Import Success
Once the import is complete, verify that all deposits have been accurately imported into your system. Check for discrepancies and ensure the data aligns with your transaction records.
Note: SaasAnt Transactions supports bulk imports, allowing you to process large volumes of deposits simultaneously. This feature reduces manual effort and minimizes errors.
FAQ’s
How to Import Deposits in QuickBooks Online?
To import deposits into QuickBooks Online:
Log In: Use your QuickBooks credentials to access SaasAnt Transactions.
Prepare for Import: Navigate to 'Import Section' > 'Deposits.'
Format Your File: Confirm your data file is in CSV or Excel format.
Align Columns: Ensure data columns match the QuickBooks fields.
Validate and Import: Check for errors, adjust if necessary, and finalize the import.
How to Export Deposits from QuickBooks Online?
To export deposits from QuickBooks Online using SaasAnt Transactions:
Sign In to SaasAnt Transactions: Start by logging in.
Start Export: Go to 'Export Section' and choose 'Deposits.'
Set Filters: Apply necessary filters like date or category.
Choose Format: Select the format (CSV, Excel) and customize the fields.
Download File: Initiate the export and download your file.
How to Delete Deposits in QuickBooks Online?
To delete deposits in QuickBooks Online:
Access SaasAnt: Connect it to your QuickBooks account.
Prepare to Delete: Navigate to ‘Delete’ > ‘Initiate Clean Up.’
Select Deposits: Use ‘Date by Searching’ to pick deposits within a specific date range.
Confirm Deletion: Click ‘Ok’ to permanently remove the selected deposits.
How to Edit Deposits in QuickBooks Online?
To edit deposits in QuickBooks Online:
Log Into QuickBooks: Access your account.
Find Deposits: Go to ‘Deposits,’ select a deposit, and hit edit.
Update Information: Change details like customer name, date, or amount.
Save Updates: Confirm the changes and update the record.
Read also
How To Make a Deposit in QuickBooks Online?
How to Record and Make Bank Deposits in QuickBooks Online
How to Import Bank Transactions into QuickBooks Online?
How to Import PDF Bank Statements into QuickBooks Online