How To Make a Deposit in QuickBooks Online?
Are you a small business owner, freelancer, or bookkeeper trying to keep your QuickBooks Online records accurate and up-to-date? A crucial part of that is recording deposits correctly. This step-by-step guide will walk you through the process of making a deposit in QuickBooks Online, ensuring your income is properly tracked. Whether you're dealing with a single check or a batch of payments, we'll cover everything you need to know, including how to handle bank fees and match deposits to invoices.
Contents
How to make a Deposit in QuickBooks Online: Step-by-Step Guide
Managing Bank Deposits
Conclusion
FAQs
How to make a Deposit in QuickBooks Online: Step-by-Step Guide
Managing bank deposits accurately is crucial for maintaining precise financial records in QuickBooks Online. This guide will combine multiple transactions into a single record, ensuring that your QuickBooks entries match your real-life bank deposits.
Step 1: Transfer-Transactions to the Undeposited Funds Account
Move all relevant invoice payments and sales receipts into the Undeposited Funds account. This account temporarily holds the transactions until you record a deposit.
Navigate to the Undeposited Funds Account
Go to the QuickBooks dashboard.
Select the payments and sales receipts you want to combine.
Ensure these transactions are assigned to the Undeposited Funds account.
Step 2: Combine Transactions Using the Bank Deposit Feature
Each bank deposit in QuickBooks creates a separate record. Follow these steps to combine your transactions into one deposit:
Initiate a New Bank Deposit
Select the ‘+ New’ button on the QuickBooks dashboard.
Choose ‘Bank Deposit’ from the dropdown menu.
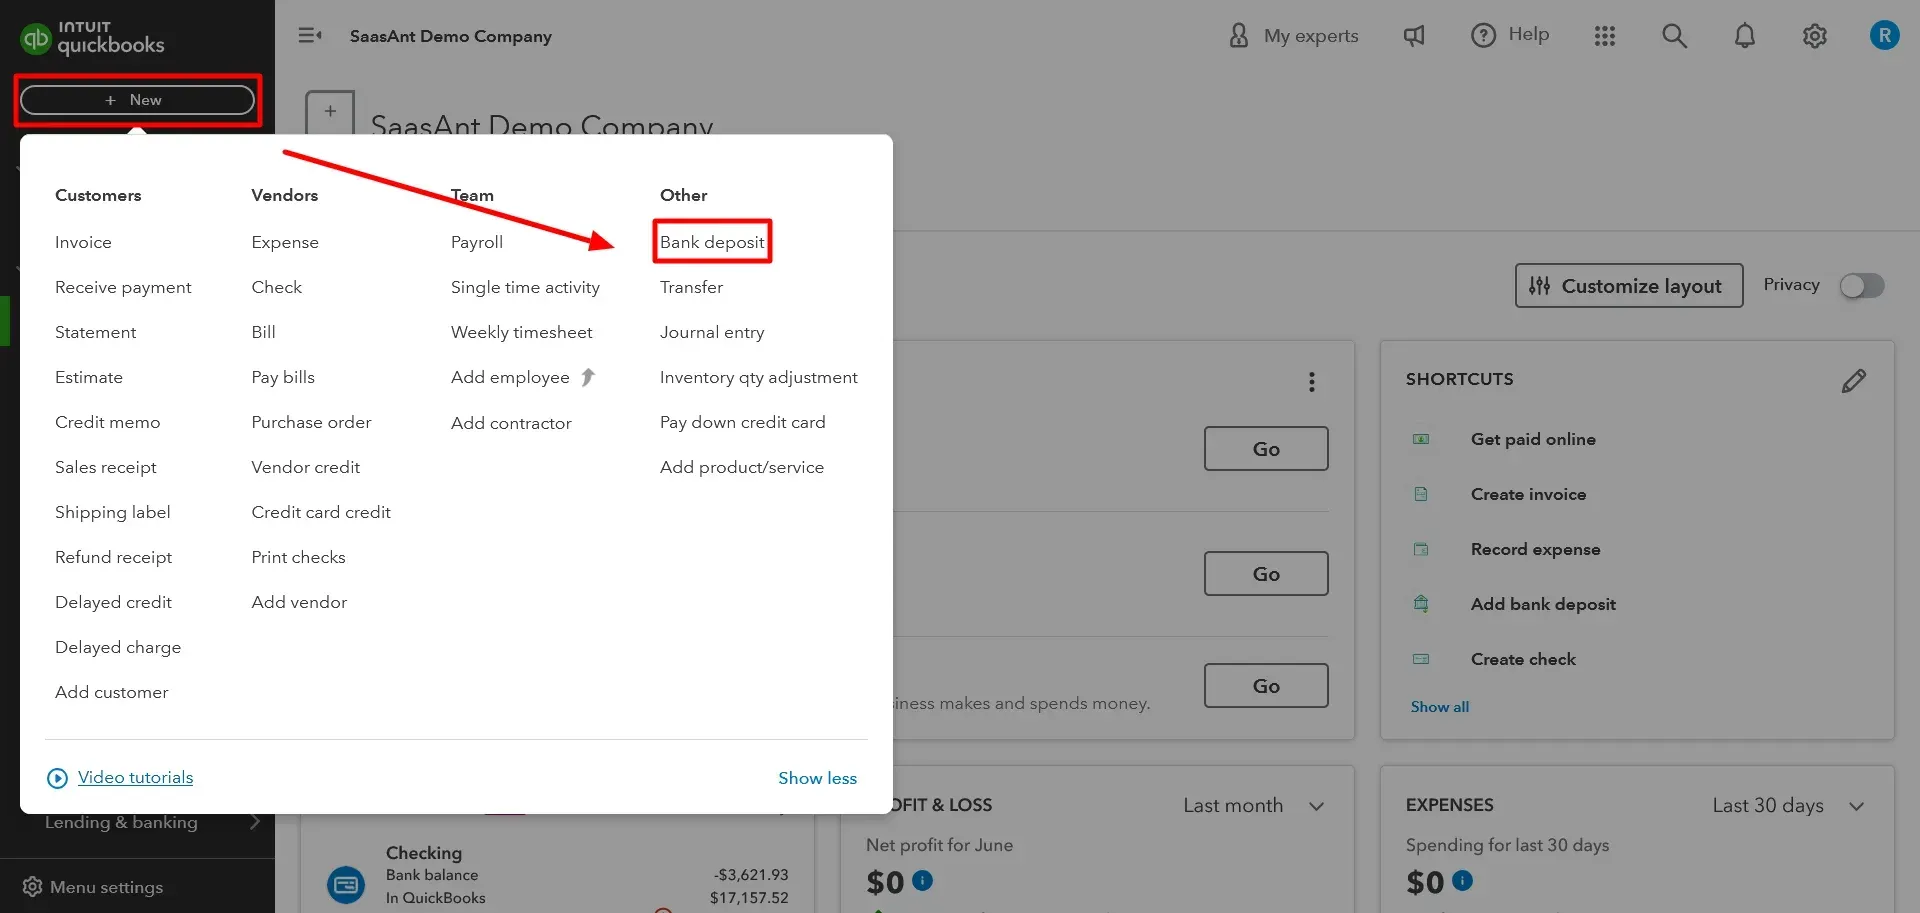
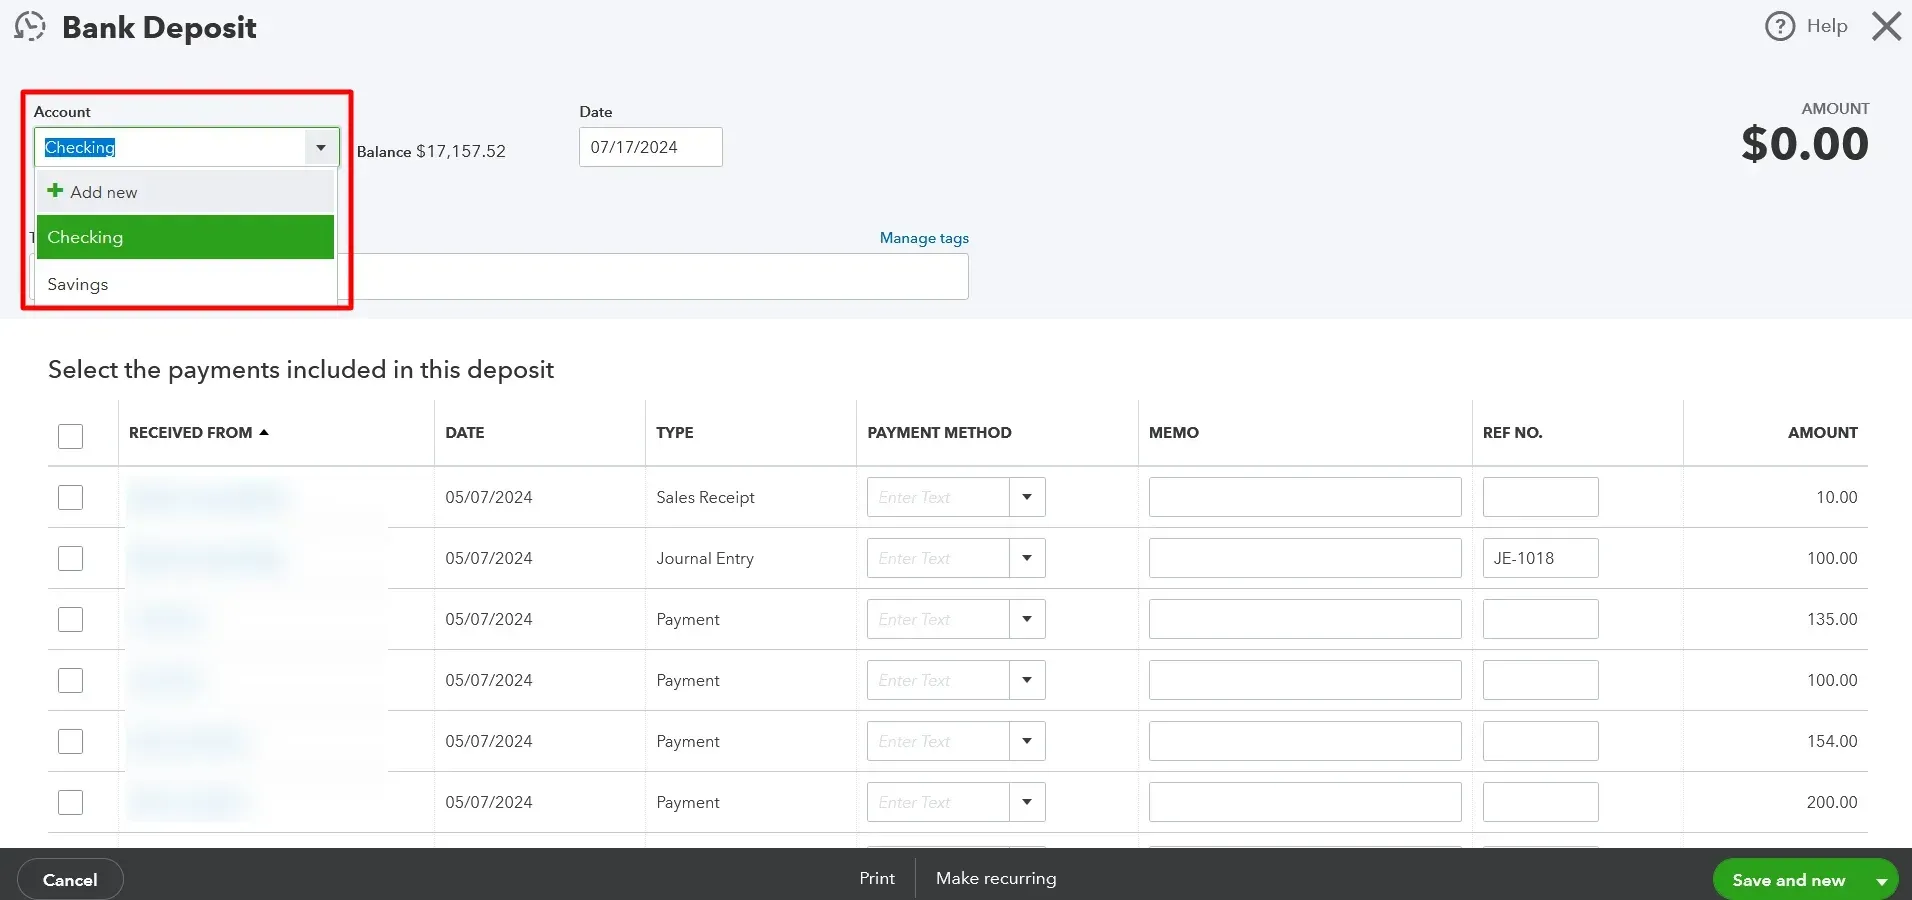
Select the Deposit Account
From the Account ▼ dropdown, choose the bank account where you deposit the money.
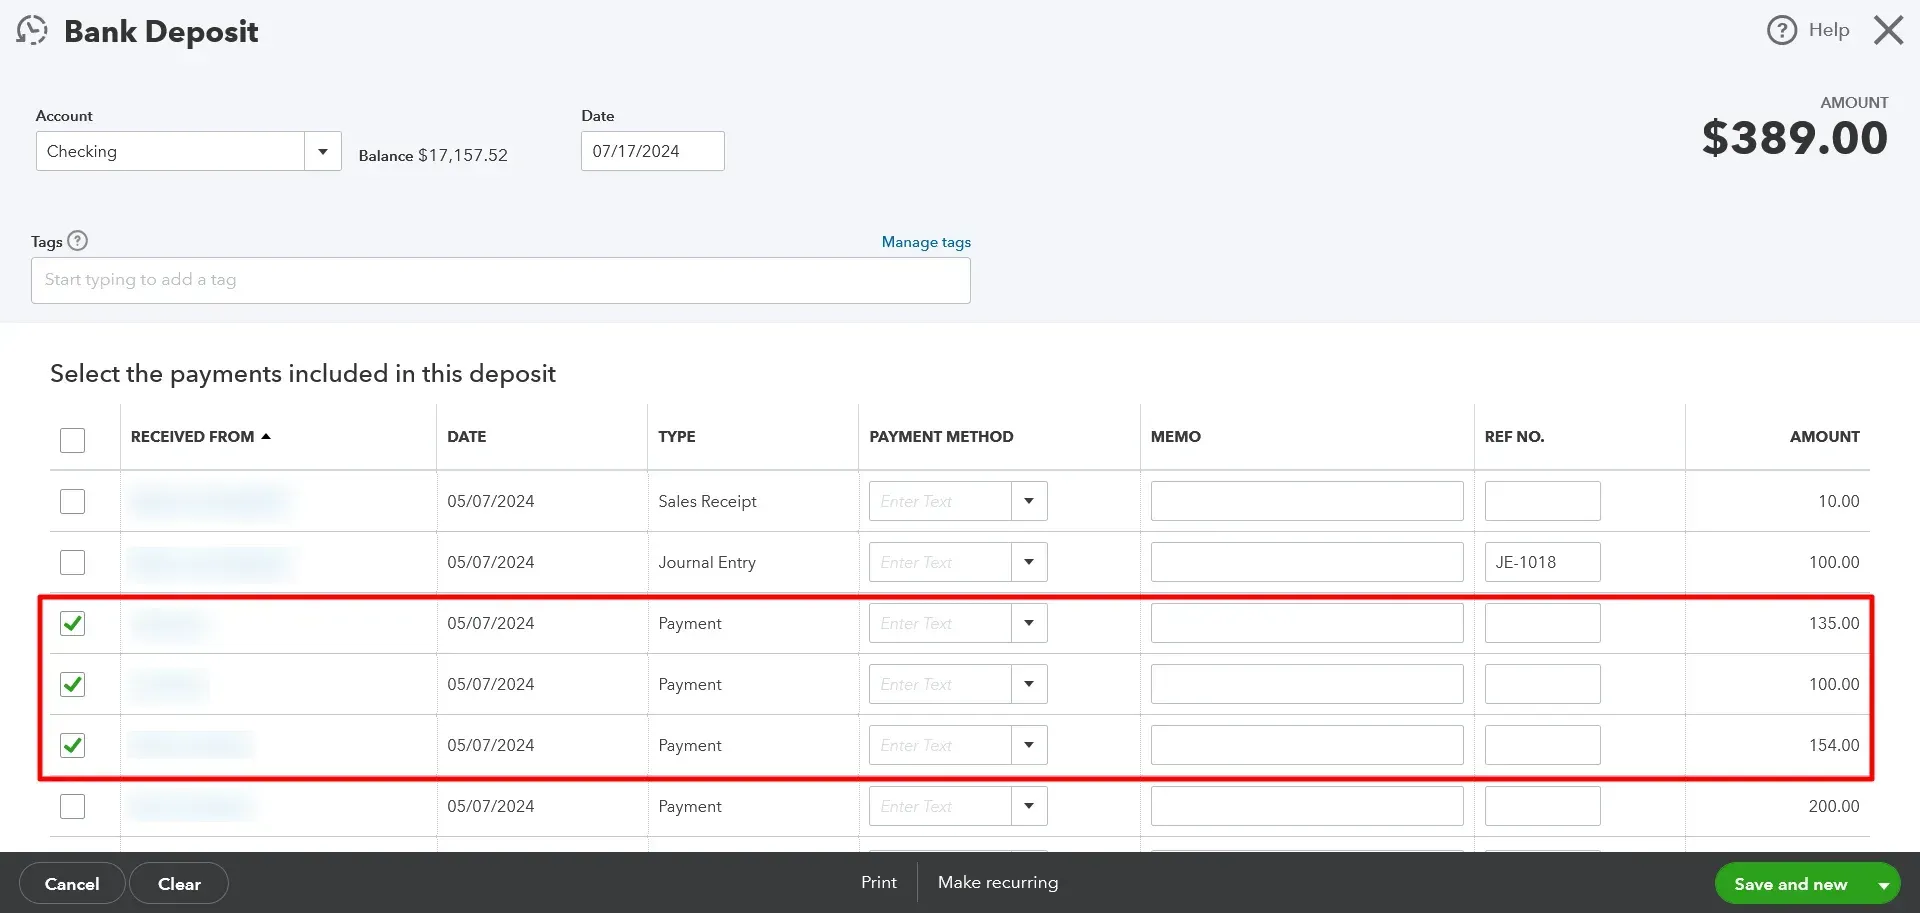
Combine Transactions
Select the checkboxes next to the transactions you want to include in the deposit.
Ensure the total of the selected transactions matches the total on your deposit slip.
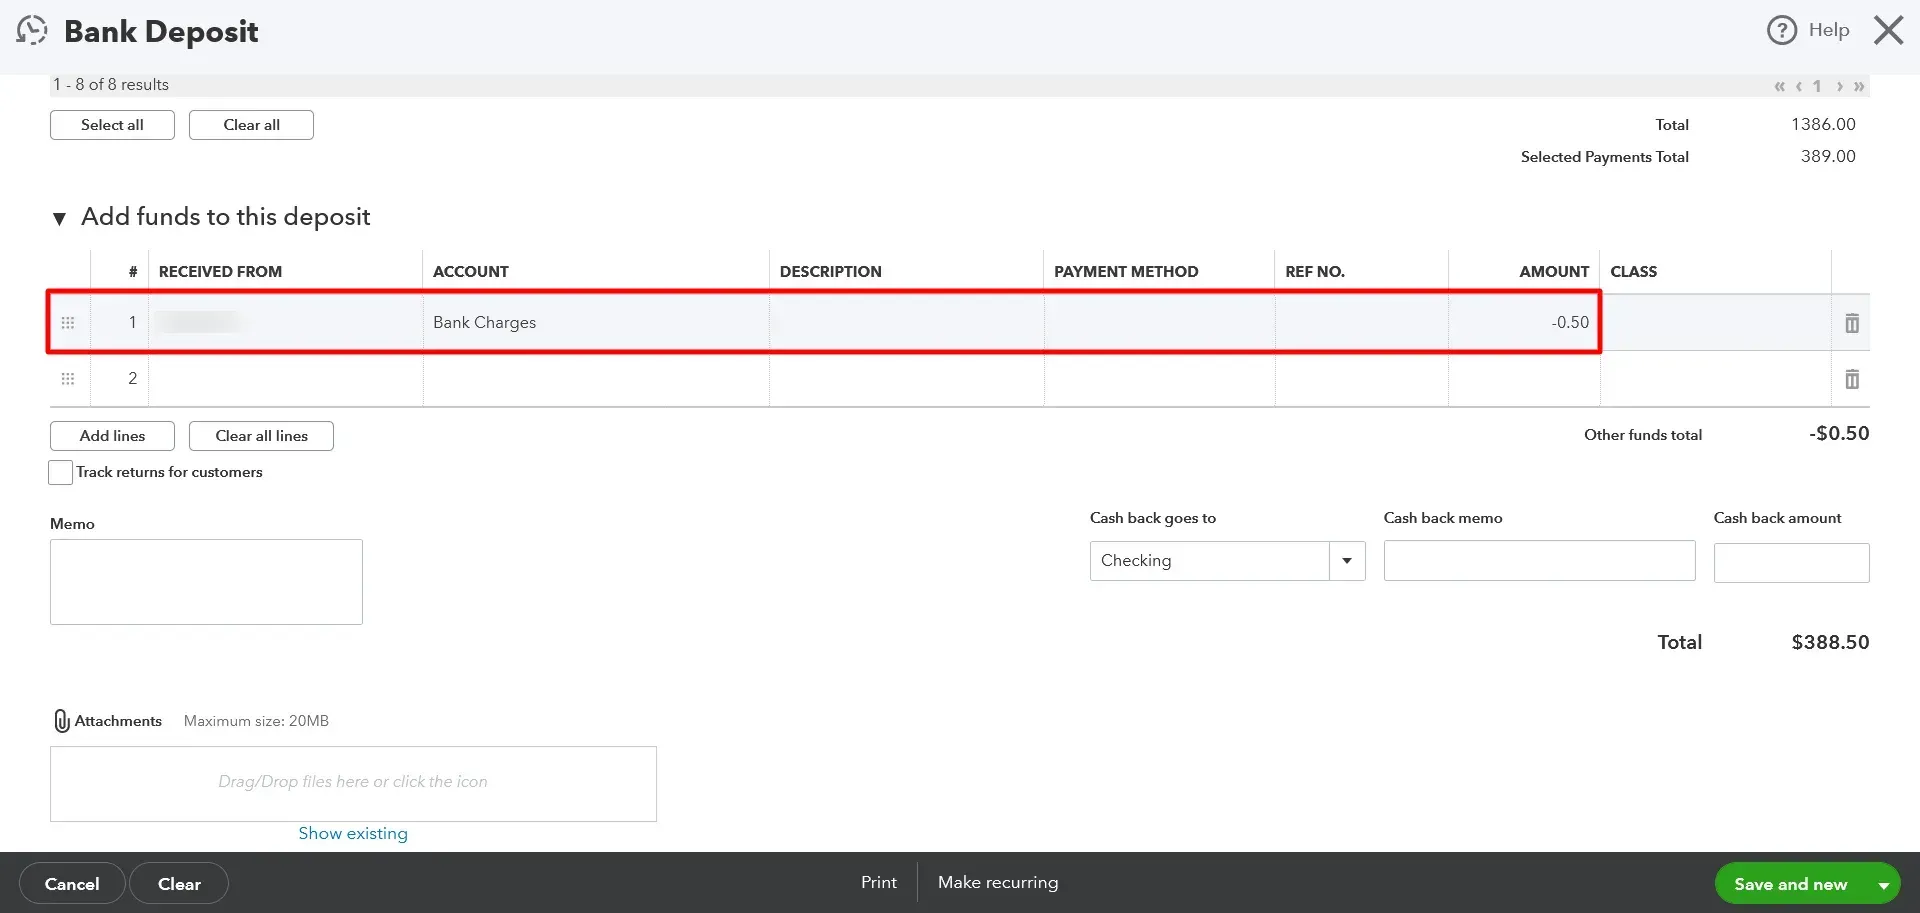
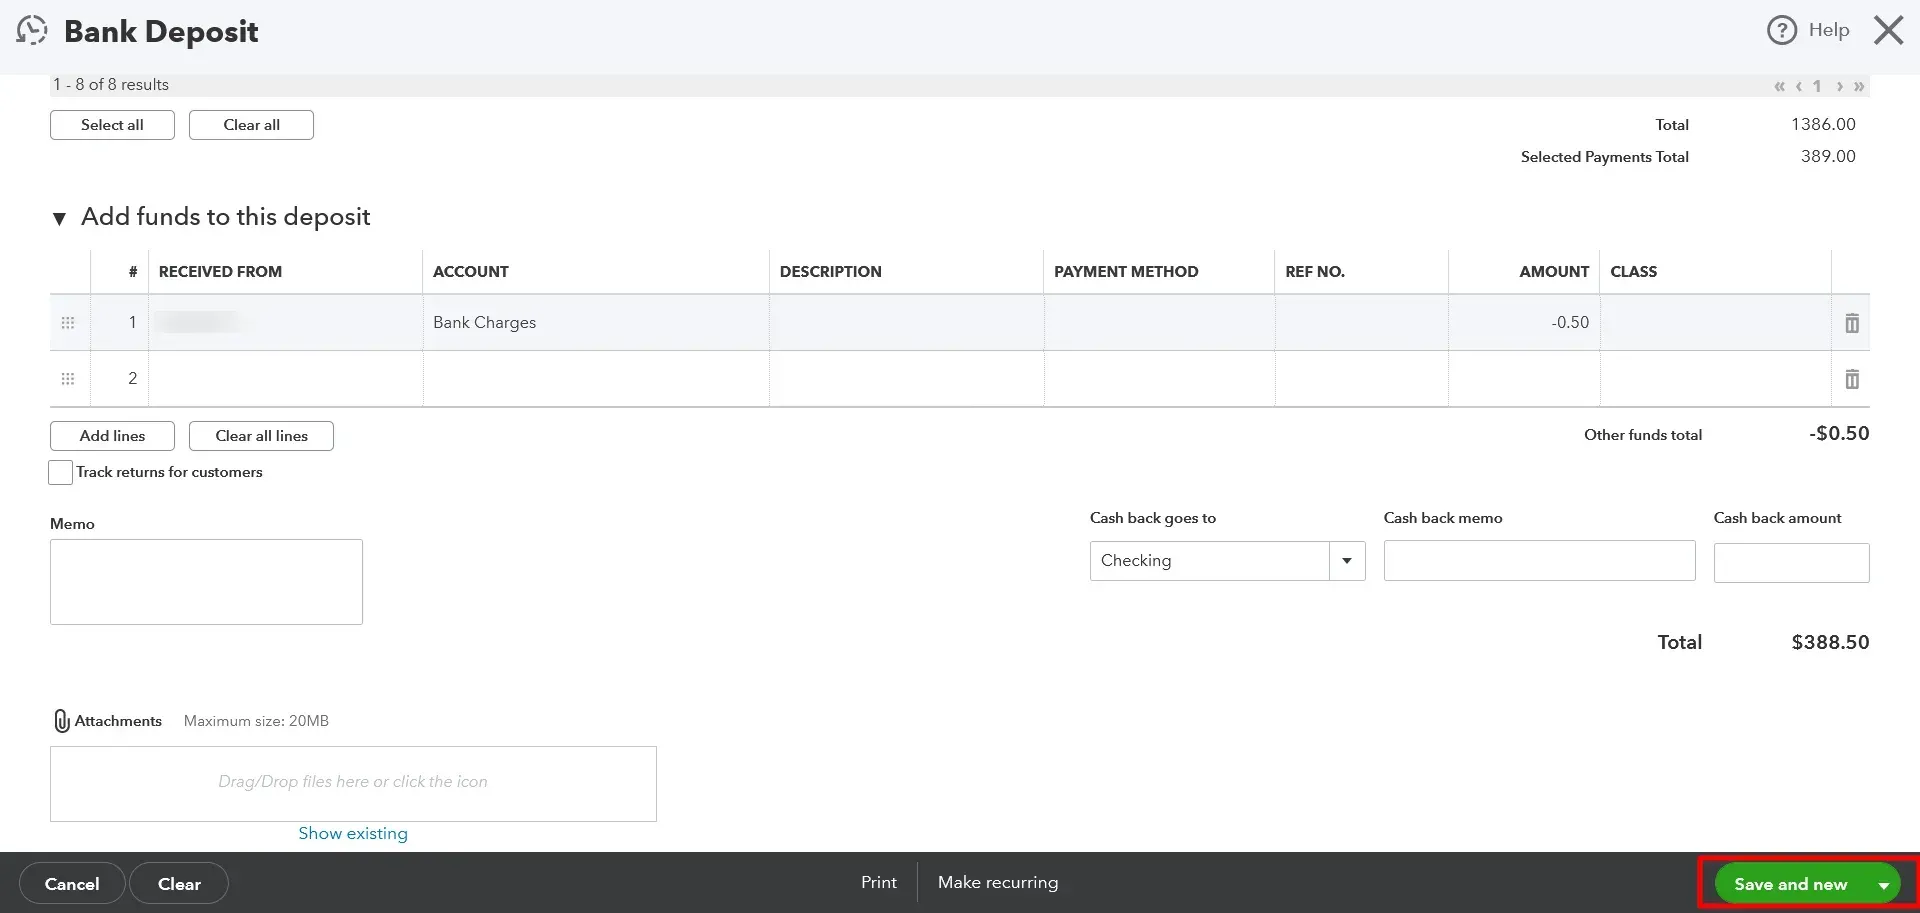
Add Bank Fees (if applicable)
Scroll to the Add funds to this deposit section.
Enter any bank fees as a line item.
Choose Bank Charges from the Account dropdown and enter the fee amount as negative (e.g., -0.50 for a $0.50 fee).
Finalize the Deposit
Once everything matches your deposit slip, select Save and close or Save and New.
Managing Bank Deposits
Review Past Bank Deposits
To review past bank deposits, follow these steps:
Access the Deposit Detail Report
Navigate to Reports.
Scroll down to the Sales and customers section.
Select the Deposit Detail report to view all completed bank deposits.
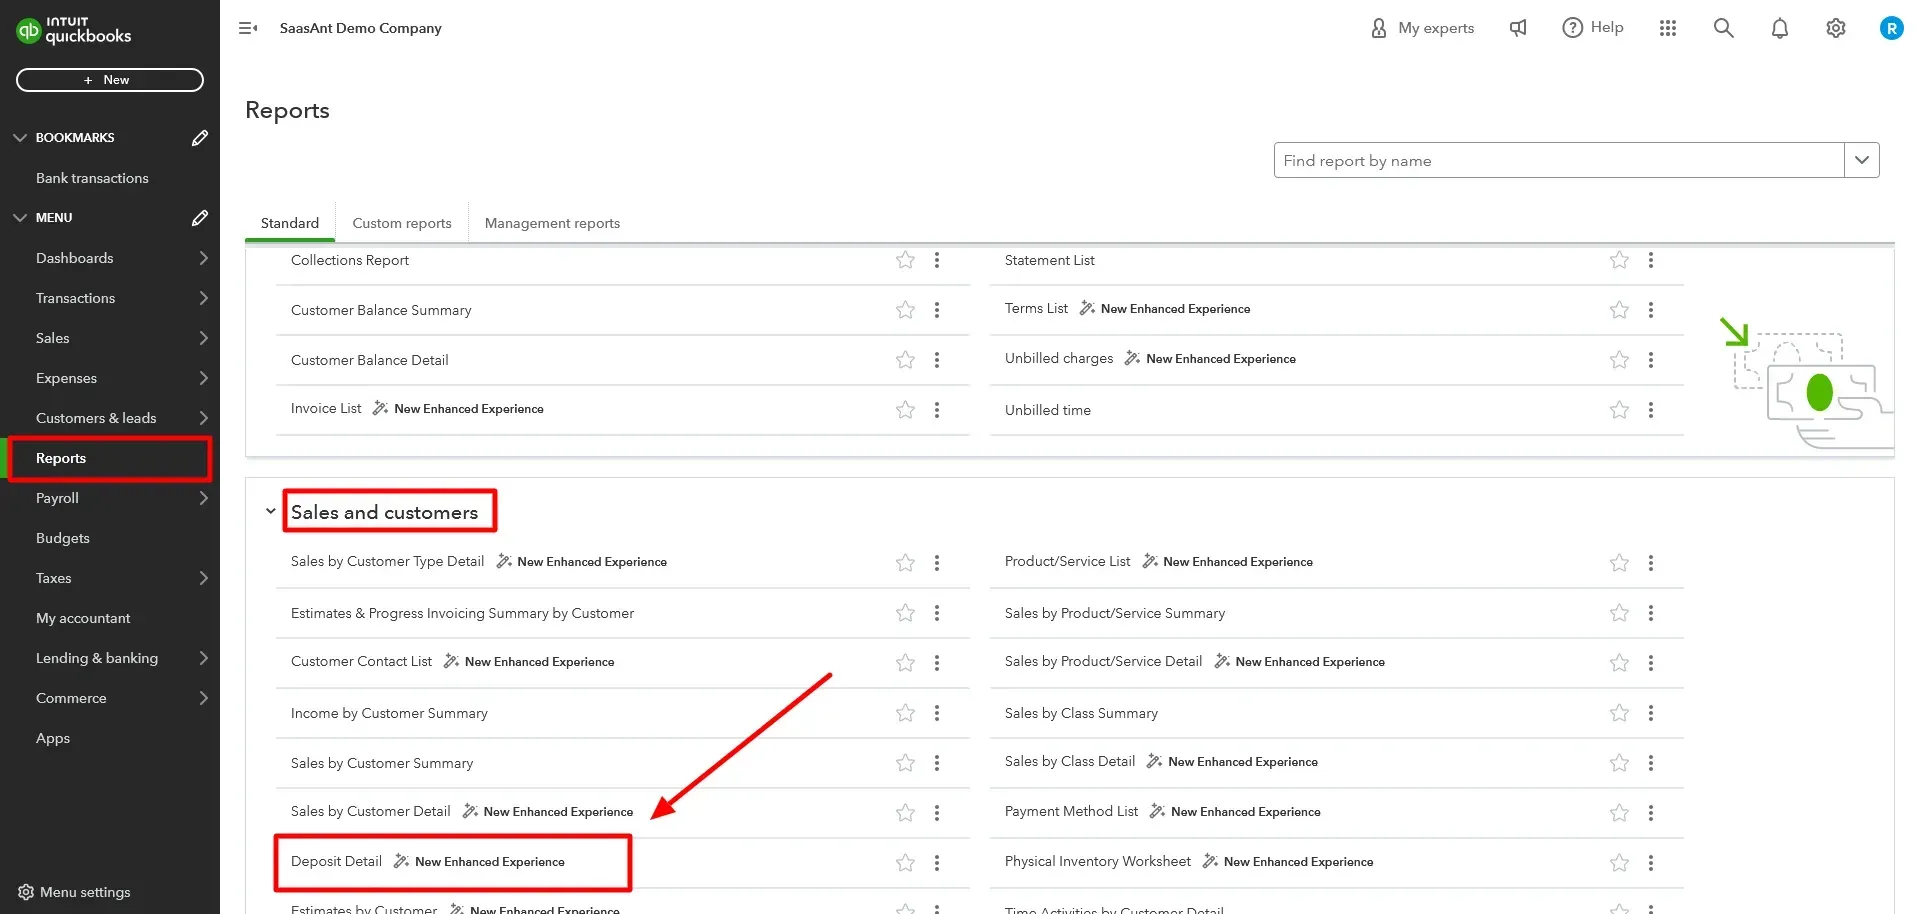
Review Individual Deposits
Click on specific deposits within the report for more details.
Remove a Payment from a Bank Deposit
If you accidentally added a payment to a deposit and need to remove it:
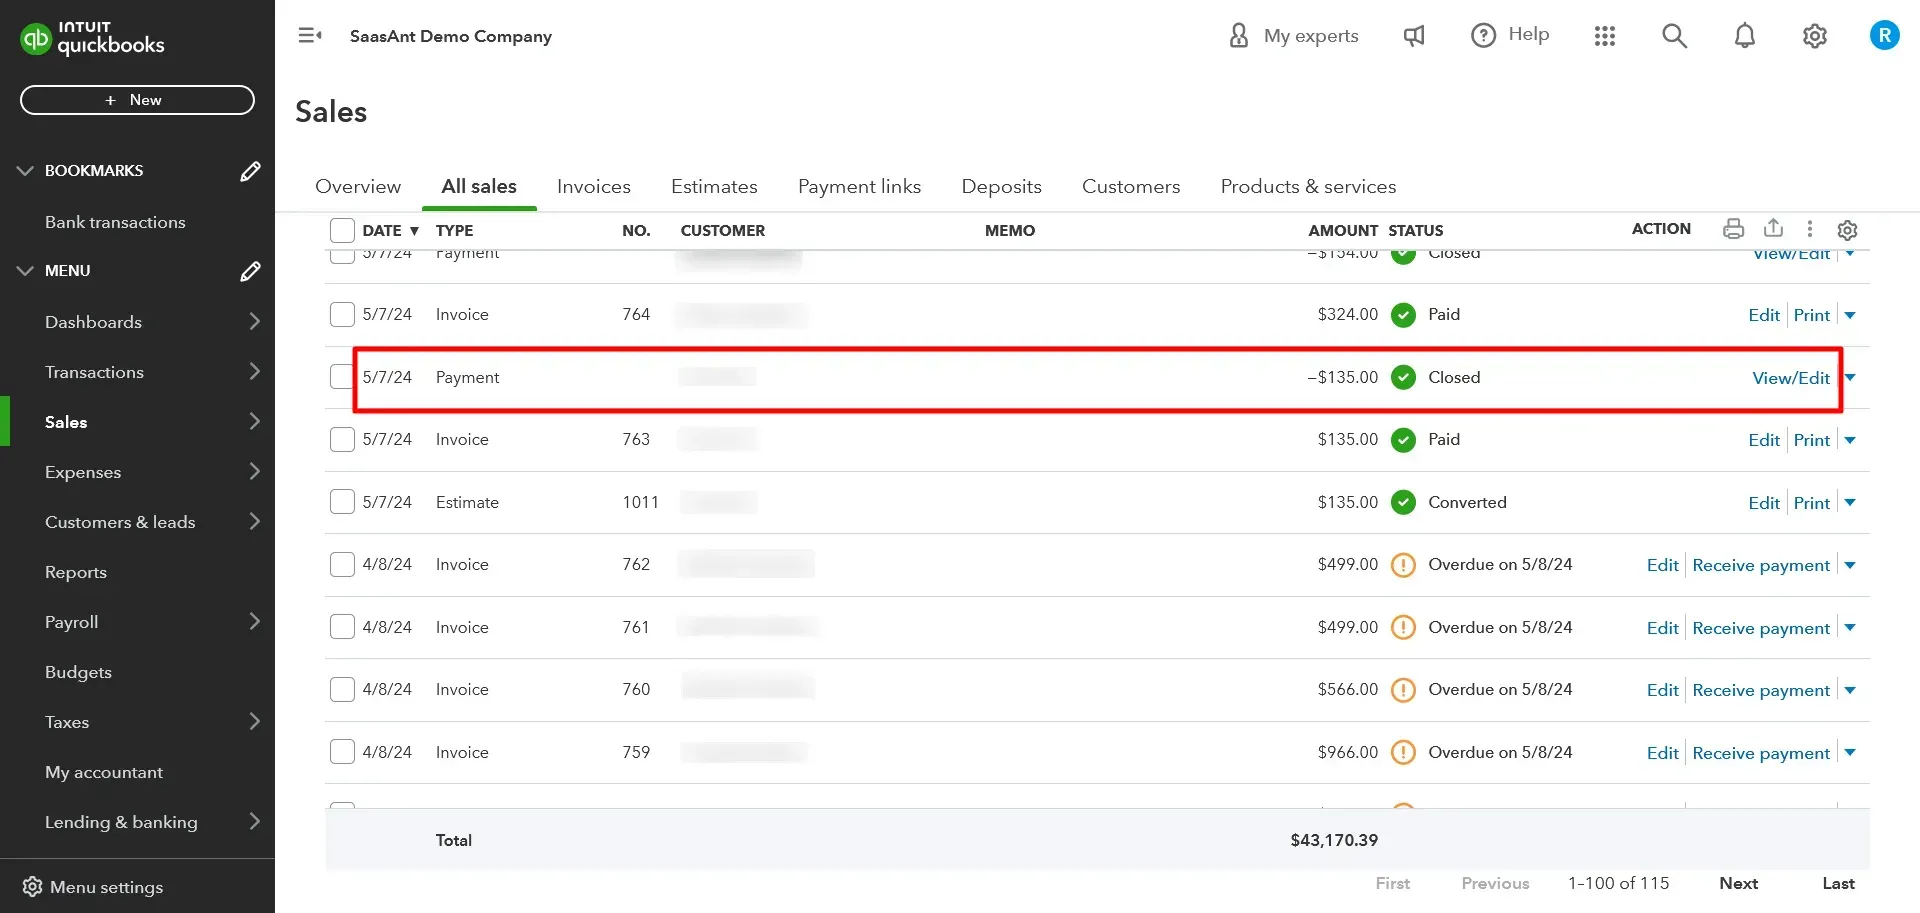
Locate the Payment
Go to Sales, then All sales.
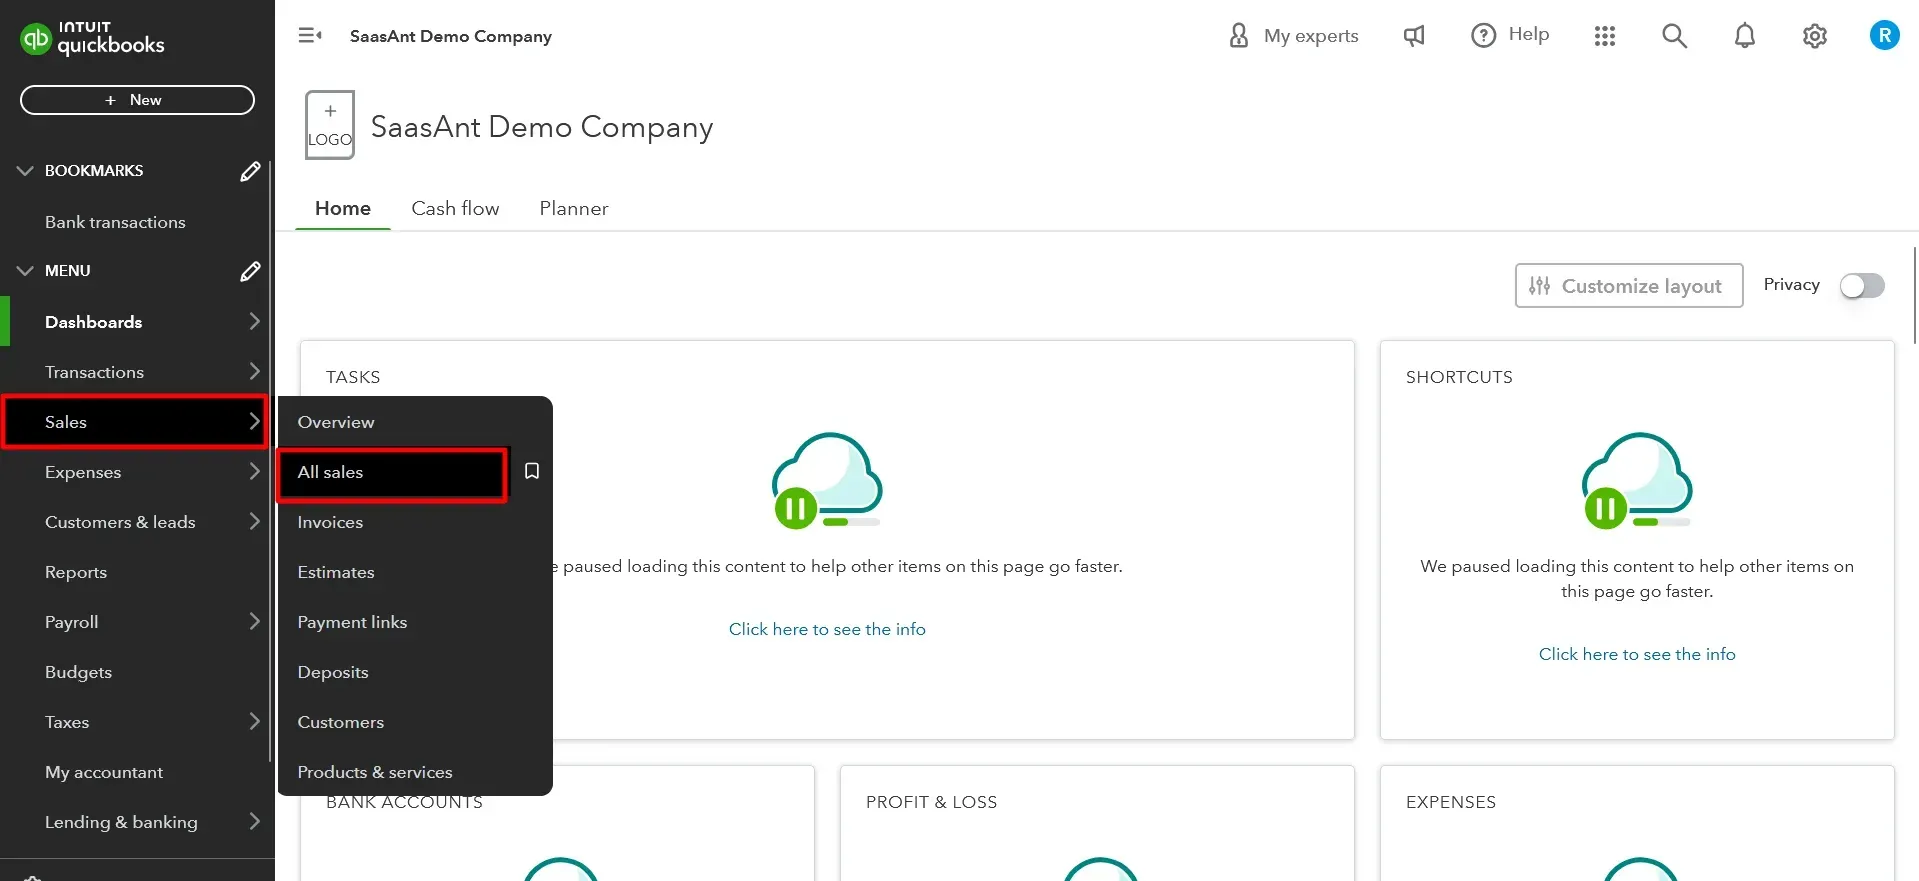
Find and open the payment you want to remove (status should be “Closed”).
Open the Bank Deposit
Select the date link near the customer name to open the bank deposit.
Remove the Payment
Uncheck the checkbox for the payment.
Select Save and new or Save and close to finalize the change. The payment will return to the Undeposited Funds account.
Following these steps will help you effectively make your bank deposits in QuickBooks Online, ensuring that your records accurately reflect your bank deposits. Using the Undeposited Funds account and the Bank Deposit feature, you can combine multiple transactions seamlessly and maintain precise financial records.
The Necessity to Manually Enter Bank Deposit Details
While QuickBooks Online offers extensive automation features, there are instances where manual data entry becomes essential to maintain the integrity of financial records. One such instance is the manual entry of bank deposit details. Accurate recording of bank deposits is crucial for several reasons:
Ensuring Data Accuracy: Automated bank feeds may occasionally misinterpret transactions, leading to discrepancies in financial records. Manually entering deposit details ensures that each transaction is accurately categorized and recorded.
Reconciling Accounts: Accurate bank deposit entries are vital for the reconciliation process. Reconciling accounts involves matching the transactions recorded in QuickBooks Online with those on bank statements. Manual entry of deposit details aids in this process by ensuring that all deposits are correctly reflected in the accounting records.
Tracking Cash Flow: Manually entering bank deposits provides a clear picture of cash inflows, aiding in effective cash flow management. It allows businesses to monitor the timing and amount of deposits, facilitating better financial planning and forecasting.
Audit and Compliance: Precise recording of bank deposits is essential for audit purposes and regulatory compliance. It ensures that financial records are transparent and verifiable, reducing non-compliance risk and potential legal issues.
While QuickBooks Online significantly enhances financial management through automation, the manual entry of bank deposit details remains a critical practice. It ensures the accuracy and reliability of financial records, supporting effective decision-making, account reconciliation, cash flow management, and compliance.
Handle Multiple Deposit Entries in QuickBooks Online Using SaasAnt Transactions
Manually entering, editing, correcting, or deleting multiple deposit entries in QuickBooks Online can be time-consuming and error-prone. SaasAnt Transactions, a third-party tool, provides a powerful alternative by streamlining these tasks through batch processing. Here's how it works, the use cases, and the problems it addresses.
When to Use SaasAnt Transactions for Deposit Management
High Volume of Transactions
Businesses handling numerous payments daily, such as retail stores or e-commerce platforms, often receive multiple deposits that need to be recorded in QuickBooks.
Manually entering each deposit can lead to delays and inconsistencies.
Complex Deposit Splits
Situations where deposits are split across multiple accounts or involve adjustments, fees, or discounts.
QuickBooks’ manual interface makes this process tedious.
Data Migration and Setup
Importing historical deposit data when migrating from another system to QuickBooks Online.
Ensuring records are consistent without manual re-entry.
Error Correction
Correcting multiple deposit entries due to incorrect amounts, dates, or accounts assigned.
Manually finding and fixing these entries in QuickBooks can be cumbersome.
Bulk Edits or Deletions
Updating large numbers of deposits to reflect changes in accounting policies or correcting categorizations.
Deleting outdated or duplicated entries efficiently without navigating individual records.
How SaasAnt Transactions Solves These Problems
Bulk Import
Easily import multiple deposits from spreadsheets or CSV files.
Map fields automatically to QuickBooks, reducing manual data entry errors.
Batch Edit
Make changes to multiple deposit entries in a single operation.
Update fields like amounts, dates, or accounts without opening each entry.
Error Prevention
SaasAnt validates data before import, highlighting discrepancies or missing information.
Avoids errors like incorrect account assignments or duplicate entries.
Automation
Automate repetitive tasks like recording daily deposits, eliminating the need for manual input.
Use predefined templates for recurring transactions.
Bulk Deletion
Identify and remove unwanted deposit entries in bulk, ensuring a clean and accurate ledger.
Key Features of SaasAnt Transactions for Deposit Management
User-Friendly Interface: Import and manage deposits with an easy-to-navigate interface.
Customizable Mapping: Map custom fields to QuickBooks fields, ensuring compatibility with your specific requirements.
Detailed Reports: Generate reports on imported, edited, or deleted transactions for auditing and compliance.
Error Log: Receive detailed feedback on failed entries for quick resolution.
Use Cases Where SaasAnt Can Help
Franchise or Multi-Location Businesses
Managing deposits across multiple locations or branches where transactions flow into a single QuickBooks account.
Seasonal Businesses
Handling surges in deposits during peak seasons without overloading accounting teams.
Accounting and Bookkeeping Firms
Managing deposits for multiple clients in QuickBooks Online, saving time and maintaining accuracy.
E-Commerce and Subscription Services
Importing payment data from payment processors like PayPal, Stripe, or Square to record bulk deposits in QuickBooks.
Conclusion
Managing bank deposits in QuickBooks Online is key to accurate financial records. Manually verifying deposits ensures proper reconciliation and compliance. Application like SaasAnt Transactions automate bulk data handling, saving time and reducing errors. Combining QuickBooks with SaasAnt helps businesses optimize cash flow and maintain accurate financial records.
To learn more, check out this article on manage deposits in QuickBooks Online.
FAQs
How to Make a Deposit in QuickBooks Online?
To deposit QuickBooks Online, follow these steps:
Navigate to the Banking Menu: From the left-hand menu, select ‘Banking.’
Select the Account: Choose the bank account where you want to deposit.
Record the Deposit: Click the “New” button and select “Bank Deposit.”
Fill in Deposit Details: Enter the necessary details, such as the account, date, and deposit amount.
Add Additional Information: If applicable, add any additional information, such as customer name, payment method, and memo.
Save and Close: Click “Save and Close” to record the deposit.
How to Delete a Deposit in QuickBooks?
Log in to your QuickBooks Online account to delete a deposit in QuickBooks. Navigate to the 'Banking' menu, select the relevant deposit, and click 'Edit.' Then, choose 'Delete' and confirm your action to remove the deposit.
How to Manually Add a Deposit in QuickBooks Online?
To manually add a deposit in QuickBooks Online:
Access the Bank Deposit Screen: Click the ‘+ New’ button and select ‘Bank Deposit.’
Select the Account: Choose the bank account where the deposit will be made.
Enter Deposit Information: Input the date, received from, account, and amount fields.
Add Memo and Class (Optional): Include any relevant memo or class for tracking purposes.
Review and Save: Ensure all details are accurate, then click ‘Save and Close.’
How Do I Make a Deposit in QuickBooks Online Without an Invoice?
To deposit QuickBooks Online without an invoice:
Navigate to Bank Deposit: Click the ‘+ New’ button and choose ‘Bank Deposit.’
Choose the Bank Account: Select the appropriate bank account for the deposit.
Fill in Deposit Details: Enter the date and amount of the deposit.
Add Additional Information: Include the customer name, payment method, and any relevant memo.
Save the Deposit: Click ‘Save and Close’ to complete the process.
How Do I Add a Deposit to an Invoice in QuickBooks Online?
To add a deposit to an invoice in QuickBooks Online:
Create or Open the Invoice: Navigate to the ‘Sales’ tab, then ‘Invoices.’ Open the relevant invoice or create a new one.
Record a Payment: Click on the ‘Receive Payment’ button.
Enter Payment Details: Input the payment date, amount, and payment method.
Select the Deposit Account: Choose the bank account where the deposit will be recorded.
Save and Close: Click ‘Save and Close’ to apply the deposit to the invoice.
How Do I Change a Deposit in QuickBooks Online?
To change a deposit in QuickBooks Online:
Find the Deposit: Navigate to the ‘Accounting’ tab, select ‘Chart of Accounts,’ and find the relevant bank account.
Locate the Deposit: Click ‘View Register’ to locate the deposit transaction.
Edit the Deposit: Select the deposit and click on ‘Edit.’
Make Necessary Changes: Update the deposit details as needed.
Save Changes: Click ‘Save and Close’ to apply the changes.
How to Invoice for 50% Deposit in QuickBooks?
To invoice for a 50% deposit in QuickBooks Online:
Create an Invoice: Navigate to ‘+ New’ and select ‘Invoice.’
Enter Invoice Details: Fill in the customer name, date, and products/services.
Calculate the 50% Deposit: Manually calculate 50% of the total amount.
Add a Line for Deposit: Add a new line item, enter ‘Deposit’ as the description, then input the 50% amount.
Apply Deposit: Reduce the remaining balance on the invoice by the deposit amount.
Send Invoice: Click ‘Save and Send’ to email the invoice to your customer.
Tags
Read also
How to Import Deposits in QuickBooks Online
How to Export Deposits in QuickBooks Online
Accounting Automation with SaasAnt Transactions: Streamline Your Financial Processes
How to Edit Multiple Transactions in QuickBooks