How to Merge Customers in QuickBooks Online
When adding and managing customers in QuickBooks Online, a need to merge customers might arise. This could be due to various reasons, such as duplicate entries, incorrect information, or changes in business structure. How to merge customers in QuickBooks is a common query among users. While QuickBooks Online offers a direct method to merge customers, understanding the process and potential challenges is crucial. This blog will walk you through the step-by-step instructions to merge contacts in QuickBooks Online.
Pro tip: With SaasAnt Transactions, you can bulk import customers into QuickBooks. At the end of the article, you will find a section detailing how to import customers seamlessly.
Why do you need to merge customers in QuickBooks?
Sometimes, multiple users accessing QuickBooks may inadvertently save the same customer's information under different names, such as company or individual names. This can lead to inconsistencies in transaction records, causing confusion and potential issues like:
Duplicate records: This can clutter the customer list and make it challenging to find the correct information.
Incorrect reporting: Duplicate records can lead to inaccurate financial reports and analyses.
Inefficient workflows: Manually reconciling duplicate transactions can be time-consuming and error-prone.
Customer dissatisfaction: Delays and inaccuracies in billing and communication can negatively impact customer relationships.
How to Merge Two Customers in QuickBooks : Prerequisite
To merge customers in QuickBooks, you'll need to ensure no outstanding payments or deposits. First, delete any payments associated with the customers you want to merge. This will temporarily open the related invoices, which you can later close using the receive payment feature. Follow these steps to delete the payment:
Steps for Deleting the Payment Before Merging Customers in QuickBooks
Step 1: Go to QuickBooks Dashboard -> Transactions -> Chart of Accounts.
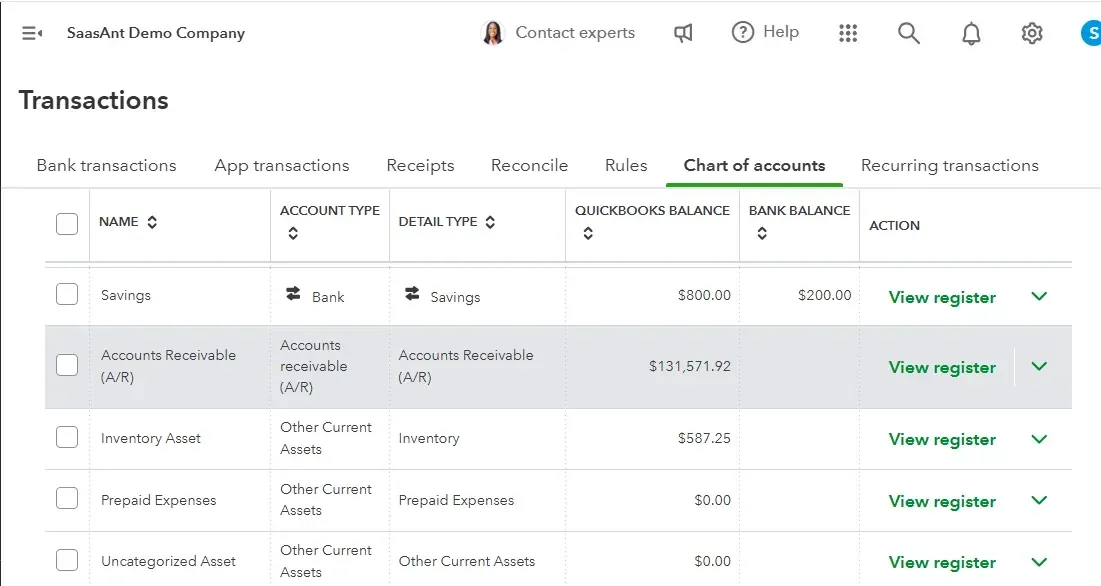
Step 2: Double-click on the account and double-click on the customer’s name. Select the delete option.
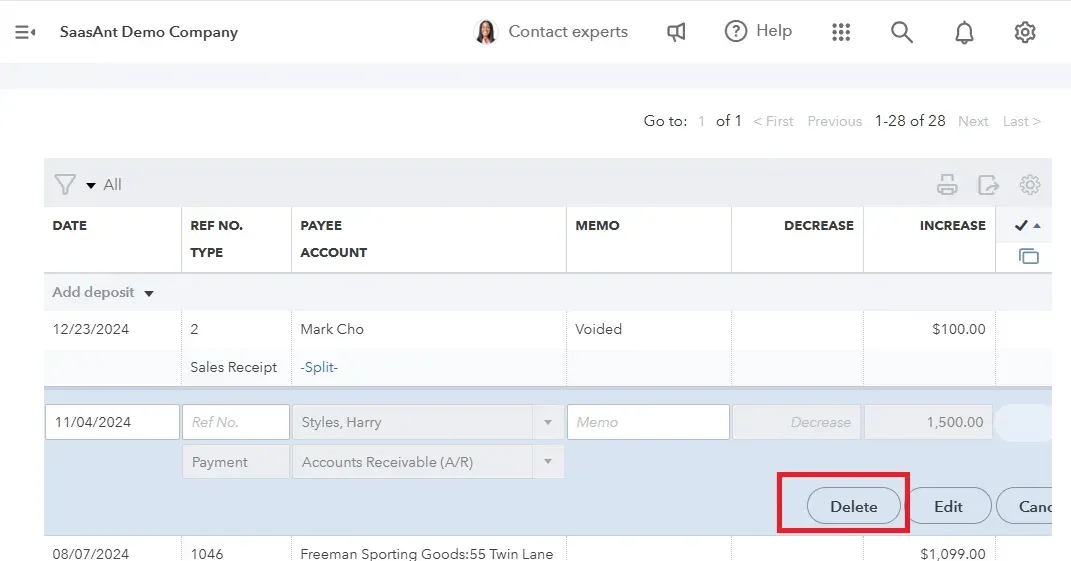
Step 3: Click ‘yes’ when prompted to confirm.
How to Merge Customers in QuickBooks Online: Step-by-Step Guide
Before we discuss how to merge two customers in QuickBooks Online, determine which profile will be the primary and which will be merged to that primary profile.
Step 1: Go to QuickBooks dashboard -> Sales -> Customers.
Customer Hub to Customer in the new UI from apps.

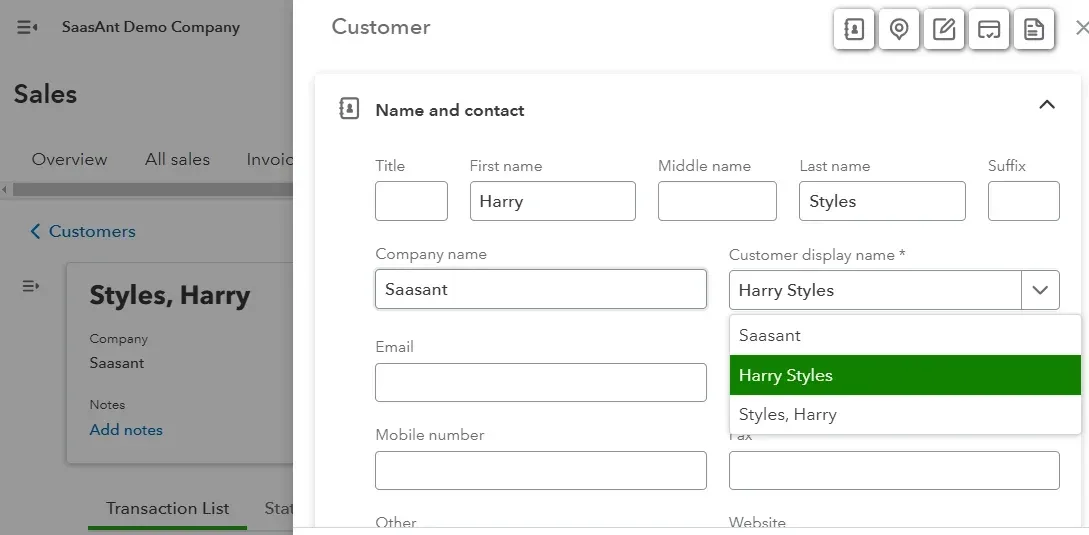
Step 2: Select the name of the customer you don’t want to keep -> Edit.
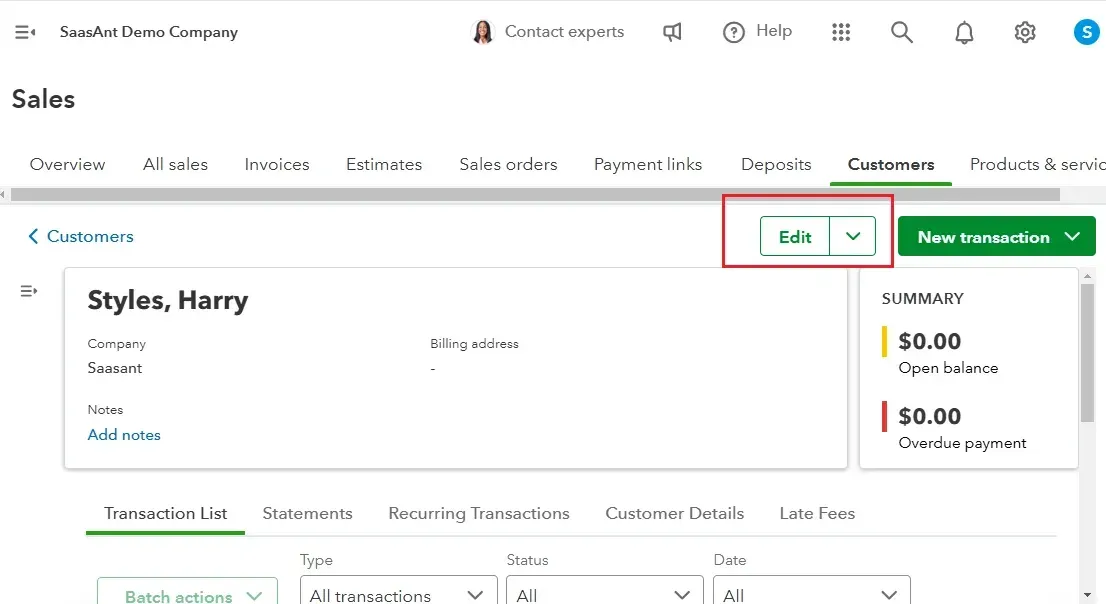
In the new UI, you can directly click on Merge contacts from the Edit dropdown.

Step 3: Enter the name of the duplicate customer you wish to keep in the Customer display name field. If the customer is a sub-customer, check off the check box ‘is a sub-customer’ and enter the name of the parent customer in the respective field.
Step 4: Select Save and confirm ‘Yes’ when prompted if you want to merge the two profiles.
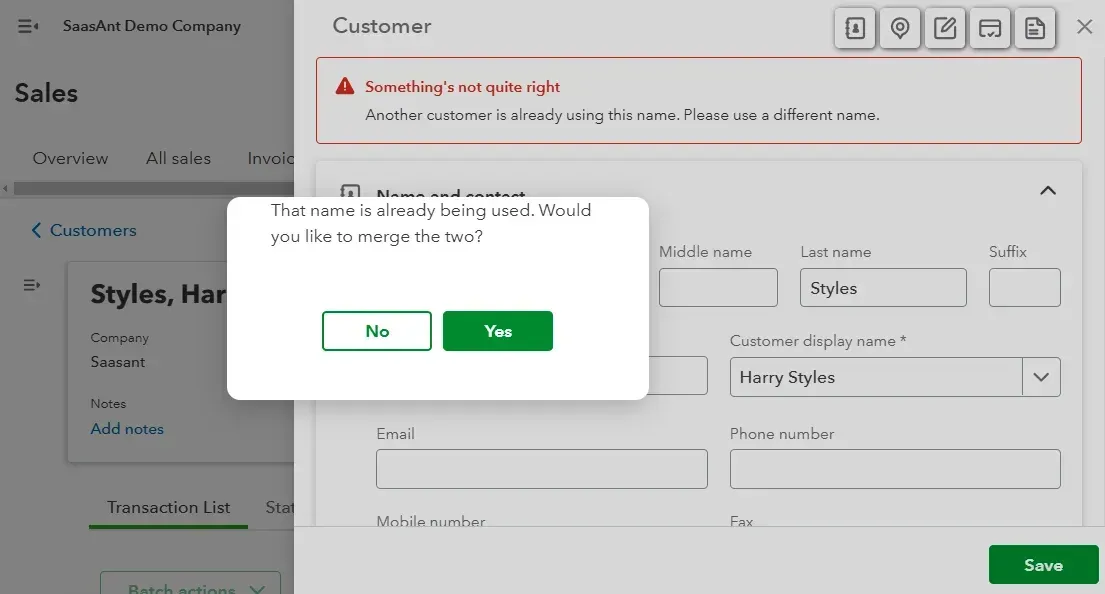
For the new UI, the merging window will look like this. You can directly choose customers that needs to be merged.
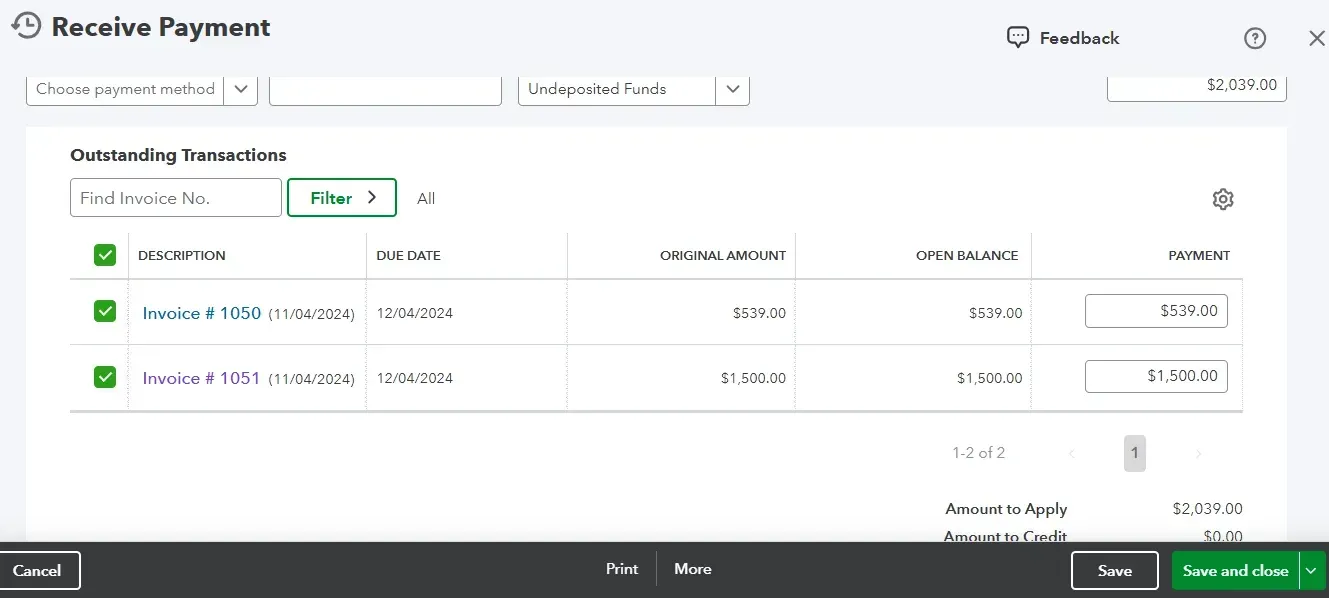
Receive Payment for Merged Customers
Step 1: Select ‘Receive Payment’ under the customer menu and search for the merged customer.
Step 2: Check off the invoice checkboxes and Save.
Best Practices to Follow When Merging Customers in QuickBooks
Backup Your Data: Before making any changes, create a complete backup of your QuickBooks file to safeguard against accidental data loss.
Review and Verify: Carefully review the customer records to be merged, ensuring accurate information and identifying any potential conflicts.
Test Thoroughly: After merging customers, test various functions like invoicing, payments, and reporting to identify and rectify any issues.
Utilize Automated Data Import Tools: You can always automate the bulk import of customer lists using SaasAnt Transactions so that you don’t have to suffer from duplicate contacts as a result of data entry errors. This will help you save time and improve overall data accuracy.
How to Import Customers into QuickBooks Online?
Find SaasAnt Transactions in the QuickBooks App Store and connect it to your QuickBooks account. SaasAnt Transactions is a certified, secure app designed to keep your data safe and well-managed. You can get started right away with a 30-day free trial.
SaasAnt Transactions Dashboard -> New Import -> Select Customers.
Browse to choose your file or drag and drop it. Supported formats include XLS, XLSX, CSV, and IIF. There’s an inbuilt feature to convert PDF to Excel before uploading.
Map the fields in QuickBooks to those in the imported file, selecting the appropriate sheet if necessary.
Click Upload to import your file into QuickBooks Online, then click Show Results after uploading.
Verify uploaded data by clicking the reference number. You can also roll back the imported data if needed.
You can also bulk export, edit, and delete customers and backup using email or FTP/SFTP for data security using SaasAnt Transactions.
Wrap Up
Following the steps outlined in this guide, you can effectively merge duplicate customers in QuickBooks Online, simplifying your financial management and improving overall data accuracy. Remember to back up your data before making any changes and test thoroughly to ensure a smooth transition.
By utilizing automated data import applications like SaasAnt Transactions, you can further optimize the process and minimize the risk of errors. By taking these proactive steps, you can maintain a clean and organized customer database in QuickBooks Online.
FAQ
Can you unmerge two customers once you have merged them?
The process cannot be reversed once you merge two customers in QuickBooks Online. This action is permanent and cannot be undone.
Can I merge two accounts in QuickBooks?
To merge accounts in QuickBooks, navigate to the Lists tab, select Chart of Accounts, and identify the account to keep. Right-click on the account to be merged, choose Edit Account, replace its name with the desired account's name, and confirm the merge.
How do I merge names in QuickBooks?
To merge names in QuickBooks Online, go to Sales > Customers. Select the customer to merge, edit its name to match the primary customer, and confirm the merge when prompted. If the customer is a sub-customer, check the "is a sub-customer" box, enter the parent customer's name, save, and confirm the merge.
Recommended Reading:
Read also
Workflow Automation for Bookkeeping and Accounting Professionals
Batch Transactions in QuickBooks Online - Detailed Guide