How to Record Refunds in QuickBooks Online: A Comprehensive Guide
 Accurate refund recording in QuickBooks Online is essential for clean financial records. This guide provides a step-by-step approach to managing customer and supplier refunds, ensuring accurate transactions, reliable reports, and consistent bookkeeping. Following these practices simplifies accounting and strengthens your business's financial management.
Contents
Why Recording Refunds Accurately is Important?
Steps to Record a Customer Refund in QuickBooks Online
Steps to Record a Supplier Refund in QuickBooks Online
Tips for Managing Refunds in QuickBooks Online
Conclusion
FAQs
Why Recording Refunds Accurately is Important?
Accurate Financial Records: Maintaining precise records is essential for the integrity of your financial statements. Every transaction, including refunds, must be documented correctly to ensure your financial data is reliable. Accurate records help you track financial performance, identify trends, and make informed business decisions.
Impact on Financial Reports: Properly recorded refunds significantly affect the accuracy of your financial reports and bookkeeping. Incorrect or missed refunds can lead to inaccurate income reporting, affecting your tax calculations and financial analysis. Ensuring refunds are recorded correctly helps maintain consistency in your financial statements, aiding in better financial planning and compliance with regulatory requirements.
Steps to Record a Customer Refund in QuickBooks Online
Here are the more precise steps to record a customer refund in QuickBooks Online:
1. Initiate the Refund Process:
Open QuickBooks Online and navigate to the "+" symbol in the top right corner.
From the dropdown menu, select "Refund receipt".
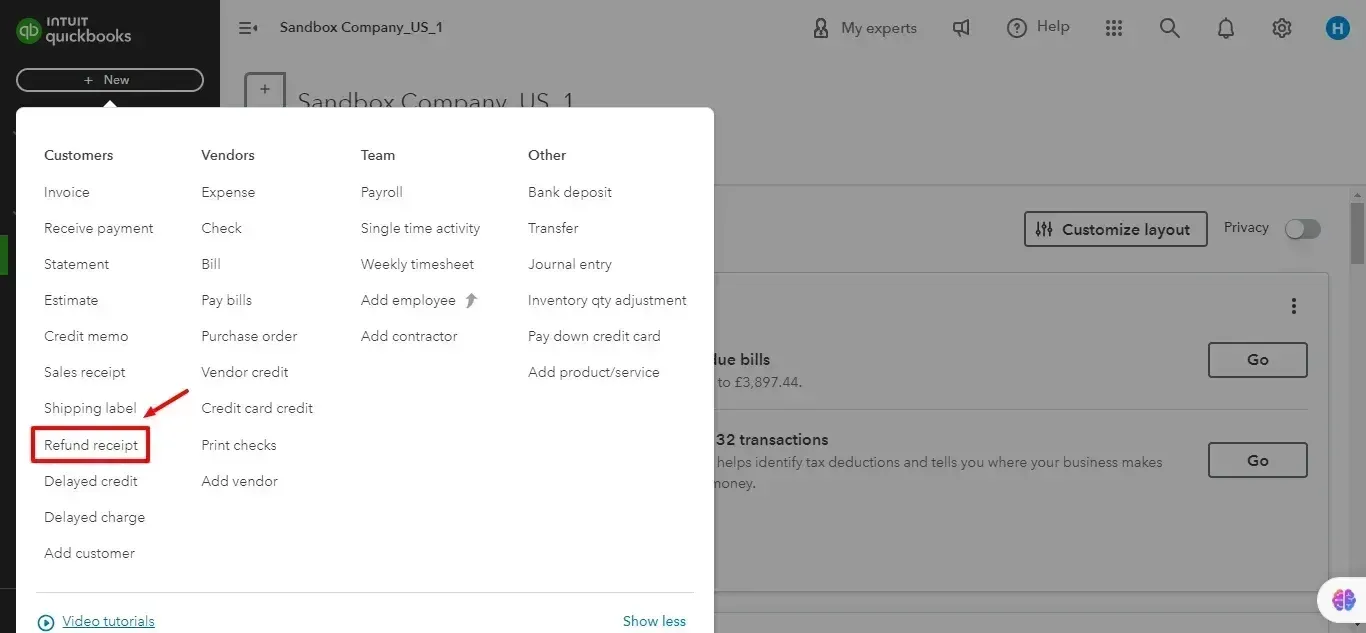
2. Select the Customer:
A new window will appear. In the "Customer" field, click the dropdown menu and choose the customer you're refunding.

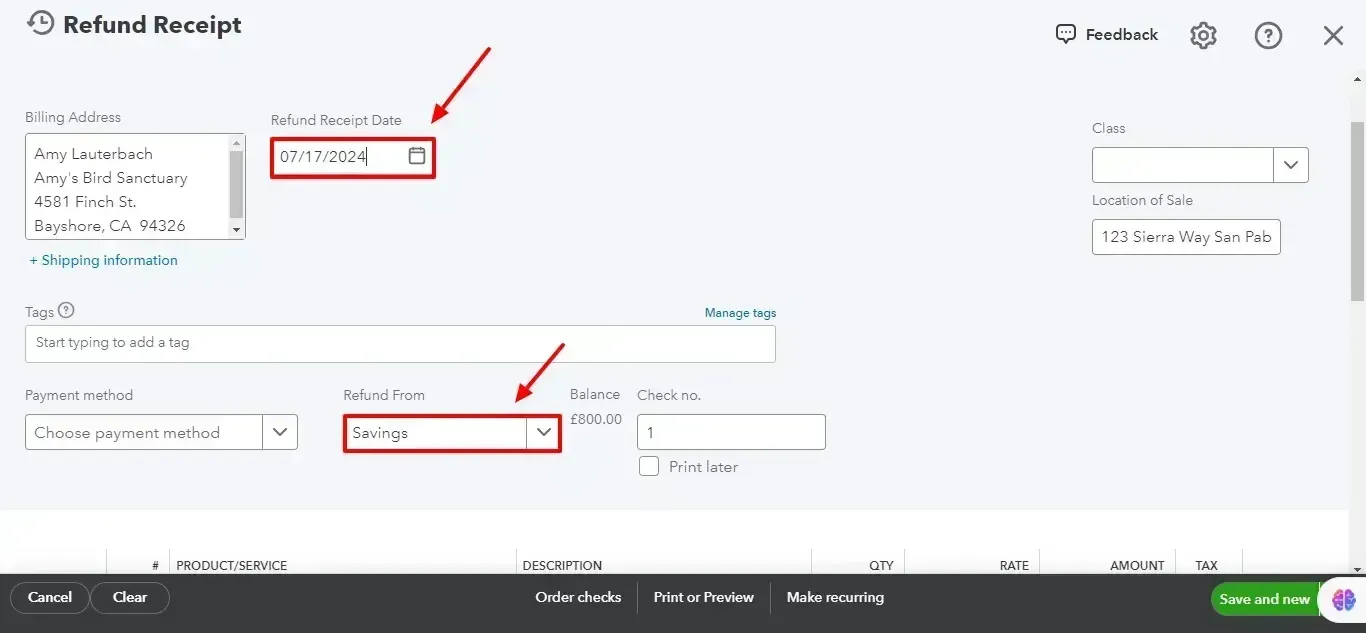
3. Enter Refund Details:
Fill in the "Refund Date" with the date you're processing the refund.
In the "Refund From" dropdown, select the bank account you used to deposit the original customer payment.
4. Detail the Refunded Items (Optional):
In the "Product/Service" column, you can add details about the items or services the customer is returning (optional).
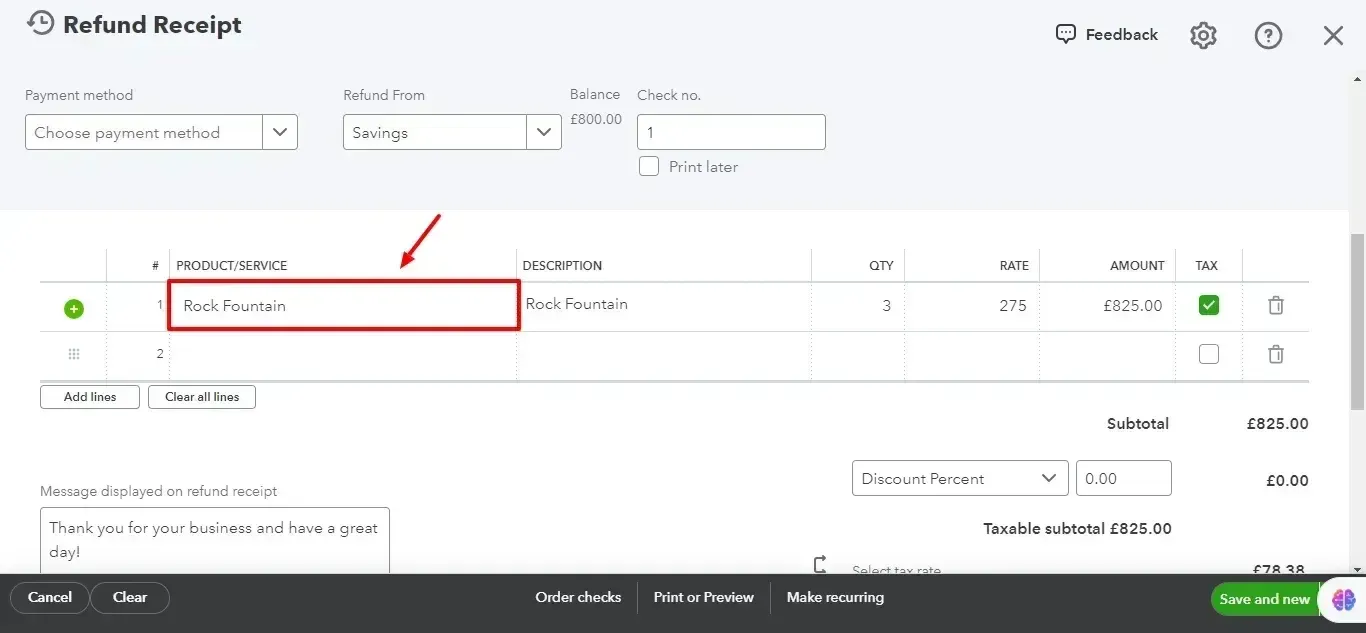
If applicable, include each refunded item's service date, quantity, rate, and amount.
You can also enter the sales tax information if the refunded items were taxable.
5. Finalize the Refund:
Review the information for accuracy once you've entered all the necessary details.
Click "Save and close" to finalize the refund process.
Steps to Record a Supplier Refund in QuickBooks Online
Here are the steps to record a supplier refund in QuickBooks Online, presented clearly and concisely:
1. Initiate the Refund Recording:
Open QuickBooks Online and locate the "+" symbol in the top right corner.
Click on the dropdown menu and select "Vendor credit."
2. Identify the Supplier:
A new window will appear. In the "Vendor" field, choose the supplier who refunded you.
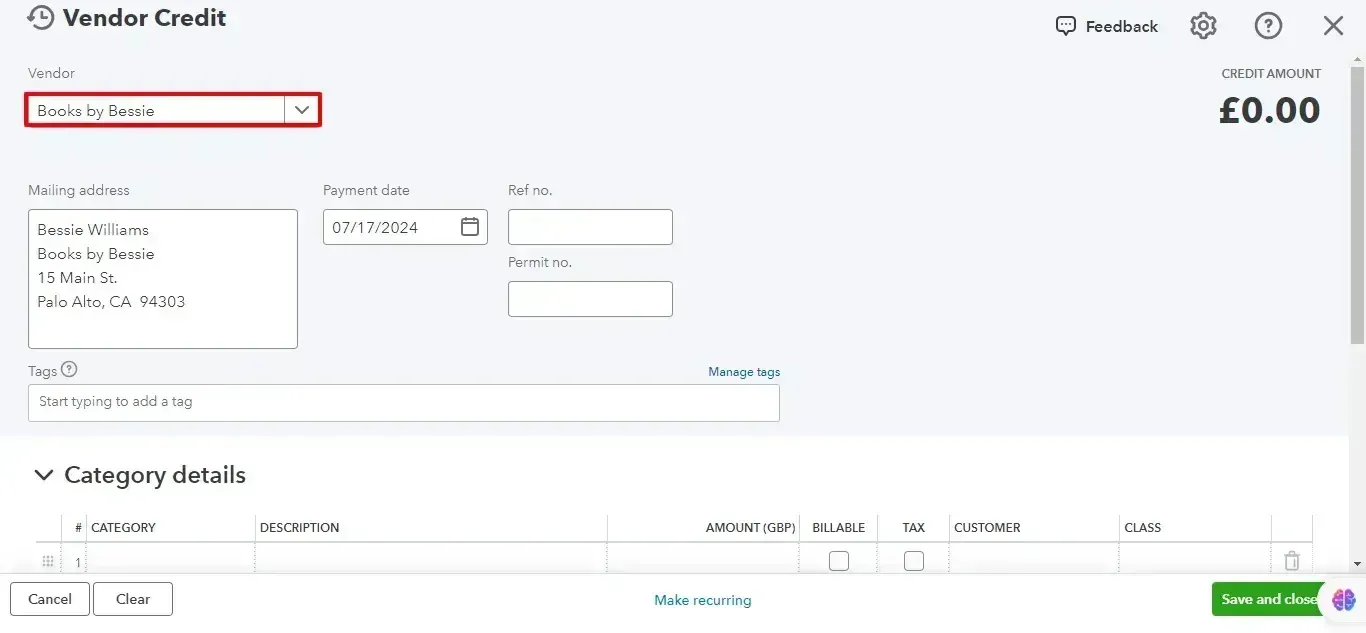
3. Enter Refund Details:
Fill in the "Date" with the date you received the refund from the supplier.
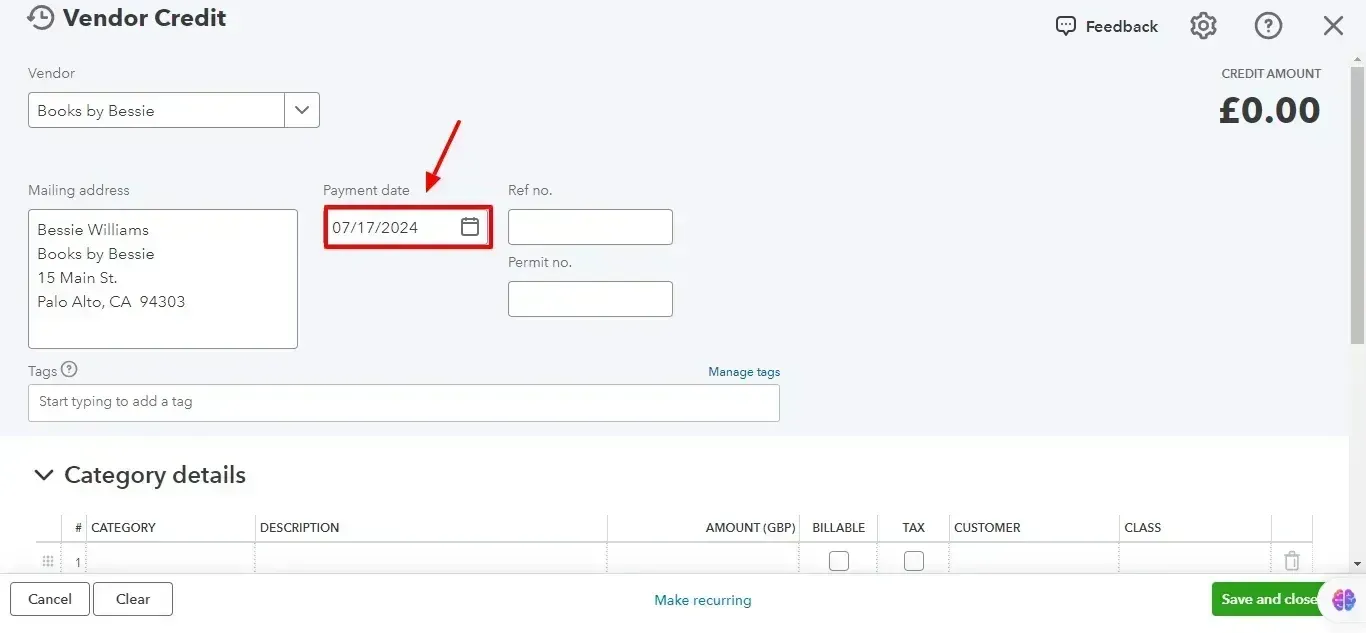
4. Describe the Reason (Optional):
In the "Memo" field, you can optionally provide a brief explanation for the supplier refund (e.g., "Returned merchandise," "Incorrect product received").

5. Finalize the Recording:
Once you've entered all the information, carefully review it for accuracy.
Click "Save and close" to finalize recording the supplier refund.
Tips for Managing Refunds in QuickBooks Online
Here are some essential tips to ensure you efficiently manage refunds in QuickBooks Online:
1. Maintain Consistent Review:
Develop a habit of regularly reviewing your accounts in QuickBooks Online. This includes examining your bank statements, customer accounts, and supplier accounts.
Please pay close attention to transactions categorized as refunds to ensure they are accurate and properly recorded.
Reconcile your accounts frequently to identify discrepancies between your records and bank statements. Early detection helps prevent errors from snowballing.
2. Prioritize Documentation:
Maintain a well-organized system for documenting all refund transactions. This includes:
Customer/Supplier Information: Keep track of the customer or supplier involved in the refund.
Refund Details: Document the reason for the refund, any specific items returned (if applicable), and the amount refunded.
Dates and Records: Record the date the refund was processed and maintain copies of any supporting documentation, such as receipts or return slips.
Easy Access: Store your refund documentation in a readily accessible location, either electronically or physically. This ensures you can easily retrieve it for reference or audit purposes.
3. Addressing Common Refund Issues:
Issue: Refund Not Appearing in Reports/Registers
Solution: Double-check the refund transaction's categorization. Ensure it's classified as a "Refund receipt" or "Supplier credit" instead of a regular expense or income entry.
Solution: Verify your filters and date range settings in your reports or registers. The refund might be outside the current filter criteria.
Issue: Processing a Partial Refund
Solution: When processing a partial refund for a customer, keep the original invoice. Instead, create a new "Refund receipt" transaction.
Solution: Enter the amount refunded instead of the complete invoice total in the refund receipt. For clarity, you can also reference the original invoice number.
Additional Tips:
Utilize Automatic Reminders: Set up automated reminders within QuickBooks Online to notify you when upcoming refunds are due. This helps prevent missed deadlines or delays.
Categorize Refunds Clearly: Create specific expense categories for customer and supplier refunds. This simplifies tracking and reporting on refund trends.
Consider Customer Communication: Depending on your business practices and customer service policies, establish a communication protocol for informing customers about their refunds (e.g., email notification).
Conclusion
Recording refunds accurately in QuickBooks Online is essential for maintaining accurate financial records and ensuring business continuity. Follow these steps and tips to manage your refunds effectively.
FAQs
How Do I Record a Vendor Refund in QuickBooks Online?
To record a vendor refund in QuickBooks Online (QBO), follow these steps:
Select Bank Deposit from the ‘+ New’ button.
Choose the bank account where the refund was deposited.
Enter the vendor who issued the refund in the ‘Received From’ field.
Select ‘Accounts Payable’ as the account.
Enter the refund amount and save the transaction.
To link this refund, go to Pay Bills, select the refund, and apply it to the appropriate bill or vendor credit.
How Do I Apply a Vendor Credit in Quickbooks Online?
You can apply a vendor credit toward any open or future bills by:
Navigating to ‘Expenses’ and selecting ‘Vendors.’
Choose the vendor who sent the credit, then click ‘Enter Bills.’
In the ‘Credit radio’ button, record the amount and assign it to the correct ‘Expense Account.’
Navigate to ‘Pay Bills,’ select the vendor, and apply the credit toward the open bill.
How Do I Record a Refund Check from a Vendor in QuickBooks Online?
To record a refund check from a vendor in QuickBooks Online:
Click on ‘+ New’ and select ‘Bank Deposit.’
Enter the vendor’s name under the ‘Received From’ field.
Select ‘Accounts Payable’ under the ‘Account’ column and enter the refund amount.
After saving, link the deposit to the vendor credit by going to ‘Pay Bills’ and applying the refund to the vendor’s open or future bills.
How Do I Create a Vendor Credit in QuickBooks Online?
To create a vendor credit in QBO:
Go to ‘+ New’ and select ‘Vendor Credit.’
Choose the vendor from the drop-down list and enter the necessary information, such as the amount and Expense Account.
Save the transaction. You can later apply this credit to an open bill through the Pay Bills option.
How Do I Record a Refund Deposit from a Vendor in QuickBooks Online?
To record a refund deposit:
Open the ‘+ New’ menu and select ‘Bank Deposit.’
Select the account where the refund was deposited.
Enter the vendor's name under ‘Received From.’
Choose ‘Accounts Payable’ for the account field.
Save the deposit, and then link it by applying it to any open bills or vendor credits.
How Do I Enter a Vendor Refund in QuickBooks Desktop?
In QuickBooks Desktop, you can record a vendor refund by:
Creating a Vendor Credit to record the refund.
Use the Accounts Payable account to record the transaction.
If the refund is received as a check, deposit the check to the vendor credit via Bank Deposits, selecting the Accounts Payable option.
What Account Should I Select for Vendor Refunds in QuickBooks?
When recording a vendor refund, you should select Accounts Payable as the account. This ensures that the refund is properly linked to the vendor’s balance and can be applied to any open or future bills.
How Do I Deposit a Vendor Refund Check in QuickBooks Online?
To deposit a vendor refund check:
Navigate to ‘+ New’ and select ‘Bank Deposit.’
Enter the vendor’s name and use ‘Accounts Payable’ as the account.
Save and then apply the refund check to the vendor credit by selecting ‘Pay Bills’ and linking the payment to the appropriate credit.
How Do I Manage Vendor Refunds in QuickBooks Online?
You can manage vendor refunds in QuickBooks Online by:
Recording the refund via ‘Bank Deposit.’
Creating a ‘Vendor Credit’ and applying it toward future bills.
Customizing vendor reports to track refunds and credits associated with each vendor.
How Do I Apply Vendor Refunds in QuickBooks When There Is No Open Bill?
If there are no open bills, you can apply for a vendor refund as a credit:
Create a Vendor Credit.
Apply this credit toward any future bills or link it directly to a refund deposited under Accounts Payable.
The vendor credit will remain in the system until used against future transactions.
Can I Deposit a Refund from a Vendor into a Different Account in QuickBooks?
Yes, you can deposit a refund from a vendor into a different account:
Navigate to ‘+ New’ and select ‘Bank Deposit.’
Choose the desired bank account for the refund deposit.
Enter the vendor's name, select Accounts Payable, and input the refund amount.
You can then apply this deposit toward any open vendor credits or bills.