How to Remove a Bank Account from QuickBooks: Step-by-Step Guide
If you are looking for how to remove a bank account from QuickBooks Online, you’re likely a business owner or bookkeeper focused on maintaining accurate financial records. Whether you’re closing an old account or switching banks, especially during the maintenance or reconciliation stage, knowing how to remove a bank account from QuickBooks Online is essential.
Confusion from multiple bank accounts can lead to errors in your financial reporting, which is the last thing you want. To avoid the hassle of deleting the bank account, you can choose to maintain data integrity with regular automated data import of bank statements and bulk deleting.
In this blog, we’ll explain two methods for removing a bank account to keep your QuickBooks Online account in top shape. We’ll also show you how to modify accounts and import bank statementsif you decide to add the account back later, or you can skip removing the account using bulk delete of SaasAnt Transactions, which has a 4.9-star rating from around 4000 users in the QuickBooks app store.
Quick Instructions: Removing a Bank Account from QuickBooks Online
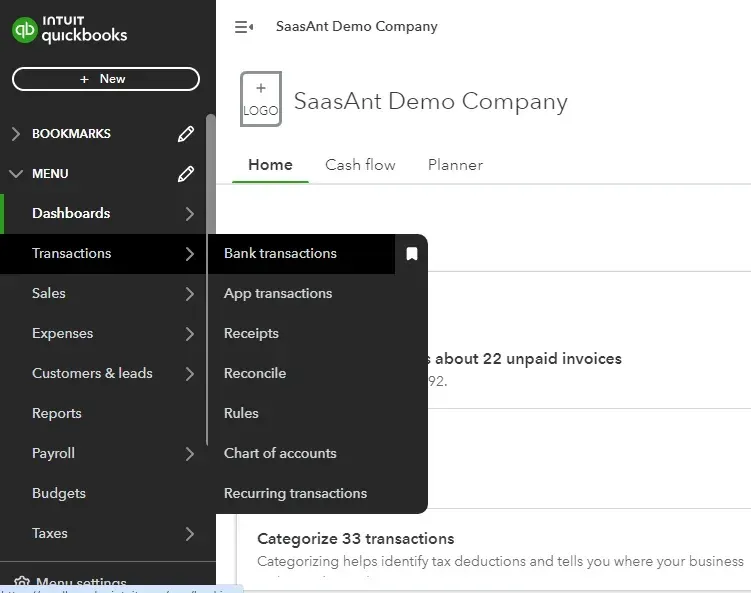
QuickBooks Dashboard -> Transactions -> Bank Transactions.
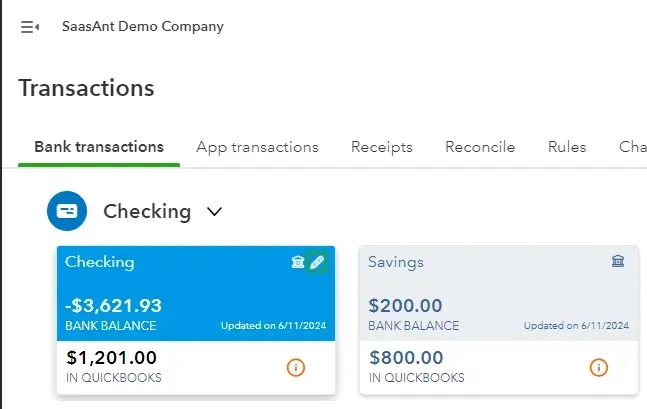
Select the bank account and click the pencil icon.
Click "Edit Account Info."
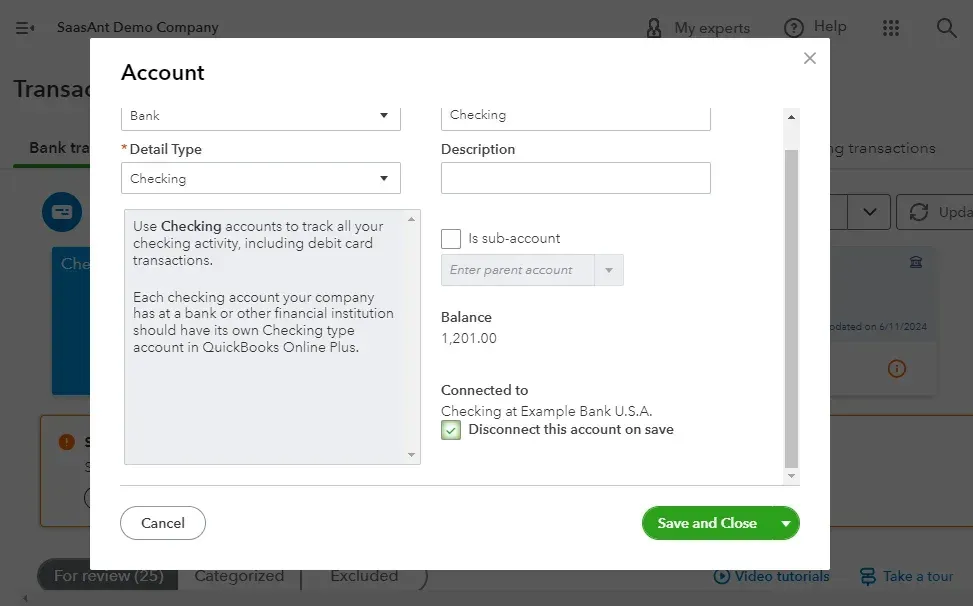
Check "Disconnect this account on save," then save and close.
How to Remove a Bank Account from Quickbooks Online?
There are two ways to delete a bank account from QuickBooks Online. Here is a step-by-step breakdown of both methods.
Method 1: Deleting a Bank Account from Your Transactions Screen
Let’s look at how to remove unwanted bank accounts from QuickBooks. Here are the steps to remove it from the banking tab or transactions menu
Here are the steps to remove it from the banking tab or transactions menu
Step 2: Select the bank account you wish to remove from the list of accounts and click the pencil icon.
Step 3: Choose "Edit Account Info."
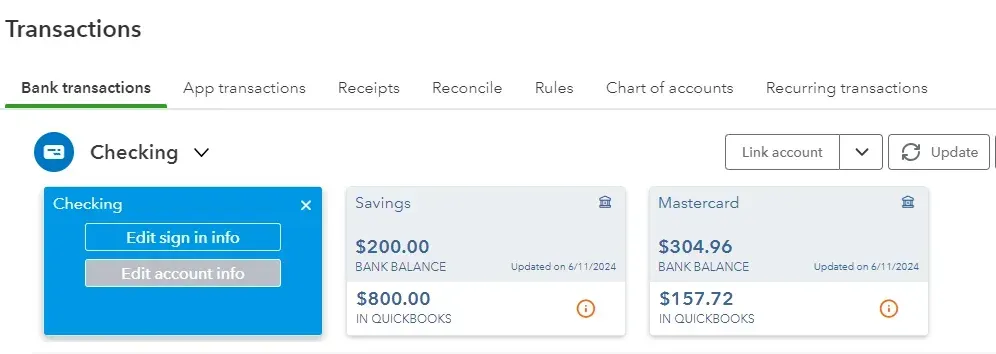
Step 4: In the popup box, check "Disconnect this account on save," then save and close.
Method 2: Deleting a Bank Account from Your Chart of Accounts
Here’s how to disconnect a bank account from QuickBooks Online from the chart of accounts screen
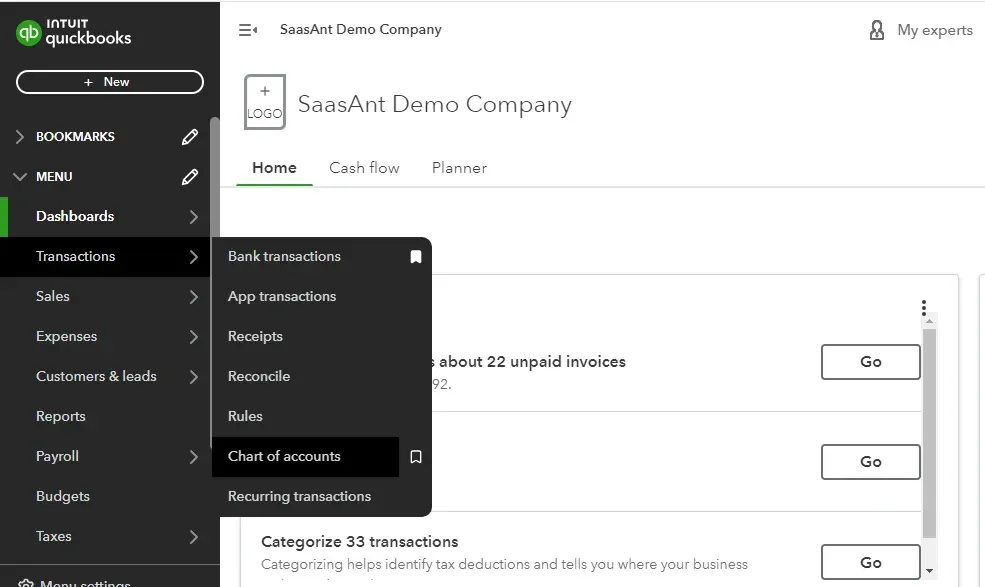
Step 1: Go to Transactions -> Chart of Accounts.
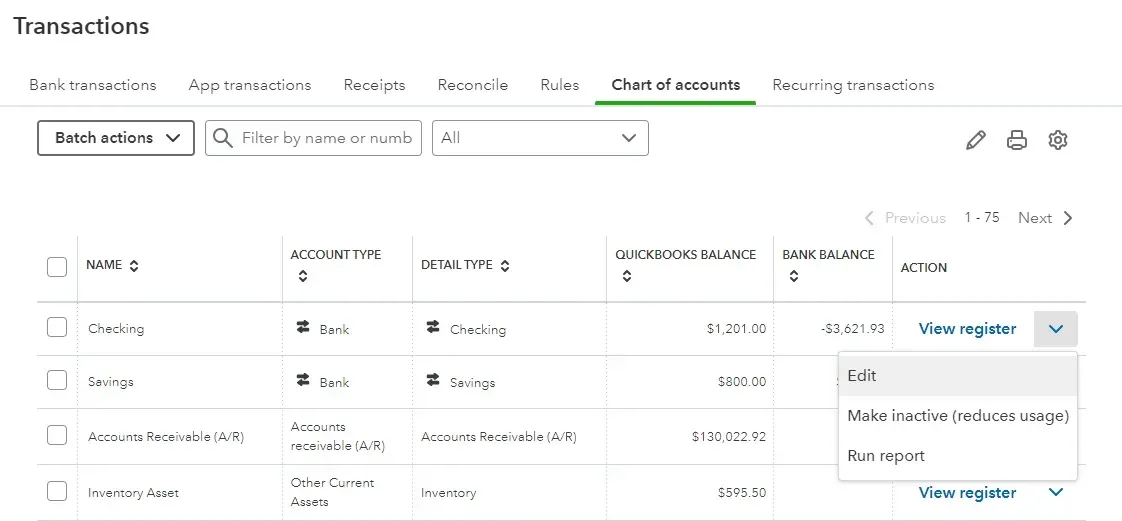
Step 2: A list of bank accounts will appear. Click the view register drop-down menu in the action column and select ‘make inactive.’
For businesses managing multiple bank accounts, keeping records updated can become cumbersome. In case you remove your bank account for some reason, you can use SaasAnt Transactions to automate the import bank transactions into QuickBooks. It simplifies your workflow and ensures accurate financial records. You can also delete accounts rather than making them inactive using SaasAnt Transactions. It lets you delete accounts not linked to any products or services. SaasAnt Transactions also lets you bulk delete transactions. Better yet, you can change the accounts using the modify feature.
Quick Instruction: How to Modify Accounts?
Connect your QuickBooks account with SaasAnt Transactions via the QuickBooks Apps Store by searching for ‘SaasAnt’ and clicking ‘Get the App Now.’ Get started with a 30-day free trial.
Go to the Dashboard -> Export -> Accounts.
Search using reference number or date range.
Download in .XLSX or .CSV format and make changes.
Dashboard -> Modify -> Accounts -> Upload the file you have made changes to.
Roll back if needed.
Quick Instructions: How to Import Transactions Into QuickBooks?
If you are thinking, “How do I delete bank accounts and start again?” here are the necessary steps.
New Import -> Bank Statement or Credit Card Statement.
Browse to choose your file or drag and drop it. Supported formats include XLS, XLSX, CSV, and IIF. There’s an inbuilt feature to convert PDF to Excel before uploading.
Map the fields in QuickBooks to those in the imported file, selecting the appropriate sheet if necessary.
Click Upload to import your file into QuickBooks Online, then click Show Results after uploading.
Verify uploaded data by clicking the reference number. You can also roll back the imported data if needed.
Here’s a list of detailed guides with screenshots that you may want to check out:
Import bank transactions into QuickBooks
Delete accounts rather than make them inactive
Quick Instructions: How to Bulk Delete Transactions Into QuickBooks?
Go to SaasAnt Transactions Dashboard -> Delete and choose Delete by Searching to specify the data type and range for the transactions you want to delete. You can also search using reference numbers.
Review the displayed transactions, uncheck any you do not wish to delete, and click Delete.
Note: Remember to back up your transactions using the Download option before proceeding.
Reasons for Removing a Bank Account from QuickBooks Online
Let’s learn the common reasons one might want to unlink a bank account from QuickBooks online. Here are five common reasons.
Account Closure: The bank account is being closed or is no longer in use.
Switching Banks: The business has moved to a different bank and no longer needs the old account linked.
Error Correction: The account was linked incorrectly, or duplicate accounts must be resolved.
Security Concerns: Sometimes, the bank account must be unlinked for enhanced security or privacy. You can use SaasAnt Transactions to bulk import your bank transactions and statements to maintain security.
Inactive or Dormant Account: The bank account has not been used long and is no longer needed.
Maintain Accurate Records with QuickBooks and SaasAnt Transactions
In conclusion, you may need to remove a bank account from QuickBooks Online for several reasons. However, consider trying bulk delete transactions to skip the hassle of individually removing bank accounts from QuickBooks Online. Otherwise, you can opt for regular data imports or modify the existing data to maintain data accuracy rather than deleting a bank account from QuickBooks Online for tidiness. SaasAnt Transactions simplifies the process, saves time, and reduces the risk of errors when handling large volumes of data. You can ensure that your financial data remains precise and reliable even as you make necessary adjustments to your account setup.
FAQ
How to remove a bank account from quickbooks?
Go to QuickBooks Dashboard -> Transactions -> Bank Transactions. Select the bank account you want removed and click the pencil icon in the upper right. Select edit account info and check off the check box “Disconnect this account on save,” then save and close.
How do I delete a bank account?
Navigate to the QuickBooks Dashboard and go to Transactions -> Bank Transactions. Choose the bank account you wish to remove and click the pencil icon in the upper right. Select "Edit Account Info" and check the box labeled "Disconnect this account on save,” then save and close.
How do I edit a bank account in QuickBooks?
Go to QuickBooks Dashboard -> Transactions -> Bank Transactions. Choose the bank account you wish to remove and click the pencil icon in the upper right. Select "Edit Account Info.”
How do I update my bank connection in QuickBooks?
Go to the QuickBooks Dashboard and select Transactions -> Banking. You will see the list of bank accounts. Click on the “update” button on the right side of the screen to update your bank connection.
How do I add a new bank account in QuickBooks?
Go to the QuickBooks Dashboard and select Transactions -> Chart of Accounts -> New. Enter the account name, select the account type and detail type from the drop-down and save.
Can I link two bank accounts to QuickBooks?
Yes, you can link multiple bank accounts to QuickBooks. Go to the QuickBooks Dashboard and select Transactions -> Chart of Accounts -> New. Enter the account name, select the account type and detail type from the drop-down and save. Repeat the steps for every bank account you wish to add.
How can you manage transactions after removing a bank account?
You can integrate SaasAnt Transactions to automate the bulk import of bank statement data, ensuring your bank transaction data remains error-free and secure.