How to Import Bank Transactions into QuickBooks Online?
Manually entering bank transactions into QuickBooks Online wastes time and leads to costly errors. But what if you could import them in minutes without making any errors?
In this blog, we’ll explain the fastest, most accurate ways to import bank transactions, whether through direct feeds or file imports. Master these steps and free up your time for more important tasks.
Contents
Import Bank Transactions into QuickBooks Online: Quick Instructions
Importing Bank Transactions into QuickBooks Online: The Process
How to Import Bank Transactions into QuickBooks Online
Conclusion
Frequently Asked Questions
Import Bank Transactions into QuickBooks Online: Quick Instructions
Follow the below steps to import your bank transactions into QuickBooks Online:
Log in to your QuickBooks Online account.
Navigate to the Apps tab and find SaasAnt Transactions.'
Connect SaasAnt Transactions with your QuickBooks Online account.
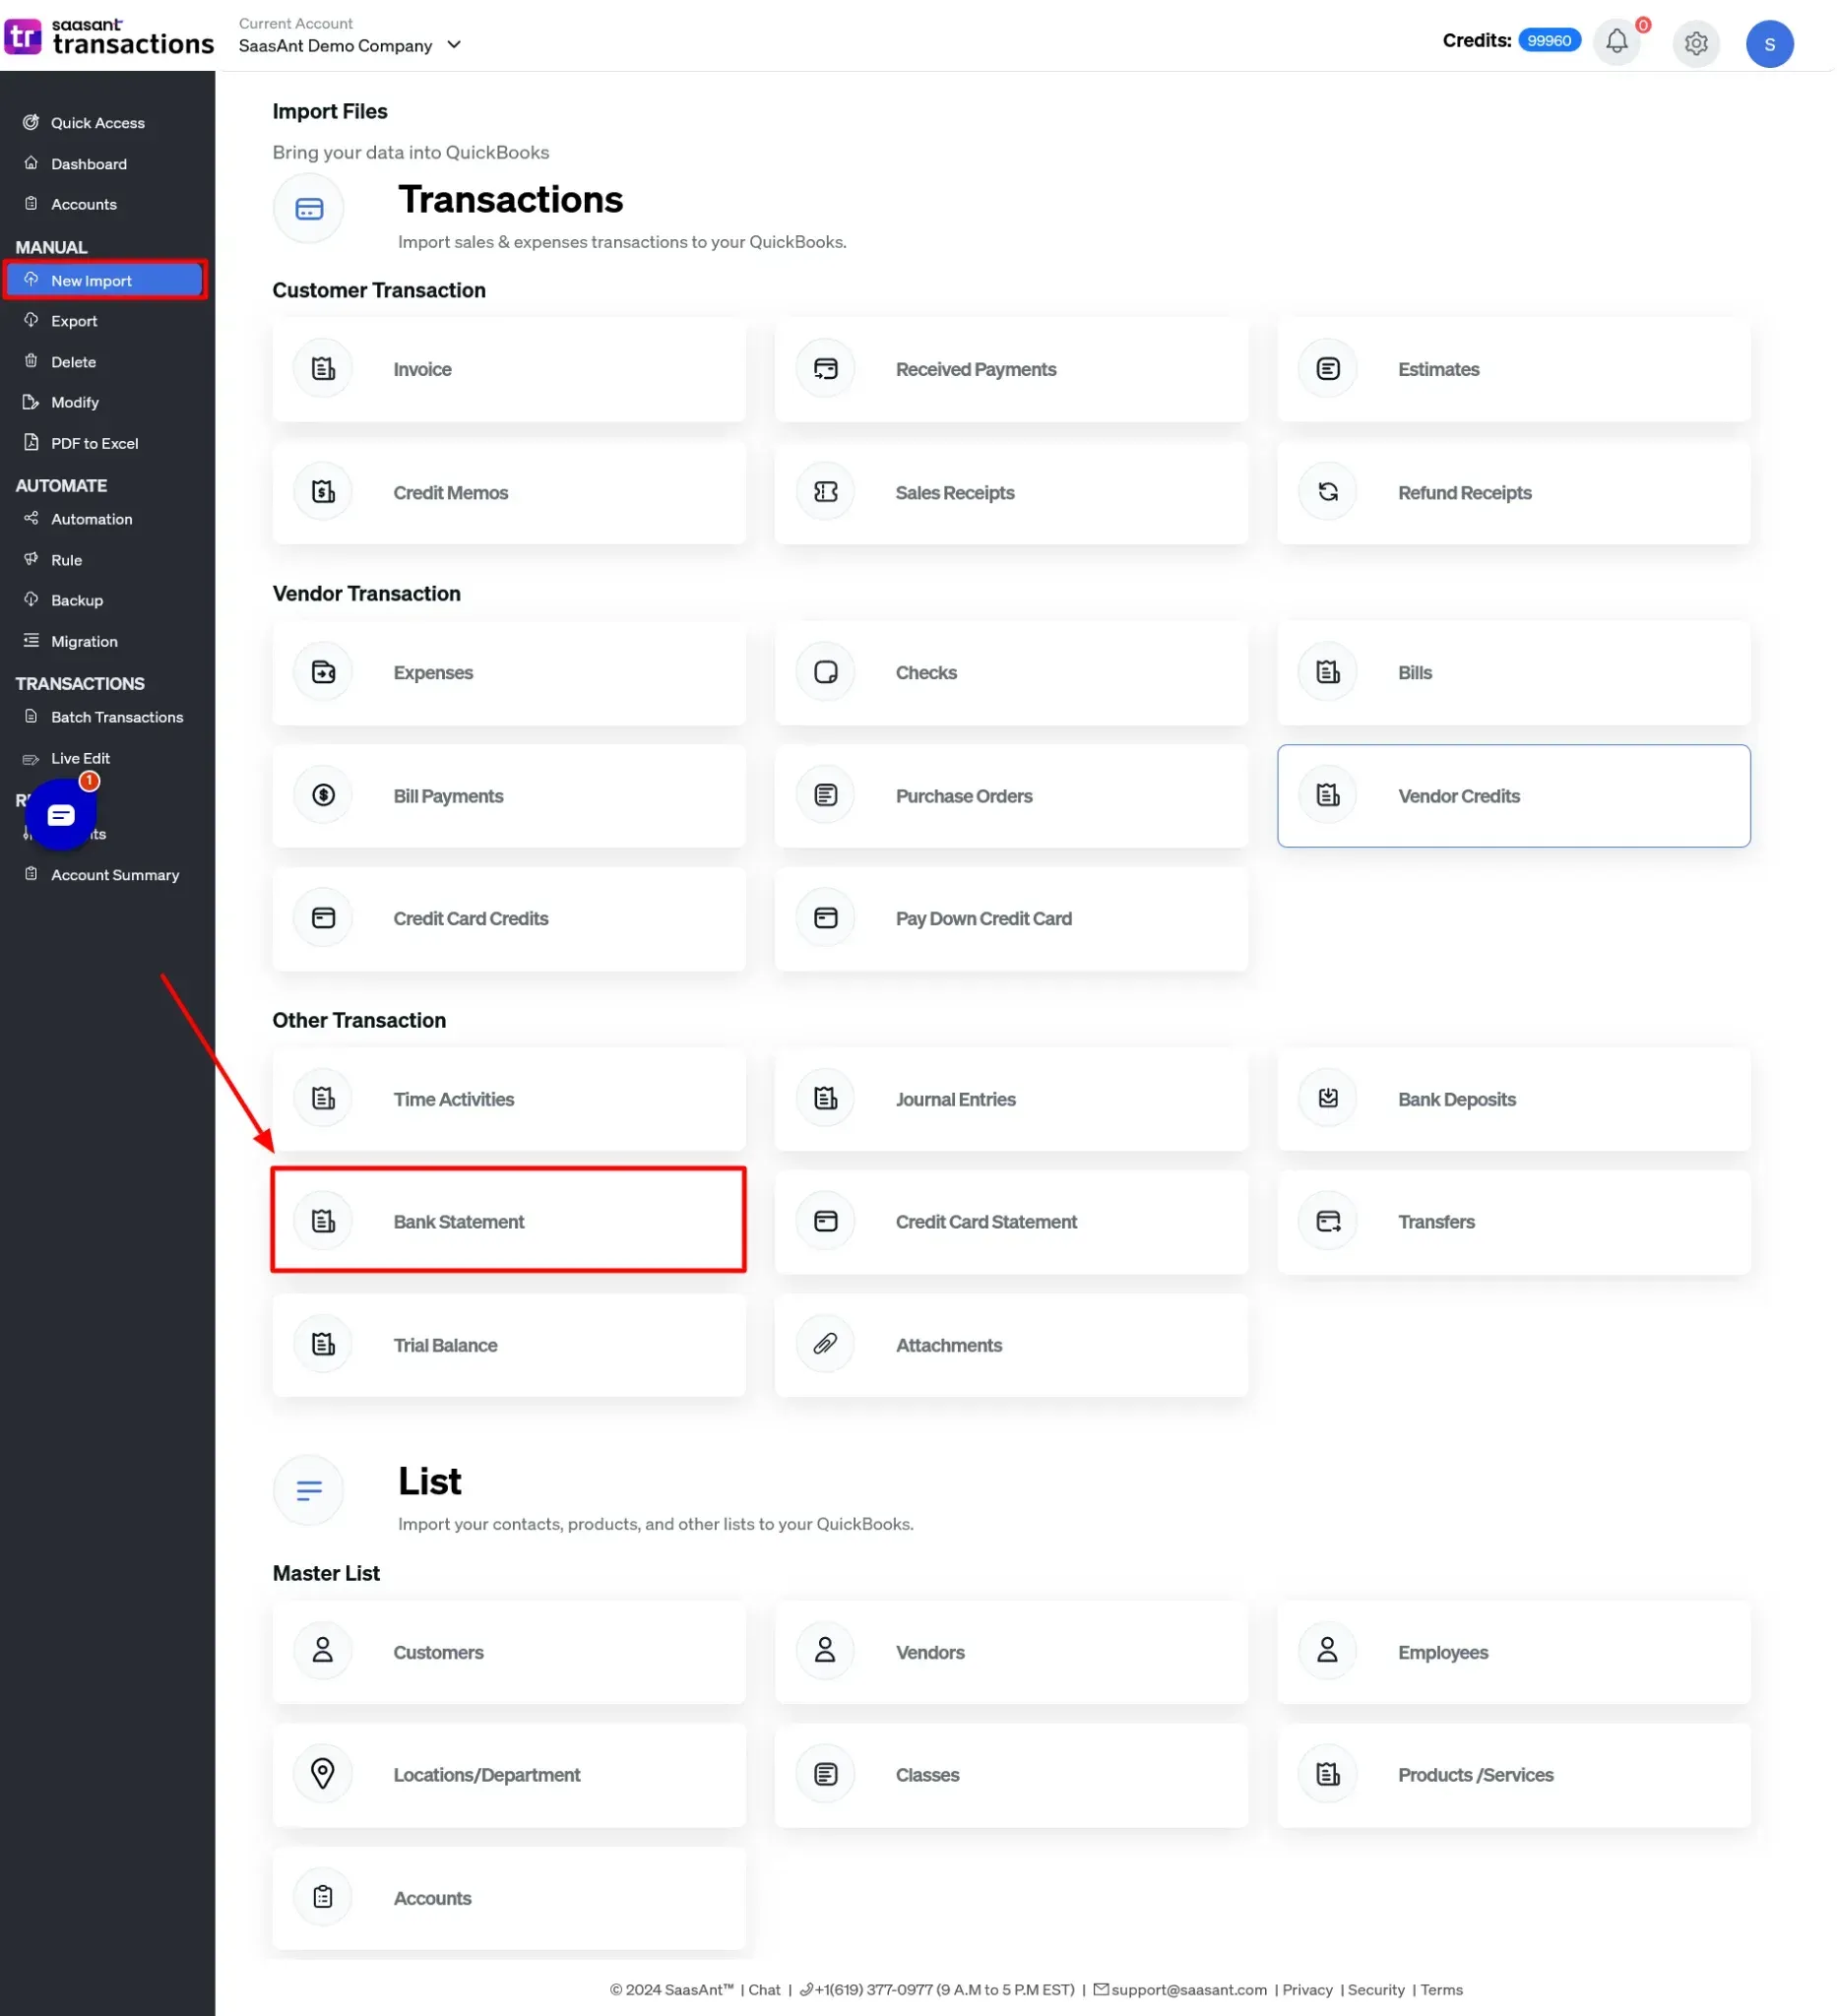
Click 'New Import' to start the bank transaction import process.
Upload your file (supports various formats, including Excel, CSV, PDF, Images, and IIF).
Map the fields in your file correctly with QuickBooks fields in the mapping screen.
Review the mapping for accuracy and initiate the import.
Validate the imported data in QuickBooks Online to ensure accuracy.
Importing Bank Transactions into QuickBooks Online: The Process
Importing bank transactions using SaasAnt Transactions Online simplifies the bank reconciliation process in QuickBooks Online, automatically matching the imported transactions with those recorded in the software. The application saves time and ensures accurate reconciliation.
This article will walk you through using SaasAnt Transactions to simplify importing bank transactions into QuickBooks Online.
How to Import Bank Transactions into QuickBooks Online
Follow the below steps to import transactions into QuickBooks Online seamlessly;
Step 1: Export Bank Transactions
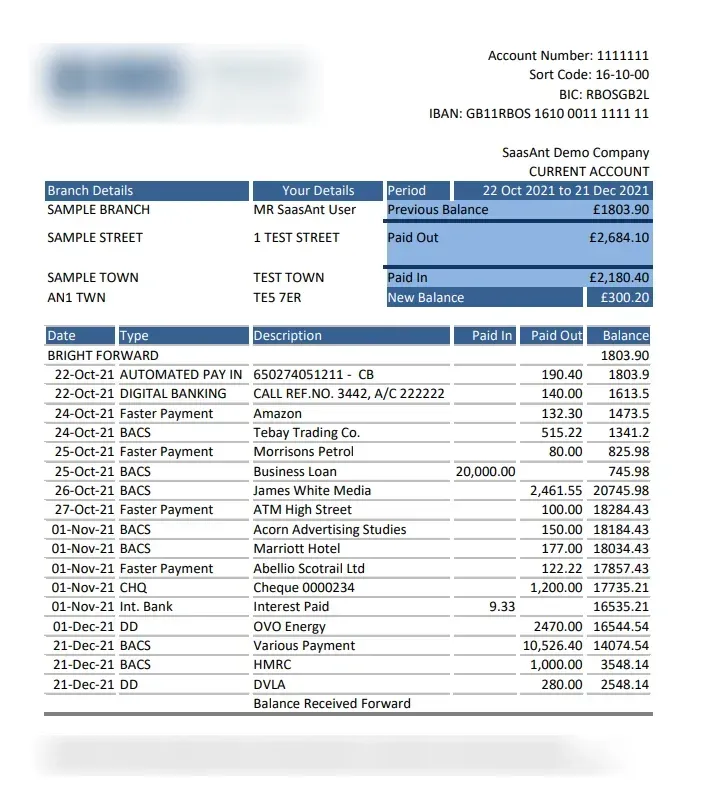
Start by collecting your latest transactions. This is your first step because QuickBooks needs your recent transaction data to update your records. You can download these transactions directly from your bank's website or through their mobile app. This ensures that you have all the necessary financial information ready for import.
Step 2: Bank Transactions Data Preparation
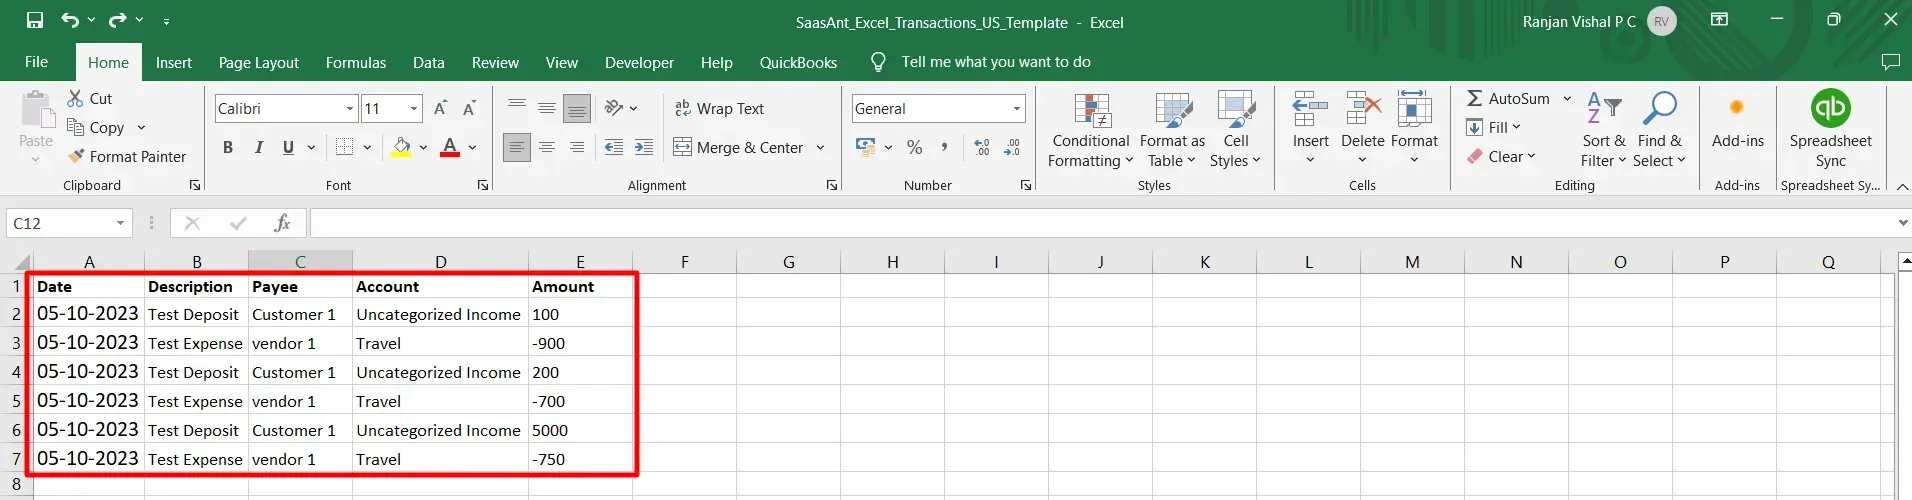
Before importing, make sure your transaction data is in the right format. QuickBooks supports formats like Excel (.xls or .xlsx), CSV, PDF, Image, or IIF files. Organizing your data in these formats helps QuickBooks to process and recognize your financial information correctly. It's important because it ensures that all your transactions will be imported accurately, without any data mismatch or errors.
To know how to upload pdf bank statements refer this guide.
Step 3: Connect SaasAnt Transactions Online
SaasAnt Transactions helps you import transactions into QuickBooks. By connecting SaasAnt to your QuickBooks Online, you're setting up a bridge to transfer your bank data easily. This step is important as it allows you to automate the data import process, reducing manual work and the risk of errors.
Step 4: File Upload
With SaasAnt, you can now upload your prepared bank transaction file. This is where you start the import process. You need to ensure that the file is the correct one and that you've selected the right type of transactions (like bank statements) to import. This precision is key to making sure that your financial data integrates seamlessly into QuickBooks.
To upload your file, follow these steps:
Open SaasAnt Transactions and click on ‘New Import.’
Choose ‘Bank Statement’ as the transaction type.
Upload your bank transactions file via the ‘Browse’ option, ensuring it is in a supported file format (Excel, CSV, PDF, Image, or IIF).
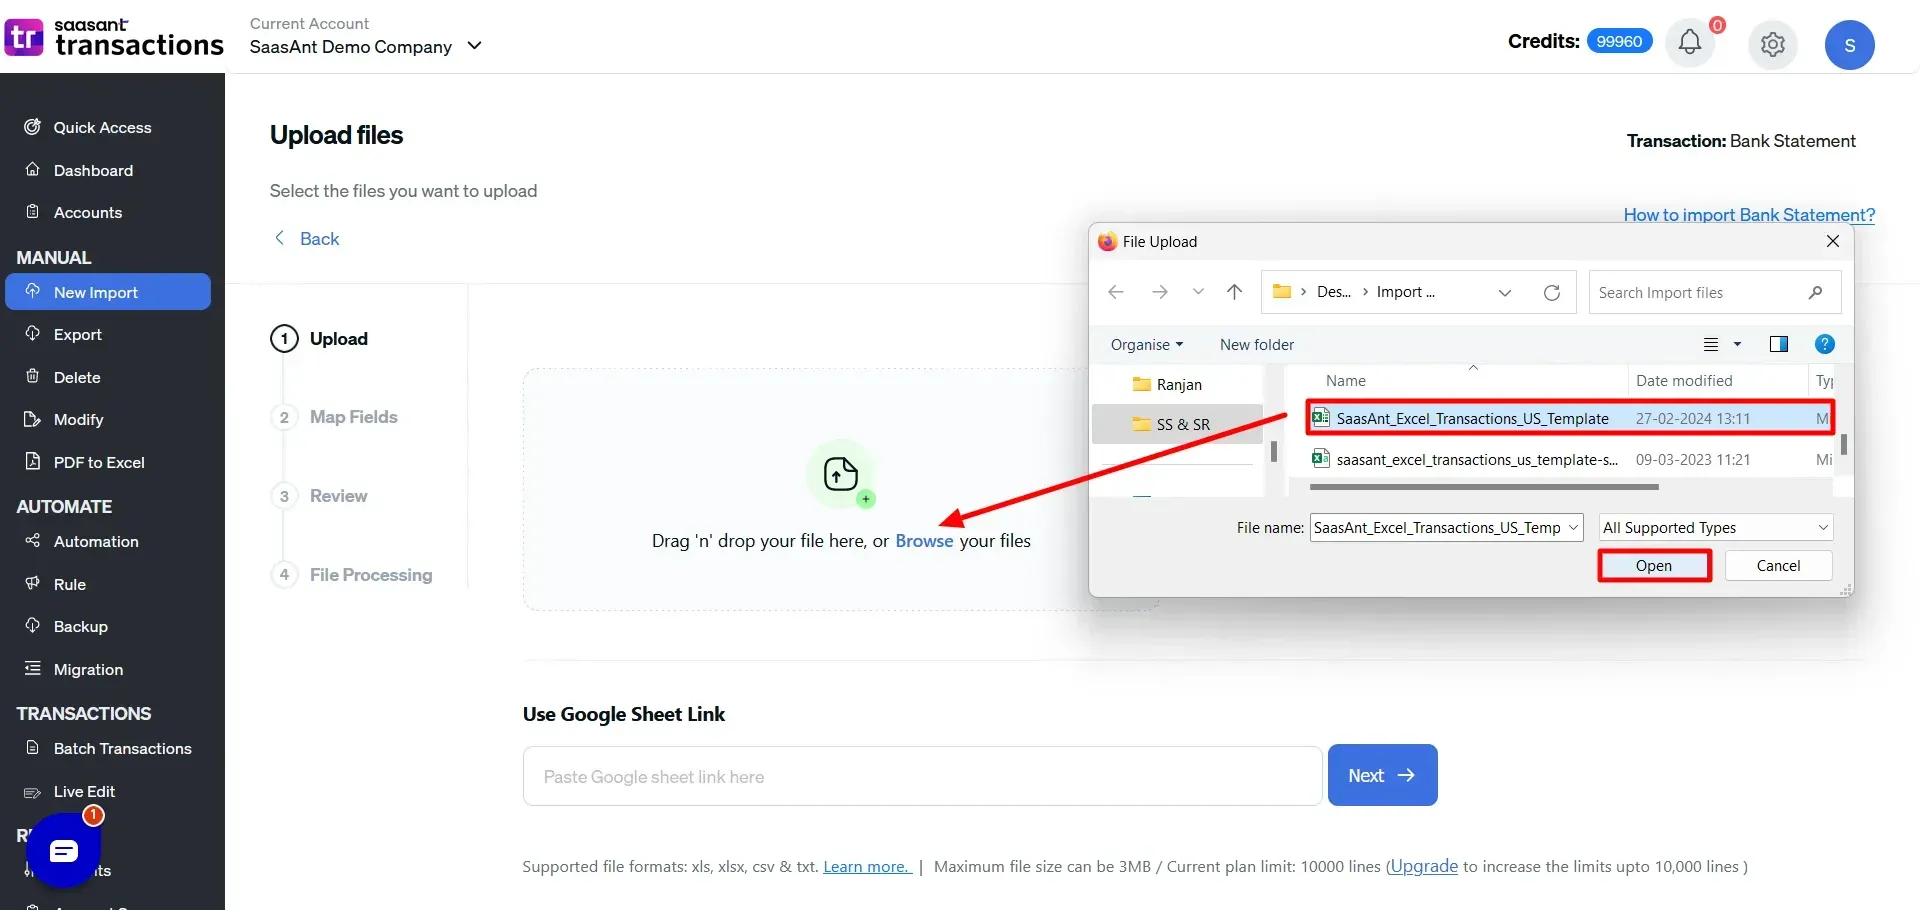
Note: If you have multiple sheets, ensure to manually choose ‘Bank Statements.’ Also, if you have a certain period of data, you can manually select the particular ‘Bank Statement Sheet’.
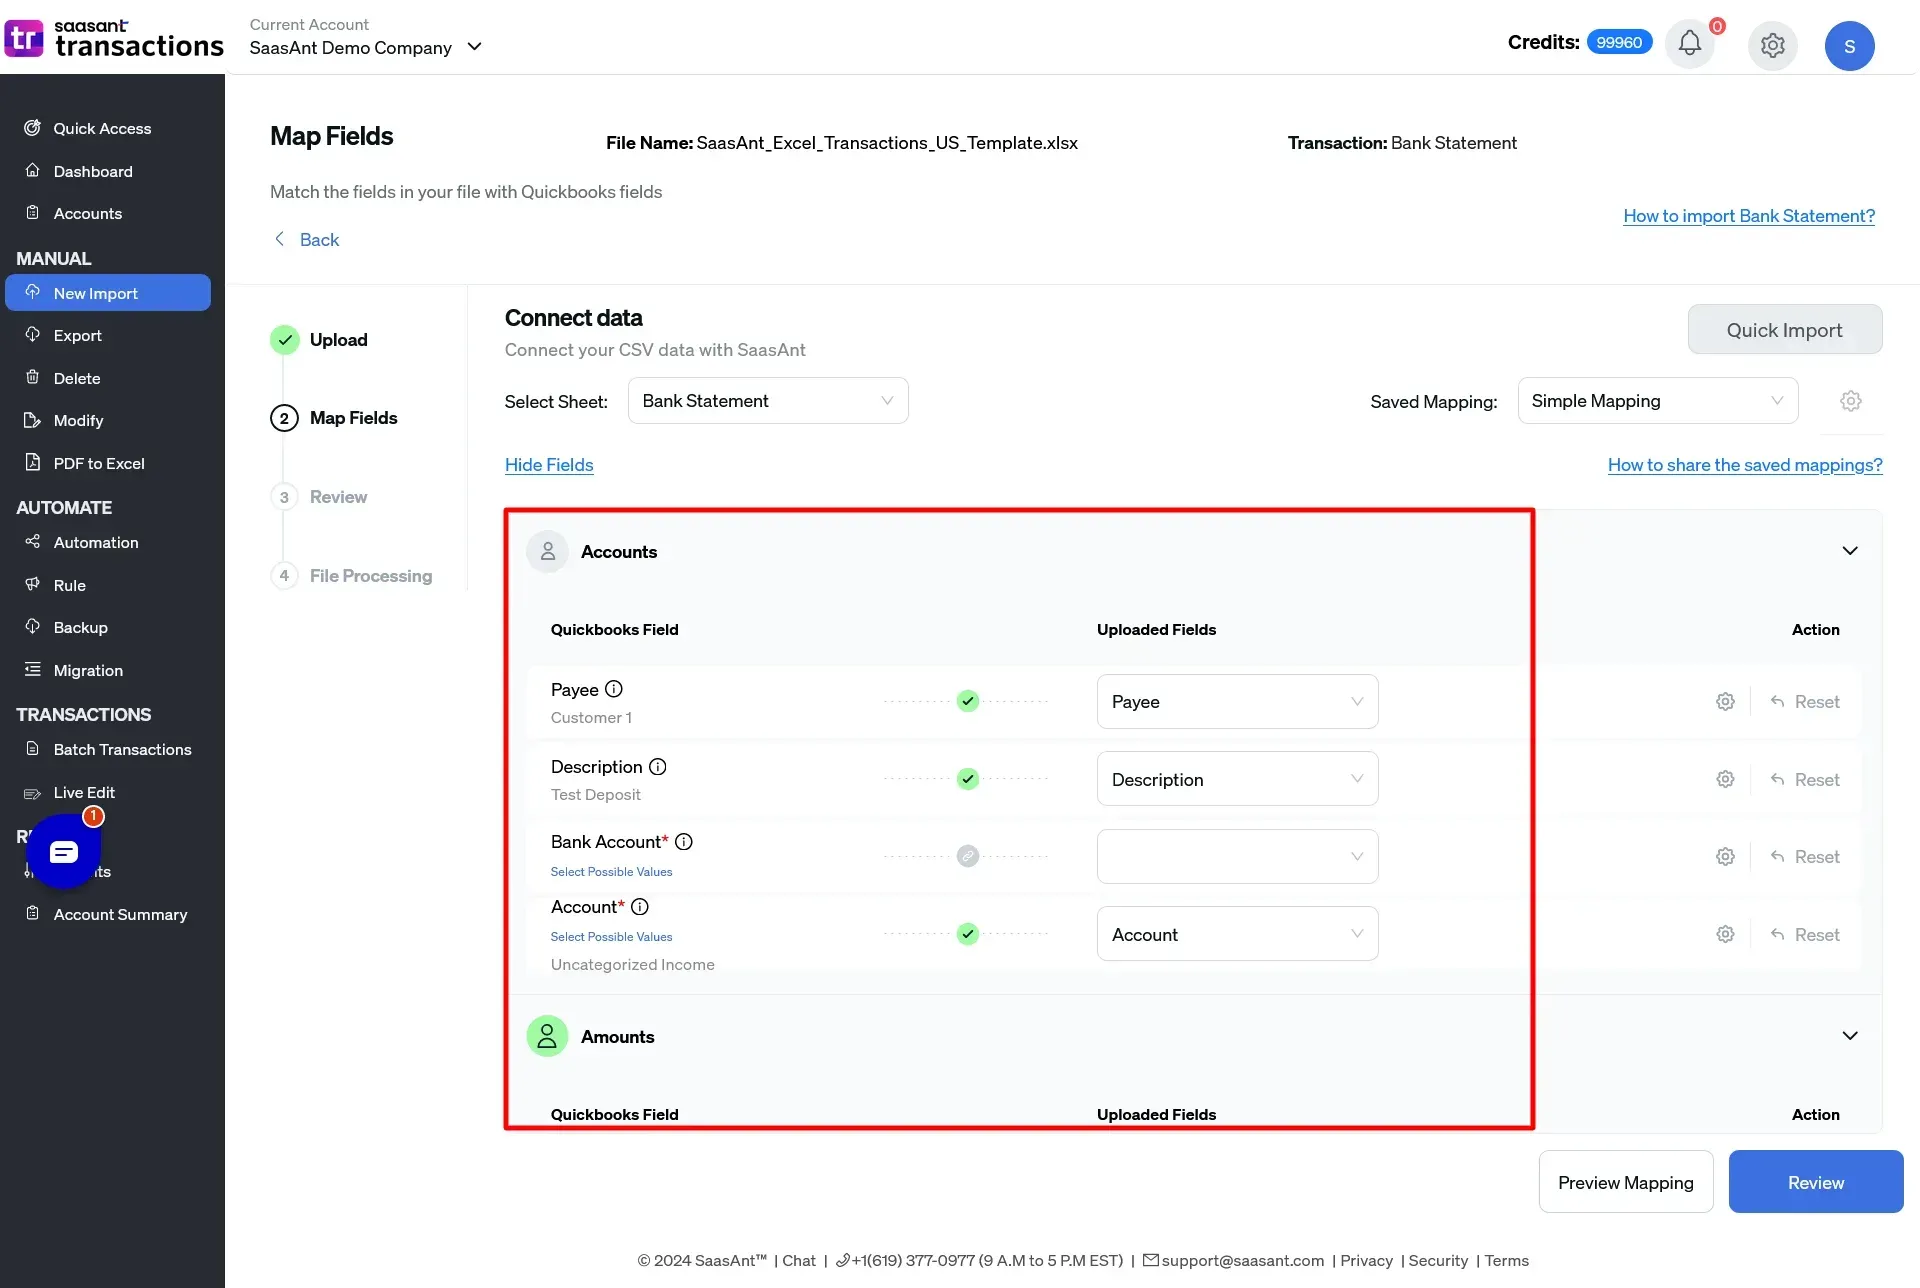
Step 5: Mapping
Matching your data accurately is another important step in the import process. In this step, you align your bank transaction details with the corresponding fields in QuickBooks. This ensures that every single data goes into the right place, like amounts in the amount field, dates in the date field, and so on. Correct mapping prevents errors in your financial records, making your accounts reliable and up-to-date.
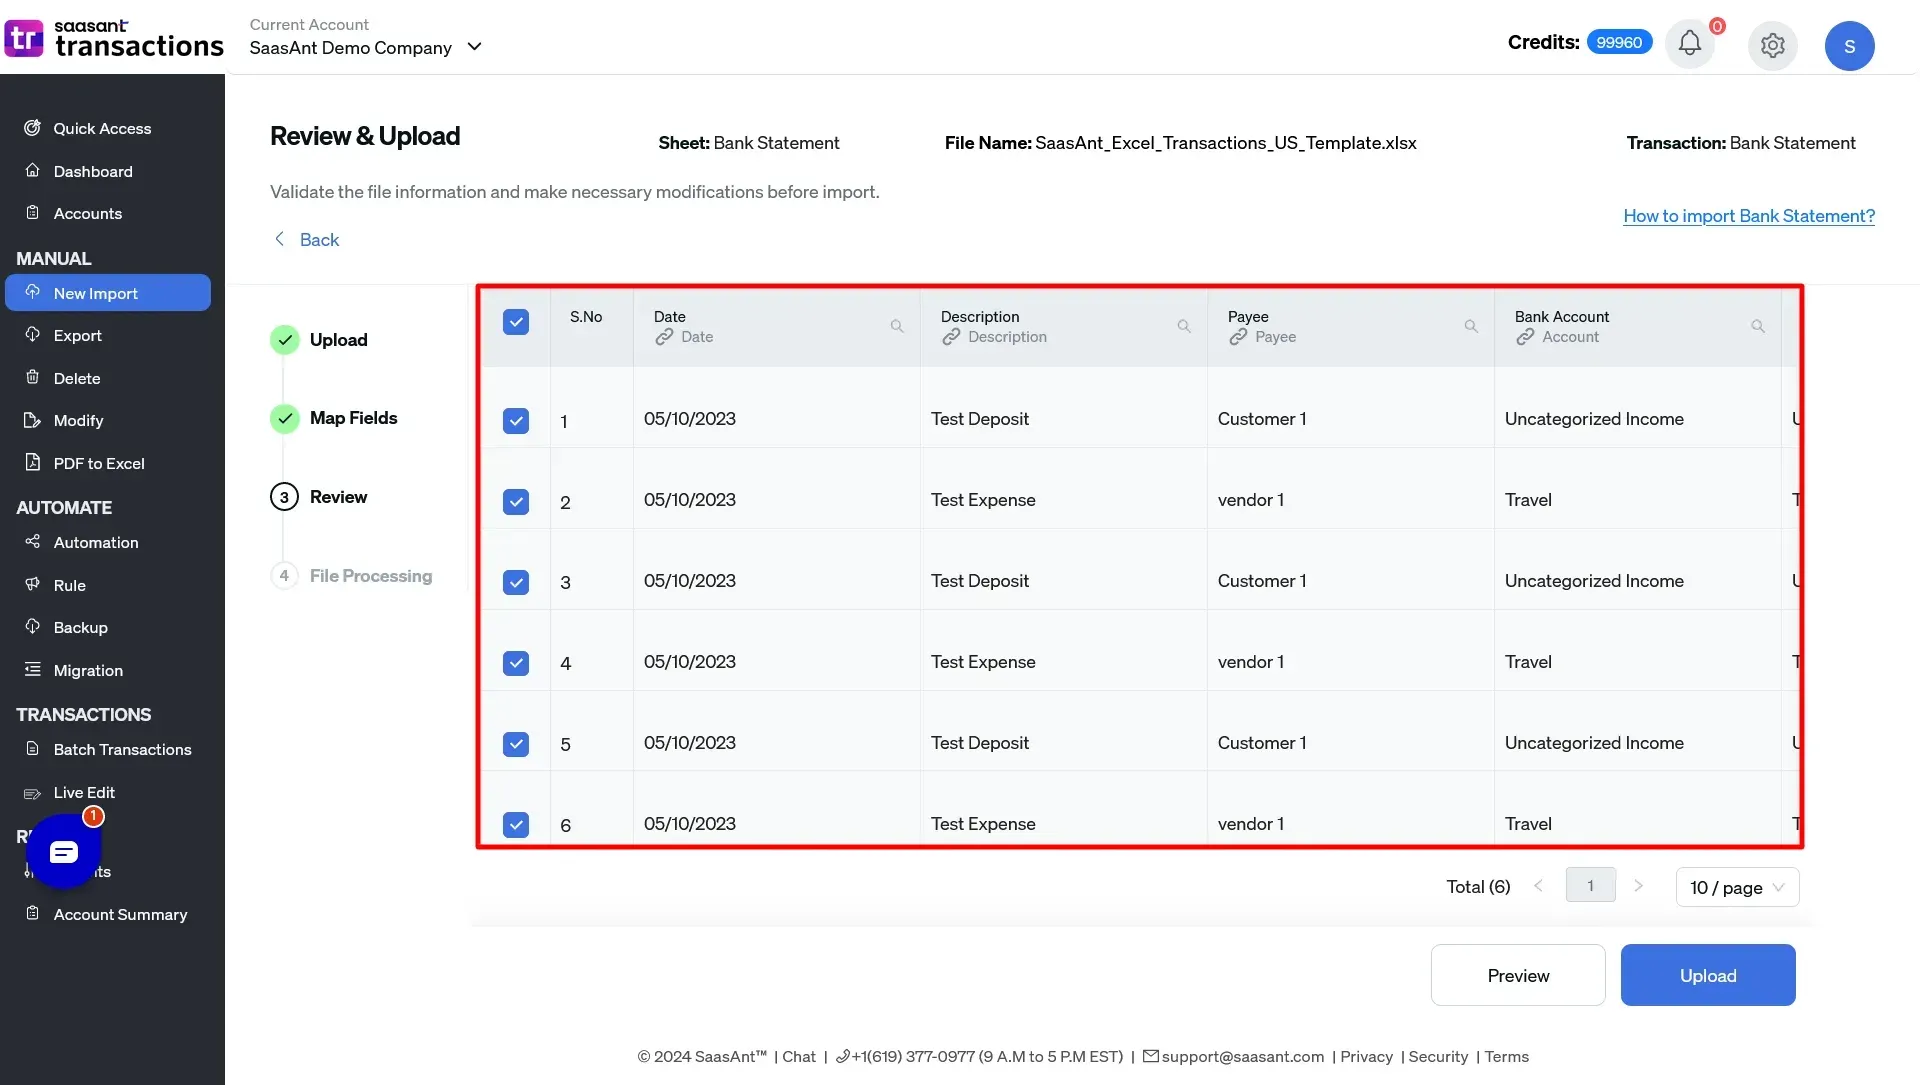
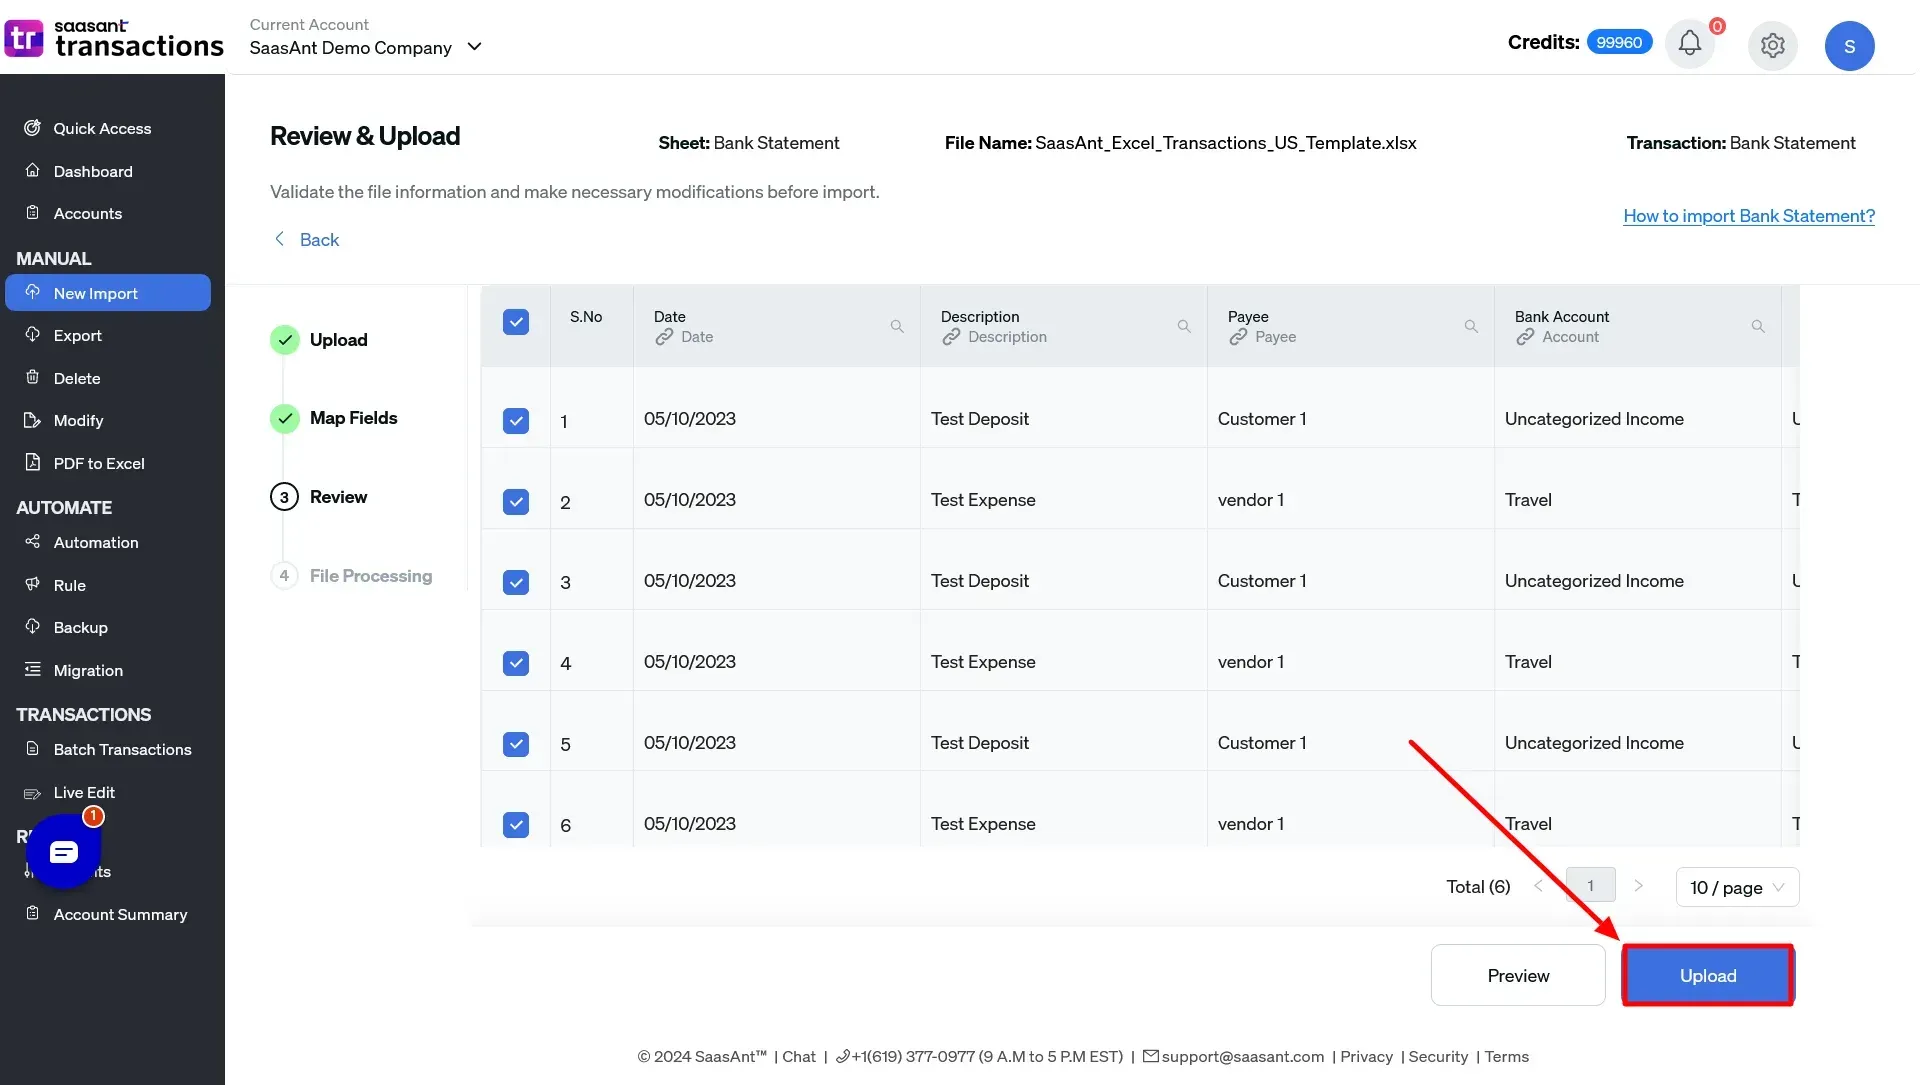
Step 6: Pre-import Data Review
It’s essential to review your data before finalizing the import. This pre-import review allows you to find any errors or mismatches in your data. Correcting these issues beforehand ensures that your financial records in QuickBooks will be accurate and trustworthy, saving you from the headaches of correcting errors later.
Step 7: Import to QuickBooks Online
When you click ‘Upload’, SaasAnt will import your transactions into QuickBooks. This step is where all your preparation pays off. The data you've prepared and reviewed is now transferred into your QuickBooks account, updating your financial records with the latest transactions from your bank.
Step 8: Verify the Imports
After importing, it's crucial to confirm that all your transactions are correctly reflected in QuickBooks. This verification ensures that your financial data is accurate and complete. If you spot any issues, SaasAnt usually offers ways to revert the import or correct specific errors, maintaining the integrity of your financial data.
Why Should You Import Bank Transactions into QuickBooks Online?
Bringing your bank transactions into QuickBooks Online offers various advantages for businesses and individuals.
Time-saving and Error Reduction:
Syncing easily with your bank, QuickBooks Online eliminates the need for manual data entry, saving precious time and reducing the risk of human error. This ensures the accuracy of your financial records, enhancing efficiency.
Enhanced Financial Insights:
Importing bank transactions provides a comprehensive overview of your finances, enabling better-informed decision-making. It simplifies the reconciliation process, making it easier to match transactions and maintain an accurate view of your company's financial well-being.
Efficiency and Accuracy Boost:
Integrating bank transactions into QuickBooks Online enhances both efficiency and accuracy in financial management. By automating transaction importation, you can effortlessly categorize and reconcile transactions, gaining real-time insights into your business’s financial health.
Precise Record-keeping:
Importing bank transactions into QuickBooks Online ensures the upkeep of precise and up-to-date financial records, crucial for informed decision-making and regulatory compliance. It streamlines income and expense categorization, facilitating financial transparency.
Simplified Account Reconciliation:
Importing bank transactions into QuickBooks Online simplifies the account reconciliation process, enabling efficient financial management and analysis. By eliminating manual data entry, it reduces the risk of errors and provides a real-time view of your financial status.
Conclusion
With SaasAnt Transactions, you can automate importing bank transactions into QuickBooks. The application integrates seamlessly with tools like Zapier and FTP, enabling users to automate the import process effortlessly. Additionally, SaasAnt Transactions offers white-glove onboarding assistance, helping you simplify the importing process quickly.
Check out our detailed guide on import bank transactions into QuickBooks Desktop for more insights.
Frequently Asked Questions
How do I export bank transactions from QuickBooks Online?
Follow these steps to export your bank transactions from QuickBooks Online:
Log in to QuickBooks Online.
Go to Banking or Transactions and select the bank account.
Set the date range for the transactions.
Click the Gear Icon and choose Export to Excel/CSV.
Download and save the file.
Can I automate the import process?
You can automate the import process using the SaasAnt Transactions application. This application can process various file formats like Image, Excel, CSV, PDF and IIF, seamlessly integrating with QuickBooks and with a single-click import, thereby reducing manual data entry and ensuring accuracy.
How to Import Old Bank Transactions into QuickBooks Online Using SaasAnt Transactions?
Open SaasAnt Transactions and connect to your QuickBooks Online account.
Navigate to the Import screen, click the 'Import' button, then choose 'Bank' as the import type.
Select the bank account in QuickBooks where you want to import transactions.
Map the fields in your imported file to the appropriate fields in QuickBooks.
Preview the imported bank transactions.
Click the 'Send to QuickBooks' button to start the import process.
Read also
How to Upload Bank Statements to QuickBooks Online: A Comprehensive Guide
How to Import Transactions into QuickBooks from Excel
Accounting Automation with SaasAnt Transactions: Streamline Your Financial Processes
How to Download Bank Statements into QuickBooks Online