How to import invoices into QuickBooks Desktop

February 13, 2025

Syncing invoices from a file or report to QuickBooks can be challenging for an accountant or business owner. Consider the scenario where you must transfer existing invoices from your current company's QuickBooks account to the new franchise. You often have to generate and handle numerous invoices during seasonal sales. Manually transferring bulk invoices into QuickBooks Desktop can be daunting in such instances.  

SaasAnt Transactions Desktop is a practical application to help you overcome these challenges. With SaasAnt Transactions, you can effortlessly import invoices into QuickBooks Desktop in various formats while benefiting from automated processes. This automation application saves you valuable time and ensures accurate record-keeping, eliminating the risk of manual data-entry errors.

This guide will walk you through using SaasAnt Transactions to simplify importing invoices into QuickBooks Desktop. Let's start making your invoicing easier and saving you time to focus on growing your business.

Simplify your accounting today. Import invoices with SaasAnt Transactions - fast, accurate, and hassle-free. Try Today!

How to Import Invoices into QuickBooks Desktop: Quick Instructions

For users looking for a swift start, follow these simple steps to import your invoices into QuickBooks Desktop:

  • Log in to your QuickBooks Desktop account.

  • Download and install the 'SaasAnt Transactions' application.

  • Connect SaasAnt Transactions with your QuickBooks Desktop account.

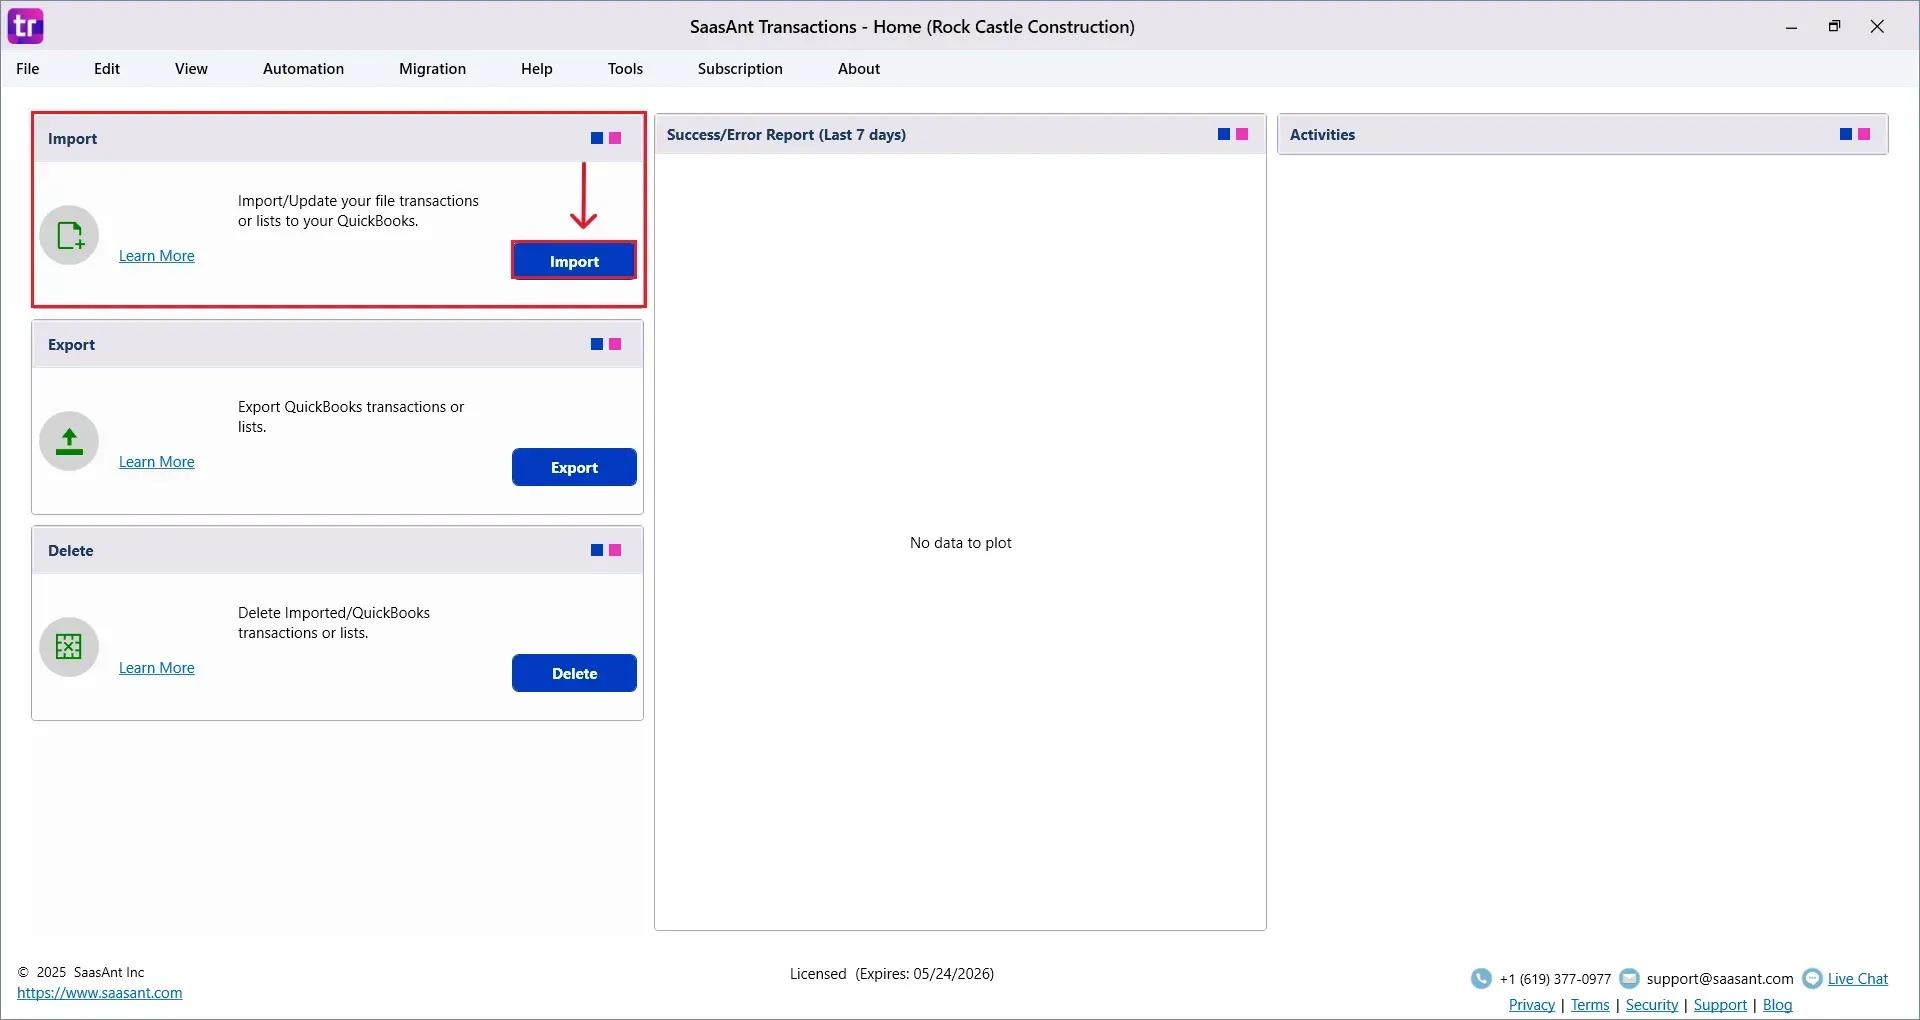
  • Click 'Import' to start the invoice import process.

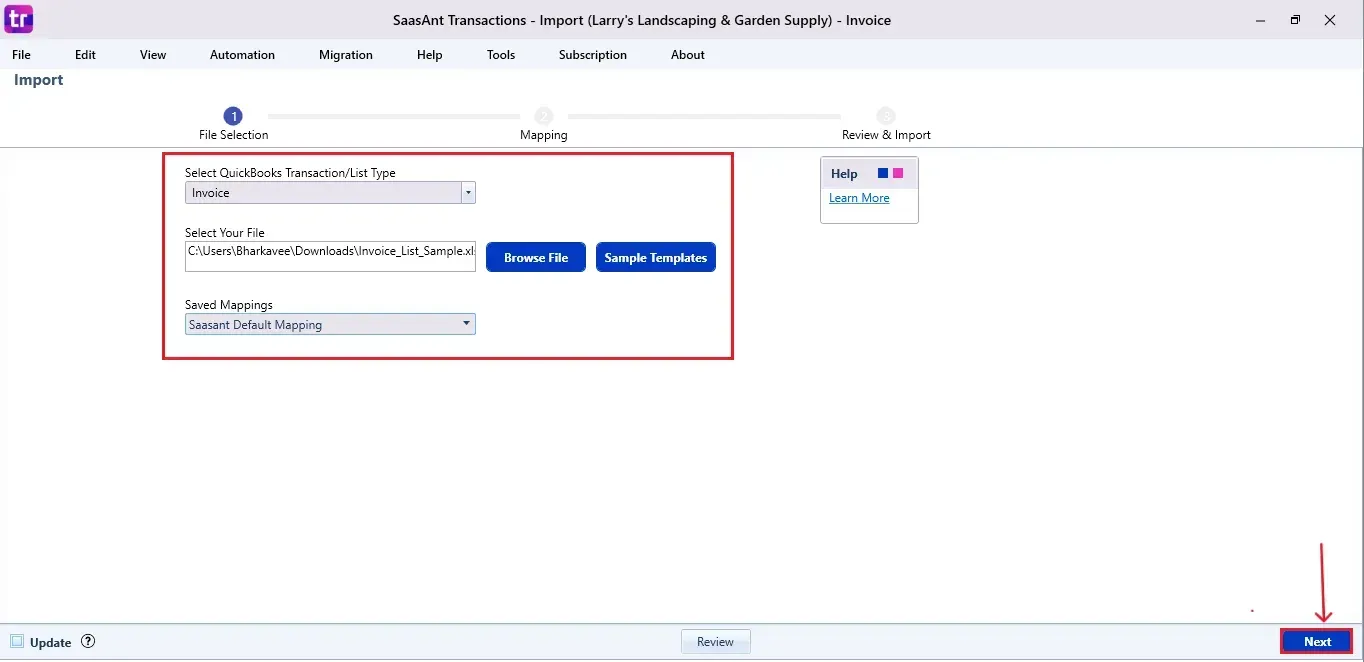
  • Upload your invoice file (supports various formats, including Excel, CSV, and IIF).

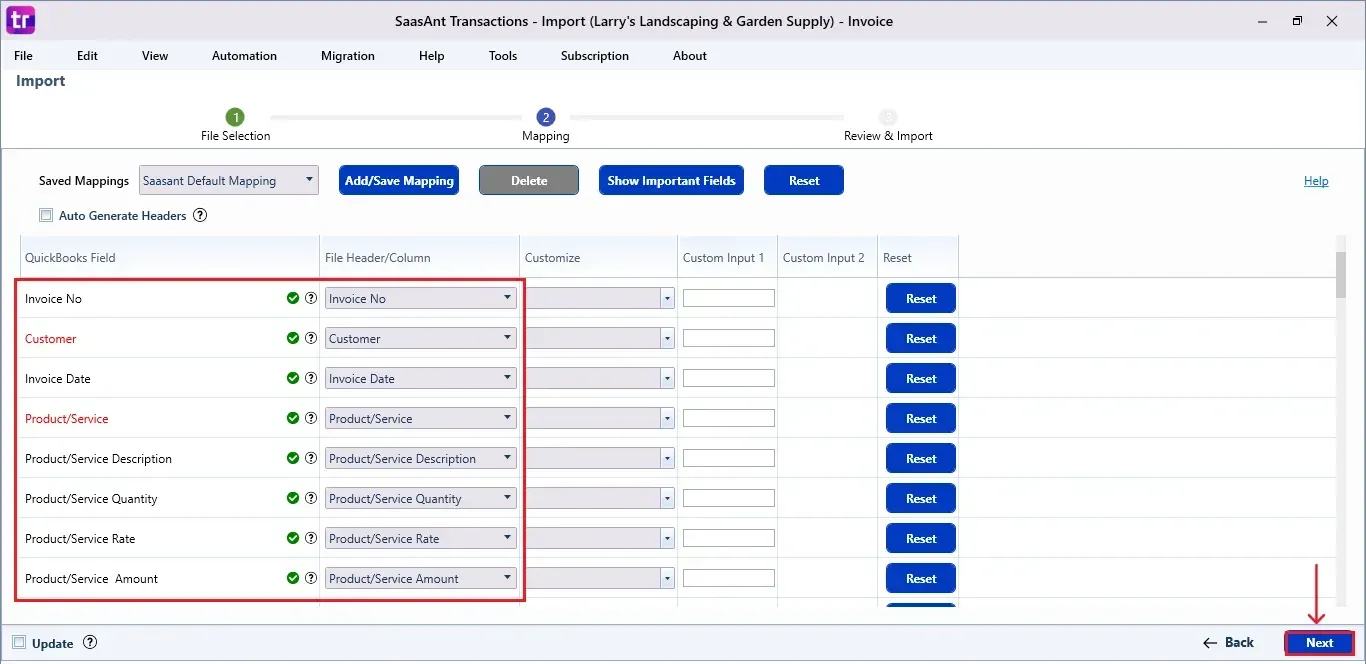
  • Ensure proper alignment of fields in your file with QuickBooks fields on the mapping screen.

  • Review the mapping for accuracy and start the import.

  • Validate the imported data in QuickBooks Desktop to ensure precision.

Import invoices into QuickBooks Desktop: Step-by-Step Guide

Before you start, ensure you have installed your PC's latest version of SaasAnt Transactions. If not, visit SaasAnt Transactions to download & install the software before we learn how to import invoices in QuickBooks Desktop. 

Step 1: Preparing Your Invoice Data for Import

Ensure your invoice data is ready in a compatible format, such as Excel, CSV, or IIF. The SaasAnt Transactions Sample Template is available to help you map your data fields correctly, avoiding issues during the import process.

Step 2: Setting Up the SaasAnt Transactions

To install and activate the free trial of SaasAnt Transactions Desktop, first download the latest version by clicking on the free trial. Run the "SaasAntTransactions-Setup.exe" file with administrative privileges, accept the license agreement, choose your installation path, and complete the setup.

After installation, launch the application, navigate to Subscription > Register, and enter the license key provided in your confirmation email to activate the software. Ensure your computer has an active internet connection during this process.

Once QuickBooks Desktop is connected with SaasAnt Transactions, you can import invoices efficiently into QuickBooks Desktop.

Step 3: Uploading Your Invoice File

Open the SaasAnt Transactions application. Initiate an import in the SaasAnt Transactions:

  • Click ‘Import’ to start uploading your invoice file.

  • Choose 'Invoice' as the transaction type.

  • Use the ‘Browse’ option to select and upload your file in a supported format.

Step 4: Successfully Mapping Your Invoice Data Fields

Now, you'll be mapping the fields from your file to the corresponding fields in QuickBooks Desktop. For additional assistance, refer to the comprehensive guides on the SaasAnt support portal.

Step 5: Reviewing Your Data Before Final Import

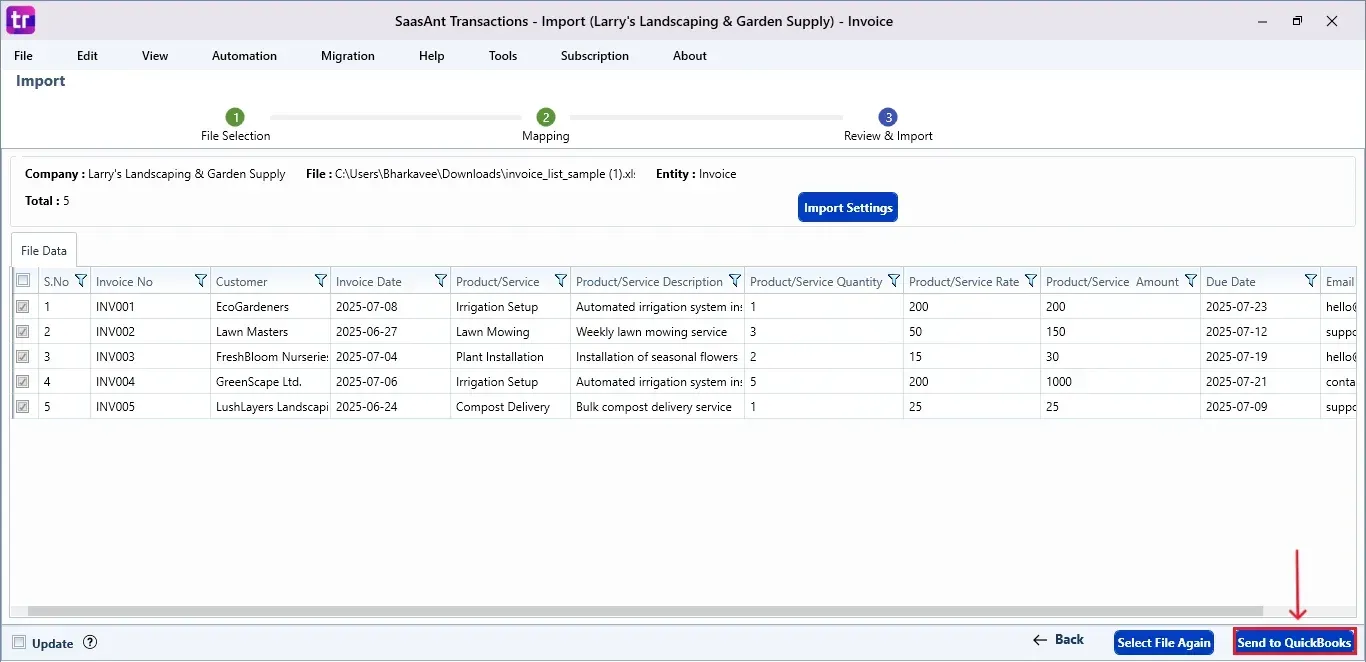
Review the data mapped to avoid mistakes and ensure the accurate alignment of all details. SaasAnt Transactions aids in easy data review and corrections, helping you identify errors and help you resolve them.

Step 6: Completing the Import Process

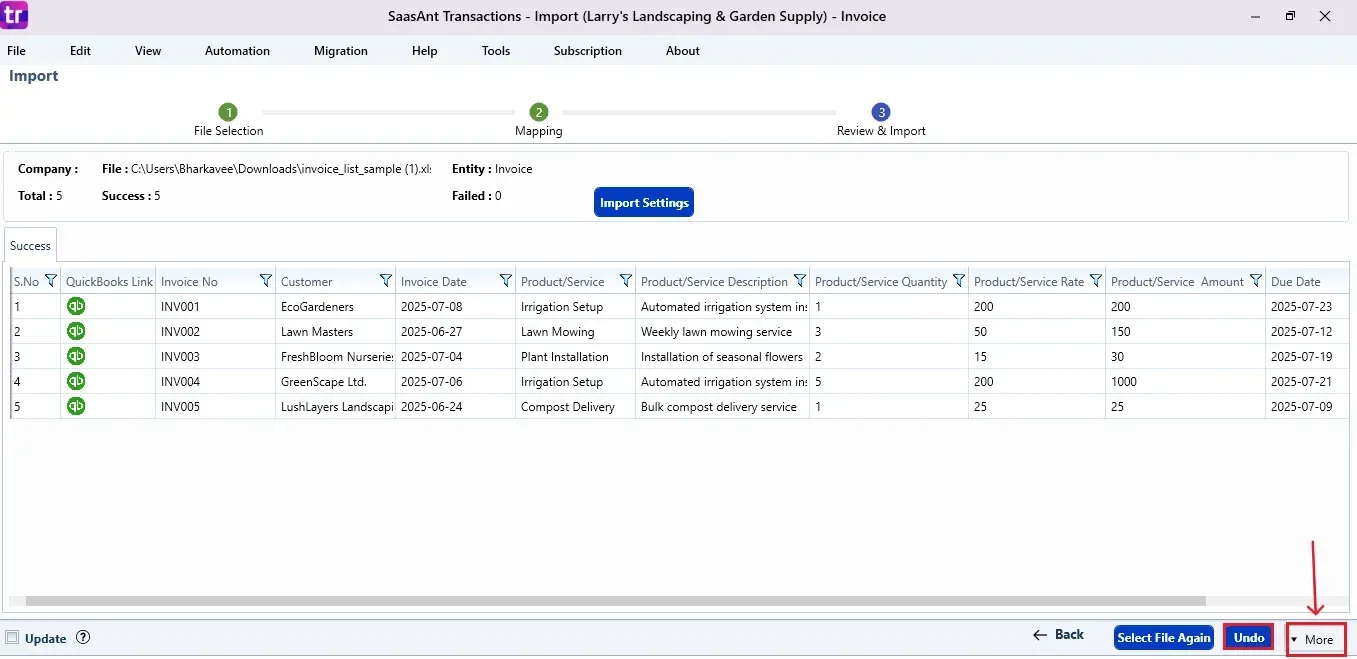
Upon confirming the data's accuracy, click ‘Import’ in the SaasAnt Transactions to initiate the seamless import of your invoice data into QuickBooks Desktop, organizing your invoices effectively.

Step 7: Verifying the Imported Invoices

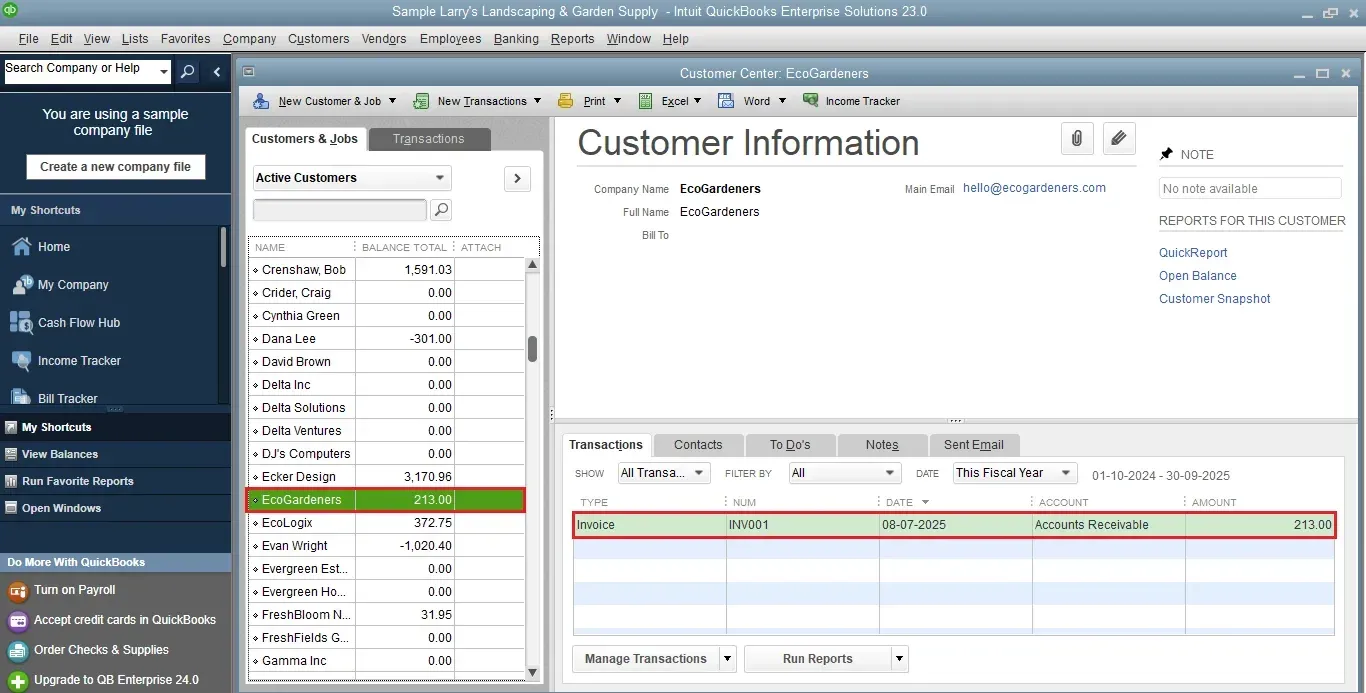
After importing, verifying the data's correct integration into QuickBooks Desktop is vital. Navigate through QuickBooks's ‘Reports’ section to check the imported invoices, ensuring accuracy. Alternatively, click on the QB icon in each row to open the imported invoice in your QuickBooks company to validate the accuracy of the import.

Simplify your accounting today. Import invoices with SaasAnt Transactions - fast, accurate, and hassle-free. Try Today!

Conclusion

Importing invoices into QuickBooks Desktop using SaasAnt Transactions is streamlined and can be automated for greater efficiency. The application offers white-glove onboarding assistance, helping you quickly kickstart your simplified invoicing process.

Check out our complete guide on Importing Invoices into QuickBooks Online for more insights.

FAQs

How do I import invoices into QuickBooks Desktop from Excel using SaasAnt Transactions?

  1. Download & install ‘SaasAnt Transactions Desktop’ and connect to your ‘QuickBooks account.’

  2. Click ‘Import’ and select the transaction type ‘Invoices.’

  3. Select your file and do the necessary mappings

  4. Review the mappings and click on ‘Send to QuickBooks.’

How can I import PDF invoices into QuickBooks desktop using SaasAnt Transactions?

  1. Download & install ‘SaasAnt Transactions Desktop’ and connect to your ‘QuickBooks account.’

  2. Click on Tools, upload your PDF file, and convert it into Excel. 

  3. It will now be saved as a local folder.

  4. Now, click ‘Import’ and select the transaction type as ‘Invoices.’

  5. Select your file and do the necessary mappings

  6. Review the mappings and click on ‘Send to QuickBooks.’

What do I do if I face problems while importing invoices?

  • Double-check your import file for formatting errors, such as missing or incorrect columns.

  • Ensure that the data in your import file aligns with the data fields in QuickBooks.

  • Check for any error messages or logs generated during the import process to identify specific issues.

How do I ensure the correct data goes to the right place during import?

  • Map the headers in your import file to the corresponding data fields in QuickBooks during the import process.

  • Carefully review the mapping to ensure each piece of information (e.g., customer name, product description) is correctly aligned.

  • Review the import data before finalizing the process to catch any discrepancies.

How can I transfer invoice data when creating a new company setup in QuickBooks?

Transitioning to a new company set up in QuickBooks Desktop is hassle-free with SaasAnt. Export your invoices from the existing company in formats like XLS, XLSX, or CSV, and then import them into the new company using SaasAnt Transactions, ensuring a seamless data migration process. SaasAnt Transactions provides a smooth export & import data transition for your new company setup.

What's the process to check and review my imported invoice data?

After importing invoices:

  • Generate reports or lists of the imported invoices to review the data in QuickBooks.

  • Cross-check a sample of imported invoices with your original data to verify accuracy.

  • Perform a reconciliation between your imported invoice data and your original records.

  • Address any discrepancies or errors promptly to maintain accurate financial records.

Can I incorporate data from other software into QuickBooks Desktop?

Absolutely, data from other software can be imported into QuickBooks Desktop using SaasAnt Transactions. This application allows effortless data import from different software into QuickBooks, ensuring a smooth transition and a straightforward import process. 

How to Export Invoices from QuickBooks Desktop?

Follow these steps to export invoices using SaasAnt Transactions:

  • Sign In: Access SaasAnt Transactions with your login details.

  • Start Export: Go to “Export” > “Invoices.”

  • Apply Filters: Set date, customer, or other filters as needed.

  • Choose Format: Select CSV or Excel and customize fields for export.

  • Download File: Start the export and save the file to your system.

How to Delete Invoices in QuickBooks Desktop?

To delete invoices in QuickBooks Desktop using SaasAnt Transactions:

  • Log In: Connect SaasAnt Transactions to QuickBooks Desktop.

  • Navigate to Delete Section: Select “Delete” > “Initiate Clean Up.”

  • Select Invoices: Search by filters such as date or customer.

  • Confirm Deletion: Click “OK” to permanently delete the selected invoices.

How to Import Invoices into QuickBooks Online?

To import invoices into QuickBooks Online using SaasAnt Transactions:

  • Log In: Access SaasAnt Transactions with your QuickBooks credentials.

  • Go to Import Section: Select “Import” > “Invoices.”

  • Prepare File: Ensure your file is in CSV or Excel format with all necessary invoice details.

  • Map Fields: Match your file columns to the appropriate QuickBooks fields.

  • Validate and Import: Review for errors, fix any issues and complete the import process.

How to Import PDF Invoices into QuickBooks Online?

To import PDF invoices into QuickBooks Online using SaasAnt Transactions:

  • Convert PDF to Excel/CSV: Use a reliable tool to convert PDF invoices to Excel or CSV format.

  • Log In to SaasAnt Transactions: Access your account with QuickBooks credentials.

  • Go to Import Section: Select “Import” > “Invoices.”

  • Map Fields: Ensure the file columns match QuickBooks fields correctly.

  • Validate and Import: Check for errors, correct them, and complete the import.

How to Import Invoices into QuickBooks Enterprise?

Follow these steps to import invoices into QuickBooks Enterprise using SaasAnt Transactions:

  • Log In: Open SaasAnt Transactions and sign in.

  • Choose QuickBooks Enterprise: Connect your Enterprise account.

  • Go to Import Section: Select “Import” > “Invoices.”

  • Upload File: Ensure the invoice file is in CSV or Excel format.

  • Map Fields: Match file columns to QuickBooks Enterprise fields.

  • Validate and Import: Review for errors and complete the import.

How to Import Sales Invoices into QuickBooks Online?

To import sales invoices into QuickBooks Online using SaasAnt Transactions:

  • Log In: Access SaasAnt Transactions with your QuickBooks credentials.

  • Navigate to Import Section: Select “Import” > “Invoices.”

  • Prepare File: Ensure your sales invoice data file is in Excel or CSV format.

  • Map Fields: Align your file columns with the correct QuickBooks fields.

  • Validate and Import: Correct any errors and complete the process.

Tags

Import invoices

Import invoices into QuickBooks

Scale Your Bookkeeping

Download the guide to scale and streamline your bookkeeping business.

Automated data Import / Export to QuickBooks Online
Say goodbye to the hassle of managing transactions manually
Grow exponential with Clear Financial Visibility