Import Sales Receipts into QuickBooks Online

Importing sales receipts into QuickBooks Online (QBO) is a crucial step for maintaining accurate financial records and streamlining accounting processes. This guide will walk you through the essential steps to efficiently import sales receipts using SaasAnt Transactions. By following these procedures, you can ensure data accuracy, minimize errors, and enhance your financial management practices in QuickBooks Online.
Contents
Import Sales Receipts into QuickBooks Online: Quick Instructions
Getting Started
Import Sales Receipts into QuickBooks Online: Step by Step Guide
Wrap Up
FAQs
Import Sales Receipts into QuickBooks Online: Quick Instructions
For a quick start, follow the given steps to import sales receipts into QuickBooks Online:
Connect SaasAnt Transactions to QuickBooks Online.
Upload your sales receipts file (PDF, Images (PNG/ JPEG), Excel, CSV, or IIF formats supported).
Review and initiate the sales receipts import process.
To undo or rollback the import, click the ‘Undo’ button.
Getting Started
With SaasAnt Transactions Online, you can easily import bulk sales receipts into QuickBooks Online. Also, the application syncs sales receipts seamlessly, updates inventory levels, and manages accounts receivable efficiently.
The application will help you with the sample template for easy data mapping, enhancing accuracy and efficiency. When importing sales receipts, even if you encounter any errors, SaasAnt Transactions will identify these errors and assist you in rectifying them.
Import Sales Receipts into QuickBooks Online: Step by Step Guide
Step 1: Preparing Your Sales Receipts Data for Import
Ensure your sales receipts data is prepared in a compatible format (PDF, Images (PNG/ JPEG), Excel, CSV, or IIF) and use the SaasAnt Transactions Sample Template to map data fields accurately and avoid import issues.
Step 2: Setting Up the SaasAnt Transactions
To connect SaasAnt Transactions to QuickBooks Online, open QuickBooks, go to the ‘Apps’ tab, locate SaasAnt Transactions, and click ‘Get app now’ to enable efficient sales receipt imports.
Step 3: Uploading Your Sales Receipts File
Open SaasAnt Transactions Online, click ‘New Import’, select 'Sales Receipts' as the transaction type, and use ‘Browse’ to upload your file in PDF, Images (PNG/ JPEG), Excel, CSV, or IIF format.
Step 4: Complete the Mapping
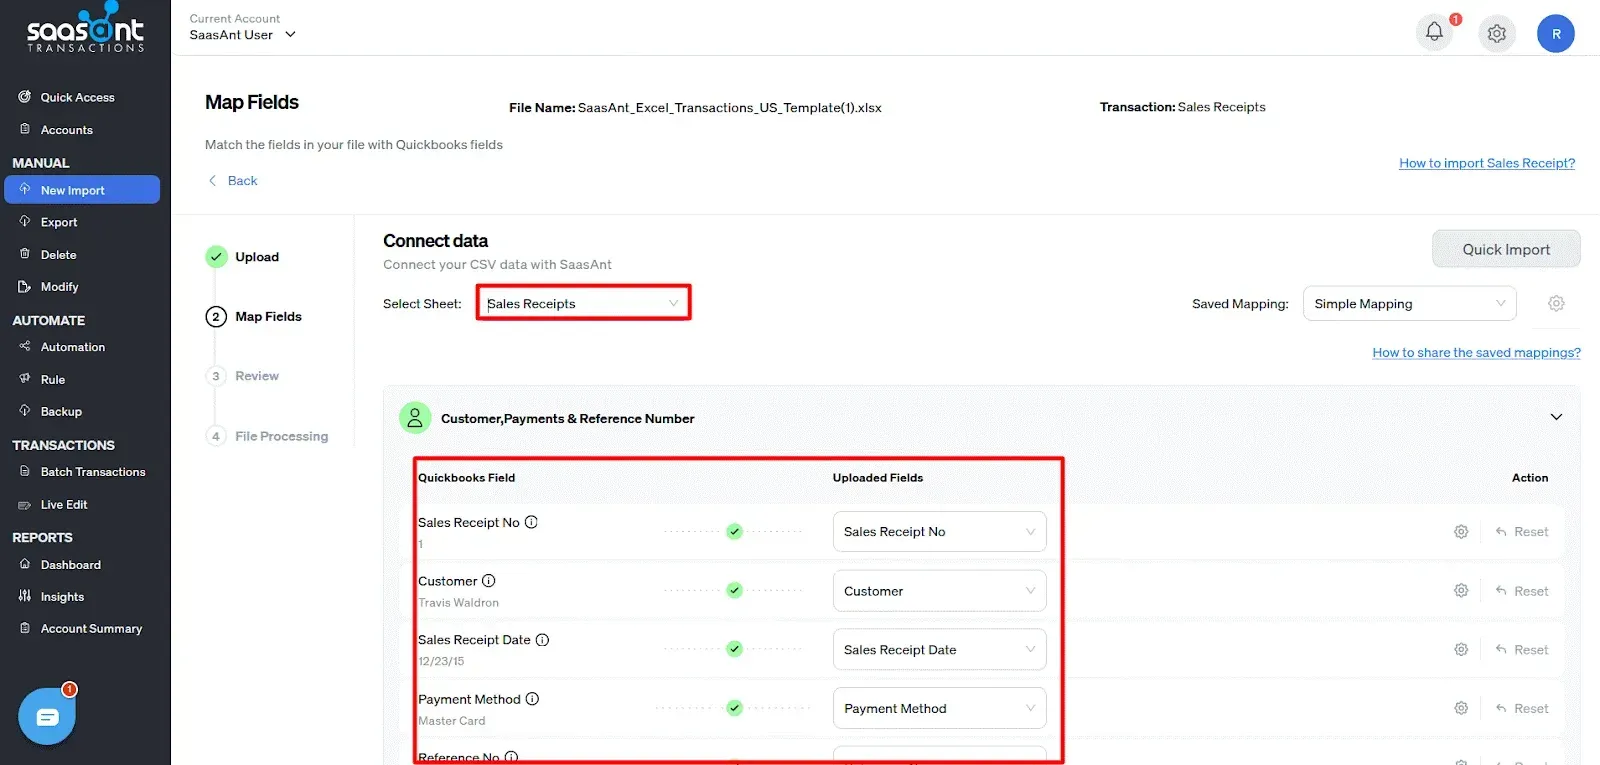
Next, map the fields from your file to the corresponding fields in QuickBooks Online. SaasAnt Transactions provides a user-friendly interface with a ‘Preview Mapping’ option to help prevent errors during import.

Step 5: Reviewing Your Data Before Final Import
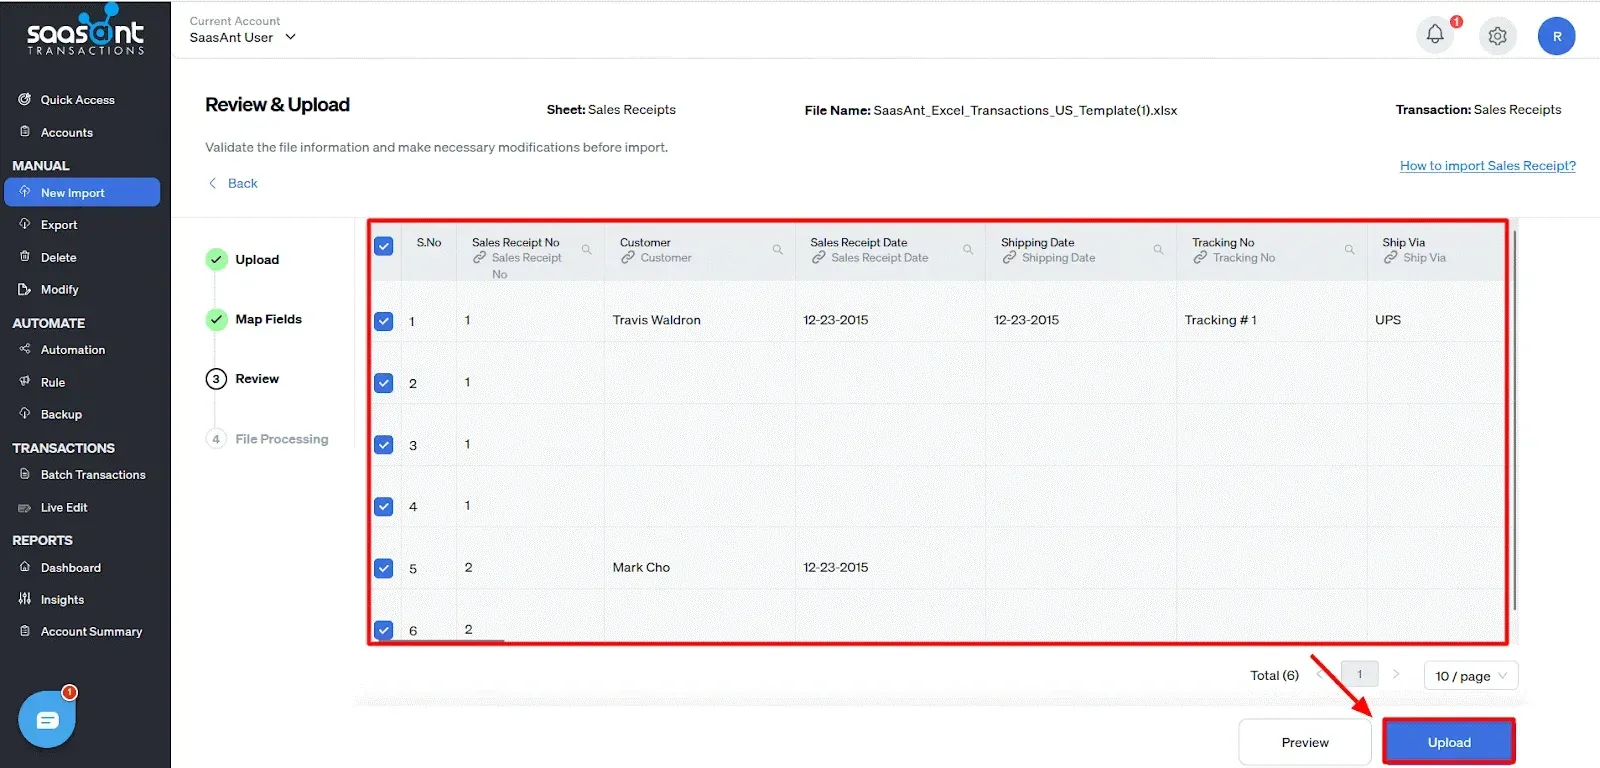
Review the imported data to ensure accuracy and proper alignment of details. SaasAnt Transactions facilitates easy data review and corrections, helping you identify and resolve any errors.

Step 6: Completing the Import Process
Once you have confirmed the data's accuracy, click ‘Upload’ to import your sales receipts data into QuickBooks Online.
Step 7: Verifying the Imported Sales Receipts
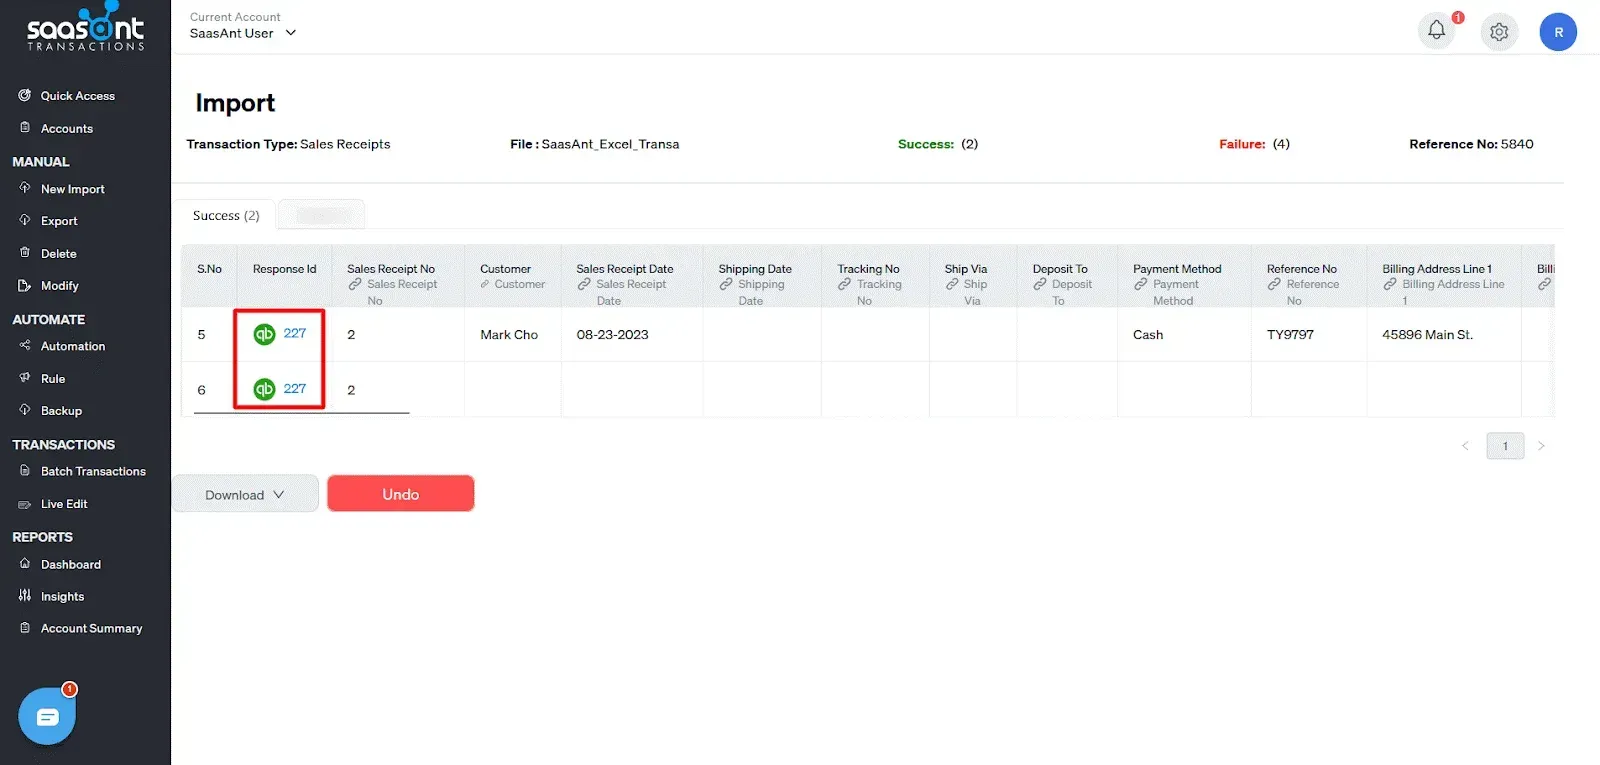
After importing, if successful, a QuickBooks Response ID will appear next to the S.No column. Click the ID to view the imported data in your QuickBooks account.

Step 8: Undo or Rollback Changes (if required)
If you believe the sales receipts were imported incorrectly, or if the imported receipts are no longer required, no need to worry. Our undo feature allows you to easily reverse the sales receipt import process, ensuring that your QuickBooks account returns to its previous state before the import. Click the ‘Undo’ button next to the ‘Download’ button to start reversing the changes made during the import.
Advantages of Utilizing SaasAnt Transactions
Cost-Efficient Operations: Reduce your expenses by using a budget-friendly solution to import sales receipts, making it accessible for businesses looking to manage costs effectively.
Accurate Financial Data: Ensure that your sales receipts are accurately recorded in QuickBooks by leveraging applications that identify and correct errors, enhancing the reliability of your financial information.
Efficient Workflow Automation: Save time and streamline your operations by automating the import of sales receipts. This reduces manual input and integrates seamlessly with your existing accounting processes.
Greater Data Control: Manage your sales receipts with ease. Efficiently handle the import, export, or deletion of records, allowing for greater flexibility and control over your financial data in QuickBooks.
Reliable Support for Smooth Operations: Access dedicated support to resolve any issues related to the import of sales receipts quickly, ensuring your accounting processes remain uninterrupted and effective.
Risk-Free Trial Experience: Explore the full capabilities of SaasAnt Transactions with a 30-day free trial, allowing you to assess how it meets your needs for importing sales receipts without any initial financial commitment.
Wrap Up
Importing sales receipts into QuickBooks Online streamlines financial management and ensures accurate record-keeping. Following the article's outlined steps, you can efficiently import sales receipts to QuickBooks Online using SaasAnt Transactions. This application saves time and ensures financial data accuracy and reliability.
FAQs
How to import sales receipts in QuickBooks?
To import sales receipts into QuickBooks Online using SaasAnt Transactions, connect your QuickBooks Online account to SaasAnt, upload a file containing the sales receipt data, map the fields to match QuickBooks, and proceed to import the data.
How do I edit a sales receipt in QuickBooks?
To edit sales receipts in QuickBooks online, go to QuickBooks dashboard -> sales -> all sales -> select sales receipts, and you will see the list. Click on the edit option next to the sales receipt you wish to edit.
Can I delete a sales receipt in QuickBooks?
Yes, you can delete a sales receipt in QuickBooks. Go to QuickBooks dashboard -> Sales -> All sales -> select sales receipt from the drop-down menu. The list of sales receipts will appear. Click on the more option to find the delete option.
How to Export Sales Receipts from QuickBooks?
You can export sales receipts from QuickBooks using SaasAnt Transactions. Integrate SaasAnt Transactions with QuickBooks -> select the entity as sales receipts to export -> search for sales receipts based on the created date or transaction date -> enter a date range. Select whether you want to download it in .XLSX or .CSV format.
Read also
How to Import Sales Receipts into QuickBooks Desktop?
How to Create a Sales Receipt in QuickBooks Online
Accounting Automation with SaasAnt Transactions: Streamline Your Financial Processes
Batch Upload Invoices to QuickBooks Online