How to Manage Sales Tax in QuickBooks Online: A Complete Guide
QuickBooks is a popular choice among small business owners and accountants like you — because you like to keep your accounting simple and accurate. But there’s one thing that can make accounting complicated and stressful: Sales tax.
Sales tax is the tax you collect from your customers when you sell them goods or services. It’s different from income tax, which is the tax you pay on your business income.
Sales tax rates and rules vary by state and local governments. Therefore, you need to know how much to charge your customers, how much to pay the government, and how to file your sales tax returns on time.
If you want to know more about sales tax and how to handle it, you can read this article. If you don’t manage your sales tax correctly, you may have to deal with fines, penalties, audits, and messy paperwork. That’s why we created this guide to help you manage your sales tax in QuickBooks Online. So let’s get started!
How to Set Up Sales Tax in QuickBooks Online
Sales tax: It’s one of those things you can’t ignore as a small business owner or an accountant. But don’t worry — QuickBooks Online has your back. It makes setting up sales tax a breeze, so you can get on with running your business.
Here’s how it works: First, you turn on sales tax in QuickBooks Online with a few clicks. Then, you add your tax rates and the government agencies you need to pay. And that’s it!
QuickBooks Online will automatically apply sales tax to your invoices and transactions based on your and your customers' locations. But wait, there’s more: QuickBooks Online also keeps track of your sales and taxes for each state or jurisdiction you do business in. You can see what you owe at a glance and pay your tax liabilities on time. No more headaches or surprises!
To set up sales tax in QuickBooks Online, you need to follow these steps:
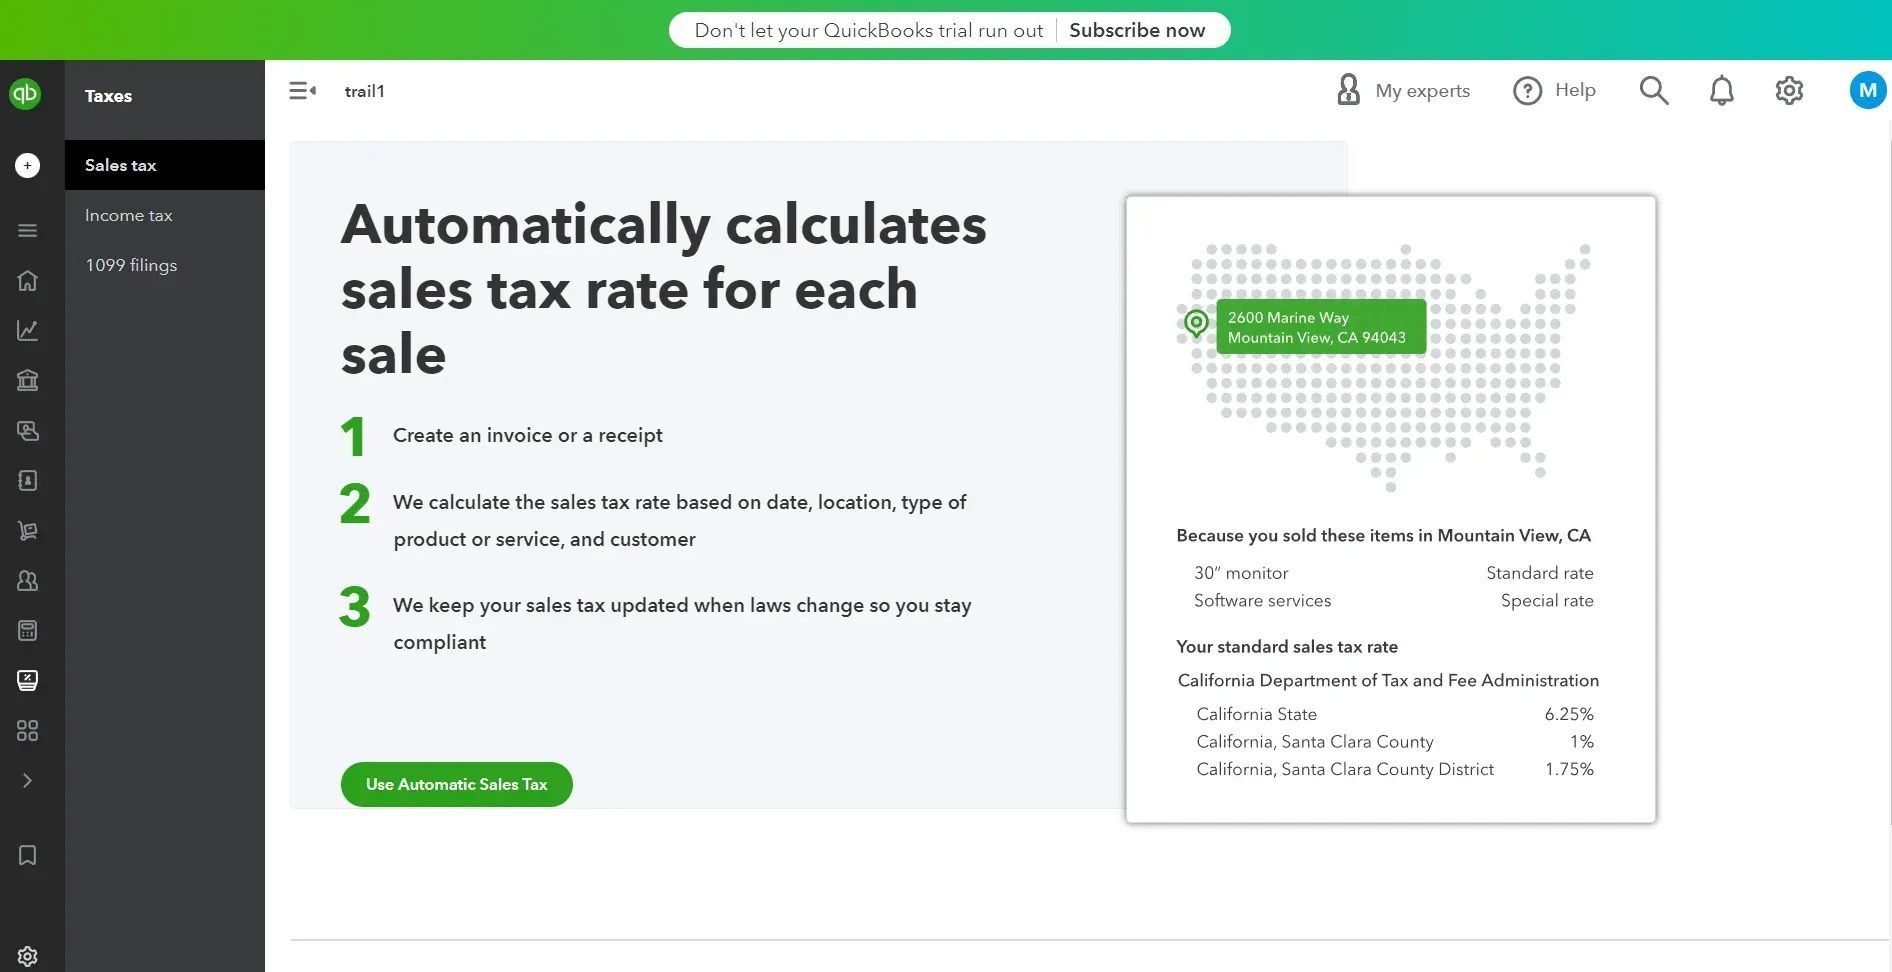
How to Enable Sales Tax in QuickBooks Online
Select Taxes on the left side menu bar.
Click on Sales Tax to go to the automatic sales tax setup wizard
Click on ‘Use Automatic Sales Tax’
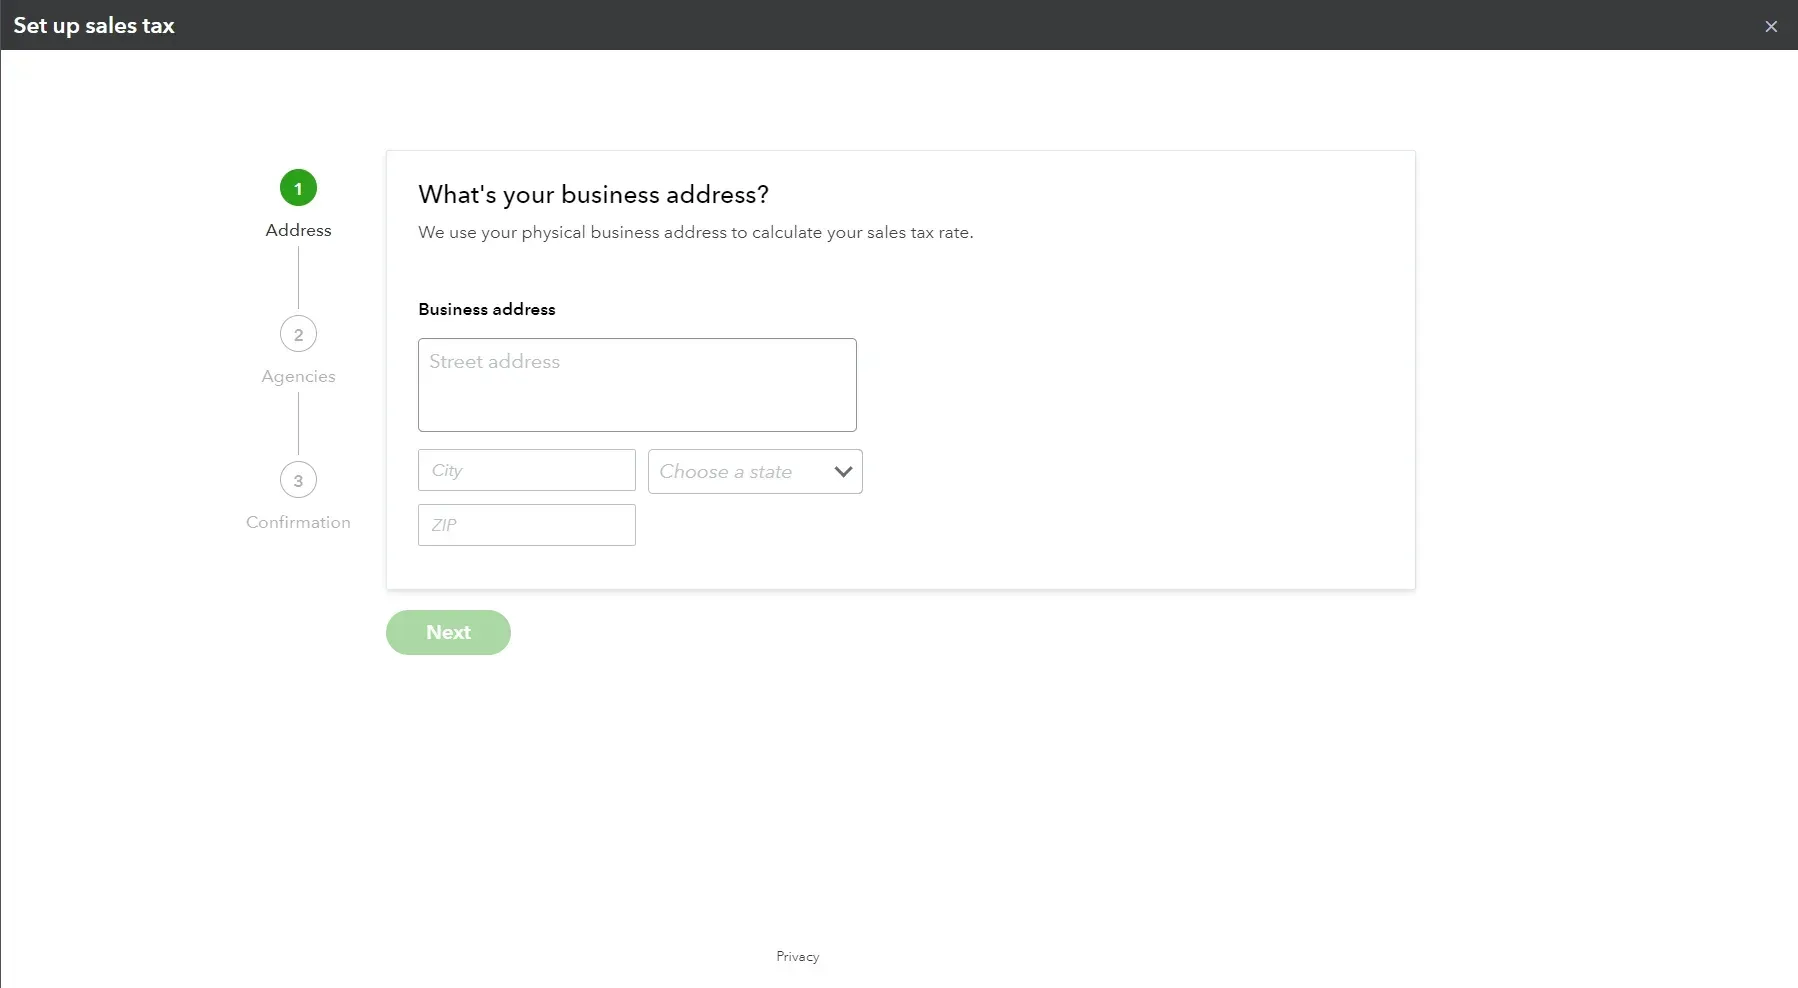
Fill in your business details.
If you are selling your products or services to customers in multiple locations, you need to enable the option to collect sales tax outside your state.
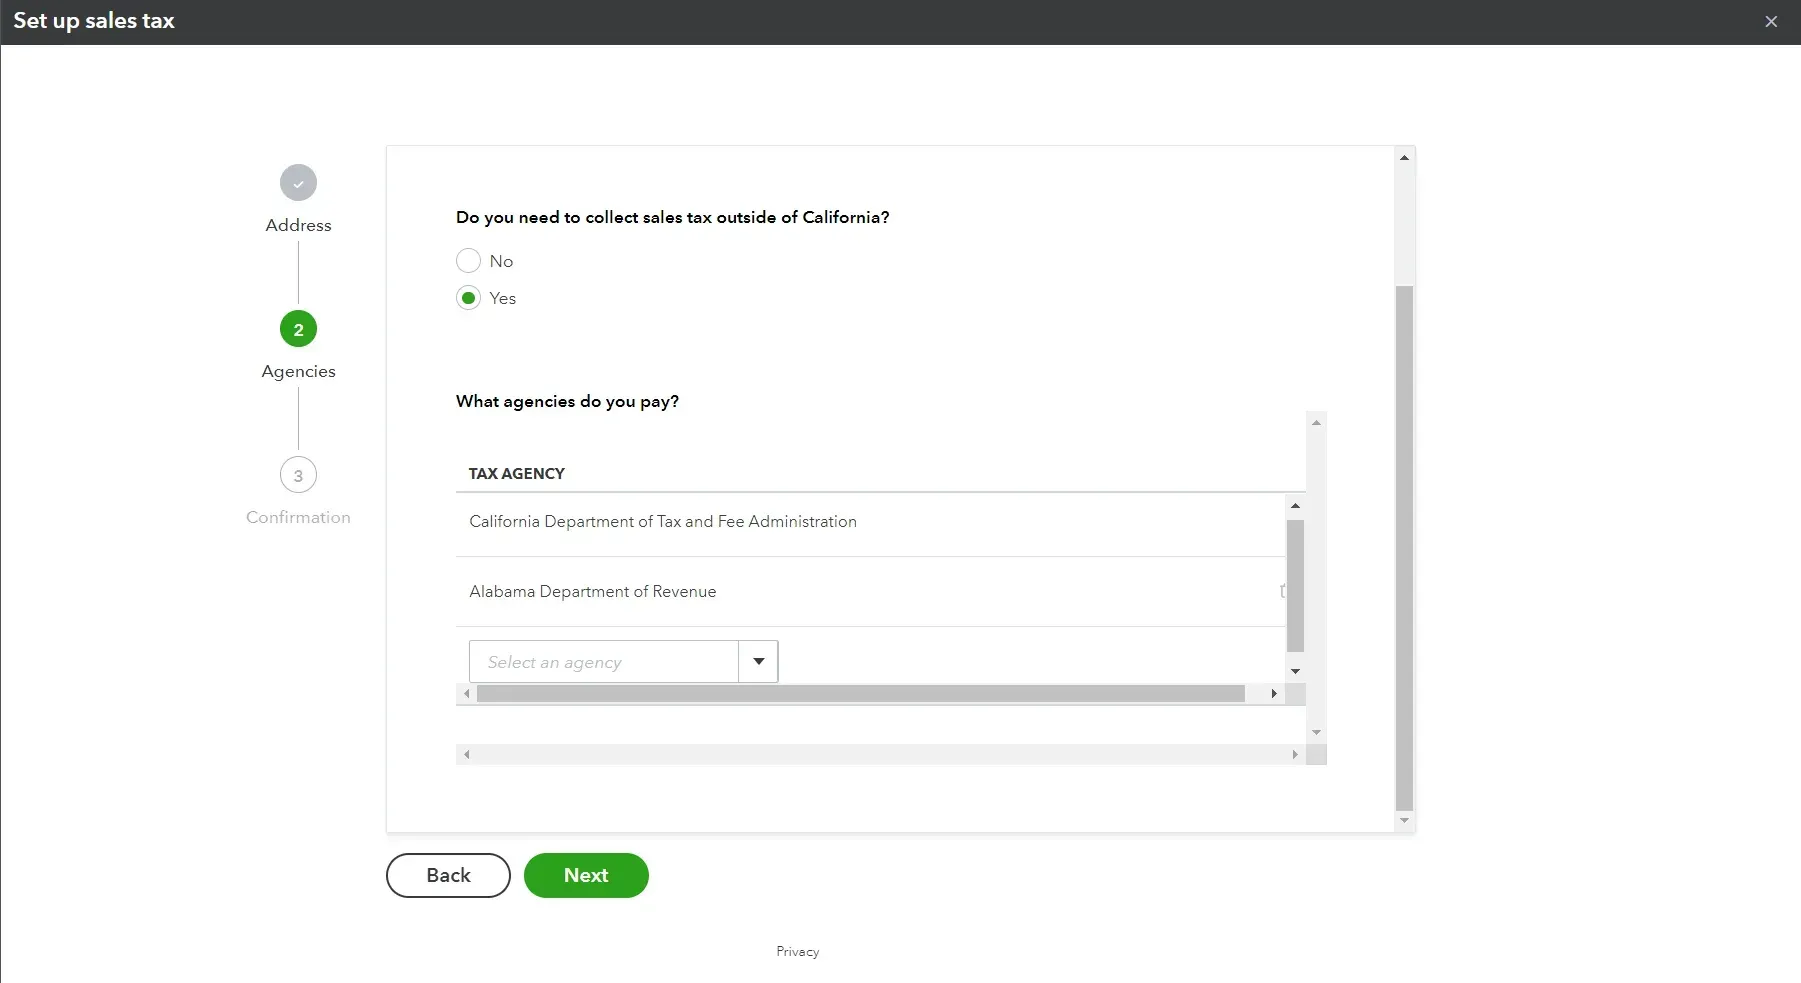
You can add as many tax agencies as you need based on your sales.
Automatic sales tax is now set up.
Click Next again and close the window or create an invoice.
Choose how often you file sales tax for each location and save your settings.
Now that you have enabled Automatic Sales Tax, QuickBooks will automatically add the tax to invoices or other transactions of your choice. You can follow the upcoming steps if you want to add another tax agency and rate.
How to Add a Tax Agency and Rate in QuickBooks Online
If you need to collect sales tax from multiple agencies, you can easily add them to QuickBooks.
First, go to Taxes and click on Sales. This will show you all your sales transactions and how much sales tax you owe.
Next, click on Sales Tax Settings. This is where you can manage your sales tax settings and preferences.

Then, click on ‘Add agency.’ This will let you add a new tax agency and set up how often you need to file sales tax with them.

Choose the agency from the list or type in the name. You can also select the state or city where the agency is located.
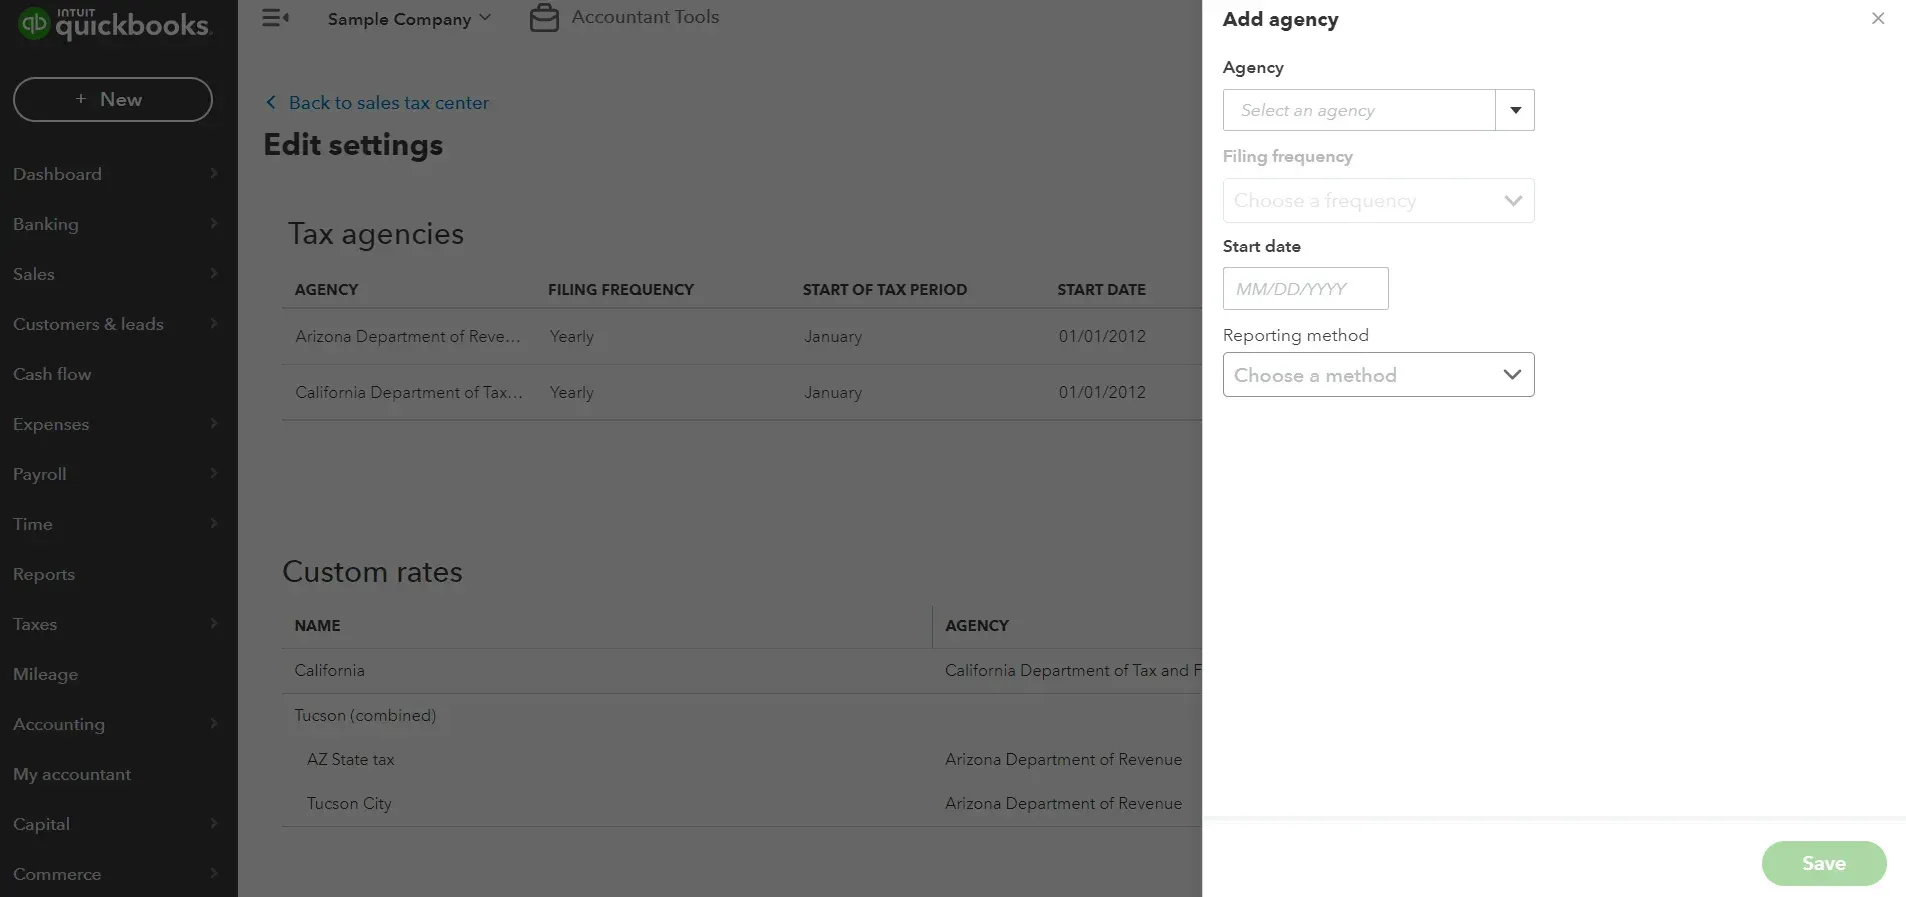
After that, choose the filing frequency. This is how often you need to report and pay sales tax to the agency. It can be monthly, quarterly, or annually.
Next, enter the start date. This is the date when you started collecting sales tax for this agency.
Finally, choose the reporting method. This is how you record your sales and sales tax in QuickBooks. You can choose cash or accrual. Cash means you record sales when you receive payment from customers. Accrual means you record sales when you send invoices to customers.
Click Save to add the new agency and filing frequency to QuickBooks.
Now, whenever you create an invoice or a sales receipt, QuickBooks will automatically calculate and apply sales tax based on your business address. If you need to change the sale location for a specific transaction, you can do that by editing the invoice or sales receipt.
How to Add Sales Tax to Invoices and Transactions in QuickBooks Online
Once you have set up your sales tax rates in the Sales Tax Center, you can start applying them to your transactions in QuickBooks Online.
If you don’t see these settings, you may be using Automated Sales Tax. This is a feature that calculates and applies sales tax for you based on your location and the customer’s location.
To apply a sales tax on invoices, sales receipts, estimates, and credit memos, follow these steps:
Open the customer form you want to use. This can be an invoice, a sales receipt, an estimate, or a credit memo.
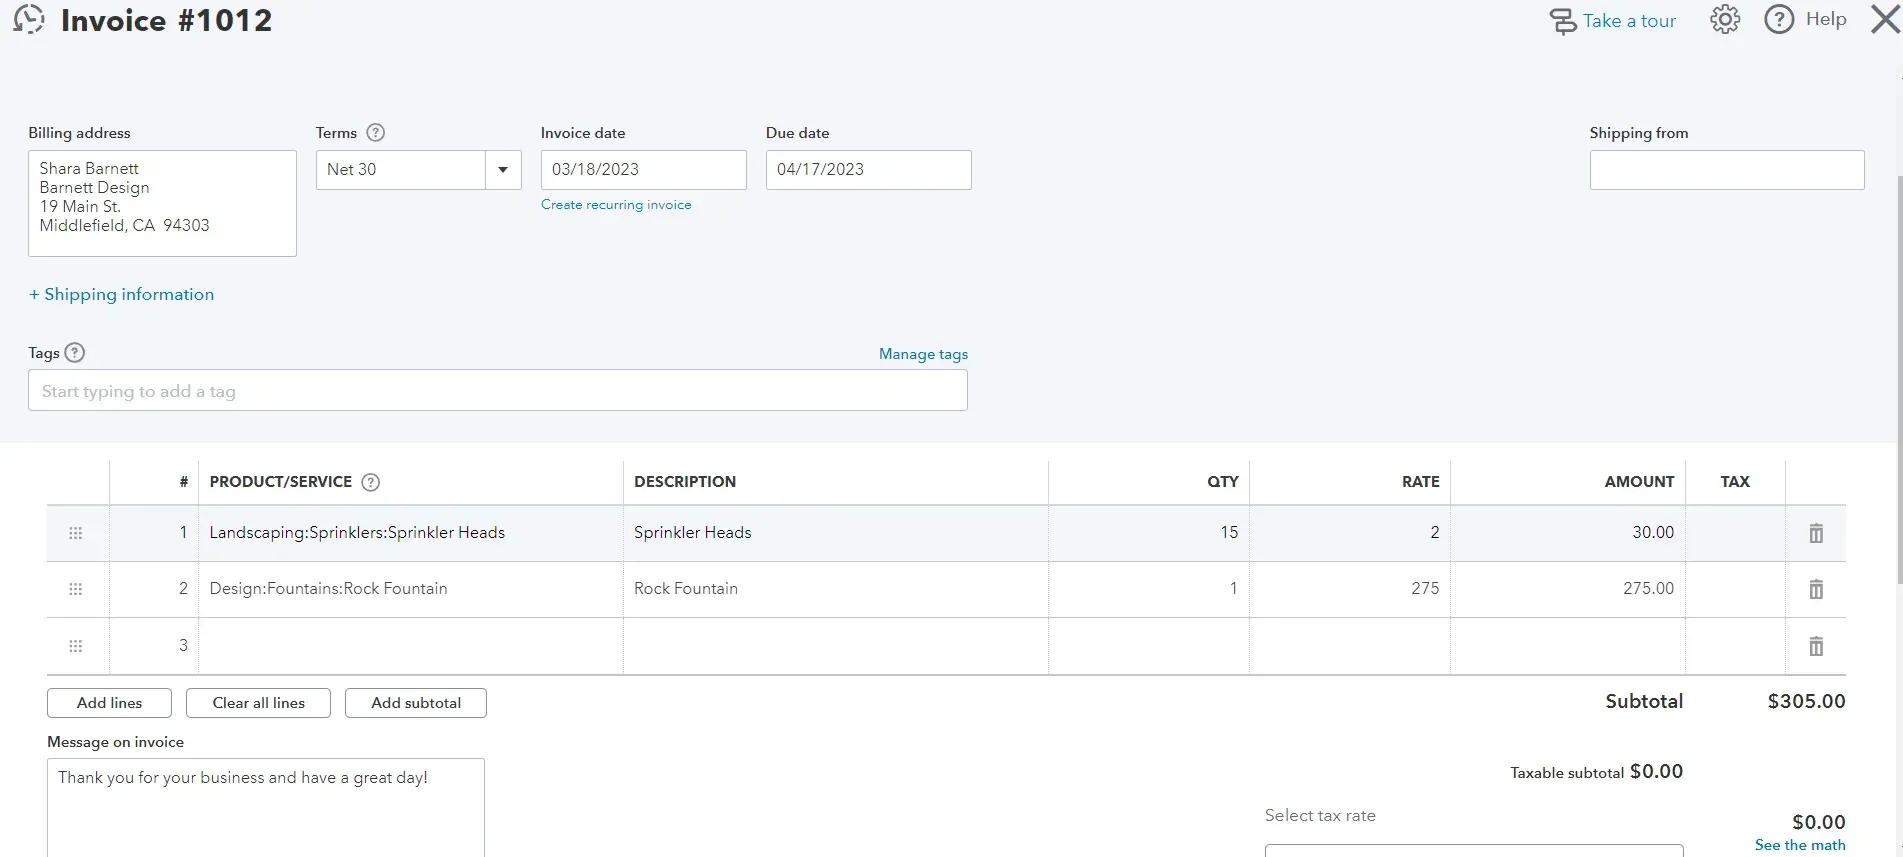
Under the Tax column, look for taxable products or services. Then, check the box next to them to mark them as taxable.
At the bottom right, choose a sales tax rate from the dropdown menu. This rate will be applied to taxable products and services.
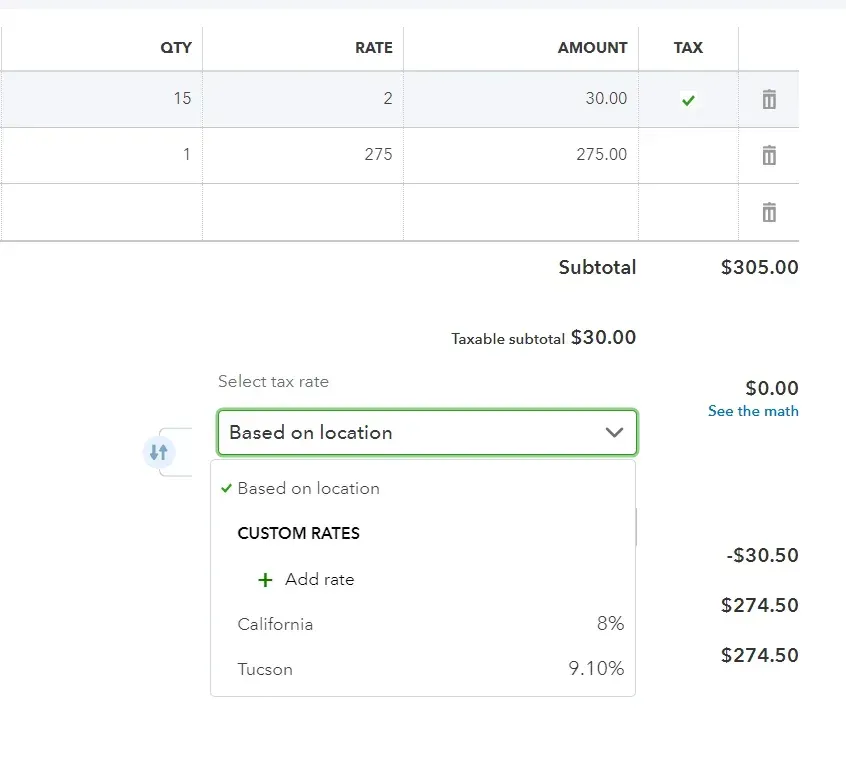
If you need to add a new sales tax rate, click Add Rate. This will take you to the Sales Tax Center, where you can create a new sales tax rate.
Click Save to save the customer form with the sales tax applied.
How to File Your Sales Tax Return and Record Your Tax Payment in QuickBooks Online
Once you've set up your sales tax settings and collected sales tax from your customers, you need to file your sales tax return and record your tax payment in QuickBooks Online. Filing your sales tax return and recording your tax payment will ensure that you accurately report your sales and taxes, pay your tax liabilities on time, and avoid penalties, audits, or legal issues.
QuickBooks Online makes filing your sales tax return and recording your tax payment easy and fast. You can review what you owe and make adjustments as needed, fill out your tax form using QuickBooks Online data, record your tax payment and zero out your sales tax payable, and change or delete your sales tax information as required. QuickBooks Online will also track your sales and taxes for each state or jurisdiction where you do business and show you what you owe at a glance.
To file your sales tax return and record your tax payment in QuickBooks Online, you need to follow these steps:
Review what you owe and make adjustments in QuickBooks Online
Fill out your tax form using QuickBooks Online data
Record your tax payment and zero out your sales tax payable in QuickBooks Online
Let's start with reviewing what you owe and making adjustments in QuickBooks Online.
How to Review What You Owe and Make Adjustments in QuickBooks Online
Before you file your sales tax return, you need to review what you owe and make sure everything is accurate.
To do this, go to Taxes and click on Sales Tax. This will take you to the Sales Tax Center, where you can see all your sales tax information.
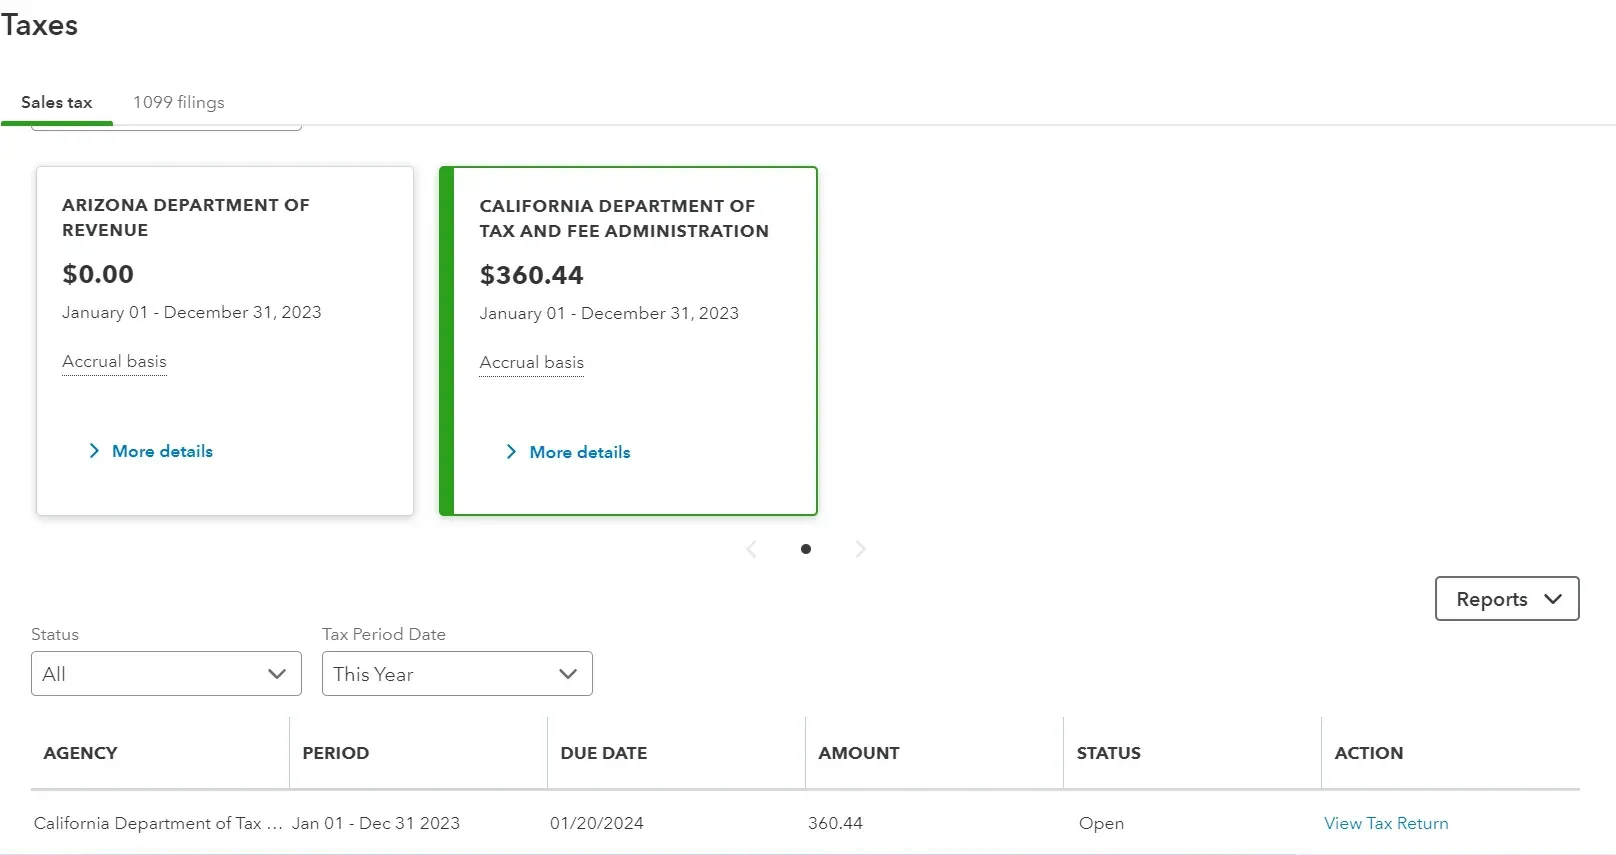
Choose the filing period from the dropdown menu. This is the time period that you are reporting and paying sales tax for. It can be monthly, quarterly, or annually.
Choose a tax period and look for the return that is due. This is the return that you need to file with the tax agency. Then, click on View Tax Return to open it.
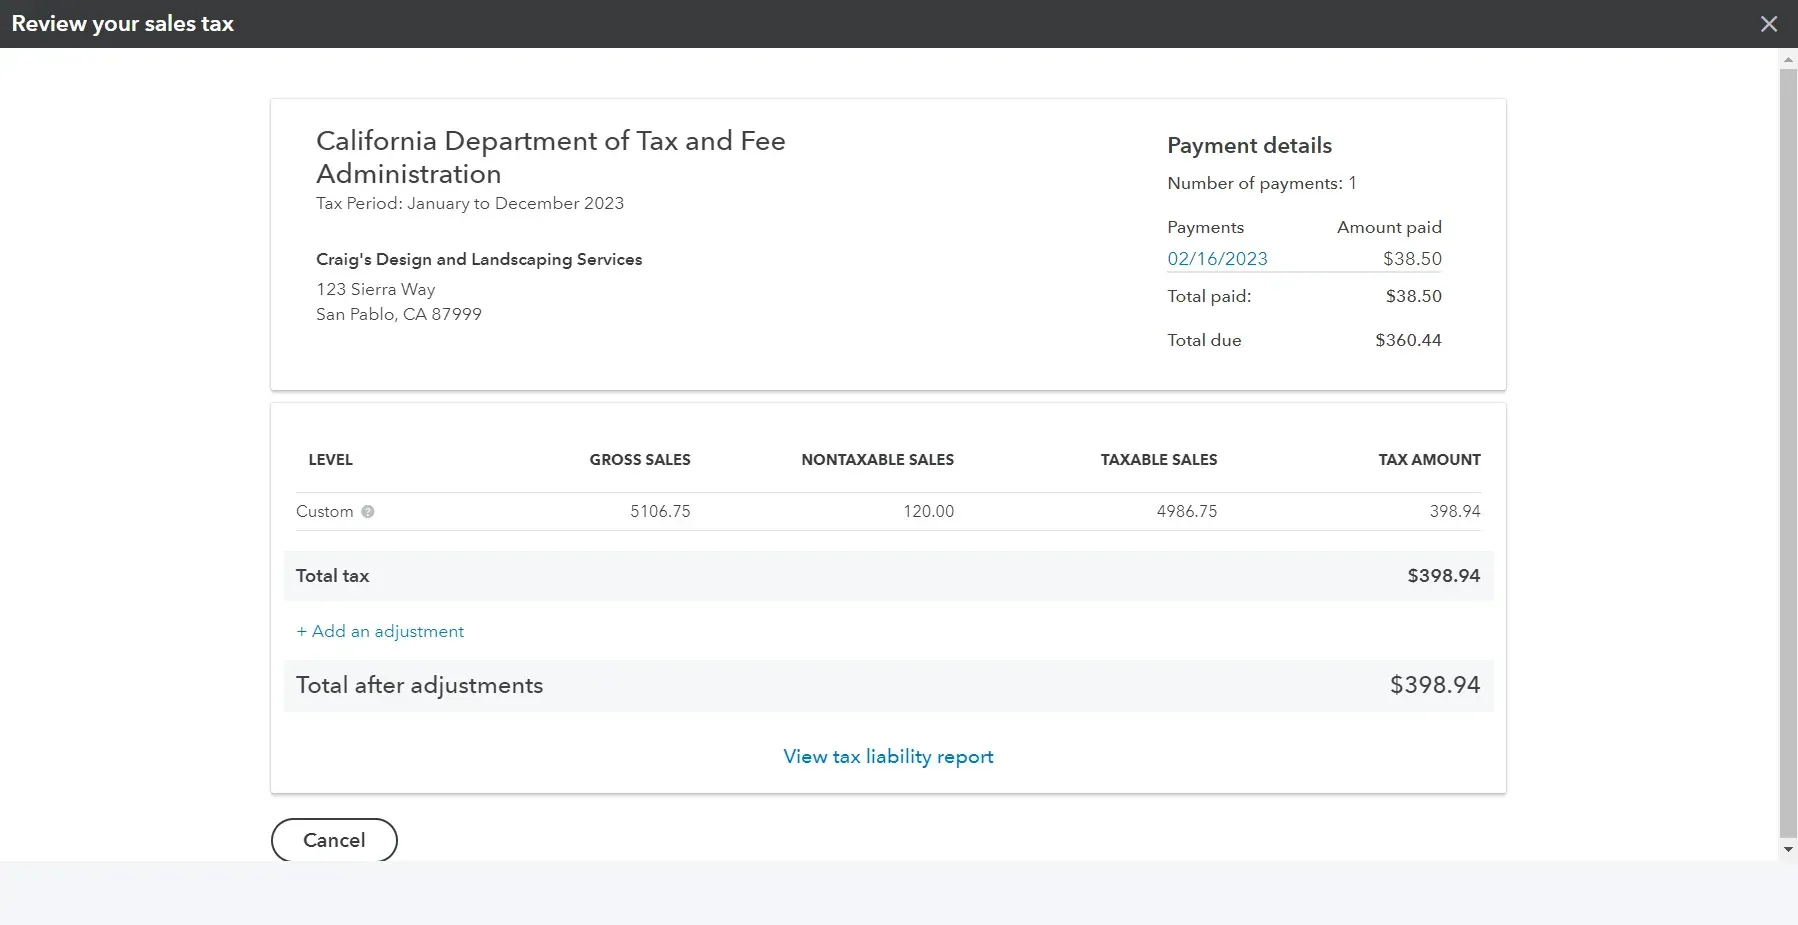
You’ll see how much you owe in state, county, and local taxes, if relevant.
If you need to make any adjustments to your sales tax amount, click on Add an adjustment for the item that you want to change. This can be for things like credits, discounts, or corrections that affect your sales tax calculation. Then, fill out the adjustment details in the form and click Save. The adjusted value will be updated in your return.
Take note of your gross sales, taxable sales, tax due, and adjustment amount (if you have one). When you fill out your sales tax return form with the tax agency, you will need these numbers.
After reviewing everything and ensuring it is correct, click Mark as filed. This will mark your return as filed in QuickBooks and move it to the History tab.
Click Continue to proceed to the next step.
Note: If you want more details about what you owe, you can run your sales tax liability report for the same tax period. This report will show you all your taxable and nontaxable invoices, receipts, and other transactions that affect your sales tax amount. To run this report, go to Reports and search for Sales Tax Liability Report.
How to Fill Out Your Tax Form Using QuickBooks Online Data
Once you have reviewed your sales tax in QuickBooks Online, it's time to file your return with the correct tax agency. This would be the agency you registered with and obtained your sales tax permit from.
Depending on your state's requirements and preferences, you can file your return either online or by mail. Most states nowadays prefer online filing because of its speed and convenience. However, if online filing isn't an option, you can check your state's website for information on how to mail your return.
To file your return online or by mail, here are some simple steps to follow:
Visit your state's website and look for the e-filing service. If it's your first time, you may need to sign up for an account and provide some details about your business.
Use the data from your QuickBooks Online reports and transactions to fill out your sales tax return form. Remember to note down the gross sales, taxable sales, and tax-due amounts.
Complete the filing process and submit your return. Depending on your state's rules, you may also need to pay your sales tax at this point or later.
For those filing by mail, remember to print out your sales tax return form and mail it to the address provided by your state. You may also need to include a check or money order for your sales tax payment.
Did you know that you can prepay your sales tax in advance? It's like depositing to cover your future sales tax liability before the due date.
Some states even require prepayments if you have a high sales tax due. If you want to learn more about sales tax prepayments and how to make them, head to the IRS State Government Websites page and choose your state. Or, if you prefer, you can contact your state's taxing agency for more info.
That's it – following these steps will help you file your sales tax return quickly. Happy filing!
How to Record Your Tax Payment and Zero Out Your Sales Tax Payable in QuickBooks Online
Once you have filed your sales tax return and made the necessary payment to your state's taxing agency, it's essential to record your tax payment in QuickBooks Online. Doing so will help you keep track of your sales tax payments and balance out your sales tax payable account.
To record your tax payment in QuickBooks Online, you can follow these simple steps:
Click on Taxes and select Sales Tax. This will take you to the Sales Tax Center, where you can access all your sales tax information.
Find the return that you just filed and click on the View Tax Return. From there, click on Record Payment. This will open up a form where you can enter your payment details.
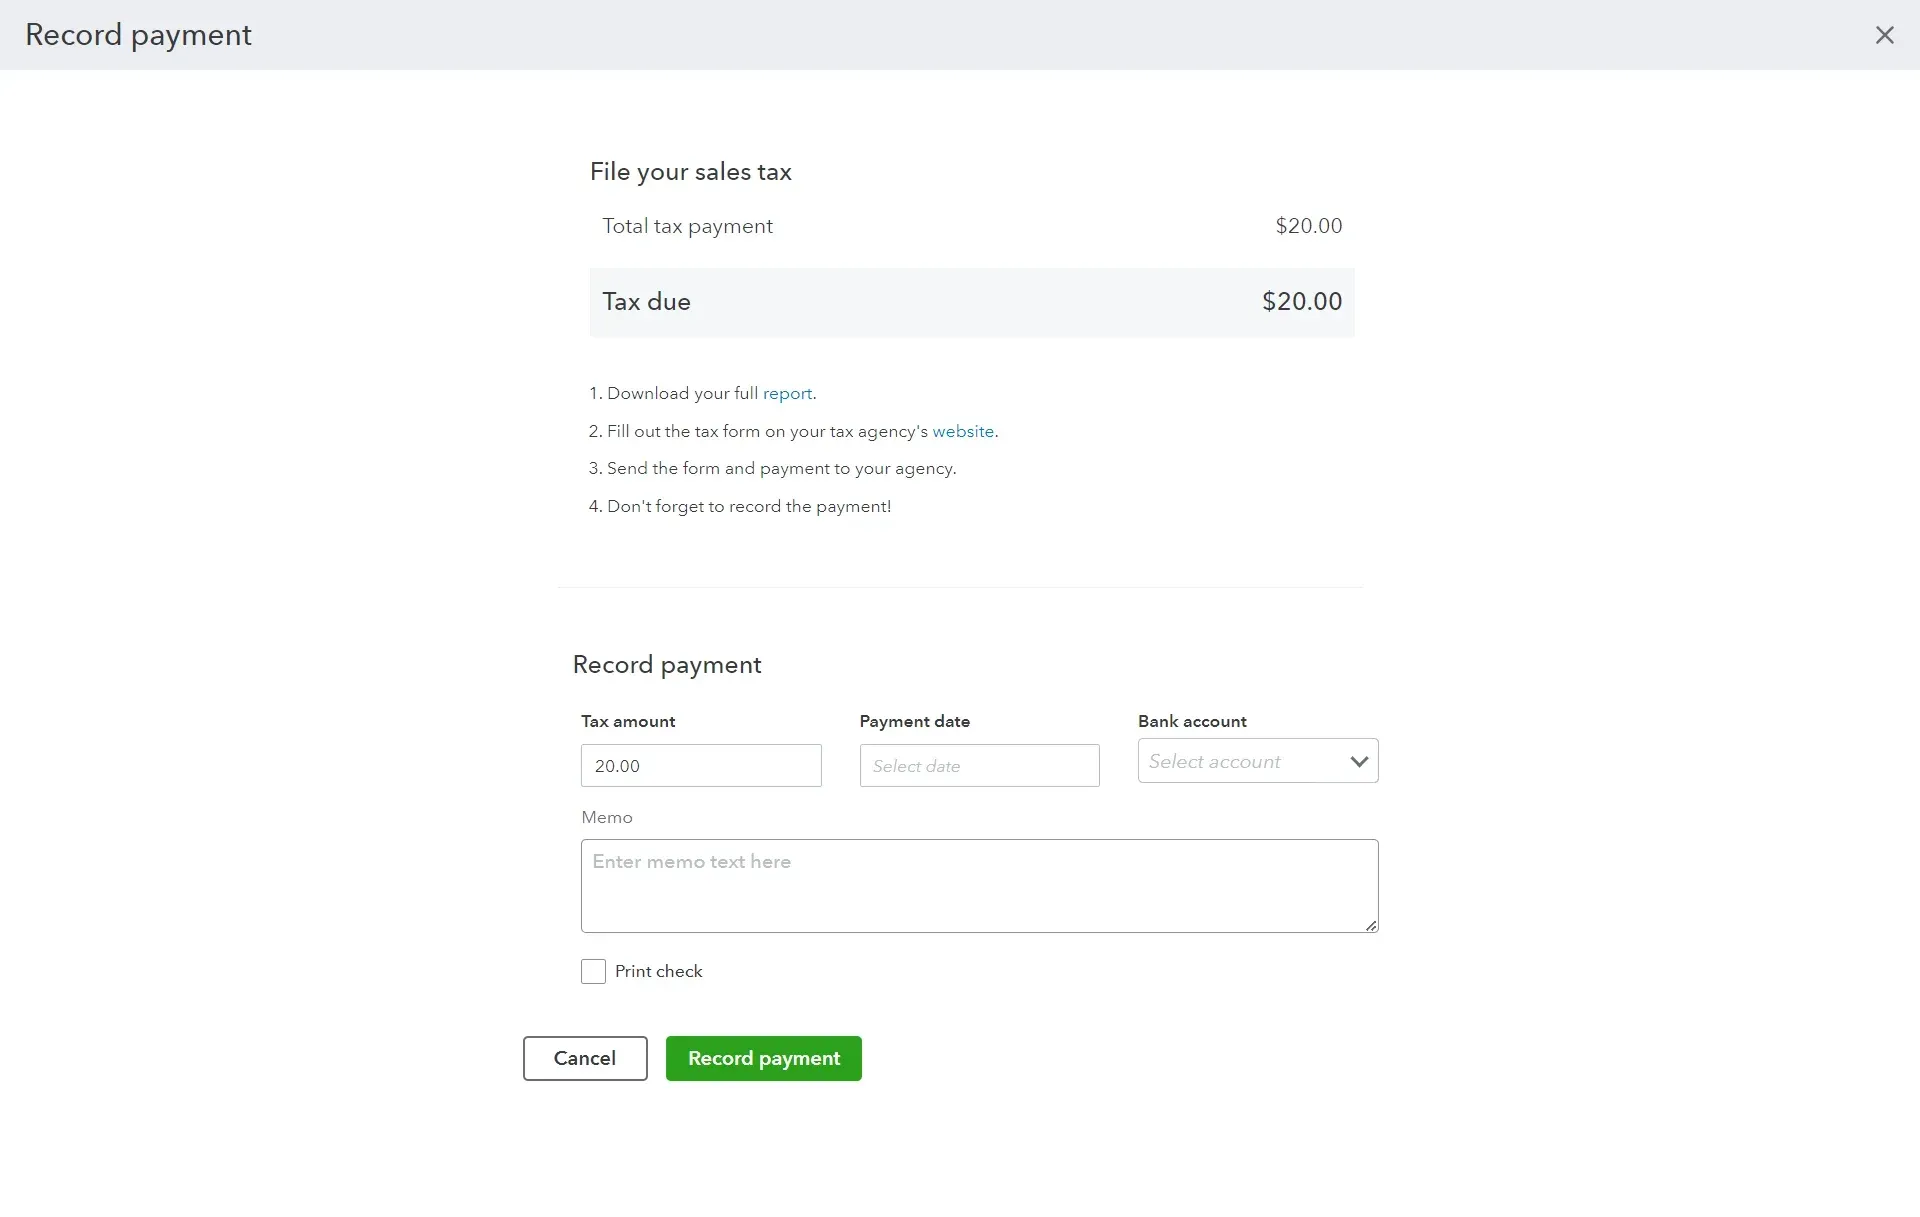
Choose the bank account you used to pay your sales tax from the Payment From dropdown menu. This is the account that will be debited for your payment.
Enter the date that you made your payment in the Payment Date field. This is the date that will be recorded in your books.
In the Payment Amount field, enter the amount that you paid. This amount should match the amount you reported and paid to your state's taxing agency.
Once you've entered all the necessary information, click Record Payment. This will record your payment in QuickBooks Online and balance out your sales tax payable account.
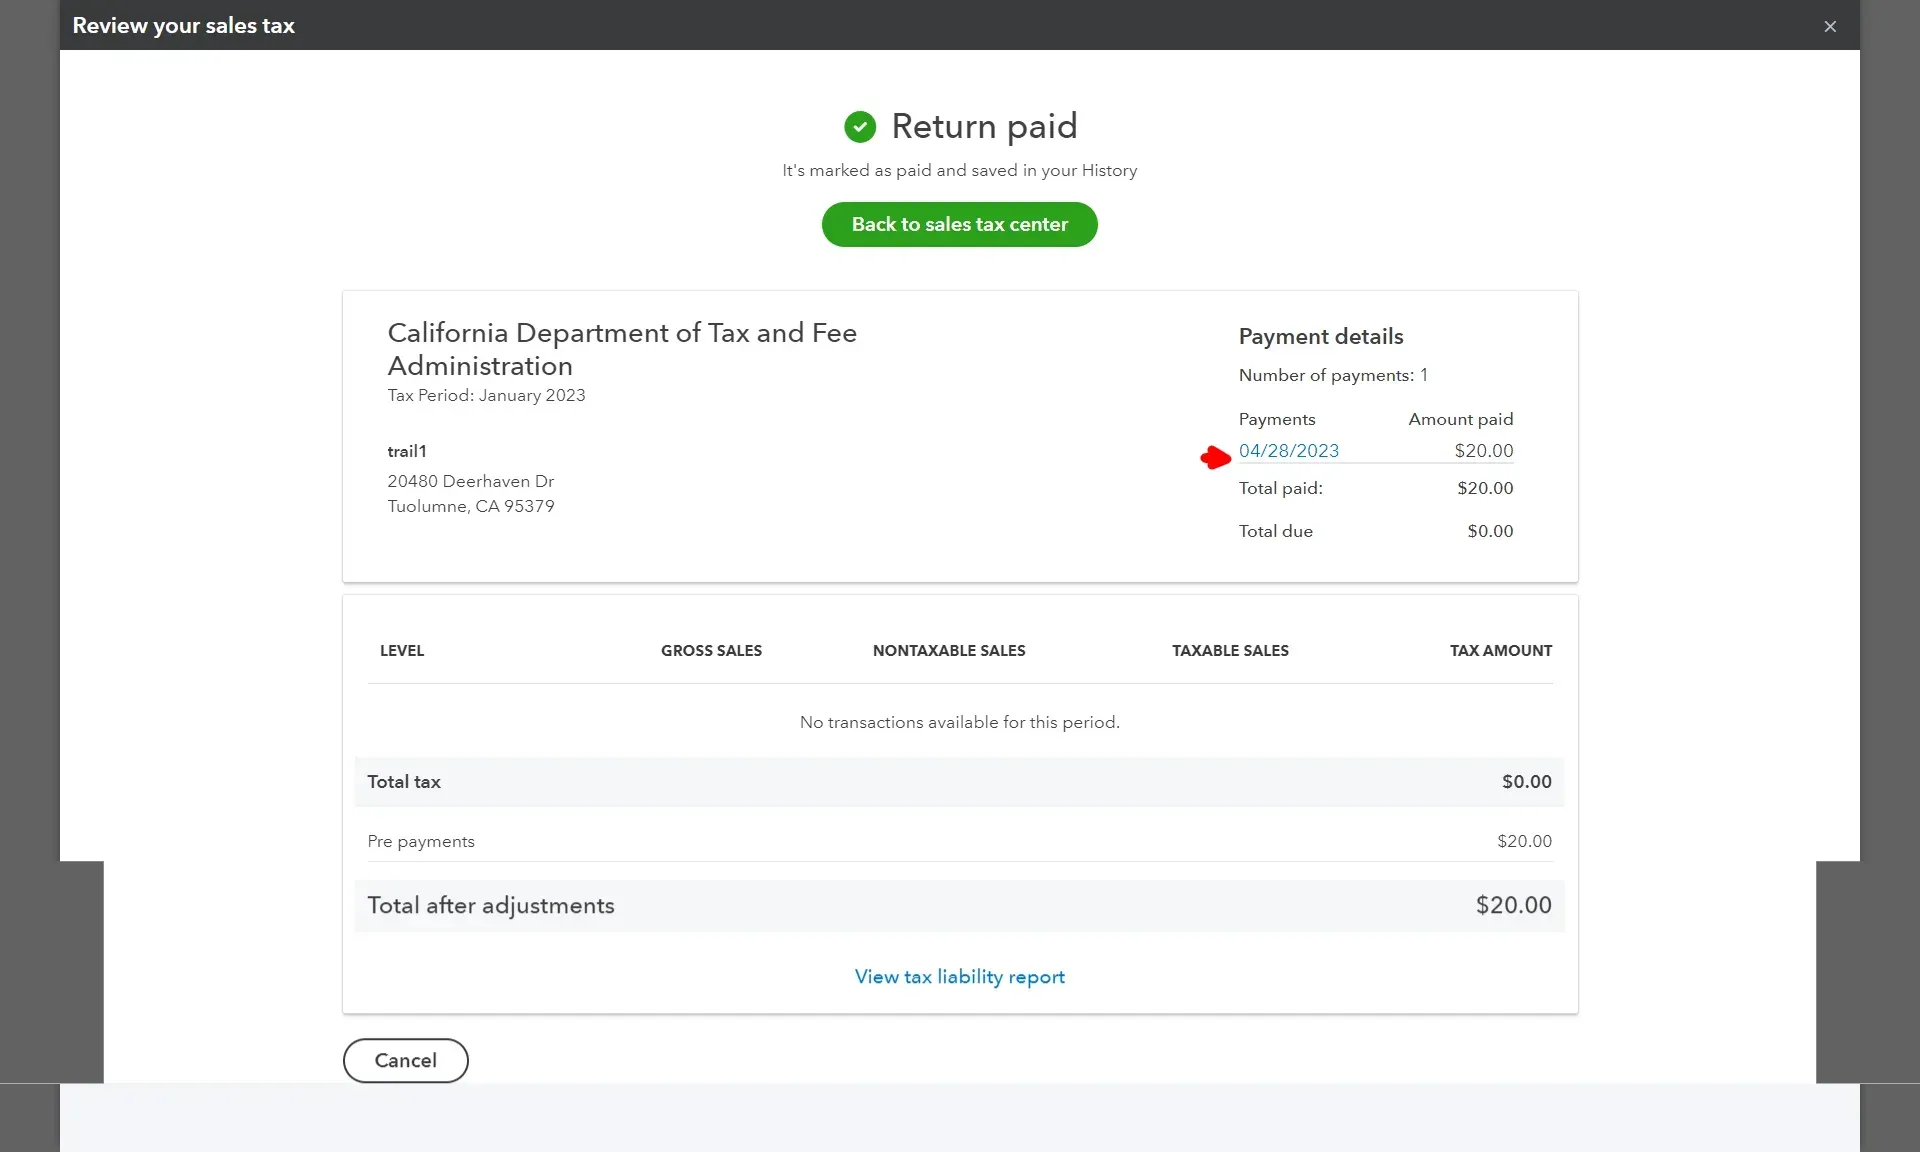
Under the Payments tab in the Sales Tax Center, you can view all your payment details. Additionally, you can run a sales tax payment report to see all your payments for a specific period.
These steps will ensure that your sales tax payments are accurately recorded in QuickBooks Online, giving you a clear overview of your financials.
How to Change or Delete Sales Tax Information in QuickBooks Online
QuickBooks Online makes keeping your sales tax info accurate and up-to-date easy. You can change or delete your sales tax rate, agency, payment, or adjustment anytime.
You can also turn off the sales tax feature if you don’t need it anymore. QuickBooks Online will show you your sales and taxes for each state or area where you do business and how much you owe.
There are two ways to handle sales tax in QuickBooks Online: Automated and manual.
Automated sales tax is a new feature that calculates and applies the correct sales tax rate for you based on your location and the type of product or service you sell. QuickBooks Online automatically creates the tax agencies and rates you need.
Manual sales tax is the old feature that lets you create and apply your own custom sales tax rates. You have to enter and update the tax agencies and rates yourself.
To find out which feature you’re using, go to Taxes and select Sales Tax. If you see a button that says “Turn on automated taxes,” you’re using manual sales tax. You're using automated sales tax if you don’t see that button.
How to Edit Your Sales Tax Rate Using Automated Sales Tax
If you use automated sales tax, follow these steps to edit your custom sales tax rates:
First, go to Taxes and select Sales Tax.
Select Sales Tax Settings.
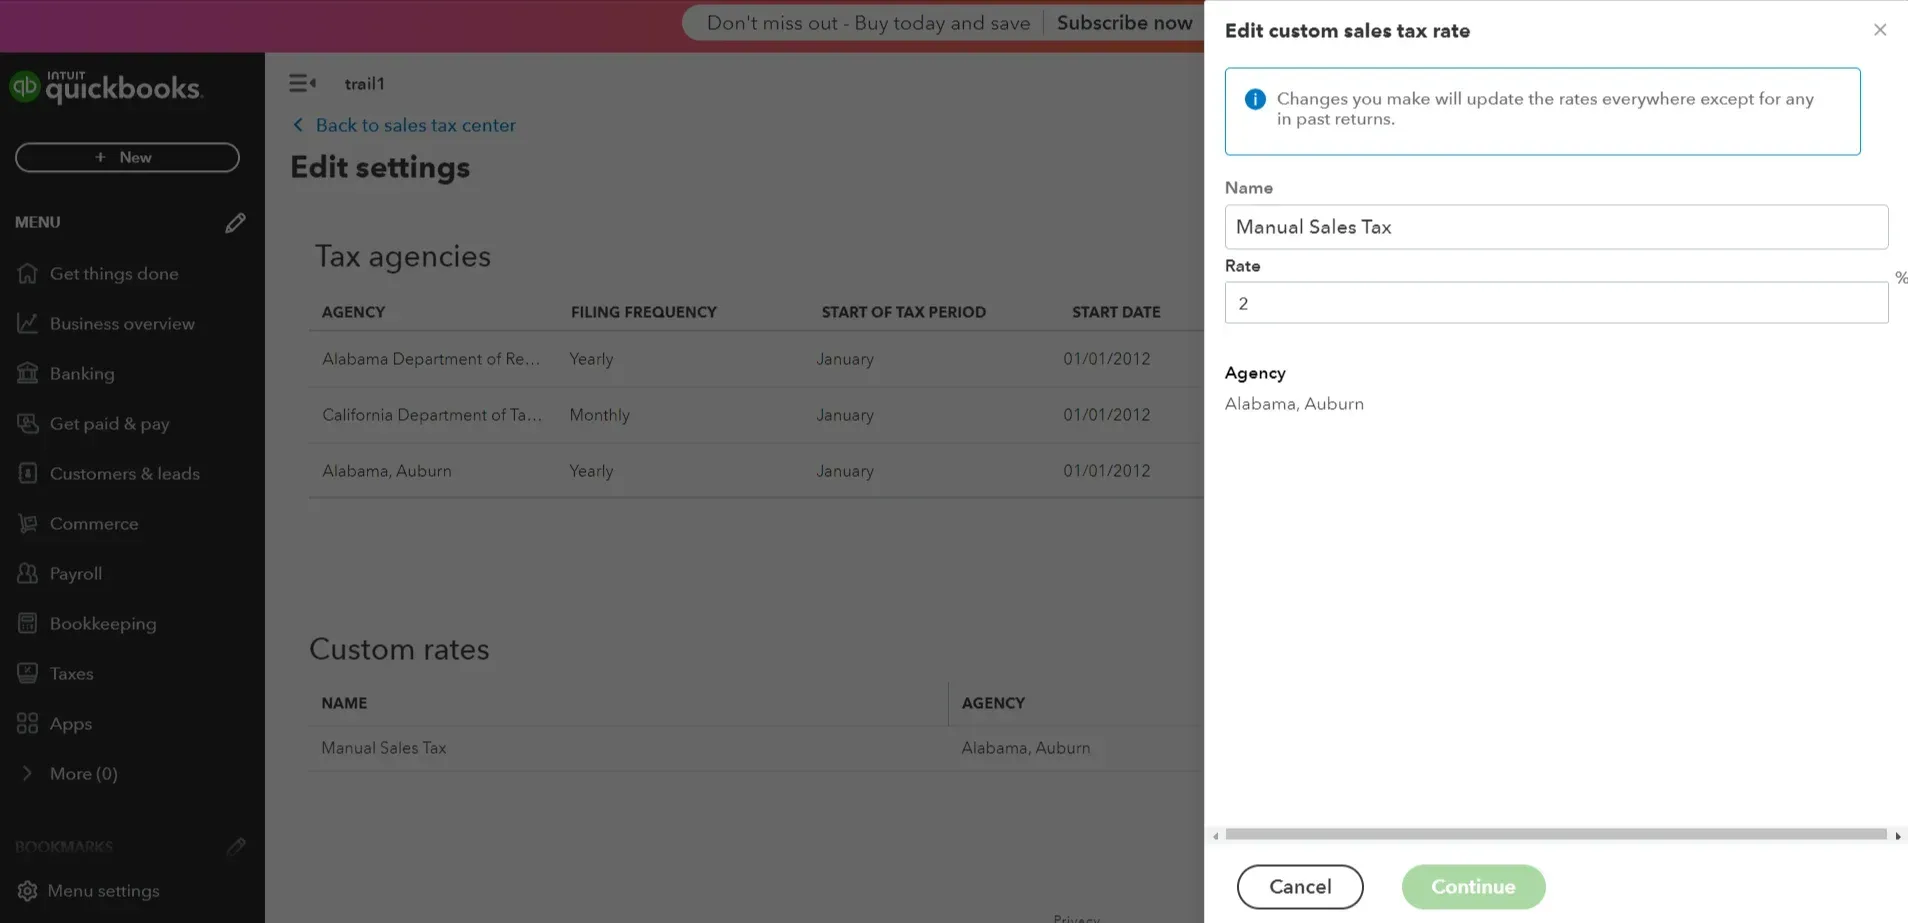
In the Custom Rate section, find the sales tax rate you want to edit and select Edit.
Update the name or rate as needed.
Select Continue and then select Edit.
Note: You can only edit custom sales tax rates you created. You can’t edit the default rates that QuickBooks Online generated for you based on your location and products.
How to edit your sales tax rate using manual sales tax
If you use manual sales tax, follow these steps to edit your custom sales tax rates:
Go to Taxes and select Sales Tax.
Under Related Tasks, select Add/Edit Tax Rates and Agencies.
Select the rate you want to change from the Sales Tax Rates and Agencies table and select Edit.
Edit the tax rate or component name as needed.
Select Save.
Note: When you edit a sales tax rate, it only affects new transactions. Existing transactions that use the old rate will not change.
How to edit a tax agency name using manual sales tax
If you use manual sales tax, you can also edit a sales tax agency’s name through the Sales Tax Center. However, this will not change the name on your sales forms. If you want a different name to show on your sales forms, you’ll have to create a new tax agency instead.
To edit a tax agency’s name using manual sales tax, follow these steps:
First, go to Taxes and select Sales Tax Settings in the sales tax.

In the Custom Rates section, find the tax agency you want to edit and select Edit.
Enter the new name and select Save.
That’s it! You’ve learned how to edit your sales tax rate or agency in QuickBooks Online using either automated or manual sales tax. We hope this helps you keep your books accurate and up-to-date.
How to delete a sales tax payment or adjustment in QuickBooks Online
Sometimes you may need help deleting tax payments that your previous accountant mistakenly entered. It can be stressful to deal with accounting issues, especially concerning taxes.
To delete tax payments, log in to your QuickBooks Online account and follow these steps:
Navigate to Taxes and choose the Tax Agency you need to edit.
Next, click on View Tax Return and locate the sales tax payment you want to remove.
Click on the payment date from the Payment details column and select Delete.
Voila! You've successfully deleted the tax payments that were causing you trouble.
How to turn off the sales tax or automated sales tax in QuickBooks Online
You can turn off the automatic sales tax in QuickBooks Online. Maybe you don't need to collect sales tax for your business, or perhaps you prefer to calculate it manually. Whatever your reason, you want to get rid of the sales tax feature that keeps popping up on your invoices and reports.
But how do you do that? Well, it depends on whether you have the old sales tax center or the new one. The old sales tax center lets you switch between manual and automated sales tax calculations. The new one doesn't.
If you have the old sales tax center, you can turn off automated sales tax by following these steps:
Go to Taxes > Sales Tax.
Click Sales Tax Settings in the upper right corner.
At the bottom of the screen, you'll see "Want to temporarily switch to the old tax center? Switch here."
Click the ‘here’ link.
That's it! You've successfully turned off automated sales tax and switched back to manual calculation. But what if you have the new sales tax center?
Unfortunately, there's no easy way to turn off automated sales tax once you've enabled it. You can't switch back to the manual calculation or disable sales tax altogether.
The only option is to create a new QuickBooks Online account and import your data from your old account. But be careful not to turn on automated sales tax in your new account.
If you don’t need to collect sales tax for your products/services, you can mark them as non-taxable by following these steps.
Head over to the Get Paid & Pay menu and pick Product and Services.
Tap twice on any item with a tax applied and hit Edit sales tax.
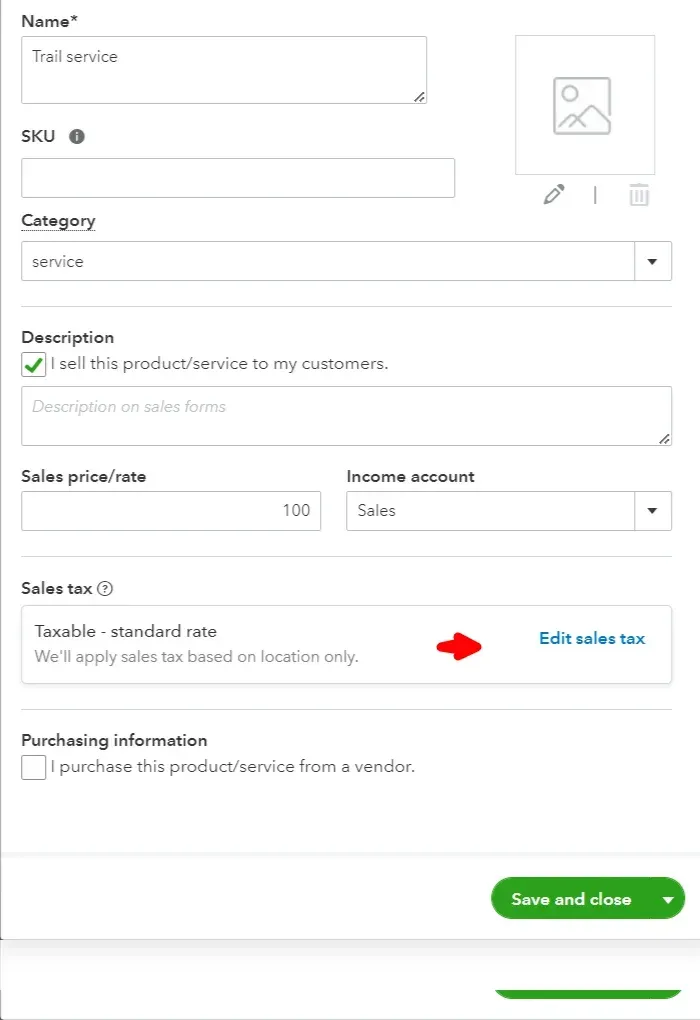
Next, scroll down until you see “Other options” and select Nontaxable.
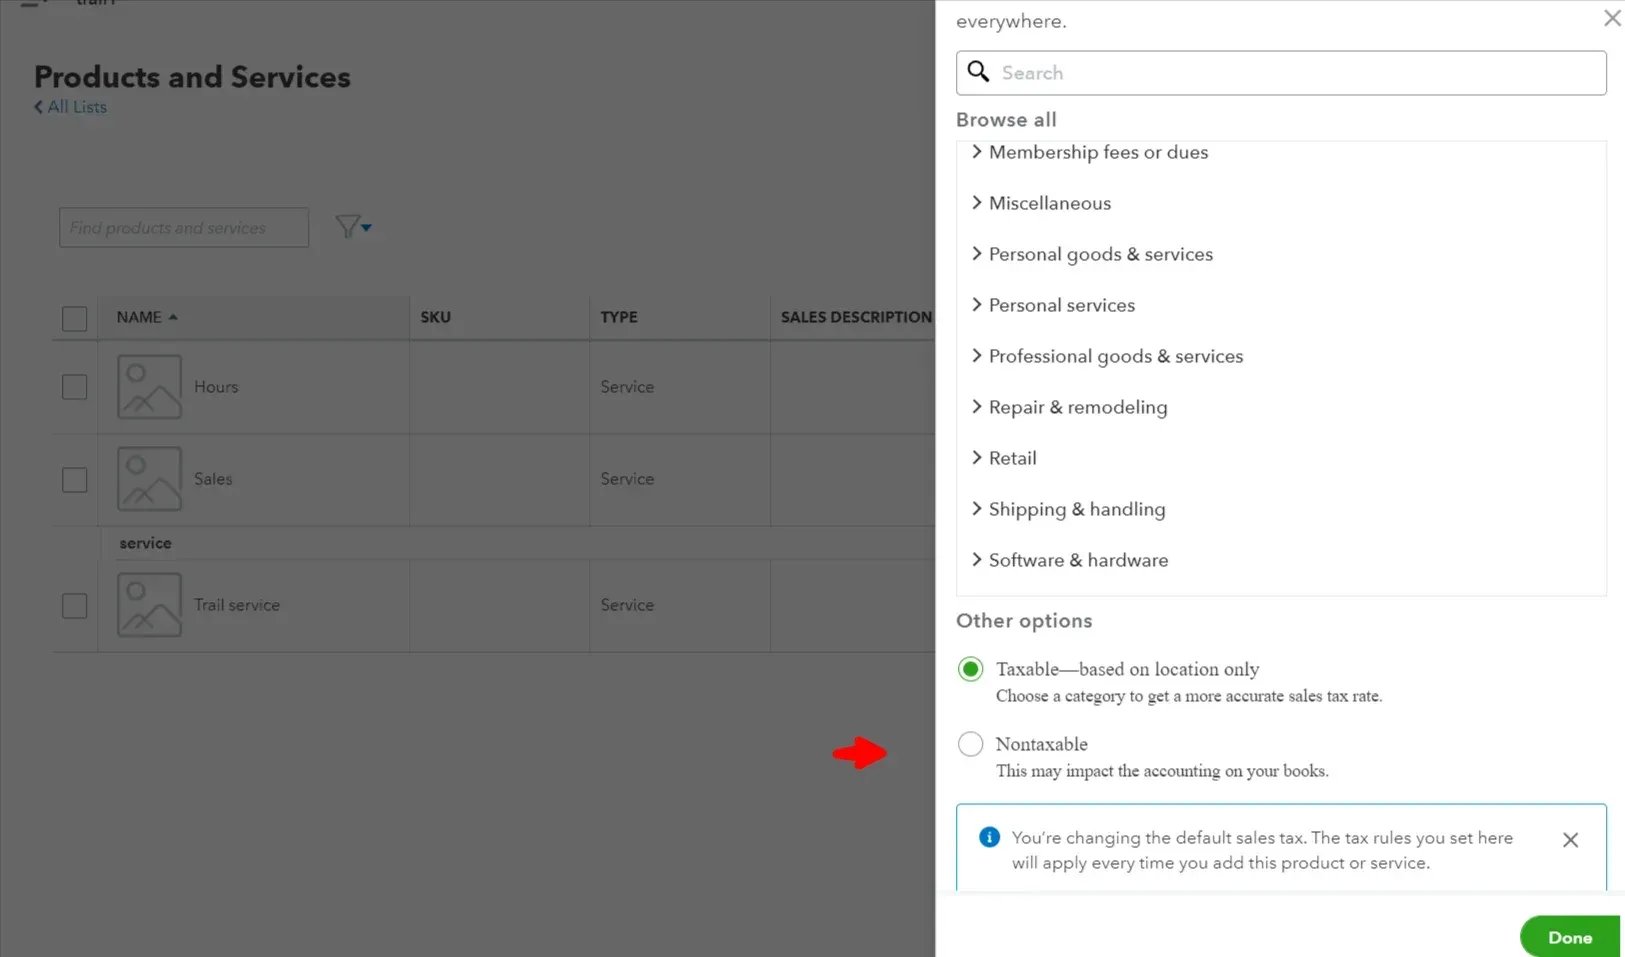
Finally, click Done, and you’re all set.
Manage Sales Tax With Ease
Like a pro, you've learned how to set up and use sales tax in QuickBooks Online. But what if you could make it even easier and faster? That's where SaasAnt products come in. SaasAnt products are excellent tools for importing, exporting, and deleting transactions and lists in QuickBooks Online with just a few clicks.
Imagine being able to import sales tax items, bundles, and codes from any spreadsheet format. Or export them for backup or reporting purposes. Or delete unwanted or duplicate transactions and lists in bulk. Sounds awesome, right?
That's not all. SaasAnt products also help you save time, avoid errors, and comply with tax regulations. So you'll never have to worry about sales tax again. To learn more about how SaasAnt products can supercharge your QuickBooks Online experience, visit their website or chat with their helpful support team. You can also try SaasAnt products for free for 15 days and see the magic for yourself. So what are you waiting for? Start your free trial today and unleash the power of SaasAnt and QuickBooks Online.