Migrating Data from Xero to QuickBooks Online
This guide will walk you through migrating data from Xero to QuickBooks Online using SaasAnt Transactions.
Quick Instructions for Migrating Data from Xero to QuickBooks Online
Connect your Xero account to SaasAnt Transactions.
Sign in to SaasAnt Transactions, click ‘Export,’ and select the entity you want to export (Eg, Journal Entry).
Select the entity as ‘Manual Journal’ and the date type as ‘Transaction Date.’ Also, specify the required date range to export.
Click on ‘Search’ and click ‘Download.’ You can download the file into Excel or CSV.
Sign in to QuickBooks and connect your QuickBooks account with SaasAnt Transactions.
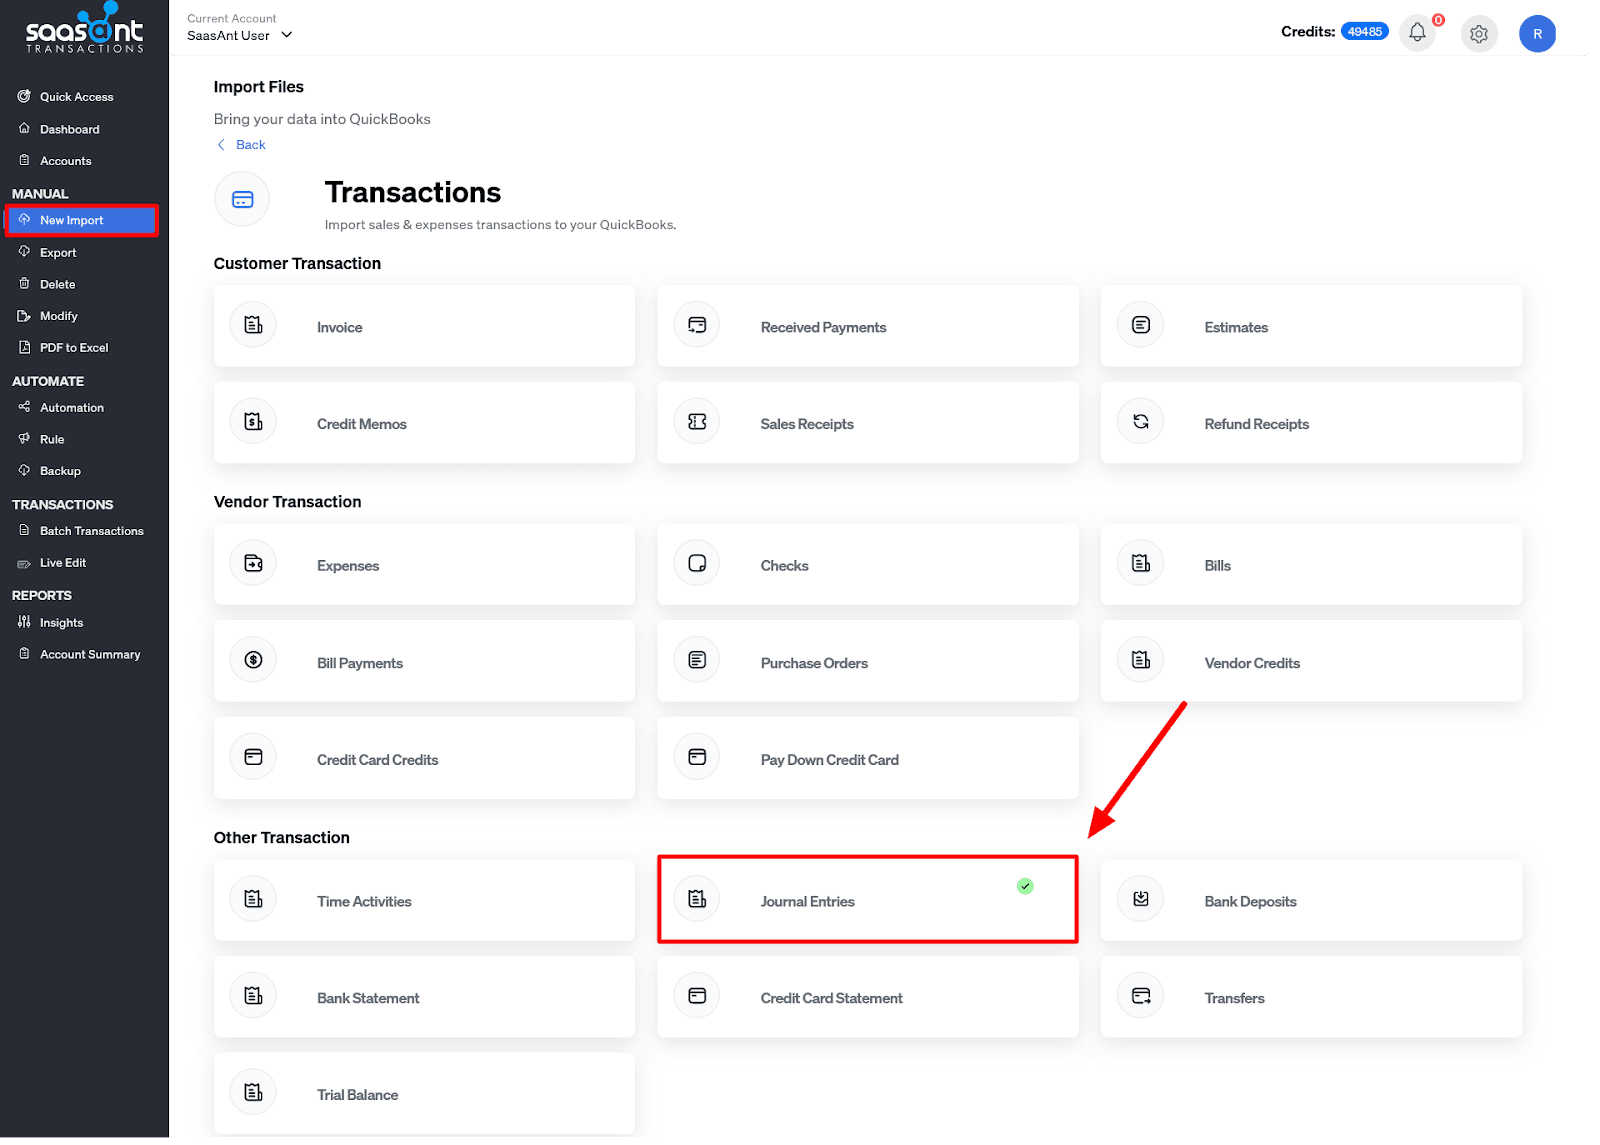
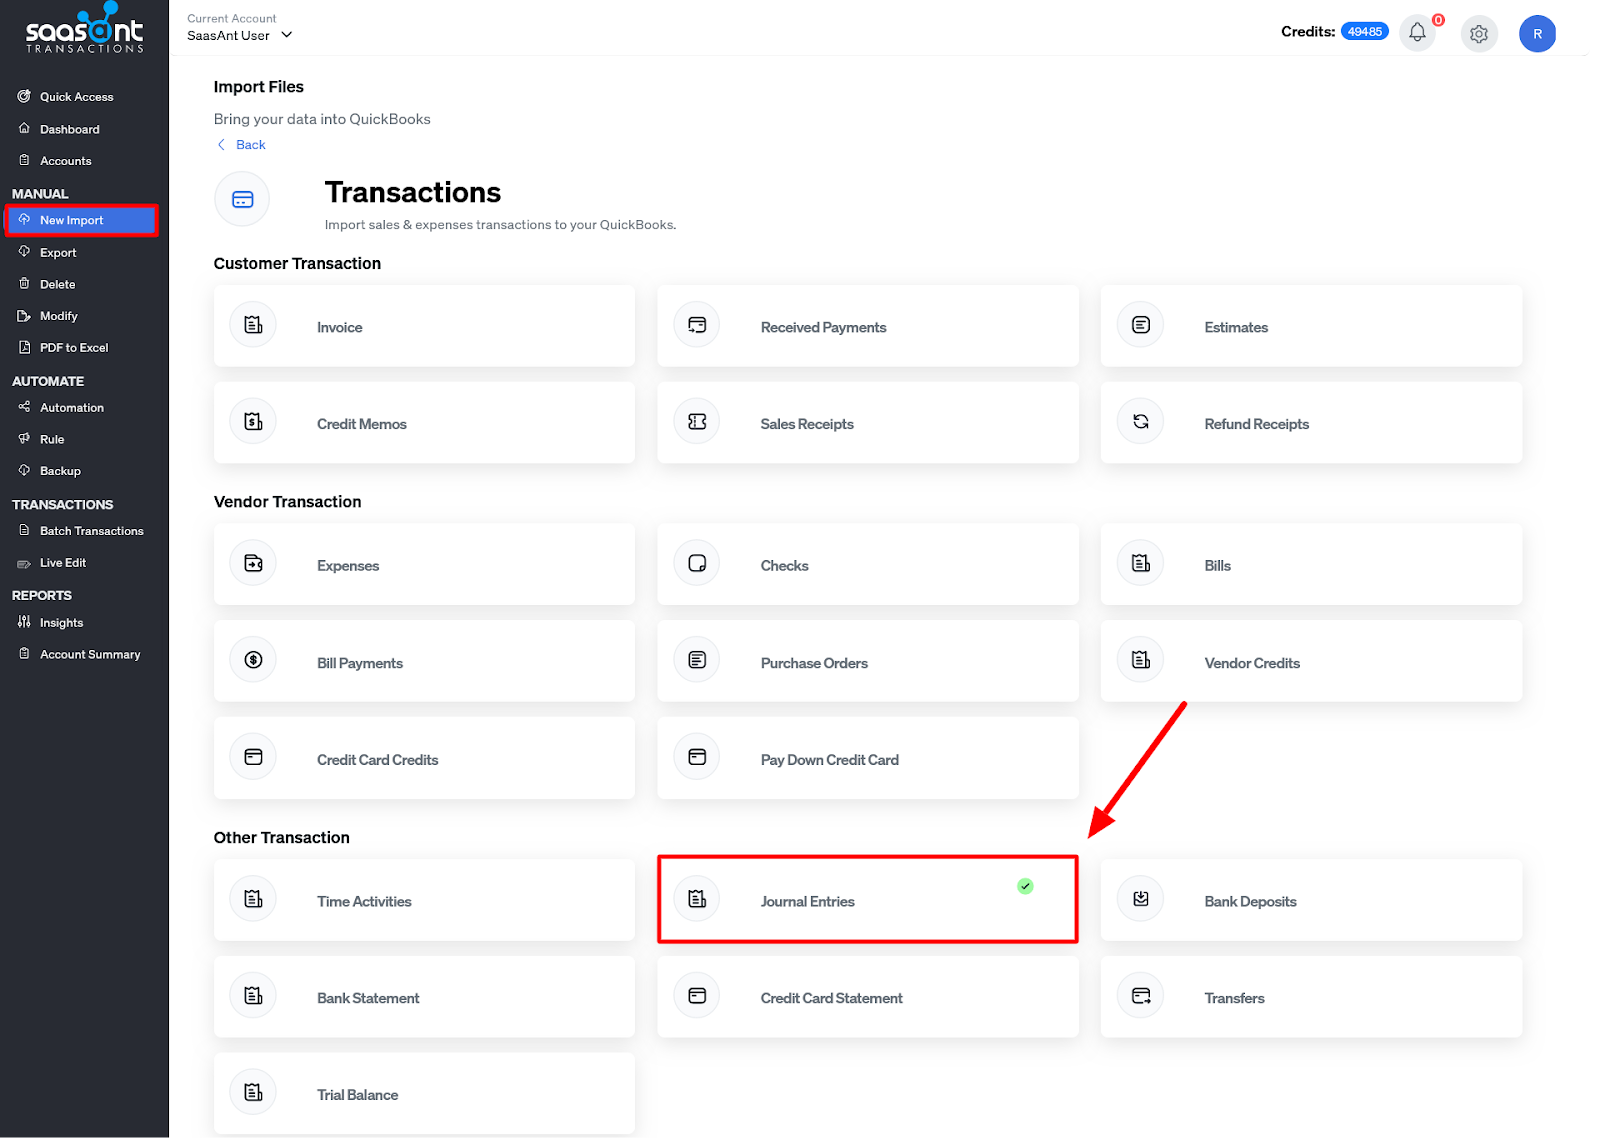
Open SaasAnt Transactions, click on New Import -> Transactions -> Journal Entries. Select and upload the exported file.
Align the fields with QuickBooks fields on the mapping screen, review the mapping for accuracy, and start the import.
Pre-migration steps before migrating from Xero to QuickBooks Online
Suppose you have an active company file within your QuickBooks Online account. Setting up a new account is recommended, as transferring data from Xero to an existing QuickBooks Online account might create data issues with the current books.
Generating a secure backup of your Xero data file is essential, which will be valuable for later review and validation of the transfer outcomes.
It’s also crucial to reconcile all your banking and credit card accounts to the most recent statements and record ending balances since they are required for the reconciliation process in QuickBooks Online after the data transfer.
Migrate from Xero to QuickBooks Online: Step-by-Step Guide
Migrating from Xero to QuickBooks Online can seem challenging manually; however, with the proper automation application like SaasAnt Transactions Online, you can migrate all your data seamlessly. Additionally, SaasAnt Transactions Online saves valuable time and ensures accurate record-keeping, reducing the risk of manual data-entry errors.
Follow the steps below to understand how to securely transfer your data from Xero to QuickBooks Online without compromising data integrity.
Step 1: Exporting Data from Xero into an Excel file
Connect your Xero account to the SaasAnt Transactions (Online) App from the Xero App by clicking the “Get this app” button.
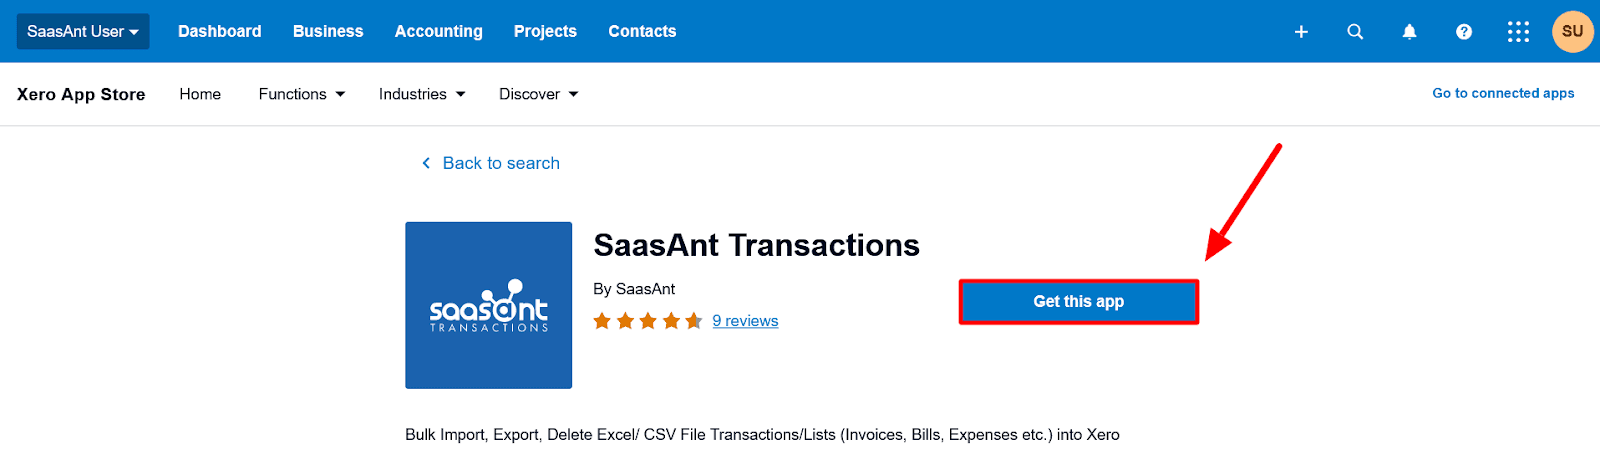
Click on the “Export” Menu to export the data in SaasAnt Transactions.
Note: This article will walk you through migrating ‘Journal Entries’ from Xero to QuickBooks Online. Follow the instructions for migrating other data like customer/vendor details, invoices, sales receipts, etc.
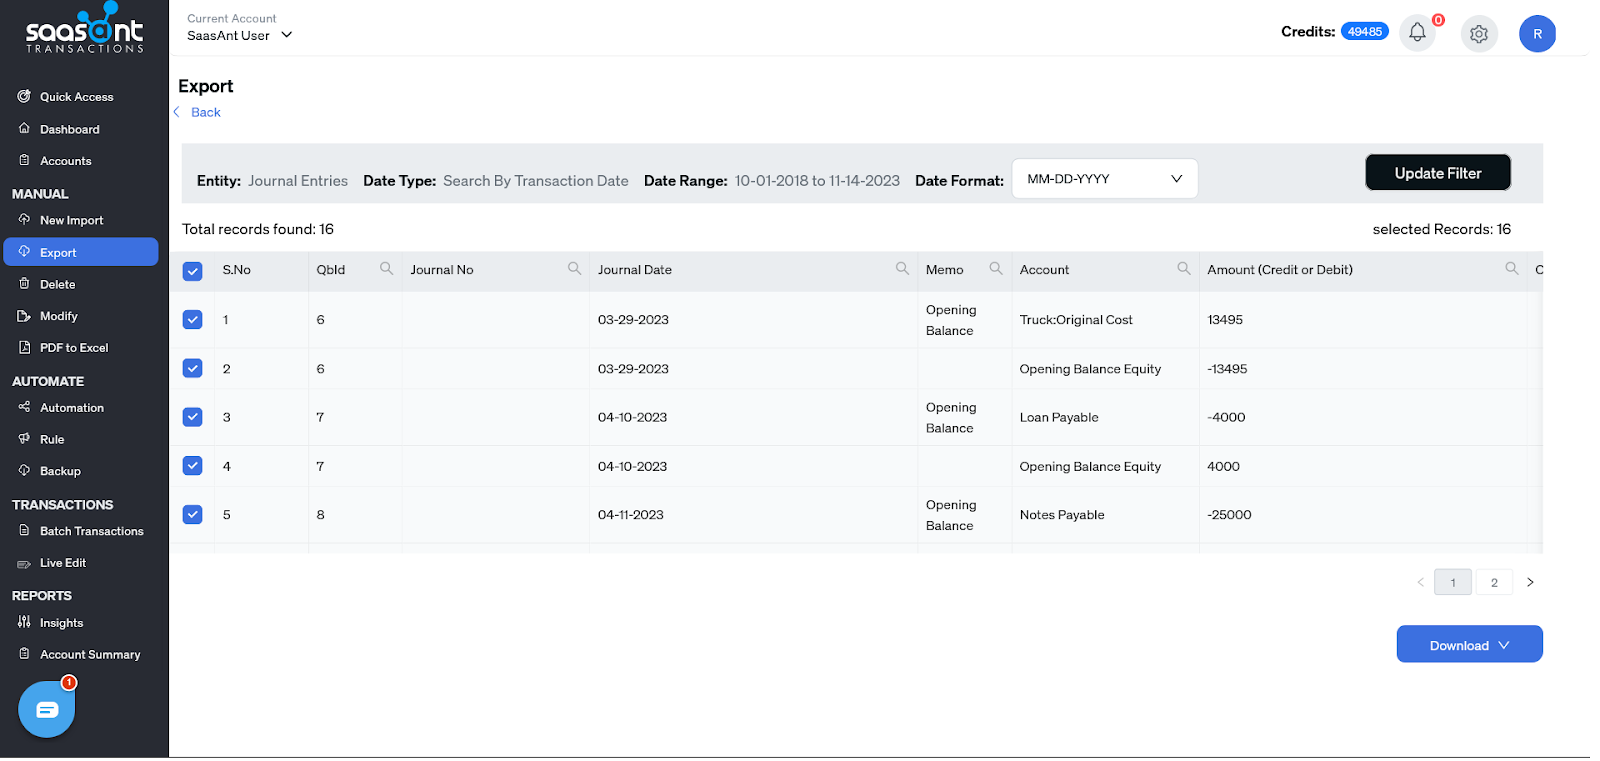
Select the entity as ‘Journal Entries’ and the date type as ‘Transaction Date.’ Also, specify the required date range to export.
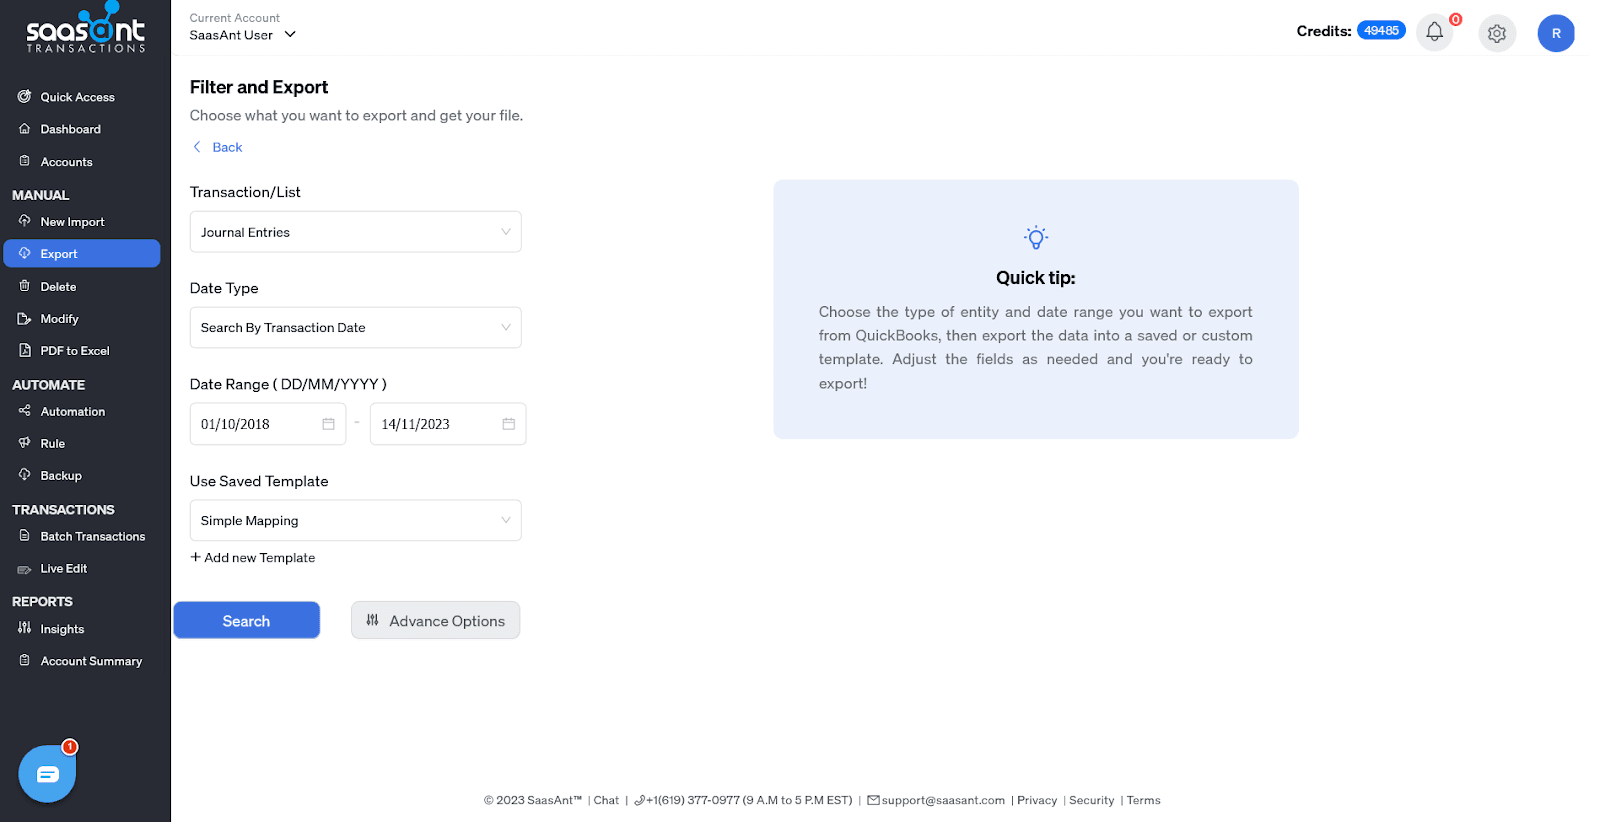
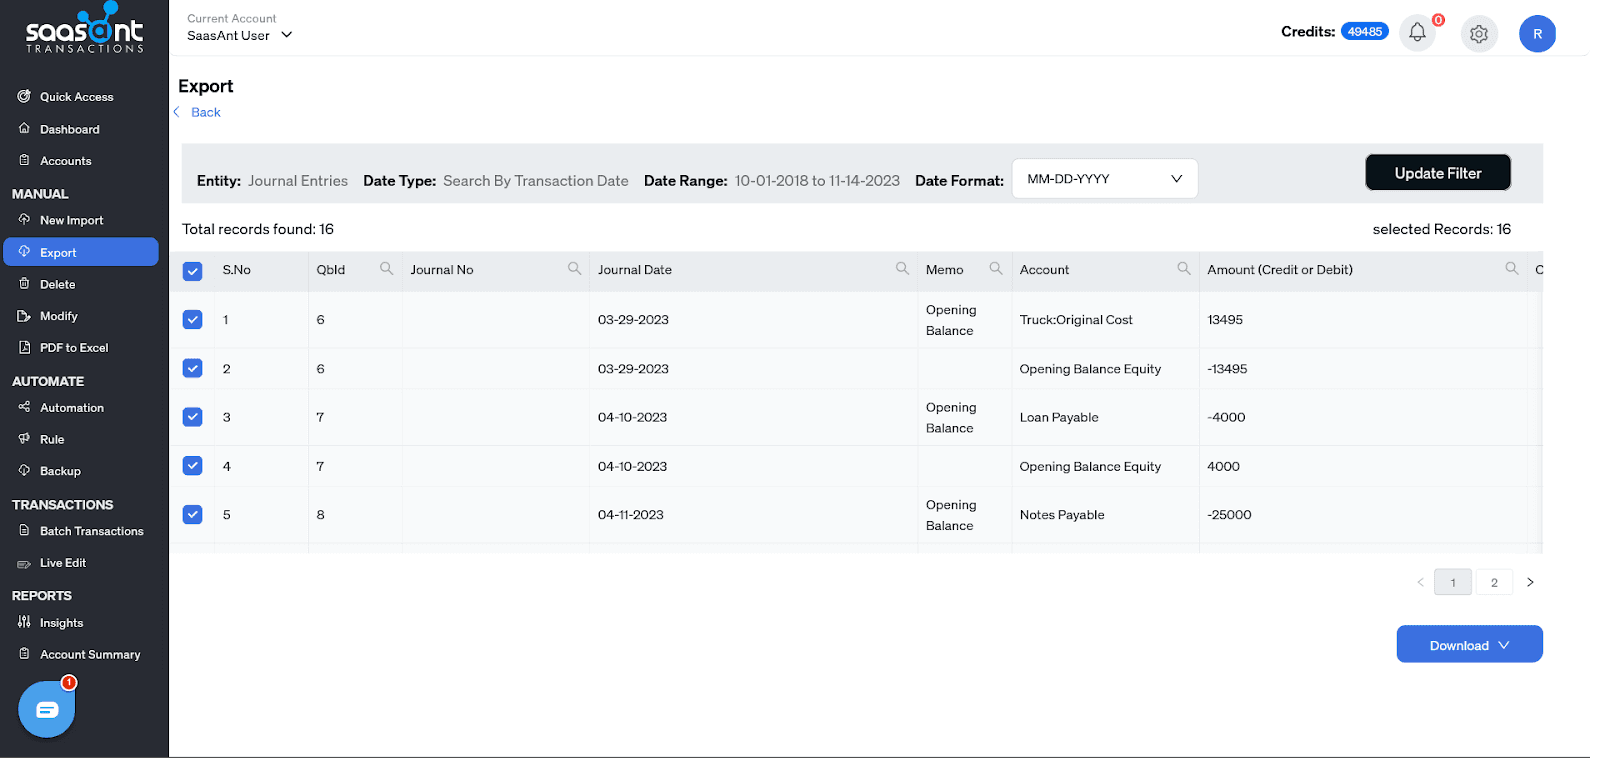
Click on ‘Search’ and click ‘Download.’ You can download the file in Excel or CSV format.
The data will be downloaded in the SaasAnt Template, allowing you to migrate the data to QuickBooks Online easily.
Prepare Data for Import: Open the exported files and review the data. Ensure that you include and format all necessary information.
Step 2: Set Up QuickBooks Online and Connect with SaasAnt Transactions
Create a ‘New QuickBooks Online Account.’ If you already have a QuickBooks account, create a ‘New Account’ to avoid confusion and discrepancies.
Open the SaasAnt Transactions app in QuickBooks Online Appcenter once your data is ready.
Navigate to the ‘Apps’ page in QuickBooks after logging in to locate the SaasAnt Transactions. After selecting “Get the app now” to connect, you can quickly start with the migration.
To import the journal entry, Open SaasAnt Transactions and click ‘New Import.’ Choose the transaction type as ‘Journal Entry’ and upload the exported file.
Step 3: Data Mapping
After uploading the file, click the ‘Next’ button at the bottom of the screen, which will take you to the data mapping. This step is crucial to ensure all your journal entry data is migrated correctly to your new account in QuickBooks Online.
SaasAnt Transactions will automatically map the fields to their corresponding QuickBooks fields.
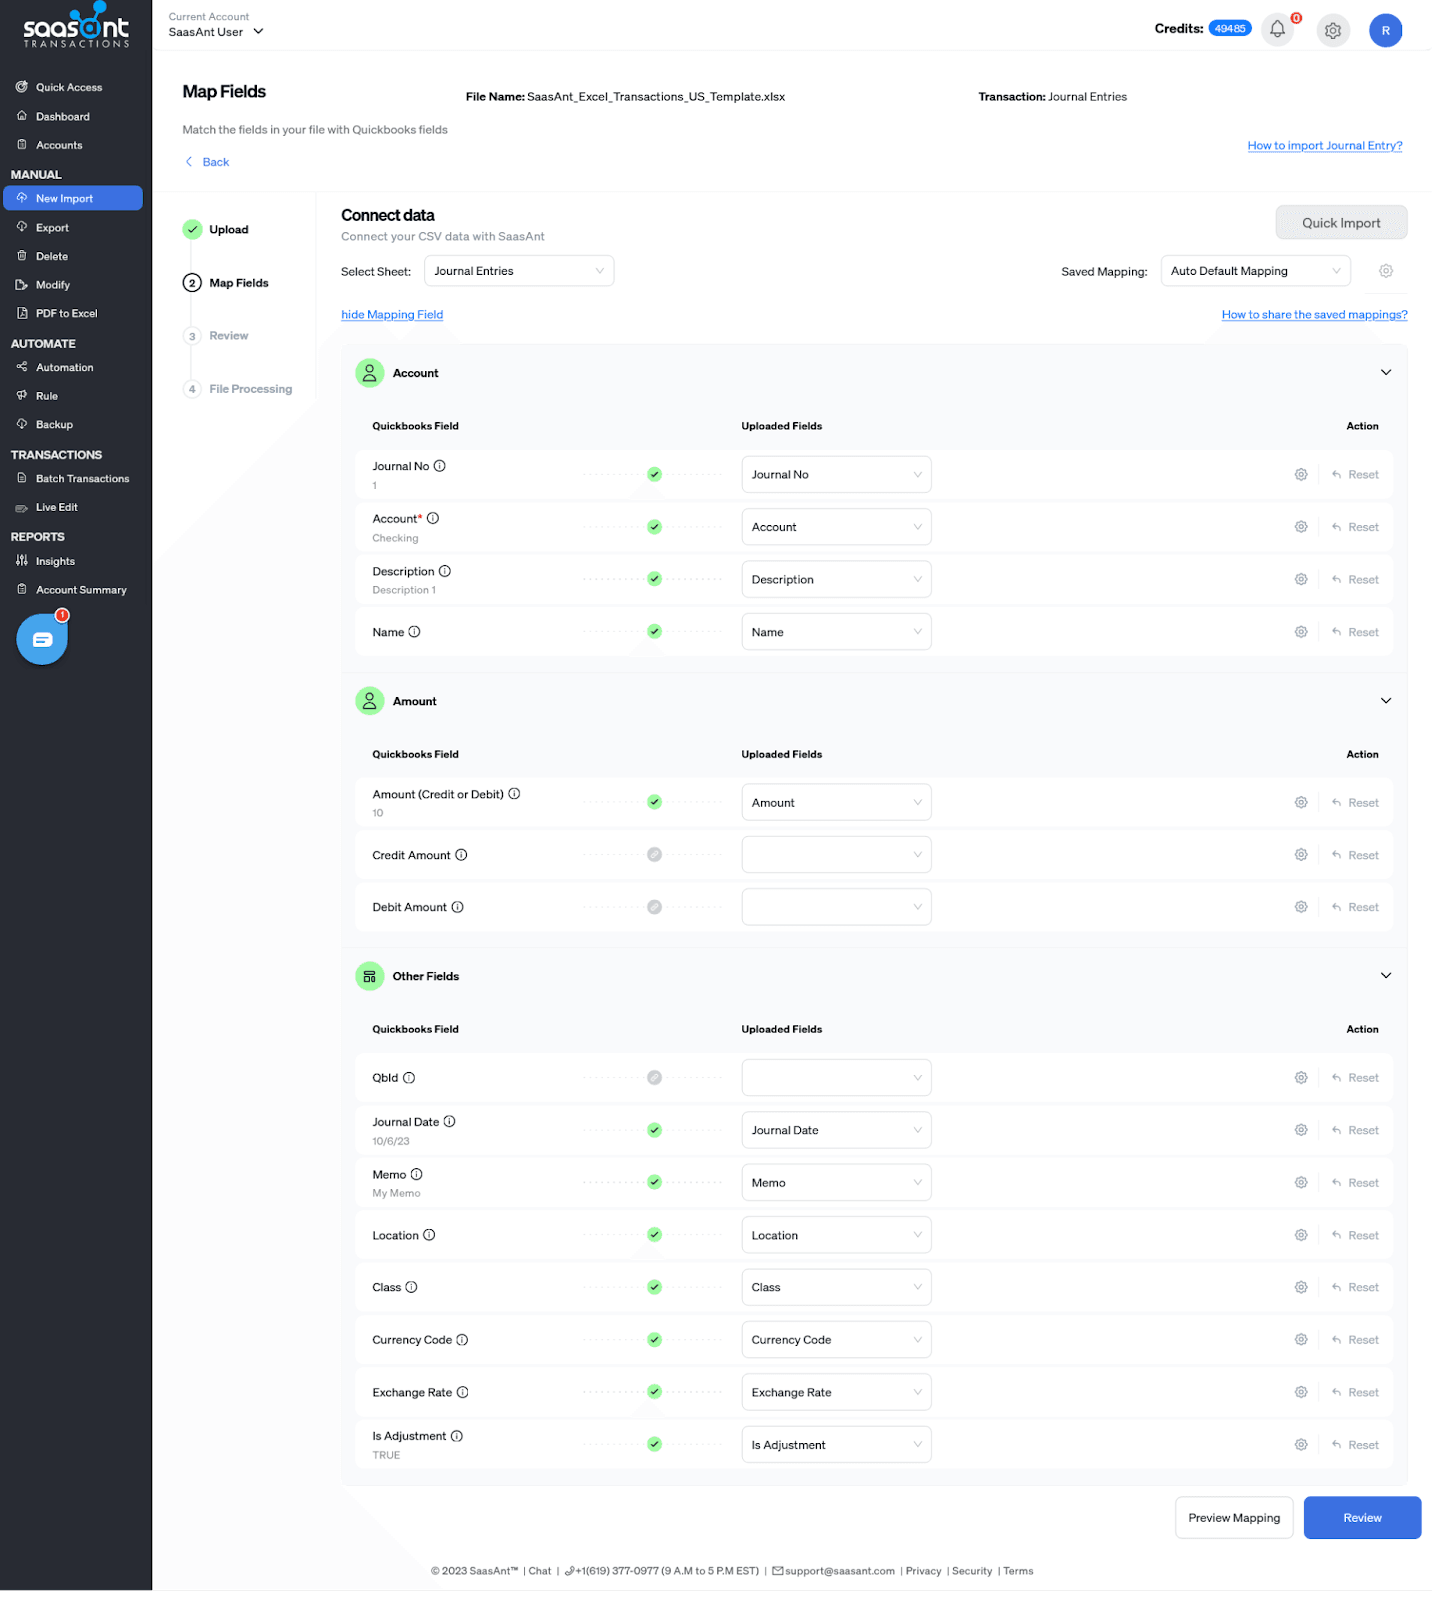
You can use your custom template or the SaasAnt template for uploading your data. SaasAnt template allows you to map all the fields accurately without any discrepancies.
Note: If you are dealing with different countries, you only have to enable ‘Multi-currency’ at QuickBooks. To do this, click on ‘Advanced & settings, select ‘Advanced’ and then select ‘Multi-currency and click on ‘Enable.’
Once the mapping is complete, initiate the migration process. SaasAnt Transactions ensures the secure transfer of your data to QuickBooks Online.
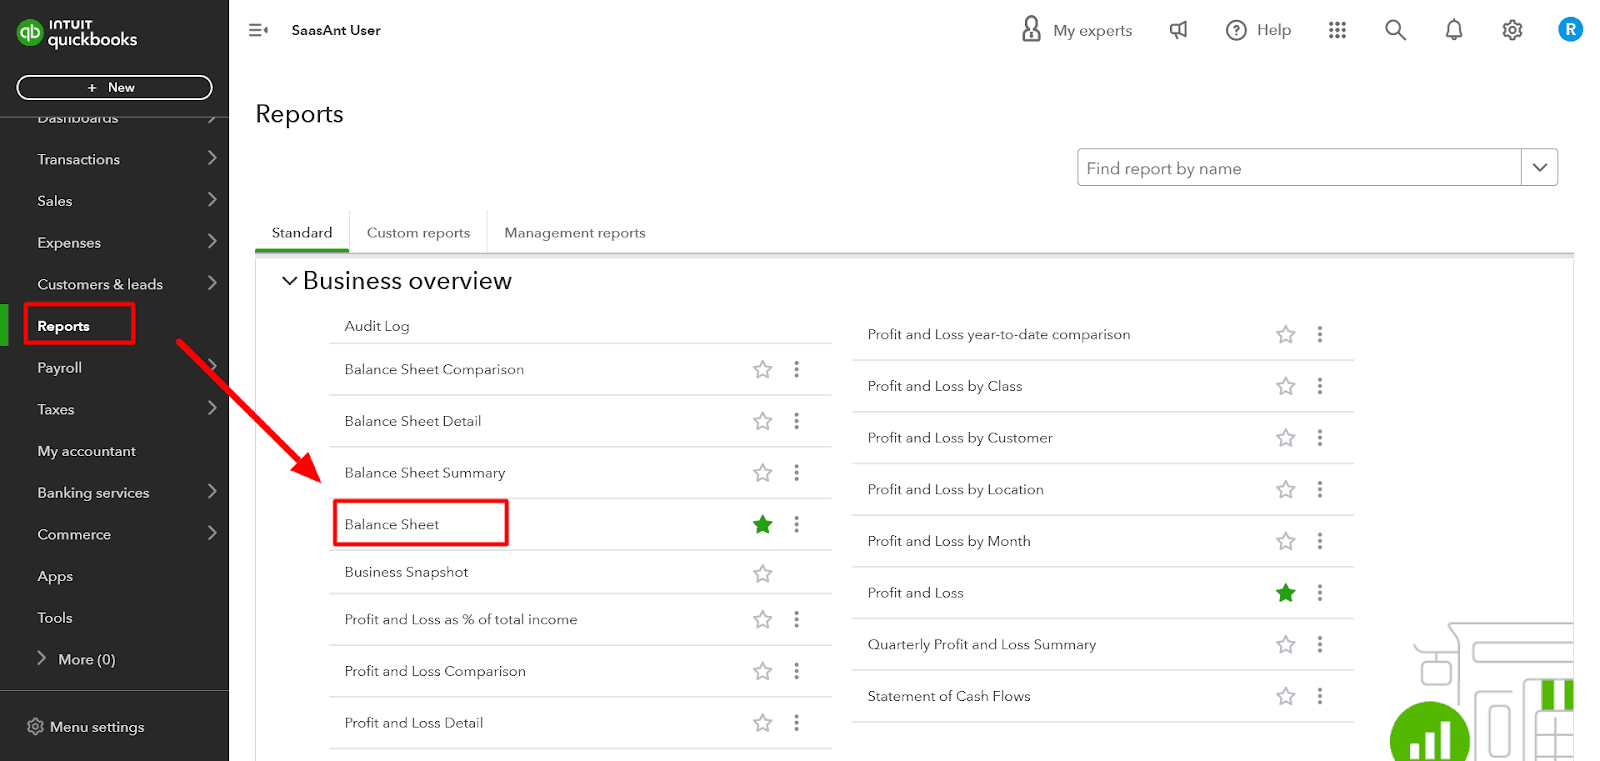
Step 4: Generate Reports
Generate reports in QuickBooks Online and compare them with your reports from Xero to confirm the accuracy of the migration.
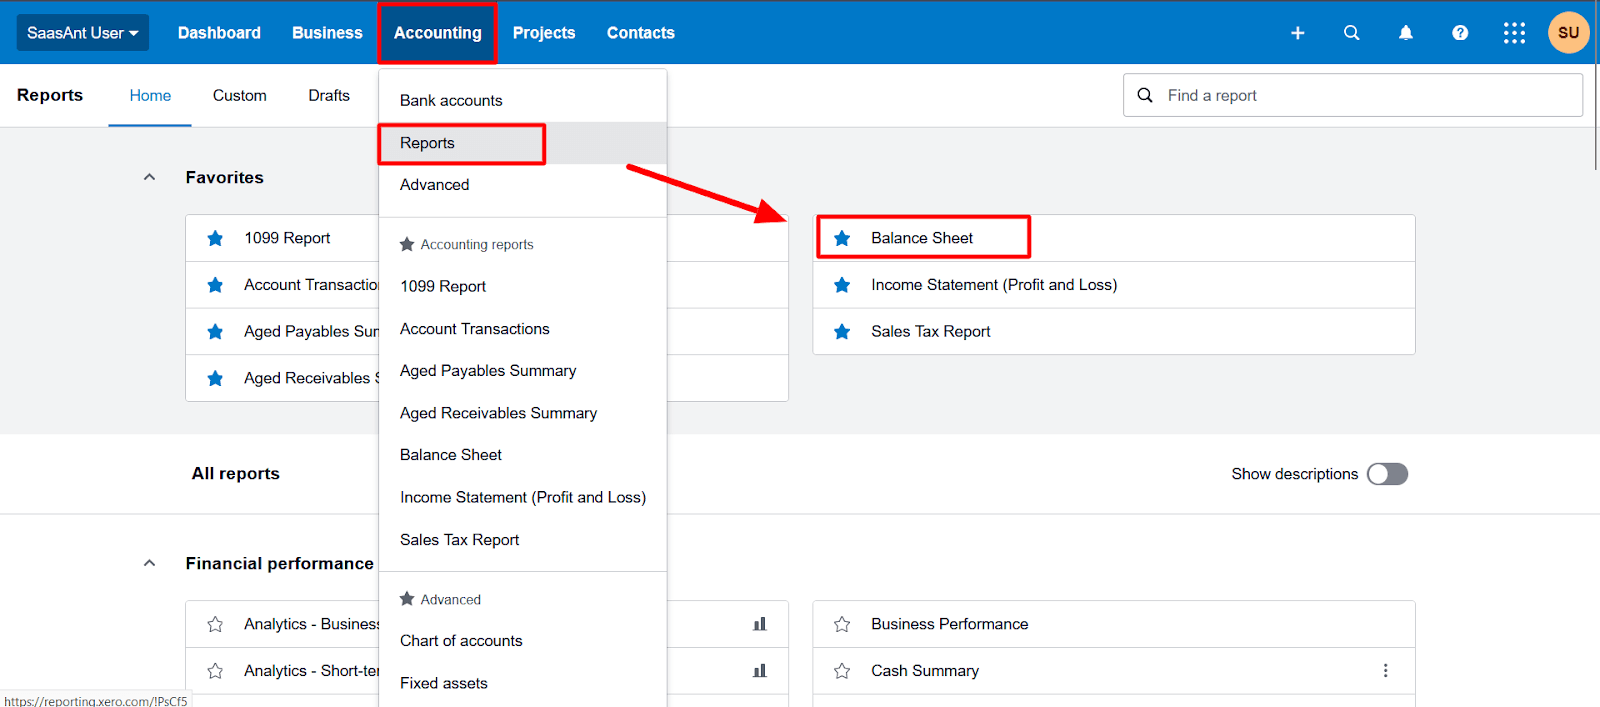
To generate reports, open ‘Reports’ in QuickBooks Online and check ‘Balance sheet’ and ‘General Ledger.’
In Xero, click on ‘Accounting’ -> ‘Reports.’ Then check the ‘Balance Sheet.’
Your migration from Xero to QuickBooks Online is complete if everything matches without errors.
Common Errors while Migrating Data from Xero to QuickBooks Online
Migrating data from Xero to QuickBooks Online can be a complex process, and several common errors might occur during this transition. Here are some of the common errors that users might encounter:
There will be errors if the name provided in the Excel file does not match.
Also, the error occurs when the debit and credit amounts need to match.
For example, let’s say you mentioned a customer name in Xero, and the customer name is not available in QuickBooks; then there is a possibility that an error might occur.
Data issues with date formats, currency symbols, and decimal separators might also occur.
Based on the error, you must make changes in QuickBooks or the Excel file.
Conclusion
Migrating from Xero to QuickBooks Online is essential to managing your finances. In this transition, SaasAnt Transactions serves as your reliable ally, making the migration smoother and ensuring the safety of your data.
FAQ’s
How do you transfer invoices from Xero to QuickBooks Online?
To transfer invoices from Xero to QuickBooks Online, connect SaasAnt Transactions with Xero, click ‘Export’ ->, choose the entity as ‘Invoices’ ->, select the particular date range, and click Download and invoices are downloaded in an Excel/ CSV file format.
Now, open QuickBooks Online and connect with SaasAnt Transactions. Now, open SaasAnt Transactions -> click on ‘Import’ -> select the entity as ‘Invoices’ -> browse the invoice file -> Map the fields accurately with QuickBooks fields -> click on ‘Import’ to transfer invoices from Xero to QuickBooks Online.
Can I switch back to Xero after using QuickBooks Online for several months, and what is the process?
Yes, switching back to Xero after using QuickBooks Online for several months is generally possible. Follow the below steps;
Step 1: Connect your QuickBooks to SaasAnt Transactions to export all your necessary financial data, such as journal entries, chart of accounts, customer and supplier details, transactions, invoices, and bills.
For instance, if you’re looking to export journal entries, open SaasAnt Transactions -> click on ‘Export’ -> select the entity as ‘Journal entries’ -> select the date range, and click on ‘Download.’
Step 2: Ensure your Xero subscription is active and set up for the import. After connecting SaasAnt Transactions with Xero, open SaasAnt Transactions -> click on ‘Import’ -> select the entity as ‘Journal entries’ -> browse the file -> map the fields accurately, and click ‘Import.’
This way, you’ve successfully switched back to Xero from QuickBooks Online. After import, reconcile all transactions to ensure that your data matches the records you had in QuickBooks Online. Ensuring that the balances in Xero accurately reflect your financial position is crucial.
How can I export data from Xero?
To export data from Xero, connect your Xero account to the SaasAnt Transactions (Online) App from the Xero App by clicking the “Get this app” button. Then, click on the “Export” Menu to export the data. Select the entity and date range, and click on download the data.
Can I choose which data to migrate from Xero to QuickBooks with SaasAnt Transactions?
Yes, you can choose which data to migrate based on your requirements. Whether you want to transfer invoices, journal entries, expenses, credit card statements, or bank statements, SaasAnt Transactions allows you to download and migrate specific entities as required.
Without Intuit’s technical support, what resources or third-party services are available to assist with this migration?
SaasAnt Transactions is a practical application that offers powerful accounting automation and can be an invaluable resource for users seeking to migrate data without direct support from Intuit.
Could there be any data loss or feature limitations when moving data from QuickBooks Online to Desktop?
Yes, when migrating from Xero to QuickBooks Online, data loss or feature limitations may occur due to:
Differences in the platforms’ features and data structures.
Possible incompatibilities in custom fields, reporting, and inventory management.
Limitations in historical data and payroll information transfer.
Variances in user permissions and third-party app integrations.
Tags
Read also
What Are the 3 Primary Ways to Migrate Client Data to QuickBooks Online?
A Step-by-Step Guide to Migrating from QuickBooks Desktop to Online
Migrating from QuickBooks Desktop to QuickBooks Online
Streamlining Your FreshBooks to QuickBooks Migration with SaasAnt Transactions