Import Checks into QuickBooks Desktop
This guide will walk you through importing checks into QuickBooks Desktop.
Import Checks into QuickBooks Desktop: Quick Instructions
Download and install the SaasAnt Transactions Desktop
Navigate to the dashboard and access the 'Import' section.
Initiate the process by clicking on 'Let's Import.'
Choose 'Checks' as the 'QuickBooks Transaction Type.'
Effortlessly map essential QuickBooks fields such as 'Date,' 'Bank Account,' 'Transaction ID,' 'Description,' 'Payee,' 'Account,' and 'Amount.'
Customize data mapping conditions to tailor your expense management.
Click Upload to initiate the import.
After a successful import, review the imported data to validate the import.
Optimizing Check Imports
SaasAnt Transactions offers a streamlined solution for optimizing check imports. Manual data entry of financial transactions can be challenging, with common issues like errors and time-consuming tasks. Let's explore how SaasAnt Transactions Desktop, a user-friendly desktop application, helps simplify the process, making the check import experience efficient and hassle-free.
Streamlining Monthly Check Batch Import for Small Businesses
In the context of small businesses regularly receiving checks from customers and suppliers, SaasAnt Transactions plays a pivotal role. At the end of each month, these businesses must import a batch of checks into QuickBooks Desktop to reconcile their accounts.
SaasAnt Transactions streamlines check imports, enabling batch uploads, precise data mapping, customizable rules for consistency, and efficient error resolution, enhancing the efficiency and accuracy of the process.
Consolidating Checks from Multiple Sources with SaasAnt Transactions
Businesses often handle checks from various sources, including online payments, in-person transactions, and mailed checks. Efficiently consolidating and importing these checks into accounting software like QuickBooks Desktop is essential for streamlined financial tracking.
SaasAnt Transactions streamlines check imports from various sources and file formats (XLSX, XLS, TXT, CSV, IIF), ensuring precise data mapping, customizable source-specific rules, and efficient error resolution, ultimately preserving data integrity during consolidation.
Streamlining Data Cleanup for Historical Check Data
When businesses need to import historical check data into QuickBooks Desktop, often requiring consistent formatting like varying date formats and account codes, SaasAnt Transactions is a go-to solution.
Data Standardization: SaasAnt Transactions simplifies data standardization during import, converting diverse date formats into a uniform standard for seamless integration.
Custom Data Transformation: Users can harness the power of SaasAnt Transactions to create customized rules that transform and clean up data before it enters QuickBooks, ensuring a consistent and accurate record.
Error Identification and Resolution: During data import, the applications’ efficient identification and resolution capabilities are instrumental in addressing formatting or data-related errors in historical data and maintaining data integrity.
How to Import Checks into QuickBooks Desktop: Step-By-Step Guide
Step 1: Start with SaasAnt Transactions Desktop and Commence Import
To install and activate the free trial of SaasAnt Transactions Desktop, first download the latest version by clicking on the free trial. Run the "SaasAntTransactions-Setup.exe" file with administrative privileges, accept the license agreement, choose your installation path, and complete the setup.
After installation, launch the application, navigate to Subscription > Register, and enter the license key provided in your confirmation email to activate the software. Ensure your computer has an active internet connection during this process.
You're ready to begin by simply clicking the prominent 'Import' button on the homepage.
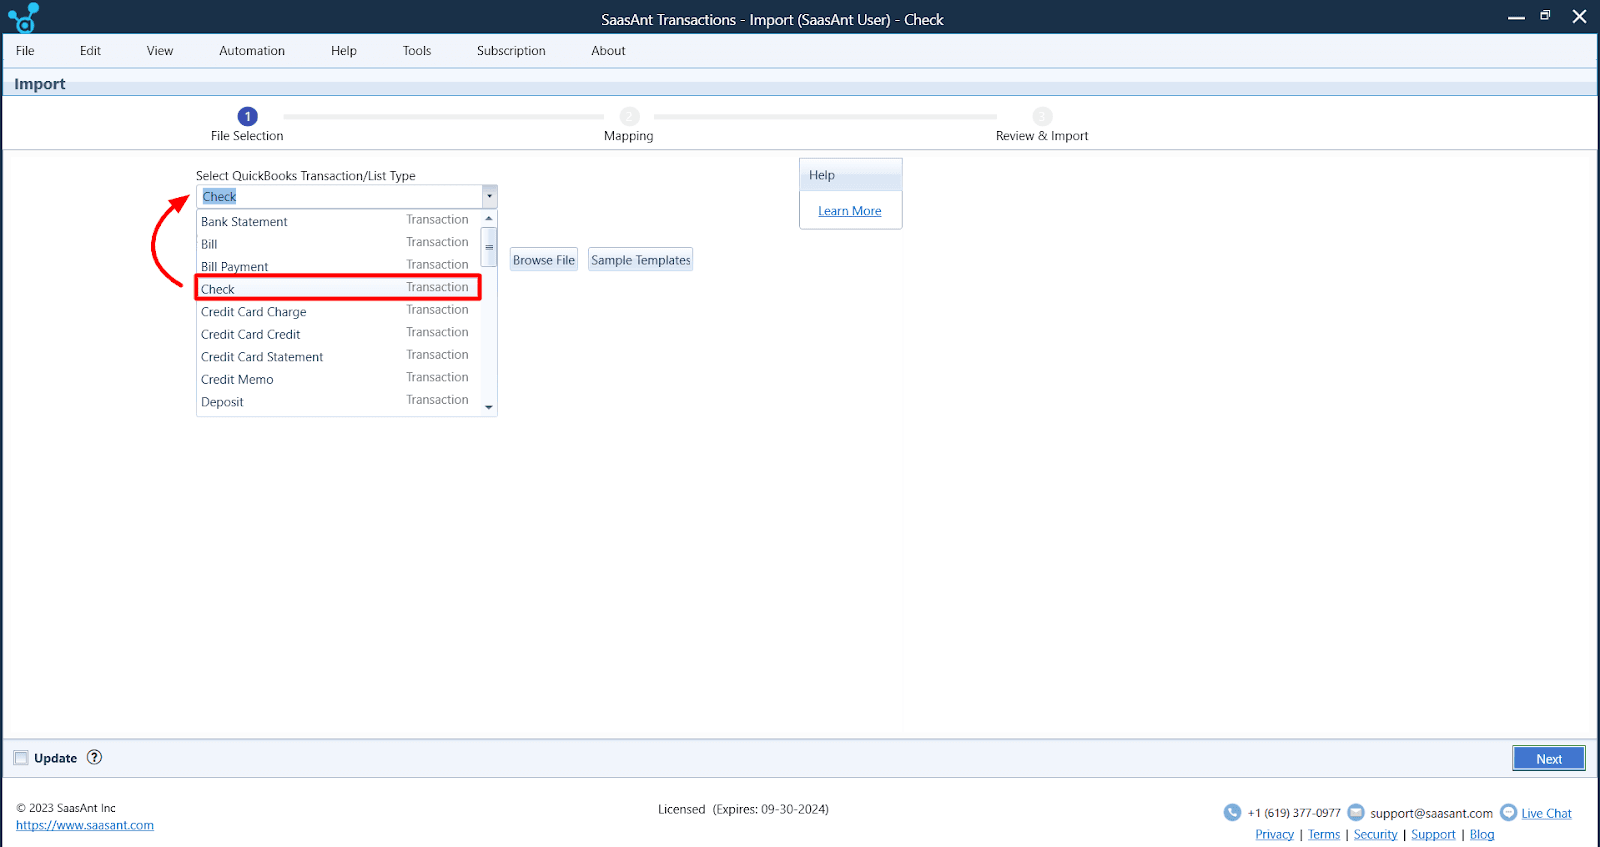
Step 2: Choose the Appropriate QuickBooks Transaction Type
Within the 'Import' window, navigate to the 'QuickBooks Transaction Type' section. Improve categorization by selecting 'Checks’ from the dropdown menu that best suits your financial transactions.
Step 3: Seamlessly Upload Your Payment File
Progress smoothly by uploading your 'Checks.' Click the 'Browse File' button, and your selected file will seamlessly integrate into the system.
Step 4: Select the Relevant Sheet from a CSV File
Use the 'Select Sheet' option when dealing with CSV files containing multiple sheets. Choose the suitable sheet from the dropdown menu that includes the data you intend to import.
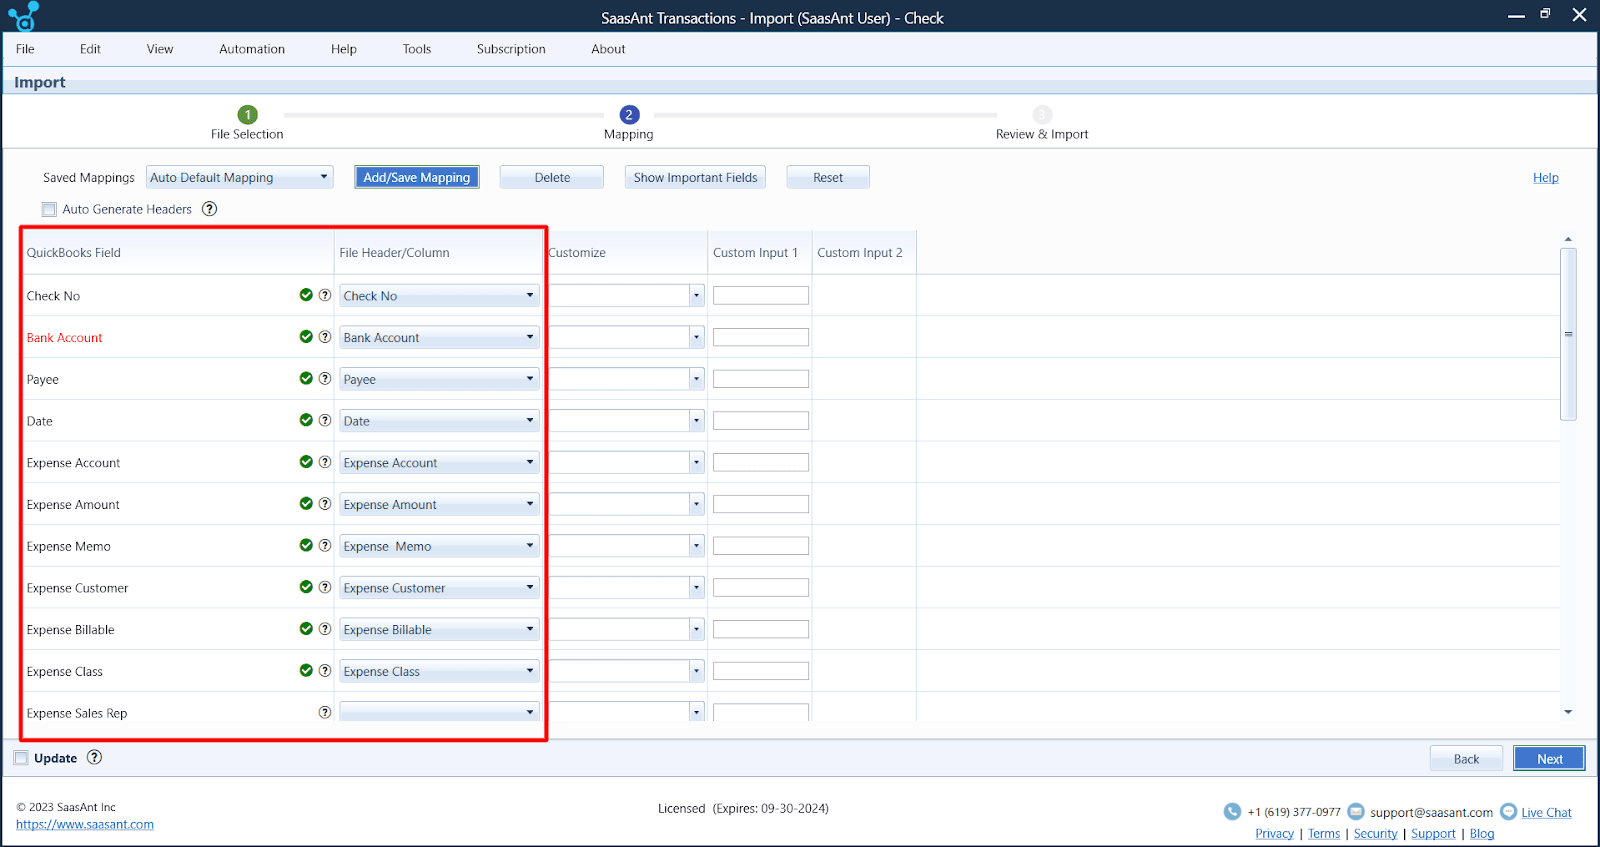
Step 5: Configure Essential QuickBooks Fields with Ease
Click 'Next' to move to the 'Data Mapping' window. Here, easily configure crucial data mapping for vital QuickBooks fields like 'Date,' 'Bank Account,' 'Transaction ID,' 'Description,' 'Payee,' 'Account,' and 'Amount.'
Step 6: Simplify Data Mapping Configuration
In the 'Data Mapping' window, utilize the user-friendly 'Auto Generate Headers' feature to simplify handling files without headers. Employ the 'Customize' option to fine-tune specific fields for personalized adjustments.
Step 6.1: Customize Specific Fields for Advanced Flexibility (Optional)
Optimize advanced flexibility using the 'Customize' option. Tailor conditions to align with your requirements, whether it's 'Set value if empty,' 'Override,' or 'Replace if matches.'
Step 6.2: Initiate the Smooth Import Process
With data mapping perfectly configured, confidently proceed by clicking 'Next,' smoothly transitioning to the 'Review & Import' phase.
Step 7: Set Preferences and Confirm Accuracy
Configure your preferences and meticulously review the preview. When ready, advance your Checks management process by clicking the 'Send to QuickBooks' button at the bottom.
Step 8: Address Any Errors (If Necessary)
Encounter errors? No problem. Access the 'Error Log' section, review the displayed errors, and commence the resolution process by clicking the integrated 'Fix' button.
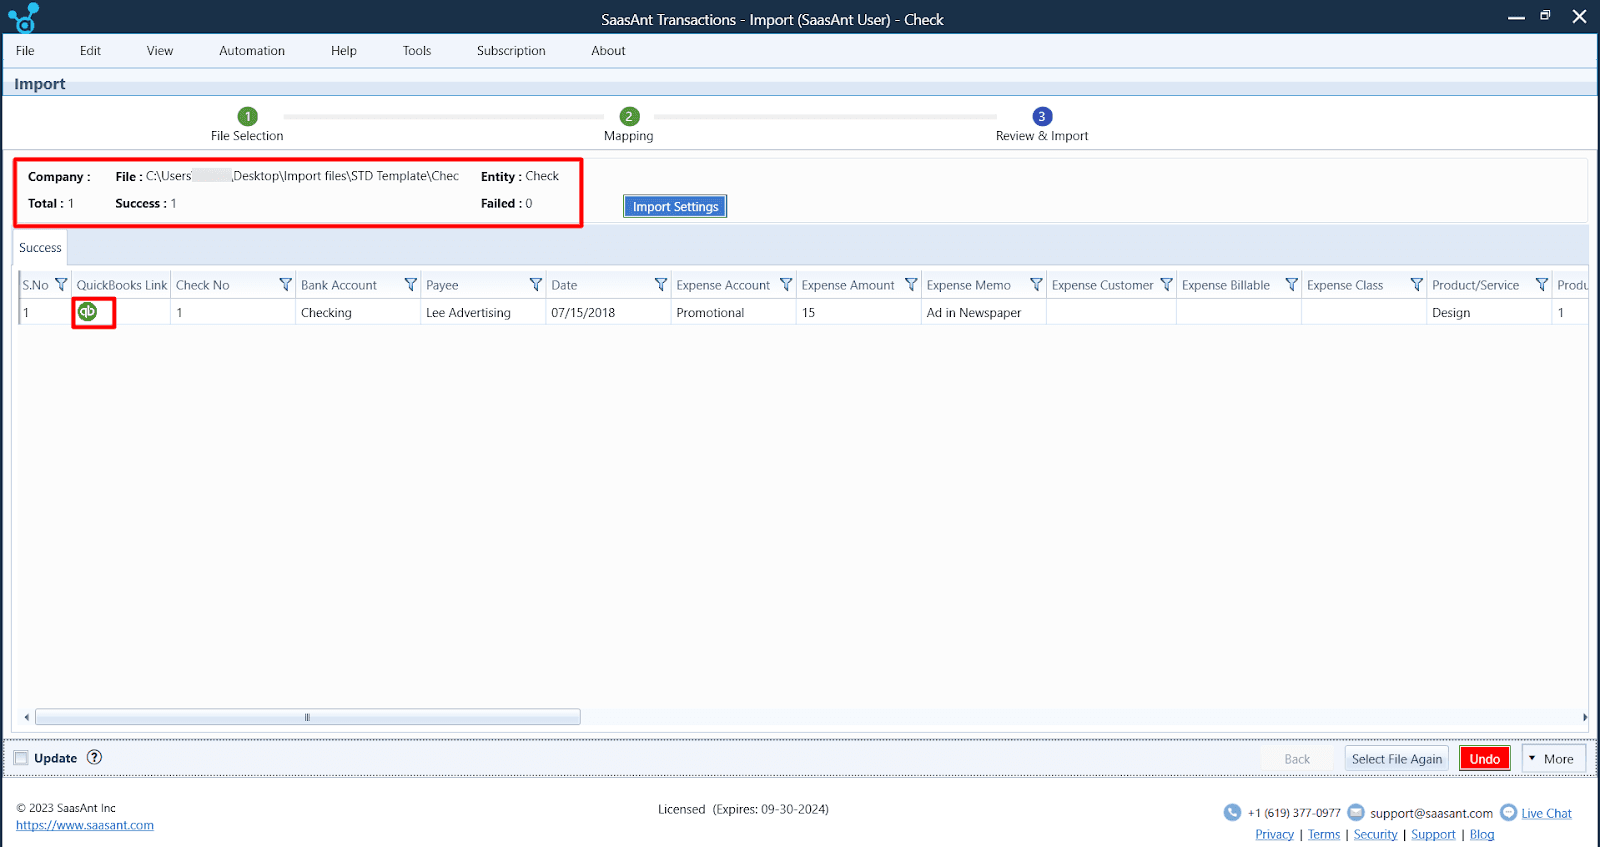
Step 9: Successfully Complete the Import
With errors resolved and data accurately aligned, conclude your import journey by clicking 'Send to QuickBooks.'
To learn more, check out this article on importing checks into QuickBooks Online.
Wrap Up
SaasAnt Transactions offers an efficient and accurate solution for importing checks into QuickBooks Desktop. Its user-friendly interface and robust features simplify the process, from data mapping and customization to error resolution. Whether handling monthly check batches, consolidating checks from various sources, or cleaning up historical check data, SaasAnt Transactions streamlines financial processes, ensuring data integrity and efficiency.
FAQs
What Is SaasAnt Transactions Desktop, and How Does It Help Import Checks into QuickBooks Desktop?
SaasAnt Transactions Desktop is a software solution that seamlessly integrates with QuickBooks Desktop, enabling businesses to import check-related data efficiently and accurately. It streamlines check imports, allowing batch uploads, precise data mapping, customizable rules for consistency, and efficient error resolution, enhancing the efficiency and accuracy of the process.
What Are the Steps to Import Checks into QuickBooks Desktop Using SaasAnt Transactions?
The steps to import checks into QuickBooks Desktop using SaasAnt Transactions are as follows:
Launch SaasAnt Transactions Desktop and click on the 'Import' button.
Select 'Checks' from the 'QuickBooks Transaction Type' dropdown menu.
Upload your 'Checks' file by clicking the 'Browse File' button.
Choose the relevant sheet from the dropdown menu if dealing with CSV files containing multiple sheets.
Configure essential QuickBooks fields like 'Date,' 'Bank Account,' 'Transaction ID,' 'Description,' 'Payee,' 'Account,' and 'Amount' in the 'Data Mapping' window.
Use the 'Auto Generate Headers' feature to simplify handling files without headers or customize specific fields for advanced flexibility.
Review the preview and configure your preferences before clicking the 'Send to QuickBooks' button.
Address errors by accessing the 'Error Log' section and clicking the 'Fix' button.
Click 'Send to QuickBooks' to complete the import process.
What Are the Benefits of Using SaasAnt Transactions for Importing Checks into QuickBooks Desktop?
The benefits of using SaasAnt Transactions for importing checks into QuickBooks Desktop are:
Streamlined check imports with batch uploads.
Precise data mapping.
Customizable rules for consistency.
Efficient error resolution.
Consolidation of checks from various sources and file formats.
Customizable source-specific rules
Simplified data standardization
Customized data transformation
What Other Types of Transactions Can Be Imported into QuickBooks Desktop Using SaasAnt Transactions?
Apart from checks, SaasAnt Transactions can import different transactions such as invoices, expenses, bills, payments, payment items, and deposits into QuickBooks Desktop from Excel using SaasAnt Transactions.
Can SaasAnt Transactions Import Historical Check Data into QuickBooks Desktop?
SaasAnt Transactions can import historical check data into QuickBooks Desktop. It simplifies data standardization during import, converts diverse date formats into a uniform standard for seamless integration, creates customized rules that transform and clean up data before it enters QuickBooks, and efficiently identifies and resolves formatting or data-related errors in historical data, maintaining data integrity throughout the process.
Tags
Read also
Import Checks into QuickBooks Online: Step-by-Step Guide
How to Import Invoices into QuickBooks Enterprise?
PDF Invoices Importation into QuickBooks Desktop