Import Expenses into QuickBooks Desktop from Excel
Managing expenses in QuickBooks Desktop poses significant challenges across various industries. Manual data entry is not only time-consuming but also prone to errors, leading to inaccurate financial records. The lack of integration between expense management systems and existing financial software often results in data discrepancies and redundant entries, slowing down processes. As businesses grow, handling a high volume of transactions becomes overwhelming, and older versions of QuickBooks Desktop may lack essential features, further complicating expense management.
SaasAnt Transactions Desktop offers a comprehensive solution to these issues. It enables bulk import, export, and deletion of transactions from various file formats directly into QuickBooks Desktop, reducing manual data entry and minimizing errors. The software provides customizable import settings and advanced custom rules, allowing for accurate data mapping and automated categorization of expenses. Additionally, SaasAnt Transactions Desktop includes robust validation features to detect discrepancies before data is imported, ensuring the integrity of financial records. For businesses using older versions of QuickBooks Desktop, SaasAnt extends usability by providing an alternative method to import expenses, delaying the need for immediate upgrades.
By leveraging SaasAnt Transactions Desktop, businesses can overcome common challenges associated with expense management in QuickBooks Desktop, leading to more efficient workflows and accurate financial reporting.
Importing Expenses into QuickBooks Desktop: Quick Instructions
Download & install SaasAnt Transactions Desktop
Launch SaasAnt Transactions, click ‘File’ and select ‘Connect to QuickBooks.’
Click 'Import' on the home page and navigate to the Import screen.
Upload your Excel/CSV expense file.
Choose 'Transaction Type' and select from various QuickBooks expense-related transaction types like expenses, bills, purchase orders, and bill payments.
Map your file headers with QuickBooks fields and ensure mandatory fields like date, bank account, payee, and amount are mapped accurately.
Initiate import and validate imported data in QuickBooks Desktop to ensure accuracy.
Import Expenses into QuickBooks Desktop from Excel: Step-by-Step Guide
Efficiently manage your expenses by seamlessly importing them into QuickBooks Desktop using SaasAnt Transactions. Follow this detailed guide to simplify importing expense-related transactions from an Excel/CSV file into QuickBooks with a few clicks.
Step 1: Launch SaasAnt Transactions Desktop and Initiate Import
Download the latest SaasAnt Transactions Desktop version.
Run SaasAntTransactions-Setup.exe as an administrator.
Accept the license agreement and complete the installation.
Open the app, go to Subscription > Register.
Enter the license key from your confirmation email.
Keep your internet connection active
After installation, launch the application, navigate to Subscription > Register, and enter the license key provided in your confirmation email to activate the software. Ensure your computer has an active internet connection during this process.
Launch the SaasAnt Transactions Desktop application and kickstart the process by clicking the 'Import' button on the home page.
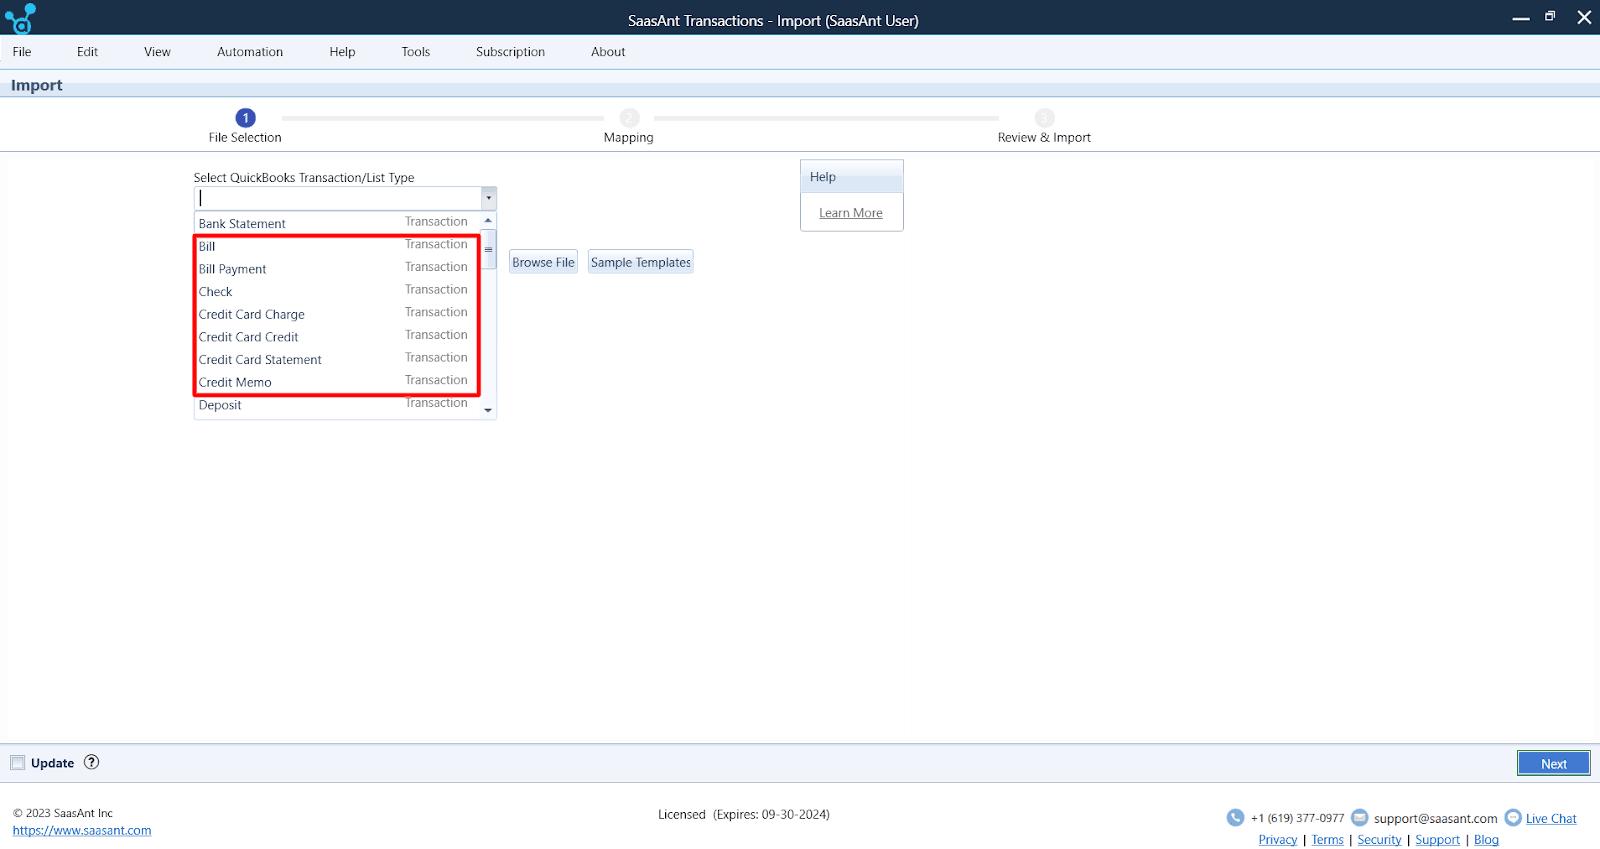
Step 2: Choose QuickBooks Transaction Type
In the 'Import' window, locate the 'QuickBooks Transaction Type' section. Choose the relevant expense transaction category from the dropdown menu, including options like 'Purchase Orders,' 'Item Receipts,' 'Bills,' 'Bill Payments,' 'Checks,' or 'Credit Card Statement.'
Step 3: Upload Your File
Once you've selected the appropriate QuickBooks Transaction type, proceed by clicking the 'Browse File' button to begin uploading your desired file.
Step 4: Map QuickBooks Fields
Once the sheet is selected, click the 'Next' button to access the 'Data Mapping' window. Here, you'll configure essential data mapping for QuickBooks fields such as 'Date,' 'Bank Account,' 'Check Number,' 'Description,' 'Payee,' 'Account,' and 'Amount.'
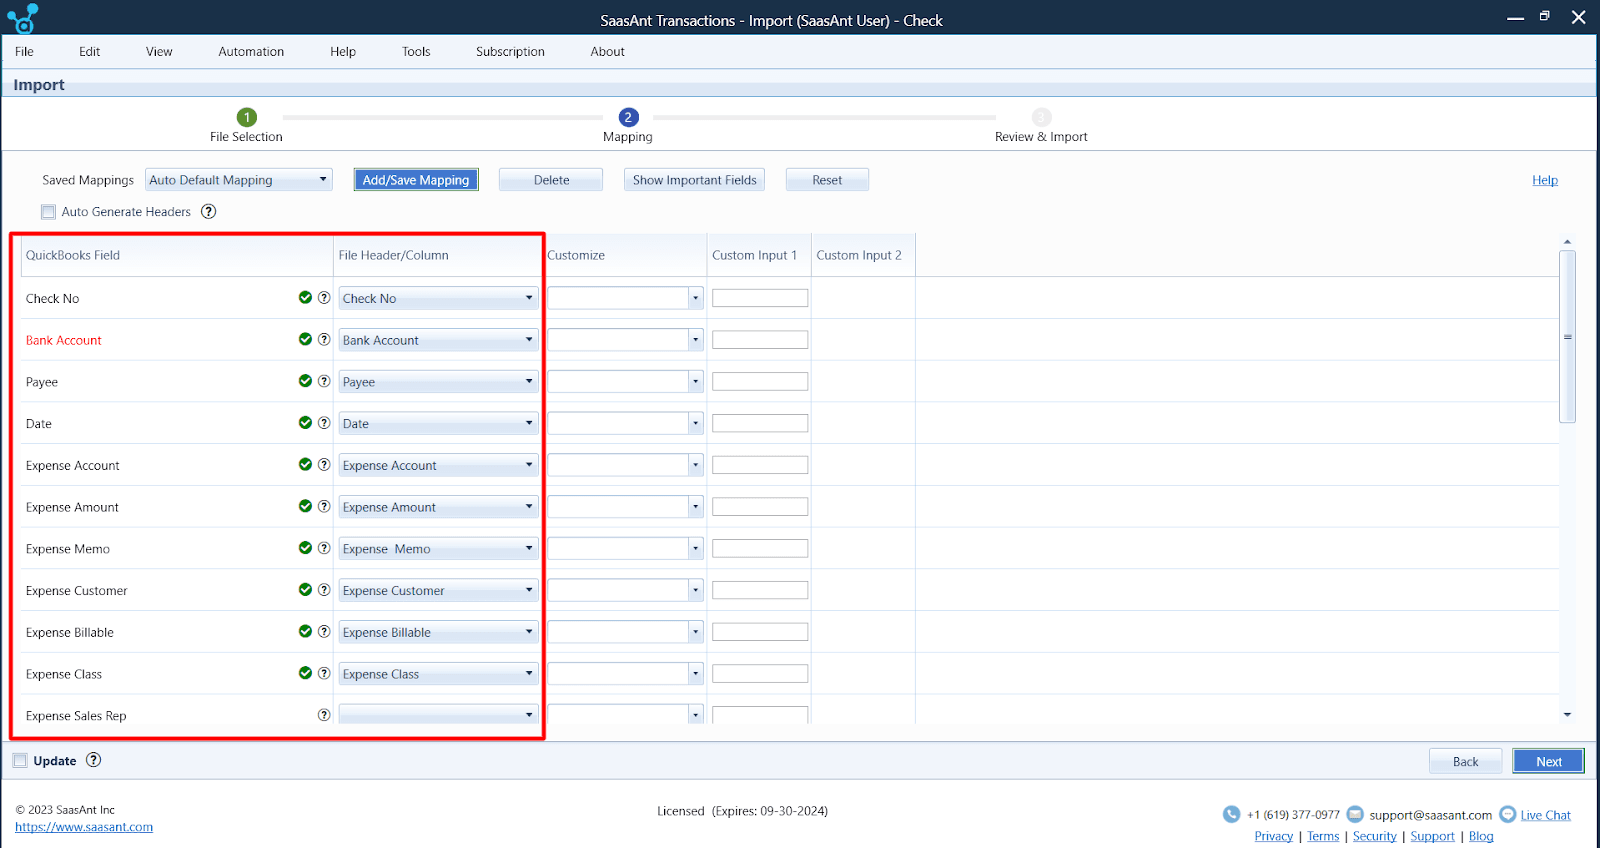
Step 5: Configure Data Mapping
Precision in field mapping is vital when importing into QuickBooks Desktop. SaasAnt Transactions simplifies this step with a user-friendly interface that prevents errors. For guidance, consult the SaasAnt support portal for a seamless and accurate import process.
Now, match the fields in your file with the corresponding QuickBooks fields. It ensures that the data aligns correctly during the import process. Data mapping is crucial for accurate data import.
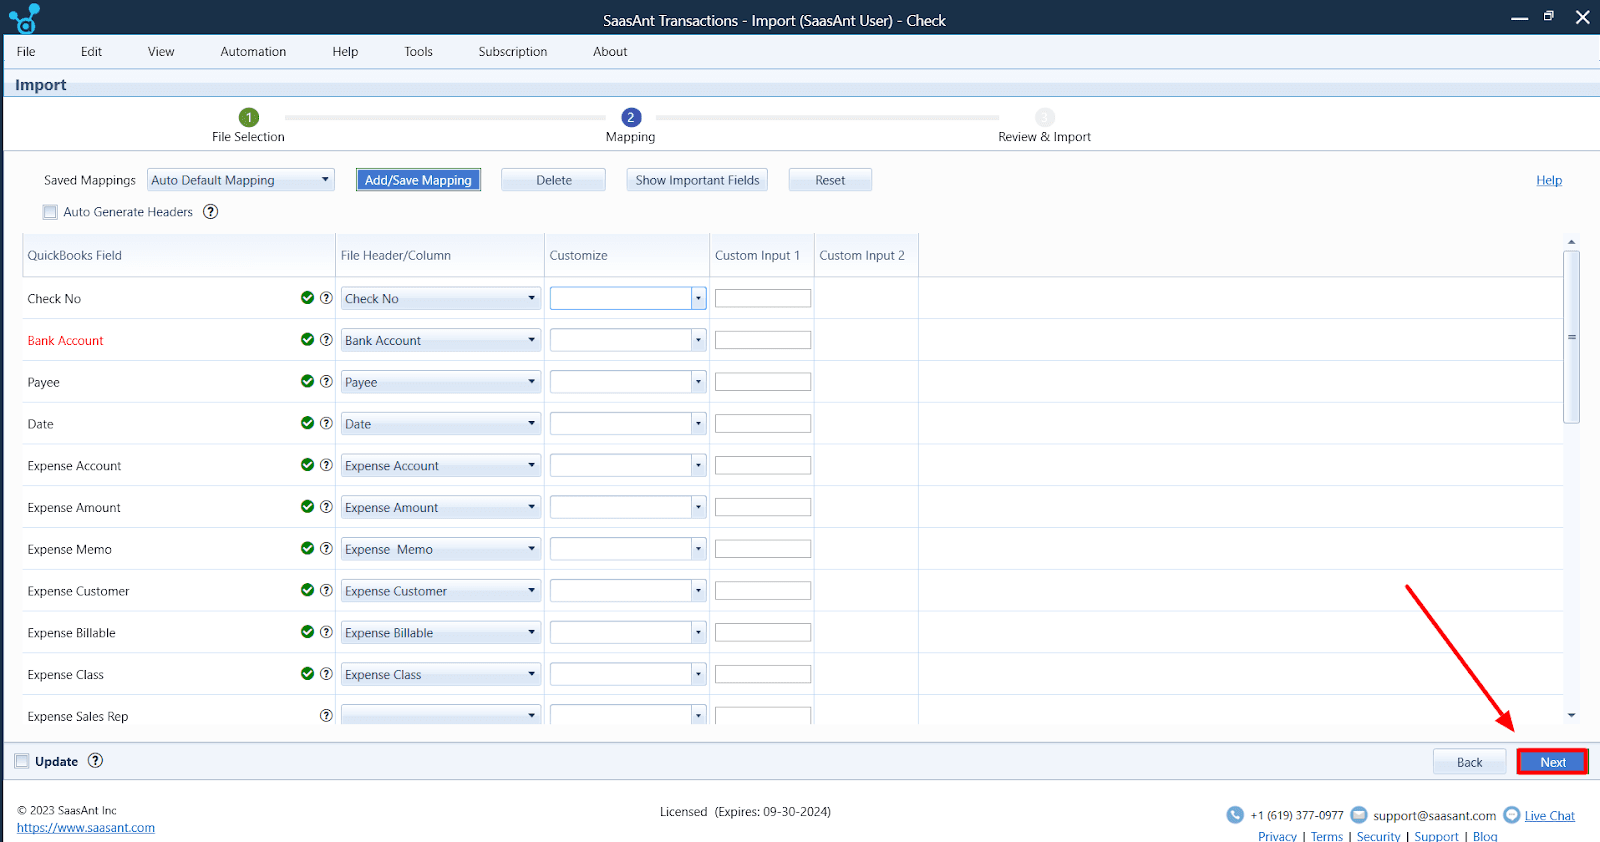
In the 'Data Mapping' window, leverage SaasAnt Transactions Desktop's 'Auto Generate Headers' feature to handle files without any headers. Customize specific fields using the 'Customize' option for advanced adjustments.
Utilize the 'Customize' option to tailor conditions according to your requirements, like 'Set value if empty,' 'Override,' 'Replace if matches,' and more.
Once you've fine-tuned the 'Data Mapping,' move ahead by clicking 'Next' to proceed to the 'Review & Import' process.
Step 6: Configure and Confirm
Set your preferences and review the preview table to ensure the accuracy of the file data. To begin the import, click the 'Send to QuickBooks' button at the bottom. If there are any import errors, you'll find them displayed in the 'Error Log' section. Click the 'Fix' button within the application to correct these errors. To ensure the accuracy of your imported expenses, click on the 'Number with QuickBooks icon' to access the data in your QuickBooks account. This final verification step instills confidence in the imported data.

To learn more, check out this article on import expenses from Excel into QuickBooks.
Wrap Up
Effectively handling expenses is a fundamental aspect of sound financial management for businesses. The integration of expenses into QuickBooks Desktop has evolved into a crucial method for improving operational efficiency, saving time, and reducing errors.
From initiating the import process to mapping QuickBooks fields and addressing potential errors, every step is meticulously detailed to ensure a smooth experience. By leveraging SaasAnt Transactions, businesses can embrace automation, eliminating manual data entry and enhancing accuracy.
FAQs
How Do I Import Expenses into QuickBooks Desktop Using SaasAnt Transactions?
Launch the SaasAnt Transactions Desktop application and start by clicking the 'Import' button on the home page.
Select your desired expense category from the dropdown menu in the' Import' window.
Options include 'Purchase Orders,' 'Item Receipts,' 'Bills,' 'Bill Payments,' 'Checks,' and 'Credit Card Activities.'
After selecting the transaction type, click 'Browse File' to upload your Excel/CSV file containing the expense data.
Configure essential data mapping for QuickBooks fields like 'Date,' 'Bank Account,' 'Check Number,' 'Description,' 'Payee,' 'Account,' and 'Amount.'
Click 'Send to QuickBooks' to initiate the import in the ‘Review’ screen.
What Types of QuickBooks Transactions Can I Import Using SaasAnt Transactions?
SaasAnt Transactions allows you to import various types of QuickBooks transactions, including 'Purchase Orders,' 'Item Receipts,' 'Bills,' 'Bill Payments,' 'Checks,' and 'Credit Card Activities' such as 'Credit Card Charge,' 'Credit Card Credit,' or 'Credit Card Statement.'
What If My Excel/CSV File Has Multiple Sheets? How Do I Choose the Suitable Sheet to Import?
Use the 'Select Sheet' option within SaasAnt Transactions if your Excel/CSV file contains multiple sheets. This option allows you to choose the specific sheet within the Excel/CSV file that includes the expense data you want to import.
Can I Customize Data Mapping for Specific Fields?
Absolutely. You can customize data mapping using the 'Customize' option SaasAnt Transactions provides. This feature enables you to define conditions for specific fields, such as setting values if they are empty, overriding existing values, replacing values if they match specific criteria, and more.
Is SaasAnt Transactions Suitable for My Business Size?
SaasAnt Transactions is designed to serve businesses of all sizes, from startups to larger enterprises, streamlining expense management across diverse business scales with its automation and data import features.
How to Record Expenses into QuickBooks Desktop?
To record an expense in QuickBooks Desktop, follow these steps:
Navigate to the Expense Entry Screen:
For expenses paid by check or debit card:
Go to the Banking menu and select Write Checks.
For expenses paid by credit card:
Go to the Banking menu and select Enter Credit Card Charges.
Enter Transaction Details:
Choose the appropriate bank or credit card account.
Enter the Payee name.
Specify the Date of the transaction.
If writing a check, input the Check Number.
In the Expenses tab, select the relevant Expense Account and enter the Amount.
Save the Transaction:
Click Save & Close to finalize the entry.
Read also
How to Import Bills into QuickBooks Desktop
How to Import Invoices into QuickBooks Desktop
Importing Journal Entries into QuickBooks Desktop from Excel
Bulk Import, Export, Edit, Delete in QuickBooks Desktop using SaasAnt Transactions Desktop